Murph
y
Andr
oid 2
Beginning
CompanioneBook
Available
Beginning
Android 2
Trim: 7.5 x 9.25 spine = 0.78125" 416 page count
Begin the journey toward your own
successful Android 2 applications
Mark L. Murphy
COMPANION eBOOK SEE LAST PAGE FOR DETAILS ON $10 eBOOK VERSIONUS $44.99 Shelve in Mobile Computing User level: Beginner
www.apress.com
SOURCE CODE ONLINE
BOOKS FOR PROFESSIONALS BY PROFESSIONALS
®ISBN 978-1-4302-2629-1
9 781430 226291
5 44 9 9
this print for content only—size & color not accurate
F
irst, welcome to the world of Android! As you have probably noticed,Android is rapidly growing; with the release of Android 2, many devices from various manufacturers are dotting the landscape. With millions of de-vices in the wild, and millions more on the way, those who get into the latest version of Android early will reap the benefits as the ecosystem con-tinues to grow.
Second, welcome to the new edition of this book, which now covers Android 2! Its purpose is to start you on your way to building compelling Android 2 ap-plications, and to help you master the learning curve. Android 2 is a rich frame-work, which means that there is a lot of cool stuff for you to pick up along your journey in order to create the slickest, most useful apps you can imagine. Android 2 is an important release of the framework, so it’s important to get off to the best possible start when learning the ins and outs of Android 2 development. This book guides you on your journey to learning Android 2, pointing out what is possible and showing you how to turn those concepts into reality. From there, building practical and popular apps is a matter of time and creativity.
Andr
oid 2
ISBN 978-1-4302-2629-1
9 781430 226291
i
Beginning Android 2
■ ■ ■
ii
All rights reserved. No part of this work may be reproduced or transmitted in any form or by any means, electronic or mechanical, including photocopying, recording, or by any information storage or retrieval system, without the prior written permission of the copyright owner and the publisher.
ISBN-13 (pbk): 978-1-4302-2629-1 ISBN-13 (electronic): 978-1-4302-2630-7
Printed and bound in the United States of America 9 8 7 6 5 4 3 2 1
Trademarked names may appear in this book. Rather than use a trademark symbol with every occurrence of a trademarked name, we use the names only in an editorial fashion and to the benefit of the trademark owner, with no intention of infringement of the trademark.
Java™ and all Java-based marks are trademarks or registered trademarks of Sun Microsystems, Inc., in the US and other countries. Apress, Inc., is not affiliated with Sun Microsystems, Inc., and this book was written without endorsement from Sun Microsystems, Inc.
President and Publisher: Paul Manning Lead Editor: Steve Anglin
Development Editor: Matthew Moodie
Editorial Board: Clay Andres, Steve Anglin, Mark Beckner, Ewan Buckingham, Gary Cornell, Jonathan Gennick, Jonathan Hassell, Michelle Lowman, Matthew Moodie, Duncan Parkes, Jeffrey Pepper, Frank Pohlmann, Douglas Pundick, Ben Renow-Clarke, Dominic Shakeshaft, Matt Wade, Tom Welsh
Coordinating Editor: Fran Parnell Copy Editor: Marilyn S. Smith
Compositor: MacPS, LLC Indexer: John Collin Artist: April Milne
Cover Designer: Anna Ishchenko
Distributed to the book trade worldwide by Springer-Verlag New York, Inc., 233 Spring Street, 6th Floor, New York, NY 10013. Phone 1-800-SPRINGER, fax 201-348-4505, e-mail
[email protected], or visit www.springeronline.com.
For information on translations, please e-mail [email protected], or visit www.apress.com. Apress and friends of ED books may be purchased in bulk for academic, corporate, or promotional use. eBook versions and licenses are also available for most titles. For more information, reference our Special Bulk Sales–eBook Licensing web page at
www.apress.com/info/bulksales.
iv
Contents at a Glance
■Contents at a Glance ... iv
■Contents... v
■About the Author... xiii
■Acknowledgments ...xiv
■Preface...xv
■Chapter 1: The Big Picture ... 1
■Chapter 2: Projects and Targets ... 5
■Chapter 3: Creating a Skeleton Application ... 17
■Chapter 4: Using XML-Based Layouts ... 23
■Chapter 5: Employing Basic Widgets ... 29
■Chapter 6: Working with Containers... 39
■Chapter 7: Using Selection Widgets... 59
■Chapter 8: Getting Fancy with Lists... 75
■Chapter 9: Employing Fancy Widgets and Containers ... 95
■Chapter 10: The Input Method Framework ... 117
■Chapter 11: Applying Menus... 125
■Chapter 12: Fonts... 137
■Chapter 13: Embedding the WebKit Browser... 141
■Chapter 14: Showing Pop-Up Messages ... 149
■Chapter 15: Dealing with Threads ... 155
■Chapter 16: Handling Activity Life Cycle Events ... 167
■Chapter 17: Creating Intent Filters ... 171
■Chapter 18: Launching Activities and Subactivities ... 177
■Chapter 19: Handling Rotation... 185
■Chapter 20: Working with Resources ... 197
■Chapter 21: Using Preferences ... 213
■Chapter 22: Managing and Accessing Local Databases ... 225
■Chapter 23: Accessing Files... 237
■Chapter 24: Leveraging Java Libraries ... 245
■Chapter 25: Communicating via the Internet... 253
■Chapter 26: Using a Content Provider... 259
■Chapter 27: Building a Content Provider ... 265
■Chapter 28: Requesting and Requiring Permissions ... 275
■Chapter 29: Creating a Service ... 279
■Chapter 30: Invoking a Service... 285
■Chapter 31: Alerting Users via Notifications... 289
■Chapter 32: Accessing Location-Based Services... 295
■Chapter 33: Mapping with MapView and MapActivity... 301
■Chapter 34: Handling Telephone Calls ... 311
■Chapter 35: Development Tools ... 315
■Chapter 36: Handling Multiple Screen Sizes... 331
■Chapter 37: Dealing with Devices ... 353
■Chapter 38: Handling Platform Changes... 359
■Chapter 39: Where Do We Go from Here? ... 367
v
Contents
■
Contents at a Glance... iv
■
Contents ... v
■
About the Author ... xiii
■
Acknowledgments...xiv
■
Preface ...xv
■
Chapter 1: The Big Picture... 1
Challenges of Smartphone Programming ...1
What Androids Are Made Of...2
Stuff at Your Disposal ...3
■
Chapter 2: Projects and Targets... 5
Pieces and Parts ...5
Creating a Project ...6
Project Structure...6
Root Contents ...6
The Sweat Off Your Brow...7
And Now, the Rest of the Story...7
What You Get Out of It...8
Inside the Manifest ...8
In the Beginning, There Was the Root, And It Was Good ...9
Permissions, Instrumentations, and Applications (Oh My!) ...9
Your Application Does Something, Right? ...10
Achieving the Minimum ...11
Version=Control ...12
Emulators and Targets...12
Virtually There...12
vi
■
Chapter 3: Creating a Skeleton Application... 17
Begin at the Beginning...17
Dissecting the Activity ...18
Building and Running the Activity...20
■
Chapter 4: Using XML-Based Layouts ... 23
What Is an XML-Based Layout? ...23
Why Use XML-Based Layouts? ...24
OK, So What Does It Look Like?...24
What’s with the @ Signs?...25
And How Do We Attach These to the Java? ...25
The Rest of the Story ...26
■
Chapter 5: Employing Basic Widgets... 29
Assigning Labels...29
Button, Button, Who’s Got the Button? ...30
Fleeting Images ...31
Fields of Green. Or Other Colors. ...32
Just Another Box to Check...33
Turn the Radio Up ...35
It’s Quite a View ...37
Useful Properties ...37
Useful Methods ...38
Colors...38
■
Chapter 6: Working with Containers ... 39
Thinking Linearly ...39
LinearLayout Concepts and Properties ...40
LinearLayout Example...42
All Things Are Relative ...46
RelativeLayout Concepts and Properties ...47
RelativeLayout Example...49
Tabula Rasa ...51
TableLayout Concepts and Properties ...52
TableLayout Example...53
Scrollwork...54
■
Chapter 7: Using Selection Widgets ... 59
Adapting to the Circumstances...59
Lists of Naughty and Nice ...60
Spin Control ...63
Grid Your Lions (or Something Like That...) ...66
Fields: Now with 35% Less Typing! ...69
Galleries, Give or Take the Art ...72
■
Chapter 8: Getting Fancy with Lists ... 75
Getting to First Base ...75
A Dynamic Presentation...77
Better. Stronger. Faster. ...80
Using convertView ...80
vii
Making a List... ...84
...And Checking It Twice ...89
Adapting Other Adapters...94
■
Chapter 9: Employing Fancy Widgets and Containers... 95
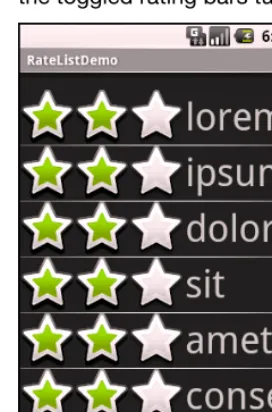
Pick and Choose ...95
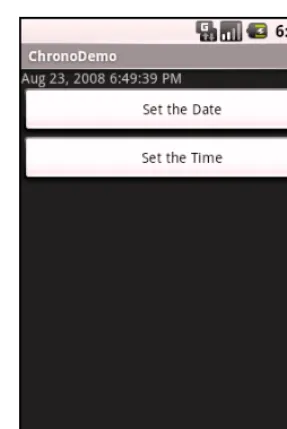
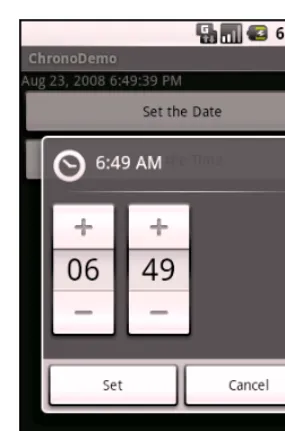
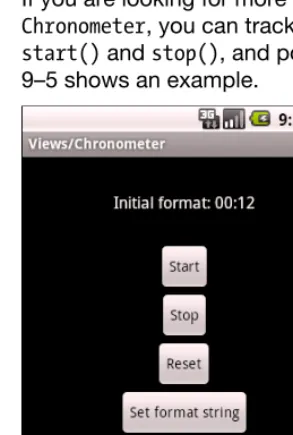
Time Keeps Flowing Like a River...99
Making Progress ...101
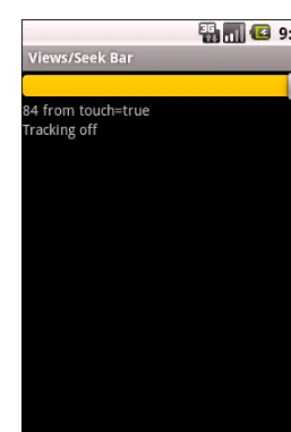
Seeking Resolution ...101
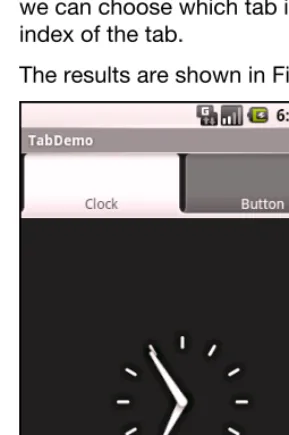
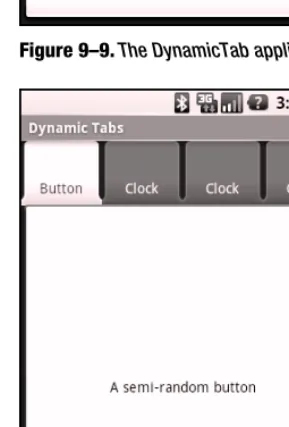
Put It on My Tab ...102
The Pieces ...103
The Idiosyncrasies ...103
Wiring It Together ...104
Adding Them Up...106
Intents and Views ...109
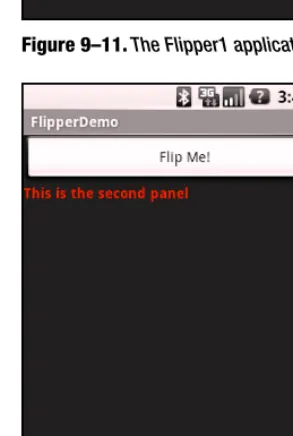
Flipping Them Off...109
Manual Flipping ...110
Adding Contents on the Fly ...112
Automatic Flipping ...113
Getting in Someone’s Drawer ...114
Other Good Stuff ...116
■
Chapter 10: The Input Method Framework... 117
Keyboards, Hard and Soft ...117
Tailored to Your Needs...118
Tell Android Where It Can Go ...121
Fitting In...123
Unleash Your Inner Dvorak ...124
■
Chapter 11: Applying Menus ... 125
Menus of Options ...125
Creating an Options Menu ...125
Adding Menu Choices and Submenus ...126
Menus in Context ...127
Taking a Peek ...128
Yet More Inflation...133
Menu XML Structure ...133
Menu Options and XML ...134
Inflating the Menu...135
■
Chapter 12: Fonts ... 137
Love the One You’re With...137
More Fonts...138
Here a Glyph, There a Glyph ...140
■
Chapter 13: Embedding the WebKit Browser ... 141
A Browser, Writ Small...141
Loading It Up...143
Navigating the Waters...144
Entertaining the Client ...145
viii
■
Chapter 14: Showing Pop-Up Messages... 149
Raising Toasts...149
Alert! Alert!...150
Checking Them Out...151
■
Chapter 15: Dealing with Threads ... 155
Getting Through the Handlers ...155
Messages...156
Runnables ...158
Running in Place ...159
Where Oh Where Has My UI Thread Gone? ...159
Asyncing Feeling...159
The Theory ...159
AsyncTask, Generics, and Varargs...160
The Stages of AsyncTask...160
A Sample Task ...161
And Now, the Caveats...164
■
Chapter 16: Handling Activity Life Cycle Events... 167
Schroedinger’s Activity ...167
Life, Death, and Your Activity...168
onCreate() and onDestroy() ...168
onStart(), onRestart(), and onStop() ...169
onPause() and onResume() ...169
The Grace of State ...169
■
Chapter 17: Creating Intent Filters ... 171
What’s Your Intent?...171
Pieces of Intents ...172
Intent Routing ...172
Stating Your Intent(ions) ...173
Narrow Receivers ...174
The Pause Caveat ...175
■
Chapter 18: Launching Activities and Subactivities... 177
Peers and Subs ...177
Start ’Em Up...178
Make an Intent ...178
Make the Call ...178
Tabbed Browsing, Sort Of ...182
■
Chapter 19: Handling Rotation ... 185
A Philosophy of Destruction...185
It’s All the Same, Just Different ...185
Now with More Savings!...189
DIY Rotation ...191
Forcing the Issue ...193
Making Sense of It All ...195
■
Chapter 20: Working with Resources ... 197
The Resource Lineup ...197
ix
Plain Strings...198
String Formats ...198
Styled Text ...199
Styled String Formats ...199
Got the Picture? ...202
XML: The Resource Way ...204
Miscellaneous Values ...206
Dimensions ...207
Colors...207
Arrays...208
Different Strokes for Different Folks ...208
■
Chapter 21: Using Preferences ... 213
Getting What You Want ...213
Stating Your Preference...214
And Now, a Word from Our Framework ...214
Letting Users Have Their Say...215
Adding a Wee Bit o' Structure...219
The Kind of Pop-Ups You Like...221
■
Chapter 22: Managing and Accessing Local Databases... 225
The Database Example ...225
A Quick SQLite Primer...227
Start at the Beginning ...227
Setting the Table...230
Makin’ Data...230
What Goes Around Comes Around ...232
Raw Queries...232
Regular Queries ...232
Building with Builders...233
Using Cursors...234
Data, Data, Everywhere ...235
■
Chapter 23: Accessing Files ... 237
You and the Horse You Rode in On ...237
Readin’ ’n Writin’ ...240
■
Chapter 24: Leveraging Java Libraries ... 245
The Outer Limits...245
Ants and JARs...246
Following the Script ...246
...And Not a Drop to Drink ...250
Reviewing the Script...251
■
Chapter 25: Communicating via the Internet ... 253
REST and Relaxation...253
HTTP Operations via Apache HttpClient ...254
Parsing Responses ...255
Stuff to Consider ...257
■
Chapter 26: Using a Content Provider ... 259
x
Getting a Handle ...260
Makin’ Queries...260
Adapting to the Circumstances...261
Give and Take ...263
Beware of the BLOB!...264
■
Chapter 27: Building a Content Provider ... 265
First, Some Dissection ...265
Next, Some Typing...266
Creating Your Content Provider...267
Step 1: Create a Provider Class ...267
Step 2: Supply a Uri ...272
Step 3: Declare the Properties ...272
Step 4: Update the Manifest ...273
Notify-on-Change Support ...273
■
Chapter 28: Requesting and Requiring Permissions ... 275
Mother, May I? ...275
Halt! Who Goes There? ...276
Enforcing Permissions via the Manifest...277
Enforcing Permissions Elsewhere ...278
May I See Your Documents? ...278
■
Chapter 29: Creating a Service... 279
Service with Class ...279
There Can Only Be One ...280
Manifest Destiny ...281
Lobbing One Over the Fence...282
Callbacks ...283
Broadcast Intents...283
Where’s the Remote? And the Rest of the Code? ...284
■
Chapter 30: Invoking a Service ... 285
The Ties That Bind ...286
Catching the Lob ...287
■
Chapter 31: Alerting Users via Notifications ... 289
Types of Pestering ...289
Hardware Notifications ...290
Icons ...290
Seeing Pestering in Action...290
■
Chapter 32: Accessing Location-Based Services ... 295
Location Providers: They Know Where You’re Hiding ...295
Finding Yourself ...296
On the Move...297
Are We There Yet? Are We There Yet? Are We There Yet? ...298
Testing...Testing... ...299
■
Chapter 33: Mapping with MapView and MapActivity ... 301
Terms, Not of Endearment ...301
Piling On...302
xi
Exercising Your Control...303
Zoom ...304
Center ...304
Rugged Terrain ...304
Layers upon Layers...305
Overlay Classes...305
Drawing the ItemizedOverlay...305
Handling Screen Taps ...307
My, Myself, and MyLocationOverlay ...307
The Key to It All ...308
■
Chapter 34: Handling Telephone Calls... 311
Report to the Manager ...311
You Make the Call! ...312
■
Chapter 35: Development Tools... 315
Hierarchical Management...315
Delightful Dalvik Debugging Detailed, Demoed ...321
Logging ...322
File Push and Pull ...323
Screenshots ...324
Location Updates ...325
Placing Calls and Messages ...326
Put It on My Card ...328
Creating a Card Image ...328
Inserting the Card ...329
■
Chapter 36: Handling Multiple Screen Sizes ... 331
Taking the Default...331
Whole in One...332
Think About Rules, Rather Than Positions ...332
Consider Physical Dimensions...333
Avoid Real Pixels...333
Choose Scalable Drawables ...334
Tailor-Made, Just for You (and You, and You, and...)...334
Add <supports-screens>...334
Resources and Resource Sets ...335
Finding Your Size ...336
Ain’t Nothing Like the Real Thing...337
Density Differs ...337
Adjusting the Density ...337
Accessing Actual Devices ...338
Ruthlessly Exploiting the Situation ...339
Replace Menus with Buttons ...339
Replace Tabs with a Simple Activity...340
Consolidate Multiple Activities...340
Example: EU4You ...340
The First Cut...340
Fixing the Fonts ...346
xii
Using the Space ...348
What If It’s Not a Browser? ...350
What Are a Few Bugs Among Friends?...351
■
Chapter 37: Dealing with Devices... 353
This App Contains Explicit Instructions...353
Button, Button, Who’s Got the Button? ...354
A Guaranteed Market ...355
The Down and Dirty Details ...355
Archos 5 Android Internet Tablet ...355
Motorola CLIQ/DEXT ...356
Motorola DROID/Milestone...356
Google/HTC Nexus One ...357
Motorola BACKFLIP ...357
■
Chapter 38: Handling Platform Changes ... 359
Brand Management ...359
More Things That Make You Go Boom ...360
View Hierarchy...360
Changing Resources ...361
Handling API Changes...362
Detecting the Version...362
Wrapping the API ...362
■
Chapter 39: Where Do We Go from Here? ... 367
Questions—Sometimes with Answers ...367
Heading to the Source ...368
Getting Your News Fix...368
xiii
About the Author
Mark Murphy is the founder of CommonsWare and the author of the Busy Coder’s Guide to Android Development. A three-time entrepreneur, his experience ranges from consulting on open source and collaborative development for the Fortune 500 to application development on just about anything smaller than a mainframe. He has been a software developer for more than 25 years, from the TRS-80 to the latest crop of mobile devices. A polished speaker, Mark has delivered conference presentations and training sessions on a wide array of topics internationally.
Mark writes the Building ‘Droids column for AndroidGuys and the Android Angle column for NetworkWorld.
xiv
Acknowledgments
I would like to thank the Android team, not only for putting out a good product, but for
invaluable assistance on the Android Google Groups. In particular, I would like to thank Romain Guy, Justin Mattson, Dianne Hackborn, Jean-Baptiste Queru, Jeff Sharkey, and Xavier Ducrohet.
xv
Preface
Welcome to the Book!
Thanks for your interest in developing applications for Android! Increasingly, people will access Internet-based services using so-called "nontraditional" means, such as mobile devices. The more we do in that space now, the more that people will help invest in that space to make it easier to build more powerful mobile applications in the future. Android is new—Android-powered devices first appeared on the scene in late 2008—but it likely will rapidly grow in importance due to the size and scope of the Open Handset Alliance.
And, most of all, thanks for your interest in this book! I sincerely hope you find it useful and at least occasionally entertaining.
Prerequisites
If you are interested in programming for Android, you will need at least a basic understanding of how to program in Java. Android programming is done using Java syntax, plus a class library that resembles a subset of the Java SE library (plus Android-specific extensions). If you have not programmed in Java before, you probably should learn how that works before attempting to dive into programming for Android.
The book does not cover in any detail how to download or install the Android
development tools, either the Eclipse IDE flavor or the stand-alone flavor. The Android web site covers this quite nicely. The material in the book should be relevant whether or not you use the IDE. You should download, install, and test the Android development tools from the Android web site before trying any of the examples presented in this book.
Some chapters may reference material in previous chapters. Also, not every sample shown has the complete source code in the book, lest this book get too large. If you wish to compile the samples, download the source code from the Apress web site (www.apress.com).
Editions of This Book
This book is being produced via a partnership between Apress and CommonsWare. You are reading the Apress edition, which is available in print and in digital form from various digital book services, such as Safari.
CommonsWare continually updates the original material and makes it available to members of its Warescription program, under the title The Busy Coder's Guide to Android Development.
xvi
Source Code and Its License
1
Chapter
The Big Picture
Android devices, by and large, will be mobile phones. While the Android technology is being discussed for use in other areas (e.g., car dashboard “PCs”), for now, the focus is on phone applications. For developers, this has benefits and drawbacks.
Challenges of Smartphone Programming
On the plus side, Android-style smartphones are sexy. Offering Internet services over mobile devices dates back to the mid-1990s and the Handheld Device Markup Language (HDML). However, only in recent years have phones capable of Internet access taken off. Now, thanks to trends like text messaging and products like Apple's iPhone, phones that can serve as Internet-access devices are rapidly gaining popularity. So, working on Android applications gives you experience with an interesting technology (Android) in a fast-moving market segment (Internet-enabled phones), which is always a good thing.
The problem comes when you actually have to program the darn things.
Anyone with experience in programming for PDAs or phones has felt the pain of phones simply being small in all sorts of dimensions, such as the following:
Screens are small (you won’t get comments like, “Is that a 24-inch LCD in your pocket, or...?”).
Keyboards, if they exist, are small.
Pointing devices, if they exist, are annoying (as anyone who has lost a stylus will tell you) or inexact (large fingers and “multitouch” LCDs are not a good mix).
CPU speed and memory are limited compared with what are available on desktops and servers.
You can have any programming language and development
framework you want, as long as it was what the device manufacturer chose and burned into the phone’s silicon.
Moreover, applications running on a phone must deal with the fact that they are on a phone.
People with mobile phones tend to get very irritated when those phones don’t work, which is why the “Can you hear me now?” ad campaign from Verizon Wireless has been popular for the past few years. Similarly, those same people will get angry with you if your program “breaks” their phone:
By tying up the CPU so that calls can’t be received
By not quietly fading into the background when a call comes in or needs to be placed, because it does not work properly with the rest of the phone’s operating system
By crashing the phone’s operating system, such as by leaking memory like a sieve
Hence, developing programs for a phone is a different experience than developing desktop applications, web sites, or back-end server processes. The tools look different, the frameworks behave differently, and there are more limitations on what you can do with your programs.
What Android tries to do is meet you halfway:
You get a commonly used programming language (Java) with some commonly used libraries (e.g., some Apache Commons APIs), with support for tools you may be used to using (Eclipse).
You get a fairly rigid and separate framework in which your programs need to run so they can be “good citizens” on the phone and not interfere with other programs or the operation of the phone itself.
As you might expect, much of this book deals with that framework and how to write programs that work within its confines and take advantage of its capabilities.
What Androids Are Made Of
When you write a desktop application, you are “master of your own domain.” You launch your main window and any child windows—like dialog boxes—that are needed. From your standpoint, you are your own world, leveraging features supported by the operating system, but largely ignorant of any other program that may be running on the computer at the same time. If you do interact with other programs, it is typically through an API, such as Java Database Connectivity (JDBC), or frameworks atop it, to
communicate with MySQL or another database.
Activities: The building block of the user interface is the activity. You can think of an activity as being the Android analogue for the window or dialog box in a desktop application. While it is possible for activities to not have a user interface, most likely your “headless” code will be packaged in the form of content providers or services.
Content providers: Content providers provide a level of abstraction for any data stored on the device that is accessible by multiple
applications. The Android development model encourages you to make your own data available to other applications, as well as your own. Building a content provider lets you do that, while maintaining complete control over how your data is accessed.
Services: Activities and content providers are short-lived and can be shut down at any time. Services, on the other hand, are designed to keep running, if needed, independent of any activity. You might use a service for checking for updates to an RSS feed or to play back music even if the controlling activity is no longer operating.
Intents: Intents are system messages, running around the inside of the device, notifying applications of various events, from hardware state changes (e.g., an SD card was inserted), to incoming data (e.g., an SMS message arrived), to application events (e.g., your activity was launched from the device’s main menu). Not only can you respond to intents, but you can create your own to launch other activities or to let you know when specific situations arise (e.g., raise such-and-so intent when the user gets within 100 meters of this-and-such location).
Stuff at Your Disposal
Android comes with a number of features to help you develop applications:
Storage: You can package data files with your application, for things that do not change, such as icons or help files. You also can carve out a bit of space on the device itself, for databases or files containing user-entered or retrieved data needed by your application. And, if the user supplies bulk storage, like an SD card, you can read and write files there as needed.
Multimedia: Android devices have the ability to play back and record audio and video. While the specifics may vary from device to device, you can query the device to learn its capabilities, and then take advantage of the multimedia capabilities as you see fit—whether that is to play back music, take pictures with the camera, or use the microphone for audio note-taking.
5
Chapter
Projects and Targets
After you have downloaded and installed the latest Android Software Development Kit (SDK), and perhaps the Android Developer Tools (ADT) plugin for Eclipse (both available from the Android Developers web site), you’re ready to get started. This chapter covers what is involved in building an Android application.
Pieces and Parts
To create an Android application, you will need to create a corresponding Android project. This could be an Eclipse project, if you are using Eclipse for Android development. The project will hold all of your source code, resources (e.g.,
internationalized strings), third-party JARs, and related materials. The Android build tools—whether Eclipse-integrated or stand-alone—will turn the contents of your project into an Android package (APK) file, which is the Android application. Those tools will also help you get your APK file onto an Android emulator or an actual Android device for testing purposes.
One key element of a project is the manifest ( ). This file contains the “table of contents” for your application, listing all of the major application components, permissions, and so on. The manifest is used by Android at runtime to tie your
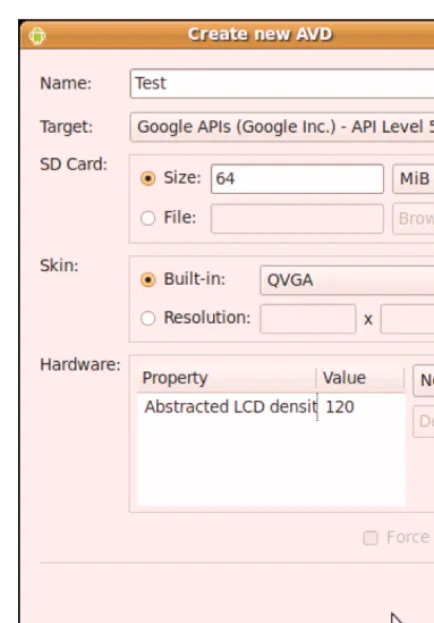
application into the operating system. The manifest contents are also used by the Android Market (and perhaps other independent “app stores”), so applications that need Android 2.0 will not be presented to people with Android 1.5 devices, for example. To test your application with the emulator, you will need to create an Android Virtual Device, or AVD. Most likely, you will create several of these, as each AVD emulates an Android device with a particular set of hardware. You might have AVDs for different screen sizes, Android versions, and so on.
When creating projects and creating AVDs, you will need to indicate to Android the API level with which you are working. The API level is a simple integer that maps to an Android version; for example, API level means Android 1.5. When creating a project, you will be able to tell Android the minimum and maximum API levels your application supports. When creating an AVD, you will tell Android which API level the AVD should
emulate, so you can see how your application runs on various (fake) devices implementing different versions of Android.
All of these concepts are described in greater detail in this chapter.
Creating a Project
To create a project from the command line, for use with the command-line build tools (e.g., ), you will need to run the command. This command takes a number of switches to indicate the Java package in which the application’s code will reside, the API level the application is targeting, and so on. The result of running this command will be a directory containing all of the files necessary to build a “Hello, World!” Android application.
Here is an example of running :
android create project --target 2 --path ./FirstApp --activity FirstApp --package apt.tutorial
If you intend to develop for Android using Eclipse, rather than , you will use the Eclipse new-project wizard to create a new Android application.
NOTE: The source code that accompanies this book was set up to be built using the command-line build tools. If you prefer to use Eclipse, you can create empty Eclipse Android projects and import the code into those projects.
Project Structure
The Android build system is organized around a specific directory tree structure for your Android project, much like any other Java project. The specifics, though, are fairly unique to Android. Here’s a quick primer on the project structure, to help you make sense of it all, particularly for the sample code referenced in this book.
Root Contents
When you create a new Android project (e.g., via ), you get several items in the project’s root directory, including the following:
: An XML file describing the application being built and which components—activities, services, and so on—are being supplied by that application.
and : Property files used by the Ant build script.
: A folder that holds other static files you wish packaged with the application for deployment onto the device.
: A folder that holds the application once it is compiled. : Where Android’s build tools will place source code that they generate.
: A folder that holds any third-party JARs your application requires.
: A folder that holds the Java source code for the application. : A folder that holds resources—such as icons, graphic user interface (GUI) layouts, and the like—that are packaged with the compiled Java in the application.
: A folder that holds an entirely separate Android project used for testing the one you created.
The Sweat Off Your Brow
When you create an Android project (e.g., via ), you supply the fully qualified class name of the main activity for the application (e.g.,
). You will then find that your project’s tree already has the namespace directory tree in place, plus a stub subclass representing your main activity (e.g., ). You are welcome to modify this file and add others to the tree as needed to implement your application.
The first time you compile the project (e.g., via ), out in the main activity’s namespace directory, the Android build chain will create . This contains a number of
constants tied to the various resources you placed in the directory tree. Throughout this book, you will see that many of the examples reference things in (e.g., referring to a layout’s identifier via ).
NOTE: You should not modify yourself, but instead let the Android tools handle this for you.
And Now, the Rest of the Story
: For images (PNG, JPEG, etc.).
: For XML-based UI layout specifications. : For XML-based menu specifications.
: For general-purpose files (e.g., a CSV file of account information).
: For strings, dimensions, and the like.
: For other general-purpose XML files you wish to ship. All of these, as well as other resources, are covered in this book.
What You Get Out of It
When you compile your project (via or the IDE), the results go into the directory under your project root, as follows:
: Holds the compiled Java classes.
: Holds the executable created from those compiled Java classes.
: Holds your application’s resources, packaged as a ZIP file (where is the name of your application).
or : The actual Android application (where is the name of your application). The file is a ZIP archive containing the file, the compiled edition of your resources (), any uncompiled resources (such as what you put in ), and the file. It is also digitally signed, with the portion of the filename indicating it has been signed using a debug key that works with the emulator, or indicating that you built your application for release ( ), but the APK still needs to be signed using and an official key.
Inside the Manifest
The foundation for any Android application is the manifest file, in the root of your project. Here is where you declare what is inside your application—the activities, the services, and so on. You also indicate how these pieces attach themselves to the overall Android system; for example, you indicate which activity (or activities) should appear on the device’s main menu (a.k.a. the launcher).
demo suite is more than 1,000 lines long. Your production Android applications will probably fall somewhere in the middle.
Most of the interesting bits of the manifest will be described in greater detail in the chapters on their associated Android features. For example, the element will be described in greater detail in Chapter 29, which covers creating services. For now, you just need to understand the role of the manifest and its general overall construction.
In the Beginning, There Was the Root, And It Was Good
The root of all manifest files is, not surprisingly, a element:<manifest xmlns:android="http://schemas.android.com/apk/res/android" package="com.commonsware.android.search">
...
</manifest>
Note the namespace declaration. Curiously, the generated manifests apply it only on the attributes, not the elements (e.g., it’s , not ). Since this pattern works, unless Android changes, you should stick with it.
The biggest piece of information you need to supply on the element is the attribute (also curiously not namespaced). Here, you can provide the name of the Java package that will be considered the “base” of your application. Then, everywhere else in the manifest file that needs a class name, you can just substitute a leading dot as shorthand for the package. For example, if you needed to refer to in this preceding manifest, you could just use , since is defined as the application’s package.
Permissions, Instrumentations, and Applications (Oh My!)
Underneath the element, you may find the following:elements: Indicate the permissions your application will need in order to function properly.
elements: Declare permissions that activities or services might require other applications to hold in order to use your
application’s data or logic.
elements: Indicate code that should be invoked on key system events, such as starting up activities, for the purposes of logging or monitoring.
elements: Hook in optional Android components, such as mapping services.
element: Defines the guts of the application that the manifest describes.
Here’s an example:
<manifest xmlns:android="http://schemas.android.com/apk/res/android" package="com.commonsware.android">
<uses-permission
android:name="android.permission.ACCESS_LOCATION" /> <uses-permission
android:name="android.permission.ACCESS_GPS" /> <uses-permission
android:name="android.permission.ACCESS_ASSISTED_GPS" /> <uses-permission
android:name="android.permission.ACCESS_CELL_ID" /> <application>
...
</application> </manifest>
In this example, the manifest has elements to indicate some device capabilities the application will need—in this case, permissions to allow the application to determine its current location. The contents of the element will describe the activities, services, and whatnot that make up the bulk of the application itself. Permissions will be covered in greater detail in Chapter 28.
Your Application Does Something, Right?
The children of the element represent the core of the manifest file.
By default, when you create a new Android project, you get a single element:
<manifest xmlns:android="http://schemas.android.com/apk/res/android" package="com.commonsware.android.skeleton">
<application>
<activity android:name=".Now" android:label="Now"> <intent-filter>
<action android:name="android.intent.action.MAIN" />
<category android:name="android.intent.category.LAUNCHER" /> </intent-filter>
</activity> </application> </manifest>
This element supplies for the class implementing the activity,
for the display name of the activity, and (frequently) an child element describing under which conditions this activity will be displayed. The stock element sets up your activity to appear in the launcher, so users can choose to run it. As you’ll see later in this book, you can have several activities in one project, if you so choose.
activities in other applications on the device. These wrap up databases or other data stores into a single API that any application can use. Later, you’ll see how to create content providers and how to use content providers that you or others create. Finally, you may have one or more elements, describing services, which are long-running pieces of code that can operate independently of any activity. The quintessential example is the MP3 player, where you want the music to keep playing even if the user pops open other activities and the MP3 player’s user interface is “misplaced.” Chapters 29 and 30 cover how to create and use services.
Achieving the Minimum
Android, like most operating systems, goes through various revisions, versions, and changes. Some of these affect the Android SDK, meaning there are new classes, methods, or parameters you can use that you could not in previous versions of the SDK. If you want to ensure your application is run only on devices that have a certain version (or higher) of the Android environment, you will add a element, as a child of the root element in your file. The element has one attribute, , indicating which SDK version your application requires: <manifest xmlns:android="http://schemas.android.com/apk/res/android"
package="com.commonsware.android.search"> <uses-sdk minSdkVersion="2" />
... </manifest>
At the time of this writing, there are five possible values: : Android 1.0 SDK
: Android 1.1 SDK : Android 1.5 SDK : Android 1.6 SDK : Android 2.0 SDK
If you omit the element, your application will behave as though is set to .
CAUTION: The Android Market seems to insist that you specifically state your , so be certain to have a proper element if you are going to distribute via that channel.
every Android SDK version ever released, and you will need to test your application to determine if this is indeed the case.
Also note that a bug in the Android Market means you should make the element be the first child of your element.
Version=Control
Particularly if you are going to distribute your application, via the Android Market or other means, you probably should add a pair of other attributes to the root element: and . These assist in the process of upgrading applications.
The attribute is some human-readable label for the version name or number of your application. So, you can use or or or as you see fit.
The attribute is a pure integer indication of the version of the application. This is used by the system to determine if one version of your application is newer than another. Newer is defined as “has a higher value.” Whether you attempt to convert your actual version (as found in ) to a number or simply increment this value by one for each release is up to you.
Emulators and Targets
Let’s take a moment to discuss the notion of targets in Android, since they can be a bit confusing. Targets are important for your long-term application development,
particularly when you use the Android emulator for testing your applications.
Virtually There
To use the emulator, you will need to create one or more AVDs. These virtual devices are designed to mimic real Android devices like the T-Mobile G1 or the HTC Magic. You tell the emulator which AVD to use, and the emulator will pretend it is the device described by that AVD.
When you create an AVD, you need to specify a target. The target indicates which class of device the AVD will pretend to be. At the time of this writing, there are five targets:
TIP: You can find out the available API targets via the command.
If you are building applications that may use Google Maps, you will want to use an AVD that has a target of or higher.
You can create as many AVDs as you need and for which you have disk space. Each AVD behaves as a totally distinct device, so installing your app on one AVD does not affect any other AVDs that you have created.
AVDs can be created through the command, via Eclipse, or via the AVD Manager, a GUI added in Android 1.6. To use the AVD Manager, simply run the command without any arguments. As shown in Figure 2-1, you will be presented with a list of prebuilt AVDs, New and Delete buttons to add and remove AVDs, a Start button to launch an emulator using a selected AVD, and so on.
Figure 2-1. The AVD Manager GUI, showing a list of available AVDs
Figure 2-2. Adding an AVD
Aiming at a Target
When you create a new project (via or Eclipse), you will need to indicate which class of device this project targets. The same values shown in the
previous section apply. For example, creating a project with a target of indicates Android 1.5. Your resulting application will not install on devices that do not meet the specified target.
Here are some rules of thumb for dealing with targets:
Ask for only what you really need. If you are sticking with Android 1.5 APIs, you may as well ask to build with Android 1.5 APIs and maximize the number of devices on which your program can run.
Check out the new target levels with each Android release. There should be a new values with every Android point-release update (e.g., 2.0 or 1.6), and possibly even for SDK patch levels (e.g., 1.5r1 versus 1.5r2). Be sure to test your application on those new targets whenever you can, as some people may start getting devices with the new Android release soon.
17
Chapter
Creating a Skeleton
Application
Every programming language or environment book starts off with the popular “Hello, World!” demonstration. This is just enough of a program to prove you can build things. However, the typical Hello, World! program has no interactivity (e.g., it just dumps the words to a console), and so it’s really boring.
This chapter demonstrates a simple project, but one using Advanced Push-Button Technology and the current time, making it a bit more interesting than the typical Hello, World! demo.
Begin at the Beginning
As described in the previous chapter, to work with anything in Android, you need a project. If you are using tools that are not Android-enabled, you can use the android create project script, found in the tools/ directory in your SDK installation. You will need to pass to android create project the API target, the directory where you want the skeleton generated, the name of the default activity, and the Java package where all of this should reside:
android create project --target 2 \
--path /path/to/my/project/dir --activity Now \ --package com.commonsware.android.Now
You can also download the project directories of the samples shown in this book in a ZIP file on the Apress web site. These projects are ready for use; you do not need to run android create project on those unpacked samples.
Your project’s src/ directory contains the standard Java-style tree of directories based on the Java package you used when you created the project (e.g., com.commonsware.android results in src/com/commonsware/android/). Inside the innermost directory, you should find a pregenerated source file named Now.java, which is where your first activity will go.
This activity will contain a single button that displays the time that the button was last pushed (or the time the application was started if the button has not been pushed).
NOTE: If you downloaded the source files from the Apress web site, you can just use the Skeleton/Now project directly, rather than entering the code.
Open Now.java in your editor and paste in the following code: package com.commonsware.android.skeleton;
import android.app.Activity; import android.os.Bundle; import android.view.View; import android.widget.Button; import java.util.Date;
public class Now extends Activity implements View.OnClickListener { Button btn;
@Override
public void onCreate(Bundle icicle) { super.onCreate(icicle);
btn=new Button(this); btn.setOnClickListener(this); updateTime();
setContentView(btn); }
public void onClick(View view) { updateTime();
}
private void updateTime() {
btn.setText(new Date().toString()); }
}
Let’s examine this piece by piece.
Dissecting the Activity
The package declaration needs to be the same as the one you used when creating the project. And, as with any other Java project, you need to import any classes you reference. Most of the Android-specific classes are in the android package. package com.commonsware.android.skeleton;
It’s worth noting that not every Java SE class is available to Android programs. Visit the Android class reference to see what is and is not available.
public class Now extends Activity implements View.OnClickListener { Button btn;
Activities are public classes, inheriting from the android.app.Activity base class. In this case, the activity holds a button (btn).
NOTE: A button, as you can see from the package name, is an Android widget, and widgets are the user interface elements that you use in your application.
Since, for simplicity, we want to trap all button clicks just within the activity itself, we also have the activity class implement OnClickListener:
@Override
public void onCreate(Bundle icicle) { super.onCreate(icicle);
btn=new Button(this); btn.setOnClickListener(this); updateTime();
setContentView(btn); }
The onCreate() method is invoked when the activity is started. The first thing you should do is chain upward to the superclass, so the stock Android activity initialization can be done.
In our implementation, we then create the button instance (new Button(this)), tell it to send all button clicks to the activity instance itself (via setOnClickListener()), call a private updateTime() method (shown shortly), and then set the activity’s content view to be the button itself (via setContentView()).
NOTE: All widgets extend the View base class. You usually build the user interface out of a hierarchy of views, but in this example, we are using a single view.
We will discuss that magical Bundle icicle in Chapter 16. For the moment, consider it an opaque handle that all activities receive upon creation.
public void onClick(View view) { updateTime();
}
private void updateTime() {
btn.setText(new Date().toString()); }
When we open the activity (onCreate()), or when the button is clicked (onClick()), we update the button’s label to be the current time via setText(), which functions much the same as the JButton equivalent.
Building and Running the Activity
To build the activity, use your integrated development environment’s (IDE’s) built-in Android packaging tool or run ant in the base directory of your project. Then do the following to run the activity:
1. Launch the emulator by running the android command, choosing an AVD in the AVD Manager, and clicking the Start button. You should be able to accept the defaults in the Launch Options dialog. Figure 3–1 shows the Android home screen.
NOTE: The first time you use an AVD with the emulator, it will take substantially longer to start than it will subsequent times.
Figure 3–1. The Android home screen
3. View the list of installed applications in the emulator and find the Now application. In Figure 3–2, it’s on the bottom row.
Figure 3–2. The Android application launcher
4. Open that application. You should see an activity screen similar to the one shown in Figure 3–3.
Clicking the button—in other words, clicking pretty much anywhere on the phone’s screen—will update the time shown in the button’s label.
Note that the label is centered horizontally and vertically, as those are the default styles applied to button captions. You can control that formatting, as described in Chapter 5. After you are finished gazing at the awesomeness of Advanced Push-Button
23
Chapter
Using XML-Based Layouts
While it is technically possible to create and attach widgets to your activity purely through Java code, as we did in the preceding chapter, the more common approach is to use an XML-based layout file. Dynamic instantiation of widgets is reserved for more complicated scenarios, where the widgets are not known at compile time (e.g., populating a column of radio buttons based on data retrieved from the Internet). With that in mind, it’s time to break out the XML and learn how to lay out Android activities that way.
What Is an XML-Based Layout?
As the name suggests, an XML-based layout is a specification of widgets’ relationships to each other—and to their containers (which are covered in Chapter 6)—encoded in XML format. Specifically, Android considers XML-based layouts to be resources, and as such, layout files are stored in the res/layout directory inside your Android project. Each XML file contains a tree of elements specifying a layout of widgets and containers that make up one View hierarchy. The attributes of the XML elements are properties, describing how a widget should look or how a container should behave. For example, if a Button element has an attribute value of android:textStyle = "bold", that means that the text appearing on the face of the button should be rendered in a boldface font style. Android’s SDK ships with a tool (aapt) that uses the layouts. This tool should be
automatically invoked by your Android toolchain (e.g., Eclipse or Ant’s build.xml). Of particular importance to you as a developer is that aapt generates the R.java source file within your project, allowing you to access layouts and widgets within those layouts directly from your Java code, as will be demonstrated in this chapter.
Why Use XML-Based Layouts?
Most everything you do using XML layout files can be achieved through Java code. For example, you could use setTypeface() to have a button render its text in bold, instead of using a property in an XML layout. Since XML layouts are yet another file for you to keep track of, we need good reasons for using such files.
Perhaps the biggest reason is to assist in the creation of tools for view definition, such as a GUI builder in an IDE like Eclipse or a dedicated Android GUI designer like DroidDraw. Such GUI builders could, in principle, generate Java code instead of XML. The challenge is rereading the UI definition to support edits, which is far simpler when the data is in a structured format like XML rather than in a programming language. Moreover, keeping generated XML definitions separated from handwritten Java code makes it less likely that someone’s custom-crafted source will get clobbered by accident when the generated bits are regenerated. XML forms a nice middle ground between something that is convenient for tool writers to use and easy for programmers to work with by hand as needed.
Also, XML as a GUI definition format is becoming more commonplace. Microsoft’s Extensible Application Markup Language (XAML), Adobe’s Flex, and Mozilla’s XML User Interface Language (XUL) all take a similar approach to that of Android: put layout details in an XML file and put programming smarts in source files (e.g., JavaScript for XUL). Many less well-known GUI frameworks, such as ZK, also use XML for view definition. While following the herd is not necessarily the best policy, it does have the advantage of helping to ease the transition to Android from any other XML-centered view description language.
OK, So What Does It Look Like?
Here is the Button from the previous chapter’s sample application, converted into an XML layout file, found in the Layouts/NowRedux sample project:
<?xml version="1.0" encoding="utf-8"?>
<Button xmlns:android="http://schemas.android.com/apk/res/android" android:id="@+id/button"
android:text=""
android:layout_width="fill_parent" android:layout_height="fill_parent"/>
The class name of the widget, Button, forms the name of the XML element. Since Button is an Android-supplied widget, we can just use the bare class name. If you create your own widgets as subclasses of android.view.View, you will need to provide a full package declaration as well (e.g., com.commonsware.android.MyWidget).
The root element needs to declare the Android XML namespace: xmlns:android="http://schemas.android.com/apk/res/android"
Because we want to reference this button from our Java code, we need to give it an identifier via the android:id attribute. We will cover this concept in greater detail in the next section.
The remaining attributes are properties of this Button instance:
android:text: Indicates the initial text to be displayed on the button face (in this case, an empty string).
android:layout_width and android:layout_height: Tell Android to have the button's width and height fill the parent—in this case, the entire screen.
These attributes will be covered in greater detail in Chapter 6.
Since this single widget is the only content in our activity, we need just this single element. Complex UIs will require a whole tree of elements, representing the widgets and containers that control their positioning. All the remaining chapters of this book will use the XML layout form whenever practical, so there are dozens of other examples of more complex layouts for you to peruse.
What’s with the @ Signs?
Many widgets and containers need to appear only in the XML layout file and do not need to be referenced in your Java code. For example, a static label (TextView) frequently needs to be in the layout file just to indicate where it should appear. These sorts of elements in the XML file do not need to have the android:id attribute to give them a name.
Anything you do want to use in your Java source, though, needs an android:id.
The convention is to use @+id/... as the id value, where the ... represents your locally unique name for the widget in question. In the XML layout example in the preceding section, @+id/button is the identifier for the Button widget.
Android provides a few special android:id values, of the form @android:id/.... You will see some of these in various examples throughout this book.
And How Do We Attach These to the Java?
Given that you have painstakingly set up the widgets and containers in an XML layout file named main.xml stored in res/layout, all you need is one statement in your activity’s onCreate() callback to use that layout:
setContentView(R.layout.main);
R.layout, keyed by the base name of the layout file; for example, res/layout/main.xml results in R.layout.main.
To access your identified widgets, use findViewById(), passing in the numeric identifier of the widget in question. That numeric identifier was generated by Android in the R class as R.id.something (where something is the specific widget you are seeking). Those widgets are simply subclasses of View, just like the Button instance we created in the previous chapter.
The Rest of the Story
In the original Now demo, the button’s face would show the current time, which would reflect when the button was last pushed (or when the activity was first shown, if the button had not yet been pushed). Most of that logic still works, even in this revised demo (NowRedux). However, rather than instantiating the Button in our activity’s onCreate() callback, we can reference the one from the XML layout:
package com.commonsware.android.layouts;
import android.app.Activity; import android.os.Bundle; import android.view.View; import android.widget.Button; import java.util.Date;
public class NowRedux extends Activity implements View.OnClickListener { Button btn;
@Override
public void onCreate(Bundle icicle) { super.onCreate(icicle);
setContentView(R.layout.main);
btn=(Button)findViewById(R.id.button); btn.setOnClickListener(this);
updateTime(); }
public void onClick(View view) { updateTime();
}
private void updateTime() {
btn.setText(new Date().toString()); }
}
The R.java source file will be updated when we rebuild this project to include a reference to our layout file (stored as main.xml in our project’s res/layout directory). The other difference is that we need to get our hands on our Button instance, for which we use the findViewById() call. Since we identified our button as @+id/button, we can reference the button’s identifier as R.id.button. Now, with the Button instance in hand, we can set the callback and set the label as needed.
The results look the same as with the original Now demo, as shown in Figure 4–1.
29
Chapter
Employing Basic Widgets
Every GUI toolkit has some basic widgets: fields, labels, buttons, and so on. Android’s toolkit is no different in scope, and the basic widgets will provide a good introduction to how widgets work in Android activities.
Assigning Labels
The simplest widget is the label, referred to in Android as a TextView. As in most GUI toolkits, labels are bits of text that cannot be edited directly by users. Typically, they are used to identify adjacent widgets (e.g., a “Name:” label next to a field where you fill in a name).
In Java, you can create a label by creating a TextView instance. More commonly, though, you will create labels in XML layout files by adding a TextView element to the layout, with an android:text property to set the value of the label itself. If you need to swap labels based on certain criteria, such as internationalization, you may wish to use a resource reference in the XML instead, as will be described in Chapter 20.
TextView has numerous other properties of relevance for labels, such as the following: android:typeface: Sets the typeface to use for the label (e.g.,
monospace).
android:textStyle: Indicates that the typeface should be made bold (bold), italic (italic), or bold and italic (bold_italic).
android:textColor: Sets the color of the label’s text, in RGB hex format (e.g., #FF0000 for red).
For example, in the Basic/Label project, you will find the following layout file: <?xml version="1.0" encoding="utf-8"?>
<TextView xmlns:android="http://schemas.android.com/apk/res/android" android:layout_width="fill_parent"
android:layout_height="wrap_content"
android:text="You were expecting something profound?" />
Just that layout alone, with the stub Java source provided by Android’s project builder (e.g., android create project), gives you the demo shown in Figure 5–1.
Figure 5–1. The LabelDemo sample application
Button, Button, Who’s Got the Button?
You have already seen the use of the Button widget in the previous two chapters. As it turns out, Button is a subclass of TextView, so everything discussed in the preceding section also applies to formatting the face of the button.
However, Android 1.6 adds a new feature for the declaration of the “on-click” listener for a Button. In addition to the classic approach of defining some object (such as the activity) as implementing the View.OnClickListener interface, you can now take a somewhat simpler approach:
Define some method on your Activity that holds the button that takes a single View parameter, has a void return value, and is public. In your layout XML, on the Button element, include the
android:onClick attribute with the name of the method you defined in the previous step.
For example, you might have a method on your Activity that looks like this: public void someMethod(View theButton) {
// do something useful here }
<Button
android:onClick="someMethod" ...
/>
This is enough for Android to wire together the Button with the click handler.
Fleeting Images
Android has two widgets to help you embed images in your activities: ImageView and ImageButton. As the names suggest, they are image-based analogues to TextView and Button, respectively.
Each widget takes an android:src attribute (in an XML layout) to specify which picture to use. These usually reference a drawable resource, described in greater detail in Chapter 20. You can also set the image content based on a Uri from a content provider via setImageURI().
ImageButton, a subclass of ImageView, mixes in the standard Button behaviors, for responding to clicks and whatnot. For example, take a peek at the main.xml layout from the Basic/ImageView sample project:
<?xml version="1.0" encoding="utf-8"?>
<ImageView xmlns:android="http://schemas.android.com/apk/res/android" android:id="@+id/icon"
android:layout_width="fill_parent" android:layout_height="fill_parent" android:adjustViewBounds="true" android:src="@drawable/molecule" />
The result, just using the code-generated activity, is simply the image shown in Figure 5–2.
Fields of Green. Or Other Colors.
Along with buttons and labels, fields are the third anchor of most GUI toolkits. In Android, they are implemented via the EditText widget, which is a subclass of the TextView used for labels.
Along with the standard TextView properties (e.g., android:textStyle), EditText has many other properties that will be useful to you in constructing fields, including the following:
android:autoText: Controls if the field should provide automatic spelling assistance.
android:capitalize: Controls if the field should automatically capitalize the first letter of entered text (useful for name or city fields, for example).
android:digits: Configures the field to accept only certain digits. android:singleLine: Controls if the field is for single-line input or multiple-line input (e.g., does pressing Enter move you to the next widget or add a newline?).
Most of these properties are also available from the new android:inputType attribute, introduced in Android 1.5 as part of adding “soft keyboards” to Android (discussed in Chapter 10).
For example, from the Basic/Field project, here is an XML layout file showing an EditText widget:
<?xml version="1.0" encoding="utf-8"?>
<EditText xmlns:android="http://schemas.android.com/apk/res/android" android:id="@+id/field"
android:layout_width="fill_parent" android:layout_height="fill_parent" android:singleLine="false"
/>
Note that android:singleLine is set to "false", so users will be able to enter in several lines of text.
For this project, the FieldDemo.java file populates the input field with some prose: package com.commonsware.android.field;
import android.app.Activity; import android.os.Bundle; import android.widget.EditText;
public class FieldDemo extends Activity { @Override
public void onCreate(Bundle icicle) { super.onCreate(icicle);
![Combined theoretical and computational study of interstrand DNA guanine–guanine cross linking bytrans [Pt(pyridine)2] derived from the photoactivated prodrugtrans,trans,trans [Pt(N3)2(OH)2(pyridine)2]](data:image/gif;base64,R0lGODlhAQABAIAAAP///wAAACH5BAEAAAAALAAAAAABAAEAAAICRAEAOw==)