Key Voice
Voice Processing
S
YSTEM
I
NSTALLATION
AND
M
AINTENANCE
THE SOFTWARE CONTAINED IN THIS PACKAGE CONSTITUTES YOUR ACCEPTANCE OF THESE TERMS AND CONDITIONS AND AGREEMENT TO ABIDE BY THEM.
If you do not agree with the terms and conditions of this Agreement, return the package and its entire contents to the location where you obtained it for a refund.
In return for acquiring a license to use the Key Voice Technologies Inc. software and documentation contained in this package ("the Software"), and for acquiring the accompanying documentation, you, the original purchaser ("You"), agree as follows:
1. License Grant : You are granted a nonexclusive, personal license to: (a) use the Software on a single personal computer system (b) copy the Software solely for the purpose of installing it on your computer and for backup and archival storage. You may not transfer, sell, lease or distribute copies of the Software to others. You may assign your rights under this Agreement to a third party provided the third party agrees in writing to be bound to the terms of this Agreement and you transfer all copies of the Software to the third party or destroy any copies not transferred. Any other attempt to sublicense, assign or transfer any of the rights, duties or obligations hereunder is void.
2. No Other Rights : You acknowledge that the Software is copyrighted and is proprietary. The license granted above is not a sale of the Software, and except as stated above, this Agreement does not give you any rights to patent, copyright, trade secrets, trademarks or any other rights or licenses with respect to the Software. You agree to hold the Software in confidence and to take reasonable steps to prevent unauthorized copying or distribution.
3. No Modification or Reverse Compilation : YOU MAY NOT MODIFY, ALTER, TRANSLATE, DISASSEMBLE OR DECOMPILE THE SOFTWARE OR DOCUMENTATION OR ANY COPY, IN WHOLE OR IN PART.
4. Limited Warranty : Key Voice Technologies, Inc. warrants that the original diskettes are free from defects in material and workmanship, assuming normal use, for a period of ninety (90) days from the date of purchase. If a defect occurs during this period, you may return your faulty disk along with a dated proof of purchase; it will be replaced free of charge.
EXCEPT FOR THE EXPRESS WARRANTY OF THE ORIGINAL DISKETTES SET FORTH ABOVE, NO OTHER WARRANTIES ARE GRANTED, EXPRESS OR IMPLIED, BY STATUTE OR OTHERWISE, REGARDING THE DISKS AND RELATED MATERIALS, THEIR FITNESS FOR ANY PURPOSE, THEIR QUALITY, THEIR MERCHANTABILITY, OR BOTH.
THE LIABILITY UNDER THE WARRANTY SET FORTH ABOVE SHALL BE LIMITED TO THE AMOUNT PAID BY THE CUSTOMER FOR THE PRODUCT. IN NO EVENT SHALL THE MANUFACTURER OR DISTRIBUTORS BE LIABLE FOR ANY SPECIAL, CONSEQUENTIAL, OR OTHER DAMAGES FOR BREACH OF WARRANTY.
Information in product documentation is subject to change without notice, and does not represent a commitment on the part of Key Voice Technologies Inc. No part of Key Voice manuals may be reproduced or transmitted in any form or by any means, electronic or mechanical, including photocopying, for any purpose other than the purchaser's personal use, without the written permission of Key Voice Technologies, Inc. Products mentioned in this documentation that are not manufactured by Key Voice Technologies, Inc. may be trademarks or registered trademarks of their respective manufacturers.
LIMITED WARRANTY
The initial hardware and software of all Key Voice Technologies, Inc. (“Key Voice”) products accompanying this installation manual shall be referred to collectively herein as the “Product”. Non-Key Voice products are warranted solely by the manufacturer in accordance with the manufacturer’s warranty, and are sold by Key Voice “as is”. Key Voice warrants, to its purchaser, its authorized dealers and the end users of the Product, that, under normal operating conditions, (a) the Product hardware (except for fuses, lamps and other consumables) and the medium on which the Product software is contained will be free from defects in material and workmanship, and (b) the Product software will perform substantially in accordance with the specifications set out in the user guide accompanying the Product which is prepared by Key Voice, in each case for a period of one year, measured from the manufacturing date stamped on the Product hardware or software, as the case may be, provided however, development products, i.e., products which have not yet been approved by Key Voice for production, are sold pursuant to Key Voice’s field trial agreement and are warranted as set out therein. Key Voice’s sole obligation under this warranty or under any other legal obligation with respect to the Product is to repair or replace, at its option, the Product at its Sarasota, Florida, headquarters, free of charge, if the Product is deemed defective by Key Voice during the warranty period, with refurbished or new equipment or parts , at Key Voice’s option, when the Product is returned to Key Voice, freight or postage prepaid, during the warranty period, provided however, if Key Voice is not able, using reasonable efforts, to cure or correct a defect, Key Voice’s sole obligation shall then be to refund (or cause to be refunded) an equitable portion of the price Key Voice was paid for the Product. This warranty does not apply if, in the sole judgment of Key Voice, the Product, or any part(s) or component(s) thereof, have been improperly installed or installed or used in combination or in assembly with hardware or software not supplied by Key Voice and which are not compatible with the Product or which are of inferior quality, design or performance, or the Product, or any part(s) or component(s) thereof, have been improperly handled, misused, abused, altered, tampered with, accidentally damaged, or damaged or malfunction or fail to function due to neglect, negligence, contamination (by liquid or otherwise) or as a result of any other causes beyond Key Voice’s reasonable control, including extraordinary wear and tear and acts of God such as fire, flood, water, or lightning or other incidence of excessive or insufficient voltage or failure to follow instructions. Repair, wiring, or alteration of the Product other than as specifically authorized by Key Voice or its authorized repair agent is prohibited and will void this warranty. This warranty does not cover costs associated with installation, removal, or reinstallation of the Product. Key Voice does not warrant that the Product is compatible with all telephone or switching systems or that the Product is invulnerable or immune from unauthorized or fraudulent use, or unaccounted for access to the Product. THIS WARRANTY IS EXCLUSIVE, BEING IN LIEU OF ALL OTHER WARRANTIES EXPRESS OR IMPLIED, INCLUDING, BUT NOT LIMITED TO, ANY IMPLIED WARRANTY OF MERCHANTABILITY OR FITNESS FOR A
VOICE UNDER ANY WARRANTY, STATUTORY, EXPRESS OR IMPLIED, IS LIMITED TO THE
PURCHASE PRICE OF THE PRODUCT. KEY VOICE SHALL HAVE NO RESPONSIBILITY FOR DAMAGE TO PROPERTY OR ANY OTHER LOSS OR INJURY, INCLUDING CONSEQUENTIAL, INCIDENTAL, OR INDIRECT DAMAGES, SUCH AS LOSS OF PROFITS OR LOSS OF BUSINESS INFORMATION, DAMAGES DUE TO BUSINESS INTERRUPTION OR ANY OTHER PECUNIARY LOSS, EVEN IF KEY VOICE HAS BEEN ADVISED OF THE POSSIBILITY OF SUCH DAMAGES, OR PUNITIVE DAMAGES, RESULTING FROM THE PURCHASE, POSSESSION, INSTALLATION, OPERATION, REPAIR, USE OF PURCHASE, POSSESSION, INSTALLATION, OPERATION, REPAIR, USE OF OR INABILITY TO USE, THE PRODUCT, OR THE UNAUTHORIZED OR THE FRAUDULENT USE OF, OR UNACCCOUNTED FOR ACCESS TO, THE PRODUCT, ALL SUCH CLAIMS BEING HEREBY EXPRESSLY WAIVED. THE
PURCHASER’S EXCLUSIVE WARRANTY AND REMEDY SHALL BE ONLY AS STATED HEREIN.
This warranty gives you specific legal rights and you may also have other rights which may vary from state to state. Some states do not allow limitation on how long an implied warranty lasts or the exclusion or limitation of incidental or consequential damages, so the above limitations may not apply to you. If the Magnuson Moss Act should be held to apply to the sale of the Product by a court of competent
REVISION HISTORY
Version Changes Owner Date
4/00 Updated to reflect functionality enhancements incorporated into the NT-based VP system release 10.2 and the DOS-based VP system release 8.3. Sections affected: 2, 5, 10, 12, 15, 20, 21, 22, 23.
INSTALLATION AND MAINTENANCE MANUAL 4/00
TOC-1
Table of Contents
1. Overview ...1-1
1.1 What Does This Voice Processing System Do? ...1-1 1.1.1 What is an Automated Attendant? ...1-1 1.1.2 What is Voice Mail? ...1-2 1.2 Understanding the VP System Product Design ...1-2 1.2.1 Understanding Box Types ...1-2 1.2.2 Understanding the Default Database ...1-4 1.2.3 Understanding Product Differences ...1-6 1.2.4 Understanding the Services and Applications in NT-based VP Systems ...1-7 1.3 Accessing DOS-based VP System Menu Options ... 1-15 1.4 Accessing NT-based VP System Menu Options ... 1-162. Preparing the System ...2-1
2.1 Understanding Available System Setup Techniques ...2-1 2.2 Connecting the VP System to the Telephone System ...2-3 2.2.1 Connecting Directly to the Telephone Lines ...2-3 2.2.2 Connecting to a PBX or Key System ...2-3 2.2.3 Connecting the Serial Cable Between the VP System and PBX ...2-5 2.2.4 Making Local Connections to the Board ...2-6 2.3 Moving Greetings, Prompts, Messages, and Mailboxes from DOS-based to NT-based VPSystems ...2-7 2.4 Adding Features and Ports ...2-9 2.4.1 Understanding Special Activation Codes to Add Features and Ports ...2-9 2.4.2 Entering a Renew Code ...2-9 2.4.3 Entering SWITCHES.TXT, LOGINS.TXT, PBXLINK.TXT, and NUMLINES.TXT
Activation Codes ...2-11 2.5 Starting the VP System, Logging in, and Shutting It Down ...2-12 2.6 Upgrading VP Systems to the Latest Software Versions ...2-14 Upgrading DOS-based VP Systems ...2-14 Upgrading NT-based VP Systems ...2-14 2.7 Collecting Information Needed for New VP System Setups ...2-15 2.7.1 Application and User Setup Information ...2-15 2.7.2 Phone System Information ...2-26 2.8 Understanding the New VP System Setup Steps ... 2-28 2.9 Accessing the NT-based VP System Database Administrator Application (DBA) from a
Networked PC...2-28 2.10 Using Microsoft Exchange Administrator to Modify NT-based VP System Mailboxes ...2-29
3. Running the PBX Setup Utility ...3-1
4.4 Setting Up the General Information Screen ...4-3 4.4.1 General Information Screen Field Descriptions ...4-5 4.5 Setting Up the Line Information Screen ...4-15 4.5.1 Line Information Screen Field Descriptions ... 4-16 4.6 Setting Up the Business Hours Screen ...4-17 4.6.1 Business Hours Screen Field Descriptions ... 4-18 4.7 Setting Up the Holiday Schedule Screen ...4-19 4.8 Setting up the Call Transfer Screen (DOS-based VP System) / PBX Information Screen
(NT-based VP Systems) ...4-20 4.8.1 Call Transfer Screen / PBX Information Screen Field Descriptions ...4-22 4.9 Setting up the Technical Information Screen (DOS-based VP Systems) ... 4-27 4.9.1 Technical Information Screen Field Descriptions ...4-27 4.10 Setting up Class of Service Screens ...4-29 4.10.1 Class of Service Screen Field Descriptions ...4-32 4.11 Setting Up the Other Customizations Screen (DOS-based VP Systems) ...4-37 4.11.1 Other Customizations Screen Field Descriptions ...4-38 4.12 Setting up Diagnostic Menu Options (NT-based VP Systems) ...4-41 4.12.1 Diagnostic Menu Option Descriptions ...4-41
INSTALLATION AND MAINTENANCE MANUAL 4/00
TOC-3
5.9.2 Directory Box Screens ...5-59 5.9.3 Directory Box Field Descriptions ...5-59 5.10 Setting up an ACD Box / Customer Service Box ...5-62 5.10.1 What Does an ACD Box / Customer Service Box Do? ...5-62 5.10.3 ACD box / Customer Service Box Screens ...5-64 5.10.4 ACD Box / Customer Service Box Field Descriptions ...5-66 5.11 Setting up an Account Number Box ...5-71 5.11.1 What Does an Account Number Box Do? ... 5-72 5.11.2 Account Box Screens ...5-72 5.11.3 Account Number Box Field Descriptions ... 5-73
6. Calling Into a Mailbox ...6-1
6.1 Identifying Yourself as the Mailbox Owner ...6-1 6.2 Completing the New User Tutorial ...6-2 6.2.1 Tutorial Contents ...6-2 6.2.2 Options for the Tutorial...6-4 6.3 Understanding the Main Menu ...6-4 6.4 Listening to Messages ...6-6 6.4.1 Listening to New Messages ...6-7 6.4.2 Listening to Saved (Old) Messages ...6-7 6.4.3 Selecting Options Between Messages ...6-7 6.5 Sending a Message ...6-10 6.6 Changing Mailbox Options ... 6-11 6.6.1 Recording a Name ... 6-12 6.6.2 Recording a Greeting ... 6-12 6.6.3 Changing a Password ...6-13 6.6.4 Changing the Call Transfer Service ...6-14 6.6.5 Changing the Message Notification Service ...6-15 6.6.6 Changing the Pager Service ...6-15 6.6.7 Reviewing Messages Scheduled for Future Delivery ...6-15 6.6.8 Changing the Personal Distribution Lists ... 6-16 6.6.9 Retrieving a Message Already Sent to Another Mailbox ...6-16 6.6.10 Logging into and out of ACD Boxes ...6-16 6.7 Listening to Question Box Answers ...6-17 6.8 Changing Languages in a Mailbox ...6-17 6.9 Using Supervisor Mailbox Options ...6-18 6.10 Placing an Outgoing Call from a Mailbox ...6-18 6.11 Exiting a Mailbox ...6-18INSTALLATION AND MAINTENANCE MANUAL 4/00
TOC-5
7.24.3 Troubleshooting Call Recording ...7-105 7.25 Specifying Dial Rules ... 7-105 7.25.1 Using the Insert Rule ...7-106 7.25.2 Using the Delete Rule ...7-106 7.25.3 Using the Append Rule ...7-107 7.25.4 Understanding a Dial Rules Example ... 7-107 7.26 Setting up Network Messaging and External Call Transfers Between VP System Sites ... 7-108
8. Using Hotel Integration Features...8-1
8.1 Specifying Guest Boxes ...8-1 8.2 Using the Wake-up Call Feature ...8-1 8.2.1 Scheduling Wake-up Calls ...8-1 8.2.2 Making Wake-up Calls ...8-2 8.2.3 Administrating Wake-up Calls ...8-2 8.2.4 Resetting the Guest Mailbox During Room Check-in ...8-3 8.3 Integrating with the PMS System ...8-49. Troubleshooting the System ...9-1
9.1 Using Test Equipment ...9-1 9.2 Performing Basic Troubleshooting ...9-2 9.3 Troubleshooting Display Problems (DOS-based VP systems) ...9-5 9.4 Calling Technical Support ...9-7 9.5 Using the Trace Feature ...9-710. Using Serial Administration Features on DOS-based VP Systems ...10-1
10.1 Installing KeyLink on a Kit System Host PC ...10-1 10.2 Installing Necessary Software on a Remote PC ... 10-2 10.3 Connecting the Remote PC to the Host PC ...10-3 10.4 Transferring Files Between the Remote and Host PC ...10-611. Using the Teleparameter Feature...11-1
11.1 Using the Teleparameter Feature to Run PBX Setup (DOS-based VP Systems) ...11-1 11.2 Using the Teleparameter Feature to Adjust System Info, Box Setups, and VM.CFG Data ... 11-412. Configuration File Options...12-1
INSTALLATION AND MAINTENANCE MANUAL 4/00
TOC-7
13.1.11 Adjusting the Rhetorex Configure File ... 13-12 13.2 Using Train for Dialogic Boards in DOS-based VP Systems ...13-13 13.2.1 Connecting Lines for Training to the Board ...13-13 13.2.2 Running the Train Utility ...13-13 13.2.3 Starting the PBXpert Program ...13-14 13.2.4 Configuring the PBXpert Program ... 13-14 13.2.5 Creating a New PBXpert Tone Definitions File (TSF File) ... 13-15 13.2.6 Consolidating PBXpert Tones ...13-15 13.2.7 Testing the New PBXpert Tones ... 13-16 13.3 Using PBXpert for Dialogic Boards in NT-based VP Systems ... 13-16 13.3.1 Connecting Lines for PBXpert/32 Training to the Board ... 13-17 13.3.2 Running the PBXpert/32 Program on NT-based VP Systems ... 13-17
14. Making Backups ...14-1
14.1 Backing up DOS-based Systems to Diskette ...14-1 14.1.1 Copying the AUTOEXEC.BAT and CONFIG.SYS Files ...14-1 14.1.2 Copying the Database and Setup Files ...14-2 14.1.3 Copying Greetings, Names, and Messages ...14-2 14.1.4 Automating the Backup Process on DOS-based VP Systems ...14-3 14.2 Restoring Files on DOS-based Systems ...14-3 14.2.1 Restoring the AUTOEXEC.BAT and CONFIG.SYS Files ...14-4 14.2.2 Restoring the Database and Setup Files ... 14-4 14.2.3 Restoring Names Greetings, Names, and Messages ...14-5 14.3 Backing up NT-based Systems ...14-5 14.3.1 Automating the Backup Process on NT-based VP Systems ...14-6 14.4 Restoring Files on NT-based Systems ...14-615. System Prompts...15-1
15.1 Recording System Prompts ...15-15 15.1.1 Using RPROMPT and VPROMPT (DOS-based VP Systems) ... 15-16 15.1.2 Using NTPROMPT (NT-based VP Systems) ...15-17 15.2 Using the Sound Recorder Dialog Box (NT-based VP Systems) ... 15-18 15.3 Preventing Certain Prompts from Playing ... 15-19 15.4 Using Pre-Recorded Prompt Options ...15-1916. Understanding File Organization ...16-1
17. Understanding VP System Integration ...17-1
17.1 Detecting Hang-Up ...17-1 17.2 Integrating with PBXs ...17-2 17.3 Interfacing with PBXs without Voice Mail Integration ...17-418. System Error Messages...18-1
19.Mapping Menu Options...19-1
20.1.1 Dialogic Board Installation Considerations ...20-1 20.1.2 Installing a DIALOG/4 Board (DOS-based VP Systems) ...20-1 20.1.3 Installing a ProLine/2V Board (DOS-based VP Systems) ...20-4 20.1.4 Installing a D/41D Board (DOS-based VP Systems) ...20-6 20.1.5 Installing a D/41E Board (DOS-based VP Systems) ...20-8 20.1.6 Special Connection Notes For Two-Port Boards (DOS-based VP Systems) ...20-9 20.1.7 Installing a D/41H Board (NT-based VP Systems) ...20-9 20.1.8 Installing a D160SC-LS Board (NT-based VP Systems) ... 20-11 20.2 Using Rhetorex Boards ... 20-13 20.2.1 Rhetorex Board Installation Considerations ...20-13 20.2.2 Configuring Rhetorex RDSP 208B (Duet ) and 408B (Quartet) Boards ...20-15 20.2.3 Installing Rhetorex Boards in the Computer ...20-15
21. Installing Kit Systems...21-1
21.1 DOS-based VP System Requirements ...21-1 21.2 Configuring the PC for the DOS-based VP System ...21-1 21.3 NT-based VP System Requirements ...21-2 21.4 Configuring the PC for the NT-based VP System ...21-2 21.5 Installing the Voice Processing Board ...21-3 21.6 Installing the Key ...21-3 21.7 Installing DOS-based VP System Software ...21-4 21.7.1 Selecting the Appropriate Installation Diskettes ...21-4 21.7.2 Running the DOS-based VP System Installation Program ...21-4 21.7.3 Installing Optional Modules on a DOS-based VP System ...21-5 21.8 Using Disk Maintenance Utilities on DOS-based VP Systems ...21-5 21.8.1 Defragmenting Systems Using DOS 6.0 and Above ...21-5 21.8.2 Defragmenting Systems Using DOS 5 and Norton Utilities ...21-6 21.8.3 Defragmenting Systems Using DOS 5 and Other Disk Maintenance Utilities ...21-6 21.8.4 Modifying the Automatic Maintenance Schedule on DOS-based VP Systems ...21-7 21.9 Installing NT-based VP System Software Components ...21-7 21.9.1 Installing the NT-based VP System Software ...21-7 21.9.2 Installing Optional Modules on an NT-based VP System ...21-8 21.10 Using Disk Maintenance Utilities on NT-based VP Systems ...21-822. Installing and Using CTI Features...22-1
22.1 Implementing VCM ...22-1 22.1.2 Setting up Subscriber Workstations to Use VCM ...22-2 22.1.3 Adjusting Subscriber Mailboxes to Permit VCM Access ...22-4 22.1.4 Using VCM...22-4 22.2 Implementing Unified Messaging and E-mail Reader Version 10.1 ...22-5 22.2.1 Understanding Unified Messaging and E-mail Reader Requirements ...22-5 22.2.2 Understanding How Unified Messaging and the E-mail Reader Function on theINSTALLATION AND MAINTENANCE MANUAL 4/00
TOC-9
22.2.6 Installing and Setting up Unified Messaging and E-mail Reader Features on a
Client PC ...22-16 22.2.7 Using Unified Messaging and E-mail Reader Features ...22-20
23. Installing Optional Modules...23-1
23.1 Activating Modules and Installing Module Prompts ...23-1 23.2 Installing Hardware/Software Required for Fax Modules ...23-2 23.2.1 Connecting the Telephone Lines to the Fax Boards ...23-3 23.2.2 Installing Satisfaxion Fax Boards ...23-4 23.2.3 Installing Satisfaxion Software and Configuring Each Board ...23-5 23.2.4 Installing GammaLink Fax Boards ...23-7 23.2.5 Installing GammaLink Software and Configuring Each Board ... 23-8 23.3 Sharing Fax Ports... 23-11 23.4 Using Enhanced Fax Configurations ...23-12 23.4.1 Using Fax Boards with Dedicated Telephone Lines ...23-12 23.4.2 Using a Third-Party Application to Send Faxes ...23-1324. Using the Fax Distribution Module ...24-1
24.1 Setting up a Fax Box ...24-1 24.1.1 Accessing the Fax Box Screen ...24-1 24.1.2 Fax Box Field Descriptions ...24-2 24.2 Setting up System Settings for Fax ...24-5 24.2.1 Accessing the Fax Setup Screen ...24-5 24.2.2 Fax Setup Screen Field Descriptions ...24-6 24.2.3 Setting up Fax Distribution Restrictions ... 24-10 24.3 Sending a Fax into a Fax Box...24-12 24.3.1 Sending a Document on Disk into a Fax Box ...24-12 24.3.2 Sending a Document on Paper into a Fax Box ...24-13 24.4 Retrieving a Fax from the VP System ...24-13 24.5 Setting Up Fax Broadcasting ...24-16 24.6 Logging Fax Calls ... 24-16 24.6.1 Using the General Call Log File ...24-16 24.6.2 Reviewing the Fax Log File ...24-17 24.7 Using Fax Distribution Prompts ...24-17 24.7.1 Using New Prompts ...24-17 24.7.2 Modifying Existing Prompts ...24-18 24.7.3 Copying Pre-Recorded Modified Prompts ...24-1826. Using the IVR Module ...26-1
26.1 What is IVR?...26-1 26.2 Setting Up an IVR Box ... 26-1 26.2.1 What Does an IVR Box Do? ...26-1 26.2.2 Accessing the IVR Box Screen ...26-2 26.2.3 IVR Box Field Descriptions ...26-3 26.3 Using Custom Prompts for IVR ...26-10 26.3.1 Setting Up Custom Prompts ...26-10 26.4 Setting Up an IVR Application ...26-11 26.5 Speeding Searches Using Indexed Files ... 26-14 26.5.1 Running VRBINDEX ...26-15 26.5.2 Notes on Delimiters ...26-1527. Using the Talking Classifieds Module ...27-1
27.1 Setting Up a Talking Classifieds Application ...27-1 27.2 Setting Up a Gateway Box ...27-4 27.2.1 What Does a Gateway Box Do? ...27-4 27.2.2 Accessing the Talking Classifieds Gateway Box Screen ...27-5 27.2.3 Gateway Box Screen Field Descriptions ... 27-6 27.3 Setting Up a Listing Box ... 27-8 27.3.1 What Does a Listing Box Do? ...27-8 27.3.2 Accessing the Listing Box Screen ...27-8 27.3.3 Listing Box Screen Field Descriptions ...27-9 27.4 Accessing a Listing Box Remotely ...27-11 27.5 Generating Talking Classifieds Reports ... 27-12 27.5.1 Preparing the Talking Classifieds Report ... 27-12 27.5.2 Completing the Call History Screen ... 27-13 27.5.3 Printing the Talking Classifieds Report ... 27-14 27.6 Automatically Allocating Mailboxes ...27-14 27.6.1 Accessing the Auto Allocation Screen ... 27-15 27.6.2 Automatic Allocation Screen Field Descriptions ...27-16 27.6.3 Setting Up Allocable Mailboxes ...27-17 27.6.4 Setting up Companion Listing Boxes for Automatic Allocation Mailboxes ...27-18 27.7 Using Talking Classified Module Prompts ... 27-19 27.7.1 Using New Prompts ...27-19 27.7.2 Modifying Existing Prompts ...27-20 27.7.3 Copying Pre-Recorded Modified Prompts ...27-20INSTALLATION AND MAINTENANCE MANUAL 4/00
TOC-11
INSTALLATION AND MAINTENANCE MANUAL 4/00
1-1
1. Overview
1.1 What Does This Voice Processing System Do?
In its simplest form, this voice processing system, or VP system as it is referred to as in this manual, acts like a telephone receptionist. It answers incoming calls and transfers them to the appropriate extension. If the called extension is not available (busy or no answer), the VP system offers to take a message or try an alternative extension.
VP system functionality includes:
• Automated attendant features
• Voice mail features
These two functions work together to provide smooth call coverage for your application.
1.1.1 What is an Automated Attendant?
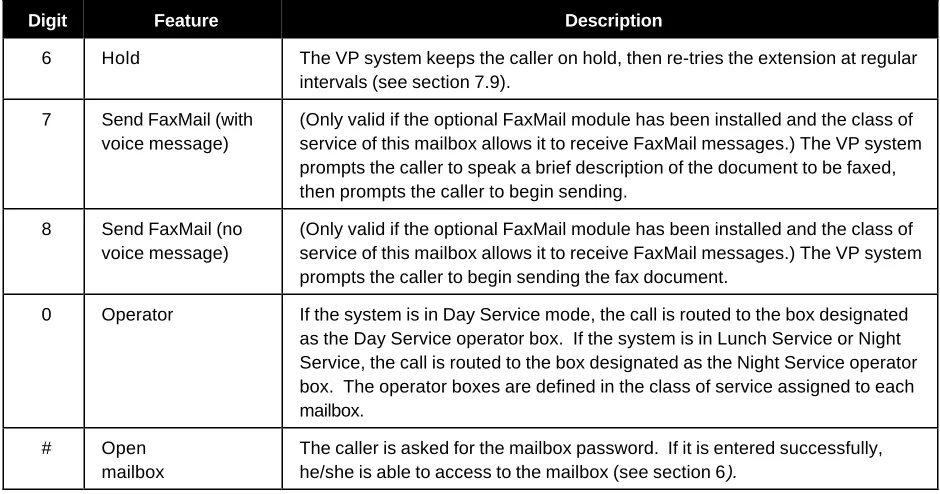
The VP system automated attendant features perform the tasks of a live attendant. The following table illustrates how.
Live Attendant VP System Automated Attendant
Answers an incoming call by lifting telephone. Answers an incoming call by going “off-hook.”
Greets the caller with a phrase such as, "Welcome to [XYZ Company]."
Greets the caller by playing a pre-recorded greeting such as, "Welcome to [XYZ Company]."
Asks to whom the caller wishes to speak. Plays a pre-recorded greeting that prompts the caller to either dial the extension of the party they are trying to reach or choose from a list of voiced options to route the call to a specific department or group.
Listens to the caller's response. Listens to the digits dialed by the caller.
Says, "Please hold." Plays a pre-record phrase, "Please hold..." Calls the required extension by hook-flashing and
dialing the extension number.
Calls the required extension by hook-flashing and dialing the extension number.
Listens for busy tone, ring tone, answer, etc. Listens for busy tone, ring tone, answer, etc.
If the extension is busy, offers to let the caller hold. If the extension does not answer, offers to take a message or try another extension.
If the extension is busy, plays a pre-recorded prompt offering the option to hold. If the extension does not answer, plays a pre-recorded prompt offering to take a message or try another extension.
1.1.2 What is Voice Mail?
In a typical office environment, the live attendant takes a message from a caller and writes it down on a piece of paper. The attendant then places the slip in the recipient’s in-box or mailbox. The box owner then retrieves and reads the message placed in the box.
In contrast, the VP system records a message from a caller and places it in a voice mailbox. The mailbox owner can later retrieve the message by calling into the VP system and listening to the recording. The table below compares how the VP system processes voice messages compared to a live attendant.
Live Attendant VP System Voice Mail
Attendant listens as the caller dictates his/her message, writing it down on a piece of paper.
VP system records the message as the caller speaks.
Attendant places the message slip in a mailbox belonging to the recipient.
VP system stores the voice message electronically in the recipient’s voice mailbox.
Attendant dials the code to turn on message waiting lamp on the recipient's telephone.
VP system dials the code to turn on the message waiting lamp on the recipient's telephone.
Recipient sees the message waiting lamp is on, and retrieves message slips from the message mailbox.
Recipient sees the message waiting lamp is on and dials the VP system to retrieve messages.
Recipient reads messages left on message slips. VP system plays messages recorded by callers in the voice mailbox.
1.2 Understanding the VP System Product Design
All VP systems are designed using the Box concept. A box contains a set of instructions that tells the program what to do with a call it is handling. By setting up the system to send calls to different boxes created on the system, you can have it effectively process calls—including playing certain prompts or greetings to callers, collecting information and messages from callers, and routing calls to certain extensions based on digits dialed by callers.
Note: All VP system products use the same general software design, but each has different limitations on the number of boxes you can set up on the system and whether you have access to certain optional modules. Information provided in this manual is designed to accommodate all VP system types. Therefore, certain sections and procedures may not be applicable to certain VP system users. If you have questions regarding the
availability of a specific feature or option on a particular system, contact your sales representative.
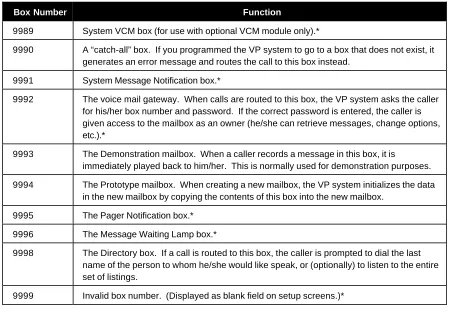
1.2.1 Understanding Box Types
INSTALLATION AND MAINTENANCE MANUAL 4/00
1-3
Routing boxes and mailboxes are the two core boxes used on VP systems. The following table identifies other available box types and provides a brief synopsis of how each box is used on the VP system.
Box type Function
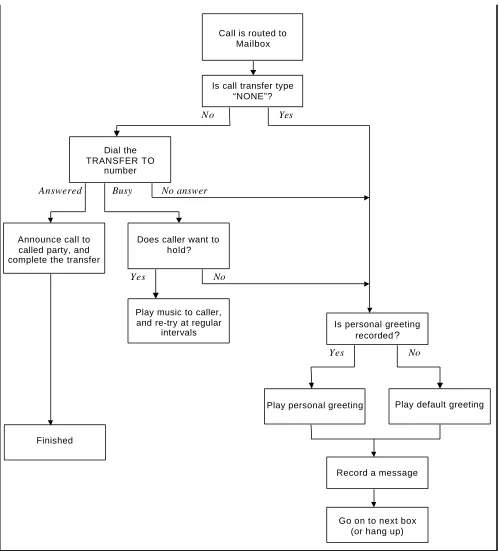
Mailbox Performs call transfers. Plays personal greetings. Takes messages. Activates pagers. Delivers messages internally or externally. Activates message waiting lights.
Question box Performs question/answer sessions. Records caller responses verbally or in a text file.
Routing box Offers menu choices, and routes calls. Plays system recordings.
Group box Houses a list of mailboxes, allows users to easily send one message to more than one mailbox owner.
Directory box Allows callers to spell out (via their touch-tone dial-pad) the name of the person to whom they want to speak, or to simply listen to the entire directory listing.
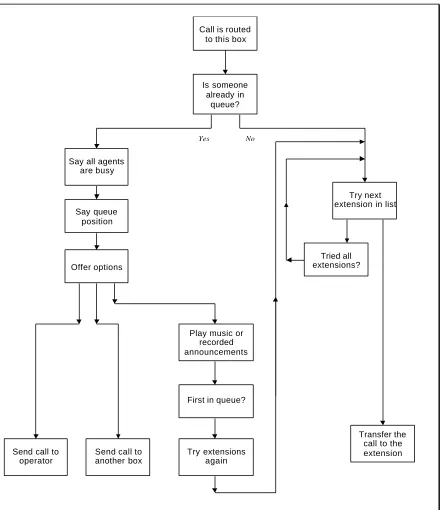
ACD box Searches a list of extensions for one that is not busy, then transfers the call to that extension.
Account Number box
Asks the caller to enter an account number (or phone number, Zip Code, etc.), which is tagged to the call and used for other functions.
Each of these boxes is described in detail in section 5.
Note: No matter where you are in the system, you can get help by pressing the <F1> key from VP system screens.
1.2.2 Understanding the Default Database
The VP system contains a default database with a setup configuration that allows the system to perform fundamental call processing tasks efficiently with minimal system adjustments by the installing technician. This default database configuration includes 2 pre-defined classes of service (0 and 7), 1 supervisor mailbox (mailbox 70), and 3 Routing boxes—800, 801, 821.
As you proceed through these setup instructions, you will make adjustments to specific information relating to the default setup. As you make any changes, keep in mind that we urge you to maintain the initial general configuration of Routing boxes 800, 801, and 821, Class of Service 7, and supervisor mailbox 70. This configuration allows the VP system to perform fundamental call processing tasks efficiently. Maintaining it helps both the installing technician and VP system technical support to service the system and resolve any call processing issues. For these reasons we urge you not to deviate from this general system setup default configuration.
The information below highlights the set up configuration provided with the default database included on the VP system. Refer to this information as needed while you customize the VP system for the
Note: Though you may make adjustments to specific inform ation relating to this default setup, you are urged to maintain the general configuration of Routing boxes 800, 801, and 821, Class of Service 7, and supervisor mailbox 70. This configuration allows the VP system to perform fundamental call processing tasks efficiently. Maintaining it helps both the installing technician and VP system technical support to service the system and resolve any call processing issues.
Technician Password:
1234
Business Hours (specified on the BUSINESS HOURS screen): 8:00 AM - 5:00 PM
Routing Box 800:
Answers all incoming calls during day/lunch hours (specified on the BUSINESS HOURS screen) Owned by mailbox 70
Routing Box 801:
Answers all incoming calls during non-day/lunch hours (specified on the BUSINESS HOURS screen) Owned by mailbox 70
Routing Box 821:
Routes calls that have already passed through Routing box 800 or 801 Owned by mailbox 70
Class of Service 0:
Set up with the following parameter settings (for information on specific parameter fields, refer to section 4.10:
MAXIMUM NUMBER OF GREETINGS: 10
MAXIMUM NUMBER OF MESSAGES: 200 MAXIMUM GREETING LENGTH (SECS): 60
MAXIMUM MESSAGE LENGTH (SECS) 60
AUTO-DELETE OLD MESSAGES AFTER 30 DAYS. AUTO DELETE NEW MESSAGES AFTER99 DAYS. SUPERVISOR STATUS? No
ACCESS TO GROUP-BOXES? Yes
DIAL-OUT ALLOWED? No
ACCESS TO P.A.? Yes
PLAY MENU AFTER GREETING? No
ALLOWED TO RECEIVE FAXMAIL? No
OPERATOR BOX (DAY): 888 (NIGHT): 888 WHEN EXITING OPEN MAILBOX, GO TO BOX: 821
MAX LINES ALLOWED TO HOLD FOR ONE BOX: 2 WHILE IN QUEUE, SAY POSITION IN LINE? No
TRY EXTENSION3 TIMES BEFORE GOING BACK TO CALLER RESTRICTED DIGITS: [None]
Class of Service 7:
INSTALLATION AND MAINTENANCE MANUAL 4/00
1-5
Extension Length: 3 digits
Password Length:
4 digits
Default Passwords:
Equal the mailbox numbers
Mailbox 70:
Set up as the Supervisor mailbox with Class of Service 7
Prototype mailbox 9994 (characteristics are automatically assigned to all mailboxes created): TRANSFER TYPE: Wait for Ring
CLASS OF SERVICE: 0
to: X (signifies the mailbox number) CURRENTLY ENABLED: Yes
TRANSFER SCHEDULE: Always
PASSWORD: X(signifies the mailbox number)
SEQUENCE TO TURN ON/OFF MESSAGE WAITING LAMP: (set by Integration program) AFTER PLAYING GREETING: Wait for digit
1.2.3 Understanding Product Differences
All VP system products use the same software base, but each has different limitations on the number of boxes you can set up on the system and whether you have access to certain optional modules.
Information provided in this manual is designed to accommodate all VP system types. Therefore, certain sections and procedures may not be applicable to certain VP system users. If you have questions regarding the availability of a specific feature or option on a particular system, contact your sales representative.
Also be advised that the NT-based VP systems offer users a graphical screen interface, which provides slide bars, tabbed pages, buttons, and icons that are not available with other VP systems. For information on navigating NT-based VP system screens using graphical screen elements such as tabbed pages and buttons, consult a Microsoft NT or Windows user’s manual.
The functionality of system and box setup screens, fields on screens, and most configuration file
parameters is identical throughout the entire line of VP system products, including the NT-based products. With the NT-based products, however, there are differences in the techniques you use to access system and box setup screens and navigate through those screens. The NT-based VP systems allow you to display multiple VP system windows simultaneously, for example, and to access some screens from within others, whereas other VP systems do not. These differences equip NT-based system users with
additional navigational and display flexibility.
To ease dealer and technician transition to the NT-based VP systems, most screen and system navigation techniques provided with other VP systems are also provided with the NT-based systems. You can, for example, use the same function keys in both types of systems to navigate through program screens.
Because this manual is designed to accommodate all VP systems, it references these common
you are working with an NT-based VP system, you may choose to use navigational techniques other than those documented here to access and work with VP system screens.
With this in mind, also be advised that you may choose to use Windows tools such as File Manager or Explorer to complete tasks that are performed from a DOS prompt on other VP systems. Because NT-based system users can perform these tasks from a DOS prompt or using other techniques, for the sake of simplicity, only the DOS prompt method is discussed in this manual.
1.2.4 Understanding the Services and Applications in NT-based VP Systems
When the VP system is installed on a PC running Windows NT, 5 separate applications and 6 separate services are set up on the PC. Each of these is listed below.
Note: An application is a program launched by a user. Applications typically include a graphical user interface (GUI) that allows a user to easily make modifications that affect how the program operates. A service is a program typically launched by the operating system. Services do not have a graphical user interface (GUI), and under normal operation, they are not directly modified by the user. In some cases, however, a service may be designed to monitor a specific application and use information a user enters onto that application’s screens.
PBX Setup
Dialogic
Message Status Viewer
KVT Database Manager
KVT Voice Mail Manager
Voice Mail Viewer
KVT FTP Server
Online Help
Proxy E-mail Client Database
Administrator
Applications
Services
INSTALLATION AND MAINTENANCE MANUAL 4/00
1-7
Understanding VP System NT Applications
The following illustration depicts an example of the VP system applications menu that displays on PCs running Windows NT-based VP systems.
Note that an additional application, PBX Setup, is also provided with NT-based VP systems. Because the PBX Setup application should only be run the first time the system is set up, it is not included on the applications menu.
Database Administrator Application
Purpose: Allows the user to view and modify system and box setups.
Location: VP system PC (but can be moved to another PC on the LAN).
Filename: DBA.EXE.
Message Status Viewer Application
Purpose: Allows the user to view the number of Old and New messages in mailboxes.
Location: VP system PC (but can be moved to another PC on the LAN).
Filename: BOXDISPLAY.EXE.
INSTALLATION AND MAINTENANCE MANUAL 4/00
1-9
Voice Mail Viewer Application
Purpose: Allows the user to view the status of the KVT Voice Mail Manager service, including the current line activity, and the storage available. Also allows the user to enable or disable a port on the system.
Location: VP system PC (but can be moved to another PC on the LAN).
Filename: VIEWER.EXE.
Online Help Application
Purpose: Provides online access to the information in the Installation and Maintenance Manual. Information provided covers installing, setting up, and working with the VP system using the system’s screens and telephone interface.
Location: VP system PC (but can be moved to another PC on the LAN).
Filename: DBA.HLP.
INSTALLATION AND MAINTENANCE MANUAL 4/00
1-11
PBX Setup Application
Purpose: Allows the user to specify the PBX type, extension length, and other system setup and integration-related information.
Location: VP system PC.
Filename: PBXSETUP.EXE.
Understanding VP System Services
The following illustration depicts an example of a Services dialog box that displays on PCs running Windows NT-based VP systems. (You access this box by clicking on the Start button, then selecting Control Panel / Services.) The VP system services are listed below:
• Dialogic Service
• GammaLink Service
• KVT Database Manager Service
• KVT Voice Mail Manager Service
• KVT FTP Server Service
INSTALLATION AND MAINTENANCE MANUAL 4/00
1-13
Dialogic Service
Purpose: Operates the voice boards.
Location: VP system PC.
Filename: DLGC_SRV.EXE.
Interaction: Exchanges data with other services, primarily the KVT Voice Mail Manager service.
GammaLink Service
Purpose: Operates the fax boards.
Location: VP system PC.
Filename: GFDCP.EXE.
Interaction: Exchanges data with other services, primarily the KVT Voice Mail Manager service.
KVT Database Manager Service
Purpose: Holds the syst em setup and box setup information.
Location: VP system PC.
Filename: KVDBSERVER.EXE.
Interaction: Exchanges data with other services, primarily providing data to the Database Administrator application and the Message Status Viewer application.
KVT Voice Mail Manager Service
Purpose: Interacts with the GammaLink and Dialogic service hardware to process calls.
Location: VP system PC.
Filename: VMSERVICE.EXE.
Interaction: Exchanges data with other services, primarily providing data to the Voice Mail Viewer application.
KVT FTP Server Service
Purpose: Communicates with client PCs running VCM and unified messagi ng features.
Location: VP system PC.
Filename: KV_FTP_SERVICE.EXE.
Interaction: Exchanges data with other services and with applications installed on client PCs (application such as VCM, unified messaging, report generation programs, etc).
Proxy E-mail Client Service
Purpose: Communicates with the e-mail server and client PCs running unified messaging client software.
Location: VP system PC.
Interaction: Exchanges data with the e-mail server and the KVT Voice Mail Manager service.
1.3 Accessing DOS-based VP System Menu Options
Question Box screen Mail Box screen 1
Mail Box screen 2
Mail Box screen 3
Main menu Box menu General Line Information Call Transfer Business Hours
Technical Technical screen
Call Transfer screen Business Hours screen General Information screen
Line Information screen
System menu
Group Box screen Routing Box screen
Directory Box screen Line Status screen
Page Page 2 Page 3 Exit To screen To file To printer Holiday Schedule
Holiday Schedule screen Display Line Status
Box Information System Information Mail Box Question Box Routing Box Group Box Directory Box ACD Box
Class of Service Class of Service screen
Optional Features
Optional Features menu screen Account Number
Display Database
Optional Features
Optional feature box screens feaox
ACD Box screen
Acct number Box screen
INSTALLATION AND MAINTENANCE MANUAL 4/00
1-15
1.4 Accessing NT-based VP System Menu Options
Main menu bar
Boxes menu General Line Information Business Hours System menu Holiday Schedule File Boxes Diagnostics Mail Box Question Box Routing Box Group Box Directory Box ACD Box
Class of Service Account Number Box
Optional Features System Help PBX Information Optional Features Trace Setup Custom Flags Diagnostics menu System Prompts Exit
Mail Box screen
Question Box screen
RoutingBox screen
Group Box screen
Business Hours screen Line Information screen General Information screen Directory Box screen
ACD Box screen
Account Number Box screen
Optional feature box screens
Holiday Schedule screen
Class of Service screen
PBX Information screen
Optional feature setup screens
Trace Setup screen
2. Preparing the System
2.1 Understanding Available System Setup Techniques
There are two techniques you can use to set up VP systems:
• Use the program’s screen interface to run the System Setup utility then complete System Information and Box Setup screens (you may need to attach a laptop to the VP system PC, if the system does not have a monitor and/or a keyboard—procedures are provided in section 10)
• Call into the VP system and use the teleparameter feature to run the System Setup utility then enter parameter codes and corresponding values to set up system and box information
Technicians who have experience setting up VP systems may prefer to use the teleparameter feature to quickly make modifications and get VP system up and running at the customer’s site. Detailed
instructions on using the teleparameter feature to complete system setup steps are provided in section 11.
Be advised that because the teleparameter setup technique involves inputting codes that represent system parameters and corresponding values to which parameters are to be set, it is a bit more difficult to use effectively if you are unfamiliar with setting up VP systems. For this reason, we recommend that technicians unfamiliar with VP systems refrain from using the teleparameter feature and instead, use instructions provided in the following sections to complete all necessary system setup steps through the screen interface.
Note: If you choose to set up the system using the teleparameter feature, be sure to first review section 1, so you clearly understand the setup of the default database provided with the VP system. For detailed information on using the teleparameter feature, see section 11.
Note that if you choose to initially set up the system using the screen interface (either directly of via a laptop), you can later make additional modifications by simply calling into the VP system and using options on the Supervisor menu (see section 7.11) or using the teleparameter feature (see section 11).
To install, set up, and maintain a VP voice processing system, you need the equipment listed below.
Equipment Needed • VP System Unit
Note: If you are installing a VP system purchased as a kit (the software and boards are not pre-installed in the system), see section 21 for kit installation requirements and procedures. Once you complete procedures provided in section 21 continue with information and procedures provided here.
• Portable Diskette Drive (only for systems without a diskette drive)
INSTALLATION AND MAINTENANCE MANUAL 4/00
2-2
we strongly recommended that technicians servicing VP units without diskette drives have access to a portable diskette drive.
• Authorization Key
VP systems only run if the authorization key is attached to the PC’s parallel port. This key is shipped in the packaging with the VP system. To attach the authorization key, simply plug the key into the parallel port in the back of the PC.
Authorization Key
If you choose to set up the system by connecting a laptop to the VP unit, you need the following additional equipment:
• Laptop Computer
• Null Modem Serial Cable
• KeyLink Communications Software (provided with the VP system)
This additional equipment is necessary to perform screen interface setups on VP systems that do not include a keyboard and monitor.
To set up the system using a laptop, you must use a null modem serial cable to attach the laptop PC to the VP unit. So that the laptop computer can communicate with the VP system unit, you must install
KeyLink communication software, provided with the VP system, onto the laptop PC. The KeyLink installation procedure and instructions on using the program are provided in section 10.
Once the system is set up and tested, the system supervisor on-site can maintain the day-to-day aspects of the system (adding, deleting, modifying mailboxes; modifying greetings and call routing; etc.) by simply calling into the system using a telephone. No special teleparameter modification instructions or laptop computers are necessary for regular daily maintenance of the VP system. (See section 7.11 for details.)
2.2 Connecting the VP System to the Telephone System
2.2.1 Connecting Directly to the Telephone Lines
The VP system unit can be connected directly to the telephone lines as shown below.
Line 1
Line 2
Voice processing board
Radio Shack part number 279-402
Figure 2-1 Connecting the VP System Directly to Telephone Lines
Note that the modular input connectors on the voice boards are RJ-14 jacks that contain two independent telephone lines. The modular adapter shown (or its equivalent) must be used if the telephone lines are terminated with RJ-11 (single line) jacks.
If you want the VP system to be able to transfer calls, make sure the telephone line has either the call-transfer or three-way calling feature. If you are unsure whether a line has these capabilities, contact the local telephone company.
Local C.O. lines connected to VP should not have the call-waiting feature assigned. Once again, if in doubt, contact the local telephone company.
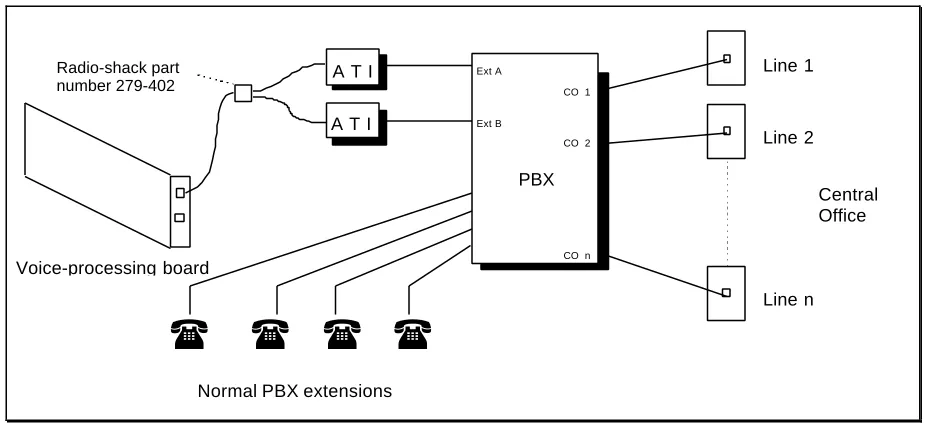
2.2.2 Connecting to a PBX or Key System
INSTALLATION AND MAINTENANCE MANUAL 4/00 2-4 Line 1 Line 2 PBX Line n Voice processing board
CO 1
CO 2
CO n
Normal PBX extensions
Central Office Radio Shack
part number 279-402
Ext A Ext B
Ext C
Ext D
( ( ( (
Figure 2-2 Connecting the VP System Behind a Key-System or PBX
Note that the modular input connectors on the voice boards are RJ-14 jacks, which contain two
independent telephone lines. The modular adapter shown (or its equivalent) must be used if the PBX extensions are terminated with RJ-11 (single line) jacks.
Unless special digital voice boards are installed in VP system PC, each line to the VP system unit requires an industry-standard-telephone port on the PBX(this is also known by other names such as analog port, 2500 set interface, SLT port). Some telephone systems do not provide single-line-telephone ports, and they require a special analog interface box between the PBXand the voice mail system, as shown below. If you have questions on the type of ports provided on the phone system, contact the local PBX
manufacturer’s representative. For information on digital voice boards, contact a VP system sales representative. Line 1 Line 2 PBX Line n Voice-processing board
CO 1
CO 2
CO n
Normal PBX extensions
Central Office A T I
A T I Ext A
Ext B
( ( ( (
Radio-shack part number 279-402
2.2.3 Connecting the Serial Cable Between the VP System and PBX
If you are establishing a serial integration, you must attach a serial cable between the VP system and the PBX. The VP system unit is set up to use the COM 1 port to communicate with the phone system. Therefore, you should connect the serial cable to the VP unit’s COM 1 port.
Consult the phone system documentation for instructions on attaching the serial cable to the phone system COM port.
Note: If the phone system you are working with is a Comdial DSU (Impression 24, 48, 72), attach the serial cable to COM 1 on the DSU. If the phone system is a DSUII (Impact 24, 48, 72), attach the serial cable to COM 3 on the DSUII.
Typical Setup
For typical automated attendant service, program the PBX so that incoming calls are routed via the PBX to ring the VP system. The VP system answers the call and asks the caller to enter the required extension (or mailbox) number. The caller enters the number, and the VP system transfers the call just as a live attendant would.
2.2.4 Making Local Connections to the Board
When you create mailboxes, Routing boxes, or other boxes on the system, you have the option to record names and greetings at the time you create the box. You make these recordings by selecting from recording options available directly from box setup screens. On DOS-based VP systems, to make recordings from the VP system PC, you must attach a telephone directly to the voice board in the VP system using one of the two techniques detailed below.
Using Two Telephone Lines
INSTALLATION AND MAINTENANCE MANUAL 4/00
2-6
Line A
Line B
(rear view) Voice board
Figure 2-4 Using Two Telephone Lines to Record
Using an Audio Coupler or Single Channel Audio Connector
By using an audio coupler or single channel audio connector, you can play and record prompts and greetings from a DOS-based VP system PC without using two telephone lines.
Note: Audio couplers and single channel audio connectors function only with systems using Rhetorex voice boards.
To use a microphone or local speaker to play or record prompts or greetings, connect them to the PC by following the manufacturer’s instructions.
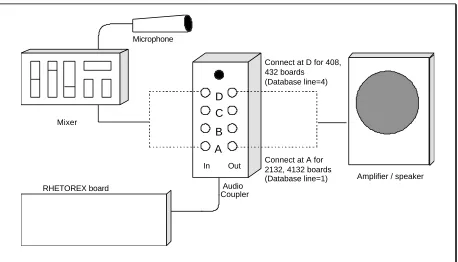
To connect an audio coupler to the Rhetorex board, refer to Figure 2-5. This illustration identifies how you connect all devices.
To connect a single channel audio connector, insert the 3 pin audio connector into the Rhetorex board on the right side of the board below the RJ14 connector (when viewing the board with the bracket to the right). Next, connect the output, which is a small, silver phone jack, to the speaker. Finally, connect RCA jack (the remaining jack) to the recorder.
When using either an audio coupler or single channel audio connector with the VP system, you must include the parameter LOCAL SPKR in the VM.CFG configuration file (see section 12). If you are
connecting to a Rhetorex 408 or 432 board, you must also change the VM.CFG file parameter DATABASE LINE from 1 to 4.
Microphone
Out In Mixer
RHETOREX board
Amplifier / speaker Audio
Coupler
A B C D
Connect at A for 2132, 4132 boards (Database line=1) Connect at D for 408, 432 boards
(Database line=4)
Figure 2-5 Recording via an Audio Coupler on a System with Rhetorex Boards
2.3 Moving Greetings, Prompts, Messages, and Mailboxes
from DOS-based to NT-based VP Systems
BE ADVISED:
The DOS-based VP system must be running VP system software version 8.2 or higher. If the DOS-based system is running a VP system version prior to 8.2, you must upgrade the VP system software to version 8.2 or higher before moving greetings, prompts, messages, and mailboxes from DOS-based to NT-based systems.
The NT-based VP system includes a conversion utility that allows you to easily move greetings, prompts, messages, and mailboxes from DOS-based VP systems running software version 8.2 or higher to NT-based VP systems. To use the utility to convert and copy files between two separate PCs, you back up each subdirectory (and its files) indicated in step 3 below from the DOS-based PC onto a tape backup or Zip disk. Then, restore the directories and files from that media into subdirectories you create on the NT machine. Do not copy DOS-based files directly into the \VM, \VM\M, or \VM\P subdirectories on the NT machine. Instead, create a subdirectory structure such as the \VMDOS, \VMDOS\M, and \VMDOS\P on the NT machine, and restore the files into their associated subdirectories. Once the conversion is complete (and tested), you can delete the directory structure you created and the DOS-based files it contains from the NT machine.
The conversion utility is named DCONVERT.EXE, and it is located (by default) in the \VM directory.
To transfer files from the DOS-based VP system to NT-based VP system:
INSTALLATION AND MAINTENANCE MANUAL 4/00
2-8
2. Create the following directories on the NT machine: \VMDOS, \VMDOS\M, \VMDOS\P. Back up and restore or copy files from the \VM, \VM\M, and \VM\P directories on the DOS-based machine into their associated \VMDOS directories on the NT machine.
3. From the Start button at the bottom of the Windows NT desktop, select Run.
4. In the Open field of the Run dialog box, type C:\VM\DCONVERT (where C: is the drive on which the VP system is installed) then select the OK button.
5. On the screen that displays, indicate in the appropriate fields the complete paths to the DOS-based VP system database ( .DVM) files, message files, greeting files, and prompt files as they are stored on the NT-based PC. Refer to section 16 for information on the default VP system file organization structure. Also indicate in the appropriate fields the complete paths to the database files, message files, greeting files, and prompt files as they are to be stored on the NT-based VP system. The default directory structure is indicated. You must modify the drive designation letters as necessary to
accommodate the file transfer technique you are using.
6. Indicate in the appropriate fields the type of conversion you need to perform : In the top half of the screen, select the Dialogic or Rhetorex option to identify whether the DOS-based VP system used Dialogic or Rhetorex boards. In the bottom half of the screen, it is recommended you retain the .WAV file format set as the default.
7. To initiate the conversion, select the Convert Now button. Files are copied and converted as necessary to the destinations you indicated. If you receive a Dr. Watson – KVDBServer.exe error, click on the OK button. This error does not affect the conversion process. When you see a message indicating the conversion completed successfully, click on the OK button.
8. From the Windows NT desktop, select the Start button then select Run. In the field, type
C:\VM\DB2UM.EXE (where C: is the drive on which the VP system is installed) then select the OK button.
9. From the Windows NT desktop, select the Start button then select Run. In the field type
C:\VM\LINECONVERTER.EXE (where C: is the drive on which the VP system is installed) select the OK button.
10. Reboot the PC as instructed to restart the VP system.
Note: Be advised that fax documents stored in Fax boxes on DOS-based VP systems are in a .PCX file format. On NT-based systems, however, these documents must be stored in a .TIF file format. Therefore, you must re-enter fax documents into the NT-based system. See section 24.3 for details.
2.4 Adding Features and Ports
2.4.1 Understanding Special Activation Codes to Add Features and Ports
controlled by activation codes and by the key that is attached to the parallel port on the back of the VP system PC. These activation codes and the key control the VP system software on the PC, so the software will provide users access to only the optional features or number of ports that were purchased with the system.
To upgrade a VP system so additional ports are available or so access to certain features is allowed, you must obtain a code from your sales or technical support person and input that code on the VP system. The type of code you use depends on the type of VP system you have and the capabilities you are trying to ad. Once you obtain your code, enter it by following the appropriate procedure below.
2.4.2 Entering a Renew Code
You enter a Renew code by running Renew utility. Use one of the procedures detailed below.
To run Renew on DOS-based VP Systems:
Note: If you are entering a Renew code to eliminate the 5-only limitation on Routing, Question, ACD, Group, and Account boxes, the system must be running VP system software version 8.2 revision 5B or higher. If it is not, the limitation will not be removed, even after you enter the Renew code.
1. Before you can obtain a Renew Code and run the Renew program, you must supply a VP system technical or sales person with 1) the serial number of your key and 2) a Renew Use number. To obtain these numbers, shut down the VP system if it is running. Change to the \ VM directory on the VP system, type RENEW then press <Enter>. The screen displays the serial number of the key attached to the PC, a Use number, and the current system date. Note these numbers and relay them to the technical or sales person with whom you are working. You can exit this screen by pressing <Esc> until you return to a DOS prompt.
2. To enter the 15-digit Renew code you are provided (with no spaces or hypens), shut down the VP system if it is running. Change to the \VM directory on the VP system, type renew then press <Enter>. From the screen that displays the serial number of the key attached to the PC, the Use number, and the current system date, press <Enter> again. Type the code you were provided when prompted. Press <Enter> when you finish.
Note: If you have a certain type of key, it may be necessary for you to initiate the Renew code program by typing RENEWOLD at the \VM prompt (instead of typing RENEW). If it is necessary for you to type RENEWOLD to initiate the program, you will be instructed to do by the technical/sales person from whom you obtained the Renew code.
To run Renew on NT-based VP Systems:
INSTALLATION AND MAINTENANCE MANUAL 4/00
2-10
2. Shut down the KVT VOICE MAIL MANAGER SERVICE. If the site is also running the unified messaging feature, first also shut down the PROXY E-MAIL CLIENT SERVICE. To stop one or both services, from the Windows NT desktop, click on the Start button, then choose Settings / Control Panel / Services. From the SERVICES screen that displays, highlight KVT VOICE MAIL MANAGER and click on the Stop button. To exit the SERVICES screen, click on the Close button. To exit the Control Panel window, click on the X icon in the upper-right corner of the window.
3. Access the NTRENEW screen using the procedure detailed in step 1. Type the 21-digit code you are provided (with or without the hyphens) in the NT RENEW CODE field.
4. Select the Apply button. The screen updates to identify the new system’s statistics and access to optional modules. Exit the screen by selecting the Done button.
Note: On NT-based VP systems, if the original system ordered is less than 16 ports, the authorization key shipped with the system is programmed to authorize a maximum of 16 voice mail ports. If the original system ordered is 16 or more ports, the key is
programmed to authorize a maximum of 32 voice mail ports. Also, all keys are programmed to authorize a maximum of 50 VCM users, unless more user licenses are purchased at the time of the original order.
A key cannot be re-programmed using the procedure discussed above for authorizations beyond the maximums originally programmed. To add ports or VCM users beyond the maximums originally programmed on the key, you must replace the original key with a new key. Contact the VP system sales representative for additional information.
2.4.3 Entering SWITCHES.TXT, LOGINS.TXT, PBXLINK.TXT, and NUMLINES.TXT
Activation Codes
software (to activate a certain capability), you can find the code(s) printed on the invoice shipped with the system.
• SWITCHES.TXT: Fax Distribution, Fax Mail, Talking Classifieds, IVR, Outbound Telemarketing
• LOGINS.TXT: VCM (DOS-based VP systems only)
• PBXLINK.TXT: Serial-port integration
• NUMLINES.TXT: Port additions when additional boards are added
You enter codes for NUMLINES.TXT, SWITCHES.TXT, LOGINS.TXT, and PBXLINK.TXT using teleparameters 4001, 4002, 4003, and 4004 respectively. See section 11.2 for instructions on using the teleparameter feature.
On DOS-based VP systems you can also use the VMCODES program to enter codes for NUMLINES.TXT, SWITCHES.TXT, LOGINS.TXT, and PBXLINK.TXT. Use the following procedure:
1. Shut down the VP system if it is running.
2. Change to the directory in which the VP system is installed (by default, the \VM directory).
3. Type VMCODES then press <Enter>.
4. From the list that displays, type a number to select the code you need to input.
5. Enter the authorization number , then press <Enter>. A message displays, indicating the authorization number has been written to the appropriate file.
6. Repeat the above steps for each code you must input.
2.5 Starting the VP System, Logging in, and Shutting It Down
By default, all VP systems are configured to start running the voice processing system automatically upon boot-up. Should you exit the system to perform maintenance or make configuration file changes, simply restart the VP system PC. The VP system loads after the restart.
To manually start the VP system:
• On DOS-based VP systems, you change to the \VM directory and type GOVM then press <Enter>.
• On NT-based VP systems, you select the Start button at the bottom of the Windows NT desktop, then choose Settings / Control Panel / Services. From the SERVICES screen that displays, you highlight one of the VP system services shown below then select the Startup button. On the screen that displays, you then select the AUTOMATIC option then click on the OK button. When completing this procedure, start each VP system service in the order shown:
1. DIALOGIC
2. GAMMAFAX
3. KVT FTP SERVER
4. KVT DATABASE MANAGER
5. KVT VOICE MAIL MANAGER
INSTALLATION AND MAINTENANCE MANUAL 4/00
2-12
Before you can access the VP system database, you must log in by entering a password. On DOS-based VP systems, you access the password entry field by pressing <F10> from the LINE STATUS screen (the screen displayed when the VP system starts). On NT-based VP systems, you access the password entry field by clicking on the DATABASE ADMINISTRATOR icon on the Windows NT desktop.
There are two levels of password security, the Customer level (referred to as the Administrator level on NT-based systems) and the Technician level. If you enter the Customer / Administrator password, you are provided access to everything on the VP system except the technical setup fields on several system setup screens. Though you are able to view the technical information, you cannot modify it. If you enter the Technician password, you are provided access to everything on the VP system. The default Customer / Administrator password is blank, and the default Technician password is 1234.
To shut down the VP system:
• To shut down a DOS-based VP system, press <Esc>. At the prompt to enter a password, enter either the Customer or Technician password. The system stops processing new calls and waits while calls in progress are completed. Once all ports are clear, the system shuts down the VP system software program.
If absolutely necessary, you can force a DOS-based VP system to shut down immediately by pressing <F10> when prompted. Use caution when forcing the system to immediately shut-down, as all calls in progress are immediately disconnected.
• To shut down an NT-based VP system, you must stop the VP system services in a specific order. To stop VP system services, from the Windows NT desktop, click on the Start button, then choose Settings / Control Panel / Services. From the SERVICES screen that displays, highlight each of the following services, in the order presented, and click on the Stop button after each time you highlight a service:
1. PROXY E-MAIL CLIENT
2. KVT VOICE MAIL MANAGER
3. KVT DATABASE MANAGER
4. KVT FTP SERVER
Be advised that when you stop the KVT VOICE MAIL MANAGER service, all calls currently being handled by the VP system are immediately terminated. To exit the SERVICES screen, click on the Close button.
2.6 Upgrading VP Systems to the Latest Software Versions
Upgrading DOS-based VP Systems
Sites running DOS-based VP system versions prior to the latest available revision can obtain system software version upgrades by contacting VP system sales or technical support representatives. Use the procedure below to upgrade older versions to the latest available version once you receive an upgrade package.
To upgrade DOS-based VP System software to the version supplied in the upgrade package:
1. Follow the procedure in section 2.5 to shut down the VP system if it is running.
2. Follow the procedure in section 14.1 to make a complete back up of the existing VP system. It may be necessary for you to restore files from this backup in the unlikely event you experience problems during the upgrade process.
3. Insert Disk 1 from the set of VP system installation disks shipped with the VP system software you are attempting to upgrade into the diskette drive of the VP system PC.
4. From the DOS prompt, type CD\VM then press <Enter> to change to the \VM directory.
5. Type A:INSTALL then press <Enter> to start the installation program.
6. From the list of options that display, highlight UPGRADE OLD VERSION then press <Enter>.
7. Follow the prompts to complete the upgrade. As prompted, insert the diskettes provided in the upgrade package.
8. When the upgrade completes, reboot the VP system PC as prompted. Once the PC reboots, the VP system starts automatically.
If you experience problems after you upgrade the system, you can restore the previous system software backup that you created in the procedure above. For information on restoring system backups, refer to section 14.2.
Upgrading NT-based VP Systems
Sites running NT-based VP system versions prior to the latest available revision can obtain system software version upgrades by contacting VP system sales or technical support representatives. Because the upgrade procedures for NT-based systems differ depending on the version currently installed at the site, the instructions you should use when performing the upgrade will be enclosed with the shipment containing the upgrade CD.
INSTALLATION AND MAINTENANCE MANUAL 4/00
2-14
2.7 Collecting Information Needed for New VP System Setups
2.7.1 Application and User Setup Information
While setting up the VP system, you may need to adjust default settings for the customer’s regular business open hours and business closed hours. You also need to set up Routing boxes to handle incoming calls and set up mailboxes for subscribers who will be using the system. The following worksheets are provided to help the installing technician collect this information from the system supervisor.
Business Hours/Holiday Worksheet
(System Supervisor Completes)Below, indicate each holiday on which the business is closed by writing the month and day. Do not complete the INITIAL BOX field.
On the lines corresponding to each day of the week, write in 24-hour format (for example 8:00 PM is 20:00) the normal hours the company opens and closes for business. If the business is open 24 hours on a particular day, enter 0:00 as the DAY SERVICE BEGINS time and 24:00
as theDAY SERVICE ENDS time. If the business is closed the entire day on a particular day, enter 0:00 on both lines.
INSTALLATION AND MAINTENANCE MANUAL 4/00