H
ANDS
-
ON
P
RACTICE
:
D
EPLOY AN
A
PPLICATION
This hands-on practice accompanies the NoCOUG October conference presentation “Just Get it Written: Deploying Applications to OC4J Using JDeveloper and EM,” by Peter Koletzke (Quovera).
This hands-on practice demonstrates how to distribute JSP code to an application server. Deployment in J2EE terms means collecting all files required by an application into a Java archive file (an enterprise application archive, or EAR file) and then copying that file to the proper location on the J2EE application server. After developing an application, in addition to testing within JDeveloper, you need to test in an application server environment to prove it can be run without JDeveloper.
This hands-on practice creates a JSF JSP project and then deploys JSP files and their required ADF BC files to the standalone OC4J server included with JDeveloper. First, you will set up the OC4J server and become familiar with its administration screens. Then you will deploy the application you created in the first phase using two different methods.
This hands-on practice contains the following phases: I. Create a sample application
II. Set up Standalone OC4J III. Create an EAR file IV. Deploy using JDeveloper
• Create the application server connection • Deploy and test the application
I. Create a Sample Application
This phase provides you with a small, non-database application that you can use to try out deployment procedures.
1. In JDeveloper 10.1.3.x, select New Application from the right-click menu on the Applications node. 2. Fill in the Application Name as “JSPDeploy”, the Application Package Prefix as “jspdeploy” and the
Application Template as “Web Application [JSF, ADF BC]”.
3. Click OK to create the projects. You will not use the Model project for this example.
4. On the ViewController project, select New from the right-click menu and select the Web Tier\JSF category. Double click the JSF JSP item on the right to start the JSF JSP Wizard. Click Next if the Welcome page appears.
5. Fill in the File Name as “login.jsp”, the Type as “JSP Page” and click Next.
6. Select “Do Not Automatically Expose UI Components in a Managed Bean” and click Next.
7. Move all ADF Faces libraries to the right if they are not already there and click Finish. The page will open in the Visual Editor.
8. In the Component Palette (top right corner of JDeveloper), click PanelForm. This will add a component to the screen and you will see a “footer” box.
9. Drop two InputText items into the Panel Form (black dotted lines) to add two fields. Change the Title property of each to “Username” and “Password”. Add a CommandButton inside the footer area and change the Text property to “Login”. The layout should appear as follows:
10. Click Save All in the toolbar. Be sure the cursor is on the page and click Run. The browser will open and the form will appear.
11. Close the browser and stop the server (by clicking the red box icon in the Log window). What Just Happened?
You just created a simple login form. The form does not do anything, but you can use this application to test deployment principles.
II. Set Up Standalone OC4J
To better emulate deployment to another server, you can use the steps in this phase to set up and run the OC4J Server outside of JDeveloper.
1. Close JDeveloper to prove that the following steps have no dependency on the IDE. 2. In a browser session, enter the following URL (location):
http://localhost:8888/
Additional Information: You should receive a “Cannot find server or DNS error” or “Internet Explorer cannot display the webpage” or “Unable to connect” message. If you do reach a page, you already have an OC4J or other server running on the machine and you need to shut it down before proceeding.
3. Leave the browser open. Start a command-line window by selecting Start|Run from the Windows start menu, entering “CMD” in the Open field, and clicking OK.
4. In the command-line window, change directories to the bin directory which contains the JDeveloper files. For example, if JDeveloper is in “C:\JDev1013,” enter the following on the command line:
cd \JDev1013\jdev\bin
5. Enter this command:
start_oc4j
Additional Information: If this is the first time OC4J has been run, you will see a number of notifications about unpacking WAR and JAR files.
6. If a prompt appears for an admin password, enter "oracle" (in lowercase) and press ENTER. Enter the password again and press ENTER. This is the password for the oc4jadmin administrator account. (This is a one-time setup step.)
Caution: Once you perform this setup step, you may experience problems if you rename the JDeveloper installation home directory. The setup process writes the JDeveloper home directory into some of the configuration files and the application server may not work if you rename the home directory.
7. Wait for the message (the “x” will be specific to your version number):
<date-and-time> Oracle Containers for J2EE 10g (10.1.3.x) initialized
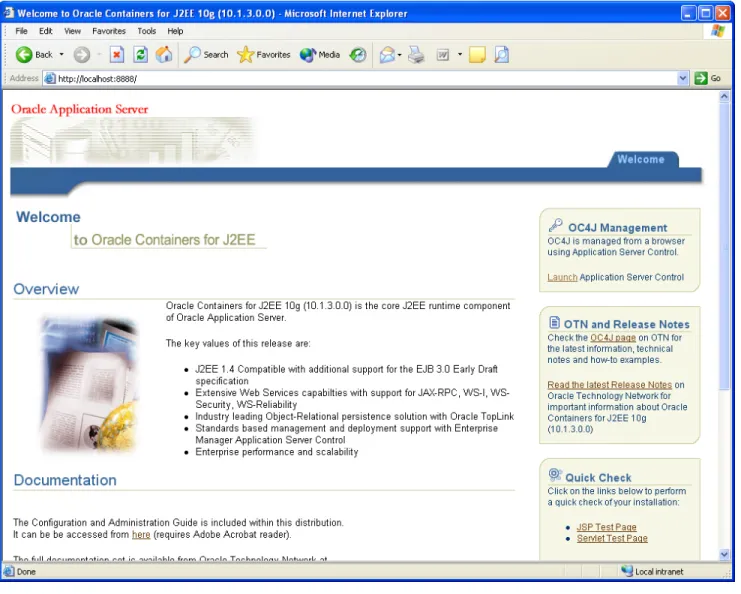
8. Click the Refresh button in the browser. If you closed the browser, open it and connect to “http://localhost:8888”. You should see something like the screen shown in Figure 1.
Figure 1. Standalone OC4J Server home page
9. Open another the command line window and change to the directory “C:\JDev1013\jdev\bin.” Enter this command to stop the server:
stop_oc4j oc4jadmin oracle
Note: The server should stop and return to the command prompt in the first command line window. If the server does not stop, close the first command line window. 10. Click the browser Refresh button again to prove that the server is stopped.
Tip: You can create shortcuts for the start and stop batch files to save having to open commandline windows.
What Just Happened?
You set up and tested the OC4J server outside of the JDeveloper IDE. This will allow you to try out deployments on your local machine.
Note: Youneed to test deployments with the same OC4J version as on the production application server. The version of OC4J is displayed in the console window when you start it.
III. Create an EAR File
Deploying to a J2EE server requires copying all application files to the proper directories and including standard J2EE configuration files. The most efficient method is to create a web application archive (WAR) file that contains all files and directories. This file is archived into an enterprise application archive (EAR) file, which is then copied to the J2EE application server. The application server
automatically knows how to handle this type of file if it contains properly formatted configuration files. Setting up all the files and directories to archive is a tricky task, but JDeveloper offers a utility that helps. This utility requires the creation of a deployment profile.
The deployment profile is a JDeveloper-specific “build file” that guides the process of deployment; it specifies the files and locations of the files required by the application. It also specifies the names and locations of the WAR and EAR files that are created by the deployment. The WAR deployment profile is only used for the process of deployment and is not packaged into the WAR file. It is also not used at runtime. This phase sets up this deployment profile and creates the EAR file from it.
1. Open JDeveloper. On the ViewController node of the JSPDeploy application, select New from the right-click menu.
2. Select the General\Deployment Profiles category, and double click the WAR File item. In the Create Deployment Profile – WAR file dialog, enter the Deployment Profile Name as “jspdeploy” and add to the end of the Directory name “\deploy”.
3. Click OK. The WAR Deployment Profile Properties dialog shown here will appear (your main directory name for the WAR and EAR will probably be different).
4. Select Specify J2EE Web Context Root and set it to “jspdeploy”.
5. Select the Profile Dependencies page. You will see that the ViewController project (.jpr) file is listed as well as the Model.jpr. The Model project would be used for ADF Business Components code to communicate to the database. This project has no files at this point. If you were to add files to this project, they would be packaged with the ViewController project.
7. The defaults will work for this purpose, so click OK. Expand the Resources node in the navigator to see the new deployment profile file. Double clicking this file will display its properties dialog. (Dismiss this dialog if you opened it.)
8. On the jspdeploy.deploy file, select Deploy to EAR file from the right-click menu. The Log window will show the progress of the deployment. Make a note of the directory name in which the WAR and EAR files were created. It should be <application directory>\ViewController\deploy.
9. To examine the contents of these files in JDeveloper, select the jspdeploy.deploy file and select File | Open. JDeveloper opens the directory for the file you have selected so the EAR and WAR files should be visible. If not, navigate to the directory you noted in the preceding step.
10. Select jspdeploy.ear and CTRL-click jspdeploy.war to select both files. Click Open. The JDeveloper editor will display the contents of the archive files.
11. Examine the EAR file first.Notice that it contains only the WAR file and a J2EE configuration file (application.xml). The EAR file can hold many application (WAR) files so you can deploy a number of applications at the same time.
12. Click the jspdeploy.war editor tab to view its contents.You should recognize the names of the JSP, image, and library files required by the application. If you had Model project files, you would also see them in this archive because of the dependency you saw in the profile.
13. Close both archive file viewer tabs. What Did You Just Do?
You just created a WAR deployment profile and created EAR and WAR files from it. You also briefly examined the files to get a feel for their contents.
IV. Deploy Using JDeveloper
You have several options for installing the EAR file into an application server:
• Manually copy the file to the server and stop and edit the server’s configuration files to register the application. This often requires stopping and starting the server so the modified configuration files can be read.
• Use JDeveloper’s “one-click” deployment utility to copy the EAR file. This is useful for smaller applications but you may run into problems when deploying a larger application to a full production server.
• Use Application Server Console (also called “Enterprise Manager” or “EM”), a web utility included with OC4J that allows you to administer and monitor the OC4J instances on an application server.
Although, in the early days of J2EE support by the IDEs, the manual process was the only method possible, it was (and still is) time-consuming and is prone to error. Fortunately, the other two alternatives work, so this practice ignores the manual process. This phase concentrates on the second option and the Extra Credit section describes the third option. This phase shows how to copy the EAR file and register it using JDeveloper. This method is supported for deploying files directly to an OC4J, Oracle Application Server, JBoss, Tomcat, or WebLogic server.
Create the Application Server Connection
The deployment features in JDeveloper require a JDeveloper application server connection. Like a database connection, setting up an application server connection is a one-time step; you can use the same connection for all deployments to the same application server.
1. In JDevleoper, click the Connections Navigator tab, and double click the Application Server node to start the Create Application Server Connection Wizard. (You could also have selected New from the right-click menu to start this wizard.)
2. Click Next if the Welcome page appears. Fill in Connection Name as “LocalOC4J” (one word) and leave the default Connection Type as “Standalone OC4J 10g (10.1.3)”. Click Next.
3. Leave the Username as “oc4jadmin” and enter a Password of “oracle”. Select the Deploy Password checkbox and click Next.
4. Leave the defaults on the Connection page and click Next. Click Test Connection. You will receive an error because the server is not started.
5. In the command line window you left open from Phase II, enter “start_oc4j”, press ENTER, and wait for the initialization message.
6. In JDeveloper, click Test Connection again. This time, the connection should succeed. If an error message returns, check the settings on the previous page and test the connection until it works. 7. Click Finish to dismiss the dialog.
Deploy and Test the Application
This section deploys the application to a WAR file again. This time, the process will also copies it to the OC4J server and register it with the server. It usually does not require a server restart. This process is a “one-click” operation (with multiple menu selections) if you have an application server connection set up (as in the last section). After deploying the application, you will test it in a browser.
1. Run the application within JDeveloper to be sure everything still works. Close the browser and stop the JDeveloper Embedded OC4J Server.
2. Click the Applications Navigator tab. On the jspdeploy.deploy file node, select Deploy to | LocalOC4J from the right-click menu.
Additional Information: This is a “one-click deployment” process, which compiles the files, creates the WAR and EAR files, and copies the files to the OC4J web server, which expands the files and registers and installs the application.
3. The Configure Application dialog will appear. This dialog allows you to change settings for a specific deployment, but the defaults will work for our purposes so click OK. (This is actually the second click of the “one-click deployment.”)
4. The Log window Deployment tab (and the server console window) will display messages about the progress of the deployment.
5. When you receive a message that the deployment has finished (with the elapsed time), look in the Log window for a message that ends with “… under context root jspdeploy.” The URL will be constructed of the host name, port number, “\faces,” and the context root, “jspdeploy.”
6. Close JDeveloper (to prove that the application does not require its runtime facilities). Open your browser if it is not already open, enter the following URL:
http://localhost:8888/jspdeploy/faces/login.jsp
7. The browser should display the login page.
8. Open JDeveloper. On the Connections Navigator tab, expand the LocalOC4J\standalone\Applications nodes. You will see a number of application nodes including jspdeployapp.
Additional Information: The right-click menu on these nodes allows you to stop or undeploy the applications from JDeveloper.
What Just Happened?
You deployed the JSP application to an external standalone OC4J server. In JDeveloper, the process of deploying to an external OC4J server is really only one step. The deployment process and OC4J handle compiling the JSP pages, copying the WAR file to the server, expanding the WAR files, and configuring the application in the OC4J environment. Deploying to an Oracle Application Server, Apache Tomcat, JBoss, or BEA WebLogic server is a very similar process.
Extra Credit
Deploy Using Application Server Console
The steps in this section use the Oracle Application Server Console (Enterprise Manager or “EM”) to deploy the application. This is the method you or an application server administrator will probably use to deploy a production application because it is more flexible and allows you to also monitor activity on the application server.
1. Start the OC4J standalone instance if it is not already running.
2. In JDeveloper, in the Connections Navigator tab, under the Connections\LocalOC4J\standalone\ Applications node, select Undeploy from the right-click menu on the jspdeploy application. When the progress meter stops, click Close.
3. On the Applications Navigator tab, select the jspdeploy.deploy file under ViewController\Resources and notice its directory by holding the mouse over it as shown here:
4. Close JDeveloper so you can prove that it is not required for the rest of these steps. 5. In the browser, connect to this URL:
http://localhost:8888
6. Click the Launch Application Server Control link in the top-right corner. In the login page, enter Username as “oc4jadmin” and password as “oracle” (both are case sensitive). The Application Server Console of Oracle Enterprise Manager will appear. The first page shows the status of the OC4J server.
7. Click the Applications link. You will see a number of default applications already loaded. Click Deploy.
8. On the Deploy: Select Archive page, click Browse next to Archive Location. Find the EAR file (in the ViewController\deploy directory you noted earlier) and click Open. (The EAR contains the WAR file although the WAR file also appears in this directory.)
9. Leave the Deployment Plan as the default (automatic). Click Next and wait for the progress clock to stop.
10. On the Deploy: Application Attributes page, enter the Application Name as “jspdeploy”. Note the Context Root name (jspdeploy). Leave the other defaults and click Next.
11. On the Deploy: Deployment Settings page, click Deploy. A log window will appear to show the deployment progress. When it is finished, you will see a message such as:
[date-time] Application Deployer for jspdeploy COMPLETES. Operation time: 6069 msecs
12. Click Return. The application will appear under the default node in the Applications tab. Click the application name (jspdeploy) to view its administration page.
13. Open a new browser session (do not open a new "window" from the File menu) and enter the following URL:
http://localhost:8888/jspdeploy/faces/login.jsp
14. In the browser with the Application Server Console session, under the Modules heading, click jspdeployapp to look at details about the activity in this application. Open another browser and connect to the application home page URL. Then refresh the browser with the administration session. You should see the numbers increase in the Requests Processed column.
15. Open another browser window and connect to the login page using the same URL. Return to the administration browser and refresh it. The pages you visited in the preceding session will be listed. 16. Continue to explore the Application Server Console to get a feel for what it does.