Learning Records Service
Organisation Portal
Learner Management
User Guide
Contents
Contents ... 1
Purpose and structure of this guide ... 4
1. Operational guidelines for super users ... 5
1.1 Appoint other super users ... 5
1.2 Things to consider when creating users ... 5
1.3 User responsibilities ... 6
1.4 Arrangements for data governance ... 6
1.5 Training and awareness ... 6
1.6 Naming conventions for multiple sites ... 6
1.7 Privacy notice ... 6
1.8 Support ... 7
1.9 Logging into Learner Management ... 7
1.10 Log onto the LRS for the first time ... 7
1.11 Welcome page ... 8
1.12 Online help ... 9
1.13 User Management Permissions ... 10
1.14 Your role as a super user ... 10
1.15 Appoint new super users and users ... 10
1.16 Update an existing user account ... 11
1.17 Delete/remove a user account ... 12
1.18 Verify identity ... 12
1.19 Reset password ... 13
1.20 Monitor users activity ... 13
1.21 Change of super user ... 14
1.22 Contract staff or third party organisations using the LRS ... 14
1.23 Lost your only super user account? ... 14
2. Unique Learner Number (ULN) Management ... 15
2.1 Unique Learner Number (ULN) management ... 15
2.2 LRS Organisation Portal (Manual) ... 15
2.3 Batch Process ... 19
2.4 Return Codes RC001-RC011: what they mean ... 22
2.5 Batch exceptions (RC006-RC011) ... 23
3. Personal Learning Record ... 30
3.1 Access the Personal Learning Record ... 30
3.2 Information displayed on the PLR ... 31
3.3 Privacy notice – unable to share data ... 31
3.4 View a PLR ... 32
3.5 Create a report ... 34
3.6 Audit information on viewing a PLR ... 35
3.7 Report a Problem - ULN or Learning Event... 36
3.9 Report a PLR Learning Event Problem ... 37
3.10 View data challenge history ... 42
4. Find a QCF qualification... 42
4.1 Find a QCF qualification – generic (anonymous) ... 43
4.2 Grouping of Units ... 45
4.3 Grouping of Units - Process ... 46
4.4 Rules of Combination ... 47
4.5 Find a QCF qualification – including learner’s completed QCF Units ... 48
Appendix A – Types of user in the LRS ... 53
Appendix B – Tips for searching ... 54
Appendix C – Tips for updating a learner’s details ... 55
Appendix D Create/update learner fields ... 56
Appendix E – Verification Type and Ability to Share ... 57
Appendix F – Nationality codes (for learner detail fields) ... 58
Appendix G – Return codes RC001-RC011 ... 65
Purpose and structure of this guide
This Guide provides information and guidance for Learner Registration Bodies (LRBs) that sign up to use the Learning Records Service (LRS).
Section 1 provides important operational guidelines on how to administer and manage users.
Section 2 provides guidance on managing Unique Learner Numbers (ULNs). There are several steps to managing ULNs, and the Guide describes these including how to set up and manage batch processes.
Section 3 describes in detail how to access and manage the Personal Learning Record (PLR).
Section 4 describes how to find aQCF qualification. This includes processing Rules of Combination (RoC) enquiries, which gives Learner Registration Bodies (LRBs) the opportunity - using selection criteria that help to produce options for learners - to find suitable courses.
The Guide also offers advice and information on best practice, to help you make the most of the LRS, and provide details of how to get further help and guidance.
If any of your users would receive the LRS newsletter - Service News - they can subscribe by sending their full name, organisation name and contact details by email to the LRS Customer Help Desk.
1. Operational guidelines for super users
Once your organisation has registered with the Learning Records Service (LRS) it will be referred to as a Learner Registration Body (LRB). You will need to establish managerial arrangements for running the LRS and ensure that appropriate
arrangements for data governance are in place.
Once we have checked and accepted your registration, LRS will set up your organisation account on theOrganisation Portal and email your nominated Super User with a username and provide a password to enable access to the Organisation Portal.
This section is for your organisation’s Super User and will help to:
Clearly define your managerial arrangements for running the LRS. Establish your data governance arrangements.
1.1 Appoint other super users
It is strongly recommended that your organisation has at least three super users to ensure that a Super User is available to unlock accounts, and so on, at any time. The Organisation Agreement sets out two complementary areas of responsibility which are assigned to the Super User(s) of the LRS:
Oversight of Data Protection (DP) issues.
Operational management of the LRS, including managing users, removing those who leave and oversight of procedure and practice.
1.2 Things to consider when creating users
As a Super User creating other users you must consider:
Internal processes; including how additional users can be set up.
Depending on the role, this may involve Criminal Records Bureau (CRB) checks. CRB checking is NOT mandated by the LRS. You must set up procedures for requesting a new user account which checks that the person being given access is properly authorised to access the LRS.
What level of permission is needed for the user?
Are users aware of their responsibilities in using the LRS?
Training and awareness about the LRS, including guidance on the use of the FileName field in respect of batches, be implemented.
How Super Users will deal with internal enquiries, as your Super User must be the first point of contact in your organisation.
Number of potential users in your organisation.
Please note: the LRS does not recommend the creation of ‘Guest’ user accounts. This will break the responsibility for maintaining access authorisation. The LRS may contact you if we identify any inappropriate behaviour when using our services. 1.3 User responsibilities
The User Agreement sets out the individual’s responsibilities in using the LRS and must be accepted on screen every time a user logs into the LRS Portal. This text is also available in the Terms & Conditions in the footer of the LRS Portal.
1.4 Arrangements for data governance
Whilst the obligations upon each individual user are set out in the User Agreement, the LRS requirements for data governance are articulated in the Organisation Agreement. These documents taken together frame and detail the responsibilities imposed upon the LRB. Ensuring proper practice in handling personal data is a requirement of learning providers, although there is no standard model of practice across the sector.
1.5 Training and awareness
The LRS does not give training courses in using the LRS. The responsibility for user training and awareness lies with you as Super User. LRS does offer a range of support materials (including this Guide) which can be accessed on the LRS website. 1.6 Naming conventions for multiple sites
The LRS registers an LRB as a single legal entity, even if the organisation has multiple sites and users. If you have a number of sites or offices, we suggest you give each its own name which can then be input into the FileName field when submitting a batch job.
This will allow users to filter batch jobs by site using this field on the Organisation Portal. Once the filter is set, it will be applied every time that user logs in, until they remove it. You may want to consider issuing guidance to all your organisation’s users regarding the use of this function.
1.7 Privacy notice
The LRS has released standardised texts for Privacy Notices. These are for the benefit of learner providers to incorporate into their course registration and application forms plus administration systems for the next academic year.
A short text version - suitable for inclusion in student and learner facing application forms.
An extended text with simple explanations of how the LRS will use and process the information and data provided to us by Learner Registration Bodies (LRBs). This version is suitable for cascading to students and learners and to be used within your own application and information packs.
Access and download the short and extended versions of the Privacy Notices and the Framework Code of Practice for all Providers.
Please also see Section 4 to understand the implications for learners regarding the Privacy Notice and the Personal Learning Record.
The learner’s wishes should be recorded in the Ability to Share field – see Appendix B.
1.8 Support
For further information and support please contact the LRS Customer Help Desk. Open Monday to Saturday, 8:00 am – 8:00 pm
Telephone: 0845 602 2589
Email: [email protected]
Website: https://www.gov.uk/government/collections/learning-records-service 1.9 Logging into Learner Management
You are now ready to log on to and use Learner Management. 1.10 Log onto the LRS for the first time
Open the internet and log on to https://lm.lrs.imservices.org.uk/ You will be presented with the logon screen.
Enter your Username and the ‘one time’ password that has been provided to you by your super-user or, in the case of this being the first time your
organisation has used the Learning Records Service, by the LRS Customer Help Desk.
Select ‘Login’.
You will have to re-enter your one time password given to you by the LRS Customer Help Desk or your super-user and then enter and confirm your chosen new password. Passwords must be at least 8 alphanumeric characters long. There has to be at least one upper case alphabetic character, one lower case alphabetic character and one numeric character.
NOTE: Passwords have an expiry set upon them and you will be required to change your password when your password has expired. The system will automatically present you with the change password screen.
Once you have successfully changed your password you will be presented with the terms and conditions of using the Learning Records Service screen shown below:
You must accept the terms of the User agreement in order to proceed to the final screen used to activate your account which captures your answer to a secret question. This screen is shown over the page:
Choose one of the questions from the drop down list and then enter and re-enter your answer. This question and answer will be used to facilitate the resetting of your password in the event that you forget it in the future.
Once you have succesfully completed this step you will be presented with the Welcome page of the Organisation Portal.
1.11 Welcome page
Once you successfully log on, you are directed to the Welcome Page which is unique to the user type and role permissions.
From this Welcome page you can use the Menu bar and Main menu tabs to navigate around the Organisation Portal.
The Organisation Portal has a comprehensive set of roles and permissions that governs what every user can and cannot do when logged on. In the example shown above, Bob has been given access to User Management, Learner Verification and Achievement Management functions, in addition to the Welcome page and My Account which are applicable for all users of the system.
The My Account hyperlink provides every user with the ability to update some of their user account details and also to reset their own password.
1.12 Online help
The Organisation Portal provides online help and assistance, via the hyperlinks available at various points within the portal, giving function specific help.
1.13 User Management Permissions 1.14 Your role as a super user
When your organisation registered as a Learner Registration Body (LRB), the LRS recognised a Super User as the person whose details were supplied on your LRS Organisation Registration form.
An LRS Super User is the highest level organisation-specific role that you can be given. As a Super User, you are responsible for managing all users within your LRB, including setting up additional Super Users. This is to ensure that only the right people have access to LRS, that you maintain your user community and to make sure that the confidentiality of the records of learners is protected.
As a Super User you will be the first contact point for your user community to: Create Users
Update Users - Change in personal and details; Change in role and permission
Resolve access and password problems; reset; suspend; reinstate Remove Users: leavers and movers
Monitor User activity
So now you must decide how to administer your user community and set up all other users.
1.15 Appoint new super users and users
Once you as the nominated Super User have accessed the LRS Organisation Portal for the first time, it is good practice to create additional Super Users. The Learning Records Service recommends at least three Super Users per establishment. To set up additional users
Select ‘User Management ‘ hyperlink in left-hand navigation
“Find User” screen is displayed. The Super User must check if the user already has access to the LRS Organisation Portal before a create can be performed:
Fill in the Given Name and Family Name and select the Learner Registration Body Super User role to tick the box.
Select ‘Find User’ – This is to check that the user does not already exist before you create a new record.
The results screen with a message ‘no users match the selected criteria’ is displayed.
Select ‘Create User’
Type in the Given Name and Family Name; the LRS automatically produces a user account name out of the given name and family names.
Select the tick box next to the ‘User Role’ you would like to assign the individual – see Appendix A for a list of user role descriptions.
Complete the e-mail address field as this enables users to use the Forgotten Password option from the login screen to reset their own password
You will need to enter some information into the Verification Provided box – this could be staff ID or a school email address.
If you have additional information such as a telephone number you could add it to the data, but only the fields marked * are mandatory.
Select ‘Create User’. The Super User is now created shows the Super User’s Username and Password. Copy these carefully and send them to the new Super User/User.
Select ‘OK’.
The next screen shows a summary of the User you have created. When the additional users login for the first time they will be required to
change their password. This allows the user to choose a more user friendly password.
1.16 Update an existing user account
Select ‘User Management ‘Tab; “Find User” screen is displayed Search by Username (if known) or Given and Family name Check the Status is set to “Active”
Select “Find User”; “Find User Results” screen is displayed
Select the radio button next to the user whose account details you wish to update
Select ‘Update User’
The following details can be updated: Title, Given name and Family name
Telephone landline and mobile numbers – optional Email address
Verification provided – confirmation of your internal authorisation procedure.
Staff ID or Your reference – optional
You may use this screen to update the roles allowed for your own Super-User account.
Select ‘Update’ to commit the changes made. You will this confirmation screen
Select ‘OK’ to continue.
1.17 Delete/remove a user account
Don’t leave user accounts open for people who no longer work for the organisation. This is important; if an account is left active, that person could still access the Portal online and potentially misuse the service. These activities will still be associated to your organisation and you will be held responsible.
Remove a user account as soon as the user has: Left your organisation
Moved to another organisation which is also an LRB
Taken on a role that no longer needs access to the Organisation Portal Ceased being sub-contracted to your organisation
To delete a user account:
Select ‘User Management ‘Tab; “Find User” screen is displayed Search by Username (if known) or Given and Family name Check the Status is set to “Active”
Select “Find User”; “Find User Results” screen is displayed
Select the radio button next to the user whose account details you wish to update
Check the radio button next to the user whose account you wish to delete Select ‘Delete User’ option’
Select ‘Delete’ to go ahead with the deletion of the account or ‘Cancel’ to return without deleting the account screen
1.18 Verify identity
You may receive requests to amend user account details or reset passwords from your users who may be geographically dispersed. The LRS offers you a facility to check the identity of the remote user:
Select ‘User Management ‘Tab; “Find User” screen is displayed Search by Username (if known) or Given and Family name Check the Status is set to “Active”
Select “Find User”; “Find User Results” screen is displayed
Check the radio button next to the user whose identity you wish to verify. Select ‘Verify Identity’.
The secret question that the user has selected when activating their account will be presented:
Select 'Verify’. If the answer supplied was correct, you can continue. If the answer had been incorrect, the message in the response box would be in red. Select ‘Ok’.
Note: the answer is not case sensitive, so ‘taylor’ will match against ’Taylor’ for example.
1.19 Reset password
When a user has used the wrong password 3 times without entering the correct details to access the Organisation Portal, that user’s account will be locked. Only a Super User can reset the password of users registered to use the LRS portal. Note: Users can reset their own password as long as they have an email recorded against their account. This will allow users to the use Forgotten Password option available from the login screen of the LRS Organisation Portal.
If you wish to deny a user (for any reason) access to the Organisation Portal, you can change the user account status to ‘suspended’.
To reset a password:
Select ‘User Management ‘Tab; “Find User” screen is displayed Search by Username (if known) or Given and Family name Check the Status is set to “Suspended”
Access the user account and change the status to ‘active’ to reinstate the account.
The account is now active again and the password will work.
Check the radio button of the user whose password you wish to reset. Select ‘Reset Password’ screen
‘Confirm’ if you wish to proceed with resetting the password or ‘Cancel’ to exit.
The LRS displays the new one-time password for the selected user. You need to send this to the user. The user will be asked to change the password when they next log on.
1.20 Monitor users activity
The LRS recommends that you audit your user community annually, to check whether all your users are still using the LRS and whether they still hold the right level of access.
You can find all your organisation’s users on the Portal. Just go to the ‘User Management ‘, leave the ‘find user’ criteria blank and select all of the roles and
select ‘Find User’. The Portal will generate a full list of users where you can review your user’s roles.
1.21 Change of super user
The initial Super User detailed on your Organisation Registration form is the LRS primary contact point. If you or another Super User changes roles or leaves the organisation, please complete the Change of Super User Form or contact the LRS Customer Help Desk.
1.22 Contract staff or third party organisations using the LRS
From time to time, you may hire contract or temporary staff to help within your organisation. As part of their role they may need access to the Organisation Portal. These staff must be subject to the same checks that protect confidentiality following your organisation’s policy.
If another organisation is contracted to do work for your organisation and needs access to the Portal, it is your responsibility to give them access as users belonging to your organisation. This will ensure that all transactions that are conducted for your organisation are audited as belonging to your organisation.
If you are an agency working for a number of different LRBs, you will have to use separate user logons for each organisation you are working for.
1.23 Lost your only super user account?
In the unfortunate event that your Super User account is suspended or your Super User account holder has left the organisation, and you have no other Super Users, the LRS will create a new Super User account for you.
To request a new Super User, please complete in the Change of Super User Form
2. Unique Learner Number (ULN) Management
Once your organisation has registered with us you need to decide the best approach for managing your ULNs. The options are:
1. Manually create ULNs through the LRS Organisation Portal - If you have a group of up to 50 learners, this is probably the quickest way to get them. For more information and guidance refer to section 5.1.
2. Use the Batch process – More than 50 learners prepare batch files containing multiple learner details and submit them manually using the LRS Organisation Portal. The Output file can be downloaded and uploaded back into your system. The output file may also contain exceptions which needs manual intervention to resolve. For more information and guidance refer to section 5.2 and 5.3.
3. Web Services – If you choose to use web services, your management information (MI) software is linked into the Learner Register, automatically
updating the LRS. The MI software may assist in the resolution of the exceptions. This is the preferred method but does rely on your own MIS Vendor or software supplier providing the interface with the Learner Register. For more information about how to register as a developer visit “I want to develop a web service”:
2.1 Unique Learner Number (ULN) management
This section of the Guide tells you how to obtain and manage Unique Learner Numbers (ULNs) through the LRS Organisation Portal.
2.2 LRS Organisation Portal (Manual)
2.2.1 Find individual ULNs by personal details
Before registering a new ULN the system will perform a find to check if a ULN already exists for the individual.
From the top of the Organisation Portal: Select ‘Learner Management’
Select ‘Find a learner’ - You can see the ‘Find a Learner’ which contains two forms. You need to work with the right hand form ‘Find by Personal Details’ Enter ‘Given name’ and ‘Family name’ of the learner whose ULN you are
looking for
Enter the ‘Date of birth’ from the drop down menu. Select the ‘Gender’ from the drop-down menu.
Enter the last known ‘Postcode’. As a last resort use the ZZ99 9ZZ – if there is no possibility of obtaining a postcode from the learner.
This completes the mandatory fields, but if you know of a Previous Family Name, it would be useful to enter it as well to improve your search results:
Select ‘Search.’The results screen is displayed
In this case, Screenshot – Find Learner Results shows that the LRS has found no learners matching the description entered.
Check the details you entered as you can amend the details and ‘Search again’. Take a look at Appendix B for more tips on searching for learners. If you are unable to find a ULN, select ‘Register this learner’ to register the
learner. See Section 5.1.2 for more information.
Screenshot – Find Learner Results
2.2.2 Register the learner (find by ULN unsuccessful)
You have searched using the tips for searching but there is no record of a ULN for your learner. So you need to register this learner for a ULN.
Select ‘Register this learner’
Enter as many further details as you can onto this screen to help identity this learner in future searches.
Complete all mandatory fields including;
Verification Type - A learner’ identity should be verified at enrolment. Although a lack of proof of identity should not prevent enrolment. When a learner’s identity cannot be verified it must be verified at a later date. (Appendix B)
Ability to Share – You can make your learners aware of the way their data can be used by ensuring they have read or have access to a Privacy Notice. An example of a Privacy Notice can be found on the LRS website. For list of the status’ (Appendix B)
Select ‘Register learner’ – confirmation screenshot – Learner registered successfully, showing the ULN you have created.
You now have a ULN for the learner – use the copy and paste hyperlink to copy the ULN into your MI Database, and tell the learner. Remember to use the ULN in future if you need to access this learner’s ULN record or Personal Learning Record in the Organisation Portal.
Select ‘View learner profile’ to view the learner’s ULN record or select ‘Register another learner’ to create another ULN for another learner.
Screenshot – Learner registered successfully
2.2.3 Register individual ULNs – Using Fast Track
If you are confident that the learner doesn’t already have a ULN, a new learner can be registered through the Organisation Portal using the Register Learner (fast track option).
Select ‘Learner Management’ and then ‘Register Learner’
Fill in the Given Name, Family Name, Previous Family Name (optional). Enter the date of birth – (using the drop down menus).
Select the Gender from the drop-down menu and enter the last known postcode – if there is none available then as a last resort use the default postcode ZZ99 9ZZ.
Select the ‘Register’ button.
The LRS will perform a search for any learners that match the details entered. If any matches are found, the system will display them.
If a match is found but you still wish to register this learner, click the ‘Register this learner’ button on the results screen.
Alternatively, if no matches are found the system will display the Register Learner - details screen.
Note that the mandatory information has been transferred from the search screen – add in as much more information as you can from Screenshot – Register learner – details (fasttrack)
Select Verification Type from the drop-down. Pre-16 schools should use the Relationship with School entry.
Select Ability to Share – hopefully this will be FPN seen and able to share data – See Section 2.6 for more information regarding the Privacy Notice. Add in any other information you may have to help identify this learner in
future searches and then click ‘Register learner’
You now have a ULN for the learner – use the copy and paste hyperlink to copy the ULN into your MI Database, and tell the learner. Remember to
use the ULN in future if you need to access this learner’s ULN record or Personal Learning Record in the Organisation Portal.
Select ‘View learner profile’ to view the learner’s ULN record or select ‘Register another learner’ to create another ULN for another learner.
2.2.4 View, Add or Update learner’s ULN details
On the ‘Welcome Page’ or on the ‘Find a Learner Page’ go to the left-hand form ‘Find a learner by ULN.’
Enter the learner’s ULN, Given Name and Family Name and select ‘Search’. On the Results screen select ‘View profile’. You will now see the ‘View
Learner Profile’ screen.
View Learner Profile screen holds all the personal and contact details of the learner plus dates and times of when the record was created and last amended, as well as any linked ULNs (these are other ULN records that have been merged to make this ULN the Master ULN).
Here you can check the learner’s details, and add further details or update information (refer to section 6.6 for Tips for updating a learner’s details):
Select ‘Edit details‘ at the bottom of the screen.
Refer to Appendix C – Create/Update learner fields for more information on field requirements.
Once all the fields have been updated select ‘Save changes’ to update the learner’s ULN.
2.3 Batch Process
The Organisation Portal is useful for obtaining individual ULNs, but a faster and more effective method is to use the batch process.
2.3.1 Create a batch file – Important Information
To create a batch file you need to have access to the LRS Batch File Toolkit
available from the LRS Website. The Batch Toolkit includes the following documents which will help you produce and upload your batch file, as well as dealing with any exceptions:
How to prepare an LRB batch file: this technical document describes the fields and the content
CSV file template: the template uses Microsoft Excel
Validation Tool: The tool checks and assists users with batch validation issues prior to its upload to the LRS Organisational Portal. Note: Ensure you have read the system requirements and that you have the required software on your computer.
The toolkit is a set of technical documents which describe exactly how to set up the data within the file and needs to be followed precisely to create the CSV file. 2.3.2 Update ULN data using batch
A batch file can create or update ULNs. If updating ULNs, please note updates will only occur as follows:
1. The five mandatory fields (Given Name, Family Name, Date of Birth, Gender or Last Known postcode), will only be updated if the Verification Type value is set to a value higher than 0 = none provided.
2. If updating Given Name or Family Name, the above applies as well as the name needs to match the database value on a fuzzy or synonym (known alternative of the name).
3. If updating the Address fields the five mandatory fields must match as
explained in point 1. An update will be performed if at least 1 of the 4 address fields supplied in the batch file is completed.
4. The batch file field contains a value and the same field in the ULN record is blank.
5. The Verification fields will be updated as a group with the values in the batch file whether the same as the LRS or not.
6. Ability to Share Ability to Share field has previously been set by the learner then this cannot be reset by any values in the batch file. Similarly, it cannot be
updated to “0 = FPN Not Seen” if the field was previously set to one of the “FPN Seen” values.
If updating the learner’s details, the minimum data content for each learner for the batch file is: ULN, Given Name and Family Name. If creating a new ULN, the minimum data content for each learner is: Given Name, Family Name, Postcode, Date of Birth, Gender, Ability to Share, Verification Type (ID) and if applicable, Verification Other Description.
2.3.3 Upload the batch file
Once you have created your batch file, you are now ready to upload your batch file to the LRS Organisation Portal
Select ‘Learner Management’. Select ‘Submit Batch Registration’.
Now choose your submission type from the dropdown menu. You are going to submit a file for ‘Full Submission’, so
Select the ‘Full (FUL)’. (You would use the ‘Verification only (CHK)’ submission if you already had ULNs for your learners).
Select the ‘Upload File’ button. (The file is processed at regular intervals throughout the day)
Make a note of the Job ID Number, to identify your file.
Select ‘Submit another file’ to submit another batch file, if you need to or select ‘View job list’ to see that status of your file (section 6.10).
If your file has been correctly prepared, you should see a success message.
2.3.4 View Job List (batches)
Once you have uploaded your batch you can view all batch jobs uploaded in the last 45 days:
Select ‘Learner Management‘. Select ‘View Batch Registration’.
You can identify the file you are interested in from the ’Job ID’ column. If the ‘Status’ column shows ‘Waiting’, you have the option to remove the file
from the list and cancel the batch process for that file.
If the ‘Status’ column shows ‘Successful’ you have a choice of hyperlinked options in the right hand column.
You can select ‘Download output file’ – allows the file to be downloaded in the same format it was uploaded (either CSV or XML).
You can select ‘View exceptions’ to process the exceptions for just a particular batch file. (section 6.12)
You can select ‘View Job Details’ for each processed file, which will display the Job Id, Organisational File Name, Type, Status, User, Date and Time including:
o Total number of records overall
Screenshot 1 – Batch job details
2.4 Return Codes RC001-RC011: what they mean
Once a batch file has been processed, an output file is available which contains a list of return codes (Appendix D). These codes describe whether a ULN has been
found, a new one created or if an Exception has been found which needs to be investigated (section 6.12).
‘Return Codes’ tell you what has happened to each learner record in your file. Some of these codes indicate a warning or error message to explain the reason for failure – these are call ‘exceptions’. There are 11 different return codes, but not all of them indicate exceptions (refer to Appendix D)
2.4.1 RC001-RC005
These return codes all represent ‘Return Codes’ require no further action to be taken by you (refer to Appendix D).
2.4.2 RC006-RC011
These return codes all represent ‘exceptions’ and further will be required by you (for more information about these codes refer to section 6.4 and Appendix D)
2.5 Batch exceptions (RC006-RC011)
Exceptions need to be resolved so that the learner’s ULN can be obtained or updated. This usually means checking that the learners’ details are correct. The different Return Codes relate to issues with the data in your batch file and need further action to resolve.
The Batch Exception process provides an online procedure to help Learner Registration Bodies provide additional and corrective information to improve the processing of Batch Exceptions.
The output file can be used to update your own MI database with new ULNs and the Exceptions should be ‘processed’, for example, investigated.
There are two ways to enter the exceptions process: Analyse the exceptions for an individual batch, or
View all outstanding Exceptions for all batches for your organisation. 2.5.1 Viewing batch exceptions
You can view all the exceptions in your organisation’s files together, or view the exceptions for a single batch file. The actions that you take within the LRS and the options available to you are the same in either case.
To view all exceptions for your organisation:
Select ‘Learner Management‘ from the main tabs on any screen Select ‘View Exceptions’. You will now see the ‘Exception List’ screen. To view the exceptions for a single batch file:
Select ‘Learner Management’
Select ‘View Batch Registration’; the “View LRB batch job” screen is displayed
Find the batch you wish to resolve the exceptions for
Select ‘View exceptions’ hyperlink; the “Exceptions List” screen is displayed The “Exceptions List” screen shows all the exceptions that:
match the current filter set (refer to screenshot 50). Your filter criteria will be saved and will continue to be applied across user account sessions until they are either cleared using the ‘Clear Filter’ option, or amended.
number of unique exceptions shown in the table, and the number of
duplicates of those that are hidden. The first number will always be the sum of the other two.
Screenshot – View exceptions – filter options
2.5.2 Processing batch exceptions
This section explains how you can resolve any exceptions which require further attention:
Duplicate exceptions RC006, RC007, RC008, RC009 - RC011
2.5.2.1 Duplicate exceptions
If an organisation submits the same learner details multiple times, and receives the same return code every time, these will be marked as duplicates, and only the most recent one matching the filter will be shown in the list. These are identified by the link “Process Duplicates” which will take you to the “Process Duplicates screen”.
Screenshot - Process duplicate exceptions
Selecting ‘Process all’ from the “Process exception summary” screen will resolve all the duplicates, whereas selecting ‘Process single’ will only resolve a single
exception.
Note: the “Process exception summary” screen will show all duplicate exceptions across all batch files, no matter what filter settings were applied to the exceptions list. Therefore, the number here may be higher than the total number of duplicates displayed on the exceptions list page.
2.5.2.2 RC006 Insufficient data to create a ULN
RC006 is returned when LRS failed to create a ULN because one or more of the mandatory fields has not been supplied particularly Verification Type and/or Ability to Share not supplied.
Steps to process RC006
From the view exceptions screen select the ‘Process’ hyperlink on the far right column of the individual record.
You have two possible options – ‘Cancel’ or ‘Register New Learner’ If the ‘Cancel’ option is selected, you return to View exceptions screen. If the ‘Register this learner’ option is selected, you will need to complete a
new registration:
2.5.2.3 RC007 Possible Matches
RC007 is returned when you have tried to register a learner for a new ULN but the system believes one exists.
Check;
Has the learner moved address and the postcode needs updating in the CTF submission.
Date of birth; day and month has not been transposed
Is the learner’s name different from your records i.e. Your records show the learner’s full name but LRS holds the learner’s preferred name.
Has the learners gender been recorded correctly; 2=Female, 1=Male Steps to process RC007
From the exceptions list select the ‘Process’ hyperlink on the far right column of the individual record.
The possible matches are listed and an option ‘+’ to expand one or more of the searched results to check that it is the record that matches with your entry (screenshot 5)
Once you have reviewed the list select your learner by ticking the checkbox Once the checkbox is selected, ‘Select this learner’ and ‘Select and update
learner’ button are enabled;
o ‘Select and update learner’ button displays the ‘View learner profile’ screen.
o ‘Select this learner’ processes the exception only
Once selected the exception will be deleted from the exceptions list.
Finally there are two other options within this display - ‘Return to exceptions list’ will return you to exception list. The option to ‘Register new learner’ will only be displayed, if no checkbox is selected.
Screenshot - RC007 results
2.5.2.4 RC008 Too Many Possible Matches
RC008 is returned when the system failed to find/create a ULN, the LRS found more than 10 possible matches.
Check:
You are not searching using the default or establishment postcode Try including a previous family name in your CTF file
Steps to process RC008
From the exceptions list select the ‘Process’ hyperlink on the far right column of the individual record.
You will be presented with a screen with a message “Too many records match your search results”
If you are still unable to match a ULN, create a new ULN through the LRS Organisation portal.
2.5.2.5 RC009 – RC011
These exceptions may have an issue because some of the details are wrong or missing.
The details provided in your file are used to populate both the ‘Provided details’ and the ‘Find by Personal Details’. If you are processing multiple duplicate exceptions, the MIS Identifier field will show a link to a pop-up window listing all of the MIS Identifiers for the duplicates that are being processed.
RC009 is returned when the ULN supplied in your original file has not been recognised by the LRS (serious error).
o Check; ULN, Given and/or Family name in the database against those submitted in your CTF file.
RC010 is returned when one or more of the mandatory fields is blank apart from Given or Family Name
o Check; All mandatory fields have been completed; gender, date of birth and postcode.
RC011 is returned when the learner record submitted in the original CTF file contained data which does not meet LRS formats.
Check;
o The learner is aged 14 years and above
o A valid verification type code is supplied; between 0 and 7 as well as 999. If 999 is selected; Verification Other Description field must be populated. o Check none of the fields contain prohibited text. A list of prohibited values
is available from the LRS Customer Help Desk.
o “Last Known Postcode” field does not contain a prohibited postcode value.
o The “Ability to Share” field has a valid code; 0, 1 or 2 Steps to process RC009-RC011 Exceptions
Complete and/or update the information, including the mandatory fields will allow the full registration of a new learner and will return a Unique Learner Number
From the exceptions list select the ‘Process’ hyperlink on the far right column of the individual record.
You have two possible options – ‘Cancel or ‘Register New Learner’. When you select ‘Cancel’ look at the ‘Find by Personal Details’ fields and
2.5.3 Next Steps - Completed processing exceptions
Exceptions are deleted automatically after 45 days. However IF; o Select this learner
o Select and update this learner or
o Register new learner buttons are chosen, some management is still required.
From the Exception list or Process duplicate exceptions screen; select the check boxes of exceptions to be deleted and click the ‘Delete selected records’ button.
Once you have completed exception processing, the function to ‘Export my processed exceptions’ should be used to download a file to enable you to update your organisation’s database with your processed exceptions:
From the “View exceptions screen”
Select the ‘Export processed exceptions’ button which takes you to the “Export my processed exceptions” screen.
Select the same format you used to upload the file so the file can be loaded in your database. When you select a radio button the download button will be highlighted.
3. Personal Learning Record
3.1 Access the Personal Learning RecordThe Personal Learning Record (PLR) is an electronic folder which details in one central place online all the awards, learning Achievements and qualifications of a learner.
Only LRB Online Users or View Only Users can access the PLR as long as the learner has agreed to share their PLR. For more information refer to section 6.3.
3.2 Information displayed on the PLR
Data for the PLR is obtained from three sources:
National Pupil Database (NPD) for Key Stage 4 and 5 qualifications.
Periodic Individualised Learner Record (ILR) returns to the Data Service, as long as a valid ULN and UKPRN are included within the ILR and they match the learner’s details.
Awarding Organisations are able to upload QCF qualifications and National Qualification Framework (NQF) qualifications regulated by Ofqual.
Data from the NPD and ILR returns has been uploaded since summer 2008; therefore learners cannot expect to find data about learning achievements prior to this date included in their PLR.
3.3 Privacy notice – unable to share data
In order to allow both the learner and others to access the learner’s PLR, you must ensure that a copy of the Privacy Notice has been shared. The Privacy Notice provides an explanation of the way in which the learner’s data may be shared with different organisations.
A copy of the LRS Privacy Notice can be found on Gov.UK website.
After reading the Privacy Notice a learner must be given the opportunity to opt out of sharing their PLR (qualification and participation data or learning events). This is something your organisation is responsible for but we recommend you encompass this as part of your enrolment process.
If a learner chooses to opt out of sharing their PLR the following steps are required: The learner or training provider must switch off the “Ability to Share” flag. The
learner can change their data sharing settings through the National Career Service by opening a Life Long Learning Account (for more information visit the National Careers Service website).
The learner cannot opt out of sharing their Unique Learner Number. If the learner chooses to opt out of sharing their PLR please explain the
implications below:
Only the learner will be able to view their learning events on the PLR. Learning providers will be prevents from viewing the learner’s PLR; a
message would subsequently be displayed: ‘No Learning Events to display’.
3.4 View a PLR
To find a learner’s PLR you will need to carry out a search either by Unique Learner Number (ULN) or by personal details:
Select the ‘Learner Management’ and then ‘Find a learner’. Enter the learner's ULN, Given Name and Family Name. Select the ‘Search’ button:
o If no exact match is found the Find Learner’s Results screen is displayed.
o If an exact match is found you are taken directly to the View learner profile screen.
Select the View Personal Learning Record hyperlink to view the learner’s PLR
Each of the records display with up to eight fields of data (not all of the fields are populated) including:
Subject – displaying the title of each record (Hyperinks to View Qualification Detail)
Level – Level of the award from Entry Level – Level 8 (or could be blank). Grade – Generally showing the grade of the award or ‘Pass’ or ‘blank’. Credit – displaying the amount of Credit achieved for record.
Source – will be NPD, ILR or AO Start Date – if applicable
End Date – if applicable
Award Date – Date of the Award or Achievement
All of the above details are held in columns which can be sorted, using the down arrow, either in ascending (first select) or descending (second select) order. If several pages of records are available for the displayed learner, then all records are used within the sorting process and redisplayed.
The Credits and Units can be viewed by selecting the Credit and Units tab, showing the list of credits and units along with Level, Grade, Credit and Award Date. Once again all the columns can be sorted by selecting the down arrow on the header of each column name.
All the subjects have a hyperlink which can be selected to view more information on that particular subject or qualification:
The source of the About this Qualification data is the Regulatory IT System (RITS). You can also see the Status of the qualification; Provisional or Final and whether or not the qualification is Under data challenge. Only NQF qualifications can have a Status of Provisional. All QCF qualifications are treated as Final.
When under data challenge. A View details hyperlink will become available which will redirect you to the View enquiries screen so you can see the current status.
3.5 Create a report
A PLR report can be downloaded by LRB’s for individual learners to include one or more achievement/participation records:
The report can accessed via the Create a Report tab on the PLR screen.
Screenshot 2 – Create a report (PLR)
A screen displaying all qualifications and events listed in date order will appear. There are check boxes on the left hand side of each record – all check boxes are ticked ready for reporting.
If there are any of the records that you do not wish to see in the report, simply un-tick the relevant check boxes.
Select “View my report”
The report will be displayed in PDF format and choose from one of the following options: “save” for future use OR “open”, giving a read only version of the report. From here you can save and / or print the report as required.
Note: if you need to download a viewer for a PDF, select the hyperlink to ‘Download Adobe Acrobat Reader to view your report’ and follow the instructions on the screen.
Screenshot – View report (PLR) - PDF
3.6 Audit information on viewing a PLR
An audit record of who has viewed a learner’s PLR is held within the LRS and can be accessed by contacting LRS Customer Help Desk. This information will only be made available to the learner themselves, in line with guidance from the Information Commissioners Office (ICO). For a learner to request this information they must be able to:
Provide their ULN, Family Name and Given Name (exactly as entered in the LRS), or
If the learner has logged onto the Learner Portal provide their ULN and be able to provide the answer to their secret question. (This will have been created when they first logged onto the Learner Portal)
If the learner cannot provide this information the LRS Customer Help Desk will not be authorised to disclose the information.
3.7 Report a Problem - ULN or Learning Event
Part of the quality control process and procedures, you can Report a Problem (known as a Data Challenge) with a learner’s ULN or Learning Event(s) (qualification/unit) data showing on PLR.
3.8 Report a ULN problem
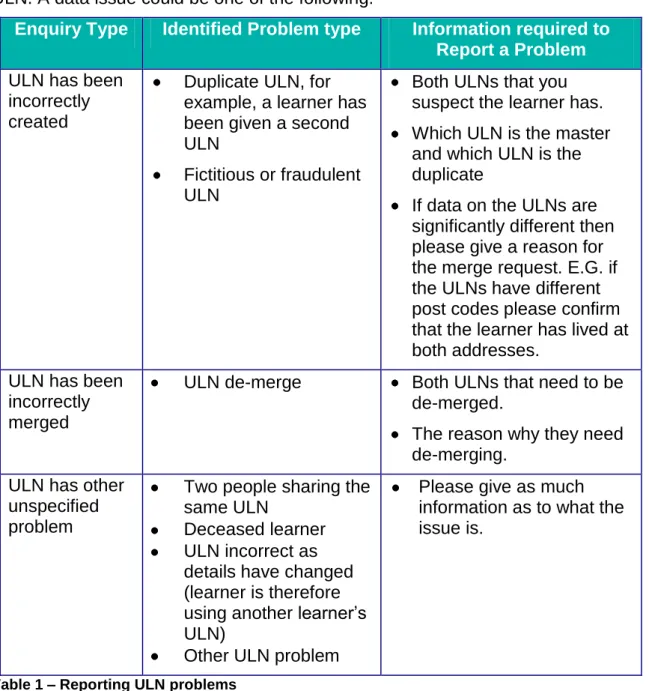
The Data Challenge process allows you to identify a data issue with a learner’s ULN. A data issue could be one of the following:
Enquiry Type Identified Problem type Information required to
Report a Problem ULN has been
incorrectly created
Duplicate ULN, for example, a learner has been given a second ULN
Fictitious or fraudulent ULN
Both ULNs that you suspect the learner has. Which ULN is the master
and which ULN is the duplicate
If data on the ULNs are significantly different then please give a reason for the merge request. E.G. if the ULNs have different post codes please confirm that the learner has lived at both addresses.
ULN has been incorrectly merged
ULN de-merge Both ULNs that need to be de-merged.
The reason why they need de-merging.
ULN has other unspecified problem
Two people sharing the same ULN
Deceased learner ULN incorrect as details have changed (learner is therefore using another learner’s ULN)
Other ULN problem
Please give as much information as to what the issue is.
Data Challenge process is only for instances where the LRB cannot resolve the issue themselves and also includes issues raised by the learner. Instances where a data issue can be corrected directly by an LRB are:
Wrongly spelt/Incorrect Name Wrong/Incorrect Address Opting out settings Date of Birth
These can be changed using by updating the learner’s details – see Section 3.2. 3.8.1 Steps to report a ULN problem
Select the Report a ULN Problem button from the “View Learner Profile” screen. Select the type of data issue from the list of options (table 6 above).
Explain what your organisation believes the required corrective action is. Complete your name, email address and telephone number so that you can be
contacted should any questions arise.
Finally, select the ‘Finish’ button to submit your request.
Make a note of enquiry reference number should you wish to contact the LRS Customer Help Desk.
Please ensure that you include as much information as you can when reporting a problem. If the LRS Customer Help Desk does not have enough information they will need to get in contact with you for further information which will delay the issue being resolved.
Screenshot – Report a problem history
3.9 Report a PLR Learning Event Problem
Learning Events. This is a 4 step process:
Step 1; select the ‘Report a Problem’ button from the PLR display will give a drop down box with a number of options:
o Information on one of the qualifications is wrong (section 7.2.1)
o One of the qualifications does not belong to this learner (section 7.2.2) o One of the qualifications appear more than once (section 7.2.4)
Note: When you are reporting a problem, remember that the Learning Events available are those after summer 2008. Even data after this date may be missing as it may not have been possible to uniquely match the learner with their
qualification data from the data sources used to populate the record.
Once you have selected an option from the drop down box, select Next. Each of the options listed above will now be detailed over the next few pages: steps 2 - 4.
3.9.1 Information on one of the qualifications is wrong
This option can be selected when the learning event appears in the PLR but the details are incorrect:
Step 2: Choose the qualification that you are reporting by selecting the appropriate radio button in the ‘Select’ column
Select ‘Next’ to proceed to step 3 of the process. Note that there may also a separate ‘Next’ button for further pages of qualifications.
Step 3: Details of the chosen qualification appear in a form allowing you to edit the fields, so that correct information can be entered, for that learning event. Changes should only be made if they do not match Awarding Organisation certificates. Enter the changes and then select ‘Next’. Provide: as much additional information as possible,
Step 4: You must provide your name and contact details (valid email address and telephone number) in case we have any further questions. Note if you would like the enquiry to come back to another member of staff, their details can be entered in here.
Select ‘Finish’.
Once your enquiry has been successfully submitted, you will see an enquiry reference number; make a note of this number in case you need to contact the LRS Customer Help Desk.
Screenshot – Report a Learning Event problem – qualification wrong - step 2
3.9.2 A learning event does not belong to the learner
This option can be selected when the learning event does not belong to the learner: Step 2: Select the radio button from the “Select” column against the qualification
that you are reporting
Select ‘Next. Note that there may also a separate ‘Next’ button for further pages of qualifications.
Step 3: The record that is being challenged as not belonging to the learner is displayed. This gives the opportunity to check the details, cancel or go to the previous screen.
Once the details have been verified, select the ‘Next’ button. Provide: as much additional information as possible,
Step 4: You must provide your name and contact details (valid email address and telephone number) in case we have any further questions. Note if you would like the enquiry to come back to another member of staff, their details can be entered in here.
Select ‘Finish’.
Once your enquiry has been successfully submitted, you will see an enquiry reference number; make a note of this number in case you need to contact the
LRS Customer Help Desk.
Select ‘Continue’ to return to Report a Problem step 1.
3.9.3 A Duplicate learning event
This option can be selected if one or more qualifications is duplicated:
Step 2: Select the two qualifications which you wish to report (two events need to be selected, in order to proceed to the next stage of the procedure). Select ‘Next’.
Step 3: The record that is being challenged as not belonging to the learner is displayed. This gives the opportunity to check the details, cancel or go to the previous screen.
Once the details have been verified, select the ‘Next’ button. Provide: as much additional information as possible,
Step 4: You must provide your name and contact details (valid email address and telephone number) in case we have any further questions. Note if you would like the enquiry to come back to another member of staff, their details can be entered in here.
Select ‘Finish’.
Once your enquiry has been successfully submitted, you will see an enquiry reference number; make a note of this number in case you need to contact the LRS Customer Help Desk.
Screenshot – Report a Learning Event Problem – duplicate event – step 2
3.10 View data challenge history
A list of previously opened data challenges for a given learner can be viewed on the Organisation Portal.
From the View learner profile screen, select the ‘View enquiries’ button. To view the details of any data challenge, click the ‘View Details’ hyperlink. If the data challenge has not been previously resolved or withdrawn, it can
be withdrawn by clicking on the ‘Withdraw enquiry’ button. Select the ‘Return to enquiry list’ to go back to the first screen.
4.
Find a QCF qualification
The Welcome screen, presents a form for the Find a QCF Qualification function, available to a Learner Registration Body (LRB) Online User and LRB View Only User. This feature allows you to browse QCF Qualifications and to select Units which will make up a qualification.
The Qualifications and Credit Framework is a way of recognising achievement through the award of credit for the achievement of units and qualifications. This function is designed to give quick and easy access to Qualifications within the QCF and to give users the opportunity to search and produce suitable combinations.
There are two versions of the Find a QCF Qualification:
a search that links to a learner’s achieved units available from the PLR and a generic search that does not use any information within a learner’s PLR
(generic anonymous refer to section 8.1.1)
The Find a QCF Qualification can be developed into Rules of Combination enquiries. The Rules of Combination refer to regulatory rules around how QCF qualifications must be designed. These rules, in combination with the design of the qualification, determine what credits a learner must achieve to be considered to award for a qualification.
4.1 Find a QCF qualification – generic (anonymous)
This section takes you through the generic option and is suitable for a one on one discussion or for group sessions when carrying out careers advice.
From the homepage on the LRS Organisation Portal complete the “Find a QCF Qualification” fields: The search allows you to enter key details to help find relevant qualifications.
Search fields:
Keyword; performs an exact match on the word(s) provided and returns results with those words within the title of the qualification. If more than one word is entered, then these words must appear exactly in the order as entered on the screen.
Level; All qualifications have a level between Entry Level and level 8. The level is chosen from options within a drop down box.
Size; volume of learning. There are three types of qualification size: o Awards (1 to 12 credits)
o Certificates (13 to 36 credits) o Diplomas (37 credits or more)
Sector Subject Area (SSA) – select a subject area from the drop down list. SSA are used to find qualifications within sectors which correspond to relevant subjects.
Screenshot – Find QCF qualification – quick search (on welcome page)
If your search details find more than 100 records, the “More search options” screen is displayed to allow you to refine your search criteria. The “More search options” screen includes the same fields listed on the “Find a QCF Qualification” plus two additional fields:
Reference Code – the reference code must be entered with the slashes and needs to match exactly with a code held by the Ofqual Register of Regulated Qualifications
Offered In – the country codes regulated by Ofqual are listed and they are England, Wales and Northern Ireland. More than one can be selected using the appropriate check boxes.
To proceed you must select and/or supply information for one or more of the following fields; ‘Keyword’, ‘Reference Code’ or ‘Subject Sector Area’;
Select Search.
You will be presented with a results screen matching the criteria provided: o Results can be sorted by; column title.
o For multiple pages of information you can select ‘View All’ from the ‘Show’ dropdown box to display all selections found Or choose a page number Or ‘Next’ to move to the following page.
o Select; “Export” to generate a PDF report detailing the search results and search criteria. This may be viewed, downloaded or printed.
o Each of the qualification titles appears as a hyperlink (see the next step for more information)
Screenshot – Find a QCF qualification – successful search
Select a qualification (hyperlink) and this link will open a further screen with details about the qualification.
This screen is split into two sections;
o ‘About this Qualification’; name of the owning organisation, Level, Sector Subject Area, Grading Structure, Total Credits, Minimum Credits at Level and Minimum Guided Learning Hours. This information can be hidden by selecting the toggle, ‘-‘, and expanded by selecting ‘+’.
o Structure of the qualification; Grouping of Units.
4.2 Grouping of Units
This section provides more information about the “Grouping of Units” and its purpose.
Each Group can have minimum credit, maximum credit, minimum
components and maximum components. The minimum credits and minimum components for each group are displayed on the screen. The maximum constraints (limits to overachievement) are also used when calculating the
levels of credit.
You have the choice to either open up a single group or all the displayed groups. Selecting ‘+’, shown alongside a group will open display all the details of that group, whereas selecting ‘Expand all’ will expand all groups within the qualification.
The Total Credit and Credit at Level that must be met are shown in the header line and are the aggregate of the various credits that are selected using the check boxes, displayed between the level and the amount of credit for that unit.
The ‘Minimum Credit at Level’ must also be achieved – credits for units may be awarded at different levels. This value is the amount of the total credit that must be at this level of the qualification or above. (At a minimum this will be 51% of the total credit but may be more).
Screenshot 102 – Find a QCF qualification - calculate
4.3 Grouping of Units - Process
Select ‘Default to View’ will return the display to the default view and has the opposite effect of ‘Expand All’;
o Some qualifications can have many group and units. For qualifications that may be displayed over several screens, the ‘back to top’ option can be selected to return to the first screen.
o Selecting Export to PDF will export the results to a PDF file that will reflect the state of the screen as it was when it was last calculated. Screen changes after the last calculation are not reflected in the report.
o More information about the units displayed can be found on the Register of Regulated Qualifications site (Ofqual record); by selecting the ‘Unit Code’ (hyperlink) you will be directed to the Ofqual record.
Select the relevant unit check box. Some of the units are mandatory to achieve the qualification while others are optional.
Once you have selected your options, select ‘Calculate’ (known as Rules of Combination, see section 8.1.3 for more information). The calculate button will recompute the credits at the various points in the structure of the qualification. You can go back into the group structure to select more options.
Screenshot – Find a QCF qualification – successful outcome
4.4 Rules of Combination
The Rules of Combination is a calculation process to ensure that all combinations are evaluated, especially where the learner has over achieved by having more credits than are required. When this happens the calculation has to choose which of the learners credits best meets the constraints of the group / qualification. Occasionally it may indicate that the qualifications criteria have not been met when in fact there is a successful outcome.
The calculation can never indicate that the constraints have been met when they have not.
working as expected’.
The option ‘Back to List’ will return you to the list of selected qualifications. 4.5 Find a QCF qualification – including learner’s completed QCF Units
This is the “Find a QCF Qualification” for users with access to the PLR and displaying details of learners who have agreed to share their PLR. Entry to this option is available from within the PLR by selecting the ‘Find a QCF Qualification’ hyperlink:
o The learner’s details are displayed on screen.
o The process is very similar to the generic version, but this time any of the qualifications can be selected and used within the search, for a suitable qualification(s). The search will only select qualifications that include ‘checked’ unit or qualification and the entered values in Keyword, Reference Code, Level, Size, Sector Subject Area and Country (Offered in)
o As per the generic version you may Export to PDF, which will generate a PDF report detailing the search results and search criteria. This may be viewed, downloaded or printed. The PDF report will be compatible with the PDF file format (Adobe Acrobat Reader v5.0 and above)