Xmanager 4 User Guide
Powerful PC X server for Windows
Copyright © 2011 NetSarang Computer, Inc. All rights reserved. Xmanager User Manual
This product or document is protected by copyright and distributed under licenses restricting its use, copying, distribution, and decompilation. No part of this product or document may be reproduced in any form by any means without prior written authorization of NetSarang Computer, Inc. and its licensors, if any.
This product or document can be changed for upgrading purpose without prior notice.
Xmanager, and Xshell are registered trademarks of NetSarang Computer, Inc. Xlpd, and Xftp are trademarks of NetSarang Computer, Inc. Microsoft Windows is a trademark of Microsoft. Unix is a tradeamk of AT&T Bell
Laboratories. SSH is a trademark of SSH Communications Security. Secure Shell is a trademark of SSH
Communications Security.
NetSarang Computer, Inc.
Republic of Korea: 16F, Prime Center, 97, Technomart-gil, Gwangjin-gu, Seoul, 143-200 United States of America: 3003 N. 1st Street, San Jose, CA, U.S.A., 95134
Table of Contents | i
Table of Contents
Xmanager Introduction ... 1
Features ... 1
System requirements ... 2
Installation and uninstallation ... 3
Technical support ... 3
License Agreements... 3
Xmanager License Agreement ... 3
Xmanager Evaluation License Agreement ... 4
Getting Started ... 7
Starting with Xbrowser ... 7
Starting with Xstart ... 11
Managing Sessions ... 15
Xstart session ... 15
Dynamic session ... 16
Static session ... 17
Configuring properties of a session ... 18
Creating a Folder ... 19
Export Sessions... 19
Import Sessions ... 19
Establishing Connections ... 21
Connecting with Xbrowser ... 21
Connecting with Xstart ... 21
Configuring firewall ... 23
Solving connection problems ... 25
Configuring Server Profiles ... 27
Managing Fonts ... 29
Configuring Keyboard and Mouse ... 33
Configuring keyboard ... 33
Configuring mouse ... 34
Managing Color ... 37
Using Window Mode ... 39
Security ... 43
Multiple Monitors ... 47
Copying, Saving and Printing X Applications ... 49
Logging Session ... 51
Reference ... 53
ii | Table of Contents
ii
Xmanager system menu ... 56
Xmanager tray menu ... 58
Xmanager command line options ... 59
Xbrowser ... 61
Xbrowser main window ... 61
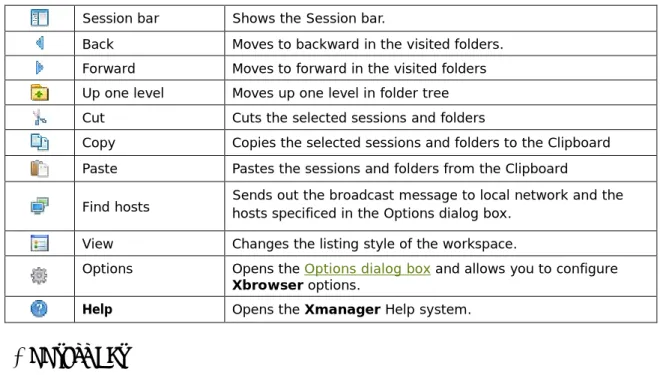
File menu ... 62
Edit menu... 64
View menu ... 65
Tools menu ... 67
Help menu ... 68
Session Context Menu ... 68
Toolbar buttons ... 70
Address bar ... 71
Options dialog box ... 72
Xbrowser Properties dialog box ... 75
New Session Wizard ... 79
Session Import Wizard ... 80
Session Export Wizard ... 83
Columns dialog box ... 86
Secure XDMCP Setup dialog box ... 88
Xstart ... 91
Xstart main window ... 92
New Session dialog box ... 95
SSH Protocol Setup dialog box ... 95
Forwarding Rule dialog box ... 99
Password Setup dialog box ... 101
Public Key Authentication Setup dialog box ... 101
TELNET/RLOGIN/RSH/REXEC Protocol Setup dialog box ... 102
Registered Commands dialog box ... 103
Add Command dialog box ... 104
Xstart Advanced Options dialog box ... 105
Command tag definition ... 107
Xrcmd command line options ... 108
Xconfig ... 110
Xconfig main window ... 110
File menu ... 111
Edit menu... 112
View menu ... 112
Help menu ... 113
Toolbar buttons ... 114
Properties dialog box ... 114
Table of Contents | iii
Panning Settings dialog box ... 128
Add Font Server dialog box ... 129
Keyboard Settings dialog box ... 130
Add Keyboard dialog box ... 132
Mouse Settings dialog box ... 132
Sound Settings dialog box ... 134
Monitor Settings dialog box ... 134
Keyboard Editor ... 136
Keyboard Editor main window ... 136
File menu ... 137
Edit menu ... 138
View menu ... 138
Help menu ... 139
Toolbar buttons ... 139
Option bar ... 140
Normal layout ... 140
Compose layout ... 142
Select Keyboard Type dialog box ... 143
User-defined Keysym dialog box ... 143
Edit Key dialog box ... 144
Edit Compose Sequence dialog box ... 146
Common dialog box ... 148
Host Keys dialog box ... 148
User Keys dialog box ... 149
User Key Properties dialog box ... 150
User Key Generation Wizard... 152
SSH Security Warning dialog box ... 157
SSH User Authentication dialog box ... 158
Fonts ... 159
Font format ... 159
Font name ... 159
Font directory ... 160
Font server ... 160
Font catalogue and font path element ... 160
Error Messages ... 161
Xmanager errors ... 161
Xstart errors ... 161
Xbrowser errors ... 162
Xmanager Introduction | 1
Xmanager Introduction
Xmanager is a powerful and easy-to-use PC X server software program that is running on a
Windows platform. It allows you to bring remote UNIX/Linux desktops to your Windows PC seamlessly. You can also run remote X applications securely through the SSH (Secure Shell) protocol even when your Windows PC is inside a private nework and a firewall is between your PC and the remote server.
Xmanager 3.0 incorporates a variety of new features such as multiple server profiles,
multi-visual, multi-monitor support, multi-user configuration, multiple XDMCP sessions and SSH security enhancement. It offers many advanced options to meet the needs of professional users and also has been designed as simply as possible for beginners.
Features
This section explains key features in Xmanager.
Connection and Startup
• Xbrowser program for managing multiple Xstart and XDMCP sessions
• Xbrowser manages sessions for Xmanager, Xshell and Xftp
• XDMCP, SSH, RSH, REXEC, RLOGIN and TELNET connection protocols • Up to 128 X client connections per Xmanager session
• Shortcuts for Xstart and XDMCP sessions
• Advanced prompt parsing and command scripting in Xstart
• Secure XDMCP for XDMCP connection to the outside of firewall or private network
Deployment
• Support for Windows 2000 SP4 and above
• Windows Terminal Server, Citrix XenServer for Windows • Session sharing for Windows terminal service
• Silent Installation • Multi-user configuration
• Easy distribution of sessions and server profiles • Supports user defined session path
Security
• Integrated SSH1/SSH2 protocols with public key authentication • SSH key generation wizard
• SSH agent support through Xshell • Host-based Access control
2 | Xmanager Introduction
X Server
• A high-performance X11R7 PC X server
• Supports GLX 1.3 and OpenGL 1.2 (Xmanager Enterprise Edition only) • X Rendering extension protocol
• Multiple server configuration • Multi-user support
• Multiple monitor support
• Support for multiple network adaptors • Multiple XDMCP sessions
• Automatic display number allocation • Single & multiple window mode
• Panning and Auto Raise support on local window manager • Multi-visual support
• 256-color emulation in true-color video device • Automatic color substitution for PseudoColor visual • Backing Store support
• Full Planemask feature for 256-color applications • Mouse wheel support
• 3 button mouse emulation • Graphical keyboard editing
• On the fly keyboard switching with a hot key • Sound file support for XBell request
• Local Resource Database
• Printing in multiple window mode
• Automatic Cut & Paste between X and MS Windows applications • Tray icon
Fonts
• Font compiler • Font server support • BDF, PCF font format • Automatic font substitution
• Additional font packages for each language and X application
System requirements
• Processor: Intel® compatible
• Operating System: Microsoft Windows® 2000 SP4 or later
• Hard disk: 100M bytes of free space
• Network: TCP/IP Winsock 1.1 compatible or later
Xmanager Introduction | 3
Installation and uninstallation
The Xmanager installation program is available for download at It is packaged with the widely used InstallShield® installation program. To begin the
installation process, simply run the executable file after downloading it.
The Xmanager installation process includes several steps with options for you to modify the default installation. However, in most cases, just clicking Next button will be enough for the installation.
To uninstall Xmanager, follow the standard Add/Remove feature of Windows. In the Control
Panel, double-click Add/Remove Programs, click Xmanager in the program list, and then
click Change/Remove button.
IMPORTANT: The uninstallation process will not remove the registry information and data
files generated by users. It can be used again when you need to re-install Xmanager later. If you want to remove all the files and registry information completely, you need to remove the following explicitly:
Registry information:
\HKEY_CURRENT_USER\Software\NetSarang\Xmanager
\HKEY_CURRENT_USER\Software\NetSarang\Xmanager Enterprise
File and folders:
• %APPDATA%\NetSarang\Xmanager
• %APPDATA%\NetSarang\Xmanager Enterprise
Technical support
The overall guide and reference information are in this Help manual in detail. If you cannot find a solution in this manual, please visit our web site at:
You can either post your questions on the Xmanager Q&A Forum or use our request support form on our online customer support page. Support request form is available at:
We will be able to support you better if you describe your problem as detailed as possible.
License Agreements
Xmanager License Agreement
This license agreement applies to the registered version of Xmanager. If you are using
Xmanager for evaluation, see “Xmanager Evaluation License Agreement”. License Agreement
4 | Xmanager Introduction
software indicates your acceptance of this license agreement. No component part of any version of Xmanager may be distributed individually, disassembled, copied, reverse engineered, or altered in any form.
Registered Version
One registered copy of Xmanager may either be used by a single person who uses the software personally on one or more computers, or installed on a single workstation used non-simultaneously by multiple people, but not both.
You may access the registered version of Xmanager through a network, provided that you have obtained individual licenses for the software covering all workstations that access the software through the network. For instance, if five different workstations will access
Xmanager on the network, each workstation must have its own Xmanager license,
regardless of whether they use Xmanager at different times or concurrently.
Title and Copyright
The software (including any images, applets, photographs, animations, video, audio, music and text incorporated into the software) is owned by NetSarang Computer, Inc., or its suppliers and is protected by Korean copyright laws and international treaty provisions. Part of this software may have been developed by a third party software supplier, which holds copyright and other proprietary rights to the software.
This software is licensed to you. You are not obtaining title to the software or any copyrights. You may not sublicense, rent, or lease the software for any purpose. The license may be transferred (not resold) to another individual only if you keep no copies of the software.
Disclaimer of Warranty
THIS SOFTWARE AND THE ACCOMPANYING FILES ARE SOLD "AS IS" AND WITHOUT WARRANTIES AS TO PERFORMANCE OR MERCHANTABILITY OR ANY OTHER WARRANTIES WHETHER EXPRESSED OR IMPLIED. Because of the various hardware and software environments into which Xmanager may be put, NO WARRANTY OF FITNESS FOR A PARTICULAR PURPOSE IS OFFERED.
Xmanager® is a registered trademark of NetSarang Computer, Inc.
Xmanager Evaluation License Agreement
This license agreement applies to the evaluation version of Xmanager. If you are a registered user, see “Xmanager License Agreement”.
License Agreement
Read carefully the following terms and conditions before using this software. Your use of this software indicates your acceptance of this license agreement and warranty.
Evaluation and Registration
Xmanager is not a free software program. Subject to the terms below, you are hereby
licensed to use the Evaluation Version of Xmanager for evaluation purposes without charge for a period of 30 days. Any other use requires purchase of a license for the registered version, as described in Ordering Information. Unregistered use of Xmanager after the 30-day evaluation period is in violation of Korean and international copyright laws.
Xmanager Introduction | 5
Distribution of Evaluation Version
You are hereby licensed to make as many copies of the evaluation version of this software and documentation as you wish; give exact copies of the original evaluation version to anyone; and distribute the evaluation version of the software and documentation in its unmodified form via electronic means. There is no charge for any of the above.
You are specifically prohibited from charging, or requesting donations, for any such copies, however made; and from distributing the software and/or documentation with other products (commercial or otherwise) without prior written permission from NetSarang Computer, Inc., with no exceptions.
Disclaimer of Warranty
THIS SOFTWARE AND THE ACCOMPANYING FILES ARE SOLD "AS IS" AND WITHOUT WARRANTIES AS TO PERFORMANCE OR MERCHANTABILITY OR ANY OTHER WARRANTIES WHETHER EXPRESSED OR IMPLIED. Because of the various hardware and software environments into which Xmanager may be put, NO WARRANTY OF FITNESS FOR A PARTICULAR PURPOSE IS OFFERED.
Getting Started | 7
Getting Started
This section explains how to connect to a remote UNIX/Linux host and how to bring a remote X application or full remote desktop to your Windows desktop.
Xmanager provides two basic methods to access remote UNIX/Linux hosts: Xbrowser and Xstart. With Xbrowser, you can bring a full remote desktop to your Windows desktop through
XDMCP (X Display Manager Control Protocol) and it is much easier for most users. With Xstart, you can get a single remote X application such as xterm and it is faster and simpler than XDMCP connection.
Once you have installed Xmanager successfully, you will be able to find Xstart and Xbrowser programs in the Xmanager folder on the desktop.
Starting with Xbrowser
Xbrowser helps you to find UNIX/Linux hosts on your network and connect to a host using
XDMCP protocol.
To use Xbrowser, the remote Unix host should be configured to allow XDMCP service for remote X terminals. Usually one of dtlogin, kdm, gdm or xdm should be running on the host. For more information about configuring XDMCP service on the Unix host, please refer to the manual of your Unix server.
8 | Getting Started
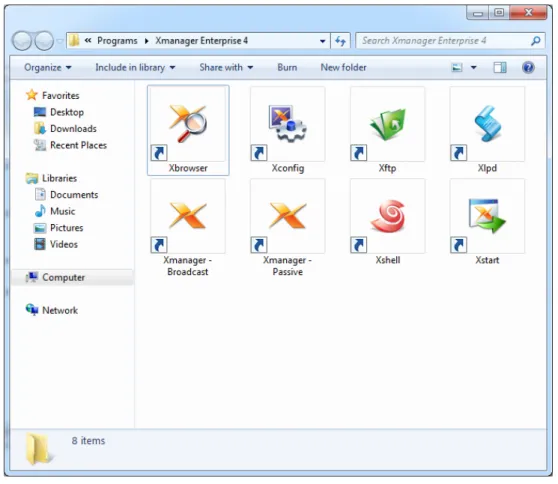
Figure 1: Xmanager Folder
2. Double-click Xbrowser.
RESULT: The Xbrowser window opens, as the figure below shows.
Notes
Xbrowser finds all UNIX/Linux hosts on your local network automatically. If UNIX/Linux
host that you wish to access is in different network with the one of user’s PC, open Options dialog box and register IP address or Broadcast address of the host, then try it again. If your UNIX host is not listed on the Xbrowser window, the host is not ready to serve XDMCP connections.
Getting Started | 9
Figure 2: Xbrowser Main Window
3. Double-click the host you want to connect to.
RESULT: A graphic login window opens, as the figure below shows.
Notes
If you are not able to get a graphic login window, there may be a firewall between your PC and the remote host.
10 | Getting Started
Figure 3: XDMCP Login Window
4. To log on to the host, enter your account name and password. RESULT: A remote desktop opens, as the figure below shows.
Notes
If the remote desktop does not open after entering username and password, there may be an error in your login shell scripts.
Getting Started | 11
Figure 4: UNIX Desktop on Windows
If you experience any problem in using Xbrowser, visit our support page at:
From the support page, you can find some tips about configuring UNIX/Linux servers for XDMCP connections.
Starting with Xstart
Xstart helps you to run a remote X application. Once you have created an Xstart session, you
can bring a remote X application on your Windows with a single click. 1. From the Xmanager folder, run Xstart.
12 | Getting Started
Figure 5: Xstart Main Window
2. Click New.
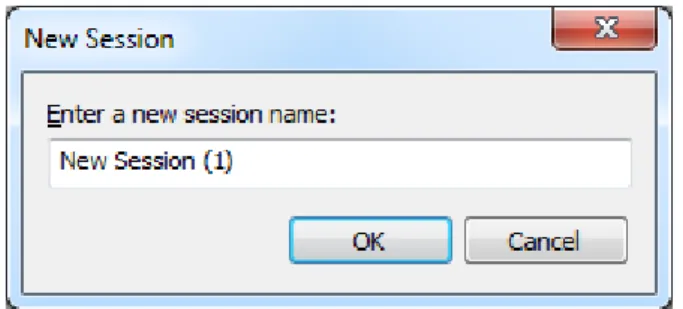
RESULT: A New Session dialog box appears, as you see below.
Figure 6: Xstart New Session Dialog Box
3. Enter a new session name, and click OK.
4. In the Host box, enter the hostname or IP address of the remote UNIX/Linux host. 5. In the Protocol box, select an appropriate protocol that is available on the host. 6. To set up protocol-specific options such as port and time-out, click Setup. 7. In the Username box, enter the user account on the host.
8. If you want to save the Password to the session, click the Setup button next to the Password field.
Getting Started | 13 RESULT: Password Setup dialog box opens.
Figure 7: Password Setup Dialog Box
9. In the Execution Command box, enter a command that will be executed on the host. For example, enter the following to run an xterm:
/usr/bin/X11/xterm –ls –display $DISPLAY 10. Click Run.
RESULT: An xterm window opens, as shown in the figure below.
14 | Getting Started
If you experience any problem in using Xstart, visit our support page at:
Most problems are caused by a firewall configuration on your systems and network. So, you may need to consult your system administrator to solve the problems.
Managing Sessions | 15
Managing Sessions
A session contains properties of a connection to a remote host. By creating a session, you can specify different options and a server profile for each connection.
This section explains Xstart and Xbrowser sessions, creating a shortcut for a session and configuring a server profile for a session. For more information about Xstart and Xbrowser, refer to “Xstart” and “Xbrowser”.
You can save the sessions in a folders and open all sessions in the folder simultaneously.
Xstart session
By creating an Xstart session, you can open remote X applications from PC. Xstart session automatically processes the login steps and runs the specified X application.
You can create Xstart sessions with both Xstart and Xbrowser.
To create a session on Xstart:
1. From the Xmanager folder, run Xstart. RESULT: The Xstart window opens. 2. Click New.
RESULT: A New Session dialog box appears. 3. Enter a new session name, and click OK.
4. In the Host box, enter the hostname or IP address of the remote UNIX/Linux host. 5. In the Protocol box, select an appropriate protocol that is available on the host. The
TELNET protocol is appropriate for most hosts.
6. To set up protocol-specific options such as port and time-out, click Setup. 7. In the Username box, enter the user account on the host.
8. If you want to save the Password to the session, click the Setup button next to the Password field.
RESULT: Password Setup dialog box opens.
9. In the Execution Command box, enter a command that will be executed on the host. For example, enter the following to run an xterm:
/usr/bin/X11/xterm –ls –display $DISPLAY 10. Click Save.
To create a session with Xbrowser:
1. From the Xmanager folder, run Xbrowser. RESULT: The Xbrowser window opens.
2. In the File menu, point to New, and then click Xstart Session. RESULT: A new Xstart session is created on the Xbrowser window. 3. Right-click on the new Xstart session.
RESULT: A menu appears. 4. Click Properties.
16 | Managing Sessions 5. Click the General tab.
6. In the Host box, enter the hostname or IP address of the remote UNIX/Linux host. 7. In the Protocol box, select an appropriate protocol that is available on the host. The
TELNET protocol is appropriate for most hosts.
8. To set up protocol-specific options such as port and time-out, click Setup. 9. In the Username box, enter the user account on the host.
10. In the Password box, enter the password of the user account.
11. In the Execution Command box, enter a command that will be executed on the host. For example, enter the following to run an xterm:
/usr/bin/X11/xterm –ls –display $DISPLAY 12. Click OK.
Notes
You can also create an Xstart session with New Session Wizard provided by Xbrowser. To use it, point to New in the File menu, and then click New Session Wizard.
To create a shortcut for an Xstart session:
1. Run Xstart.
2. In the Session list, select a session. 3. Click Shortcut.
RESULT: A Browse for Folder dialog box appears.
4. Select a folder in which you want to put a shortcut of the session.
Dynamic session
Xbrowser sends an XDMCP broadcast message to all hosts in your local network and shows
the hosts which respond to the message as available sessions. Any hosts that responds to the messages shows up on the top level XDMCP folder.
Also, Xbrowser provides an option to find a host in a different network. You can disable the broadcast feature when there are too many hosts in your local network.
To find hosts in a different network:
1. Run Xbrowser.
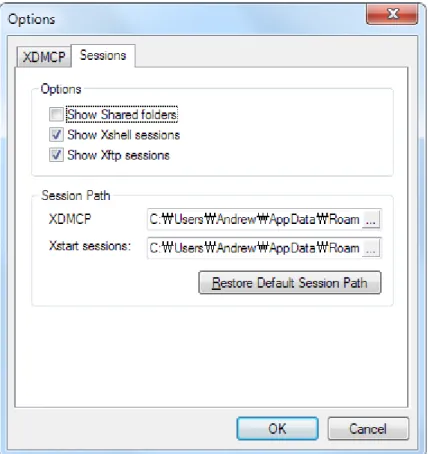
2. In the Tools menu, click Options. RESULT: An Options dialog box opens.
3. In the New Address box, enter the hostname you want to find. 4. Click Add.
5. Click OK.
To disable local broadcast:
1. Run Xbrowser.
In the Tools menu, click Options. RESULT: An Options dialog box opens.
2. Clear the Use local broadcast address check box. 3. Click OK.
Managing Sessions | 17
Static session
Static sessions are user created sessions. On Xbrowser, you can create Passive, XDMCP Query, XDMCP Broadcast, XDMCP indirect, and Secure XDMCP sessions. Unlike the Dynamic sessions which are available only when the remote hosts respond to the XDMCP braodcast message, the Static sessions are always shown on Xbrowser.
To create a Passive session:
1. Run Xbrowser.
2. In the File menu, point to New, and then click New Session Wizard. RESULT: A New Session Wizard opens.
3. Select Passive and then click Next.
4. In the X Server Profile list box, select an appropriate server profile and then click Next. 5. In the Name box, enter a session name.
6. Click Finish.
To create an XDMCP Query/Broadcast/Indirect/Secure XDMCP session:
1. Run Xbrowser.
2. In the File menu, point to New, and then click New Session Wizard. RESULT: A New Session Wizard opens.
3. Select XDMCP and then click Next.
4. In the Connection Method list box, select Query, Broadcast, Indirect, or Secure
XDMCP.
5. In the Host box, enter the hostname of the remote host and then click Next.
6. In the X Server Profile list box, select an appropriate server profile and then click Next. 7. In the Name box, enter a session name.
8. Click Finish.
To create a shortcut for a static session:
1. Run Xbrowser.
2. Right-click on a session. RESULT: A menu appears. 3. Click Shortcut.
To send a session to another user via email:
1. Run Xbrowser.
2. Right-click on a session. RESULT: A menu appears.
3. Point to Send To and then click Mail Recipient.
To import a session:
1. Drag a session with a left-click. 2. Drop on the Xbrowser window.
18 | Managing Sessions
Notes
You can only import static sessions saved as a file. Dynamic sessions cannot be imported.
To share a session with other users:
1. Run Xbrowser.
2. Right-click on a session. RESULT: A menu appears. 3. Click Sharing.
Notes
A shared session is moved to a common folder and you should have an administrative privilege to do the task.
To save Dynamic sessions as Static sessions:
1. Run Xbrowser.
2. Select the Dynamic sessions and right-click on a session. RESULT: A menu appears.
3. Click Save as.
Configuring properties of a session
A session contains basic connection information such as hostname and port. You also have the option to specify a display number and a server profile for Xmanager it invokes.
To allocate a static display number for a session:
1. Run Xbrowser.
2. Right-click on a session. RESULT: A menu appears. 3. Click Properties.
RESULT: A Xbrowser Properties dialog box opens. 4. Click the X Server tab.
5. Clear the Allocate display number automatically check box. 6. In the Display Number box, enter an appropriate display number. 7. Click OK.
To associate a session with a server profile:
1. Run Xbrowser.
2. Right-click on a session. RESULT: A menu appears. 3. Click Properties.
RESULT: A Xbrowser Properties dialog box opens. 4. Click the X Server tab.
5. In the Server Profile list, select an appropriate profile. 6. Click OK.
Managing Sessions | 19
Creating a Folder
Xmanager supports folder. You can save the sessions in folder. To create a new folder: 1. Run Xbrowser.
2. Click on the File menu, point to New and then select the Folder menu. RESULT: A new folder is created.
3. Enter the name for the folder.
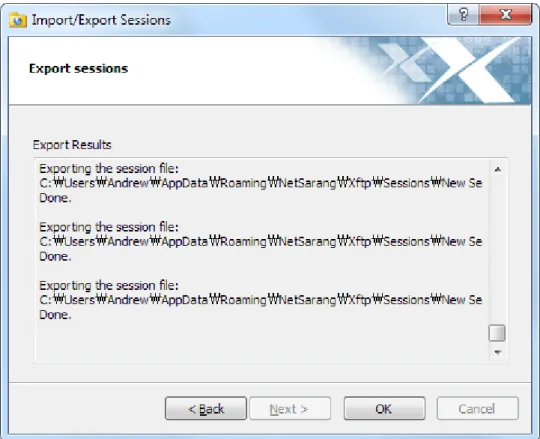
Export Sessions
Xmanager supports exporting sessions. Sessions are exported to single file for easy import. You can import the exported session file from a different PC where Xmanager is installed and use it without extra configuration. To export sessions:
4. Run Xbrowser.
5. Click on the File menu, select the Export menu. RESULT: The Import/Export wizard dialog box opens.
6. Select the products to export its sessions, and then click the Next button.
7. Select the folder where the exported session file will be saved and then click the Next button.
RESULT: Sessions are exported to a single file. 8. Click the OK button to close the Import wizard.
Import Sessions
Xmanager supports importing sessions. You can import sessions from the lower Xmanager versions from the same PC or the exported session file that is exported from a different PC. To import sessions:
1. Run Xbrowser.
2. Click on the File menu, select the Import menu. RESULT: The Import/Export wizard dialog box opens.
• To import sessions from the previously installed products on the same PC:
3. Select the From the previously installed products on this computer option, and the click the Next button.
RESULT: Products and its sessions are listed.
4. Select the products to import sessions from and then click the Next button. RESULT: Sessions are imported and the result is displayed.
5. Click the OK button to close the Export wizard.
• To import sessions from the an exported session file:
3. Select the From the following location option.
4. Enter the path of the exported session file or click the … button to select the exported session file.
20 | Managing Sessions
RESULT: Products and its sessions are listed.
6. Select the name of the products to import sessions from, and then click the Next button. RESULT: Sessions are imported and the result is displayed.
Establishing Connections | 21
Establishing Connections
Xmanager provides two convenient tools to connect to a remote host: Xbrowser and Xtart. Xbrowser is a comprehenisve session management tool that you can use to manage not only Xmanager sessions but also Xshell and Xftp sessions. And, Xstart is useful when you want
to run a single X application quickly and do not need the full desktop access such as Gnome and KDE.
This section explains a variety of connection methods and examples to manage with complex network environment and solve connection problems.
Connecting with Xbrowser
Xbrowser broadcasts an XDMCP query message to all the hosts in your local network and
finds the hosts that respond to the query message automatically.
To connect to a host with XDMCP:
1. Run Xbrowser.
2. Double-click the host you want to connect to.
RESULT: Xmanager brings up and connects to the host with XDMCP protocol.
To connect to a host using the Address Bar:
1. Run Xbrowser.
2. In the Address bar, enter the hostname or the IP address of the remote host. 3. Press Enter key.
Connecting with Xstart
Using Xstart, you can quickly start the remote X applications on PC. Xstart supports SSH, TELNET, RLOGIN, REXEC, RSH and LOCAL connection protocols. Each connection protocol requires a corresponding server is running on the remote host. For example, SSH server is required on the remote host to use SSH protocol.
Use the LOCAL protocol when you run a local X application that is installed on your Windows. For more information about using Xstart, see “Xstart”.
To run a remote X application with SSH protocol:
1. Run Xstart. 2. Click New.
RESULT: A New Session dialog box appears. 3. Enter a new session name, and click OK.
4. In the Host box, enter the hostname or IP address of the remote UNIX/Linux host. 5. In the Protocol box, select SSH.
6. To set up SSH protocol-specific options such as public key authentication, click Setup. 7. In the Username box, enter the user account on the host.
22 | Establishing Connections
8. In the Execution Command box, enter a command that will be executed on the host. For example, enter the following to run an xterm:
/usr/bin/X11/xterm –ls –display $DISPLAY 9. Click Run.
To run a remote X application with TELNET protocol:
1. Run Xstart. 2. Click New.
RESULT: A New Session dialog box appears. 3. Enter a new session name, and click OK.
4. In the Host box, enter the hostname or IP address of the remote UNIX/Linux host. 5. In the Protocol box, select TELNET.
6. To set up TELNET protocol-specific options such as port and time-out, click Setup. 7. In the Username box, enter the user account on the host.
8. If you want to save the Password to the session, click the Setup button next to the Password field.
RESULT: Password Setup dialog box opens.
9. In the Execution Command box, enter a command that will be executed on the host. For example, enter the following to run an xterm:
/usr/bin/X11/xterm –ls –display $DISPLAY 10. Click Run.
To run a remote X application with RLOGIN protocol:
1. Run Xstart. 2. Click New.
RESULT: A New Session dialog box appears. 3. Enter a new session name, and click OK.
4. In the Host box, enter the hostname or IP address of the remote UNIX/Linux host. 5. In the Protocol box, select RLOGIN.
6. To set up RLOGIN protocol-specific options such as port and time-out, click Setup. 7. In the Username box, enter the user account on the host.
8. If you want to save the Password to the session, click the Setup button next to the Password field.
RESULT: Password Setup dialog box opens.
9. In the Execution Command box, enter a command that will be executed on the host. For example, enter the following to run an xterm:
/usr/bin/X11/xterm –ls –display $DISPLAY 10. Click Run.
To run a remote X application with REXEC protocol:
1. Run Xstart. 2. Click New.
RESULT: A New Session dialog box appears. 3. Enter a new session name, and click OK.
Establishing Connections | 23 4. In the Host box, enter the hostname or IP address of the remote UNIX/Linux host.
5. In the Protocol box, select REXEC.
6. To set up REXEC protocol-specific options such as port and time-out, click Setup. 7. In the Username box, enter the user account on the host.
8. If you want to save the Password to the session, click the Setup button next to the Password field.
RESULT: Password Setup dialog box opens.
9. In the Execution Command box, enter a command that will be executed on the host. For example, enter the following to run an xterm:
/usr/bin/X11/xterm –ls –display $DISPLAY 10. Click Run.
To run a remote X application with RSH protocol:
1. Run Xstart. 2. Click New.
RESULT: A New Session dialog box appears. 3. Enter a new session name, and click OK.
4. In the Host box, enter the hostname or IP address of the remote UNIX/Linux host. 5. In the Protocol box, select RSH.
6. To set up RSH protocol-specific options such as port and time-out, click Setup. 7. In the Username box, enter the user account on the host.
8. In the Execution Command box, enter a command that will be executed on the host. For example, enter the following to run an xterm:
/usr/bin/X11/xterm –ls –display $DISPLAY 9. Click Run.
To run a local X application with Xstart:
1. Run Xstart. 2. Click New.
RESULT: A New Session dialog box appears. 3. Enter a new session name, and click OK. 4. In the Protocol box, select LOCAL.
5. In the Execution Command box, enter the full path of the local application. For example, enter the following to run an xlogo:
C:\Program Files\Xapps\xlogo –display $DISPLAY 6. Click Run.
Configuring firewall
You may need to alter the network settings when the remote hosts are on a different network over a gateway or when a firewall is between the PC and the remote host. Please keep in mind that Xmanager is a server (PC X server), and the connection is established from the remote X application to the Xmanager.
Port-forwarding is required for XDMCP connections when you are in a private network and you connect to a remote host over a router. Once you have configured port-forwarding on the
24 | Establishing Connections
router, you should configure connection address for XDMCP connections.
If the firewall is forced to disconnect the idle connections, enable the Send keep-alive signal option for SSH sessions.
To enable the Send keep-alive signal option for SSH connections:
1. Run Xstart.
2. In the Session list, select a session. 3. In the Protocol list, select SSH. 4. Click Setup.
RESULT: An SSH Protocol Setup dialog box opens. 5. Click the General tab.
6. Select the Send keep-alive signal check box. 7. Click OK.
To configure port-forwarding rules on a router:
1. Connect to the router and go to the port-forwarding page.
2. Forward external TCP ports 6000 ~ 6010 to the ports 6000 ~ 6010 of your Windows. For example, assumes that the IP address of your PC is 192.168.1.2:
External Port Port Address
6000 6000 192.168.1.2
6001 6001 192.168.1.2
…
6010 6010 192.168.1.2
3. Save the configuration.
Notes
Refer to the manual of your router to configure the port forwarding.
To configure a connection address for XDMCP sessions:
1. Run Xbrowser.
2. Right-click on the session you want to configure a connection address setting. RESULT: A menu appears.
3. Click Properties.
RESULT: A Xbrowser Properties dialog box opens. 4. Click the General tab.
5. In the Connection Address area, select Use following connection address check box. 6. In the Host box of the Connection Address area, enter the IP address of the router. 7. In the Port Number box of the Connection Address area, enter “6001”.
Notes
This number is a router side port number which is configured to perform port-forwarding from router to PC.
Establishing Connections | 25 9. In the Display Number area, clear the Allocate display number automatically check
box.
10. In the Display Number box, enter “1”.
Notes
This number comes from the port number “6001” which is configured to perform port-forwarding from router to PC. If you subtract 6000 from the port number, the result will be the display number.
11. Click OK.
Solving connection problems
If you failed to establish connection to the remote host after following the previous
instructions, these are some questions and information that can help you solve the problem.
To solve XDMCP connection problems:
1. Check the following:
• Is a dtlogin, kdm, gdm or xdm running on the remote host? • Does the login window open?
• Is the remote host on a different network?
• Is there a firewall between your Windows and the remote host? • Does your Windows system have a firewall configuration? • The name server may have an incorrect entry for your PC.
• The DISPLAY variable is configured incorrectly on your shell script. 2. See log messages.
• To see Xmanager log files, click the system menu on Xmanager main window, point to Log, and then click File.
• For CDE errors, read /var/dt/Xerrors when you cannot see the login window. Read $HOME/.dt/startlog and $HOME/.dt/errorlog when you failed to login.
To solve Xstart connection problems:
1. Run Xstart.
2. Select Show status dialog box. 3. Select Show reply messages. 4. Click Run.
RESULT: A Reply Messages dialog box opens.
Configuring Server Profiles | 27
Configuring Server Profiles
Xconfig is a tool that lets you manage server profiles. A server profile contains X Server
related options such as window mode, fonts, color, and security. You can make multiple profiles on Xconfig and assign a differerent profile for each session.
When you create a session, Default Profile is assigned to the session. Two default profiles are created for you automactially when you install Xmanager.
To create a new server profile:
1. Run Xconfig.
2. In the File menu, click New Profile.
RESULT: A New Profile is created on the Xconfig window. 3. Double-click on the new profile.
RESULT: A Properties dialog box opens. 4. Configure options on the dialog box. 5. Click OK.
To set a profile as the default Xstart profile:
1. Run Xconfig.
2. Right-click on the profile that will be set as a default Xstart profile. RESULT: A menu appears.
3. Click Set as Default Xstart Profile.
To set a profile as the default XDMCP profile:
1. Run Xconfig.
2. Right-click on the profile that will be set as a default XDMCP profile. RESULT: A menu appears.
3. Click Set as Default XDMCP Profile.
To share a profile with other users on Windows:
1. Run Xconfig.
2. Right-click on the profile that will be shared with other users on the local machine. 3. Click Sharing.
To email a profile:
1. Run Xconfig.
2. Right-click on a profile. RESULT: A menu appears.
3. Point to Send To and then click Mail Recipient.
28 | Configuring Server Profiles
To export a profile to a folder:
1. Run Xconfig.
2. Drag a profile and drop it on a folder.
To import a profile:
1. Run Xconfig.
Managing Fonts | 29
Managing Fonts
Xmanager provides many fonts for X applications. When installing Xmanager, you can select
font packs to install depending on the vendor of Unix server and your language.
Even though Xmanager includes many fonts required for most systems and applications, you can still add new fonts. Thus, this section explains how to: install additional fonts, add a font server and configure font options.
For more information about fonts, see “Fonts”.
To install additional font packs:
1. Visit Xmanager download page at:
2. Download additional font packs you want to install. 3. Run it on your Windows.
4. Follow the guidance of the installation wizard.
Notes
The font pack applies the new font directory to all server profiles. So, you do not have to add the new font directory using Xconfig.
To convert BDF fonts to PCF fonts:
1. Run bdftopcf.exe as following:
C:\tmp> %XMANAGER_INSTALL_DIR%\bdftopcf new.bdf –o new.pcf
To create or update FONTS.DIR using mkfntdir.exe:
1. Go to the font directory and run mkfntdir.exe:
%XMANAGER_INSTALL_DIR%\Fonts\NewFonts> ..\..\mkfntdir
To create and use a font directory:
1. Create a new directory under the following directory: C:\Program Files\NetSarang\Xmanager2\Fonts 2. Copy new fonts to the new directory.
3. Run mkfntdir.exe on the new directory:
C:\Program Files\…\Fonts\NewFonts> ..\..\mkfntdir . 4. Run Xconfig.
5. Double-click on the profile you want to change the font catalogue. RESULT: A Properties dialog box opens.
6. Click the Font tab.
7. Click Add Font Directory.
RESULT: A Browse for Folder dialog box opens. 8. Select the new font directory created above. 9. Click OK.
30 | Managing Fonts 10. Restart Xmanager.
To use a font server:
1. Run Xconfig.
2. Double-click on the profile.
RESULT: A Properties dialog box opens. 3. Click the Font tab.
4. Click Add Font Server.
RESULT: An Add Font Server dialog box opens.
5. In the Hostname box, enter the IP address or hostname of the font server. 6. In the Port box, enter the port number of the font server.
7. Click OK.
Notes
Make sure that a font server is running on the remote host. Usually the program name is xfs and the default port is 7100.
To change the default text font:
1. Run Xconfig.
2. Double-click on the profile.
RESULT: A Properties dialog box opens. 3. Click the Font tab.
4. In the Default Font box, enter a font name that will be used as a default text font. 5. Click OK.
Notes
A default text font is used when an X application does not specify a font name to display characters.
To use font aliasing when a desired font is not found:
1. Run Xconfig.
2. Double-click on the profile.
RESULT: A Properties dialog box opens. 3. Click the Font tab.
4. Select the Automatic Font Substitution check box. 5. Click OK.
To show missing font dialog box:
1. Run Xconfig.
2. Double-click on the profile.
RESULT: A Properties dialog box opens. 3. Click the Font tab.
Managing Fonts | 31 5. Click OK.
Configuring Keyboard and Mouse | 33
Configuring Keyboard and
Mouse
Xbrowser includes Keyboard Editor that allows you to define the custom keyboard layouts for international keyboards that are different from the standard AT keyboard. It also supports various mouse options for scrolling and swapping buttons.
Configuring keyboard
You can select a keymap file, specify a hot key to switch keymaps on the fly and edit a keymap file with Keyboard Editor.
To add more Keymap files to the keyboard list:
1. Run Xconfig.
2. Double-click on a profile.
RESULT: A Properties dialog box opens. 3. Click the Devices tab.
4. Click Keyboard Settings.
RESULT: A Keyboard Settings dialog box opens. 5. Click Add.
RESULT: An Add Keyboard dialog box opens. 6. Select an appropriate keymap file.
7. Click OK.
To set a keymap as a default keymap:
1. Run Xconfig.
2. Double-click on a profile.
RESULT: A Properties dialog box opens. 3. Click the Devices tab.
4. Click Keyboard Settings.
RESULT: A Keyboard Settings dialog box opens.
5. In Keyboard List, select a keymap that will be used by default. 6. Click Set Default.
7. Click OK.
To switch keymaps on the fly:
1. While Xmanager is running, press Ctrl+Alt+K. RESULT: A Keyboard Selector dialog box opens.
34 | Configuring Keyboard and Mouse 3. Release all keys.
Notes
In the Keyboard Selector dialog box, you can see only the keymaps those are in the
Keyboard List of the Keyboard Settings dialog box.
To edit a keymap file:
1. Run Xconfig.
2. Double-click on a profile.
RESULT: A Properties dialog box opens. 3. Click the Devices tab.
4. Click Keyboard Settings.
RESULT: A Keyboard Settings dialog box opens. 5. In Keyboard List, select a keymap.
6. Click Edit. RESULT: A Keyboard Editor opens.
Configuring mouse
Xmanager allows you to configure 3-button emulation, enable or disable mouse wheel support
for easier scrolling, and switch middle/right buttons.
To emulate 3-button with a 2-button mouse:
1. Run Xconfig.
2. Double-click on a profile.
RESULT: A Properties dialog box opens. 3. Click the Devices tab.
4. Click Mouse Settings.
RESULT: A Mouse Settings dialog box opens.
5. Select the Click the left and right buttons simultaneously check box. 6. Click OK.
To scroll using the wheel in X applications:
1. Run Xconfig.
2. Double-click on a profile.
RESULT: A Properties dialog box opens. 3. Click the Devices tab.
4. Click Mouse Settings.
RESULT: A Mouse Settings dialog box opens. 5. Select the Use Mouse Wheel check box. 6. Click OK.
Notes
When the wheel is used for scrolling, the right-click may not work in some X applications such as the CDE desktop menu.
Configuring Keyboard and Mouse | 35
To switch a right-click to a middle-click:
1. Run Xconfig.
2. Double-click on a profile.
RESULT: A Properties dialog box opens. 3. Click the Devices tab.
4. Click Mouse Settings.
RESULT: A Mouse Settings dialog box opens.
5. Select the Use Right Button as Middle Button check box. 6. Click OK.
Managing Color | 37
Managing Color
Xmanager supports 6 visual types simultaneously. If your video devie supports more than
16-bit colors, Xmanager sets the default visual as TrueColor. Otherwise, PseudoColor is used. The default visual is used by the X root window and most X applications.
However, some X applications such as old CAD tools are developed specifically for 256-color systems. These applications work only on PseudoColor visual, and you must set the visual to PseudoColor.
Xmanager can emulate PseudoColor visual on a true-color video device. When Xmanager
emulates PseudoColor visual, the StoreColor request is a very expensive operation that slows down the performance. Therefore, Xmanager supports the full StoreColor feature optionally. Some X applications are designed to run on specific UNIX/Linux RGB formats and may fail to run on TrueColor visual. To resolve this problem, Xmanager provides an option to set the the RGB format on TrueColor.
Also, Xmanager supports an RGB database file which translates color names to corresponding RGB values. You can edit the color database using a text editor.
To change the default server visual:
1. Run Xconfig.
2. Double-click on a profile.
RESULT: A Properties dialog box opens. 3. Click the Color tab.
4. In the Choose Default Visual list, select an appropriate visual. 5. Click OK.
To process the exact StoreColor requests in PseudoColor visual:
1. Run Xconfig.
2. Double-click on a profile.
RESULT: A Properties dialog box opens. 3. Click the Color tab.
4. Select the Exact StoreColor for PseudoColor check box. 5. Click OK.
To emulate 256-color visual in true-color video device:
1. Run Xconfig.
2. Double-click on a profile.
RESULT: A Properties dialog box opens. 3. Click the Color tab.
4. In the Choose Default Visual list, select PseudoColor. 5. Click the Advanced tab.
6. Select When Mapped for the Backing Store option. 7. Click OK.
38 | Managing Color
To reverse the order of RGB fields in TrueColor visual:
1. Run Xconfig.
2. Double-click on a profile.
RESULT: A Properties dialog box opens. 3. Click the Color tab.
4. Select the Reverse RGB Order for TrueColor check box. 5. Click OK.
To change or edit RGB color database:
1. Run Xconfig.
2. Double-click on a profile.
RESULT: A Properties dialog box opens. 3. Click the Color tab.
4. In the Color Database area, click Change or View. 5. Click OK.
Using Window Mode | 39
Using Window Mode
Xmanager provides a Single Window Mode for XDMCP sessions and a Multiple Window Mode
for Xstart sessions. In Single Window Mode, the X application opens in a single Xmanager window. It is especially usefull when you are runing desktop X applications such as Gnome or KDE. Multiple Window mode opens each X application in its own window. It is also referred to as Seamless Integration mode beacuase each X application gets an windows frame for resizing and minizing just like Windows applications. This mode is useful when you do not need full desktop access. You can change the window mode by using Xconfig.
In a Single Window Mode, you can customize the size of the root window and add a scroll bar when the X desktop is larger than your Windows desktop.
In a Multiple Window Mode, Xmanager helps you to select a window manager and desktop background, enable window panning, and activate a window on mouse focus.
To use single window mode:
1. Run Xconfig.
2. Double-click on a profile.
RESULT: A Properties dialog box opens. 3. Click the General tab.
4. In the Choose Window Mode to use list, select Single Window Mode. 5. Click OK.
To customize root window size in single window mode:
1. Run Xconfig.
2. Double-click on a profile.
RESULT: A Properties dialog box opens. 3. Click the General tab.
4. In the Choose Window Mode to use list, select Single Window Mode. 5. Click Settings.
RESULT: A Window Mode Settings dialog box opens. 6. Click the Single Window Mode tab.
7. In the Window Size list, select an appropriate size. 8. Click OK.
To use multiple window mode:
1. Run Xconfig.
2. Double-click on a profile.
RESULT: A Properties dialog box opens. 3. Click the General tab.
4. In the Choose Window Mode to use list, select Multiple Window Mode. 5. Click OK.
40 | Using Window Mode
To use window panning in multiple window mode:
1. Run Xconfig.
2. Double-click on a profile.
RESULT: A Properties dialog box opens. 3. Click the General tab.
4. In the Choose Window Mode to use list, select Multiple Window Mode. 5. Click Settings.
RESULT: A Window Mode Settings dialog box opens. 6. Click the Multiple Window Mode tab.
7. Select the Use Panning check box. 8. Click OK.
To use Auto Raise feature in multiple window mode:
1. Run Xconfig.
2. Double-click on a profile.
RESULT: A Properties dialog box opens. 3. Click the General tab.
4. In the Choose Window Mode to use list, select Multiple Window Mode. 5. Click Settings.
RESULT: A Window Mode Settings dialog box opens. 6. Click the Multiple Window Mode tab.
7. Select the Auto Raise Window check box. 8. Set Interval.
9. Click OK.
To select desktop background in multiple window mode:
1. Run Xconfig.
2. Double-click on a profile.
RESULT: A Properties dialog box opens. 3. Click the General tab.
4. In the Choose Window Mode to use list, select Multiple Window Mode. 5. Click Settings.
RESULT: A Window Mode Settings dialog box opens. 6. Click the Multiple Window Mode tab.
7. In the Background list, select an appropriate background. 8. Click OK.
To select a window manager in multiple window mode:
1. Run Xconfig.
2. Double-click on a profile.
RESULT: A Properties dialog box opens. 3. Click the General tab.
Using Window Mode | 41 4. In the Choose Window Mode to use list, select Multiple Window Mode.
5. Click Settings.
RESULT: A Window Mode Settings dialog box opens. 6. Click the Multiple Window Mode tab.
7. In the Window Manager list, select an appropriate window manager. 8. Click OK.
Security | 43
Security
Xmanager supports host-based access control and also supports the public key user
authentication method using Xstart with the SSH (Secure Shell) protocol.
Host-based access control manages a trusted hosts list, and only the X applications on the trusted hosts can connect to Xmanager. For an unauthorized X application, Xmanager posts a warning dialog box to allow the connection or not. Even though the host-based access control can prevent connections from unauthorized users, the network packets between Xmanager and X applications are not encrypted and vulnerable to intrusion.
Xmanager also supports SSH protocol for better security. The SSH connection is available only
for Xstart sessions.
Xmanager offers password and public key user authentication along with a public key
generation wizard. Xmanager shares the host key and user key database with Xshell and
Xftp programs. Therefore, once you have created a user key, Xmanager can use it without
further configuration steps.
To enable host-based access control:
1. Run Xconfig.
2. Double-click on a profile.
RESULT: A Properties dialog box opens. 3. Click the Security tab.
4. Select the Enable Access Control check box.
5. In the Trusted Hosts list, enter the hosts you will allow connections. 6. Click Add.
7. Click OK.
To warn for an unauthorized client connection:
1. Run Xconfig.
2. Double-click on a profile.
RESULT: A Properties dialog box opens. 3. Click the Security tab.
4. Select the Warn Unauthorized Connections check box. 5. Click OK.
To run a remote X application securely with SSH protocol:
1. Run Xstart. 2. Click New.
RESULT: A New Session dialog box appears. 3. Enter a new session name, and click OK.
4. In the Host box, enter the hostname or IP address of the remote UNIX/Linux host. 5. In the Protocol box, select SSH.
44 | Security
Key option for Authentication and click Setup.
7. In the Username box, enter the user account on the host.
8. In the Execution Command box, enter a command that will be executed on the host. For example, enter the following to run an xterm:
/usr/bin/X11/xterm –ls –display $DISPLAY 9. Click Run.
To open a user key manager:
1. Run Xbrowser.
2. In the Tools menu, click SSH User Key Manager.
To open a host key manager:
1. Run Xbrowser.
2. In the Tools menu, click SSH Host Key Manager.
To create a user key pair:
1. Run Xbrowser.
2. In the Tools menu, click SSH User Key Generation Wizard.
3. The User Key Generation Wizard will guide you through the whole generation process.
Notes
At the final step of the generation process, you can also register the public key on the remote SSH server.
To register a public key on the server:
1. Open the User Keys dialog box.
2. Select the user key you want to register. 3. Click Properties.
RESULT: The User Key Properties dialog box appears. 4. Click the Public Key tab.
5. In the View public key format as list, select an appropriate format depending on the type of your remote SSH server.
6. Click Save as a file.
Notes
After the public key is saved as a file, you should copy it to the remote server. How to register the copied key into your remote SSH account is different for each server and you may find it helpful to read “Step 4: Public Key Registration”.
To import a private key to the database:
1. Open the User Keys dialog box. 2. Click Import.
RESULT: The Open dialog box appears.
Security | 45 4. In the File Type list, select the type of the private key.
Notes
If you select Auto Detect, Xmanager will determine the type automatically. 5. In the Passphrase box, enter the passphrase of the private key.
6. Click OK.
To export a user key to a file:
1. Open the User Keys dialog box.
2. Select the user key you want to export. 3. Click Export.
RESULT: The Save As dialog box appears. 4. Enter a file name and click OK.
Notes
The exported file is in the NetSarang User Key format and it cannot be used in the applications provided by other vendors.
To change the name of a user key:
1. Open the User Keys dialog box.
2. Select the user key’s name you want to change. 3. Click Rename.
Notes
Notice that the key name is used as a file name. You must enter only valid characters for the name.
To change the passphrase of a user key:
1. Open the User Keys dialog box.
2. Select the user key’s passphrase you want to change. 3. Click Properties.
RESULT: The User Key Properties dialog box appears. 4. Click the General tab.
5. Click Change Passphrase.
To delete a user key from the database:
1. Open the User Keys dialog box. 2. Select the user key you want to delete. 3. Click Delete.
Multiple Monitors | 47
Multiple Monitors
Xmanager allows you to select a monitor to open X window desktops when there are multiple
monitors. You can choose a monitor from available monitors or a virtual screen which includes all monitors.
Make sure all monitors have video color greater than 16 bits, because Xmanager may not work correctly if one is 8-bit and others are greater than 8-bit.
To select a monitor for X desktop:
1. Run Xconfig.
2. Double-click on a profile.
RESULT: A Properties dialog box opens. 3. Click the Devices tab.
4. Click Monitor Settings.
RESULT: A Monitor Settings dialog box opens.
5. In the Monitor to be used list, select an appropriate monitor. 6. Click OK.
To use all monitors as a single X desktop:
1. Run Xconfig.
2. Double-click on a profile.
RESULT: A Properties dialog box opens. 3. Click the Devices tab.
4. Click Monitor Settings.
RESULT: A Monitor Settings dialog box opens. 5. In the Monitor to be used list, select Virtual Screen.
Notes
The Virtual Screen is shown when your system has multiple monitors. 6. Click OK.
To show a monitor selection dialog box at startup:
1. Run Xconfig.
2. Double-click on a profile.
RESULT: A Properties dialog box opens. 3. Click the Devices tab.
4. Click Monitor Settings.
RESULT: A Monitor Settings dialog box opens.
5. Select the Show the Monitor Selector at startup check box. 6. Click OK.
Copying, Saving and Printing X Applications | 49
Copying, Saving and Printing
X Applications
Xmanager allows you to copy text between X applications and Windows clipboard
automatically. You can also copy the image of X application windows to the clipboard, save it as a bitmap file or send it to the printer when you are using the local window manager.
To configure automatic cut & paste:
1. Run Xconfig.
2. Double-click on a profile.
RESULT: A Properties dialog box opens. 3. Click the Advanced tab.
4. In the Settings list, select Auto Cut & Paste. 5. Click OK.
To copy text area from xterm to Windows Notepad:
1. In the xterm window, select text area with the left button. RESULT: The selected area is highlighted.
2. Open Notepad.
3. In the Edit menu, click Paste.
To copy text area from Windows Notepad to xterm:
1. In the Notepad window, select text area with the left button. RESULT: The selected area is highlighted.
2. Copy with the keys, Ctrl+C, or the menu options, Edit -> Copy. 3. Open xterm.
4. On the xterm window, right-click.
To copy an X application window to the Clipboard:
1. In the system menu on the title bar, point to Copy and then click Window or Contents. RESULT: The window image is copied to the Clipboard.
Notes
You can use this feature only when you run an application with Xstart, in the Multiple Window mode and with a local window manager.
To save an X application window as a bitmap file:
1. In the system menu on the title bar, point to Save and then click Window or Contents. RESULT: A Save As dialog box opens.
50 | Copying, Saving and Printing X Applications 2. In the File Name box, enter an appropriate file name. 3. Click OK.
Notes
You can use this feature only when you run an application with Xstart, in the Multiple Window mode and with a local window manager.
To print an X application window:
1. In the system menu on the title bar, point to Print and then click Window or Contents. RESULT: A Print dialog box opens.
2. Click Print.
Notes
You can use this feature only when you run an application with Xstart, in the Multiple Window mode and with a local window manager.
Logging Session | 51
Logging Session
Xmanager saves the debugging information as a file in user folder. When multiple Xmanager
sessions are running at the same time, each session generates log messages in a different file such as X0.LOG, X1.LOG and so on. The number on the log file indicates the display number of an Xmanager session.
When you experience a problem in using Xmanager, it is helpful to see the log file.
To view the log file of the current session:
1. Right-click the Xmanager tray icon or the title bar of Xmanager main window or click the small Xmanager icon on the title bar of Xmanager main window.
RESULT: A Xmanager system menu appears.
2. In the system menu, point to Log and then click File. RESULT: Notepad opens the log file.
To view the log folder for all sessions:
1. Right-click the Xmanager tray icon or the title bar of Xmanager main window or click the small Xmanager icon on the title bar of Xmanager main window.
RESULT: A Xmanager system menu appears.
2. In the system menu, point to Log and then click Folder. RESULT: The Log folder opens.
Reference | 53
Reference
This section covers complete reference information about using Xmanager.
Xmanager is a powerful and easy-to-use PC X server software program that is running on a
Windows platform. It allows you to bring remote UNIX/Linux desktops to your Windows PC seamlessly. You can also run remote X applications securely through the SSH (Secure Shell) protocol even when your Windows PC is inside a private network and a firewall is between your PC and the remote server.
Xmanager incorporates a variety of new features such as improved user interface, folder
support and better interopearation with other NetSarang software. It offers many advanced options to meet the needs of professional users but also is designed as simply as possible for beginners.
Xmanager consists of a number of programs including Xmanager, Xconfig, Xbrowser, Xstart and some additional utilities:
• Xmanager is a PC X server program, and all X clients will open windows on MS
Windows through Xmanager. Xstart and Xbrowser execute Xmanager when they are trying to run an X application remotely or get a full GUI desktop of a remote Unix. • Xconfig creates and manages Xmanager profiles which configure manyXmanager
options such as window mode, font set, color and so on.
• Xbrowser is an easy-to-use and very user-friendly interface program for browsing
remote UNIX/Linux machines and connecting to the remote host through XDMCP protocol. It supports multiple XDMCP sessions simultaneously, and the user is able to create a shortcut icon for any of the hosts listed in the Xbrowser window.
• Xstart is a tool that lets you run a remote X application from your PC. It supports
SSH, TELNET, RLOGIN, REXEC and RSH protocols to log on to a remote host, and it executes a remote command as easily as it is on your Windows PC.