Avaya Solution & Interoperability Test Lab
Application Notes for Configuring Tone Software ReliaTel
SNMP Management Application with Avaya
Communication Manager and Avaya SIP Enablement
Services - Issue 1.0
Abstract
These Application Notes detail the configuration steps to enable interoperability between Avaya Communication Manager, Avaya SIP Enablement Services and Tone Software ReliaTel SNMP management application. Information in these Application Notes has been obtained through DeveloperConnection compliance testing. Testing was conducted via the DeveloperConnection Program at the Avaya Solution and Interoperability Test Lab in Lincroft, NJ.
GsK; Reviewed: SPOC 7/27/2007
Solution & Interoperability Test Lab Application Notes ©2007 Avaya Inc. All Rights Reserved.
1 of 19 TS-ReliaTel-ACM
1. Introduction
Supporting and maintaining network infrastructure equipment is an important issue many
network administrators face. As IP telephony continues to grow and become more commonplace the requirement to manage the IP telephony infrastructure becomes a critical component within any network. Tone Software Reliatel is an SNMP management application capable of providing network administrators monitoring and alarming for both non-telephony and IP telephony network devices.
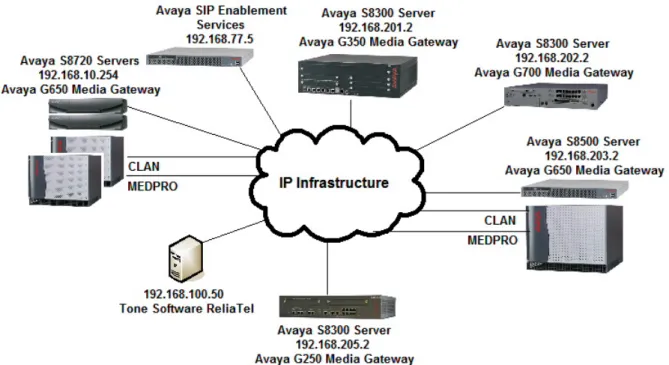
1.1. Network Diagram
The network diagram shown in Figure 1 illustrates the testing environment used for compliance testing. The network consists of multiple Avaya Communication Manager systems, multiple Avaya Media Gateways, an Avaya SIP Enablement Services (SES) and Tone Software ReliaTel SNMP management software.
GsK; Reviewed: SPOC 7/27/2007
Solution & Interoperability Test Lab Application Notes ©2007 Avaya Inc. All Rights Reserved.
3 of 19 TS-ReliaTel-ACM
2. Equipment and Software Validated
The following equipment and software were used for the sample configuration provided:
Equipment Software
Avaya S8300 Server Avaya Communication Manager 4.0
(R014x.00.0.730.5)
Patches – 12514 and 13566
Avaya G250 Media Gateway 26.31.0
Avaya S8300 Server Avaya Communication Manager 3.1
(R013x.01.0.628.6)
Avaya G350 Media Gateway 25.33.0
Avaya S8300 Server Avaya Communication Manager 4.0
(R014x.00.0.730.5)
Patches – 12514 and 13566
Avaya G700 Media Gateway 26.31.0
Avaya S8500 Server Avaya Communication Manager 4.0
(R014x.00.0.730.5)
Patches – 12514 and 13566 Avaya G650 Media Gateway TN2312BP HW3 / FW 39
Avaya S8710 Server Avaya Communication Manager 4.0
(R014x.00.0.730.5)
Patches – 12514 and 13566 Avaya G650 Media Gateway TN2312BP HW12 / FW 39 Avaya SIP Enablement Services 3.1.2
(SES-3.1.2.0-309.0) Tone Software ReliaTel
Red Hat Enterprise Linux AS release 4 (Nahant Update 5)
Kernel 2.6.9-55.ELsmp on an i686
2.4.0
3. Avaya Communication Manager SNMP Configuration
Enabling an SNMP management system is a four-step process: enable SNMP to pass through the Avaya Communication Manager firewall, configure SNMP agents, configure SNMP traps, and restarting the SNMP agent. This process is the same for the Avaya Server 8300, 8500 and 8710. Use any web browser to connect and log into Avaya Communication Manager. For complete details on how to access Avaya Communication Manager from a web interface, refer to Section 10 [1].
1. After logging into Avaya Communication Manager, the user is presented with the following screen. Click Launch Maintenance Web Interface.
GsK; Reviewed: SPOC 7/27/2007
Solution & Interoperability Test Lab Application Notes ©2007 Avaya Inc. All Rights Reserved.
5 of 19 TS-ReliaTel-ACM
Step Description
2. Navigate to the Firewall web page by clicking Firewall found on the left side of the web page within the blue background. Check the snmp and snmptrap check boxes for both Input to Server and Output from Server. Click Submit.
3. Navigate to the SNMP Traps web page by clicking SNMP Traps found on the left side of the web page within the blue background. Click Add.
Step Description
GsK; R d: SPOC 7/27/2007
Solution & Interoperability Test Lab Application Notes ©2007 Avaya Inc. All Rights Reserved.
7 of 19 TS-ReliaTel-ACM eviewe
4. From the Add Trap Destination web page, enter the information displayed below. Check the Check to enable this destination check box. Configure the IP address assigned to the Tone Software ReliaTel SNMP management application (see Figure 1) into the IP address field. Select the SNMP version 2c radio-button. Use the drop-down list for Notification type and select “trap”. The Community name can be any descriptive text. In the sample configuration “avayatrap” was used for the Community name. Click Add. After making any changes to the SNMP configuration, the SNMP Agent needs to be restarted.
5. Navigate to the Agent Status web page by clicking Agent Status found on the left side of the web page within the blue background. Click Stop Agent. Return to the Agent Status web page and then click Start Agent. Repeat all these steps on each Avaya Communication Manager.
4. Avaya SIP Enablement Services Configuration
Administering the SNMP configuration for Avaya SIP Enablement Services is similar to the process for Avaya Communication Manager. One difference between the two configurations is that the SNMP Agent does not need to be restarted on Avaya SIP Enablement Services. For complete reference on the SNMP configuration for Avaya SIP Enablement Services refer to Section 10 [2].
Step Description
1. After logging on to the web interface for Avaya SIP Enablement Services, the user is presented with the following screen. Click Launch Maintenance Web Interface.
GsK; Reviewed: SPOC 7/27/2007
Solution & Interoperability Test Lab Application Notes ©2007 Avaya Inc. All Rights Reserved.
9 of 19 TS-ReliaTel-ACM
2. Navigate to the Firewall web page by clicking Firewall found on the left side of the web page within the blue background. Check the snmp and snmptrap check boxes for both Input to Server and Output from Server. Click Submit.
GsK; Reviewed: SPOC 7/27/2007
Solution & Interoperability Test Lab Application Notes ©2007 Avaya Inc. All Rights Reserved.
11 of 19 TS-ReliaTel-ACM
Step Description
3. Navigate to the SNMP Traps web page by clicking SNMP Traps found on the left side of the web page within the blue background. Click Add.
4. From the Add Trap Destination web page, enter the information displayed below. Check the Check to enable this destination check box. Configure the IP address assigned to the Tone Software ReliaTel SNMP management application (see Figure 1) into the IP address field. Select the SNMP version 2c radio-button. Use the drop-down list for Notification type and select “trap”. The Community name can be any descriptive text. In the sample configuration “avayatrap” was used for the Community name. Click Add.
GsK; Reviewed: SPOC 7/27/2007
Solution & Interoperability Test Lab Application Notes ©2007 Avaya Inc. All Rights Reserved.
13 of 19 TS-ReliaTel-ACM
5. Tone Software ReliaTel Configuration
Tone Software ReliaTel is a software application that runs on a Linux platform. Tone Software ReliaTel is a bundled software application sold with server hardware. The configurations can be performed directly on the server or via a telnet or ssh connection. Before systems are delivered to customer locations, Tone Software engineers pre-configure the system with information obtained from customers. The information provided by customers includes the IP address(es), class, channel type and channel system names. In the sample configuration the information displayed below was provided to Tone Software in order to provision the system.
• IP address = “192.168.100.50” • Channel Type = “SNMPMGR” • Channel System = “Avaya”
• Center = “AvayaDevConnect” • Class = “cl-avayamdsrv”
Step Description
1. Using a keyboard and monitor directly connected to the Tone Software ReliaTel server login using default credentials, see Section 10 [3]. Once logged on, users will be presented with the Command Line Interface (CLI) of the Linux Operating System. Navigate to the “etc/conf/” directory by using the “cd” commands displayed below. Use the “vi” text editor and open up the
data.conf text file. c
=~=~=~=~=~=~=~=~=~= PuTTY log 2007.06.21 13:37:35 ~=~=~=~=~=~=~=~= Red Hat Enterprise Linux AS release 4 (Nahant Update 5)
Kernel 2.6.9-55.ELsmp on an i686 login: xxxxx
Password: xxxxx
-sh-3.00$ cd etc
-sh-3.00$ cd conf
2. Using “vi”, a text editing program included as part of Red Hat Linux, enter the information displayed below. The cdata.conf file houses the channel configuration information for Tone Software ReliaTel. Channels are added into the system by creating a Channel entry. A channel in the text file must follow the following format. A Channel name begins with the open bracket and ends with the closed bracket. The entity name must start with “c-“ and uses the following format: c-NAME where NAME can be any text value. In the sample configuration the IP address of the device being added to the database was used as the NAME. The chanType and chanSystem fields are Tone Software ReliaTel provided information. These parameters
distinguish what software process receives information and how that information is processed by Tone Software ReliaTel. The chanEmulator must be set to “4410” when an Avaya
Communication Manager is being managed. The account field is the IP address of the system being managed. The acc_device field is a combination of the IP address of the system, a colon and the communication port of the access method used when accessing the device from Tone Software ReliaTel. For example, a device with an IP address of “192.168.10.2” and an access method using direct System Administration Terminal (SAT) telnet access (which uses port 5023) would be “192.168.10.2:5023”. Other supported access methods include telnet and ssh. Telnet uses the standard port 23. In order to use ssh Tone Software will need to provide the user with the correct path and string needed to invoke ssh. All three access methods were tested (telnet, ssh and SAT telnet). Additional entries are created using the exact same format. Repeat this process for every Avaya Communication Manager being managed. For Avaya 87XX Servers remember to add all three IP addresses associated to the redundant systems. This includes both physical addresses assigned to each individual 87XX Server and the virtual IP address assigned to both
ystems. s
# Avaya Development Connect Lab channels configuration
[c-192.168.10.254] chanType = SNMPMGR chanSystem = Avaya chanEmulator = 4410 account = 192.168.10.254 acc_device = 192.168.10.254:5023
3. Once the changes to the cdata.conf text file have been made, the user must re-initialize the application using the procedure listed below. Repeat this process for each new device added to
he system. t
=~=~=~=~=~=~=~=~=~= PuTTY log 2007.06.21 13:37:35 ~=~=~=~=~=~=~=~= Red Hat Enterprise Linux AS release 4 (Nahant Update 5)
Kernel 2.6.9-55.ELsmp on an i686 -sh-3.00$ pkill –HUP dapmgr
-sh-3.00$ rc-cent rctype=n center=AvayaDevConnect
GsK; Reviewed: SPOC 7/27/2007
Solution & Interoperability Test Lab Application Notes ©2007 Avaya Inc. All Rights Reserved.
15 of 19 TS-ReliaTel-ACM
Step Description
4. Using a web browser, open a connection to the Tone Software ReliaTel. For example, in the sample configuration the IP address of “192.168.100.50” was assigned to Tone Software ReliaTel server and the following URL was used to access the system
http://192.168.100.50:8080/ems. The user will need to provide a login and password in order to
access Tone Software ReliaTel. Refer to Section 10 [3] for information such as default credentials used for Tone Software ReliaTel.
6. The user is presented with the Hierarchy View web page. This page displays the active alarms that have been received. Tone Software ReliaTel provides default pattern matching on traps sent from Avaya Communication Manager, however, the default parameters for any trap can be modified. To demonstrate this feature the test trap generated from every system in the test was relabeled “Avaya Diagnostic Test Trap” and the specific trap from host “192.168.205.2” was modified such that the Level would be interpreted as Major over Minor.
7. From the Hierarchy View page, the user can click on any of the specific device entities to obtain more detailed SNMP information or to access the device (based on the access type defined from Step 1).
GsK; Reviewed: SPOC 7/27/2007
Solution & Interoperability Test Lab Application Notes ©2007 Avaya Inc. All Rights Reserved.
17 of 19 TS-ReliaTel-ACM
Step Description
8. From the Entity Details web page, the user can click the Access console text to open up an additional window (not shown) with access to the system based on the access type configured in Step 1.
6. Interoperability Compliance Testing
The interoperability testing focused on verifying Tone Software ReliaTel capability to receive and interpret SNMP version 2c traps from Avaya Communication Manager and Avaya SIP Enablement Services.
6.1. General Test Approach
The general test approach was to configure the Tone Software ReliaTel database to monitor the systems depicted in Figure 1. SNMP version 2c was used and test traps were generated from each system and verified to be properly interpreted by Tone Software ReliaTel. Tone Software ReliaTel was verified to be capable of performing in-band access to the devices monitored using telnet or ssh.
6.2. Test Results
Tone Software ReliaTel passed all test cases. Tone Software ReliaTel was verified to be capable of receiving and interpreting SNMP version 2c traps from Avaya Communication Manager and Avaya SIP Enablement Services. Tone Software ReliaTel was verified to be capable of in-band
Services.
7. Verification Steps
This section describes some of the verification steps that can be taken to validate the configuration used for testing.
• Verify the Tone Software ReliaTel management station has IP connectivity to the devices being monitored. This can be done on the console of Tone Software ReliaTel by issuing the “ping” command from a terminal window.
• Verify the entity details configured for the device being monitored. See Section 5 Step 2.
8. Support
Technical support for Tone Software ReliaTel can be obtained through the following: • Phone: 1-800-833-8663
• Email: [email protected]
9. Conclusion
These Application Notes demonstrate how to configure Tone Software ReliaTel to interoperate with Avaya Communication Manager and Avaya SIP Enablement Services using SNMP version 2c. These Application Notes also demonstrate how to configure Tone Software ReliaTel to support multiple Avaya Communication Manager and/or Avaya SIP Enablement Services systems.
10. Additional References
The documents referenced below were used for additional support and configuration
information. The Avaya documentation was obtained from http://support.avaya.com. The Tone Software documentation was obtained from http://www.tonesoft.com (access to Tone Software documentation may require a support account).
[1] Administrator Guide for Avaya Communication Manager, February 2007, Issue 3.1, Document Number 03-300509
[2] Installing & Administering SIP Enablement Services, March 2007, Issue 2.1, Document Number 03-600768
GsK; Reviewed: SPOC 7/27/2007
Solution & Interoperability Test Lab Application Notes ©2007 Avaya Inc. All Rights Reserved.
19 of 19 TS-ReliaTel-ACM
©2007 Avaya Inc. All Rights Reserved.
Avaya and the Avaya Logo are trademarks of Avaya Inc. All trademarks identified by ® and ™ are registered trademarks or trademarks, respectively, of Avaya Inc. All other trademarks are the property of their respective owners. The information provided in these Application Notes is subject to change without notice. The configurations, technical data, and
recommendations provided in these Application Notes are believed to be accurate and
dependable, but are presented without express or implied warranty. Users are responsible for their application of any products specified in these Application Notes.
Please e-mail any questions or comments pertaining to these Application Notes along with the full title name and filename, located in the lower right corner, directly to the Avaya