AL; Reviewed:
SPOC 2/24/2006 Solution & Interoperability Test Lab Application Notes ©2006 Avaya Inc. All Rights Reserved. SonicVPN-NAT 1 of 31
Avaya Solution & Interoperability Test Lab
Application Notes for Configuring a SonicWALL VPN with an
Avaya IP Telephony Infrastructure - Issue 1.0
Abstract
These Application Notes describe the steps for configuring SonicWALL’s VPN to support an Avaya IP Telephony infrastructure consisting of a Main site with Avaya Communication Manager, and two branch sites. During compliance testing, H.323 telephone calls traversing the VPN tunnel were successfully established and maintained while competing non-VoIP traffic queued according to bandwidth reservation defined in the SonicWALL devices. In addition, non-VoIP network traffic using Network Address Translation (NAT) outside of the VPN tunnel was successfully demonstrated. Information in these Application Notes has been obtained through DeveloperConnection compliance testing and additional technical discussions. Testing was conducted via the DeveloperConnection Program at the Avaya Solution and Interoperability Test Lab.
AL; Reviewed:
SPOC 2/24/2006 Solution & Interoperability Test Lab Application Notes ©2006 Avaya Inc. All Rights Reserved. SonicVPN-NAT 2 of 31
1. Introduction
These Application Notes describe a compliance-tested solution comprised of Avaya Communication Manager, Avaya IP Telephones, and SonicWALL Unified Threat Management (UTM) devices. The SonicWALL UTM devices tested were the SonicWALL PRO 4060 and TZ 170.
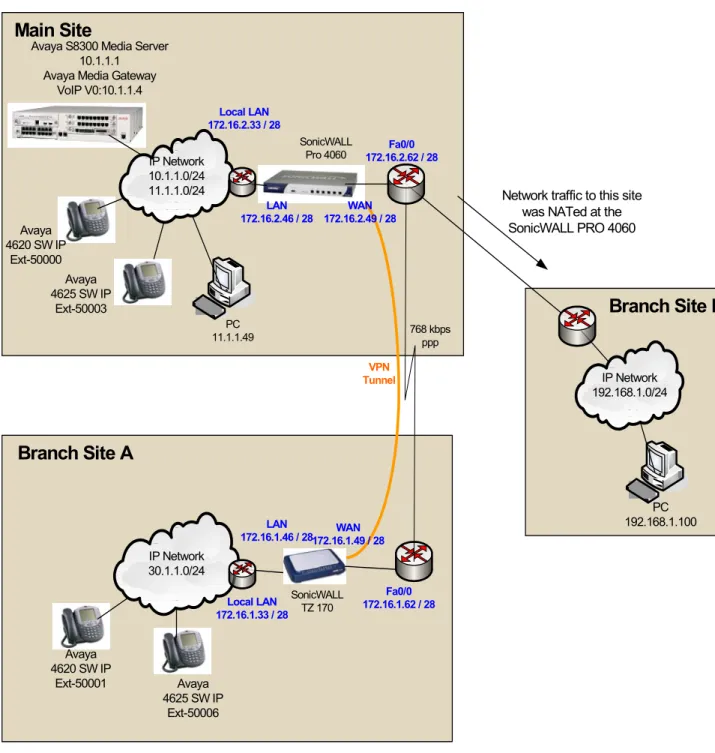
The sample configuration simulates an enterprise with a Main Site, Branch Site A, and Branch Site B. The Main Site and Branch Site A are connected via a 768Kbps PPP WAN link. An Avaya S8300 Media Server at the Main Site is responsible for supporting Avaya IP telephones at the Main Site and Branch Site A. A SonicWALL UTM device is installed at these two sites between the WAN router and the local IP networks. Although the SonicWALL UTM device is capable of functioning as a firewall, that was not the focus of the compliance testing. A single VPN tunnel was established between the SonicWALL PRO 4060 at the Main Site and the TZ 170 at the Branch Site A. The SonicWALL UTM devices were configured to automatically recognize RTP traffic flow negotiated by the H.323 protocol and provide guaranteed bandwidth for the call. Guaranteed bandwidth for two simultaneous Avaya VoIP telephone calls was configured in the SonicWALL UTM devices.
Branch Site B simulated a PC only user site with no Avaya VoIP requirement. This site was used to demonstrate and verify that SonicWALL Network Address Translation does not interfere with Avaya VoIP traffic traversing the VPN tunnel between the Main Site and Branch Site A.
AL; Reviewed:
SPOC 2/24/2006 Solution & Interoperability Test Lab Application Notes ©2006 Avaya Inc. All Rights Reserved. SonicVPN-NAT 3 of 31
1.1. Configuration
Figure 1 illustrates the configuration used in these Application Notes. All Avaya IP telephones are registered with Avaya Communication Manager in the Main Site. A 768K PPP link simulating a WAN link connects the Main Site and Branch Site A while the SonicWALL UTM establishes the VPN tunnel over this link. A separate 10Mbps link simulating a WAN link connects the Main Site and Branch Site B. All data traffic destined to Branch Site B is NAT to the SonicWALL PRO 4060 WAN interface IP address.
Avaya 4620 SW IP
Ext-50000
Fa0/0 172.16.1.62 / 28 SonicWALL Pro 4060 SonicWALL TZ 170 768 kbps ppp LAN 172.16.1.46 / 28
LAN 172.16.2.46 / 28
Fa0/0 172.16.2.62 / 28 Local LAN
172.16.2.33 / 28
Local LAN 172.16.1.33 / 28
Avaya 4620 SW IP
Ext-50001 Avaya 4625 SW IP
Ext-50003
Avaya 4625 SW IP
Ext-50006
VPN Tunnel
WAN 172.16.1.49 / 28
Avaya S8300 Media Server 10.1.1.1 Avaya Media Gateway
VoIP V0:10.1.1.4 ` PC 192.168.1.100 ` PC 11.1.1.49 IP Network 192.168.1.0/24 IP Network 10.1.1.0/24 11.1.1.0/24 IP Network 30.1.1.0/24 WAN 172.16.2.49 / 28
Network traffic to this site was NATed at the SonicWALL PRO 4060 Main Site
Branch Site A
Branch Site B
AL; Reviewed:
SPOC 2/24/2006 Solution & Interoperability Test Lab Application Notes ©2006 Avaya Inc. All Rights Reserved. SonicVPN-NAT 4 of 31
2. Equipment and Software Validated
The following equipment and software/firmware were used for the sample configuration provided:
Equipment Software/Firmware
Avaya S8300 Media Server with G700 Media
Gateway Avaya Communication Manager 3.0.1 (R0.13x.00.0.346.0)
Avaya 4620SW IP Telephones (H.323) 2.2.3
Avaya 4625SW IP Telephones (H.323) 2.5
SonicWALL Pro4060 SonicOS Enhanced 3.2.0.0-20e
SonicWALL TZ170 SonicOS Enhanced 3.2.0.0-20e
3. SonicWALL Unified Threat Management
The SonicWALL Unified Threat Management (UTM) devices SonicWALL PRO 4060 and TZ 170, were used to establish a VPN tunnel between the Main Site and Branch site A and provide Network Address Translation between the Main Site and Branch Site B. The following steps outline the configuration for SonicWALL Unified Threat Management devices and the VPN tunnel.
The steps in this section depict the screen displays for the SonicWALL PRO 4060 at the Main Site. Repeat these steps for the SonicWALL TZ 170 at Branch Site A with the appropriate IP address information.
AL; Reviewed:
SPOC 2/24/2006 Solution & Interoperability Test Lab Application Notes ©2006 Avaya Inc. All Rights Reserved. SonicVPN-NAT 5 of 31
3.1. General SonicWALL UTM Configuration
This section presents the SonicWALL VPN tunnel configuration.Step Description
1. Enter the IP address of the SonicWALL PRO 4060 into the Web Browser. Enter the appropriate Name and Password to log into the system.
AL; Reviewed:
SPOC 2/24/2006 Solution & Interoperability Test Lab Application Notes ©2006 Avaya Inc. All Rights Reserved. SonicVPN-NAT 6 of 31
Step Description
2. The System>Status screen is displayed after successfully logging on. Click on the
AL; Reviewed:
SPOC 2/24/2006 Solution & Interoperability Test Lab Application Notes ©2006 Avaya Inc. All Rights Reserved. SonicVPN-NAT 7 of 31 3. Under the expanded Network tab on the left, select Address Objects. Click the Add
button in the Address Objects panel to display the Add Address Objects pop-up window.
AL; Reviewed:
SPOC 2/24/2006 Solution & Interoperability Test Lab Application Notes ©2006 Avaya Inc. All Rights Reserved. SonicVPN-NAT 8 of 31
Step Description
4. Define all the IP networks that will be traversing the VPN tunnel. Click OK to save after entering the information. There are three IP networks and two hosts in the sample configuration that need to be defined. The IP Networks and host information are as follows:
Name: Zone Assignment
Type Network Netmask
10.1.1.x LAN Network 10.1.1.0 255.255.255.0
11.1.1.x LAN Network 11.1.1.0 255.255.255.0
30.1.1.x VPN Network 30.1.1.0 255.255.255.0
LAN Router LAN Host 172.16.2.33 N/A
Avaya Media Gateway
LAN Host 10.1.1.4 N/A
Repeat step 3 and 4 until all the IP networks and hosts above are defined.
AL; Reviewed:
SPOC 2/24/2006 Solution & Interoperability Test Lab Application Notes ©2006 Avaya Inc. All Rights Reserved. SonicVPN-NAT 9 of 31 5. Define the group where the Address Objects belong. In the sample configuration, there
were two groups. The Local Networks was composed of all the locally connected IP networks, and the Remote VPN Networks was composed of all the IP networks on the other end of the VPN tunnel.
AL; Reviewed:
SPOC 2/24/2006 Solution & Interoperability Test Lab Application Notes ©2006 Avaya Inc. All Rights Reserved. SonicVPN-NAT 10 of 31
Step Description
6. At the Add Address Object Group window, enter the name for the network group. The sample configuration used the name Local Networks. Highlight the desired networks to be included in this group on the left, then click -> to move the highlighted objects to the right. Click OK to complete.
AL; Reviewed:
SPOC 2/24/2006 Solution & Interoperability Test Lab Application Notes ©2006 Avaya Inc. All Rights Reserved. SonicVPN-NAT 11 of 31 8. Define the routing configuration of the SonicWALL PRO 4060 by clicking on Routing
under the Network tab on the left. Click Add under the Route Policies panel to display the Add Route Policy pop-up windows.
9. Define a route policy as shown:
Traffic from Any source destined to the Local Networks for Any service use LAN Router gateway reachable from interface X0 with a metric of 1.
AL; Reviewed:
SPOC 2/24/2006 Solution & Interoperability Test Lab Application Notes ©2006 Avaya Inc. All Rights Reserved. SonicVPN-NAT 12 of 31
3.2. Configure the VPN tunnel for the SonicWALL UTM devices
Step Description
1. Begin configuration of the VPN tunnel by clicking on Settings under the VPN tab on the left. Click Add under the VPN policies panel to display the Security Policy pop-up window.
AL; Reviewed:
SPOC 2/24/2006 Solution & Interoperability Test Lab Application Notes ©2006 Avaya Inc. All Rights Reserved. SonicVPN-NAT 13 of 31 2. In the General tab of the Security Policy pop-up window, enter the following
information for the VPN tunnel.
Name: Avaya DevConnect (a descriptive name for the VPN tunnel)
IPsec Primary Gateway Name or Address:
172.16.1.49 (the IP address of the remote SonicWALL’s WAN
interface)
IPsec Secondary Gateway Name or Address:
0.0.0.0
Shared Secret: 1234 (a secret string that will be entered into both SonicWALL devices) Click on the Network tab after entering the above information.
AL; Reviewed:
SPOC 2/24/2006 Solution & Interoperability Test Lab Application Notes ©2006 Avaya Inc. All Rights Reserved. SonicVPN-NAT 14 of 31
Step Description
3. Under the Network tab, select Local Networks and Remote VPN Networks as defined in Section 3.1 step 6 and 7 respectively. Click on the Proposals tab.
4. All the fields in the Proposal tab were left at the default value in the sample configuration. Click on the Advanced tab to continue.
AL; Reviewed:
SPOC 2/24/2006 Solution & Interoperability Test Lab Application Notes ©2006 Avaya Inc. All Rights Reserved. SonicVPN-NAT 15 of 31 5. Under the Advanced tab, Enable Keep Alive by clicking the check box on the left.
AL; Reviewed:
SPOC 2/24/2006 Solution & Interoperability Test Lab Application Notes ©2006 Avaya Inc. All Rights Reserved. SonicVPN-NAT 16 of 31
3.3. Configure the Firewall Access Rules and Bandwidth Reservation for
the SonicWALL VPN Tunnel.
This section defines the necessary Firewall Access Rules and Bandwidth Reservation for VoIP traffic for the VPN Tunnel.
Step Description
1. Begin by defining the Bandwidth for the WAN interface by selecting Interfaces under the Network tab on the left. Click on the icon on the right for the WAN Zone under the Interface Settings panel.
AL; Reviewed:
SPOC 2/24/2006 Solution & Interoperability Test Lab Application Notes ©2006 Avaya Inc. All Rights Reserved. SonicVPN-NAT 17 of 31 2. From the Edit Interface pop-up window, select the Advanced tab. Enable bandwidth
management by checking the Enable Egress Bandwidth Management and Enable Ingress Bandwidth Management check box. Enter the appropriate Egress and Ingress Bandwidth in kbps. The sample configuration was configured with 10,000 kbps as shown below. This number will be used as the basis for calculating Bandwidth Reservation.
AL; Reviewed:
SPOC 2/24/2006 Solution & Interoperability Test Lab Application Notes ©2006 Avaya Inc. All Rights Reserved. SonicVPN-NAT 18 of 31
Step Description
3. Now define the Firewall services by selecting Services under the Firewall tab on the left. Click on Add under Services panel to display the Add Service pop-up window.
AL; Reviewed:
SPOC 2/24/2006 Solution & Interoperability Test Lab Application Notes ©2006 Avaya Inc. All Rights Reserved. SonicVPN-NAT 19 of 31 4. Enter the following information for the new Firewall service.
Name: Any UDP 1025+ (a descriptive name for the Firewall service)
Protocol: UDP(17)
Port Range: 1025 - 65535
This rule is designed to filter out all UDP traffic that has not been negotiated using the H.323.
AL; Reviewed:
SPOC 2/24/2006 Solution & Interoperability Test Lab Application Notes ©2006 Avaya Inc. All Rights Reserved. SonicVPN-NAT 20 of 31
Step Description
5. From the Firewall’s Services display, click Add Group under the Service Groups panel to add a new Service Group.
6. At the Add Service Group pop-up window, enter a name for the new Service Group. The sample network used the name H323. Highlight H323 Call Signaling and H323 Gatekeeper RAS from the left, and then click -> to move the selected Services to the right panel. Click OK to complete.
AL; Reviewed:
SPOC 2/24/2006 Solution & Interoperability Test Lab Application Notes ©2006 Avaya Inc. All Rights Reserved. SonicVPN-NAT 21 of 31 7. Select Access Rules under the Firewall tab on the left to configure the Firewall’s rules.
Select Matrix to better display all the selections. There are two sides of the firewall that need to be configured. One is LAN to VPN and the other is VPN to LAN. Select the
AL; Reviewed:
SPOC 2/24/2006 Solution & Interoperability Test Lab Application Notes ©2006 Avaya Inc. All Rights Reserved. SonicVPN-NAT 22 of 31
Step Description
8. Click on Add under the Firewall > Access Rules > LAN > VPN panel to add a new Access Rule.
AL; Reviewed:
SPOC 2/24/2006 Solution & Interoperability Test Lab Application Notes ©2006 Avaya Inc. All Rights Reserved. SonicVPN-NAT 23 of 31 9. Under the General tab of the Add Rules pop-up window, enter the following
information:
Action: Allow radio button selected
Service: H323 (defined in section 3.3 step 6)
Source: Local Networks (defined in section 3.1 step 6)
Destination: Remote VPN Networks (defined in section 3.1 step 7) Click on the Bandwidth tab to continue.
AL; Reviewed:
SPOC 2/24/2006 Solution & Interoperability Test Lab Application Notes ©2006 Avaya Inc. All Rights Reserved. SonicVPN-NAT 24 of 31
Step Description
10. Under the Bandwidth tab, the bandwidth and priority are defined for the Outbound and Inbound traffic.
The H323 Access Rule in the sample network has defined the following:
Outbound Bandwidth Management Guaranteed Bandwidth (%): 5
Maximum Bandwidth (%): 10
Bandwidth Priority: 0highest
Inbound Bandwidth Management Guaranteed Bandwidth (%): 5
Maximum Bandwidth (%): 10
Bandwidth Priority: 0 highest
After entering all the information, click OK to complete.
Note: The percentage is based on the WAN interface bandwidth defined in Section 3.3 Step 2, not the bandwidth of the VPN tunnel.
AL; Reviewed:
SPOC 2/24/2006 Solution & Interoperability Test Lab Application Notes ©2006 Avaya Inc. All Rights Reserved. SonicVPN-NAT 25 of 31 11. Click Add again from the Firewall > Access Rule > LAN > VPN menu in Section 3.3
Step 6 to add another access rule.
Under the General tab of the Access Rules pop-up window, enter the following information:
Action: Discard radio button selected
Service: Any UDP 1025 + (defined in section 3.3 step 2)
Source: 10.1.1.x LAN (defined in section 3.1 step 4)
Destination: Remote VPN Networks (defined in section 3.1 step 7) This rule discards RTP traffic that has not been negotiated using H.323. Click on the OK tab to complete.
12. After entering the “H323” and “Any UDP 1025 +” access rules, make sure the rules order is as displayed in Step 8 of this section. The “H323” must be before the “Any UDP 1025 +” Access Rule. If necessary, use the icon to move the selected rule up or down to obtain the appropriate order.
AL; Reviewed:
SPOC 2/24/2006 Solution & Interoperability Test Lab Application Notes ©2006 Avaya Inc. All Rights Reserved. SonicVPN-NAT 26 of 31
Step Description
13. Now configure the VPN to LAN access Rule by selecting Access Rules under the
Firewall tab on the left. Select Matrix to better display the selections. Select the icon in the third row and first column to configure the VPN to LAN access rule.
AL; Reviewed:
SPOC 2/24/2006 Solution & Interoperability Test Lab Application Notes ©2006 Avaya Inc. All Rights Reserved. SonicVPN-NAT 27 of 31 14. Repeat Steps 8-13 in this Section to configure the same Access Rules for the VPN to
LAN direction.
Note: Make sure in Step 9 the Source is Remote VPN Networks and the Destination is
AL; Reviewed:
SPOC 2/24/2006 Solution & Interoperability Test Lab Application Notes ©2006 Avaya Inc. All Rights Reserved. SonicVPN-NAT 28 of 31
Step Description
15. Select Settings under the VoIP tab on the left. Check the Enable H.323 Transformations field. Click Apply to complete.
AL; Reviewed:
SPOC 2/24/2006 Solution & Interoperability Test Lab Application Notes ©2006 Avaya Inc. All Rights Reserved. SonicVPN-NAT 29 of 31
4. Interoperability Compliance Testing
The interoperability compliance testing focused on assessing the ability of the SonicWALL PRO 4060 and TZ170 to establish a VPN tunnel that would support an infrastructure consisting of Avaya Communication Manager, and Avaya 46xx IP telephones while providing guaranteed bandwidth management for Avaya VoIP traffic.
4.1. General Test Approach
The general test approach was to verify that the Avaya IP telephones could successfully place and receive calls through the network as shown in Figure 1 while competing with simulated non-VoIP low priority traffic. In addition, network traffic to Branch Site B was Network Address Translated to that of the IP address of the SonicWALL PRO 4060 WAN interface.
The main objectives were to verify:
• SonicWALL UTM devices can automatically allow RTP traffic streams based on H.323 signaling.
• Calls between telephones at the different locations were successfully completed and maintained with good voice quality.
• Multiple telephone calls between sites could be completed as per the desired bandwidth configured in the SonicWALL UTM devices.
• Non-VoIP traffic did not encroach upon the bandwidth reserved for the voice application.
• The solution supports G.711 and G.729 codecs.
• The solution supports DTMF.
• Preservation of Layer-3 DiffServ information.
• Network Address Translation (NAT) was implemented between the Main Site and Branch Site B.
4.2. Test Results
The objectives were successfully verified during compliance testing. Multiple telephone calls were successfully placed and received as per the bandwidth policy defined by the SonicWall UTM devices during varying levels of simulated competing traffic. Voice quality was good throughout testing regardless of traffic flow. DTMF was verified via access to the Meet-me Conference configured the Avaya Communication Manager.
5. Verification Steps
The following steps may be used to verify the configuration:
• Make sure all the SonicWALL UTM devices interfaces are reachable.
• Place and receive call from the Avaya telephones.
• From the SonicWALL UTM devices, verify the status of the VPN Link.
• From the SonicWALL UTM devices, verify the Access Rules are configured correctly by placing the mouse pointer over the bar chart icon in Step 8 Section 3.3. A pop-up window will display the packet count and byte processed by the Access Rule.
AL; Reviewed:
SPOC 2/24/2006 Solution & Interoperability Test Lab Application Notes ©2006 Avaya Inc. All Rights Reserved. SonicVPN-NAT 30 of 31
6. Support
For technical support on the SonicWALL UTM, contact SonicWALL, Inc. at
http://www.sonicwall.com/support/contact.html
North America 1-888-777-1476
7. Conclusion
These Application Notes have described the administration steps required to configure the
SonicWALL UTM devices to interoperate with and prioritize WAN bandwidth for Avaya IP H.323 phone traffic. During compliance testing, H.323 phone calls traversing the WAN link were
successfully established and maintained while sharing the link with non-VoIP traffic.
8. Additional References
[1] Administrator Guide for Avaya Communication Manager, Doc # 03-300509, Issue 1, June 2005 [2] Avaya Communication Manager Advanced Administration Quick Reference, Doc # 03-300364,
Issue 2, June 2005 Release 3.0
[3] SonicOS Enhanced 3.0 Administrator’s Guide
Product documentation for Avaya products may be found at
http://support.avaya.com
Product documentation for SonicWALL products may be found at
AL; Reviewed:
SPOC 2/24/2006 Solution & Interoperability Test Lab Application Notes ©2006 Avaya Inc. All Rights Reserved. SonicVPN-NAT 31 of 31 ©2006 Avaya Inc. All Rights Reserved.
Avaya and the Avaya Logo are trademarks of Avaya Inc. All trademarks identified by ® and ™ are registered trademarks or trademarks, respectively, of Avaya Inc. All other trademarks are the property of their respective owners. The information provided in these Application Notes is subject to change without notice. The configurations, technical data, and recommendations provided in these Application Notes are believed to be accurate and dependable, but are
presented without express or implied warranty. Users are responsible for their application of any products specified in these Application Notes.
Please e-mail any questions or comments pertaining to these Application Notes along with the full title name and filename, located in the lower right corner, directly to the Avaya