e-Template Instructions
It’s easy to load an e-template into Outlook. Aside from one difference, it’s just like attaching a file to an email message. Here’s a quick start. More detailed instructions are provided in Section III below.
To get started with the templates right away:
These instructions will get you started with the Purdue Extension e-templates. These instructions include the following sections:
I. Downloading the Templates II. Setting up Outlook
III. Loading the Templates
To download the Outlook templates:
1. Go to the Purdue Extension Communication and Marketing Resources site (www.
ag.purdue.edu/extension/communication). 2. Go to the “Downloads” section, select
“Templates,” , and then “For Outlook.” 3. Click on link for the template you want. 4. In your browser menu, go the the file menu
and select “Save As.”
5. Name the template something you will remember.
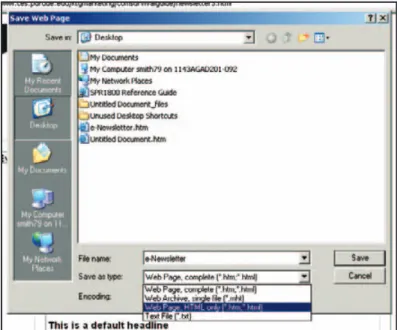
6. Under “Save as type:” select “Web Page, HTML only (*.htm, *.html)” (see Figure 1).
Quick Start
1. Create a new email message.
2. Click on the “Insert” tab and select “Attach File” (just like you would normally do to attach any file).
3. Find the e-template file on your computer and select it.
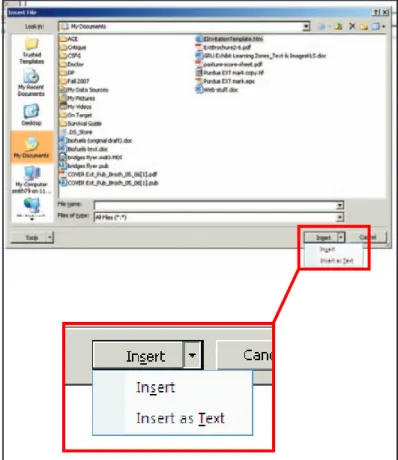
4. In the dialogue box, click on the arrow next to the “Insert” button and select “Insert as Text,” and then hit your RETURN or ENTER key (Figure 4).
Detailed Instructions
IV. Customizing Templates
V. Adding Links for email and Websites VI. Saving, Printing, and Sending
VII. Adding Space for More Articles (e-newsletter Template)
VIII. Adding Graphics
I — Downloading the Templates
Figure 2 (Above). Select “HTML” in the “Options” tab.
Figure 3. Select “HTML” in the “Options” dialogue box.
II — Setting up Outlook
Before starting your first invitation, you must set up Outlook to send emails in HTML format. To do this, you can:
Start a new email message, click on the “Options” tab, and select “HTML.” If you select this option, it may only apply to the current message (Figure 2).
OR
1. Go to the “Tools” tab and select “Options” to open the “Options” dialogue box.
2. Click on the “Mail Format” tab.
3. Select “HTML” where it says, “Compose in this message format:” (Figure 3).
4. Click “OK.” By doing this, you will send all future messages in HTML format.
Once you’re ready to use one of the e-templates, you’ll need to load it into a new email message. To do this:
1. Create a new email message. Remember, select “HTML” on the “Options” tab.
2. Click on the “Insert” tab and select “Attach File” (just like you would normally do to attach any file).
3. Find the e-template file you saved on your computer.
4. In the dialogue box, click on the arrow next to the “Insert” button and select “Insert as Text” (Figure 4).
Note: You must select “Insert as Text” or the template will not appear in your message (instead, it will just be an attached file).
Note: If you are working offline, you may not see the graphics that come with the template. Don’t panic, those graphics are online, not on your computer. When you send your message, the recipients automatically download the graphics from the Purdue Extension website.
III—Loading the Templates
Figure 4. Select “Insert as Text” to make sure the template appears in the body of your email message. If you don’t, the template file will just attach to your email like any other file.
Once you’ve loaded the template, customize it to suit your needs. You can update the fields provided in the templates or create your own. Remember, once you customize a template, you can save that template so that you don’t have to add your county-specific information each time you load the template. See Section VI below. To add your own content, simply type in your new text or copy and paste it from another file.
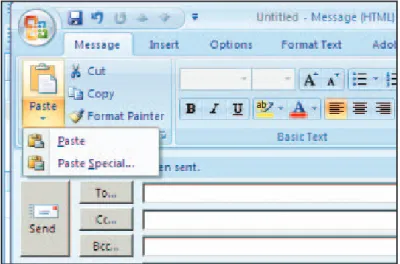
Tip: When you copy and paste text, the pasted text often has the same formatting as your source document. But you can keep the formatting of the email message by using the “Paste Special” command:
1. Copy the text from your source document (such as a Word file).
2. On the “Message” tab, click on the arrow under the “Paste” button and select “Paste Special” (Figure 5).
3. In the dialogue box, select “Unformatted Text” (Figure 6). The text you pasted should retain the formatting of the original message. Of course, this doesn’t always work exactly as planned — the software sometimes refuses to comply, so make sure to double-check.
IV—Customizing the Templates
Figure 6. Select “Unformatted Text” to retain the formatting in the message.
Figure 5. Select “Paste Special” from the “Paste” button.
You can modify your templates so readers can click on a link that will allow them to send email or visit a website for more information. To create a link for an email address or website, follow the instructions below.
To add email links:
1. Highlight the email address in your invitation.
2. Right click your mouse and select
“Hyperlink” to bring up the “Edit Hyperlink” dialogue box (Figure 7).
3. Click on the “E-mail Address” button. 4. Type in the email address exactly as it
should appear in the “Text to Display” and “E-mail Address” boxes.
V— Adding Links for email and Websites
Note: It’s a good rule of thumb to display the actual e-mail address (purdue@purdue. edu) rather than just a person’s name (John Purdue). Why? Not all your recipients allow HTML emails. If you display the actual email address, the information still comes through in your email. But if the displayed text is “John Purdue,” then the reader won’t see his email address.
5. In the “Subject:” box, you can type in the subject line for the email that the reader will send. For example, type in “Forage Workshop RSVP” so that the recipient will know what the e-mail is about.
To add a we site link:
1. Highlight the website address in your invitation.
2. Right click you mouse and select “Hyperlink” to bring up the “Edit Hyperlink” dialogue box (Figure 8).
3. Click on the “Existing File or Web Page” button.
4. Type in the exact URL for the website in the “Text to display:” and “Address” boxes. Note: Like the email address, it’s a good idea to display the actual website address in case your recipient doesn’t accept HTML emails.
5. Click “OK.”
V— Adding Links for e-Mail and Web Sites (continued)
Figure 7 (Above). Adding email links. Figure 8. Adding website links.
Before sending your message, it is a good idea to save it first. You can load the saved version to make changes or to send again another time.
Saving Your Changes
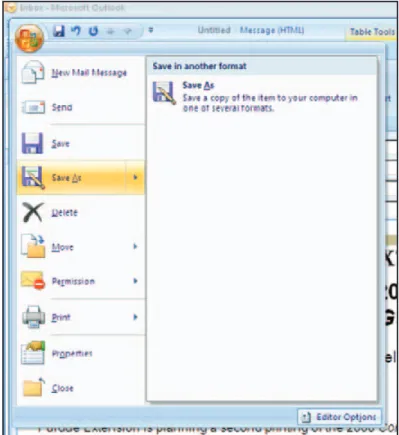
1. Click on the “Office” button in your message and select “Save As” (Figure 9).
2. Select the folder where you want to save the invitation.
3. Name the file.
Note: Be certain to give file a different name than the generic template.
4. Where it says, “Save as type:” select “HTML only (*.htm, *.html).”
5. Click “Save.”
To load the saved invitation in the future, just follow the steps from Section III.
Printing Your Message
To print, click on the “Office” button and select “Print.”
VI — Saving, Printing, and Sending
Figure 9. Click on the Office button (that’s the Office symbol in the top left corner) and select “Save As.” If you want to print your message, select “Print” from this menu.
Sending Your Message
It’s a good idea to test your message by mailing it to yourself or someone else you work with first. That way, you can catch any errors before sending it to all your recipients. If you save the message first, you can just reload and resend once you’ve made any corrections. Sending the messages is just like sending any email:
VI — Saving, Printing, and Sending (continued)
1. Enter your recipients’ email addresses in the “BCC: ” line — by adding the addresses to this line, you prevent the recipients from seeing the entire list of people who received this invitation.
2. Provide an appropriate entry on the “Subject:” line.
3. Click on the “Send” button. The e-newsletter template comes with space
for five “dummy” articles. If you don’t use all five “dummy” articles, simply delete the ones you
VII — Adding Space for More Articles (e-newsletter Template)
VIII — Adding Graphics
This section offers guidelines for adding photos and graphics to e-newsletters, shows you how to add graphics to the templates, and shows you how to modify graphics in the template.
Photo Guidelines
Adding graphics to your e-newsletter can enhance its appearance. But large or illegible graphics can make it a burden for readers or an embarrassment to you. Before inserting graphics, consider the following:
• Keep photos to a minimum. Many email users block or refuse to open messages with images.
• Optimize your images with a photo editor like PhotoShop first.
• Save images in JPG format.
• Keep image resolution at 72 dpi. Higher resolutions make for much larger file sizes
and slower download times.
• Keep images small. Few people can read, and even fewer will wait to download, an 8” X 10” photo.
• Don’t just resize images. The size of the image you are going to send in your newsletter should be the size of the image you load into it. In other words, don’t just resize a large photo in Outlook — the actual image file will still be large. So if you want a 2” X 2” image in your newsletter, make sure the file you load into Outlook begins at 2” X 2”. If you want a lot of photos, consider posting them to your website and providing a link to the page in your message. For more advice on images, see the Purdue Extension Communication and Marketing Resources site.
don’t use.
If you have to add space for more articles, just copy and paste one of the dummy articles.
Adding Graphics
To add graphics to your message:
1. Place the cursor in the spot where you want to insert the photo.
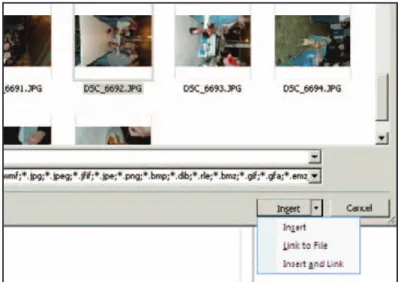
2. On the “Insert” tab, select “Picture.” 3. Find the photo on your computer, click
on the arrow next to the “Insert” button, and select “Insert and Link” (Figure 10). It’s important to “Insert and Link” here, otherwise your photo will not be sent properly.
Modifying Graphics
To modify graphics in your e-newsletter, simply select the photo and click on the “Format” tab in your message (Figure 11).
VIII — Adding Graphics (continued)
Figure 10. Select “Insert and Link” to make sure your photo will appear in your message.
Figure 11. The “Format” tab in your message allows you to modify various aspects of your photo or graphic.