EVault InfoStage™ 4.6
MS SQL Server Plug-In
Installation & Configuration Guide
March 2004
This manual describes how to install, backup and restore using MS SQL Server Plug-In, Version 4.6
MS SQL Server Plug-In Page 2 of 39
Contents
1
Introduction to MS SQL Server Plug-In
...5
1.1 Overview...5
1.2 Features...6
1.3 About this Guide...7
1.3.1Release notes...7
1.3.2On Line Helps...7
2
Installing the MS SQL Server Plug-In
...8
2.1 Install Errors...9
2.2 Licensing...10
2.3 Repairing or Uninstalling the Plug-In...11
3
Backups
... 12
3.1 Backup Information...12
3.2 Performing Backups...13
3.3 Create a New Agent...15
3.4 Create a Backup Task...17
3.5 Schedule the Backup...26
3.6 Check the Backup...27
3.7 Task Properties...29
3.8 Error Messages...30
4
Restores
... 31
4.1 Notes on Restores...32
4.2 Restoring SQL 2000...33
4.3 Databases...33
4.3.1Database types...33
4.3.2Recovering System Databases...34
4.3.2.1 Recovering the MASTER database 34 4.3.3Recovering User databases...35
4.4 SQL Bare Metal Restore...36
4.4.1Recovering from a worst case disaster...36
4.4.2Restoring the SQL Server Data...37
MS SQL Server Plug-In Page 3 of 39
Table of Figures
Figure 1. - Product Diagram 5
Figure 2. - Install error 9
Figure 3. - License Key 10
Figure 4. - Repair or Uninstall 11
Figure 5. - Agent Properties 16
Figure 6. - Backup Source Type 17
Figure 7. - MS SQL Server Instances 18
Figure 8. - MS SQL Server Login 19
Figure 9. - MS SQL Server Database Selection 20
Figure 10. - Backup Process 21
Figure 11. - Options 22
Figure 12. - Encryption 23
Figure 13. - Log Files 24
Figure 14. - Run, Schedule or Exit 25
Figure 15. - Safeset Properties 27
Figure 16. - Log File 28
MS SQL Server Plug-In Page 4 of 39
Revision: This manual is updated for Version 4.6 (March, 2004).
Software Version: 4.60.1495
Copyright 1997-2004 EVault, Inc. All rights reserved.
EVault, Inc. makes no representations or warranties with respect to the contents hereof and specifically disclaims any implied warranties of merchantability or fitness for any particular purpose. Furthermore, EVault reserves the right to revise this publication and to make changes from time to time in the content hereof without obligation of EVault to notify any person of such revision of changes. All companies, names and data used in examples herein are fictitious unless otherwise noted. No part of this document may be reproduced, transmitted, transcribed, stored in a retrieval system or translated into any language including computer language, in any form or by any means electronic, mechanic, magnetic, optical, chemical or otherwise without prior written permission of:
EVault, Inc.
c/o Corporation Trust Center 1209 Orange Street
Wilmington, New Castle Delaware 19801 www.EVault.com
EVault, EVault InfoStage, EVault Protect, and EVault DeltaPro, are registered trademarks of EVault, Inc. All other products or company names mentioned in this document are trademarks or registered trademarks of their respective owners. Acknowledgements: Two encryption methods, DES and TripleDES, include cryptographic software written by Eric Young. The Windows versions of these algorithms also include software written by Tim Hudson. Bruce Schneier designed Blowfish encryption.
The EVault InfoStage Agent, EVault InfoStage CentralControl, and EVault InfoStage Director applications (version 4.x only) now have the added encryption option of 128bit AES (Advanced Encryption Standard). Advanced Encryption Standard algorithm (named Rijndael, pronounced “Rain Doll”) was developed by cryptographers Dr. Joan Daemen and Dr. Vincent Rijmen. This algorithm was chosen by the National Institute of Standards and Technology (NIST) of the U.S. Department of Commerce to be the new Federal Information Processing Standard (FIPS). AES is not available when connecting to a Vault lower than version 4.1. See:http://csrc.nist.gov/encryption/aes/round2/r2report.pdf for details.
The EVault InfoStage Agent and EVault InfoStage Director applications (version 4.x only) also have the added security feature of an over the wire encryption method for data communications developed exclusively by EVault, Inc. Over the wire encryption is not available when connecting to a Vault lower than version 4.x.
MS SQL Server Plug-In Page 5 of 39
1 Introduction to MS SQL Server Plug-In
1.1 Overview
The MS SQL Server Plug-In has been designed to allow a user to perform a database backup on an MS SQL Server. The Plug-In is installed on top of the Agent on the database host, to perform the backups, either on demand (ad hoc), or scheduled.
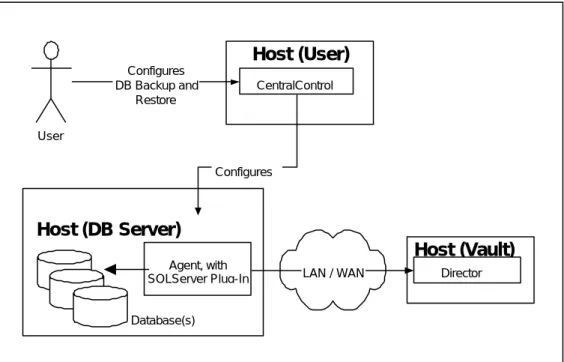
Figure 1. - Product Diagram
This diagram illustrates the basic product implementation.
• A user, typically a DBA, will configure the backup via the CentralControl application.
• CentralControl configures the agent, which may reside on a different host than CentralControl. However, the Agent and Plug-In must reside together on the MS SQL Server system.
• The User can now schedule a backup of the Database, at which time the
Agent, with the aid of the DB Plug-In, sends the database information to the Director.
Host (DB Server)
Host (User)
User
CentralControl
Agent, with SQLServer Plug-In
Database(s)
Host (Vault)
Director Configures
DB Backup and Restore
LAN / WAN Configures
MS SQL Server Plug-In Page 6 of 39
1.2 Features
The Plug-In application has its own installation program, but is operated and configured within the CentralControl program GUI.
• MS SQL Server 7 (SP4) or MS SQL Server 2000 runs on Windows 2000/2003
Server, or Advanced Server (SP4).
• The database(s) to be backed up must run on a single host.
• The Windows Agent and the MS SQL Server Plug-In must be together on the
same system running MS SQL Server. The Windows Agent and the MS SQL Server Plug-In must always have the same version number.
• If a database host is completely lost, the database software may be loaded and the database completely restored, after a full system restore. See Chapter 4.
• Hot backup - occurs without taking the database down.
• Restore may be to same or alternate database location, or to a flat file.
• Provides full and incremental backups.
• MS SQL Server 7.0 supports one (default) instance (i.e.: "computer_name"). MS SQL Server 2000 supports a default instance, and up to 15 Named instances (i.e.: "computer_name\instance_name").
• The Plug-In will dynamically determine what SQLServer client is installed.
· If it is SQLServer 7 client, the Plug-In will support access to the single instance of SQLServer 7 installed (if it exists).
· If it is SQLServer 2000 client, the Plug-In will support access to all instances of the server installed (regardless of what version they are).
MS SQL Server Plug-In Page 7 of 39
1.3 About this Guide
This guide is intended to be used in conjunction with other manuals that describe the Windows Agent, and the CentralControl.
1. CentralControl Operations Guide – This manual starts with a brief overview of how the products work. The chapters in the manual cover the following topics:
• Installing the main CentralControl software (GUI).
• Using the CentralControl GUI – Workspace, Agents, Agent Configurations, Tasks, Safesets, Catalogs and Log files.
• Performing backups – Types, Seeding, Mapped drives and databases, Options, Tape, Retentions, Notification, Expiration, Scheduling and Ad-hoc.
• Report Logs – Creating and Managing Log files.
• Data Security – User Authentication and Encryption.
• Open File Backup – Shared files, OTM, and OFM.
• Troubleshooting and Command Line Interface. 2. Windows Agent User Guide
• Agent for Windows Install
• Using the Agent for backups and restores
• Windows Systems Recovery
1.3.1 Release notes
Release Notes, which are shipped as a “ReadMe” text file with the product, contain “up to the minute” information on the released product, and contain an overview of new features, any known defect (bug) fixes incorporated since the last release, a description of any known issues, and a section on product support.
1.3.2 On Line Helps
CentralControl Help: The CentralControl application (GUI) has an online help, which contains information similar to the user manual. The help is accessed from the main pull-down menu, or by using the F1 function key. There is also context sensitive “WhatsThis?” help on each GUI screen.
Note: If the F1 Help screen is open (even minimized) the “What’s This” help will not be active. The F1 help must be closed for the “What’s This” help to function properly.
Installing MS SQL Server Plug-In Page 8 of 39
2 Installing the MS SQL Server Plug-In
The MS SQL Server Plug-In integrates into the existing Agent architecture and provides the user with the ability to backup/restore MS SQL Server database to/from the Director.
Installing the MS SQL Server Plug-In version 4.60 requires that you have previously installed the Windows Agent application, version 4.60. If your CentralControl application version is lower than 4.6, you must update it to version 4.60 before installing the MS SQL Server Plug-in. Also, your Director must be running Director, at least version 4.20 to use the MS SQL Server Plug-in.
If the SQL Server being backed up by the Plug-In was not installed as an original Microsoft product (that is, it has been resold/repackaged by a third party), you may get errors on trying to create an MS SQL task, such as “Failed to connect to the server.” The Agent log file may show “UNKNOWN ERROR in termRestore()” on every attempt to connect to the SQL Server. Get Status on the Agent may not show the SQL Server Plug-in, even though the license validates.
The problem is that the installation is missing the NTWDBLIB.DLL file, which should be in the installation directory. Contact support to obtain a copy of this file.
Note: For functions such as “Creating a new agent”, “Creating a backup task”, “Scheduling Backups”, and Disaster Recovery information, refer to the
“CentralControl Operations Guide” for more information on installing and using the Management Console software.
Installing MS SQL Server Plug-In Page 9 of 39
To install the MS SQL Plug-In double click on the “MS_SQL_Plug-In.exe” file. Or, use the Windows “Start”, “Run” sequence locating the path to the “MS_SQL_Plug-In.exe”
application. This will launch the “Install Wizard”. Follow the steps outlined in the Wizard. Briefly, the steps in a normal installation are:
1. A display shows the status of the files being extracted. Then, the Welcome screen is shown. Select Next.
2. The Support Note and MS SQL Release Note are shown. You can read or print
them. Select Next.
3. The Software License Agreement for Software is shown. You must choose Accept
to be able to continue. Select Next.
4. The Software License Agreement for Encryption is shown. You must choose
Accept to be able to continue. Select Next.
5. You are asked: “Would you like to install now?” Choose Yes. Select Next. The Setup Status is displayed.
6. The Installation Wizard complete message is shown. Click Finish.
Before you can use the Plug-In you must supply the license information. See the following section, on “Licensing”.
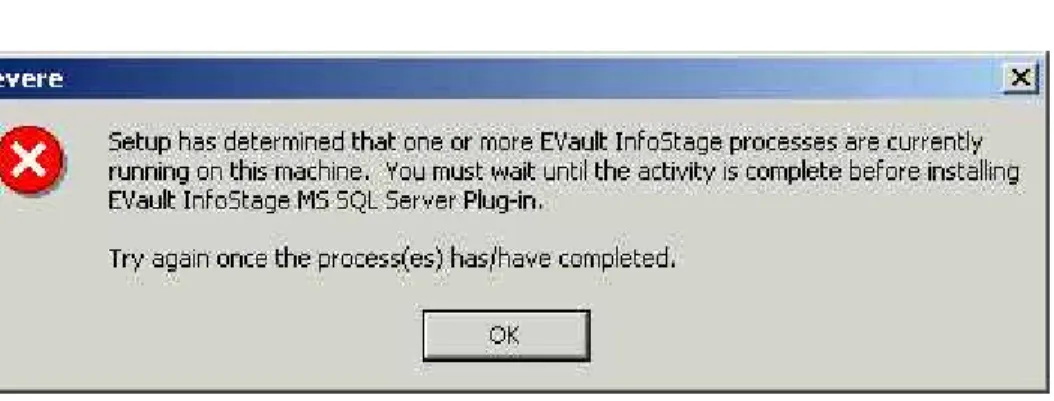
2.1 Install Errors
Figure 2. - Install error
If you receive an error similar to the figure above, and you have unsuccessfully waited, and tried again, you may have to re-boot the system.
Installing MS SQL Server Plug-In Page 10 of 39
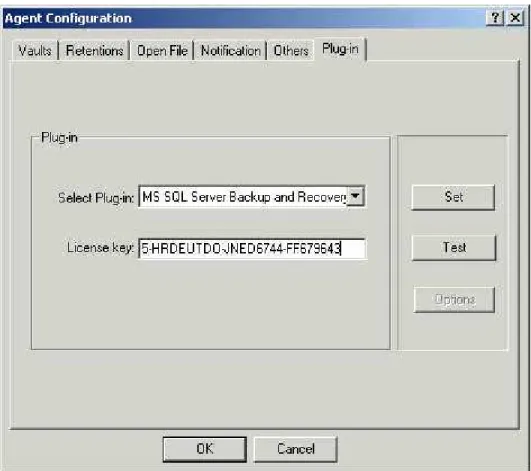
2.2 Licensing
Agent License info:
After installing the MS SQL Server Plug-In, you must supply license information before you can use the Plug-In.
Figure 3. - License Key
1. Obtain a license from EVault, or your service provider.
2. On the CentralControl program, under <AgentName>, -> Agent Configuration -> Plug-In (tab), Select the MS SQL Server Plug-In and enter the license key information.
3. Press Test, to ensure the license is correct/valid. If not, re-enter the data. 4. Press Set to save the information. Click OK to finish.
5. From the CentralControl program, if you create a new task, you should now be able to see “MS SQL Server” under Backup Source Type. See section 3.4 “Create a Backup Task”.
Installing MS SQL Server Plug-In Page 11 of 39
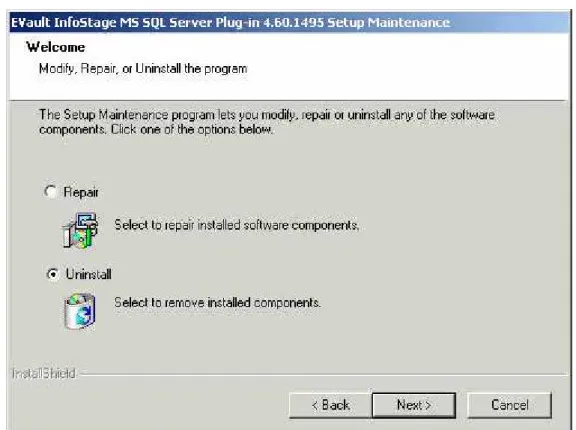
2.3 Repairing or Uninstalling the Plug-In
Figure 4. - Repair or Uninstall
An upgrade of the Plug-in is performed the same as a new install. The InstallShield
installation program will detect that a version already exists, and it will allow you to Repair, or Uninstall.
See the above diagram, and follow the Wizard instructions.
To uninstall the Plug-In, you can run the InstallShield program, and follow the Wizard. See the above diagram. Or, from Windows, you can:
1. Log onto the target system.
2. Choose Start > Settings > Control Panel. 3. Select Add/Remove Programs.
4. Select the Plug-in application.
5. Select Change/Remove. This takes you to the installation screen (above). Follow the Wizard instructions.
Backups Page 12 of 39
3 Backups
3.1 Backup Information
Before performing the MS SQL Server database Backup process, be sure you have all the information such as names, locations, passwords, etc. that the Wizard will prompt for. The table below is provided for reference.
System Requirement Customer/User supplied value Comments
New task name Name = Task used to talk to the
Agent with the MS SQL Server Plug-In
Vault profile Profile = Profile of an existing (already
created) Vault. Chosen from a pull-down menu.
Backup Source type Type = Select “MS SQL Server” from
the pull-down menu. MS SQL Server
Connection Information
Computer = Instance =
Authentication = NT or SQL User Name =
Password =
Dependent on user’s
configuration and DBA setup. Validates the fields, and allows access to the database.
MS SQL Server database selection
Database = Pull-down list of all available
databases. Network Account
Information
User Name = Password = Domain =
Supplies NT credentials to the server. Enables backup process to run across the network.
Quick file scanning Set on or off
Backup type Choose “Full” or “Incremental” First is always Full.
Encryption type Type =
Password =
If you select a type, you must supply a password
Log options Options =
Detail level = Copies =
User defined
Start the backup Immediate =
Schedule =
Backups Page 13 of 39
3.2 Performing Backups
To backup your MS SQL Server you will first need to add to your workspace the Agent with the MS SQL Server on it. Then create a new task in that agent, using “MS SQL Server” type. It is not recommended to do multiple tasks, at the same time, on the same database.
The Backup Wizard will direct the user through the process to create a task. The steps are described in detail in this chapter, but briefly, the steps are:
1. From the CentralControl GUI program (which communicates with the Agent and the Plug-In), create a new task.
2. Enter a Vault profile where the task will be targeted.
3. Select the source of the data that will be backed up by this task.
4. Supply the MS SQL Server connection information. Enter the MS SQL Server computer name. Then choose an instance from the “Select Server Instance” list. The list will have the first entry pre-selected as <Default>, designating the default instance. Other entries will be present only if they can be retrieved. 5. Next, choose the NT or SQL authorization option. (See the MS SQL Server
Help section on NT/SQL Authorization for more information.)
- If you choose the NT authorization button, access is by the NT logon
supplied user name and password. In that case, User Name and Password on this screen are not used.
- If you choose the SQL authorization button, access is determined by the User Name and Password on this screen.
6. Select a specific database for backup. Only one database at a time is backed up with each task. But there can be more than one task doing backups, on different databases.
7. Enter network account information to enable the backup process to run across the network – User name, password, and domain. This allows the Agent to connect to a local or remote database.
8. Select or de-select the “Quick file scanning” option. Note that the “deferred” option is not available here; the backup must be completed in one step.
9. If desired, select an encryption type and supply an encryption password. 10. Select logging options and level of detail, copies, and retention.
11. Start the backup (immediately), schedule it for later, or exit the Wizard without doing a backup, but still saving the backup task.
Backups Page 14 of 39
Log files are created on the CentralControl machine, under the directory, in directories with the task name. They are normally viewed from the CentralControl application screen.
Backup Notes:
1. MS SQL Server 7.0 does not allow incremental backups for databases with the ‘trunc.log on chkpt’ options. Likewise, MS SQL Server 2000 doesn’t allow incremental backups for databases if the model of database is set to Simple”. 2. MS SQL Server 7.0 does not allow incremental backups for databases after
switching the ‘trunc.log on chkpt’ options off (or truncating log) until at least one successful full backup. Likewise, MS SQL Server 2000 does not allow incremental backups for databases if the recovery model of database is set to “Simple”.
3. MS SQL Server Plug-In has standard backup/restore permission requirements for the logged user.
4. Backup Permissions: BACKUP DATABASE and BACKUP LOG permissions default to members of the db_owner fixed database role, who can transfer permissions to other users, and to members of the db_backupoperator fixed database role.
Backups Page 15 of 39
3.3 Create a New Agent
The CentralControl Operations Guide provides a more detailed look at, and understanding of, creating Agents and Tasks. This section of the User’s Guide is meant as a “quick reference” for the user.
1. In the CentralControl GUI screen, select a Workspace, and right-click to bring up the sub-menu.
2. Click once on New Agent. The Agent Properties window opens. 3. Enter a Description (the name of the agent) and the Network Address of
your MS SQL Server. The Network Address can be an IP address or a valid hostname.
4. Enter the Username, Password and Domain. Note that the password is case sensitive.
5. After the Agent Information and Authentication data has been entered, click Get Status. If the information is validated, your data is displayed in the Agent Status window. If the information is not validated, a message from the CentralControl application appears. Check your information and revise it as required. Once again, click Get Status.
6. Click OK.
When configuring the CentralControl application to connect to a remote Agent, you need to specify a particular username and password. For details, refer to “Agent Access Privileges” in Section 3.1 of the CentralControl guide. If an authentication password changes (i.e. the user listed on the Agent Properties dialog changes his or her system password), the Agent Properties dialog must be updated.
Note: The CentralControl application (GUI) has an online help, which contains information similar to the user manual. The help is accessed from the main pull-down menu, or by using the F1 function key. There is also context sensitive “WhatsThis?” help on each GUI screen.
If the F1 Help screen is open (even minimized) the “What’s This” help will not be active. The F1 help must be closed for the “What’s This” help to function properly.
Backups Page 16 of 39 Figure 5. - Agent Properties
Backups Page 17 of 39
3.4 Create a Backup Task
The CentralControl Operations Guide provides a more detailed look at, and understanding of, creating Agents and Tasks. This section of the User’s Guide is meant as a “quick reference” for the user.
1. Right-click on the Agent created above, and select “New Task”. This brings up the New Task Wizard. Enter a name for this task, and click Next.
2. On the next screen, select a Vault where the backup will go to, and click Next.
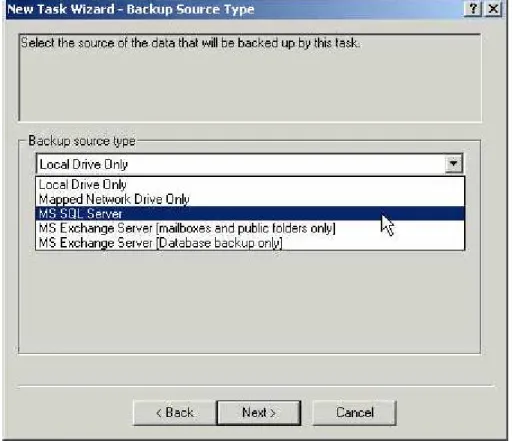
3. Next, select a Backup Source Type (MS SQL Server) from the pull down list. (Your list may appear different from this diagram.) The MS SQL Server Plug-in must be installed and licensed to be able to appear here. See Section 2 of this manual. Click Next to continue.
Backups Page 18 of 39
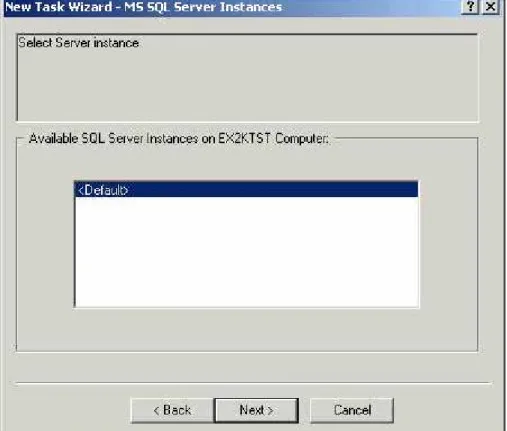
4. Select an MS SQL Server Instance. This presents a list of the SQLServer instances available for the client installed. The list will always include as first and pre-selected an entry named <Default>, designating the default instance. Other entries will be present only if they can be retrieved. If there is only one, you must select <Default>.
Backups Page 19 of 39
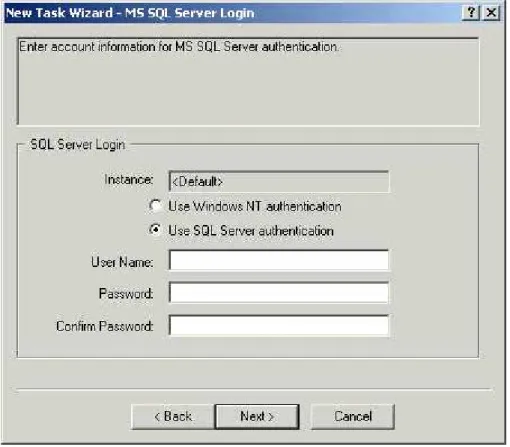
5. MS SQL Server Login. This screen will allow the user to select the authentication type (NT or SQL) and enter a user name and password to connect to the selected instance. After entering valid credentials, the user will proceed to the database selection dialog. Note here that Computer and Instance names are presented in read-only format, for information purposes. The “SQL Server Authentication” option can only be chosen if “SQL Server and Windows” authentication is enabled on the SQL Server.
Backups Page 20 of 39
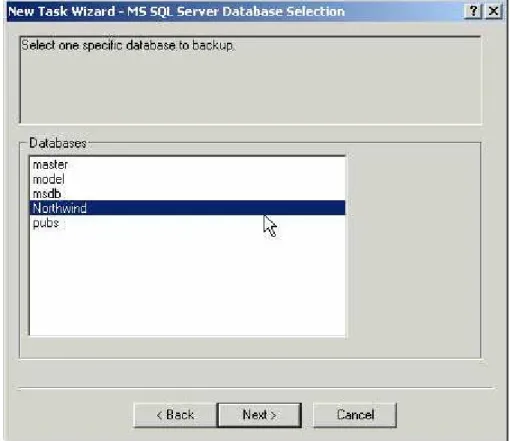
6. Database selection. Select a specific database to backup. See Section 4.3 for specific database types.
Backups Page 21 of 39
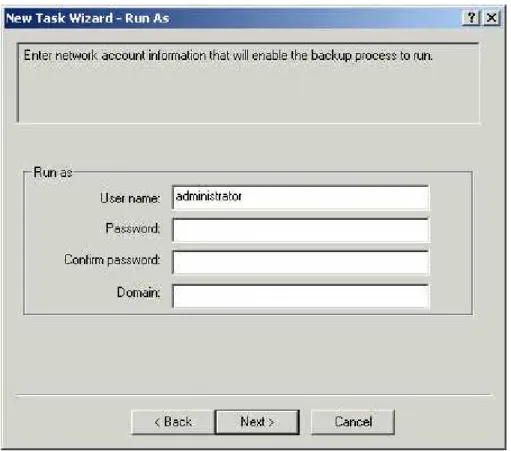
7. Run As . Enter network account information to enable the Agent backup process to run as a particular user, to be able to access the data.
Backups Page 22 of 39
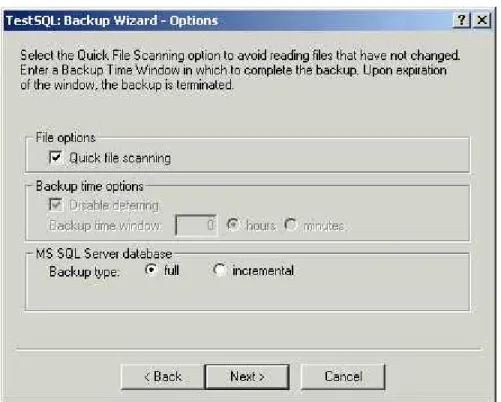
8. Options. Quick File Scanning reduces the amount of data read during the Backup process. Any file streams that are deemed unchanged since the last Backup, are skipped over. Without Quick file scanning turned on, files are read in their entirety.
The first time that you backup a SQL database, it will always be a backup type of “full”. You will not see a choice of full or incremental backup in this options screen.
For subsequent backups, you will see the choice.
The difference between "Full" and "Incremental" is that "Full" will backup the entire database, while "Incremental" will only backup the transaction log files. During a
restoration, the log files will be played back to achieve the most up to date restore since the last (full) backup.
Backups Page 23 of 39
9. Encryption. You may choose to use encryption, or not. Select one of the type shown in the list. Choose your own encryption password. This password in not stored anywhere on the system. If you lose it, your data will be inaccessible.
Backups Page 24 of 39
10. Log files. Choose the log detail level, whether to purge, and how many logs to keep.
Figure 13. - Log Files
Create Log File/Detail Level: Selecting this check box tells the system to generate log files for each task executed. These printable log files contain the start-connect-completion and disconnect times, file names (i.e. the names of each file that was copied during a Backup process) and any processing errors.
You can select the detail of logging to go from least to most: None, Files, Directory, Summary. More detailed logging creates larger log files, and is normally used only for troubleshooting problems.
Changing the logging detail level only affects log files that will get created from that point on. It does not affect any previously created log files.
Automatically purge expired log files only: You have a choice of either automatically purging expired log files, or keeping a selected number of them before they get deleted (oldest one first).
Automatic purging will delete the log file associated with a Backup, when that Backup (Safesets) is deleted.
Keep the last number of log files: You may select a number here, whereby the system will keep that number of logfiles, which are associated with that Backup. When that number is reached, the oldest logfile will be deleted to make way for the newest one.
Backups Page 25 of 39
11. Run, Schedule or Exit. You may run this task immediately, or schedule it for later. In all cases, even if you just exit now, the task will still be available later. See the next section for setting up a schedule.
Backups Page 26 of 39
3.5 Schedule the Backup
1. Select your MS SQL Server Agent on the left pane of the CentralControl application. The MS SQL Server task you created plus the Schedule, Global and Inventory files appear in the right pane.
2. Double-click on the Schedule file. The Schedule List appears. 3. Click the New button. The Schedule Wizard launches.
4. Work through the Schedule Wizard as described in Section 5.1.1 of the CentralControl manual. “Add a New Schedule Entry.”
5. On the Schedule wizard – Weekly panel, select the days you want the task to run. For example, Monday through Friday.
6. Continue working through the Schedule Wizard until finished.
7. Repeat the above procedure to run a backup of your MS SQL Server task once per week with Full backup selected (recommended).
8. Next, you should decide on how to tailor your backup and recovery options based on your specific MS SQL Server (not discussed in this section).
Backups Page 27 of 39
3.6 Check the Backup
After a successful backup, you may check the safeset properties by right clicking on the safeset, and choosing Properties (or use F2).
Backups Page 28 of 39
Also, in the logs directory you can view the log file that the backup produced. The sample here is the last part of the log of a successful backup. Notice that there were no “errors encountered”, and no “warnings encountered”.
Figure 16. - Log File
You may also have the option set to receive an email notification on a successful backup. See section 3.3.5 in the “CentralControl Operations Guide”.
Backups Page 29 of 39
3.7 Task Properties
This section describes the Task Properties screen for displaying/changing task properties. Select the properties screen by right clicking on a task, or by using F2 with a specific task selected.
From here you may view or modify the Task properties. Their meanings are described in section 3.4, “Create a Backup Task”.
Figure 17. - Task Properties
In the Task Properties, the tabs are:
• General
• Advanced
• Log
• Source
• Run As
• Encryption
Backups Page 30 of 39
3.8 Error Messages
When an SQL database is backed up using the incremental (transaction log) method, the logs are sent to the Vault, and are applied against the last full backup, when doing a restore. However if another user or task, outside of the plug-in applications, causes the database to produce a transaction log file, it is recorded by the SQL server, in msdb, but the plug-in does not know about this. In this case the transaction log files are out of synch, for the plug-in, and thus the system must create a full backup to ensure integrity of the data, as one or more of the transaction log files is “missing” from the backup.
The backup process detects that the logs are out of synch and automatically switches from an incremental backup to a full backup. No action is required on the part of the user/DBA. An informational message is written to the backup log (history) file. (Note that the backup process may take longer than anticipated, as the process is now a full backup, as opposed to an incremental one.)
“An external backup was detected. Switching from Incremental to Full backup.”
This means that the backup history of the database in the system SQL database msdb is out of synch with the list of successful task backups on the server.
List of possible reasons:
- The database backup was made outside the selected task after last successful task backup
- Some files were lost on the server - Backup history was cleaned up - msdb was restored
As well, on a restore, the system may discover that the transaction log files are out of synch, and again will switch to a full backup. Again, no action is required on the part of the user/DBA. An informational message is written to the backup log (history) file.
“A compromising restore was detected. Switching from Incremental to Full backup.” This means that the restore history of the database in the system SQL database msdb indicates that the database was restored after the last successful full backup in this task. List of possible reasons:
- The database was restored after last incremental backup in this task - Backup/restore history was cleaned up
Restores Page 31 of 39
4 Restores
For an MS SQL Restore, the user will specify a backup (a particular safeset) from which they would like to restore.
Restores can be to the original location, an alternate location, or a file.
If you are restoring to an alternate location, the logical file names of the new database and the transaction files in the database must be the same as the original ones.
Restoring to a file still requires MS SQL Server tools to get the data back into the database. Note that this also requires at least twice the database disk space, in order to keep the entire file on disk, along with the database.
Restores may be necessary in three scenarios:
• Restoring the full database, with any incremental backups, overwriting the existing database.
• With no system backup, restoring the system from the ground up (“bare
metal restore”) – installing the OS, applications and then the full database, and any incremental backups, onto a new system.
• If there is an MS SQL Server backup, and a full system backup, install the OS and then restore the system, and MS SQL Server.
The Restore Wizard will direct the user through the process, but briefly, the steps to perform this include:
1. From the CentralControl, select the restore function (Wizard). 2. Supply the restore type location and type – Vault and safeset
3. Confirm account information for MS SQL Server authentication – computer name, instance selection, user name, and password. Choose the NT or SQL authorization option.
4. Select the destination where the MS SQL Server database should be restored – original database, other database, or Directory.
5. Enter network account information that will enable the restore process to run – User name, password and domain.
6. Select logging options and level of detail. 7. Start the restore process.
Restores Page 32 of 39
4.1 Notes on Restores
1. When restoring a database, MS SQL Plug-In expects the following:
• The destination database exists;
• For MS SQL 7 Server, the database name must be the same, and
physical paths for the database and transaction logs are identical;
• For MS SQL 2000 Server, the source and destination databases use
identical database and transaction log "file names". Database name and physical file "locations" may be different.
2. Choosing the REPLACE option will cause the MS SQL Plug-in to create the specified database and its related files even if another database already exists with the same name. In such a case, the existing database is deleted. When the REPLACE option is not specified, a safety check occurs (which prevents overwriting a different database by accident). The safety check ensures that the RESTORE operation will not restore the database to the current server if:
• The database named in the RESTORE statement already exists on the
current server, or;
• For MS SQL 7, the destination database name is different from the
database name recorded in the backup set, or physical paths for database and transaction logs are different;
• For MS SQL 2000, the file names in destination database are different from that recorded in the backup set.
Restores Page 33 of 39
4.2 Restoring SQL 2000
4.3 Databases
This section provides description of steps to recover MS SQL databases. These methods are applicable to MS SQL 7 and MS SQL 2000 servers. The most notable exception between the two products is in number of supported instances. Whereas MS SQL 2000 server supports multiple, named instances, MS SQL 7 supports only one instance of the database.
4.3.1 Database types
SQL databases fall into two major categories:
1. System Databases : - any database created by/for SQL Server for server metadata storage. They are:
a. The MASTER database – As the name suggests this is the main system database and contains information about all other databases as well as SQL Server instance configuration. We assume that this database is being backed up regularly, especially when system changes are made.
b. The MSDB database – This contains information about Backup History, Replication, and Log Shipping. We assume this database is being protected by regular backups.
c. The MODEL database – This a template database for SQL database creation. If customized database configuration is done this database needs to be protected by periodic backups depending on how regularly
customization is changed.
d. The TEMPDB database – This is a temporary working database. No backups are recommended.
2. User databases: - any database created for or by users. MS SQL Server installation comes with two sample user databases:
a. Northwind b. pubs
Restores Page 34 of 39 4.3.2 Recovering System Databases
1. The MASTER database contains key information about SQL Server installation. If it is damaged or removed SQL Server instance will not start. The process of recovering the MASTER database is described below.
2. MSDB database can be restored in the same way as user databases. 3. The MODEL database can be restored in the same way as user databases.
4. The TEMPDB database contains temporary working information and so it should not be backed up or restored.
4.3.2.1 Recovering the MASTER database
In order to restore the MASTER database:1. Install and start the appropriate MS SQL Server instance.
2. Using the REBUILDM utility create a blank MASTER database for the SQL Server instance. This utility can be found in the /tools/bin directory of the MS SQL Server. After successful rebuild, user created databases will not be available.
3. Re-install the appropriate version of MS SQL Server service pack.
4. Restart MS SQL Server in single-user mode from the command line using the following syntax:
a. If the default instance is being used:
<SQL_instance_directory>/sqlservr.exe –c –m
b. If a specific instance is being restored:
<SQL_instance_directory>/sqlservr.exe –s <instance_name> –c –m
5. Restore the MASTER database using regular restore procedures with the help of Agent/CentralControl.
6. Restart MS SQL Server instance service in normal mode. Verify the data in the MASTER database has been successfully restored. At this point information about user created databases should be visible.
7. Restore other databases as needed.
Restores Page 35 of 39 4.3.3 Recovering User databases
In order to restore any user database:
1. MS SQL Server instance must be running
2. User database metadata information must be available. This can be accomplished in one of two methods:
a. Master database must already contain configuration of the user database to be restored. See the Recovering MASTER database section if the information was lost, or
b. User database must be recreated manually using Enterprise Manager. The database must be recreated with the same server
name/instance/database name combination. Additionally, the logical file name for the database (Enterprise Manager -> SQL Server instance-> user database properties -> Data Files-> File name) must match that of the original database. Manually recreating the user database is not recommended as it may not provide full database functionality with respect to access privileges, relationships etc.
3. The database must be available for restore:
a. The database must be placed in single-user mode (recommended), or b. The database may not be accessed by any users. User access to the databases can be viewed via the Enterprise Manager ->SQL Server instance-> Current activity -> Process Info. This information is not refreshed in real time, so it may not be reliable on active systems. 4. Using the Agent, Restore the database from the required Safeset as
indicated by the restore wizard.
Restores Page 36 of 39
4.4 SQL Bare Metal Restore
This section discusses how to restore an SQL server (“bare-metal”). To fully recover from a total disaster, you need the following:
• Any replacement hardware, if necessary.
• The original operating system disks that were being used.
• Full drive backups of the system drives, and other logical drives where critical applications or data were installed. A “full backup” consists of the ‘System State backup’ and the ‘full drive or system backup’. A ‘System State backup’ for Windows 2000/2003 Server captures Active Directory, Registry, IIS metabase, and types of data that may not be backed up by some other backup systems.
• SQL Server database backups.
4.4.1 Recovering from a worst case disaster
9. Reconfigure hardware that is similar (i.e.: equal or better) to the original hardware.
10. Create a logical drive that matches the original configuration. Although hardware does not always need to be identical, be aware that some drivers that are listed in the backup set may be incompatible with hardware on the new systems, and may require you to manually remove or install drivers in Safe mode. Test the system state restoration on replacement hardware before you actually need to perform a system state restoration.
11. Reinstall the operating system. Install the same version of Windows 2000/2003 as a stand-alone server to the same drives and paths to which Windows 2000/2003 Server was previously installed. Use the same server names as those used before.
12. Using Restore, restore full drive backups. The full backup consists of your ‘System State backup’ and the ‘full drive or system backup’. By restoring the system state, you have restored Active Directory, the IIS metabase, etc. 13. Using Restore, restore SQL Server databases.
Restores Page 37 of 39 4.4.2 Restoring the SQL Server Data
Your SQL Server is restored from one safeset. You need select the SQL Server backup task on the CentralControl application and run the Restore Wizard.
14. Before restoring your SQL database, you must disable the database you want to restore.
15. Highlight your SQL Server task on the CentralControl application and click the
Restore button. The Restore Wizard launches.
16. Work through the Restore Wizard, as described in Section 7 of the “CentralControl Operations Guide.
17. On the Restore Wizard – Select Restore Objects panel, click the SQL Server
check box. All SQL Server objects available for restore appear in the bottom pane. Highlight the SQL Server objects you wish to restore. When you are finished with the Select Restore Objects panel, click Next or click the Options
button to set the available options.
a. Selecting an object enables the Options button. Click the Options button to open the SQL Server Restore Options panel. For SQL Server 2000,
Hard Recovery is selected by default and Roll Forward is not selected. b. Select Roll Forward based on your choice of restore. When this option is
selected, it restores all SQL Server information from the backup but, “rolls forward”, and keeps any log files created since the last backup. The advantage of this type of restore is that your SQL Server information is completely up-to-date. The disadvantage is that, if one or more of the log files created since the last backup are corrupt, your restored SQL Server database will also be corrupt. When this option is “not” selected, the logs in the backup replace the log files on your SQL Server. The disadvantage is that you will only have the log files included up to your last backup, possibly resulting in some information loss. An SQL Server Administrator could manually delete SQL Server logs that are corrupt from your SQL Server and perform the restore without deleting the log files. Refer to the procedure recommended from Microsoft in this respect.
18. Select Restore Logs to Temporary Location. You must select a temporary location on your computer to hold certain SQL Server log files during the restore process. Once the restore is complete, the files are removed from this directory and placed in their proper location.
19. Complete the task as you normally would, and click Finish when done. 20. For Windows 2000/2003, databases must be manually mounted after restore
is complete and SQL Server has finished restoring the databases as well as replaying the log files. Always check the restore log file and the Windows Event Viewer Application Log to ensure there are no errors.
Index Page 38 of 39
5 Index
Active Directory ... 36
Advanced Server... 6
Agent Access Privileges... 15
Agent log file... 8
Agent Properties... 15
alternate database ... 6
alternate location ... 31
authentication ... 19
Authentication data ... 15
Automatically purge expired log files ... 24
BACKUP DATABASE ... 14
BACKUP LOG... 14, 30 Backup Source Type... 10
Backup Wizard ... 13
bare metal restore ... 31
case sensitive... 15
CentralControl ... 26
CentralControl Help... 7
CentralControl Operations Guide ... 37
Create Log File/Detail Level... 24
database metadata ... 35
Database selection... 20
db_backupoperator ... 14
db_owner... 14
DBA ... 5
default instance... 13, 18 deferred option ... 13
detailed logging ... 24
Director... 5
Domain ... 15
email notification... 28
encryption password ... 13, 23 Encryption type... 12
Enterprise Manager... 35
errors encountered... 28
F1 function key... 7
Failed to connect... 8
file streams... 22
flat file ... 6
full backup ...6
Full drive backups ...36
Get Status ...8, 15 Global Settings ...10
GUI ...6, 13 Hard Recovery ...37
Hot backup ...6
IIS metabase...36
incremental backup... 6, 14, 22, 31 Installation Wizard...9
InstallShield ...11
instance...6, 18 Keep the last number of log files ...24
level of detail ...13
license...8
license information ...9
Log files ...14, 24 Log options...12, 13 logical file names ...31
logs directory...28
main pull-down menu...7
MASTER database ...33
MODEL database ...33
model of database ...14
MS SQL 2000 Server...32
MS SQL 7 Server ...32
MS SQL Server service pack...34
MS_SQL_Plug-In.exe ...9
MSDB database...33
multiple tasks ...13
Named instances ...6
Network Account...12
Network Address...15
New Agent...15
normal mode ...34
Northwind ...33
NT authorization...13
NTWDBLIB.DLL...8
Index Page 39 of 39
online help ... 7
Options button ... 37
original location ... 31
out of synch... 30
processing errors... 24
product support ... 7
pubs ... 33
Quick file... 12
Quick File Scanning ... 22
ReadMe ... 7
REBUILDM utility... 34
Registry ... 36
Reinstall the operating system... 36
Release Note... 9
REPLACE option... 32
Restore Logs ... 37
RESTORE operation... 32
Restore Wizard... 31, 37 retention... 13
Roll Forward ... 37
Run As ... 21
Run, Schedule or Exit ... 25
safeset... 24, 31, 37 safeset properties... 27
Schedule List... 26
Schedule Wizard... 26
Select Server Instance... 13
Setup Status ... 9
single-user mode... 34
Software License Agreement...9
SQL authorization ...13
SQL Server Authentication ...19
successful backup...28
Support Note ...9
supported instances...33
system restore...6
System State backup...36
Task Properties ...29
TEMPDB database ...33
third party ...8
total disaster...36
transaction files ...31
transaction log...30
troubleshooting problems ...24
trunc.log on chkpt...14
truncating log...14
uninstall ...11
UNKNOWN ERROR...8
upgrade ...11
user/DBA...30
Vault profile ...12, 13 version number ...6
warnings encountered...28
Weekly panel...26
Welcome screen ...9
WhatsThis ...7
Windows Agent ...7 Workspace...13, 15