~
Burroughs
XE 500
CENTIX™
Administration
Guide
product and related material discfosed herein are only furnished pursuant and subject to the terms and conditions of a duly executed Program Product license or Agree-ment to purchase or lease equipAgree-ment. The only warranties made by Burroughs, if any, with respect to the products described in this document are set forth in such License or Agreement. Burroughs cannot accept any financial or other responsibility that may be the result of your use of the information or software material, including direct, indirect, special or consequential damages.
You should be very careful to ensure that the use of this information and/or software material complies with the laws, and regulations of the jurisdictions with respect to which it is used.
The information contained herein is subject to change without notice. Revisions may be issued to advise of such changes and/or additions. .
About This Guide
Purpose
This guide describes how to administer the XE 500
CENTIXTM system using CENTIX shell commands and BTOS Master Commands (MCommands). The CENTIX system also provides centrEASETM, a menu-driven administrative facility, with which you can perform most administrative functions. For information on centrEASE, see the centrEASE Operations
Reference Manual.
Scope
This guide describes the tasks needed to administer the XE 500 CENTIX operating system after it has been installed. For installation information, see the CENTIX Installation and
Implementation Guide.
Audience
The audience for this guide is the experienced CENTIX administrator. An inexperienced system administrator should refer instead to the centrEASE Operations Reference Manual.
Prerequisites
The system administrator who uses this guide should be very familiar with the CENTIX system.
How to Use This Guide
Organization
This manual contains the following sections and appendices: Section 1, Introduction, defines the role of the system administrator.
Section 2, Starting Up and Bringing Down the CENTIX System, describes the system software bootup and shutdown procedures.
Section 3, Setting Up the
/etc/inittabnn
Files, describes how to read and alter the/etc/inittabnn
files, which control the system operating levels.Section 4, Configuring I/O Devices, describes I/O device file names and how to configure devices into the system. Section 5, Managing File Systems, describes how to create, manage, and check CENTIX file systems. The internal file system structure is also described.
Section 6, Managing User Accounts, explains how to add, delete, and organize users on the CENTIX system.
Section 7, Managing System Security, describes how to use the security functions of the CENTIX system to keep your system secure.
Section 8, Backing Up and Restoring Files, describes how to save and recover files.
Section 9, Configuring and Administering the Printer Spoolers, describes how to set up and manage the printer spoolers.
Section 10, Administering the uucp Network, describes how to set up and use the uucp communications network. Section 11, Tracking System Activity, describes how to use the system activity package to monitor the system.
Section 12, Running Periodic Jobs with the
eron
Command, describes how to create and alter usereron
files.Section 14, Initializing and Verifying XE 500 Volumes, describes how to format a disk.
Section 1 5, Running the System in Different Operating Modes, explains how to run the system in normal, restricted, and customized modes.
Section 16, Interpreting and Recovering from Error Conditions, explains how to analyze system errors and provides procedures for recovering from some error conditions.
Appendix A, fsck Messages, lists the messages that can be generated by fsck, the file system checking program. Appendix B, XE 500 BTOS-Specific System Error Codes, lists the error codes that are specific to the XE 500 BTOS operating system. For a complete list of BTOS Error Codes, see the BrOS Status Codes Reference Manual.
Appendix C, Hardware Configuration Information, includes figures and tables that define the conventions for naming disks and processors and numbering slots.
Appendix D, FCF Reporting Procedure, outlines how to file a Field Communication Form when you have system problems. A glossary and index follow Appendix D.
Related Product Information
Bros Status Codes Reference Manual
This manual lists and describes the BTOS error codes that can occur on the XE 500 CENTIX system.
XE 500 BrOS Customizer Operations Guide
This guide discusses customizing the BTOS portion of the CENTIX operating system.
XE 500 BrOS Operations Reference Manual
XE 500 CENTIX centrEASE Operations Reference Manual
This manual describes how to use the CENTIX administrative facility centrEASE.
XE 500 CENTIX Installation and Implementation Guide
This guide describes how to install and implement the CENTIX operating system on the XE 500.
XE 500 CENTIX Kernel Customizer Operations Guide
This guide describes how to customize the CENTIX kernel. XE 500 CENTIX Operations Guide
This guide describes. how to operate the CENTIX system. The CENTIX text editors are also described in detail. XE 500 CENTIX Operations Reference Manual
This manual lists and describes all CENTIX shell commands, library functions, systems calls, and special files.
XE 550 System Capabilities Overview
This manual provides a technical overview of the XE 500 CENTIX system.
Conventions Used in This Guide
D Both BTOS and CENTIX commands are shown in boldface. D Variables are shown in italics. For example, in the following
command, oldfile and newfile are both variables.
# cp oldtlle newt/Ie
When you enter the actual command, you substitute the name of the file which you are copying and the file to which you are copying for oldfile and newfile.
D In both BTOS and CENTIX command lines, optional fields
Contents
About This Guide
Purpose ... . Scope ... . Audience ... . Prerequisite. ... ... . How to Use This Guide ... . Organization ... ... . Related Product In'omation ... ... . Conventions Used in This Guide ... ... .
Section 1: Introduction ... .
The Administrator as Superuser ... ... . BTOS in the CENTIX System ... " ... ~ ... . The centrEASE Administrative facility ... ... .
Section 2: Starting Up and Bringing Down the CENTIX System .
Starting Up the System Software ... ... . Bringing Down the System Software ... ... . Taking the System to Single User Mode ... . Taking the System from Single User to Multiuser Mode ... . Changing the letc/profile file ... . For Mixed Systems Only: Changing the Time lone Variable ... .
Section 3: Setting Up the /etc/inittabnn Files ... .
init Operating Level. . ... . When init Scans letc/inittabnn ... . Fomat of the letc/inittabnn Entries ... . The init Process: A Summary ... . I' You Make Changes to letc/inittabnn ... . The Processes Started Up by letc/init ... . /ete/getty ... . The /ete/gettydefs File ... . Sample /ete/gettydefs File ... . Making Changes to /ete/gettydefs . ' ... . /ete/mkeonre (/ete/inittabOO) ... . /ete/conre (/ete/inittabOO) ... . /ete/conrc01 (/ete/inittab01) ... . /ete/beheekre (/ete/inittabOO) ... . /ete/bre (/ete/inittabOO) ... . /ete/re (/ete/inittabOO) ... . /ete/allre (/etc/inittabOO, /ete/inittab01) ... .
Section 4: Configuring I/O Devices ... 4-1 Configuring a Disk ... 4-2 Step 1: Determining the Disk Name ... . . . 4-2 BTOS Disk Drive Device Names ... 4-3 CENTIX Disk Device File Names ... 4-3 Step 2: Initializing the Disk ... 4-7 Step 3: Creating Partitions on the Disk . . . 4-7 Step 4: Creating the CENTIX Device Files ... 4-9 Step 5: Identifying the Partitions to the BTOS Operating System ... 4-10 Step 6: Rebooting the System ... 4-11 Step 7: Creating File Systems on the Partitions ... 4-11 Configuring a Tape Drive ... 4-11 Step 1: Determining the Tape Drive Name ... 4-11 BTOS Tape Drive Names ... 4-11 CENTIX Tape Drive File Names ... 4-12 Step 2: Creating the CENTIX Device File ... 4-13 Step 3: Identifying the Special File to the BTOS Operating System ... 4-15 Step 4: Rebooting the System ... 4-15 Configuring a Terminal ... ... ,.".,.. 4-16 Terminal Device File Names ,.',',., .. ,.,",".',.",',',',.,., 4-16 How CP and TP Ports are Numbered , .... , ... ,." .... , .... ,.,., 4-16 How PT 1500 Terminals are Dynamically Assigned tty Numbers ... 4-17 Adding a Terminal to the System , ... , ... ,., ... '"... 4-18 Adding a New Terminal Type to the System ... ,."., .. ,.,.. 4-20 Configuring the Console ... " ... " ... ".... 4-21 Creating a Console for an Additional AP ..., ... ,.,., ... ,.,'..., 4-22 Changing the System Console to an RS-232-C Terminal ".".,',,' .. ,. 4-22 Configuring Printer Spoolers ,.,.,...,"',." .. ,.".,.... 4-23
Setting Up a Terminal as an Ip Printer ... 9-13 Administering the Ip Printer Spooler ... 9-13 Allowing and Inhibiting the Ip Scheduler ... 9-13 Determining the Status of the Ip Spooler ... 9-15 Preventing and Allowing Ip to Route Requests to a Destination ... 9-15 Enabling and Disabling a logical Printer ... 9-16 Moving Requests Between Destinations ... 9-16 Setting a User Default Destination ... 9-11 Setting Parallel Printer Options ... 9-17 The Ip Spooler log File ... 9-18
Polling Demons ... 10-39 Security Measures ... 1 0-39 Remote Access to the local System ... 10-39 Forwarding ... 10-42 Permitted Commands ... 10-43 Handling uucp Emergencies ... 10-44 An Example of a Direct Link ... 10-44 Configuring System 1 ... 10-45 Configuring System2 ... 10-46 Configuring uucp ... 10-47 Exercising the Link ... 1 0-48
Section 11: Tracking System Activity ... 11-1 Using the System Activity Commands ... 11-2 Using the sar Command ... 11-2 Using the timex Command ... 11-2 Using the sadp Command ...•... 11-3 Using the System Activity Report (sar) Package ... 11-4 System Activity Counters ... 11-5 CPU Time Counters •... 11-6 Iread and Iwrite ... 11-6 bread and bwrite ... 11-6 phread and phwrite ... 11-6 swapin and swapout ... 11-6 pswitch and syscall ... 11-7 iget, namei, and dirblk ... 11-7 runque, runocc, swpque, and swpocc ... 11-8 readch and writech ... 11-8 rcvint, xmtint, mdmint, rawch, canch, and outch ... 11-8 msg and serna ... 11-9 io-ops, io-bcnt, io-act, and io-resp ...•... 11-9 inodeovf, fileovf, textovf, and procovf ... 11-9 lhe sysinfo Structure ... 11-10 System Activity Package Formulas ...•... 11-11
Section 1
J:
Accessing BTOS from CENTIX ... 13-1Copying Files from BTOS to CENTIX ... 13-1
Editing BTOS Files ... 13-1
Listing B10S Files and Directories ... 13-2
Using the BTOS MCommands ... 13-2 Accessing the MCommands Through centrEASE ... 13-3 Accessing the MCommands Through of eli ... 13-3
Using the BTOS Command Line Interpreter ... 13-5 How CLI Works ... 13-5 Communicating with The CLI ... 13-6 Using Processor Initialization Files ... 13-8 Using CLI Ports ... 13-8 Using of eli ... 13-9 Cli Command Syntax ... 13-10 Command Form ... 13-10 Special Characters ... 13-11 Continuation lines ... 13-11 Comments ... 13-12 Using Call Parameters ... 13-12 File Name Conventions ... 13-12 Using Cli Commands ... 13-13 Executing a Run File ... 13-13 Calling JCL Files for Execution ... 13-14 Ending a JCL File ... 13-15 Terminating Execution of JCL Files ... 13-15 Changing the Path ... 13-16 Loading a Run File during a Debugger Session ... 13-17 CLI Status Messages ... 13-17
Section 14: Initializing and Verifying Disks ... 14-1
Overview of Disks, BTOS Volumes, and BTOS File Systems ... 14-1 BTOS Disk Drive Device Names ... 14-1 Volume Names ... 14-2 The XE 500 BTOS File System and File names ... 14-3
Overview of Volume Initialization ... 14-3 Volume Fragmentation ... 14-5 Initialization Using ECe vs. eRe Formatting ... 14-6
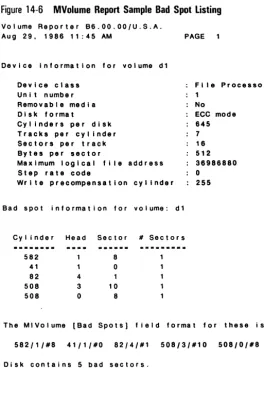
Initializing XE 500 Volumes ... 14-7 Guidelines for Initializing a Volume ...• . . . .. 14-13 Bad Spots ... 14-16 Identifying Bad Spots ... 14-16 Listing Current Bad Spots ... 14-17 Entering Bad Spots ... 14-17 Notes about Bad Spots ... 14-18
Verifying Disk Integrity ... 14-19
Recovering from System Problems ... 16-31 Using the Restricted Mode ... 16-32 Using a Boatable Disk Cartridge ... 16-32 Determining Corrupted System Files ... 16-32 Running the System in a Degraded Mode ... 16-33
Appendix A: fsck Messages ...
A-1 Initialization ... A-1 Phase 1: Check Blocks and Sizes ... A-3 Phase 1 B: Resean for More Dupes ... A-6 Phase 2: Check Pathnames ... A-6 Phase 3: Check Connectivity ... A-9 Phase 4: Check Reference Counts ... A-10 Phase 5: Check Free List (Non-Pill File Systems) ... A-14 Phase 5: Check Bit Map (Pilf File Systems) ... A-16 Phase 6: Salvage Free List (Non-Pilf File Systems ... A-17 Phase 6: Salvage Bit Map (PiI' File Systems) ... A-17 Cleanup ... A-17Appendix B: Status Code Tables ... 8-1
Appendix C: Hardware Configuration Information ...
C-1Appendix 0: FCF Reporting Procedure ...
0-1Glossary ... .
Index ... .
Illustrations
5-1 5-2 9-1 10-1 10-2 13-1 14-1 14-2 14-3 14-4 14-5 14-6 16-1 16-2 16-3 16-4 16-5 16-6 16-7 16-8 16-9 16-10C-1
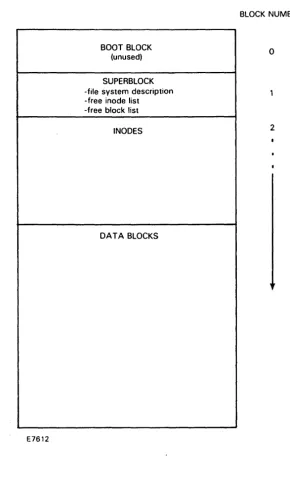
C-2 C-3 C-4 C-5Internal Structure of a File System ... .
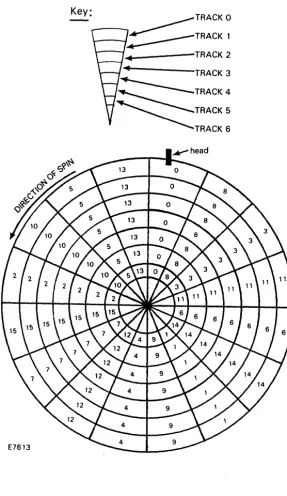
A 16-Block Disk with a Gap Factor of 5 ... .
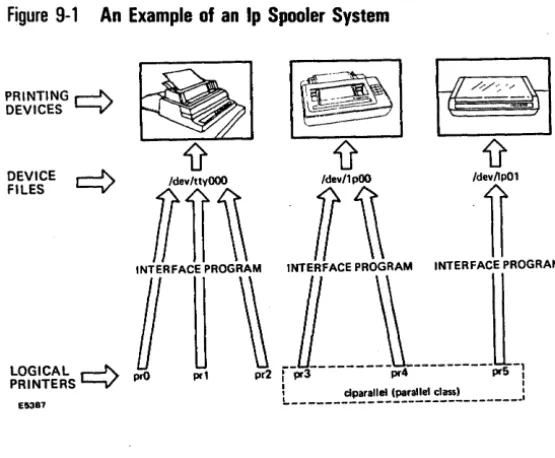
An Example of an Ip Spooler System ... .
An Example of a uucp Network ... .
uucp Configuration Example . . .
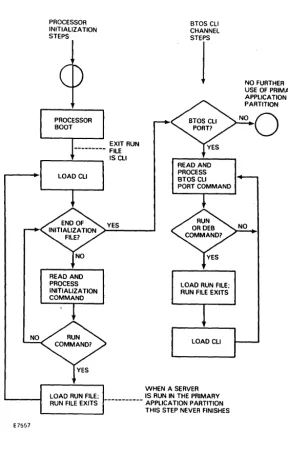
Processor Initialization File Execution . . .
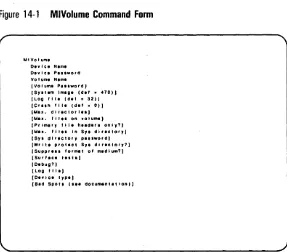
MIVolume Command Form ... .
Sample Disk Cartridge Defect Report . . .
MDisk Verify Command Form ... .
Sample MDisk Verify Report . . . ... .
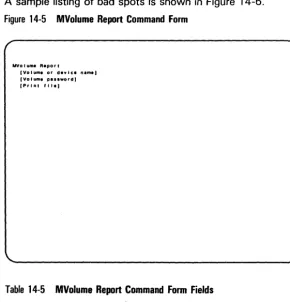
MVolume Report Command Form . . . . ... .
MVolume Report Sample Bad Spot listing ... .
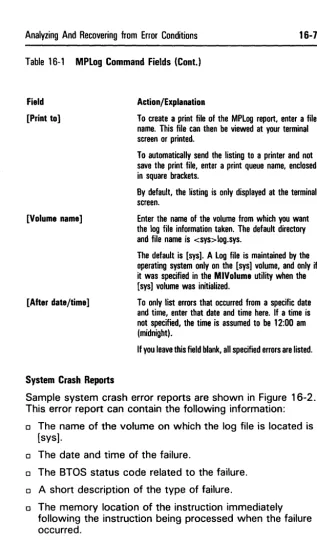
MPlog Command Form ... .
Sample MPlog System Crash Report ... .
Sample MPlog System Boot Reports ... .
Sample MPlog System Initialization Error Report .. .
Sample MPlog Disk I/O Error Report ... .
Sample MPlog Cluster Communications Error Report
Sample MPlog Tape Operations Status Report .... .
Sample MPlog Tape Operations Error Report ... .
Reading Boot ROM Error Codes on Processor Board
lEDs ... , ... .
Sample Processor lED Crash Code Sequence ... .
Built-In Disk Device Naming Conventions ... .
SMD Disk Device Naming Conventions for DPOO .. .
Processor Board Numbering Scheme ... .
Counting SP and DP Boards When Identifying
a Half-Inch Tape Drive ... .
Identifying Half-Inch Tape Drives . . .
Tables
4-1 Naming Conventions for Built-In Disk Drives 4-5 4-2 Naming Conventions for SMD Disk Drives. . . . 4-6
4-3 Naming Conventions for Tape Drives .... . . 4-13
6-1 Access Numbers for the chmod Command . . . 6-5
7-1 Values Used in the /etc/passwd File to force Users to
Change Passwords . . . 7-3
7-2 Access Denial Numbers for the umask Command. . . 7-6
7 -3 BTOS File Protection Levels . . . 7 -10 13-1 CLI Commands. . . . 13-13 14-1 MIVolume Command Form Fields. . . . 14-9 14-2 Volume Types and MIVolume Parameter Values. . . . 14-15
14-3 MDisk Verify Command Form Fields. . . . 14-22 14-4 MDisk Verify Report Testing Characters. . . . 14-24
Introduction
This guide is used in administering the XE 500 CENTIX system. The CENTIX operating system is based on UNIXTM System V and is licensed from A T& T.
The system administrator is responsible for all system management tasks. In particular, the administrator handles any task that affects more than one user, and any task that affects system security.
-The Administrator as Superuser
The administrator on this system is, by convention, referred to as superuser. Superuser has access to many commands and files that other users cannot access. To become
superuser, the administrator signs onto the system as "root". By signing on as root, you have automatic access to all superuser functions. These include:
D Writing to or reading from any ordinary or special file.
D Creating a file in or deleting a file from any directory. D Executing all administrative commands.
D Using all command options.
tJ Using the BTOS Master Commands (MCommands). See
"BTOS in the CENTIX System, n below.
The superuser prompt is a pound sign (#).
The administrator performs administrative functions at the system console. You can also use the system console as a user terminal by signing onto the console as a user other than root. If you need to change the console-or any user terminal-from normal user status to superuser status, use the su command. In normal user status, the user dollar sign prompt is on the terminal. Enter:
$ au
BTOS
in
the CENTIX System
The XE 500 CENTIX system is based on two software operating systems: CENTIX and a Burroughs workstation operating system called BTOS.
All CENTIX-based system software and applications run on the Applications Processor (AP) in the XE 500. If your XE 500 contains more than one AP, CENTIX can be configured to run on all of the APs in the system. BTOS runs on all other processor types. A BTOS-based processor, the master File Processor (FPOO), is responsible for controlling the front panel and downloading the other processors with their operating systems. BTOS-based processors also control input/output (I/O) to the peripheral devices, such as disk drives, tape drives, terminals, printers, data comm lines, and so on.
To properly install and maintain the system, you must manage both BTOS and CENTIX files and services. As administrator, you can, of course, use any CENTIX
commands to administer the CENTIX portion of your system. To administer BTOS, you must access the BTOS
MCommands through CENTIX. There are two ways to do this:
o You can use the "Issuing BTOS Commands through CENTIX" function of the centrEASE administrative facility. The next subsection, "The centrEASE Administrative Facility," gives a brief explanation of centrEASE. The facility is explained in detail in the centrEASE Operations Reference Manual.
o You can use the CENTIX of
eli
command to invoke the BTOS MUtilities. This is explained in detail in Section 13 of this guide.The centrEASE Administrative Facility
centrEASE is a menu-driven, interactive facility that you can use to perform many of the administrative tasks described in this guide. Throughout the guide, tasks that can also be done through centrEASE are noted.
Unless you are an experienced CENTIX administrator, you should use centrEASE, rather than the processes described in this guide. centrEASE not only allows you to perform administrative tasks quickly and easily, it also provides safeguards that can stop you from doing damage to your file system.
The tasks that you can perform through centrEASE are: o Manage user accounts
o Manage file systems
o Issue BTOS commands through CENTIX
o· Reconfigure the system
o Install CENTIX products
o Print configuration reports
o Back up and restore
o Manage log files
o Maintain other products
Starting Up and
Bringing Down the CENTIX System
Starting Up the System Software
To boot up your system, follow these steps:1 Power up the XE 500. This is explained in detail in the CENTIX Installation and Implementation Guide.
2 Turn on your system console. If your console is not turned on when you boot up the system, the boot up procedure may not complete.
3 Turn the front panel keyswitch to NORMAL. While the system software is booting up, the front panel status display shows numbers ranging from 1 to 20. When a 20 is displayed, the BTOS operating system is running. You can now boot up the CENTIX system at your console~ (If the display stops at 19, your system has not come up correctly. See the paragraph at the end of this subsection.) Note: If there are problems with the boot up procedure, the front panel display may show an error code. See both Appendix 8 in this Guide and the BTOS Status Codes Reference Manual for lists of XE 500 status codes.
When you first turn on your system, your CENTIX system is in single user mode. Single user mode is one of several operating modes defined by the /etc/inittabnn files (see Section 3). In single user mode, only the console is active. No other terminal can be accessed.
4 A few minutes after you boot up the system, the current date and time and the following message appear on your console:
If they are not correct, enter n, then the correct date and time, then press RETURN. If the date and time are correct, enter y.
Note:
If you have a mixed system (both full CENTIX and full BTOS operating systems), the time will not be correct the first time you bring up the system. Do not correct the time. Enter y, then proceed. See "For Mixed Systems Only: Changing the Time Zone Variable. "5 This message then appears:
Do you wa n t toe h e c k the f i Ie s y stems? (y 0 r n) Enter y. The system automatically runs the fsck file system checking program (see Section 5). fsck checks and makes minor repairs to the file systems.
6 The fsck program takes a few minutes to run. As each file system is checked, status information on that file system appears on your screen.
Messages then appear telling you the programs that are being started by the /etc/inittabOO file (see Section 3). A few moments later, the Burroughs logo appears on the console screen. At the lower left of the screen appears:
log In:
Enter: root
A password prompt appears. Enter the password for root (see Section
6
for instructions on assigning passwords). When the login appears at the console, the system has entered multiuser mode. Multiuser mode is one of the operating modes defined by the /etc/inittabnn files (see Section 3). In multiuser mode, all configured terminals can access the system.When the system enters multiuser mode, logins appear at any terminals that are configured and turned on. Users can sign on and begin work. The environment in which the users terminals are brought up-including opening
7 A message welcoming you to the system appears. Under it is the root prompt, a pound sign (#). You can now begin entering commands.
If, when bringing up your system, the front panel display stops at 1 9, the boot up procedure will not complete and you will not get a login at the console. To determine what is wrong, follow these steps:
1 Atone of the terminals connected to your system, there should be a prompt for a new run level. At the terminal, enter H 6", and press the RETURN key.
2 The login prompt appears at your console. Initiate the fsck program to check your file systems. Enter:
/I letc/fsck
See Section 5 for details on the fsck program.
Bringing Down the System Software
To bring down the system software, follow these steps:
Warning: Do not turn off your system without running the
shutdown
command. You can do extensive damage to your file systems.At the console, initiate the shutdown command. Enter:
/I shutdown
This message appears at the console screen:
SHUTDOWN PROGRAM
current date
SYSTEM BEING BROUGHT DOWN NOW!! AI.! processes being killed. Do you want to continue? (y or n)
2 If you have changed your mind about bringing down the system, enter n. The shutdown procedure stops, and a prompt appears.
To continue with the shutdown procedure, enter y.
3 A message appears telling you to wait for an okay before you stop or reset the processor. DO NOT TURN OFF YOUR SYSTEM UNTIL A MESSAGE APPEARS GIVING YOU THE OKAY TO STOP OR RESET THE PROCESSOR. 4 After a few minutes, these messages appear at the console:
INIT: New run level: 5 INIT: New run level: S INIT: SINGLE USER MODE
Wa I t for 0 k (a b 0 u t 1 5 sec 0 n d s) be for e stopping or resetting processor ...
After about 15 seconds, this message appears:
ok to stop or reset processor
II
When this message appears, the system has entered single user mode. You can now turn the XE 500 keyswitch to STOP.
The shutdown command has several options. With the -g option, you can change the amount of time that the system waits between warning users and turning off the system (60 seconds is the default). With the -i option, you can select which operating mode the system enters at the end of the shutdown procedure (single user mode is the default). See your
Taking the System to Single User Mode
There are two methods of taking the system to single user mode:
a Use the procedure described above for using shutdown.
a Use the init command. Enter:
/I in i t s
When you use this method, DO NOT turn off the XE 500 after you enter single user mode. You must still run the
shutdown procedure to guarantee an orderly closing down of your file systems.
Taking the System from Single User to Multiuser Mode
To reenter multiuser mode from single user mode without rebooting the system, enter:
/I Inlt 2
, This message appears:
INIT: New run level 2
When the Burroughs logo and the login prompt reappear, the system is in multiuser mode.
Changing the /etc/profile File
The /etc/profile file is read when the users' terminals are brought up. The file is a shell script that sets up the
environment for users. The /etc/profile file provided with the system software defines, for example, the PATH variable and the terminal type.
Use a text editor to make any changes or additions to the file. For example, if you want a message to appear at the users' terminals when they log in, add the following to the /etc/profile file:
Each user also has a . profile file in which the user can define his or her own environment (see your CENTIX Operations Guide for details.) The system reads the .profile files after the /etc/profile file. If there are any contradictions between the two files, the system uses what is defined in the .profile file.
For Mixed Systems Only:
Changing the Time Zone Variable
When the CENTIX operating system is brought up, it reads the base system time to determine the current time, then adjusts that time as defined by the TZ (time zone) variable. If you have a mixed system, the base system time is BTOS time, which has already been adjusted for time zones. You, therefore, need to redefine the CENTIX TZ variable so that it does not adjust an already-adjusted time.
The TZ variable is set in three files: /etc/beheekre,
jete/re,
and /etc/profile. In each of these files, use a text editor to change the TZ variable line to:
TZ-GMTO; export TZ
Setting Up the /etc/inittabnn Files
Note: The /etc/inittabnn files are installed with your system software. Unless you choose to add terminals to your system without using centrEASE (see Section 4 for details), you may never need to make any changes to these files. This section is for information only.
The /etc/inittabnn files are text files that list the major processes that must be started on the Applications Processors (APs) each time the operating system enters a different operating level. There is a separate /etc/inittabnn file associated with each AP on the system. The nn is the number of the AP with which the file is associated.
The files are used by the init process. The init process looks for, and spawns (starts up), the processes listed in the /etc/inittabnn files for the current operating level. That is, if level 2 is the current level, the in it process starts up all processes defined in the /etc/inittabnn files as level 2.
init Operating Levels
There are eight possible operating levels in this system: 0 through 6 and s. In the original /etc/inittabnn files released with your system software, only these levels are used: o Level s is defined as single user mode. Only the console
has access to the system.
a Level 2 is defined as multiuser mode. In multiuser mode,
the user terminals are readied for login.
a Level 6 is used to provide an administrator login if the system does not come up properly (see ·Starting Up the System Software" in Section 2 for details).
There are also three temporary levels, a, b, or c, that you can assign to processes. Like a process labeled with a normal level, a process labeled with a temporary level is started when init is invoked with that level as an argument. init, however, does not itself change levels. That is, if init is running in level 2, and Minit
an
is invoked, any entry with an"an
level is started up, but the level 2 processes are not terminated.
Any temporary processes are stopped when init enters single user mode. Any other change of level does not kill temporary processes. To stop a temporary process once it has been started up, you must remove the process entry from the /etc/inittabnn file, or change the entry type to off (see "Format of the /etc/inittabnn Entries," below).
Note: The temporary levels are not used in the /etc/inittabnn files that are released with your system software.
When init Scans /etc/inittabnn
The init process looks at the /etc/inittabnn files whenever one of these conditions occur:
o The system is booted.
o The init command is issued with a new level as an
argument. For example, the following command causes the init process to look at the /etc/inittabnn files and spawn any level 2 processes:
I nit 2
The init command can be issued by the administrator, but it is usually issued from a shell script or program. The
fete/shutdown shell script, for example, issues init at the end of its program to enter either the default mode (single user) or the operating mode selected by the administrator. (See Section 2 for details on shutdown.)
Warning: Do not issue the init command for a level that is not assigned any processes in the /etc/inittabnn files. In particular, if
Note: The telinit command can be used interchangeably with the init command. init resides in the /etc directory (Ietelinit) and telinit resides in the /bin directory Ibinltelinit).
o One of the processes that was spawned by init terminates, for example, when a user logs off a terminal. The init process is informed (by a system call) that one of its "children" has died. It looks again at the /etc/inittabnn files for further instructions.
In the example of a terminated terminal process, the further instructions may be to "respawn", that is, to regenerate the terminal login prompt. (See "Format of the
/etc/inittabnn Entries" for more details on respawn.)
Format of the /etc/inittabnn Entries
Entries in the /etc/inittabnn files have the format: id:/eve/: type:process
where:
o id is a unique one-to-four character identifier that init uses internally to label entries in its process table. It is also placed in the dynamic record file, /etc/utmp, and the log file for the login process, /etc/wtmp.
o level is one or more alphanumeric characters that specify the operating level or levels at which this process is to run. Whenever the init internal level matches a level specified by level, this entry is active. If the init internal level does not match any of the levels specified, init makes certain that the process is not running. If this field is empty, the process runs at all levels.
o type specifies some further condition required for the execution of an entry. The most commonly used types are as follows (for a listing of all types, see your CENTIX Operations Reference Manual):
initdefault. The initdefault entry is scanned when init is first invoked when the system is booted up. It specifies the level at which init should begin operation when it first comes up. If no initdefault entry exists, init asks at the system console, /dev/console, for the initial run state. off. The entry is not to run even if the process
level matches the current init level. To
temporarily disable an entry, change its type to off. respawn. The entry is to run as long as init is running in a level specified in the level field. Whenever in it detects the termination of a process labeled respawn, it restarts the process.
wait. The process is started when init enters the same level as the process level. init then waits for the process to terminate. If init rereads the /etc/inittab file before changing to a new level, init will not rerun this process.
sysinit. The process is executed before init accesses the console.
D process is the shell command that is to be performed for
the entry. Any shell command, using any standard
command syntax, can be listed. A series of commands can be listed, with a semi-colon between each command.
Note: A line in the /etc/inittabnn file that begins with a colon (:j has been "commented out" and will not be read. Commenting out a line is a way of temporarily deleting the line. The
centrEASE program may comment out lines in the /etc/inittabnn files. Do not remove any colons without knowing why the line was commented out.
The init Process: A Summary
in it scans the jetcjinittabnn files for all entries at the level defined by initdefault. It handles each of the entries as defined by the type field in the entry. That is, if the entry is labeled respawn, for example, init starts it up. Or if the entry is labeled wait, init starts it up, and then waits until the process is terminated before going on to the next process. After it has started up all of the processes for the initial level, init's task is done until it is called on to change levels. The operating level can be changed by the superuser from the console or through a shell script. For example, when you run the shutdown command, the shutdown shell script issues init at the end of its program to enter either the default mode (single user) or the operating mode selected by the administrator. (See Section 2 for details on shutdown.) When init changes levels, it first scans the jetcjinittabnn files, looking for processes that should not be active at the new level. It terminates any of these that are active. init then rescans the jetcjinittabnn files, and starts up any processes that should be active at the new level.
init also rescans the jetcjinittabnn files when it receives a signal telling it that one of the processes that it has spawned has died. If the process that died, for example, was labeled wait, init can go on to the next process. If the process that died was labeled respawn, init restarts the process that died. This sequence continues as long as the system is running. init runs quietly in the background, waiting to be told to wake up and read the jetcjinittabnn files.
If You Make Changes to /etc/inittabnn
When the system is first booted up, the jetcjinittabnn files are copied into memory. Whenever the init process looks at
When you make a change to one of the /etc/inittabnn files, you are changing the original, not the copy that was read into memory when the system was booted up. If you want init to use the changed /etc/inittabnn file, you must force the changed file to be loaded into memory. Rebooting the system is one way to do this. An easier way is to issue the
init
command with an argument. Enter:# init q
The changed /etc/inittabnn file is copied into memory. The init process reads the new /etc/inittabnn file and makes any necessary changes to the current processes.
The Processes Started Up
by /
etc/init
The processes described in the following subsections are those listed in the original /etc/inittabnn files provided with your system software.
/etc/getty (/etc/inittabOO, /etc/inittab01)
The /etc/inittabOO file contains an entry for each line on which users can log into the system, typically terminal lines. The process listed in the entry is the /etc/getty process. The getty process conditions the terminal connection for login. To get information on the terminals, the getty process reads the /etc/gettydefs file. Each entry in /etc/gettydefs specifies a set of communications options, including a baud rate, and a login message for a terminal.
The /etc/gettydefs File
Each entry in /etc/gettydefs is a line of the form:
label#initial-flagS#final-flagS#login-prompt#next-label
where:
o initial-flags is a list of communications options for getty to apply when it first opens the terminal. The first flag listed is always a capital B followed by the baud rate for the terminal when it is first opened (Bbaudrate). The following flags are bit options used in the termio general terminal interface program.
There are dozens of possible flags. These are listed in Section 6 of your CENTIX Operations Reference Manual under termio. There are four categories of flags listed:
o Flags that describe input modes are listed under the variable, c~flag.
o Flags that describe output modes are listed under the variable, c_oflag.
o Flags that describe hardware control modes are listed under the variable c_cflag.
o Flags that describe local terminal functions are listed under the variable, c...lflag.
The flags are listed in uppercase letters and are separated from each other by spaces or tabs.
o final-flags is a list of communications options for getty to apply after the user has logged in. The first flag listed is always a capital B followed by the baud rate for the terminal after the user has logged in (Bbaudrate). The
final-flags are taken from the same set described for
initial-flags.
o login-prompt is the text printed to the terminal screen when the terminal is first opened. The text should end with the login prompt:
If you want to change the login-prompt, use the following as control characters:
Use To Get This This
In
newlineIt
tabIv
vertical tab (CODE-K on dumb terminal) Ib backspaceIr
carriage returnIf form feed
Ixxx xxx is a 1- to 3-digit octal number. Octal numbers can be used for special unprintable characters.
o next indicates the label of another entry to use if getty
receives a break signal (a stream of null characters) while it is running this entry. This field is only appropriate if the line is being set up for a dial-up modem. It is
not
appropriate for a direct connection.Sample /etc/gettydefs File
The following is a sample /etc/gettydefs entry. It is appropriate for a direct-connect 9600 baud terminal.
9600# B9600 CLOCAL BRKINT IGNPAR ISTRIP IXON IXOFF ECHO OPOST ONLCR # BRKINT ISTRIP ICRNL IXON OPOST ONLCR B9600 csa CREAD ISIG ICANON ECHO ECHOE ECHOK IXANY TAB3 #BURROUGHS XESOO OPERATING SYSTEM UNIX B2.00.01\n\nlogln: #9800
Making Changes to /etc/gettydefs
You should not directly edit the /etc/gettydefs file. To make changes, follow these steps:
1 Use the cp command to make a copy of the /etc/gettydefs file. Enter:
# cp /etc/gettydefs newname
where
newname
is the name assigned to the copy of the /etc/gettydefs file.2 Use a text editor to make your changes to the
newname
file. 3 Use the getty command with an argument to copy yourchanged file back to the /etc/gettydefs file. This command ensures that the changes are correctly syntaxed. Enter:
# getty -c newname
4 The getty process usually uses new entries in
/etc/gettydefs without any prompting. However, if getty tries to use an obsolete /etc/gettydefs, the terminal can be tied up. If a terminal remains unusable after you have changed /etc/gettydefs, go to the next step.
5 Determine the process number of the getty monitoring the terminal. If you know the terminal number of the terminal that is tied up, enter at a terminal that is
not
tied up (if all terminals are tied up, go to step 7):# ps -tnnn
If you do not know the terminal number, at another terminal, enter:
# ps - a
The system returns the process numbers of all currently running processes.
6 Terminate getty. Enter: # kl I I n
where
n
is the process number of the terminal. If you usedII ps -e", and do not know which is the correct process
number, list all possible numbers: # kll I n n n n n
The init process, sensing that one of its processes has died, rereads the jetcjinittab file. The getty processes are respawned, using the information from the new
jetcjgettydefs file.
7 (Use this step only if all terminals were tied up after step 3.) If another terminal is not available, follow these steps: a Reboot the XE 500 in the restricted mode. See Section
1 5 for details.
b Mount the root file system. Enter: # /atc/mount devlcensme
where devicename is the pathname of the memory device where the root file system is stored.
c Use a text editor to change the jetcjgettydefs file back to its original state. To do this, follow the procedure described in steps 1 through 3, above.
d Reboot the system in normal mode.
/etc/mkconrc (/etc/inittabOO)
If /etc/mkconrc cannot find a PT 1500, the system console is established on the first asynchronous line in the system (usually ttyOOO).
/etc/mkconrc creates /etc/conrc.
/etc/conrc (/etc/inittabOO)
This file contains one line that defines which terminal is the system console. The line is:
/etc/console -t /dev/ttynnn
where
nnn
is the number of the terminal that is assigned as the system console. (See Section 4 for details on terminal numbering.) If you are moving your system console to, for example, a dumb serial terminal, you may have to change this file./etc/conrc01 (/etc/inittab01)
This file provides the same function for AP01 as /etc/conrc provides for APOO.
/etc/bcheckrc (/etc/inittabOO)
This file runs the file system check program (fsck) on the file systems before they are mounted (see Section 4 for details on fsck).
/etc/brc (/etc/inittabOO)
The /etc/brc process removes the mount table that was previously set up for the system.
/etc/rc (/etc/inittabOO)
This file sets up the new mount table for the system. It is also used as a general purpose file for starting up
/etc/allre (/ete/inittabOO, /etc/inittabOl)
Configuring I/O Devices
The I/O devices on the system must be configured into both the BTOS and CENTIX operating systems.
To be configured into the BTOS operating system, a device must be listed in the configuration file for the processor board that controls the device. BTOS processor
configuration files are explained in detail in your CENTIX
Installation and Implementation Guide.
To be configured into the CENTIX operating system, each I/O device must be represented in the overall CENTIX file system by a device-or special-file, located in the /dev directory. The contents of a device file point to the device driver, located in the kernel, for the device.
When you send data to, for example, a disk, you send the data to the device file in the /dev directory that you have created for that disk. The data, however, is not actually stored in the device file (in the CENTIX file system), but on the disk itself. In the same way, when you load data from a tape, you call it from the device file for the tape device, but the data is actually loaded from the tape itself.
There are two types of CENTIX device files:
o Block device files are used for devices that handle I/O data in 1024 bytes (1 kB) blocks. The I/O size is controlled by the operating system's buffer size and is independent of the user's I/O size. Disk and tape devices can be
configured as block devices.
o Character device files are used for devices that handle raw data streams. The size of I/O transfers in raw data
With the CENTIX 6.0 system software release, the naming conventions for device files for tapes and disks have changed. (Device names for printers and terminals have not changed.) The system now supports both the old and new naming conventions. Old names are linked to the new names internally. If you have installed CENTIX 6.0 as a system update to an earlier version of CENTIX, you do not have to change your device file names to meet the new convention. Both old and new naming conventions for special files are described in this section.
Configuring a Disk
Warning: You can easily destroy other disks while trying to configure a new disk. If you are not completely confident with the procedures described in this subsection, you should configure your disks through centrEASE. See your centrEASE Operations Reference Manual.
Note: An XE 500 disk can be a disk cartridge, a built-in disk, or a Storage Module Device (SMD) disk.
In this guide, a "built-in disk" is assumed to be a 5 1/4-inch hard disk controlled by a File Processor (FP). In some base enclosure styles, SMD disks can also be built into the XE 500; however, they will be referenced as "SMDs." All SMDs, whether they are in an XE 500 base enclosure or an MD3 enclosure, are controlled by Disk Processors (DPs).
After a new hard disk has been installed, you must configure the disk in both the BTOS and CENTIX operating systems. Follow the steps described in the following paragraphs.
Step 1: Determining the Disk Name
BTOS Disk Device Names
XE 500 disk devices are named according to their physical location in the system. The naming conventions are different for disks controlled by FPs (the disk cartridge drive and built-in disk drives) and for disks controlled by DPs (SMDs in an XE 500 base enclosure or an MD3 enclosure).
Disks in the first enclosure that are controlled by an FP are named dO through d3; those in a second enclosure are named d4 through d7; and so on.
SMD disks in a base enclosure, which are controlled by the first DP in the system (DPOO), are named sO and s 1. Because each DP can control up to six SMDs, OPOO can also control MD3 SMOs, up through s5. SMDs in MD3 enclosures that are controlled by the second DP in the system (DPO 1) are named s6 through s11; and so on.
Figures in Appendix C show the various disk naming schemes.
CENTIX Disk Device File Names
In CENTIX systems before the 6.0 release, the disk de' ices are named as follows:
/dev/[r)xpddn
where:
o [r] is an optional field that defines the disk as a
character-rather than block-device. See the beginning of this section for definitions of character and block devices. o xp is fp if the disk device is connected to an FP or dp if the
o dd represents the disk number. CENTIX disk numbers are the same as the BTOS disk device numbers, except that you must add a 0 in front of a one-digit BTOS disk number for CENTIX. That is, if a built-in disk is named d4 in STOS, dd is 04 in CENTIX. Or, if an SMD disk is named sl in BTOS, dd is 01 in CENTIX. (Do
not
add a zero in front of a two-digit BTOS disk number. For BTOS disk s 1 0, dd is 10.) See "BTOS Disk Device Names" earlier in this section for details on numbering the disks in BTOS.o
n
represents the disk partition. Each disk has a maximum of eight partitions (0 through 7).With the 6.0 release, the disk devices on your system are named as follows:
/dev/[r]dsk/cndnnsn
where:
o [r] is an optional field that defines the disk as a
character-rather than block-device. See the beginning of this section for definitions of character and block devices. o
cn
represents the controller number. The controller numberis always cO if the controller is an FP. The controller number is always c 1 if the controller is a DP.
o
dnn
represents the disk number. CENTIX disk numbers are the same as the BTOS disk device numbers, except that you must add a 0 in front of a one-digit BTOS disk number for CENTIX. That is, if a built-in disk is named d4 in STOS,nn
is 04 in CENTIX. Or, if an SMD disk is named s 1 in BTOS,nn
is Olin CENTIX. (Donot
add a zero in front of a two-digit BTOS disk number. For BTOS disk s10,nn
is10.) See "BTOS Disk Device Names" earlier in this section for details on numbering the disks in BTOS.
o
sn
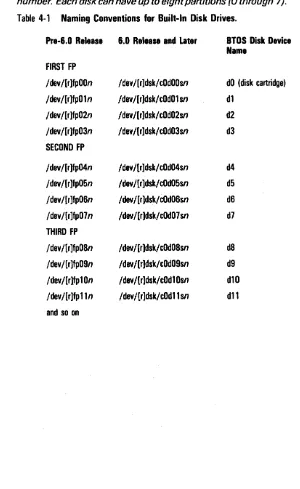
represents the disk partition. Each disk has a maximum of eight partitions (0 through 7).Note: In the disk names in Table 4-1, n represents the partition
number. Each disk can have up to eight partitions (0 through 7). Table 4-1 Naming Conventions for Built-In Disk Drives.
Pre-6.D Release 6.0 Release and later BIOS Disk Device Name
FIRST FP
/dev/[r]fpOOn / dey /[r ]dsk/ cOdOOsn dO (disk cartridge) /dev/[r]fpOln /dev/[r]dsk/cOdOl
sn
dl/dev /[r ]fp02n /dev /[r ]dsk/ cOd02sn d2 /dev/[r]fp03n /dev /[r ]dsk/ cOd03sn d3 SECOND FP
/ dey / [r ]fp04n /dev /[r ]dsk/ cOd04sn d4 /dev/[r]fp05n /dev/[r]dsk/cOd05sn d5 /dev/[r]fp06n /dev/[r]dsk/cOd06sn d6 /dev/[r]fp07n /dev/[r]dsk/cOd07sn d7 THIRD FP
[image:48.404.60.360.75.564.2]Note: In the disk names in Table 4-2, n represents the partition
number. Each disk can have up to eight partitions (0 through 7).
Table 4-2 Naming Conventions for SMD Disk Drives.
Pre-6.0 Release 6.0 Release and Later BTOS Disk Device Name
FIRST DP
/dev/[r]dpOOn / dey / [r ]dsk/ c 1 dOOsn sO /dev/[r]dpOln /dev/[r]dsk/c1 dOl
sn
sl /dev/[r]dp02n /dev/[r]dsk/c1d02sn s2 /dev/[r]dp03n / dey / [r ]dsk/ c 1 d03sn s3 /dev/[r]dp04n / dey / [r ]dsk/ c 1 d04sn s4 /dev/[r]dp05n / dey /[ r ]dsk/ c 1 d05sn s5SECOND DP
/dev/[r]dp06n /dev/[r]dsk/cld06sn s6 /dev/[r]dp07n /dev/[r]dsk/c1d07sn s7 /dev/[r]dp08n /dev/[r]dsk/c1d08sn s8 /dev/[r]dp09n /dev/[r]dsk/cld09sn s9 /dev/[r]dpl0n /dev/[r]dsk/cldl0sn s10 /dev/[r]dp11n /dev/[r]dsk/cl d11
sn
sl1THIRD DP
/dev/[r]dpl2n /dev/[r]dsk/c1d12sn s12 /dev/[r]dp13n /dev/[r]dsk/cl d13sn s13 /dev/[r]dp14n /dev/[r]dsk/c1 d14sn s14 /dev/[r]dp15n /dev/[r]dsk/c1 d15sn s15 /dev/[r]dp16n /dev/[r]dsk/c1d16sn s16 /dev/[r]dp17n /dev/[r]dsk/cl d17sn s17
Step 2: Initializing the Disk
Before a disk can accept data, you must format-or
initialize-it with the BTOS MIVolume utility. Once a disk drive has been initialized, it is said to contain a volume. The term
disk drive refers to the hardware device; volume refers to the complete BTOS file system unit of information stored on the disk. Each formatted disk in the system has a volume associated with it.
If the disk has not been initialized (or if you want to wipe out what is stored on the disk), use the BTOS MIVolume utility to initialize the disk. See Section 14 of this guide for details on when and how to initialize a disk.
Step 3: Creating Partitions on the Disk
After initializing the disk, you divide the disk into logical pieces called BTOS partitions. In step 4 (see the next subsection), you will create for each partition a CENTIX special device file. To the BTOS operating system, each partition used for CENTIX is simply one large file. To the CENTIX operating system, each partition looks like a separate storage device.
When you request an I/O operation, BTOS finds the correct partition on the disk, then CENTIX takes over to find the correct file on the partition.
A disk can hold from one to eight partitions. Each one of these partitions can hold one and only one CENTIX file system (only one file system can be assigned to each CENTIX device file). Determine the size of the file systems that will be stored in the partitions before deciding how to divide a disk. If, for example, you are going to store two very large file systems on a disk, you can make two very large partitions.
Note: If you decide that you want only one partition on a disk, you must still create that one partition. To store a file system on a disk, it must be assigned to a partition.
To create a partition on a disk, use the crup command. Enter: # crup '[BTOS device nsme)<sys>partition.n' blocks where:
o BTOS device name is the name of the BTOS disk on which you are creating the partition. If the device is a built-in disk, the device name is dn, where n is the device number. If the device is an SMD disk, the device name is sn, where n is the disk number. See "BTOS Disk Device Names, H earlier in
this section.
o
n
is the number of the partition that you are creating. The eight partitions on a disk are numbered 0 through 7.o blocks is the number of 512-byte blocks that you want in the partition. The partition should be the size of the file system that you are going to store in the partition. blocks must be an even number.
The following are examples of the crup command:
# crup '[d1)<sys>partltlon.O' 6000
# crup '[s2)<sys>partltlon.2' 20000
Note: Make sure that you include the single quotation marks shown in the crop command line.
If you need to determine the names and sizes of the partitions that have already been created on a disk, use the
of Is command. Enter:
# of Is ·1 '[BTOS device nsme)<sys>partition.·'
Step 4: Creating the CENTIX Device Files
After you define the BTOS partition on the disk, you create the CENTIX special device file that represents that partition in the CENTIX file system. For each partition, create two device files, one making the partition a block device and one making the partition a character device. Use the CENTIX mknod
command. Enter (the first line creates a block device; the second line a character device):
# mknod devlcefllename b 0 minornumber
# mknod devlcefllename c 1 minornumber where:
o devicefilename is the name of the partition device file, in the form /dev/[r]dsk/cndnnsn. See "CENTIX Disk Device File Names" for details.
o minornumber is an identifying number for the partition.
o To derive the number for a partition on an fp, use this equation:
partition number
+
(8 x disk device number) For example, for /dev/dsk/cOd02s7, the minornumber is:7
+
(8 x 2) = 23o To derive the number for a partition on a dp, use this equation:
partition number + (8 x disk device number) + 128 For example, for /dev/dsk/c1dOOs2, the minornumber is:
2
+
(8 x 0)+
1 28 = 130Note: These minornumbers are by convention only. You can
assign any minornumber as long as it is unique to that disk
The following are examples of mknod command lines. The first two lines and the last two lines are each defining one partition as both block and character.
# mknod /dev/dsk/cOd01s3 b 0 11
# mknod /dev/rdsk/cOd01s3 c 1 11
# mknod /dev/dsk/c1dOOsO b 0 128
# mknod /dev/rdsk/c1dOOsO c 1 128
Step 5: Identifying the Partitions
to the BTOS Operating System
The BTOS operating system uses several text files to define the systems hardware configuration. These text files are read when the system is booted. One of these files,
[sys]<sys>ConfigUFS.sys, lists the CENTIX disk partitions. When you create a partition on a disk, you must list it in this file, or the BTOS operating system will not recognize it.
Note:
The default [sys]<sys>ConfigUFS.sys that was provided with your system software may already have the new partition listed. Check before you add anything to the file.Use one of the CENTIX/BTOS text editors (ofvi or ofed; see your CENTIX Operations Reference Manual) to enter
[sys]<sys>ConfigUFS.sys. Add a line to the file for the partition that you are adding, in the form:
[BTOS device name]<sys>partitlon.n XPOn mlnornumber
where:
o [BTOS device name]<sys>partition.n is how you named the partition in the crup command (see step 3).
o XPOn is the processor board (FPOO, FP01, DPOO, OP01, and so on) on which the [sys]<sys>UFS.run file that is controlling the partition is running. (The
[sys]<sys>UFS.run file is the CENTIX file system server. See the CENTIX Installation and Implementation Guide for details.)
o minornumber is the number you assigned the partition's device file in the mknod command (see step 4).
Step 6: Rebooting the System
You must reboot the system to force the BTOS operating system to read the changed ConfigUFS.sys file.
To reboot the system, see Section 2 for directions on shutting down CENTIX. When CENTIX has entered single user mode, turn the front panel keyswitch to STOP, then back to NORMAL. When the front panel display shows a
"20," you can bring CENTIX back up, as described in Section 2.
Step 7: Creating File Systems on the Partitions
To make a partition available for use, you create a file system and assign it to that partition. Data can then be stored in the file system. Creating file systems is described in Section
5.
Configuring a Tape Drive
After a new tape drive has been installed, you must
configure the drive in both the BTOS and CENTIX operating systems. Follow the steps described in the following paragraphs.
Step 1: Determining the Tape Drive Name
810S lape Drive Names
810S
Qle
Drive Name. The QIC tape drive is named: qictapexy where:
o
x
is a value from 0 to 3 that represents the SP or DP to which the half-inch tape drive is connected. To determine x, look at the back of the XE 500 and identify the SP or DP to which the tape drive is connected. See Appendix C for an illustration of SP and DP numbering.The default for
x
is O. This default refers to the first SP or DP on the system,not
the SP or DP on which the first tape server is running.o y is the specific half-inch tape drive. Because two half-inch tape drives can be daisy-chained together from a single SP or DP, y can be 0 or 1. See Appendix C for an illustration of how tape drives are numbered.
Note: If only one digit is given in the tape drive name (for example, tape2j, the digit is assumed to be the y value. The default value of 0 is used for the x value.
CENTIX Tape Drive File Names
Table 4-3 shows the correlation between the old and new naming conventions for tape devices.
In CENTIX systems
before the 6.0 release,
the tape drives are named as follows:Idev/[n][r]mtn
where:
o [n] indicates that the tape is not to rewind when a tape file closes. The default is that the tape automatically rewinds.
o [r] is an optional field that defines the tape device as a character-rather than block-device. See the beginning of this section for definitions of character and block devices.
With the 6.0 release, The tape drives on your system are named as follows:
/dev/lr)mt/cndn(n}
where:
D [r] is an optional field that defines the tape device as a
character-rather than block-device. See the beginning of this section for definitions of character and block devices.
D
cn represents the controller number. For a olC tape drive,
cn
is always cO. For a half-inch tape drive,cn
is always c1.D dn represents the tape drive on the controller. You can
have only one olC drive on your system; it is dO. The first half-inch tape drive is dO, the second is d1, and so on.
D [n] indicates that the tape is not to rewind when a tape file
closes. The default is that the tape automatically rewinds. Table 4-3 Naming Conventions for Tape Drives.
Pre-B.O Release B.O Release and later
first half -inch drive /dev/[n][r]mtO /dev /[r]mt/cl dO[n] ole drive /dev/[n][r]mtl /dev/[r]mt/cOdO[n] second half-inch drive /dev/[n][r]mt2 /dev/[r]mt/cldl [n] third half-inch drive /dev/[n][r]mt3 /dev/[r]mt/cld2[n] and so on
Step 2: Creating the CENTIX Device File
The CENTIX device file represents the tape drive in the CENTIX file system. For each partition, create two device files, one making the partition a block device and one making the partition a character device. To create the device files, use the mknod command. Enter (the first line creates a block device; the second line a character device):
# mknod devlcefllensme b 2 mlnornumber
where:
o devicefilename is the name of the tape device file, in the form jdevj[r]mtjcndn[n]. See step 1 for details.
o minornumber is an identifying number for the tape drive.
minor number is assigned as follows:
o If the tape drive is automatic rewind (without the .. n H in
the device name) the minornumber is 0 for the first half-inch tape drive, 1 for the OIC tape drive, 2 for the second half-inch tape drive, 3 for the third half-inch tape drive, and so on.
o If the tape drive is not automatic rewind, add 4 to the above numbers: 4 for the first half-inch tape drive, 5 for the OIC tape drive, 6 for the second half-inch tape drive, 7 for the third half-inch tape drive, and so on.
Nots: These minornumbers are by convention only. You can
assign any minornumber as long as it is unique to that tape
device, and you enter the same number in the ConfigUFS.sys file (see Step 3).
The following are examples of the mknod command. These four lines configure a second half-inch tape drive for (in order): a block device without automatic rewind, a block device with automatic rewind, a character device without automatic rewind, and a character device with automatic rewind.
# mknod /dev/mt/c1d1n b 2 6
# mknod /dev/mt/c1d1 b 2 2
# mknod /dev/rmt/c1d1n c 4 6