Clearwell Systems, Inc.
Clearwell E-Discovery Platform V6.6 Case Administration Guide Revision: May 9, 2011
Last updated: April 27, 2011 3:41PM © 2004-2011 Clearwell Systems, Inc. All rights reserved.
Clearwell and Clearwell E-Discovery Platform are registered trademarks of Clearwell Systems, Inc. The Clearwell E-Discovery Platform software ("Software") and related documentation are provided under a license agreement between you and Clearwell ("License Agreement"), which contains restrictions on your use of the Software and the documentation. The Software is provided in object code format only and only for your internal use. The Software and documentation are protected by United States and international intellectual property laws, including without limitation United States Patent Numbers 7657603, 7593995 and 7743051. The Software is provided in object code format only and only for your internal use. Except as expressly permitted in your License Agreement, you may not use, copy, reproduce, translate, broadcast, modify, license, transmit, distribute, exhibit, perform, publish, or display any part, in any form, or by any means. Reverse engineering, disassembly, or decompilation of the software is expressly prohibited. You may not disclose, transfer, or sublicense the Software or documentation, or any part thereof, except as expressly permitted in writing by Clearwell. The information contained herein is subject to change without notice and is not warranted to be error-free.
U.S. GOVERNMENT RIGHTS Programs, software, databases, and related documentation and technical data delivered to U.S. Government customers are "commercial computer software" or "commercial technical data" pursuant to the applicable Federal Acquisition Regulation and agency-specific supplemental regulations. As such, the use, duplication, disclosure, modification, and adaptation shall be subject to the restrictions and license terms set forth in the applicable Government contract, and, to the extent applicable by the terms of the Government contract, the additional rights set forth in FAR 52.227-19, Commercial Computer Software License (December 2007).
Contents
About This Guide
5Revision History
5Typographical Conventions
5Obtaining More Product Information
6Technical Support
6Preparing Your Case
7Defining New Cases
7Guidelines on Container Extraction 15
Discovering Archive Sources
18Configuring Active Directory Discovery 18
Discovering HP IAP Archives 20
Discovering Symantec Enterprise Vaults 22
Managing Case Sources and Case Custodians
23Managing Sources 23
Importing TIFF Image Files 27
Adding EDRM XML Sources 29
Adding Email Server/Archive Sources 31
Adding Case Folder Sources 34
Processing Physical Evidence Files (LEF and E01) 40
Defining Case Custodians 42
Preprocess Your Source Data
45Processing Options Tab 46
How Preprocessing Works 49
Setting Processing Options 51
Pre-processing Example 57
Generating Pre-Processing Reports 59
Processing Source Data
61Monitoring Source Processing Status
61Viewing Processing Exceptions
65Defining Tag Sets
68Setting Up Folders
70Setting Up Non-Production Folders 70
Setting Up Production Folders 71
Setting Up Redaction Sets
74Managing Case Participants, Topics, and Groups
75Managing Case Participants and Aliases 75
Configuring Topics 78
Defining Groups 80
Managing Batches
82Case Administration
83Selecting a Case
83Changing the Case Settings
84Managing Cases
91Defining Case Templates
93Producing Search Results
102Running a Production 102
Reviewing a Production 104
Managing Case Schedules and Jobs
105File Types and File Handling
141File Types
141 PST and NSF 141 OST 142 MBOX 142 EMLX 143File Handling
143Encrypted and Digitally-Signed Content 143
Hidden Content 146
Embedded Objects 149
Case Administration Guide
Case Administration Guide
Welcome to the Clearwell E-Discovery Platform Case Administration Guide. The Clearwell Case Administration Guide provides administrators and case end users of the Clearwell E-Discovery Platform with details on how to set up and manage cases, and from performing pre-processing through post-processing tasks in preparation for end users to search, review, and analyze the data. This guide also provides details on how Clearwell handles various file types and hidden content.
This section contains the following sections:
• “About This Guide” in the next section
• “Revision History” on page 6
• “Obtaining More Product Information” on page 6
• “Technical Support” on page 7
About This Guide
This guide is intended for end users, case administrators, decision makers, and anyone who is interested in understanding how data is prepared and processing in a case through the Clearwell E-Discovery Platform. For information about administering the system, refer to the System Administration Guide.
Export and Production Tasks
For information on performing exports and production tasks, including production exports, refer to the "Export and Production Guide" .
Revision History
The following table lists the information that has been revised or added since the initial release of this document. The table also lists the revision date for these changes.
Obtaining More Product Information
Revision Date New Information05/02/2011 • Concept Search configuration
• Processing and pre--processing enhancements: – batch-level reporting for discovered data
– administrative option to remove exceptions page warnings • Moved Advanced Export information to Export and
Production Guide.
02/25/2011 • Scalable Folder Management and user interface enhancements
• Additional security and administrative options • User deletion
• Resubmit documents for OCR 12/13/2010 • Documented new features:
– custodian merge/unmerge
– Find similar (noted user-configurable threshold)
• Added graphics and description for pre-processing feature enhancement - viewing errored files during pre-processing • Inserted description for new case setting options:
– Document Duplication in Milliseconds – Process Truncated Lotus Notes Documents • (Minor revisions and graphics updates throughout)
Documentation Comments/Feedback?
Got questions or comments on this guide, or other user documentation? We appreciate your feedback! Feel free to contact us at [email protected].
Technical Support
For technical support, use any of the following methods:
• Clearwell Systems Support Portal — Go to http://www.clearwellsystems.com/support-portal.php to search the Clearwell knowledge base, view and create cases, and submit and vote on product enhancements.
• Email — Send email to [email protected]
• Phone — Contact us:
– Direct: 650-526-0600 (Option 2) – US Toll-Free: 877-727-9909 (Option 2)
Case Administration Guide
Preparing Your Case
For information about how to create new case, refer to the following topics:
• “About the Case Administrator Role” on page 9
• “Defining New Cases” in the next section
• “Discovering Archive Sources” on page 23
• “Managing Case Sources and Case Custodians” on page 28
• “Pre-Process Your Source Data” on page 52
• “Monitoring Source Processing Status” on page 69
• “Viewing Processing Exceptions” on page 73
• “Processing (or Resubmitting) Documents for OCR” on page 75
• “Setting Up Folders” on page 80
• “Setting Up Redaction Sets” on page 90
• “Managing Case Participants, Topics, and Groups” on page 91
• “Managing Batches” on page 98
About the Case Administrator Role
The case administrator’s role includes optional security rights for case access and user management which the system administrator can grant to allow refined control over user access. Additional administrator rights can be selected explicitly, with optional rights to view and manage case status and case processing, to manage users and access activity reports, and rights to other case management functions.
Note: To ensure security, case administrators may not grant rights to another user that they themselves do not have. Further, case administrators cannot change passwords for case users. For more information about administrator and user roles and permissions, refer to the section "Managing User Accounts" in the System Administration Guide.
Defining New Cases
To get started working with a set of documents in Clearwell, you create a case. A case is a self-contained repository for all of the documents associated with a particular case or investigation.
Note: You must have a licensed, installed Pre-Processing module, and pre-processing enabled on your system at the time of case setup to later analyze your pre-processed data, and view advanced pre-processing options and filters. If you do not have a license for the Pre-Processing module, or if the module is disabled at case setup, you will not be able to process LEF files, de-NIST loose files, or get Sent dates in email files (PST, MSG, EML, NSF). For more information about these features, refer to the Pre-Processing Navigation Guide. After you create a case, you can define the sources of the documents that you want to index and analyze, as well as other case-specific features, such as folders, tag categories, and customized topics and participant groups.
You can have many cases active at one time, and each case can be managed
independently of other cases. A system administrator can completely define each case, or simply specify the case name and template (if any), and allow a case administrator to define the document sources and other case settings.
To add a new case:
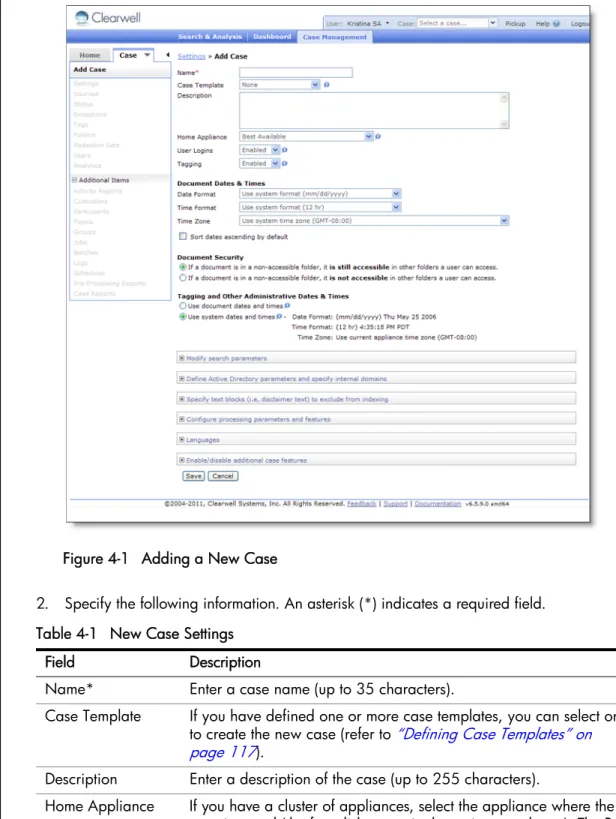
Figure 4-1 Adding a New Case
2. Specify the following information. An asterisk (*) indicates a required field. Table 4-1 New Case Settings
Field Description
Name* Enter a case name (up to 35 characters).
Case Template If you have defined one or more case templates, you can select one to create the new case (refer to “Defining Case Templates” on page 117).
Description Enter a description of the case (up to 255 characters).
Home Appliance If you have a cluster of appliances, select the appliance where the case is stored (the free disk space is shown in parentheses). The Best Available default assigns the case to the appliance with the most free disk space.
User Logins Select Disabled to prevent non-administrative users from accessing the case. You can enable user access after the initial configuration and indexing are complete.
Tagging Select Disabled to prevent all users from tagging documents in the case.
Document Dates &
Times Document-specific date/time settings are useful when the documents in a case originate in a different time zone from the location of the Clearwell appliance. Each case can have its own document date and time settings, thereby allowing a single Clearwell appliance to support cases originating from multiple locations.
For example, a law firm headquartered in New York, which has its system-level date and time settings set to a US date format and Eastern time, may be managing a case with documents that originated in London. The system time zone is U.S. Eastern time and the format is based on the 12-hour clock. To enable reviewers to see document dates and times as the London custodian would see them, the administrator configures the following document settings: •Date format—dd/mm/yyyy
•Time Format—24 hour •Time Zone—GMT
With these settings, all document-specific information in the case is displayed in the document (London-GMT) time zone using the 24-hour clock. In addition, the European date format (dd/mm/yyyy) is used for displaying and printing reports.
Select Sort dates ascending by default if you want all documents to be sorted in ascending date order and set as the default.
Document Security Select the security permissions for viewing documents in a case: •If a document is in a non-accessible folder, it is still accessible in
other folders a user can access—(Default) Least restrictive:
Allows users to view a document if the document is in a folder that they have permission to view (regardless of whether the same docu-ment exists in another folder that users do not have permission to view).
Table 4-1 New Case Settings (Continued)
3. Click each category of case settings to view or change the default values. The following table describes each group of settings.
Tagging and Other Administrative Dates & Times
Specify whether dates and times are the same for case administration functions as for document display.
Choose one of the following options:
•Use document dates and times—Ensures that all date and time set-tings for the case (for administration and document display) are in the document format and time zone, as specified in the previous entry in this table.
•Use system dates and times—Uses the system date and time settings for case administration tasks (such as user login tracking and export). Refer to "Defining System Settings" in the System Adminis-tration Guide for information on the system level date and time set-tings.
In the New York/London example, the administrator would choose Use system dates and times to keep administrative operations in the New York time zone (the system level time zone).
However, if the all of the case administration and document handling were performed in London, the administrator would choose Use document dates and times.
Table 4-2 Case Settings
Field Description
Modify search parameters Minimum size of document to
return... Enter the minimum size of documents to return when searching for documents with no indexed text: (default is 10 KB).
Maximum result size
(documents) Enter the maximum number of documents (100 to 10,000,000) that can be retrieved by a search (default is 1,000,000).
Table 4-1 New Case Settings (Continued)
Find Similar Settings Set the default document similarity threshold. This is the setting used in the similarity histogram as the default “Minimum Rating” value. A lower value indicates documents which are less similar (versus a higher value indicating closer similarity, nearly duplicate) to the original document.
Note: During review, users can adjust this similarity threshold for any original document to find similar items for analysis. For more information, refer to "Viewing Search Results" in the User
Guide.
You can also set where similar documents are found: across the entire case or within search results.
Define Active Directory parameters and specify internal domains Note: You cannot modify these settings after the case is created. Use Global Participants and
Domains If you use an Active Directory server to discover your Exchange servers and organizational data, clear the check to use only the participants and groups discovered in the document sources assigned to the case.
Note: You cannot modify this setting after the case is created.
Internal Domains To add a domain specific to this case, enter the domain name and click Add. To change a domain name, select the domain, enter the correct name, and click Replace. To delete a domain, click for the name.
Specify text blocks to exclude from indexing
Indexing exclusions To exclude commonly found blocks of text from the index, enter the text on one or more lines, and click Add. To change a text block, select the text block, enter the correct text, and click Replace. To delete a text block, click for the block.
The specified text is excluded from documents processed in the future, but is not removed from the current index. Note: Spaces are ignored for disclaimer text identification. Table 4-2 Case Settings (Continued)
Configure processing parameters and features Estimated number of
documents in index Enter the estimated number of documents to be indexed (100,000 to 10,000,000). Used only to optimize performance (not a hard limit).
Messages with no Sender
email address Select one of the following:•Process and set sender to “none.” Process the message and assign the value “none” to the Sender field. •Process and set sender to last modifier. Process the
message and assign the email address of the last person who modified the email in the Sender field.
•Do not process. Do not include the email in processing. Enable concept search Select the check box to search documents by concept
(enabled by default). Clear this option to disable this feature.
Perform topic classification Select the check box to classify document content by topic (disabled by default).
Note: Topic classification requires additional time during case processing.
Automatically generate topics Select the check box to generate topics automatically from the document content. By default, only the manually-defined topics are used (refer to “Configuring Topics” on
page 63). This check box is enabled only if Perform topic classification is selected.
Extract documents from
container files Select the check box to have the system extract all files from the attached container or archive files, such as .zip files found in messages from PST, NSF, EMLX/EML/MSG sources. After all files are extracted, the container/archive file is excluded from the search results.
Note: Loose files which are container/archive files are always extracted.
Convert mail formats (OST,
MBOX) to PST Specify which directory to place converted files. Setting this property overrides the system-level setting found at Home > Settings > Locations.
The default location places the directory in
<appliance_installation_drive>:CW\CaseData\<case ID>\.
Note: The converted files directory is not included in Clearwell’s automated case backup.
Process loose files that are 0
bytes long Select the check box to process files that are specified as 0 bytes in size. Table 4-2 Case Settings (Continued)
Process truncated Lotus Notes
documents Select the check box to process Lotus Notes files that are truncated due to excessive length. Document duplication in
milliseconds Selected by default, this option allows Clearwell to process duplicate documents in milliseconds according to the sent date (rounding up to the nearest second).
Clearing this check box means that duplicate documents will not be processed using the milliseconds to round up/ down to the nearest second (only the seconds value will be used).
Note: This applies to both loose files and e-mail, and can only be configured/modified prior to processing.
Interpret ambiguous “##/##/ ##”-formatted dates for derived emails as if formatted as
Select the date format for ambiguous dates (mm/dd/yyyy versus
dd/mm/yyyy).
A derived email is the text content of an email that is enclosed within another email. Clearwell uses these emails to construct more complete and accurate discussion threads. However, because derived emails are text only, there can be ambiguities in how Clearwell should interpret the sent date of the email.
Table 4-2 Case Settings (Continued)
Process a “.TIF” file’s matching
“.txt” file: A TIF/TXT pairing is produced when documents are in imaged form (for example, scanned from paper documents). If optical character recognition (OCR) is applied to extract the text, the result is a pair of files that represents the content: an image (TIF format) and its extracted text (TXT format).
The following options are supported.
•Never. Process all “.TIF” files as regular image files, inde-pendent of matching “.txt” files. Do not perform any special actions when processing the file.
•When the “.TIF” file is found in the specified folder and the matching “.txt” file is found in the specified folder. The system searches for a .txt text file that has the same name as the TIF file (such as “memo.tif” and “memo.txt”) and is in the same folder.
If the text file is found, it is processed instead of the TIF file.
•When a pair is found within the same folder. The system searches for a .txt text file in the specified folder that has the same name as the TIF file in the other specified folder. If the text file is found, it is processed instead of the TIF file.
•As described by a mapping file at the root of the source. The system searches for a text file that is mapped to a TIF file with the name that is found in the root folder of the source. If this mapping file is found and the corre-sponding text file is found, the text file is processed instead of the TIF file.
Specify a filter to use when
excluding known files By default, Clearwell uses the NSRL Reference Data Set (“NIST” List) to exclude known files during indexing. In addition to the default Clearwell NIST list, custom lists can be defined in the System area. To add a filter to the menu, go to Home > Known Files.
Note: The selected list cannot be changed after indexing has begun.
Table 4-2 Case Settings (Continued)
Hidden, Inserted, and
Embedded Content By default, Clearwell finds and indexes all text contained within a document. However, if the text is obscured or hidden, it can be difficult to find and view the indexed text. Identifying content enables you to search and filter for hidden and embedded content. Extracting embedded content enables you to view embedded documents as attachments or embedded content.
•Identify and extract different file types. •Identify only.
•Don’t identify or extract. Text is indexed, however, content might not be viewable if the information is not identified or extracted.
OCR Processing Use Optical Character Recognition (OCR) for documents where no text is found
Choose whether to process image and non-text files without OCR. If you enable OCR, select the file types to process when no text is found.
By default, OCR is disabled.
Note: Processing case files requires more time when OCR is enabled. Clearwell strongly recommends leaving this option disabled, with the exception of only very small cases. For normal-sized cases, leave this option off. Later, you can perform a search to select the documents you want to process with OCR. For more information, see
“Processing (or Resubmitting) Documents for OCR” on page 75.
Languages
Note: You can change all language settings after initial processing (except as indicated below in this table) and then rerun post-processing.
Automatically identify the following languages within your case
Select check boxes to specify the languages that you want to include in document searches. Select only the languages that you believe may exist in your case. Languages that are not selected will not be automatically identified and will be classified based on the settings below. The most commonly-Table 4-2 Case Settings (Continued)
For documents that can not be
automatically identified Select the single language to apply from the drop-down list if it is not possible to identify languages in a document automatically.
For example, it is difficult to accurately identify documents with limited content, such as short emails and
appointments. If the expectation is that your data set is mostly in one language, such as English, then configure this setting to that language to best classify these documents.
Alternatively, you can classify these documents as “Other.” The system identifies a
predominant language Specify the percentage of a document (50-100%) that must be in a language to consider that language predominant. This allows Clearwell to identify documents that contain mostly one language. You can search for predominant languages using Clearwell Advanced search.
Advanced Options For small amounts of document content, it is not possible or desirable to automatically identify the language. You can configure the minimum number of characters and the percentage of a document’s content that is required to automatically identify a language within the document. Exceeding either the character or percentage threshold will trigger automatic language identification.
When you click the Advanced Options button, the Automatic Language Identification Advanced Options window opens. Configure the following settings:
•Specify the minimum number of characters to automati-cally identify a language (default is 200).
•Specify the minimum percentage of a document’s content to automatically identify a language (default is 10%). •For content that does not meet the other thresholds or
cannot be automatically identified for any other reason, choose a language for manual identification.
Table 4-2 Case Settings (Continued)
4. Click Save to submit the new case, or click Cancel to discard your changes. Next Steps:
Enable stemmed search for
the following languages Select check boxes to enable stemmed searches for specific languages. A stemmed search automatically finds documents that contain common variations of a word that is entered as part of a query. For example, if you search for the word “test,” a stemmed search also finds variations such as “testing,” “tests,” and “tested.”
Two English options are available to support stemmed searches.
Both are selected by default:
•English—Uses a sophisticated linguistic stemming algo-rithm to
determine stemming rules. For example, this option con-siders “went” as a variant of “go.”
•English (suffix-based stemming)—Uses the Porter algo-rithm to strip out common word suffixes (such as “s” or “ing”) for stemming. This algorithm is useful for finding nouns in their plural and singular forms.
Note: Each additional language increases processing time within your case.
Enable/Disable Licensed Features Enable advanced processing options configuration (also known as pre-processing)
Enable or disable the options for document pre-processing. This option is available only if the appliance is licensed for processing options.
Note: If you do not have a license for the Pre-Processing module, or if the module is disabled at case setup, you will not be able to process LEF files, de-NIST loose files, or get Sent dates in email files (PST, MSG, EML, NSF).
Enable review, redaction,
and production features Enable or disable options for document review, redaction, and production. (Available only if the appliance is licensed for these features.
Table 4-2 Case Settings (Continued)
Guidelines on Container Extraction
In container extraction, container files (such as ZIP and RAR files) are examined and have their contained files extracted and processed as individual files for analysis, review, and production.
Contained files must be separated from their containers because different files within the same container may have a different status (such as relevant or privileged) and must be handled separately from their companion files.
Container extraction is enabled by default for all new cases. (For loose files, container extraction is always ebabled.) To disable container extraction, clear the Extract documents from container files check box on the Case Configuration page when creating your case. If you choose not to perform container extraction, then container file text is still fully
searchable, but the container will be processed as a single unit and will appear as a single container file for search, review, and export. Further, with container extraction disabled, and Clearwell finds a container in EML, MSG, PST or NSF documents, then these files will NOT be expanded. However, note that for loose files, container extraction is always enabled.
The following rules apply to container extraction.
• Container extraction is supported only for Releases 4.0 and later. • The default number of supported container files is 10,000.
• When Clearwell encounters a container file in a loose file directory (not attached to an email), it extracts all the contained files from within the container and processes them as individual documents. It does NOT process the container file itself as a document. Instead, the container file is treated as an element of each contained file’s path and is available for viewing search through the document locator.
For example, if the file mydocs.zip contains the files budget.xls and memo.doc, these two documents are added to the index. There will be no document entry for
mydocs.zip; however, when viewing the contained files an icon is displayed indicating that it was found in a container, and the container filename itself can be viewed and searched on through the document locator. The Case Status page will show that one container file was encountered during processing, and that two files were extracted. • When container files are email attachments, they are treated similarly to loose files. The
contained files are extracted and shown as individual attachments on the email, but the container itself is not shown as an attachment. However, Clearwell will show the name of the container file in a hierarchy in the attachment view (on both the message and in the related items area) to make it clear which attachments came from container files. On export, no specific document entry will be included for the container, but the name of the container file will appear in the locator path for all of its child documents. • If you have a container attachment that has some responsive documents and some
non-responsive documents, the whole email must be tagged consistently as if the email had regular, non-contained attachments that were responsive and non-responsive.
• ZIP, GZIP, RAR, TAR, LZH, LHA, Unix compressed, BZ2, and 7Zip container files are supported, as well as self-extracting (.exe) ZIP and RAR files. Other unsupported container files are passed unaltered to the indexer.
• If the system cannot open a container file due to password protection, encryption, or other reason, the container file is dropped and logged as an error. If there is a single encrypted file within a container, the full container is not processed.
• If the system encounters a problem extracting a specific file from a container (other than encryption), its content is not indexed, and a file warning will be logged. The path of the dropped file will include the name of the container file and any relative path information. While the content is not indexed, a document will be created and the generic file information will be indexed. An error may occur when exporting the file similar to the error encountered during processing.
• Containers with up to 10,000 files are supported by default. You can increase this limit by modifying the property esa.indexer.max.docs.percontainer. If a container has more than the allowed maximum number of files, then the entire container file is dropped. There is also a timeout threshold of a few minutes for extraction.
• During export, contained files are treated as individual files, but a reference to the container file is maintained. For example, if the file memo.doc was exported from container file mydocs.zip, then the export directory structure includes the files
..\mydocs.zip\memo.doc. From email attachments, the email is exported as a single original unit with the original container files.
• In XML exports, contained files are exported as individual files with the reference to the container file in the document location record of the XML metadata. For email
attachments, if the original native email is exported then the original container file is preserved in its original format. However, if the Separate attachments from emails option is chosen, the contained files are exported as individual attachments with the reference to the container file in the document location record of the XML metadata. • If a PST or NSF file is encountered in a loose file container, it will be extracted to the
case’s PST/NSF extraction area and processed like any other PST or NSF file. However, PST/NSF files found within attachment containers will not be extracted and will instead be flagged with a warning and logged in the case’s exception log. • MSG and EML files found within loose file containers are processed as emails. MSG
and EML files that are attached to other emails are processed as loose files. However, all of their child documents (attachments/additional embedded messages) will be broken out and indexed as separate attachments during indexing, and the full attachment hierarchy will be displayed and preserved on export.
Discovering Archive Sources
For information about how to discover and manage archive document sources, refer to the following topics:
• “Configuring Active Directory Discovery” in the next section
• “Discovering HP IAP Archives” on page 25
• “Discovering Symantec Enterprise Vaults” on page 26
Configuring Active Directory Discovery
The Active Directory (AD) crawler discovers your Microsoft Exchange servers, the mailboxes on each server, and your organizational data, such as physical locations and departments (groups). The Clearwell appliance must belong to a Windows domain for the AD crawler to run. To schedule the AD discovery to be run periodically, refer to "Managing Schedules" in the System Administration Guide.
To view the discovered Exchange servers, limit the appliances that can access them, or change the user account or password required to access each server, refer to “Adding Email Server/Archive Sources” on page 31. To index the documents on a discovered Exchange server, the server must be added to a case (refer to “Defining New Cases” on page 10).
To configure the AD crawler:
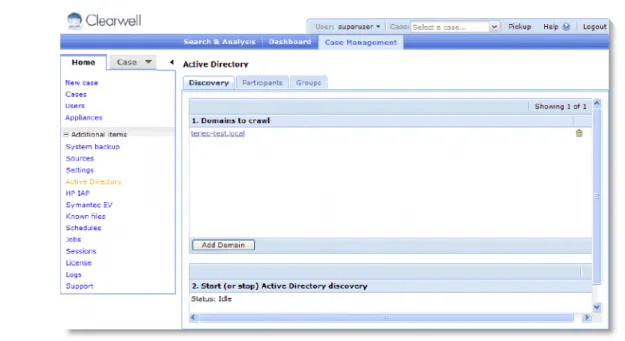
1. In the Case Management tab, click Home > System > Active Directory.
2. To add one or more Active Directory domains:
A. Click Add Domain, specify the following information, and click Save.
B. Click Save to submit the new domain, or click Cancel to discard your changes. 3. To change the user name or password for a domain, select the domain name. To delete
a domain, click for the domain.
4. To start the Active Directory discovery process, click Start Discovery.
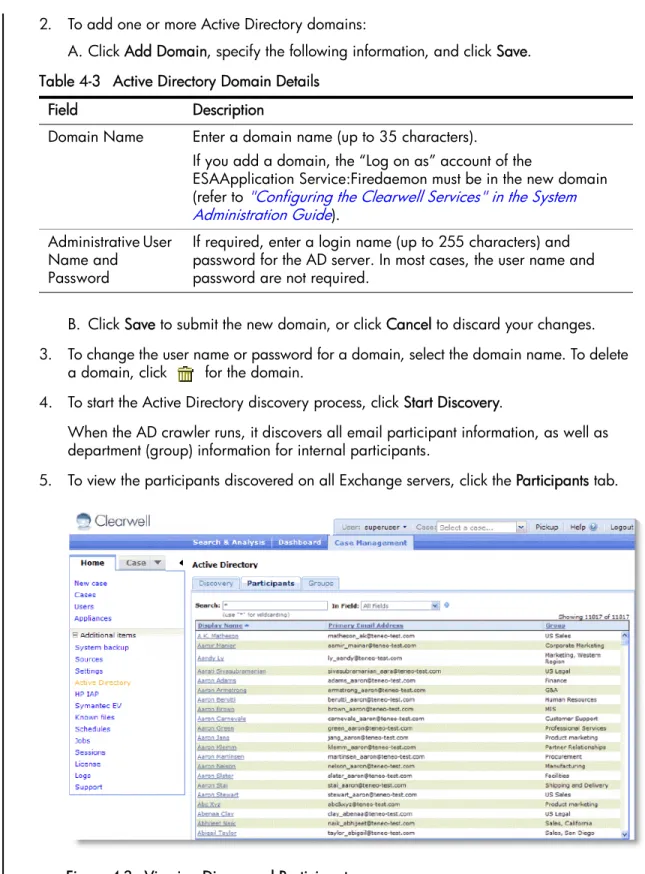
When the AD crawler runs, it discovers all email participant information, as well as department (group) information for internal participants.
5. To view the participants discovered on all Exchange servers, click the Participants tab. Table 4-3 Active Directory Domain Details
Field Description
Domain Name Enter a domain name (up to 35 characters).
If you add a domain, the “Log on as” account of the
ESAApplication Service:Firedaemon must be in the new domain (refer to "Configuring the Clearwell Services" in the System Administration Guide).
Administrative User Name and
Password
If required, enter a login name (up to 255 characters) and password for the AD server. In most cases, the user name and password are not required.
6. To search the list of participants:
A. To search just one column, select the column from the in menu (Full Name, Primary Email Address, or Group).
B. Enter the first few characters of the search text in the Search for field (use a “*” to indicate any text).
To view additional participant details, click the participant name. Internal participants may have multiple email addresses.
7. To view the list of groups (departments) discovered on all Exchange servers, click the Groups tab.
Discovering HP IAP Archives
If you have Hewlett-Packard (HP) Integrated Archive Platform (IAP) archives in your network, you can define them here and run the HP IAP discovery process to discover the mailboxes in each archive. To schedule the IAP discovery to be run periodically, refer to "Managing Schedules" in the System Administration Guide.
To limit the appliances that can access a discovered archive, refer to "Managing Schedules and Jobs" in the System Administration Guide. To index the documents on a discovered IAP archive, the archive must be added to a case (refer to “Defining New Cases” on page 10). To configure IAP archives:
1. In the Case Management tab, click Home > System > HP IAP. 2. To add an IAP archive:
A. Click Add and specify the following information. An asterisk (*) indicates a required field.
B. Click Save to submit the new archive, or click Cancel to discard your changes. Table 4-4 IAP Archive Properties
Field Description
Source Name* Enter a name for the IAP archive (up to 255 characters). Use only letters, numbers, and underscores.
Source
Description Enter a description of the IAP archive (optional).
Server Name* Enter the name or IP address of the IAP archive. If the server listens on a non-default port, append a colon and the port number. For example:
server:8080
User Name*
3. To change the archive password or description, select the archive name. To delete an archive, click next to the name.
4. To start the archive discovery process, click Start Discovery.
Discovering Symantec Enterprise Vaults
If you have Symantec Enterprise Vault (EV) servers running Enterprise Vault version 6.0 SP3, 7.x, or 2007, you can define the directory server here and run the Symantec EV discovery process to discover the Microsoft Exchange archives on each vault. Note that the Enterprise Vault administrative console must also be installed on the Clearwell appliance.
To schedule the Symantec EV discovery to be run periodically, refer to "Managing Schedules" in the System Administration Guide. To limit the appliances that can access a discovered archive, refer to "Managing Schedules and Jobs" in the System Administration Guide. To index the documents on a discovered vault, the vault must be added to a case (refer to “Defining New Cases” on page 10).
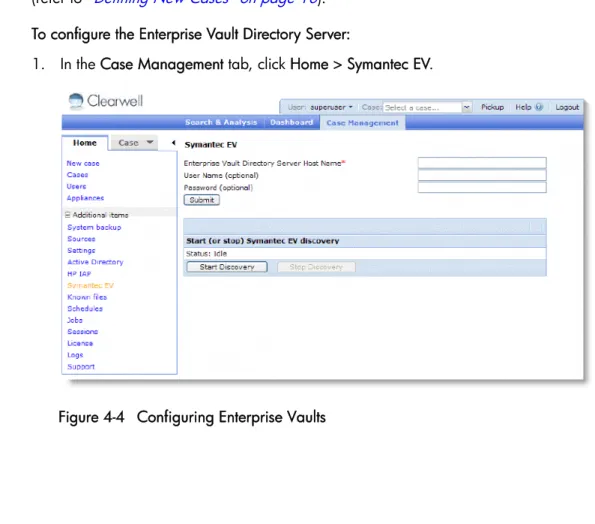
To configure the Enterprise Vault Directory Server:
1. In the Case Management tab, click Home > Symantec EV.
2. To configure an Enterprise Vault Directory Server:
A. Specify the following information. An asterisk (*) indicates a required field.
B. Click Submit.
3. To start the discovery process, click Start Discovery. Table 4-5 Enterprise Vault Properties
Field Description
Enterprise Vault Directory Server Hostname*
Enter the name of the Enterprise Vault Directory Server (up to 255 characters). Use only letters, numbers, and underscores.
User Name
Managing Case Sources and Case Custodians
For information about how to manage case document sources and custodians, refer to the following topics:
• “Managing Sources” in the next section
• “Importing TIFF Image Files” on page 33
• “Adding EDRM XML Sources” on page 36
• “Adding Email Server/Archive Sources” on page 37
• “Adding Case Folder Sources” on page 40
• “Processing Physical Evidence Files (LEF and E01)” on page 44
• “Defining Case Custodians” on page 47
Managing Sources
For each case, you can index documents from any combination of the following sources: • Selected loose files, email container files (Microsoft Exchange PST or Lotus NSF), or
individual email files (.msg or .eml).
• Selected Exchange mailboxes, archives, and/or repositories on the discovered email server/archive sources (Microsoft Exchange, Symantec Enterprise Vault, and HP IAP servers)
Indexing can be run manually for each source, or you can schedule a document crawler task to periodically update the case index with any new content found in one or more sources (refer to “Managing Case Schedules” on page 131).
Note: The speed at which documents are processed into Clearwell can vary dramatically based on the type of content and the configuration of your document sources and network. Contact Clearwell Technical Support ([email protected]) for information about optimizing your Clearwell setup to maximize document processing throughput.
Defining Document Sources
To define the document sources for a case:
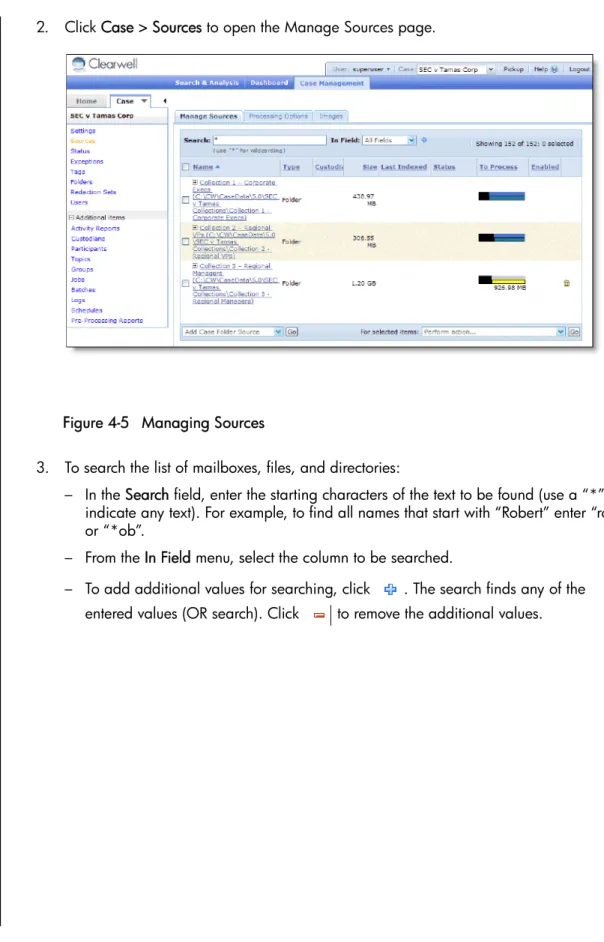
2. Click Case > Sources to open the Manage Sources page.
Figure 4-5 Managing Sources
3. To search the list of mailboxes, files, and directories:
– In the Search field, enter the starting characters of the text to be found (use a “*” to indicate any text). For example, to find all names that start with “Robert” enter “rob” or “*ob”.
– From the In Field menu, select the column to be searched.
– To add additional values for searching, click . The search finds any of the entered values (OR search). Click to remove the additional values.
For each source, the page includes the following information and controls.
4. To perform actions on the selected sources, select the check boxes for the sources. Choose one of the following options from the menu in the lower-left or lower-right corner of the page and click Go.
Note: You can choose to apply an action only to specific rows (such as an entire source, or one or more email files). If you attempt to perform an action on a row that is not permitted, a message indicates how the action should be performed.
Table 4-6 Manage Sources Page Columns
Column Description
Selection check box Check box to select the entry.
Name Name of the source.
To expand an entry and show the associated directories, click the + sign to the left of the entry. Click the - sign to collapse the entry.
Type Folder, directory, or email file.
Custodian Custodian name, if a custodian is assigned.
Size Size of the email file (PST or NSF).
Last Indexed Time that the folder, directory, or file was last indexed. Status Result of the last indexing operation, if indexing has
occurred.
To Process Status of processing options as defined on the Processing Options tag. Refer to “Pre-Process Your Source Data” on page 52.
Table 4-7 Actions on Manage Sources Page
Action Description
Add Case Folder Source Add a new document source to the case. Refer to “Adding Case Folder Sources” on page 40.
Add EDRM XML Source Add a new Electronic Document and Records Management (EDRM) source to the case. Refer to “Adding EDRM XML Sources” on page 36.
Add Email Servers/
Archives Add new email servers or archives to the case. Refer to “Adding Email Server/Archive Sources” on page 37. Add Collection Set For information on how to add a collection set, see
"Adding Collection Sets to Cases" in the Identification and Collection Guide.
Rerun Post-Processing Apply changes that you have made to this page. Export Table Export the source list in CSV format.
View Exceptions Open the Exceptions page for the selected case. Refer to “Monitoring Source Processing Status” on page 69 and “Viewing Processing Exceptions” on page 73.
Show All Sizes in GB/
Show Sizes in KB/MB/GB Change the document units shown on the page to be all in GB or in KB, MB, or GB, as appropriate according to the file size.
Discover new files for a
source Search the specified sources for new email files to index. Check email file integrity Scan email files to verify integrity prior to processing.
This allows you to ensure that email files are free of corruption and can be properly processed. For example, if a scanned email file is found to have issues, the system automatically disables the email file so you can repair it. After the file is repaired, you can rescan it. If the rescan is successful, the file is re-enabled for processing.
Start processing source
with discovery Search the specified sources for new email files to index and start the indexing process. The system prompts you to specify an optional batch processing label. The label is used in the Manage Batches area and on each indexed document. Refer to “Managing Batches” on page 98.
You can monitor the status of ongoing processing jobs through the Pickup window.
Note: If you have already performed discovery and/or pre-processing analysis on your sources, and no new files have been added, then do not use this option. Save time by choosing Start processing source without discovery instead.
Start processing source
without discovery Start the indexing process and do not search for new files to index. Stop processing source Stop the indexing process.
Set Processing Options Set processing options to apply to only this source. When you select this option and click Go, a pop-up window opens. Configure the following settings and click Go (refer to “Pre-Process Your Source Data” on page 52 for more information):
•Date—Select a date option and use the calendar icon to specify the dates.
•Size—Select a document size option and specify the size range.
•Document Types—Select check boxes for the document types that you want to include in processing. To select or deselect all of the document types, check or clear the check box at the top of the list.
•File Extensions—Enter the file extensions of files to exclude from indexing, such as EXE and DLL files. Use a space or comma to separate multiple entries. These values apply to loose files only, not to email attachments. All email attach-ments are processed regardless of the file exclusion list. •Known Files—Select the check box to exclude known files. Enable processing Activate automatic indexing.
Disable processing Deactivate automatic indexing.
None Do not include a custodian.
New custodian Assign a new custodian to a source or sources. When you click Go, the system prompts you for the name of the new custodian. When you click OK, the new custodian is created and assigned to the source or sources.
Custodians Select the custodian name to assign the custodian to that subsource. Custodian assignments take effect for the next processing or post-processing run. For more information, Table 4-7 Actions on Manage Sources Page (Continued)
Importing TIFF Image Files
In some situations, you may find that using an external TIFFing engine is preferred to using Clearwell's internal TIFFing capabilities. For example, you may have a set of Excel
spreadsheets in a document set which require special handling (such as the exclusion of blank pages or setting print parameters that are different from the spreadsheet’s defaults). In such situations, Clearwell enables you to import a set of TIFF images that have been externally generated and associate them with documents that have already been processed in Clearwell.
Note: If you want to import TIFF images for documents not already in Clearwell, use the EDRM XML import feature to load in the entire TIFF/text/native and/or metadata set. Clearwell does not support importing redacted documents with the TIFF import feature. This process requires first exporting the desired documents from Clearwell via an XML export in order to obtain their document IDs, which must be present in the Opticon or XML load file when you import the images. You then TIFF the documents and import them via a load file.
To associate externally-generated TIFF images with previously-processed documents:
1. Choose the documents that you will be TIFFing and export them via a Metadata export. Be sure to include the native files in the export, since you will need to give those to your TIFFing engine.
2. Export the documents and generate the TIFFs via an external TIFFing engine.
3. Create a CSV or XML load file that specifies the details for the import, including the Clearwell document ID and path to the TIFFs you have created. For CSV, create a standard Opticon load file. For XML, create a standard EDRM XML load file. 4. Save the load file on the Clearwell appliance.
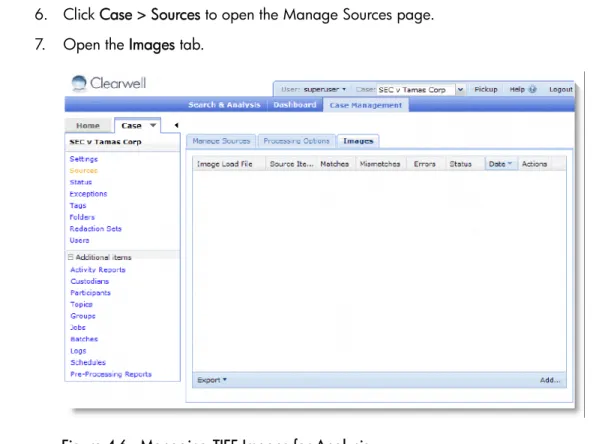
6. Click Case > Sources to open the Manage Sources page. 7. Open the Images tab.
Figure 4-6 Managing TIFF Images for Analysis
9. In the browser window, select the folder that contains the load file, choose CSV or XML, and click OK.
Figure 4-7 Selecting the Load File
The load file is imported. If the import is successful, a message is displayed and the load file is added to the Images tab.
10. When you now view the document in the Document Review page and select Native View, the imported TIFF files and attachments are displayed. These TIFF files will be used for all redaction and production for this document. For further information, refer to the
Adding EDRM XML Sources
You can add an Electronic Document and Records Management (EDRM) source to a case in XML file format. Use this option if documents have been processed or imaged outside of Clearwell and then generated as image files (such as TIFF). In this case, you can introduce a load file that indicates how to process the files.
To add an EDRM XML source to a case:
1. Under the Case Management tab, click on the Case menu and select a case. 2. Click Case > Sources to open the Manage Sources page.
3. Choose Add EDRM XML Source from the menu in the lower-left corner of the page, and click Go.
Figure 4-8 Adding EDRM XML Sources
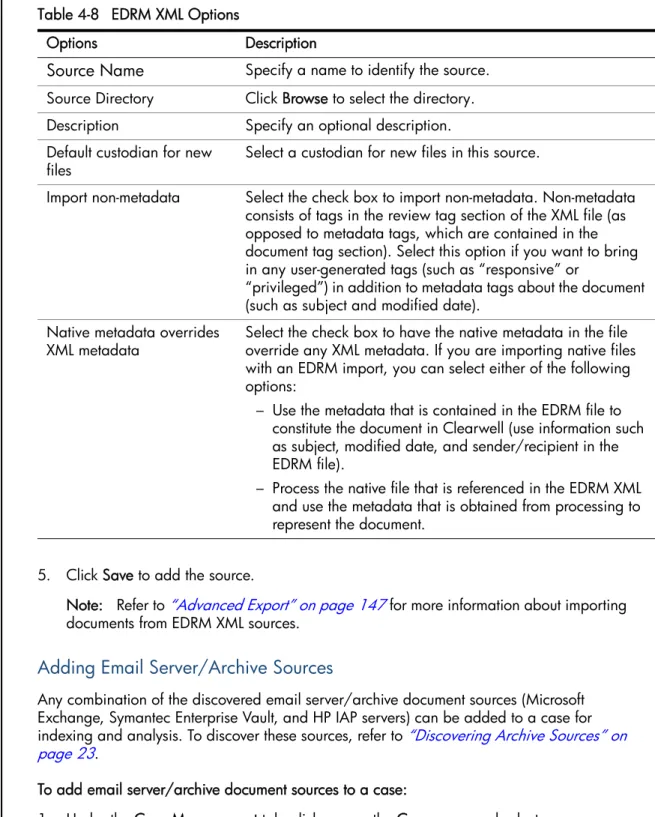
5. Click Save to add the source.
Note: Refer to “Advanced Export” on page 147 for more information about importing documents from EDRM XML sources.
Adding Email Server/Archive Sources
Any combination of the discovered email server/archive document sources (Microsoft Exchange, Symantec Enterprise Vault, and HP IAP servers) can be added to a case for indexing and analysis. To discover these sources, refer to “Discovering Archive Sources” on page 23.
To add email server/archive document sources to a case:
1. Under the Case Management tab, click on the Case menu and select a case. 2. Click Case > Sources to open the Manage Sources page.
Table 4-8 EDRM XML Options
Options Description
Source Name
Specify a name to identify the source. Source Directory Click Browse to select the directory. Description Specify an optional description. Default custodian for newfiles Select a custodian for new files in this source.
Import non-metadata Select the check box to import non-metadata. Non-metadata consists of tags in the review tag section of the XML file (as opposed to metadata tags, which are contained in the document tag section). Select this option if you want to bring in any user-generated tags (such as “responsive” or
“privileged”) in addition to metadata tags about the document (such as subject and modified date).
Native metadata overrides
XML metadata Select the check box to have the native metadata in the file override any XML metadata. If you are importing native files with an EDRM import, you can select either of the following options:
– Use the metadata that is contained in the EDRM file to constitute the document in Clearwell (use information such as subject, modified date, and sender/recipient in the EDRM file).
– Process the native file that is referenced in the EDRM XML and use the metadata that is obtained from processing to represent the document.
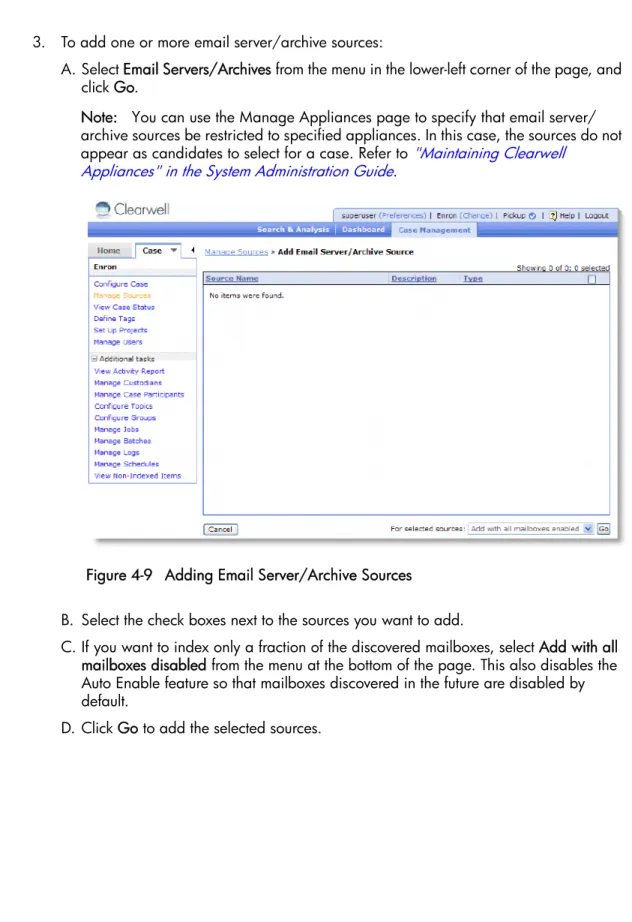
3. To add one or more email server/archive sources:
A. Select Email Servers/Archives from the menu in the lower-left corner of the page, and click Go.
Note: You can use the Manage Appliances page to specify that email server/ archive sources be restricted to specified appliances. In this case, the sources do not appear as candidates to select for a case. Refer to "Maintaining Clearwell
Appliances" in the System Administration Guide.
Figure 4-9 Adding Email Server/Archive Sources
B. Select the check boxes next to the sources you want to add.
C. If you want to index only a fraction of the discovered mailboxes, select Add with all mailboxes disabled from the menu at the bottom of the page. This also disables the Auto Enable feature so that mailboxes discovered in the future are disabled by default.
4. To limit the date range of indexed documents, click the source name on the Document Sources list, click the General tab, specify the following dates, and click Save.
5. To enable or disable indexing of specific mailboxes, archives, or repositories for the new Exchange, Enterprise Vault, or IAP server, respectively:
A. Click the source name.
B. Click Enable All or Disable All, or select the check box next to the appropriate items, select Enable or Disable from the menu in the lower-right corner, and click Go. Click the first check box to select all the items on the page.
To search the list of mailboxes:
› From the in menu, select the column to be searched.
› In the Search for field, enter the starting characters of the text to be found (use a “*” to indicate any text). For example, to find all names that start with “Robert” enter “rob” or “*ob”.
6. To assign or delete custodians for specific mailboxes, archives, or repositories: A. Select the check box next to the items where you want to assign the same custodian
(or remove the custodian). Click the first check box to select all the items on the page. B. Select a custodian from the menu in the lower-right corner, and click Go. To remove
the current custodian, select <none>. To define a new custodian, select New custodian, enter a custodian name, and click OK.
7. To start the indexing process:
A. Click Manage Sources to return to the list of document sources. B. Select the check box next to the appropriate sources.
C. Select Start Processing from the menu in the lower-right corner of the page, and click Go.
To schedule a document crawler task to periodically collect and index new content for each source, refer to “Managing Case Schedules” on page 131.
Table 4-9 Email Server/Archive Source Date Range
Field Description
Crawl start time for new
mailboxes Crawl end time for new mailboxes
Specify the date and time of the oldest and/or most recent document you want to include the first time a mailbox is indexed:
•Click , enter the time in 24-hour format, and select a month and day
.
or
•Enter the date and time directly as: MM/DD/YYYY HH:MM:SS. By default, only emails later than the previous crawl time are indexed.
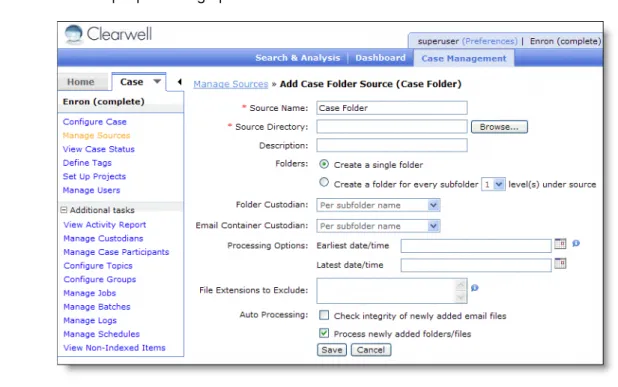
Adding Case Folder Sources
You can point to a single directory to automatically process all loose files and emails within the directory. The following rules apply:
• Clearwell allows a single discovery, scanning, and/or processing job to be active on an appliance at one time. All other discovery/scan/processing requests are queued up behind the currently-running request and are started in order when the previously scheduled job has completed.
• In order to process documents for multiple cases simultaneously, it is necessary to create those cases on different nodes of a Clearwell cluster. The node that a case is created on can be specified on the Configure Case page. This setting cannot be changed after the case is created; however, it is possible to move a case from one node to another through the backup/restore process.
• The file discovery scanning rate is approximately one million documents per 30 minutes.
You can use the Add Case Folder Source page to add the documents (email files and loose files) for a case.
Note: If you will be processing the same documents into multiple cases, you must create a separate physical copy of the files for each case and create a case folder.
To add sources to a case:
1. Under the Case Management tab, click on the Case menu and select a case. 2. Click Case > Sources to open the Manage Sources page.
3. Select Add Case Folder Source from the menu in the lower-left corner of the page, and click Go.
The settings on the Add Case Folder Source page depend upon whether the Pre-processing module is included in your system. If pre-Pre-processing is included, you can specify the document types to explicitly include in processing or exclude from processing.
Without pre-processing options:
4. Enter the following information. An asterisk (*) indicates a required field. Table 4-10 Case Folder Information
Field Description
Source Name* Enter a name for this source (up to 255 characters). Use only letters, numbers, and underscores. The name should help identify the type of source, such as “Atlanta Collection.”
Source
Directory* Click Browse and select the top level folder for the case on the Clearwell appliance or enter a remote directory name, click Go, and select the appropriate folder. Click OK. Your network access depends on the Windows name and password specified in the system settings under Indexing (refer to "Defining System Settings" in the System Administration Guide).
Alternatively, enter the full path of the source directory in Uniform Naming Convention (UNC) format (up to 256 characters). For
Folders Select the folder level appropriate for this source:
•Create a single folder. Add all documents to a single folder. •Create a folder for every subfolder. Create a new folder for each
subfolder in the original source tree. Include only the levels of interest.
Note: When you point to subfolders within a case folder directory, the system does not process any files that are found at higher levels. To check that your case folder setup is accurate, you can obtain the document count in Windows Explorer at the case folder level and make sure that the count matches the file count on the Case Status page.
Folder Custodian Custodians allow users to search for case documents according to the individual identified as responsible for the documents.
Select a default custodian associated with all files discovered in the source directory in one of the following ways:
•To use no custodian, select None.
•To define a new custodian, select New custodian, enter a custodian name, and click OK.
•To assign the custodian with the same name as a subfolder name, select Per subfolder name. This is a convenient way to assign custo-dians to folders. Use the custodian name as the folder name, and then select this option.
•To select a specific custodian, choose the custodian from the menu. Example:
The directory structure is c:\my case documents, with the files
..\Custodian 1 and ..\Custodian 2. If you select a level of “1” and set the folder/email custodians to the folder name, all emails/files under “Custodian 1” will be assigned the custodian “Custodian 1.” To override the default custodian for specific files, refer to “Defining Case Custodians” on page 47.
Email Container
Custodian Select a default custodian associated with all emails containers discovered in the source directory in one of the following ways: •To use no custodian, select None.
•To define a new custodian, select New custodian, enter a custodian name, and click OK.
•To assign the custodian with the same name as a subfolder name, select Per subfolder name. This is a convenient way to assign custo-dians to folders. Use the custodian name as the folder name, and then select this option.
•To select a specific custodian, choose the custodian from the menu. To override the default custodian for specific files, refer to “Defining Table 4-10 Case Folder Information (Continued)
5. Click Save to save the new source, or click Cancel to discard your changes.
Processing Physical Evidence Files (LEF and E01)
Note: To process any of Guidance's forensic imaging formats, load the file within Encase and convert it to a logical evidence file (LEF) or an E01 file. If you create an E01 file, ensure that you create an MDM file as well.
Processing
Options Specify the date and time range for indexing the source files. For loose files, the range applies to the last modified date/time and for email files it applies to the sent date/time.
•Click , enter the time in 24-hour format, and select a month and day
.
or
•Enter the date and time directly as: MM/DD/YYYY HH:MM:SS. Note: The date/time restrictions do not apply to new files that are added to directories that have already been indexed. To use the date/time restrictions, place new files to be indexed into new directories.
Document Types These settings are visible only if the pre-processing module is included.
Select check boxes for the document types that you want to include in processing. To select or deselect all of the document types, check or clear the check box at the top of the list.
File Extensions to
Exclude Enter the file extensions of files to exclude from indexing, such as EXE and DLL files. Use a space or comma to separate multiple entries. These values apply to loose files only, not to email attachments. All email attachments are processed regardless of the file exclusion list. Check integrity
of newly added email files
Select the check box to automatically verify the integrity of email files that prior to indexing.
Process newly added folders/ files
Select the check box to automatically index all newly added folder and files.
Table 4-10 Case Folder Information (Continued)
LEF Files
Clearwell can process LEF files directly. To add an LEF file:
• Place the LEF in a folder and add the folder as a source. Clearwell will process it like any PST, NSF, or loose file. E01 Files
A special process is required to prepare physical evidence files (E01s) for processing as part of a case folder source, because E01 files do not include readily accessible metadata. To extract the metadata that is required for processing in Clearwell, you must first process the E01s using the Clearwell E-Discovery Mapfile Generator. The MSI file for the generator
(ClearwellE-DiscoveryMapfileGenerator.msi) is available from the 5.1 directory on the Clearwell customer FTP site.
Note: The Clearwell E-Discovery Mapfile Generator is only supported on the 32-bit version of Encase.
To prepare E01 files for processing with Clearwell:
1. Download the EnScript installer file (MSI file) from the Clearwell FTP site and copy it to a machine that has EnCase installed.
2. Run the EnScript installer and follow the on-screen instructions.
This installs the Mapfile generator on the machine. The Mapfile generator is, in essence, an Encase plugin.
3. Start EnCase and open the case that contains the evidence files.
4. Locate Clearwell E-Discovery Mapfile Generator in the EnScript tab of your EnCase application.
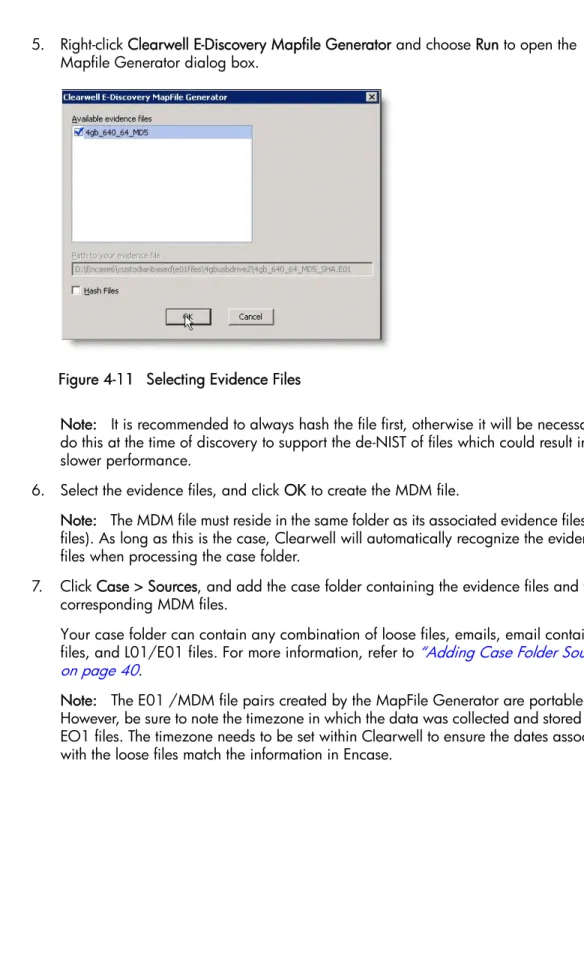
5. Right-click Clearwell E-Discovery Mapfile Generator and choose Run to open the Mapfile Generator dialog box.
Figure 4-11 Selecting Evidence Files
Note: It is recommended to always hash the file first, otherwise it will be necessary to do this at the time of discovery to support the de-NIST of files which could result in slower performance.
6. Select the evidence files, and click OK to create the MDM file.
Note: The MDM file must reside in the same folder as its associated evidence files (E01 files). As long as this is the case, Clearwell will automatically recognize the evidence files when processing the case folder.
7. Click Case > Sources, and add the case folder containing the evidence files and the corresponding MDM files.
Your case folder can contain any combination of loose files, emails, email container files, and L01/E01 files. For more information, refer to “Adding Case Folder Sources” on page 40.
Note: The E01 /MDM file pairs created by the MapFile Generator are portable. However, be sure to note the timezone in which the data was collected and stored in the EO1 files. The timezone needs to be set within Clearwell to ensure the dates associated with the loose files match the information in Encase.
Defining Case Custodians
For each case, you may assign one custodian to each mailbox, file, and directory of loose files (though it is not necessary to assign a custodian to every mailbox, or file, for example). For those assigned however, you can search the case for documents associated with its assigned custodian. You can also merge custodian records of two or more custodians found to be duplicates. (See “Merging Custodians” on page 48.)
To define custodians for a case:
1. Under the Case Management tab, click on the Case menu and select a case. 2. Click Case > Additional items > Custodians to open the Custodians page.
Figure 4-12 Viewing Case Custodians
3. To add a new custodian to the case click Add, enter the custodian name, and click Save. 4. To delete a custodian, click for the name and then click Delete Custodian. The
custodian is removed from all mailboxes, mail files, and directories. 5. To import custodians, from a file:
A. Click Import to open the Import File dialog box.
B. Choose whether to import from a text file (.txt) or CSV (.csv) file. The CSV file option allows you to include tabular data. To see a sample CSV file format, click Download example CSV file. The basic format for both options is one name per line/row. C. Click to select the file to upload.
Merging Custodians
When you have two or more of the same, or similarly-named custodians (representing the same custodian or individual) you can merge them into one unique custodian assignment. This is especially useful if you collected custodian data through Clearwell’s Identification and Collection module, where multiple name variations might appear for a single
custodian. In this case, you may find multiple name variations on a single custodian. (Refer also to the Pre-Processing Navigation Guide and Identification and Collection Guide.) Note: Unlike custodians in your case data, custodians in Clearwell’s Identification and Collection (IC) module are case sensitive. As a result, custodians in IC may be merged with similar custodian names when added to your case. For example, the IC custodians “joe admin”, “Joe admin”, and “Joe Admin”, who are all considered unique in IC, are treated as the same custodian if added to your case. Thus, if you add a collection set (created in IC) containing the custodian “joe admin” to a case that contains another custodian “Joe Admin” they are merged as one custodian. However, if that same case contains no similarly-named custodians, and all three IC custodians are added to the case, they are considered unique. Before you begin: Merging custodians is optional, and can be done either before or after processing your case data. However, if you process your case data first, before merging custodians, you must rerun post-processing for the merged custodian assignments to take effect.
To merge custodians:
1. Under the Case Management tab > Case (Case_name), click Custodians (under Additional Items).
2. Select two or more custodians that you want to merge into the same custodian assignment.
3. Click Merge.
Note that the single custodian you select will automatically be associated with all documents and items previously associated with both. All other related custodians listed on the Custodians > Merge page will be deleted.
4. Click Merge.
Note: You must run processing for this change to take effect. Once you run post-processing, you will not be able to undo this merge.
5. At the prompt, click OK to confirm the single custodian assignment.
The custodians you selected to be merged now appear in the list with the note “will merge to [new custodian name]”. The merge will occur once the case has completed post-processing, but cannot be undone after post-processing. To undo the merge, see “Unmerging Custodians”.
CAUTION! Once merged custodians have been post-processed, documents or mailboxes associated with the original custodian records can no longer be tracked, and no historical data is retained at a file level. All documents and mailboxes will be associated with the new custodian
Unmerging Custodians
If you want to undo a custodian merge and have not yet run your case through post-processing, you can still un-merge the custodian assignment. In this case, the “Un-Merge” button appears at the bottom of the Custodians page.
To un-merge custodians:
1. From Case Management > Case (Case_name), click Custodians (under Additional Items).
An alphabetic list of custodians displays, indicating the custodians slated to be merged.
2. Select only the custodian(s) you no longer want to be merged (not the custodian slated to be merged to).
3. Click Un-Merge.
The custodian merge is reversed and will not be merged upon post-processing.
Assigning Custodians
To assign custodians to specific mailboxes, mail files, or directories: 1. Click Case > Sources to open the Manage Sources page.
Figure 4-13 Viewing Case Document Sources
A. Select the check box next to the items where you want to assign the same custodian (or remove the custodian). Click the first check box to select all the items on the page. To search the list:
› From the in menu, select the column to be searched.
› Enter the first few characters of the search text in the Search for field (use a “*” to indicate any text).
B. Select a custodian from the menu in the lower-right corner, and click Go. To remove the current custodian, select <none>. To define a new custodian, select New custodian, enter a custodian name, and click OK.
C. Click Manage Sources to return to the list of document sources.