MARS
®
2021.0
Installation and
Licensing Guide
© 2021
Table of Contents
Purpose ...
3
Microsoft Updates Requirement...
3
Installation Notes ...
3
Part I – MARS
®Licensing
MARS
®Trial Version – Evaluation License ...
4
MAC Address Identification Instructions – Temporary License ...
6
Locking Code Discovery Instructions for
Standalone or Floating Network - Permanent License ...
9
Part II – MARS
®Software
Installation
MARS
®Software Installation Instructions ...
16
Part III – Post-Installation (Network only)
Post-Installation (Floating Network) Instructions ...
28
Part IV – Commuter Licensing (Network only)
Table of Contents
(cont.)
Part V – FAQs and Troubleshooting
FAQs and Troubleshooting for Installation, Licensing, and Program Errors ...
37
Purpose
The purpose of this document is to provide user instructions and troubleshooting tips for the licensing, network administration, and installation of the MARS® version 2021.0 software suite. Please read the applicable sections of this guide before installing and licensing the MARS® software.
Microsoft Updates Requirement
Please note that MARS® 2021.0 requires all license server and client Windows computers be updated with the latest Microsoft operating system service packs, security updates, and other patches. Please note that it may take several cycles to complete all available updates, as some updates are prerequisites for additional ones. In certain situations, a computer may not have administrative rights to install updates – contact your network administrator or IT specialist.
Installation Notes
MARS® 2021.0 requires a 64-bit Windows operating system - see the MARS® System Requirements
document for details.
Depending on the computer’s operating system, User Account Control settings, and the existence or absence of certain Windows components, not all the windows presented in this guide may appear, or there may be additional ones -- please respond in the affirmative to any additional prompts.
Part I –
MARS
®Licensing
MARS
®Trial Version – Evaluation License
Introduction
This section provides instructions for setting up and licensing a 30-day trial version of MARS®. This version is locked to the computer where originally installed and operates with restricted functionality and file size limits, as defined within the MARS®Functionality Matrix (available here).
NOTE** - The 30-day MARS®Evaluation can be used only once on any given computer. Please refer to Step 3 (below) for information on using MARS® in Free View™ mode after the trial period has expired. To purchase a permanent license, please contact Josh Beck, Senior Software Consultant:
Toll-free (800) 544-1714 x3715, Direct (303) 353-3715, or e-mail [email protected] Step 1: Download the Software and Evaluation License
Click on this link to download the 64-bit MARS®installer ZIP file. Also, be sure to download the Evaluation license ZIP file using the link in the auto-response e-mail that will be sent out after the download has started. Without this license, MARS® will operate only in FreeView™ mode as a read-only LiDAR data viewer.
Step 2: Install MARS® client software
Please refer to Part II – Installation beginning on Page 16 in this guide to complete the MARS® client software installation on the target computer. When the installation is complete, return to this section and continue with Step 3.
Step 3: Copy Evaluation License
Using Windows Explorer, navigate to the MARS® Evaluation license ZIP file downloaded in Step 1 and extract the contents to a local drive. When the extract has completed, copy the license file ‘lservrc’ into the MARS® installation directory (C:\MARS by default). The trial period will begin the first time MARS® is run. Once the 30-day license has expired, please delete the MARS® license file (‘lservrc’) to use MARS® FreeView™, our free LiDAR data viewer.
Step 4: Launch MARS®
To launch the MARS® software application, click MARS in the MARS® program group or double-click the MARS® desktop shortcut (Figure 1) that was created during installation.
Figure 1: MARS® desktop icon
If the following message (Figure 2) appears upon startup, please use the link to contact MARS® Sales, or refer to the NOTE on the previous page.
MAC Address Identification Instructions – Temporary License
Introduction
This section provides end-user instructions for the identification of the MAC address on a target computer. In computer terminology, a Media Access Control (MAC) address is a unique identifier assigned to network adapters and other network-ready devices by the computer, network card, or device manufacturer for identification purposes. The MAC address information is used to generate a temporary MARS® license file that will be ‘locked’ to the target computer for a pre-defined time period. Please read the complete section before attempting to identify the system’s MAC address. Notes: On some computers, administrative rights are required to perform the steps described in this document updates – contact your network administrator or IT specialist if necessary.
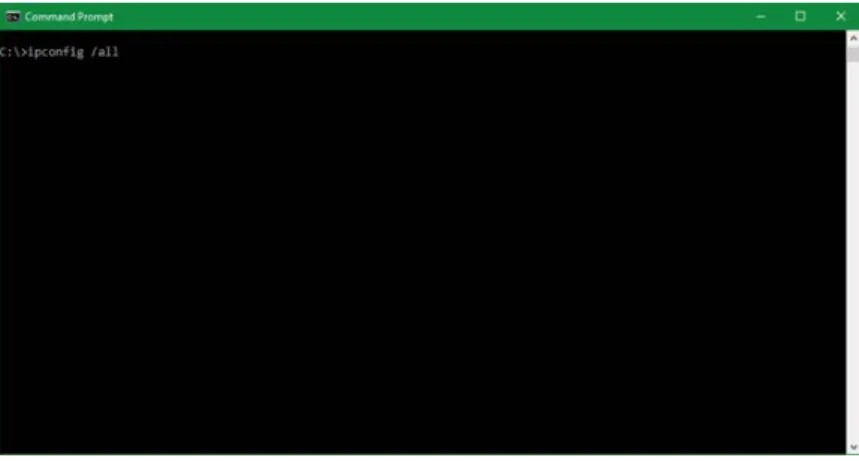
Step 1: Open Command Prompt or PowerShell Window
To identify the computer’s MAC address, open a ‘Command Prompt’ window. In Windows 10, click the Start button and type ‘cmd’, then click on Command Prompt when it appears in the list of apps. Note that Windows PowerShell may be used as a substitute for the Command Prompt window in Windows 10 and Windows Server 2012 R2 or later. In most versions of Windows 10, right-clicking the Start button will also present the ‘Command Prompt’ and/or ‘Windows PowerShell’ options. This example uses a ‘Command Prompt’ window, but ‘PowerShell’ is functionally identical for this purpose.
In Windows 7, click the Start button and go to All Programs Accessories Command Prompt. Step 2: Issue ‘ipconfig’ Command
Type ‘ipconfig /all’ at the command prompt and hit the ‘Enter’ (Return) key to issue the command (Figure 3). Note that there is a space before the slash but not after it.
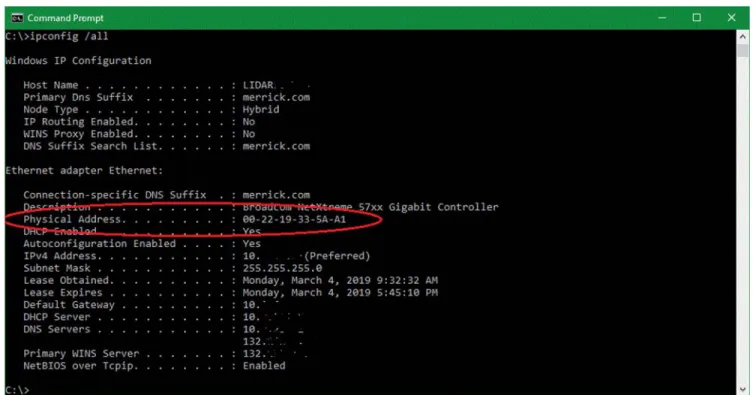
Once the command is issued, the window will display the system’s network information (Figure 4). There may be additional listings for other network adapters (such as Wi-Fi) depending on the computer’s configuration.
Figure 4: ‘Command Prompt’ window showing system network information Step 3: Document MAC Address
From the network information that is returned, please document the value displayed on the ‘Physical Address’ line of the window, as circled in Figure 4. This can be from an Ethernet adapter (as shown above) or from a Wi-Fi adapter. If both are present, either one will work.
The standard format for MAC addresses is six groups of two hexadecimal characters, separated by hyphens (-). Alpha characters are not case sensitive.
For example, the MAC address of the displayed network information in Figure 4 is: 00-22-19-33-5A-A1
Step 4: Send MAC Address to Merrick & Company
The final step is to provide this MAC address information to Merrick & Company for the generation of the temporary MARS® software license. The temporary license file is in an XML format and will
Please email the MAC address information to Mark Stucky or the MARS® Technical Support address ([email protected]) for temporary license generation.
Step 5: Install MARS® client software
Please refer to Part II – Installation beginning on Page 16 in this guide to complete the MARS® client software installation on the target computer. When installation is complete, return to this section and continue with Step 6.
Step 6: Copy Temporary License
Delete or move any existing MARS® license files from the MARS® installation directory (C:\MARS by default), then copy the provided MARS® temporary license file ‘license.xml’ into this same directory. The temporary license file can be created for different license levels as agreed upon by Merrick and the end user. See the MARS®Functionality Matrix (available here) for details of the various levels. Once the pre-defined time period of the license has expired, please delete the MARS® license file (‘license.xml’) to use MARS® FreeView™, our free LiDAR data viewer.
Step 7: Launch MARS®
To launch the MARS® software application, click MARS in the MARS® program group or double-click the MARS® desktop shortcut (Figure 5) that was created during installation.
Figure 5: MARS® desktop icon
If the following message (Figure 6) appears upon startup, please use the link to contact MARS® Sales.
Locking Code Discovery Instructions for
Standalone or Floating Network - Permanent License
Introduction
There are two possible licensing configurations for a ‘Permanent’ MARS® installation: Standalone or Floating Network. Standalone is node-locked to one specific computer and cannot be transferred to another. Floating Network uses a computer on the user’s network as a license server, and client computers on the same network can acquire an available license. The Floating Network method also allows a computer - typically a laptop - to commute or borrow a license and disconnect from the network for off-site use. Please note that USB-keyed licenses are no longer supported – contact Mark Stucky at MARS® Technical Support for more information.
This section provides instructions for determining the necessary locking code(s), using the Sentinel Wechoid utility, for either method described above. Once identified, these locking codes will be used to generate a permanent MARS® software license. The license will authorize the appropriate MARS® functions depending on the license level purchased, as defined within the MARS®Functionality Matrix (available here). This section also covers the installation of the Sentinel RMS License Manager software for Floating Network setups. Please read the entire section before beginning.
Step 1: Download Locking Code Discovery Software (Wechoid)
Using the following link, please copy the file listed below to the target computer. If prompted, navigate to the desired local directory and click ‘Save’ to copy the file locally.
1. wechoid.zip (620 KB) Download
Step 2B: If Licensing Configuration is Standalone, Proceed to Step 3A (below) Step 2C: If Licensing Configuration is Network, Proceed to Step 3B (Page 10) Step 3A: Determine Locking Code for Standalone
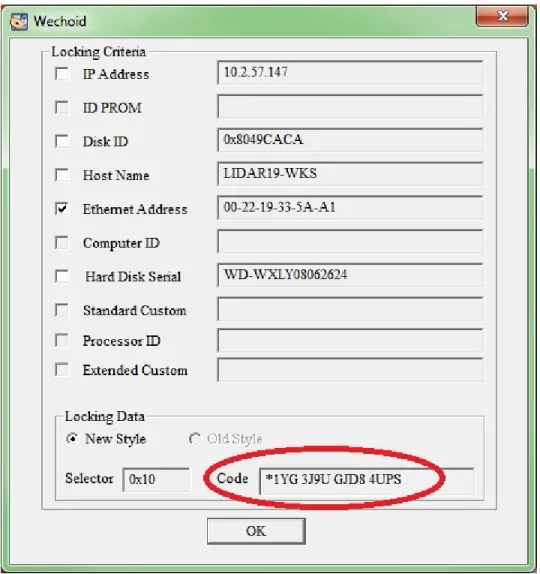
Unzip the ‘wechoid.zip’ file (downloaded in Step 1) locally and double-click the file named ‘wechoid.exe’ to launch the locking code display. To determine the locking code, uncheck all the boxes within the ‘Wechoid’ display except for the ‘Ethernet Address’ option (Figure 7). With the ‘Selector’ value displaying ‘0x10’, document the locking code value(example below,
*1YG 3J9U GJD8 4UPS) displayed in the ‘Code’ textbox for license generation purposes. Proceed to Step 4 (Page 12).
Figure 7: ‘Wechoid’ window – Ethernet Address locking code
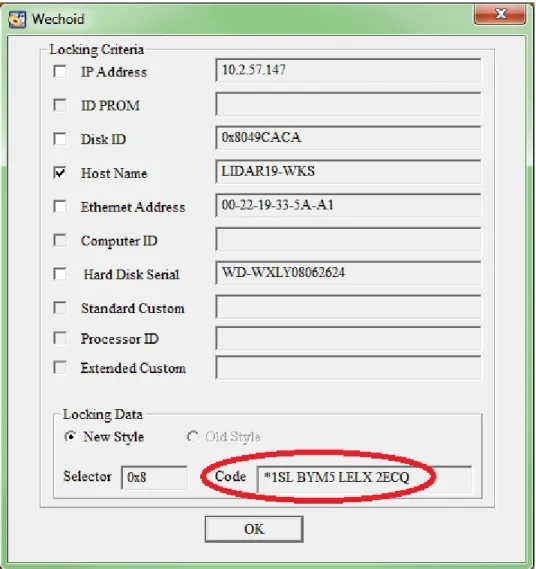
Step 3B: Determine Locking Codes for Network Configuration
Unzip the ‘wechoid.zip’ file (downloaded in Step 1) locally and double-click the file named ‘wechoid.exe’ to launch the locking code display. Two locking codes are needed for this configuration – primary and secondary. To determine the primary locking code, uncheck all the boxes within the ‘Wechoid’ display except for the ‘Host Name’ option (Figure 8). With the ‘Selector’ value displaying ‘0x8’, document the primary locking code value (*1SL BYM5 LELX 2ECQ in the example below) displayed in the ‘Code’ textbox for license generation purposes.
Figure 8: ‘Wechoid’ window – server Host Name primary locking code
To determine the secondary locking code, uncheck all the boxes within the ‘Wechoid’ display except for the ‘IP Address’ option (Figure 9). With the ‘Selector’ value displaying ‘0x2’, document the
secondary locking code value (*1CB 2BDU PL8W VFQK in the example below) displayed in the ‘Code’ textbox for license generation purposes.
Figure 9: ‘Wechoid’ window – server IP Address secondary locking code
Step 4: Send Locking Code(s) to Merrick & Company
Once the user has determined the primary and secondary locking codes (Floating Network configuration) or the single locking code of the target computer (Standalone Configuration), please send them to Mark Stucky, MARS® Technical Support Specialist, for license generation.
Step 5A: If Licensing Configuration is Standalone, Proceed to Step 6 (Page 15)
Step 5B: If Licensing Configuration is Network, Install the Sentinel RMS License Manager Software
In order to configure the server computer’s environment to support floating network licensing, please perform the following steps to set up the Sentinel RMS License Manager server.
a: Download and Install Sentinel RMS License Manager software
Using the following link, please copy the Sentinel RMS License Manager Installer software shown below to the server computer. If prompted, navigate to the desired local folder and click ‘Save’ to copy the file locally.
1. Sentinel_RMS_License_Manager_Installer.zip (9.0 MB) Download
Unzip the file locally and double-click the file named ‘setup.exe’ to launch the software installation program. Accept all the default settings during the installation process.
b: Copy Permanent License (Floating Network)
Please copy the provided MARS® license file (lservrc) to one of the following directories (depending on whether the server is running a 64-bit or 32-bit version of Windows, respectively) on the server computer hosting the Sentinel RMS License Manager, overwriting any existing ‘lservrc’ file.
C:\Program Files (x86)\Common Files\SafeNet Sentinel\Sentinel RMS License Manager\WinNT -or-
C:\Program Files\Common Files\SafeNet Sentinel\Sentinel RMS License Manager\WinNT If this exact path does not exist on the server computer, search the system to locate the installation directory for the Sentinel RMS License Manager. The license will authorize the appropriate MARS® functions depending on the license level purchased, as defined within the MARS®Functionality Matrix (available here).
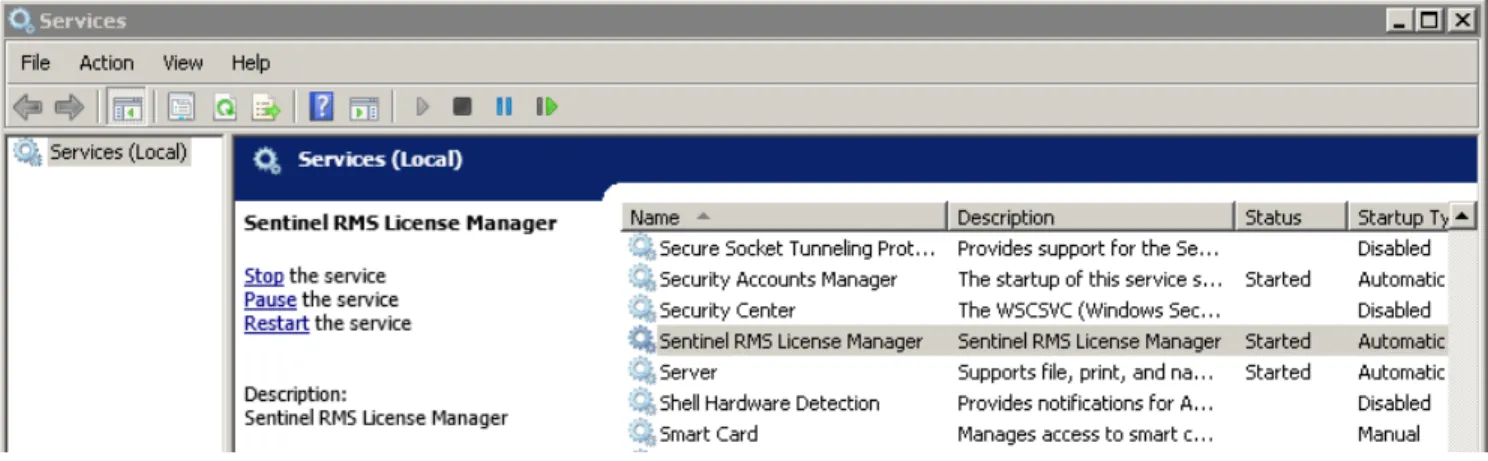
c: Stop/Restart ‘Sentinel RMS License Manager’ Service
For the Sentinel software to properly host the MARS® network license file, the ‘Sentinel RMS License Manager’ service must be stopped and restarted on the server computer.
To access the ‘Sentinel RMS License Manager’ service (Figure 10), open the Windows ‘Services’ console.
Figure 10: Windows ‘Services’ console
Locate the ‘Sentinel RMS License Manager’ service and select it by clicking on the service name. To stop the service, right-click on the highlighted service and select the ‘Stop’ option or click the ‘Stop Service’ button near the top of the console’s interface. The following message (Figure 11) will be displayed until the service has completely stopped.
Figure 11: ‘Service Control’ message – stopping a service
To restart the ‘Sentinel RMS License Manager’ service, right-click on the highlighted service and select the ‘Start’ option or click the ‘Start Service’ button near the top of the console’s interface. The following message (Figure 12) will be displayed until the service has started.
Step 6: Install MARS® client software
Please refer to Part II – Installation beginning on Page 16 to complete the MARS® client software installation on all target computers. When installation is complete, return to this section and continue with Step 7 (Standalone), or proceed to Part III – Post-Installation (Network) on Page 28. Step 7: Copy Permanent License (Standalone)
Delete any MARS® temporary license files (license.xml) from the MARS® installation directory (C:\MARS by default), then copy the new permanent license file ‘lservrc’ into this same directory. The license will authorize the appropriate MARS® functions depending on the license level purchased, as defined within the MARS®Functionality Matrix (available here).
Step 8: Launch MARS®
To launch the MARS® software application, click MARS in the MARS® program group or double-click the MARS® desktop shortcut (Figure 13) that was created during installation.
Part II –
MARS
®Software Installation
Introduction
This section provides instructions for first-time installation or in-place upgrade of the version 2021.0 MARS® software suite and sample data on client computers. Please fully read this section before starting the MARS® installation procedure. Click here for hardware and operating system requirements.
Step 1: Install MARS® on Client Computer(s)
Using Windows Explorer (File Explorer), navigate to the downloaded MARS® installer ZIP file on the local drive of the target computer and extract the installer files. Once the extraction has completed, please navigate to the MARS® installation executable (setup.exe) as displayed in Figure 14. Begin the MARS® software installation by double-clicking the ‘setup.exe’ file. Note that on some systems, ‘setup.exe’ may need to be run as an administrator.
Figure 14: MARS® installation executable (setup.exe)
NOTES:
1. Not all windows shown in this section will appear during all installations or upgrades. 2. Any existing custom XML files (e.g., “MARSBreaklineProperties.xml” or
The Windows Installer window will appear (Figure 15).
Figure 15: ‘Windows Installer’ window
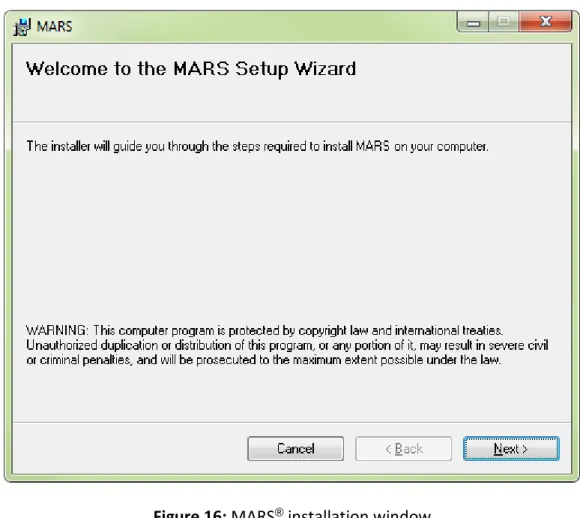
After a few seconds, the MARS® Setup Wizard window will automatically appear (Figure 16).
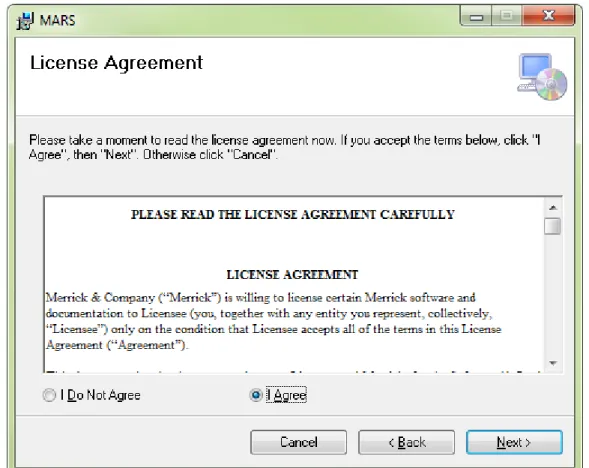
A prompt to accept or decline the MARS® end-user license agreement will appear (Figure 17).
Figure 17: MARS® end-user license agreement acceptance window
To continue with the MARS® software installation, review the license agreement, select the ‘I Agree’ radio button, and then click the ‘Next >’ button.
If the license agreement is not accepted, the MARS® software installer will close and the installation process will terminate.
The user will then be prompted to accept or define the MARS® installation folder within the ‘Folder:’ textbox of the following window (Figure 18). To change the folder for the installation, click ‘Browse’ to navigate to the desired local folder. Please note that we recommend MARS® be installed into the default location (C:\MARS) as shown below, and this guide assumes that will be the path used for all screen shots and instructions.
Figure 18: MARS® installation window
The following window (Figure 19) will be displayed to confirm the user’s intention to install the MARS® software application.
Figure 19: MARS® installation confirmation window
During the MARS® software installation, the following installation status window (Figure 20) will be displayed.
MARS® software users can navigate around the program and try out the various tools and functions using a sample data set. The MARS® sample data folder includes the following geospatial data files (plus some auxiliary files):
• LiDAR (LAS) Data MARS_Sample_LiDAR.las
• Orthophotography MARS_Sample_Image_Mosaic.ecw
• Tile Scheme MARS_Sample_Project_Tiles.shp
• Project Boundary MARS_Sample_Project_Boundary.shp
• Ground Check Points MARS_Sample_Check_Pts.csv
• Compiled Breaklines MARS_Sample_Breaklines.shp
• Metadata Sample_Dataset_Metadata.txt
The sample data will be automatically extracted and copied into the MARS® ‘Sample_Data’ folder during the installation process, as shown in the ‘Extracting files to’ line in Figure 21. On some systems, this window will remain hidden behind the installation progress window shown on the previous page (Figure 20). Once complete, the sample data folder will be slightly less than 300 MB in size.
Vertical transformation files – used for converting vertical datums and/or height models from one system to another – will not be included in the MARS® software installer. A prompt will appear (Figure 22) with an option to download a self-extracting executable that will install the vertical files before continuing with the installation. In the case of an upgrade, a check will be made in the install path to see if existing vertical files are current. If so, installation will continue normally. If they are not current, the prompt in Figure 22 will appear. Depending on connection speed, this process may take 15-30 minutes. Once started (Figure 23), the download can be canceled if necessary and the vertical files package can be downloaded separately at a later date by contacting MARS® Technical Support at ([email protected]). Note that several minutes may pass after the progress bar reaches 100% due to the time it takes to extract the files from the download.
Please note that depending on the security and permission settings of individual computers, the self-extraction process may not run automatically. Check the C:\MARS\Data\ShiftFiles\vertical\ folder to see if the files were extracted. If no files exist other than the ‘vertical_mmddyyyy.exe’ self-extractor, double-click on it to start the extraction process. Leave the ‘vertical_mmddyyyy.exe’ file in the folder when complete so that MARS® can check the status of the files during future updates.
NOTE: If a pop-up appears asking whether an existing file named ‘MARS_QAT.xml’ should be replaced, the answer depends on whether the MARS® Quick Access Toolbar has been customized since the last install/upgrade. This file holds the list of Quick Access buttons and their order of appearance – by default, 10 buttons are initially included. If no customizing has been done to the toolbar buttons, answer ‘Yes’ and allow the installer to put the latest version of the file in the install folder. Otherwise, answer ‘No’ to keep the existing version of the file. The pop-up prompt may be hidden behind the installation window which can be dragged to one side.
NOTE: If a pop-up appears asking whether an existing file named ‘geodata_74.xvw’ should be replaced, the answer depends on whether any custom coordinate systems have been created in GeoEdit, creating a new ‘custom.xml’ file and modified the existing ‘geodata_74.xvw’ file. If new systems were created, the ‘custom.xml’ file will be maintained in the new installation folder, and the existing ‘geodata_74.xvw’ should be kept to ensure that any new systems will appear in the correct folder structure when browsing for them in GeoCalc or GeoEdit. The pop-up prompt may be hidden behind the installation window which can be dragged to one side.
It is highly recommended the most current video driver be loaded on the workstation for stability and optimum rendering of data. Please check for current graphics drivers on the computer or graphics card manufacturer’s website. The following window (Figure 24) will be displayed during installation to remind users to update their video (graphics) driver, if necessary. This can be done following the reboot step (Page 26). The MARS® installation routine will not automatically update any video drivers.
Figure 24: ‘Video Driver Requirement’ update message Click ‘Next >’ to continue with the MARS® software installation.
To obtain optimum video playback when using the Video Hyperlink Playback tool in MARS®, please download and install the video CODEC (COde/DECode) package as mentioned in the install screen shown in Figure 25. This can be done following the reboot step (Page 26).
Figure 25: ‘Video playback requirement’ message
Once the software installation has completed (Figure 26), click ‘Close’ to exit the installer program.
Figure 26: MARS® software installation completion window Step 2: Reboot Computer
Finally, the user will be prompted (Figure 27) to restart the computer in order to incorporate the software configuration changes performed during installation. Click the ‘Yes’ button to reboot the computer, then proceed to the next step.
After the system has restarted, return to:
Page 4, Step 3 if running an Evaluation license Page 8, Step 6 if running a Temporary license
Page 15, Step 7 if running a Permanent (Standalone) license or go to:
Part III – Post-Installation (Floating Network only)
Introduction
This section provides instructions on setting up client computers to be able to access MARS® licenses on a network license server. The license server is the computer running the Sentinel RMS License Manager software (Part I - MARS® Licensing, Page 12, Step 5B).
Step 1: Client Configuration – Environment Variables
A Windows System environment variable must be set on each client computer in order to acquire a license from the license server. A variable named ‘LSFORCEHOST’ is used for this purpose. The following paragraphs and figures detail the creation and use of this system variable. Perform these steps for all installed client computers that will need access to a network-based MARS® license. Variables are typically assigned and maintained via the ‘Advanced System Settings’ section of the ‘System Properties’ or ‘System Info’ window – click the ‘Environment Variables’ button near the bottom of the window to open.
Click the ‘New’ button in the ‘System Variables’ section and create the ‘LSFORCEHOST’ environment variable with the following parameters (Figure 28):
Variable name: LSFORCEHOST
Variable value: <License Server computer name> (ex. lmserver-wks)
Figure 28: ‘New System Variable’ window - LSFORCEHOST
Click the ‘OK’ button to save the changes to the LSFORCEHOST environment variable, then click the ‘OK’ button in the ‘Environment Variables’ window. Finally, click the ‘OK’ button in the ‘System Properties’ window and close the Control Panel to complete this step.
For optimal network licensing performance, all computers must operate within the same network Subnet. In addition, the installer should be able to ‘ping’ the license server computer name from a Command Prompt window to verify that the license server is visible on the target network.
Step 2: Launch MARS®
To launch the MARS® software application, click MARS in the MARS® program group or double-click the MARS® desktop shortcut (Figure 29) that was created during installation.
Part IV – Commuter Licensing (Floating Network only)
Introduction
This section provides end-user instructions for the use of the commuter license feature within the MARS® software suite. The commuter license feature allows the user to check-out/check-in a
network-based MARS® software license from the Sentinel RMS License Manager for use in the field or when otherwise disconnected from the network. The maximum check-out time is 1827 days. Once the computer is returned to the network environment, it is strongly suggested that the software license be checked back into the Sentinel RMS License Manager so that other users may access it.
Remember, all check-out and check-in procedures must be performed while the computer is connected to the same network that the License Server computer is part of. Please read the entire section
before utilizing the commuter license feature to check-out/check-in a MARS® software license. First time initialization of a computer prior to using the Commute function
This procedure needs to be done only once for each computer (unless a different license type and/or version number is needed, or the C:\MARS folder is deleted) that will use MARS® while disconnected from the network license server.
1. Using a text editor (e.g., Notepad), create a one-line text file called “commute.txt”
The single line of text must read: RandomGUID MARSEXPL 2021 if an Explorer license will be commuted, RandomGUID MARSEXQC 2021 if an Explorer QC license will be commuted, RandomGUID MARSPROD 2021 if a Production license will be commuted, or
RandomGUID MARSPRPL 2021 if a Production and Powerline license will be commuted. Upper and lower cases must be observed as shown. Also, make sure there is no blank line after the single line of text.
2. Copy the completed “commute.txt” file into the C:\MARS folder.
3. From an Administrative Command Prompt window, navigate to the C:\MARS folder.
4. At the prompt, type “lsgeninit.exe commute.txt” and hit the “Enter” key. At the prompt, hit “Enter” again to continue. This will generate a file called “lsinit.exe” which will silently overwrite any older version.
5. At the prompt, type “lsinit.exe –debug” and hit the “Enter” key. A new command prompt window will open – hit “Enter” again to continue.
6. Close the original Command Prompt window. Step 1: Launch Commuter Licensing Window
To access this window, click Commute License in the MARS® program group. The following window (Figure 30) is displayed.
Figure 30: Commuter Licensing tool
Click the ‘Single Server…’ button to access the Sentinel RMS License Manager service on the license server computer. Once the ‘Specific Server’ window is displayed (Figure 31), type the name of the server computer hosting the Sentinel RMS License Manager service and click the ‘OK’ button.
the users of this organization. Any or all licenses may be checked out (up to the limit of available licenses), one per client computer. Please note that any references to version “2019” or “2020” in this section will actually appear as “2021”.
Figure 32: Commuter Licensing window – MARS® Explorer
Step 2: License Check-Out Procedure
To check-out a license, the user must select the ‘Feature’ line within the left pane of the window and click the ‘Check Out’ button. Once the license has been checked out, the Commuter Licensing window is updated as shown in the following display (Figure 34).
NOTE** - Leave the ‘Check out authorization for remote machine’ box unchecked. This feature has not been implemented, and checking this box will cause the Commuter Licensing process to fail.
Figure 34: Commuter Licensing window
Please exit the Commuter Licensing window by clicking the ‘File’ menu and selecting the ‘Exit’ option, or by clicking on the red ‘X’ in the upper-right corner of the window.
Step 3: Update/Create Environment Variable
Now that the MARS® license has been checked out, the user must update the client computer’s ‘LSFORCEHOST’ environment variable. Variables are typically assigned and maintained via the
Scroll down the variable listing within the ‘System Variables’ section of the ‘Environment Variables’ window and select the ‘LSFORCEHOST’ environment variable. Click the ‘Edit’ button and modify the ‘Variable value:’ setting to ‘no-net’, as displayed below in Figure 35.
Figure 35: Edit System Variable window (LSFORCEHOST)
Click the ‘OK’ button to save the changes to the ‘LSFORCEHOST’ environment variable, then click the ‘OK’ button in the ‘Environment Variables’ window to close it. Finally, click the ‘OK’ button in the ‘System Properties’ window to complete this step.
Step 4: MARS® Usage
Following the successful check-out of the MARS® license and the modification of the ‘LSFORCEHOST’ environment variable, the user may operate the MARS® application detached from the organization’s computer network.
A desktop icon named ‘MARS’ was previously created for the user as part of the software installation. Please double-click this icon to launch the MARS® software application, or click MARS in the MARS® program group.
Step 5: License Check-In Procedure
To start the license check-in process, the user must launch the Commuter Licensing window after re-connecting to the network. To access this window, click Commute License in the MARS® program group.
Click the ‘Single Server…’ button to access the Sentinel RMS License Manager service on a specific computer. Once the ‘Specific Server’ window is displayed (Figure 31), type the name of the
computer running the Sentinel RMS License Manager service (the same one used in Step 1) and click the ‘OK’ button.
To check-in a MARS® license, click on the checked-out license in the left pane of the window, and then click the ‘Check In’ button, as displayed in Figure 36.
Figure 36: Commuter Licensing window
Once the MARS® license has been successfully checked back in to the Sentinel RMS License Manager, the Commuter Licensing window will be updated with the network license settings (Figure 37).
Step 6: Reset/Delete Environment Variable
After the MARS® license has been checked back in, the client computer’s ‘LSFORCEHOST’ environment variable must be reset. Variables are typically assigned and maintained via the ‘Advanced System Settings’ section of the ‘System Properties’ or ‘System Info’ window – click the ‘Environment Variables’ button near the bottom of the window to open.
Scroll down the variable listing within the ‘System Variables’ section of the ‘Environment Variables’ window and select the ‘LSFORCEHOST’ environment variable. Click the ‘Edit’ button and modify the ‘Variable Value:’ setting to the name of the computer running the Sentinel RMS License Manager service. An example is displayed below in Figure 38.
Variable Name: LSFORCEHOST
Variable Value: <License Server computer name> (ex. mars-test-vm)
Figure 38: Edit System Variable window (LSFORCEHOST)
Click the ‘OK’ button to save the changes to the ‘LSFORCEHOST’ environment variable, then click the ‘OK’ button in the ‘Environment Variables’ window to close it. Finally, click the ‘OK’ button in the ‘System Properties’ window to complete this step.
Part V -
FAQs and Troubleshooting for
Installation, Licensing, and Program Errors
Issue
– MARS® fails to install.Answer
– There can be many reasons for an installation failure. Some of the more common ones include: not having the most recent Windows Service Packs and system updates installed on the computer and not answering in the affirmative at install prompts or User Account Control pop-up windows.Issue
- MARS® installs in a local folder other than C:\MARS.Answer
–
Unless the user intends for MARS® to be installed in a location other than the default C:\MARS, uninstall the program and then manually remove the remaining contents of the install folder. Re-run the installer by right-clicking on ‘setup.exe’ and selecting ‘Run as administrator’.Issue
– When opening MARS®, a ‘Splash’ error window pops up, or the program opens with a white background in the data view area (sometimes with a red ‘X’ spanning it).Answer
– These situations usually indicate that the graphics driver is out of date and/or the graphics processing unit (GPU) is manufactured by ATI/AMD; however, not all ATI/AMD processor and driver combinations create this result. The first step should always be to update the graphics driver by visiting the computer manufacturer’s or the GPU manufacturer’s website. Best rendering can be obtained from an OpenGL- and CUDA-compliant nVidia GPU.Another cause of the red ‘X’ (if it appears with an error message stating “Attempted to read or write protected memory…”) is when a Windows computer has an additional boot partition with Ubuntu Linux as the operating system and the Mesa OpenGL rendering platform loaded.
Issue
– A pop-up appears when starting MARS® that reads ‘License file is not valid or expired.’Answer
– Occasionally when saving an email-attached ‘lservrc’ permanent license file to the user’s computer, the operating system or e-mail client will create a .dat extension for the file. If this has happened, rename the license file to ‘lservrc’ with no extension.If the license file has previously authorized MARS® without any problems and suddenly fails to allow MARS® to start, then there may be an incompatibility between the license file and the version or build of MARS® installed. This typically occurs when the license file was generated for a
license file can be requested from MARS® technical support at [email protected]. A new license file will be generated and transmitted by e-mail attachment, usually the same day.
Issue
- When MARS® opens, some of the tools/buttons on some tabs may appear different from what is shown in the Help File.Answer
–
On smaller displays - especially some laptops and monitors less than 20 inches diagonally that have 4:3 aspect ratios - the tab labels will be closer together and some tools may changebutton/icon appearance. Note the example below for the two tools at the far right side of the Cross-Section/Profile tab. This is a problem with Microsoft Visual Studio and may be addressed in future releases of Visual Studio.
If icon and/or labeling text disappears (as in the example above), tool-tip pop-ups will be enabled when hovering over those buttons, as shown below. Clicking an unlabeled button will present the options for that button. Always maximize the MARS® program window to allow as much space for icons as possible.
Issue
- When MARS® opens, many of the tools are not available (buttons are grayed out).Answer
– Not all tools and functions are available at all license levels. Click on the ‘About MARS’ button on the ‘Help’ tab to see what License Type is authorized. A Production license has the most functionality, followed by Explorer QC, Explorer, Evaluation, and finally FreeView™ with the least. The 30-day Evaluation version of MARS® offers the same tools as Explorer with a few exceptions. See the MARS® Functionality Matrix for details.Issue
– The license type for MARS® should be Evaluation, Academic, Explorer, Explorer QC, or Production, but MARS® reports the License Type as FreeView™.Answer
– For a standalone installation, the license file must reside in the main MARS® installation directory which, by default, is C:\MARS. Only one license file should exist in this directory, and the file must be named either ‘lservrc’ (no extension) or ‘license.xml’ depending on the type of license in use.For a network server installation, the license file must be named ‘lservrc’ (no extension), and it must reside in one of the following directories, depending on the operating system of the license server (32-bit or 64-bit, respectively):
C:\Program Files\Common Files\SafeNet Sentinel\Sentinel RMS License Manager\WinNT -or-
C:\Program Files (x86)\Common Files\SafeNet Sentinel\Sentinel RMS License Manager\WinNT Again, only one license file should exist in the applicable directory on the license server computer. Client computers must not have a license file installed on them. Also, the client computer(s) must have a System Environment Variable set that points to the computer acting as the License Server. Please check the section titled ‘Client Configuration – Environment Variables’ (Page 29) for more details. Finally, make sure that the license server computer is running and available to the network – it should respond to a ‘ping’ from any other computer on the same network. If all these conditions are met and the License Type still shows FreeView™, then the license has expired, the license file is corrupt, or the information provided to generate the license file was incorrect.
Issue
– MARS® leaves pixel artifacts on the screen and/or fails to refresh the display when panning/zooming, etc.Answer
– This is usually a graphics card, driver, or settings issue, and is typically limited to laptops. Some higher-end laptops use two graphics systems – one for low-power consumption with less demanding programs, and a more robust one for more demanding programs like CAD software, games, etc. MARS® can be very demanding (especially with 3D rendering), so it should always be set to use the more powerful graphics system – usually nVidia or AMD/ATI. These settings are usually found in the Control Panel’s display applet in a section called “3D Settings” or similar. Note that thisIssue
– MARS® is closed on a computer that is using a network license, but cannot be immediately opened on another client computer.Answer
– The Sentinel License Server software may lock the MARS®license to a computer for up to one (1) minute after termination of the application. Wait at least one minute and then try opening MARS® again. In rare cases, but particularly if the application crashes or is terminated without properly exiting the program, the license may remain locked, and the client computer will need to be restarted.Issue
– MARS® reports no licenses available, even though there should be one or more not in use.Answer
– If a license is commuted (i.e., temporarily transferred to a laptop), and that laptop is disconnected from the network, that license is no longer available to network users. Be sure to check commuter licenses back in when finished using MARS®on the disconnected computer, as per the instructions in Part IV – Commuter Licensing.Issue
– If MARS® is updated or uninstalled, will the license file or any custom (user-created) XML files be deleted?Answer
– Yes and no. Only those files that were part of the original installation (except the sample data files) will be replaced or deleted. If the user does not manually delete the MARS® installation directory (C:\MARS by default), any existing license file – either ‘lservrc’ or ‘License.xml’ – will be preserved. In addition, all user-created custom XML files such as ‘MARSClassLabelsAndColors.xml’ and ‘custom.xml’ (user-defined projection system information) will be saved. During a software update, the user will be prompted to replace the Quick Access Toolbar file named “MARS_QAT.xml”. Answer “No” to save the existing customized version of this file to preserve the icon layout on the Quick Access Toolbar.MARS® Technical Support – General Information
o Technical Support Hours: Weekdays from 8:30 AM – 5:00 PM (U.S. Mountain Time Zone) o Toll-free Telephone: (800) 544-1714 x3933
o E-mail: [email protected]
Technical Support Contact
Mark A. Stucky, GISP - MARS® Technical Support Specialist (United States/Canada) Office: (303) 353-3933
E-mail: [email protected]
Social Media
Please follow Merrick & Company for the latest MARS® product announcements, feature enhancements and user tips!
World Headquarters: 5970 Greenwood Plaza Blvd. Greenwood Village, Colorado 80111
United States 1-303-751-0741