1 Exercise 1-1
The Outlook Screen
Getting to know the parts of the screen makes it easier to work in Outlook 2010. In the Navigation pane, you can select Mail, Calendar, Contacts, and Tasks. In the Inbox pane, you can preview e-mail messages without having to open each one. The Reading pane allows you to see the entire contents of a selected message. The Ribbon bar and Tabs
provide valuable tools for composing and editing messages. Step-By-Step 1. To launch Outlook 2010 choose Start>Microsoft Office> Microsoft Outlook 2010 2. iCheck. Your
screen should look similar to Figure 1-1.
3. Locate the
Navigation pane. 4. Locate the Inbox
pane. 5. Locate the
Reading pane.
6. Locate the Ribbon bar. 7. Locate the Tabs.
Continue to the next exercise.
Navigation pane Reading pane Ribbo n Inbox pane Tabs
You Should Know
If this is not a new installation of Outlook, messages may appear in the Inbox and Reading panes.
Exercise 1-2
Compose a New Message
There are three steps to composing a new e-mail message. First, write the address where you are sending the message. Second, include a subject that tells the recipient what your message is about. Third, write your message in the email’s body.
Step-By-Step
1. In Outlook, on the Ribbon, Click New E-mail.
2. iCheck Your screen should look like Figure 1-2.
3. In the To box, key the e-mail address of a classmate assigned by your teacher. 4. In the Subject box, key:
Animal Adoption Newsletter 5. In the body, key the message
as shown in Figure 1-3. 6. iCheck. Your screen should
look like Figure 1-3. Continue to the next exercise.
Key Address provided by your teacher into the To box Subject box Key new message into this pane
Name of message changes to match Subject box Troubleshooter
Before you send an e-mail message, check the To Box to be sure you are sending the e-mail to the correct recipient. When you ‘hover’ the insert point over the recipient’s e-mail address, their name should appear.
Figure 1-2
Exercise 1-3 Save an E-mail
There may be times when you have to leave an e-mail message you are creating and come back to it later. Outlook allows you to save a draft of an e-mail that you are composing. You can also save copies of e-mails that you have completed but not sent.
Step-By-Step
1. In your open e-mail, click Close.
2. In the dialog box, click Yes to save your draft. See Figure 1-4.
3. In the Navigation pane, click Drafts. 4. iCheck your screen should look like
Figure 1-5.
5. Double-click the saved draft to open the message. Choose File>Save As.
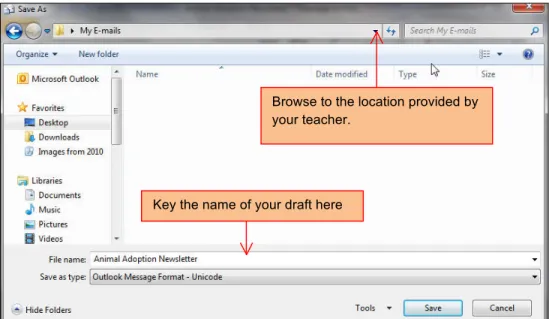
6. In the Save As dialog box, in the File name box, key:
Animal1-[your first initial_last name] 7. In the Save As box,
browse to the location
provided by your teacher. See Figure 1-6. 8. Click Save.
Continue to the next exercise.
Draft of message
Browse to the location provided by your teacher.
Key the name of your draft here Figure 1-5 Figure 1-4
Figure 1-6 Figure 1-5
Exercise 1-4 Insert an Attachment
An attachment is a file that you send alone with a message. An attachment can be a text document, a photo, a music or video file, or any other type of file. You can use attachments to provide additional information with your message, or to exchange files via e-mail.
Step-By-Step
1. In your Animal1 e-mail, click the Insert tab on the Ribbon. See Figure 1-7.
2. Click Attach File.
3. In the Insert File dialog box, ask your teacher where to locate the data file Animal.docx. Click on the file Animal.docx. 4. iCheck your screen should
look like Figure 1-8. 5. Click Save.
Continue to the next exercise.
Name of file attached to message
Tips and Tricks
You can also attach a file by dragging it into the message.
Tech Tip
To remove an attachment, right click on the attachment and click Remove on the shortcuts menu.
Figure 1-8
Exercise 1-5 Set Message Options
You can use Outlook’s Importance settings to tell the person receiving the message whether the message has a high or low priority (importance). Use the Sensitivity settings to indicate that a message is personal, private or confidential. Outlook’s Delivery options allow you to set the delivery time of a message, or to have a message automatically sent to another
person.
Step-By-Step
1. In your Animal1 e-mail, click the Options tab on the Ribbon. 2. Click More Options, click Low at
the Importance drop-down box. 3. Click Confidential at the
Sensitivity drop-down box.
4. iCheck your screen should look like Figure 1-9.
5. Click Close.
6. Click the Message tab on the Ribbon. 7. Click High
Importance.
8. iCheck Your screen should look like Figure 1-10. 9. Save your file. 10. Continue to the next
exercise.
Importance Drop-down box
Importance: High button active Figure 1-9
Exercise 1-6
Preview, Print, and Send a Message
As in other Office applications, you can use Print Preview to see what an e-mail will look like before you print. Print a message if you need a copy of the message. Use the Sent Items folder to track messages you have sent. Step-By-Step 1. In your Animal1 e-mail, choose File> Print. 2. Click Print Options 3. iCheck your screen should look like Figure 1-11.
4. Be sure your classroom
printer has been selected. With your teacher’s permission, click the Print button. 5. In the e-mail, click Send.
6. In the Navigation pane, click Sent Items. 7. iCheck Your screen should look like Figure 1-12.
Continue to the next exercise.
Print Preview
Check if your printer is selected
Figure 1-11
Exercise 1-7
Create and Modify a Signature
As with letters and other documents, you can sign your e-mails with a customized signature. A business signature usually contains information such as the sender’s name, company, position, address and phone number. Outlook will automatically include that signature in all new e-mails and replies.
Step-By-Step
1. In Outlook, create a new e-mail message. Click Insert on the Ribbon. 2. Click
Signature.
3. In the drop-down box, click Signatures
4. In the dialog box, click New.
5. Enter a name for the signature, key Newsletter.
6. In the Signature Text box, key the text shown in Figure 1-13.
7. Select the text Patricia Patel. Using the drop-down arrow next to the Font, select Lucinda
Handwriting. Click OK. 8. In the open e-mail, click Signatures>newsletter.
9. iCheck Your screen should look like Figure 1-14.
Continued on the next page.
Figure 1-13
Exercise 1-7 continued Create and Modify a Signature Step-By-Step
10. In the open e-mail, click
Signature>Signatures. In the dialog box, click on newsletter.
11. In the Edit signature box, click before
Production Coordinator. Key: Assistant. Click OK. See Figure 1-15.
12. Close the e-mail without saving it.
13. Click New E- mail.
14. iCheck Your screen should look like Figure 1-16.
You Should Know
When replying to a message, the prefix RE: is automatically added to the
Subject box. This means regarding, and indicates you are replying to a message.
Figure 1-15
Exercise 1-8
Create Multiple Signatures
You may find that you need different signatures for different purposes. For example, you may want to use one signature for professional e-mails and a second signature for personal e-mails. Outlook allows you to create different signatures and to choose which signatures to use for which e-mails.
Step-By-Step
1. In the open e-mail, click Signature>Signatures. In the dialog box click on New.
2. In the dialog box, key: Personal. Click OK.
3. In the Edit Signature box, key: Patricia. Select Patricia
4. Change the font to Lucinda Handwriting, size 10, color Red. See Figure 1-17. Click OK.
5. Close the message without saving it. 6. Click New E-mail
7. In your message, click Signature>Perso nal. 8. iCheck. Your screen should look like Figure 1-18.
Personal Signature
Figure 1-17
Exercise 1-9 Reply to a Message
Outlook regularly checks for new e-mail messages. When a new e-mail message arrives, it is displayed in the Inbox folder located in the Navigation pane. When you use Reply, your response is attached to the top of the original message.
Step-By-Step 1. In the Inbox
folder, double-click the new message Animal Adoption
Newsletter. 2. iCheck. Your
screen should look like Figure 1-19.
3. Click Reply located on the Home Tab. 4. Click inside the
Message body. Key: I would like to take photographs of the animals for the newsletter. Would you like black and white or color photographs? 5. iCheck. Your
screen should look like Figure 1-20. Continue to the next exercise.
Reply appears in a different color Figure 1-19
Exercise 1-10 Forward a Message
Sometimes you might receive a message that you want to share with a friend or co-worker. Use the Forward button to forward, or pass along, an e-mail message to other people
Step-By-Step
1. In the Inbox folder, double-click the new message Animal Adoption Newsletter. 2. Click Forward
on the Home tab.
3. iCheck. Your screen
should look like Figure 1-21.
4. Click in the
Message body. Key in the
text as shown in Figure 1-22. 5. Save your file as:
Animal3[your first initial and last name].
Continue to the next exercise.
You Should Know If you forward a message with an attachment, both the message and the attachment are sent to the new recipient.
Figure 1-21
Exercise 1-11 Use the Message Flag
Outlook provides Quick Flags to show the person receiving the message that the message requires an immediate reply. Use discretion when you send reminders to other people. Some recipients might not
appreciate reminders while they work. Another option is to send a message that is flagged with start and due dates and more information in the Flag to list. This way, the information is available to the recipients in the InfoBar of the message, without a reminder.
To send a flag so that others are prompted to do something, do the following before sending the message: Step-By-Step
1. Open your
Animal3 message.
2. In the open message, on the Message tab, in the Tags group, click Follow Up, and then click Flag for
Recipients.
3. Under Flag for Recipients, in the Flag to list, click the type of flag that you want to send.
4. By default, messages flagged for recipients include a reminder. If necessary, change
the date and time. If you don't want to include a reminder,
clear the Reminder check box.
5. iCheck. Your screen should look like Figure 1-23.
6. Click Send.
7. In the Inbox locate RE: Animal
Adoption Newsletter 8. iCheck. Your screen
should look like Figure 1-24. Continue to the next exercise.
Message Flag
Note the Information
Note the Flag Reminder Click on the box to
create a Category
Figure 1-23
Figure 1-24
Exercise 1-12 Create a Contact
Contacts are people and businesses you interact with. Your contacts might be coworkers, companies, friends, family or work-related acquaintances. You can use Outlook’s Contact feature to store contact information such as names, e-mail addresses and phone numbers.
Step-By-Step
1. In the Navigation pane, click Contacts.
2. Click New Contact on the New Group.
3. In the Full Name box, key in the name of a classmate assigned by your teacher.
4. In the E-mail box, key the e-mail address of the classmate assigned by your teacher.
5. iCheck. Your screen should look like Figure 1-25.
6. Click Save & Close.
7. iCheck. Your screen should look like Figure 1-26.
Continue to the next exercise.
Full Name Box
E-mail box
Tips and Tricks To create a new contact directly from an e-mail, right-click the person’s e-mail address. Then click Add to Outlook Contacts. Figure 1-25 Figure 1-26
Figure 1-27 Exercise 1-13
Update Contact Information
You can update your contact cards as you learn more about a contact. For example, you can add information such as phone numbers, and street addresses. You can also add information such as the contact’s job title, web site, and manager’s name.
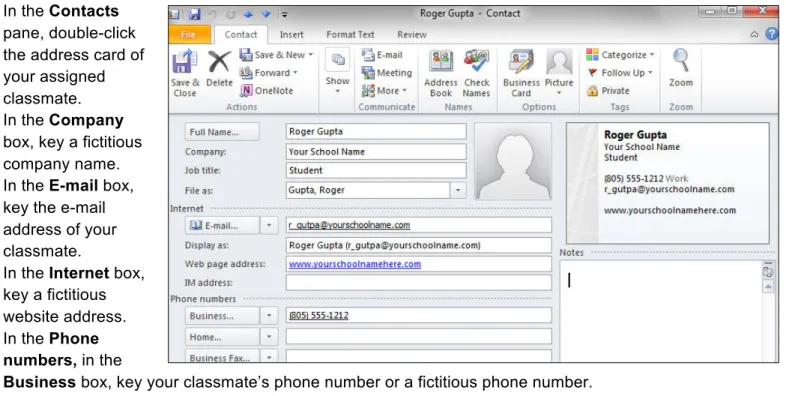
Step-By-Step 1. In the Contacts
pane, double-click the address card of your assigned classmate. 2. In the Company
box, key a fictitious company name. 3. In the E-mail box,
key the e-mail address of your classmate.
4. In the Internet box, key a fictitious website address. 5. In the Phone
numbers, in the
Business box, key your classmate’s phone number or a fictitious phone number. 6. Click Save & Close.
7. Double-click the
address card you just updated.
8. iCheck. You screen should look like Figure 1-27. Continue on the next exercise.
Figure 1-28 Exercise 1-14
Send Message Using Contacts
You can send messages directly from your contacts cards. When you click New Message to contact, a new message opens with the contact’s e-mail address already provided.
Step-By-Step
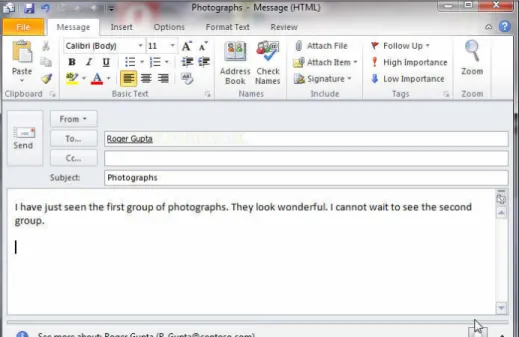
1. In the Contacts navigation pane, click on the Contact card of your assigned
classmate. Click on E-Mail on the Communicate tab. 2. A new e-mail message will
open.
3. In the new message Subject box, key: Photographs. 4. In the message body, key: I
have just seen the first group of photographs. They look wonderful! I cannot wait to see the second group. 5. iCheck. Your screen should
look like Figure 1-28. 6. Save your message as:
Photographs-[your first initial and last name].
Exercise 1-15 Choose Message Format
Outlook provides three different formats in which to send your e-mails. If a message is sent in Plain Text
format, you cannot format the text. The Rich Text format allows some text formatting such as bold or italic. The HTML format allows you to use all the formatting options, including inserting pictures. While HTML formatting is the default setting for Outlook, you may need to use the other formats depending on the e-mail program used by people receiving your messages.
Step-By-Step
1. In your Photographs message, select wonderful.
2. On the Format Text tab, click Bold. Deselect the text.
3. On the Format group, click Plain Text. 4. Click Continue in the
Compatibility dialog box 5. iCheck. Your screen
should look like Figure 1-29.
6. Check the Message Format. Click HTML. 7. Save and close the file.
Bold Formatting disappears Message
Format
Lesson 1 Concept Review
Open a Microsoft Word document to complete the Concept Review. Save the Word document as Lesson_One_Review [your first initial last name]
Key Terms Attachment Contact Card Delivery Options Forward HTML Importance Inbox Pane Message Flag Plain Text Print Preview Reading Pane Sensitivity Signature
Reviewing Key Terms
Complete the following statements in your Word document. Choose from the Key Terms on the left side to complete the
statements.
1. A(n) _______ is information about yourself that appears at the end of messages that you create.(page XXX)
2. If the _______ message format is selected for a message, the text cannot be formatted. (page XXX)
3. A (n) _______ contains information about a business or a personal acquaintance. (page XXX)
4. A (n) _______ is a separate file that you can include with an e-mail message. (page XXX)
5. Use the _______ to see what the e-mail will look like before your print it. (page XXX)
Key Term Activity
6. Working with a partner, discuss and list the pros and cons of using a _______ when sending an e-mail message. For example, if the recipient is your manager, do you want to tell him/her when you need a response? Write your pros and cons on your Word document using the columns feature.
Reviewing Key Facts
7. Which of the following message formats allows you to bold a word in a message?
a. Plain text b. Formatted text c. HTTP
d. HTML
8. Which of the following can you do with Outlook? a. Send an attachment
b. Send a flagged e-mail c. Forward an e-mail d. All the above
9. What is the quickest way to add your contact information to an e-mail message before sending it?
a. Insert a signature
b. Key your name and phone to the e-mail c. Attach a file with your information d. None of the above.
Lesson One Practice It Activities 1 Step-By-Step
1. From Start, click Microsoft Office>Microsoft Outlook 2010.
2. In the Navigation pane, click Mail. 3. Click New E-mail.
4. Click the Insert tab, click Signature> Signatures (see Figure 1-30). In the Signatures and Stationery box, click New.
5. In the dialog box, name the signature Personal2. Click OK. 6. In the Edit Signature box, key: Your First Name.
7. Format the name using Comic Sans MS, 12 point, Blue, Accent 1, Darker 50%.
See Figure 1-31. Click OK. 8. Click New E-mail. Click
Signature> Personal 2. 9. iCheck Your screen should
look similar to Figure 1-32. 10. Save your file as
personal2[your first initial last name]
Figure 1-31 Figure 1-30
Lesson One Practice It Activities 2
E-mail a New Contact with an Attachment and Signature
You must complete the Concept Review and Practice It Activity 1 before doing this activity. Step-By-Step
1. From Start, click Microsoft Office>Microsoft Outlook 2010. 2. In the Navigation pane, click
Contacts.
3. Click New Contacts.
4. In the New Contact Card, in the Full Name box, key the name of your teacher. In the Company box, key the name of your school. In the E-mail address, key your teacher’s e-mail address. 5. In the Web Page box, key the
address of your school’s website. Add the phone numbers and street
address of your school in the boxes.
6. iCheck. Your screen will look similar to Figure 1-33. 7. Click Save & Close.
8. In the Navigation pane, click Contacts. Click on your teacher’s name. Click New E-mail.
9. In the Subject box, key: Lesson One Review from[your first initial and last name]. 10. In the Message box, key two sentences to your teacher explaining the purpose of the
e-mail and telling the teacher you are attaching a Word document. Continues on the next page.
11. Click Insert>Attach File. 12. Navigate to the folder that
has your Lesson_One Review Word document. 13. Double-click on the Word
File to insert it into the E-mail.
14. In your E-mail message click Insert> Signature> Personal 2.
15. iCheck. Your screen will look similar to Figure 1-34. 16. Click Send.
17. Click in the Navigation pane, click Mail. Click Sent Items.
18. Click on the Sent Items to view the e-mail you sent to your teacher. 19. Save and close.
Critical Thinking Activities
1. Emphasize Punctuality When people are not punctual, a business loses time, money and efficiency. You are a project manager in charge of five people. Compose an e-mail message to your group proposing a time to meet to discuss the importance of
punctuality. Ask them to reply to your e-mail to confirm they will attend and to send you one reason why being punctual is important to the business. In the message, add a flag indicating that the reply is due by the end of the following day. Save the e-mail as: punctual [your first initial and last name] Send the e-mail to your teacher’s e-mail address.
2. Organize Information While attending a weekend conference about new trends in technology, you met three people you want to get to know better. All these people work for the same company. Create a contact for one person. Include the following
information • Person’s name • Company name • Person’s position • Business address • Business website
Create the other two contacts by making copies of the first contact so you do not need to key in duplicate information. (Hint: use Copy and Paste). Save the list of contacts. Compose an e-mail to all three contacts. In the e-mail, re-introduce yourself, remind them you met at the
conference. Ask them a question about technology that interests you. Thank them for their time and courtesy. Save the e-mail as conference[your first initial and last name]. Send this e-mail to your teacher’s e-mail address.
3. With your teacher’s permission, perform an Internet search about e-mail etiquette. Review some of the websites that discuss the proper use of e-mail. In a Word document, list ten rules of proper e-mail etiquette or format a Word document as the Do’s and Don’ts of e-mail in the business and personal worlds. Compare your list with a partner and discuss your research. Save the list as etiquette[your first initial and last name]. Send the document as an attachment to your teacher’s e-mail address.
21st Century Learner Being Flexible on the Job
In your part-time job at an animal clinic, your major responsibilities include answering the phone, making follow-up appointments with pet owners, and selling specialized cat and dog food. You have been working at the clinic for several months and have a good relationship with the veterinarian.
On busy Saturday, the vet’s assistant calls in sick with the flu. The vet asks you to pitch in. With her guidance, you help her take care of the dogs, cats, rabbits, snakes, and birds that come into the clinic. At the end of the day, the vet thanks you for being so flexible and praises you as a valuable employee.
Being flexible on the job means willing to learn new tasks, take on a new assignment or work longer hours. When you are flexible, you make it easier for everyone to do a good job.
Jay Smith of IDEAS, Inc. says that being flexible is “more about getting the job done than about punching a time clock.” He says that flexibility works both ways. Sometimes he has to be flexible with his workers, and he expects the same from them. Both managers and workers need to give and take to create a productive workplace.
Skillbuilder Identify: What are two ways a person can be flexible at a job?
Analyze: What are some ways an employer could be flexible with his or her employee?
Evaluate: Think of a time when you had to be flexible, either on a job or at school. What happened? Why was your flexibility helpful or not helpful?
Exercise 2-1 Explore Calendar Views
The Calendar is the part of Outlook where you schedule meetings and appointments. The Appointment area is the middle section of the Calendar pane. You can use the Day, Work Week, Week and Month views to display different calendars in the Appointment pane. The Date Navigator is located on the Ribbon, at the Arrange tab. Use this calendar to
change and view dates quickly. Step-By-Step
1. Start Outlook.
2. In the Navigation pane, click Calendar. On the Ribbon, on the Arrange group, click Month.
3. iCheck. Your screen should look similar to Figure 2-1. 4. Locate the small calendar at
the top of the Navigation pane. Click the right arrow to view the next month.
5. Click the Week button on the Arrange group.
6. Click the Work Week button on the Arrange group.
7. Click the Day button on the Arrange group. 8. iCheck. Your screen should
look similar to Figure 2-2. Continue to the next exercise.
Arrange group
Calendar
Figure 2-1
Exercise 2-2
Add an Appointment to the Calendar
Outlook is a useful tool for scheduling and recording appointments. An appointment is an activity that lasts a fixed amount of time. Use the Appointment dialog box to select when your appointment will start and end. What you key into the Appointment’s Subject box is what appears on your calendar once the appointment is saved and closed.
Step-By-Step
1. In the Calendar Ribbon bar, click Day on the Arrange group.
2. Click New Appointment on the New group.
3. In the Subject box, key: Project Meeting. 4. Click the Start time drop-down arrow (see
Figure 2-3). 5. Click Today.
6. Click and select 1:00 PM.
7. Click End time drop-down arrow and select 3:00 PM.
8. Click Save & Close.
9. iCheck. Your screen should look similar to Figure 2-4. Continue to the next exercise.
Start Time
Figure 2-3
Exercise 2-3 Schedule an Event
An Event is a scheduled activity that lasts one of more days. When you schedule an event or other
appointment, you can choose how you want to display your schedule to others. In the Options box, you can select Free, Tentative, Busy or Out of Office. While these four options are color-coded, you do not see these colors when you Save and Close an appointment.
These colors are only seen when others view your schedule.
Step-By-Step
1. In the Calendar, click New Appointment. 2. In the Subject box, key: Team Conference. 3. Click the All day event check-box.
4. In the Start time drop-down box, select the first Thursday after the current date.
5. In the End time drop-down box, select the Sunday that follows the Thursday.
See Figure 2-5.
6. Click the Options button on the Ribbon.
7. In the Show as drop-down box, click Out of Office. See Figure 2-6. 8. Click Save & Close.
9. Click Month in the Arrange group. 10. Navigate the correct month.
11. iCheck. Your screen should look like Figure 2-7.
Continue to next exercise.
Team conference
Figure 2-5
Figure 2-6
Exercise 2-4
Schedule Meetings and Invite Attendees
An appointment to which you invite others is known as a meeting. You send people a Meeting Request when you want to invite them to a meeting. The people that you invite to a meeting are called attendees. Some attendees are required, some are optional. In this exercise, you will schedule a team meeting.
Step-By-Step
1. In the Calendar, click on the Ribbon>New Meeting. 2. In the To box, key the e-mail
addresses as provided by your teacher.
3. In the Subject box, key: Team Meeting.
4. In the Location box key: Main conference Room
5. In the Start time, select the first Monday after the current date. Select a start time of 9:00 AM 6. For End time, select the same
Monday. Select an end time of 11:00 AM.
7. iCheck. Your screen should look similar to Figure 2-8.
8. Click Send.
9. Click in the Month button.
10. Navigate to the month that has the meeting.
11. iCheck. Your screen should look similar to
Figure 2-9.
Continue to the next exercise.
Team Meeting
You Should Know
Outlook allows you to decide who is required at your meeting. Required people might be your team members. Optional might be support staff at your work.
Figure 2-8
Exercise 2-5
Schedule Resources for a Meeting
In addition to inviting attendees, you can also use Outlook to schedule resources. Resources are items or places that you need to conduct a meeting. Resources might include the conference room where the meeting is held, a LCD projector for a PowerPoint presentation or a video link for an interactive virtual meeting.
Step-By-Step
1. In the Calendar, double-click the Team Meeting.
2. Click Scheduling in the Show group.
3. In the All Attendees column, below the last name entered, key: Projector. In the drop-down box to the left of Projector, click
Resource. 4. In the box below
Resources, key: Main conference Room. In the drop-down box to the left of Main
conference Room, click Resource.
5. iCheck. Your screen
should look similar to Figure 2-10. 6. Click Send.
7. Click Close.
Continue to the next exercise.
Resource may not be functional in your version of Outlook
You Should Know
Depending on the e-mail service you use, some of the features of scheduling may not be functional. If you use
Microsoft Exchange Server, all the scheduling features are installed. For example, the Resource feature should be functional in Microsoft Exchange Server.
Exercise 2-6
Accept, Tentative Accept or Decline a Meeting Request
When you receive a meeting request, you can either Accept, Tentative Accept, or Decline the invitation. You can also choose to include a message in your reply. If you are not sure you will attend the meeting, click Tentative.
Step-By Step
1. In the Navigation pane, click Mail, double-click the Team Meeting e-mail. 2. Click Change Response
to see your choices. See Figure 2-11.
3. Click Accept.
4. In the Message area, key: Which reports should I bring to the meeting? 5. Click Accept.
6. In the Calendar view, click the day of the meeting. 7. iCheck. Your screen should
look similar to Figure 2-12. Continue to the next exercise.
Click Change Response to see your choices
Figure 2-11
Figure 2-12
Exercise 2-7
Update and Cancel Meeting Requests
Sometimes you might need to update or cancel a meeting request after you have sent it. You can easily change the meeting location or time. Use the Message area to let attendees know why you have changed your meeting request. After you have modified or canceled the meeting, Outlook sends an update to the attendees. Step-By-Step
1. In the Calendar, double-click Team Meeting. See Figure 2-13
2. In the Start time box, change the start time to 10:00 AM
3. In the Message area, key: I have a 9:00 AM
conference call that day. 4. Click Send Update. 5. In the Calendar,
double-click Team Meeting.
6. Click Cancel Meeting in the Actions group.
7. In the message area, key: Can we reschedule for the following Monday?
8. Click Send Cancellation. 9. iCheck. Your screen should
look similar to Figure 2-14. Continue to the next exercise.
End time automatically changes when the Start time is changed. Message area Canceled Team Meeting no longer appears Figure 2-13 Figure 2-14
Exercise 2-8
Set Work Days and Times
Not all companies and employees have the same work schedule. Many companies work Monday through Friday. However, some people in a company may work Tuesday through Saturday. Some companies allow employees to set their own flexible hours. You can use Outlook Options to reflect your work days and times. Step-By-Step
1. In the Calendar, on the
Ribbon, click File>Options.
2. In the General pane, click
Calendar. In the Figure 2-15,
Mon, Tue, Wed, Thu, Fri are checked as the default work week.
3. Click the Start time drop-down box and select 10:00 AM.
4. Click the End time drop-down box and select 7:00 PM. 5. Uncheck Mon and check Sat.
6. In Display Options, click the drop-down button and click on the third color in the second column (see Figure 2-16).
7. In the Time zone label box, key: New York.
8. In the time zone drop-down box, select Eastern Time (US & Canada).
9. Click OK.
10. In the Calendar view, click on Day.
11. iCheck. Your screen should look similar to Figure 2-17.
Continue to the next exercise.
Tips and Tricks You may have to select
Mail>Calendar in the Navigation pane to see the changes you made in the Options dialog box.
Figure 2-15
Select this color
Figure 2-16
Exercise 2-9 Create and Modify Tasks
A task is a work-related duty or assignment that you want to track from start to finish. When you create a task, you note when you will start the task and when the task is due to be finished. You can also identify the task’s priority, and track your progress as you complete the task. Use the task list to view and modify your tasks. Step-By-Step
1. In the Navigation pane, select Task. On the Ribbon, click New Task on the group.
2. In the Subject box, key: Prepare Conference
Materials List. See Figure 2-17.
3. In the Start date box, click the drop-down box. In the calendar, select the third Thursday from the current date.
4. In the Due Date box, click the drop-down box. In the
calendar, select the Saturday that follows the Start date.
5. In the Priority box, click the drop-down box and select High.
6. Click Save & Close.
7. In the Navigation pane, click Tasks. In My Tasks, click Tasks.
8. iCheck. Your screen should look similar to Figure 2-18.
Exercise continued on next page.
Figure 2-17
Exercise 2-9
Create and Modify Tasks continued.
9. Double-click the Prepare Conference Materials List task to open it.
10. In the Status box drop-down: select In
Progress.
11. In the % Complete box, toggle 25%. 12. In the Due date box,
change the due date to the following Monday, after the original due date. See Figure 2-19. 13. Click Save & Close. 14. iCheck. Your screen should look similar to Figure 2-20.
Continue to the next exercise.
Note that Due in days has changed
Figure 2-19
Exercise 2-10 Assign Tasks
When you create a task, you are the owner of the task. If you assign the task to another person, that person becomes of the owner. Only an owner can modify a task.
Step-By-Step
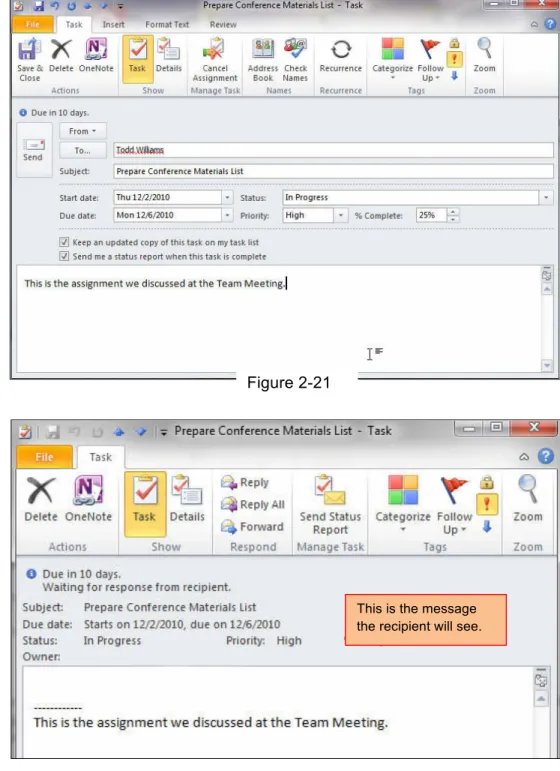
1. In the Navigation pane, click Tasks. Double-click the Prepare Conference Materials List task. 2. Click Assign Task
on the Ribbon.
3. In the To box: enter the name of your e-mail partner or other address as directed by your teacher. See Figure 2-21.
4. In the Message box, key:
This is the assignment we discussed at the Team Meeting.
5. Click Save & Close. 6. Click Send.
7. iCheck. Your screen should look similar to Figure 2-22.
This is the message the recipient will see.
Figure 2-22 Figure 2-21
Exercise 2-11 Accept or Decline Tasks
Once you have received a proposed task assignment, you may accept or decline that task.
Step-By-Step
1. In the Navigation pane, click Mail. In the Inbox, double-click on the Task Request message.
2. Click Decline (see Figure 2-23). 3. Click Cancel.
4. Click Accept. In the dialog box, click Edit the response before sending (see
Figure 2-24).
5. In the Message box, key: I have the materials required for the list.
6. iCheck. Your screen should look similar to Figure 2-25.
7. Click Send.
8. Close and exit Outlook.
Accept or Decline Task
Tech Tips Some of the features of Outlook are only
available to corporate installations of the Program. Within each installation, certain features may be enabled or disabled. Figure 2-23 Figure 2-24 Figure 2-25 Accept the task notice.
Lesson 2 Concept Review
Open a Microsoft Word document to complete the Concept Review. Save the Word document as Lesson_Two_Review [your first initial last name]
Key Terms Appointment Appointment Area Assign Attendee Calendar Date Navigator Day View Event Meeting Meeting Request Month View Resources Task Task List Tentative Work Week
Reviewing Key Terms
Complete the following statements in your Word document. Choose from the Key Terms on the left side to complete the
statements.
1. The _______ calendar view displays five weeks at once. 2. A (n) _____________ is an appointment to which you invite
others.
3. If you are not sure you can attend a meeting, you should click the _______ button in the Meeting Request.
4. A (n) _______ could be a meeting room or type of equipment needed for your meeting.
5. You can modify the ________to match your actuals days and time of work.
Key Term Activity
6. Working with a partner with your teacher’s permission, research on the Internet some companies that have offices around the world. Locate five global cities, and list their time zones. Add or subtract their time zones from your local time zone. List three zones where people are working, when your time zone is asleep.
Reviewing Key Facts 7. Which of the following is NOT a Calendar view?
a. Day b. Week c. Month d. Year
8. A task owner is usually ___________ person(s). a. one
b. two c. three
d. none of the above
9. Which tab would you use to cancel a meeting? a. File
b. Format text c. Meeting d. Review
10. A task priority choice is NOT: a. Low
b. Medium c. Normal d. High
Lesson 2 Practice It Activities-1 Switch Calendar Views and Add a Meeting
Step-By-Step
1. Start Outlook. In the Navigation pane, click Calendar.
2. Click Work Week in the Ribbon.
3. Click New Meeting on the New group.
4. In the To box, key the e-mail address provided by your teacher. 5. In the Subject box, key
Conference Call. 6. In the Location box,
key: Main conference Room.
7. In the Start time drop-down box, click Today. 8. Click the Start time
drop-down arrow. Select 4:00 PM.
9. Click the End time drop-down arrow. Select 5:00 PM.
10. Click Send.
11. iCheck. Your screen should look similar to Figure 2-26.
Tech Tip
If the Work Week and Work Times are still set to an earlier exercise, you can reset these to match the default
(standard) days and times.
Lesson 2 Practice It Activities-2 Update and Cancel a Meeting
Follow the steps to complete the activity. You must complete Practice Activity 1 before doing this activity.
Step-By-Step
1. In the Calendar, double-click Conference Call. 2. In the Meeting dialog box,
in the Location box, key: small conference room. 3. In the Start time
drop-down box, select 4:30PM. 4. Click in the message area,
key: The conference call has been rescheduled and moved to a new location. See Figure 2-27.
5. Click Send update. 6. On the Calendar,
double-click Conference Call. 7. In the Ribbon, click
Cancel Meeting.
8. In the Message area, key: The conference call has been canceled until further notice.
9. Click Send Cancellation. 10. iCheck. Your screen
should look similar to Figure 2-28.
Figure 2-27
Lesson 2 Practice It Activities-3 Create, Modify, and Assign Tasks Step-By-Step
1. In the Calendar view, click Task> New Task.
2. In the Subject box, key: Conference PowerPoint Presentation.
3. Click in the Start date drop-down calendar, select Today. 4. Click in the Due date
drop-down calendar, select the second Monday from today. 5. iCheck. Your screen should look similar to Figure PR-04. 6. Click Save & Close.
7. In the Navigation pane, click Tasks.
8. Double-click Conference PowerPoint Presentation. 9. Click Assign Task.
10. In the To box, key in the e-mail address provided by your teacher.
11. iCheck. Your screen should look similar to Figure PR-05. 12. Click Send.
Figure 2-29
Lesson 2 Practice It Activities-4 Create and Modify Calendar Options
Step-By-Step
1. In the Navigation pane, click Calendar> File> Options. 2. In the Outlook Options dialog box, click Calendar. 3. In Work time, change Start time to 10:00 AM.
4. In Work time, change End time to 8:00 PM.
5. Uncheck Mon and check Sat.
6. In the Add Holidays drop-down, choose a country that you would like to live in.
7. In the Display Options box, click Default calendar color drop-down box, choose the last color on the middle column.
8. In the Time zone, choose the time zone for the country that you added in the Add Holidays above. (Hint: if the country has more than one time zone, choose the capital city time zone-you may need to research this information). Key the country/city name in the Time zone label.
9. Check Show a second time zone.
10. In the Label box, key: New York. In the Time zone drop-down, choose Eastern Time (US & Canada).
11. Click OK.
12. iCheck .Your screen should look similar to Figure 2-31.
You Should Know Many companies have offices around the world. Knowing the local time at other offices will
help you schedule virtual meetings and teleconferences.
Critical Thinking Activities
1. Different versions of software. In the business world, companies may have different versions of Microsoft Office installed. For example, your company may have Office 2010 installed, but your client has Office 2003. Many features of Office 2010 were not
developed back in 2003. Knowing the difference between the Office versions will help you communicate to your client. With your teacher’s permission, research through Microsoft some of the differences and improvements in Outlook 2010 compared to Outlook 2003. In a Word document, list some of the improvements in Outlook 2010 and how these improvements can help you communicate more effectively with your co-workers and clients. Save your Word document as software [your first initial and last name], and e-mail to your teacher as an attachment.
2. Global communication. Outlook 2010 allows you to customize your calendar for multiple time zones. In the exercises you created dual time zones. With your teacher’s
permission, research
some types of businesses that require 24/7 customer service. For example, research companies that have sales or customer service available 24/7. Locate at least 5 companies that have offices in 5 different time zones. These could be domestic and/or overseas. Using the Outlook 2010 time zone drop-down, determine how many hours these offices are from your current time zone. List your companies, locations, time zones and differences with your time zone in a Word document. Save your Word document as time_zone [your first initial and last name], and e-mail it to your teacher as an
attachment.
3. Required or Optional Attendee. In Outlook 2010 you learned about creating a meeting request and inviting people. Some meetings have required attendees-people who are necessary to make the meeting productive; and optional attendees-people who may or may not be needed for the meeting to be productive. Working with a partner, create a business meeting situation where some people are required, and some people are optional. In a Word document, describe the fictional meeting situation, who should be required and who should be optional. Discuss with your partner if you ever were not included in a meeting that you thought it was important for you to attend. How did you respond and what was the outcome of the meeting?
Save the Word document as Attendees [both your first initials and last names], and e-mail it to your teacher as an attachment.
Exercise 3-1
Create and Modify a Distribution List
If you often send e-mail to the same group of people, create a distribution list. A distribution list groups different e-mail addresses under one list name. When you send a message to the list, each person included in the list will receive it.
Step-By-Step
1. Start Outlook. In the Navigation pane, click Contacts. 2. In the Ribbon, click New Contact Group.
3. In the Name box, key: Project Group. 4. Click Add Members>From
Outlook Contacts.
5. Click the first name in your list. Hold down the Control [CTRL] key and select two other names in your contact list.
6. iCheck. Your screen should look similar to Figure 3-1.
7. Click Save & Close. Continued on the next page.
Tech Tip To complete this
exercise, you may need to create some contacts in your Contact Card dialog box. Then you can create a distribution list using those names.
Figure 3-1
Name is shown here
8. In the Contacts pane, locate and double-click Project Group (see Figure 3-2). 9. Select the first contact from the list, and
click Remove Member.
10. iCheck. Your screen should look similar to Figure 3-3.
11. Click Save & Close. Continue to the next exercise.
Figure 3-2
Exercise 3-2 Create and Modify Notes
A note is like a sticky note for your computer. Use notes to record thoughts, ideas, or to post reminders to yourself. You have the option to open and edit notes to add, delete, or update information.
Step-By-Step
1. In the Navigation pane, click Notes. On the Ribbon, click New Note. 2. In the New Note, key: Bring Materials for PowerPoint Presentation.
See Figure 3-4.
3. Click the X in the upper right corner to save and close the note. 4. Click in the Notes pane, and select the Last 7 Days view. 5. Double-click the Bring Materials note to open it.
6. At the end of the sentence, key: Make copies for all team members. See Figure 3-5.
7. Click the X in the upper right corner to save and close the note. 8. iCheck. Your screen should look similar to Figure 3-6.
9. Your note should appear on your desktop, as a reminder whenever you have Outlook opened.
Continue to the next exercise.
Figure 3-4
Figure 3-5
Exercise 3-3
Create, Rename and Delete Folders
Create Folders to hold e-mails received and sent related to projects, contacts, or other criteria. You can create sub-folders within folders to organize your e-mails, notes and activities.
Step-By-Step
1. In the Navigation pane, click the Folder tab above the Ribbon.
2. Click New Folder.
3. In the Name box, key: Group Project (see Figure 3-7). 4. Click in the Inbox if it is not highlighted. Click OK. 5. In the Mail pane, locate your new folder.
6. iCheck. Your screen should look similar to Figure 3-8. 7. Double-click the Group Project folder.
8. Click New Folder.
9. In the dialog box, key: PowerPoint Presentation. Confirm that Group Project is highlighted, click OK.
10. iCheck. Your screen should look similar to Figure 3-9. 11. Double-click on the PowerPoint Presentation folder.
Click on Rename Folder on the Ribbon. 12. Continued on the next page.
13. In the box, next to the folder, key: Team Meeting. Click Enter. The sub-folder is renamed Team Meeting. 14. To delete a folder, select the folder from the Mail pane.
15. Click on Delete Folder on the Ribbon. Be aware that the Delete Folder action deletes any files, or e-mails within the
deleted folder.
16. iCheck. Your screen will look similar to Figure 3-10. Continue to the next exercise.
Figure 3-7
Figure 3-8
Figure 3-9
Exercise 3-4 Sort Items
Outlook can sort items so you can find what you need quickly. Sorting puts items in order by a certain field. Sort your messages by several different criteria such as importance, sender, subject, or date received. Sort mail by the date to organize messages in the order that your received them. Sort mail by sender to find an e-mail from a particular sender.
Step-By-Step
1. In the Navigation pane, click Mail. At the top of the Mail pane, click
Arrange.
2. In the drop-down box, click Date (see Figure 3-11). 3. Your e-mails should be listed in date received order.
4. Click on Newest on top. That will toggle the order to show the newest
e-mails first. Click on Oldest on top. That will toggle the order to show the oldest e-mails first.
5. Click the Arrange By, and click on From.
That will change the order to show who sent the e-mails.
6. Click on A on top. That will toggle the order to show A-Z received e-mails.
7. Click on Z on top. That will toggle the order to show Z-A received e-mails.
8. iCheck, Your screen should look similar to Figure 3-12 in the Z-A view.
Continue to the next exercise.
Figure 3-12
Exercise 3-5
Move e-mails into Folders
After you establish your work folders, you will save time and be more organized when you place your received and sent e-mails into the appropriate folders.
Step-By-Step
1. In the Navigation pane, click Mail. Scroll through your mail and select an e-mail or a meeting request you have received concerning the Group Project. You may also look in the Sent Items folder for related messages.
2. If there is more than one message, task or appointment, hold the Control [CTRL] button, and select each item. 3. iCheck. Your screen should look
similar to Figure 3-13.
4. Hold the mouse button down, and drag the items into the Group Project folder.
5. Double-click on the Group Project folder. The items you moved are in this folder. 6. iCheck. Your screen should
look similar to Figure 3-14. Continue to the next exercise.
Figure 3-13
Exercise 3-6 Archive Items
The process of saving old messages is called archiving. You can manually archive your messages by using the Archive dialog box. AutoArchive automatically moves older messages to another location so that your Inbox and other folders do not get cluttered.
Step-By-Step
1. In the Navigation pane, click File> Info> Mailbox Cleanup>Archive (see Figure 3-15).
2. In the Archive box, select Archive this folder and all subfolders.
3. In the Archive items older than drop-down box, click Today.
4. In the Archive file location box, click Browse and select the file location as directed by your teacher. In the File name box, key: Your first initial and last name. Click OK.
5. iCheck. Your screen should look similar to Figure 3-16.
Continued on the next page.
Figure 3-15
Figure 3-16 Tech Tip
You may want to save a copy of your archived items to a
flash drive or another computer. Copy and paste the
archived file and paste into another drive.
Archiv e
6. To set up the AutoArchive feature, click the File tab. Click Options.
7. In the AutoArchive dialog box, click AutoArchive settings (see Figure 3-17).
8. Select the Run AutoArchive every n days check box, and then specify how often to run AutoArchive.
9. Select any other options that you want. You can choose to have old items deleted automatically at AutoArchive. See Figure 3-18. 10. Click OK. Figure 3-17 Figure 3-18 AutoArchive Run AutoArchive every n days
Exercise 3-7
Setting Reminders and Sounds
In Outlook, the Calendar allows you to set reminders before an event happens. For example, a reminder can be set to alert you of an upcoming meeting. You can also add your own reminder sound to customize your Outlook Calendar.
Step-By-Step
1. In the Navigation pane, click File> Options>Calendar.
2. In the Calendar Options dialog box, click the drop-down window and select 3 hours. Click OK at the bottom of the dialog box. This change will set up a desktop reminder 3 hours before a calendar event. Continue to the next step.
3. To change the reminder sound, click File>Options>Advanced (see Figure 3-19).
4. In the Play reminder sound browse box,
navigate to the WAV. Sound file provided by your teacher.
5. Click OK to set the sound file.
6. In your Calendar, create a meeting as: Sound Test Meeting to start in 20 minutes. Reset the reminder to 15 minutes to test the new reminder sound.
7. In 15 minutes you should get a screen similar to Figure 3-20.
Continue to the next exercise.
Figure 3-19
Figure 3-20
Play reminder sound
Figure 3-21
Figure 3-22
Figure 3-23 Exercise 3-8
Using Read and Delivery Receipts
Outlook can help you manage your messages by alerting you when a sent message is received and read by the recipients. This is useful if the sent e-mail is time sensitive or you require a confirmation that a recipient received and opened your message. You will receive a message when the e-mail is delivered and when the recipient opens your message.
Step-By-Step
1. In the Navigation pane, click Mail. Click New Mail on the Ribbon bar.
2. Choose a recipient from your Outlook contacts or provided by your teacher.
3. In the Subject box, key: PowerPoint presentation-need materials.
4. In the Message area, key: Please send me the materials for the team PowerPoint presentation as soon as possible. Thank you.
5. Click in the Options tab, check Request a Delivery Receipt, check Request a Read Receipt (see Figure 3-21).
6. Click Send.
7. When your recipient receives and opens your email, they will be prompted to send a confirmation to you (see Figure 3-22). If the recipient clicks Yes, the confirmation will be sent to you.
8. You will receive a message similar to Figure 3-23. This is your receipt that the message was delivered and opened.
You Should Know
Some companies have their Outlook installation configured to prevent received and read options. Some recipients cannot use this feature. You may consider telephoning the recipient to confirm they received and read your message.
Figure 3-24 Exercise 3-9
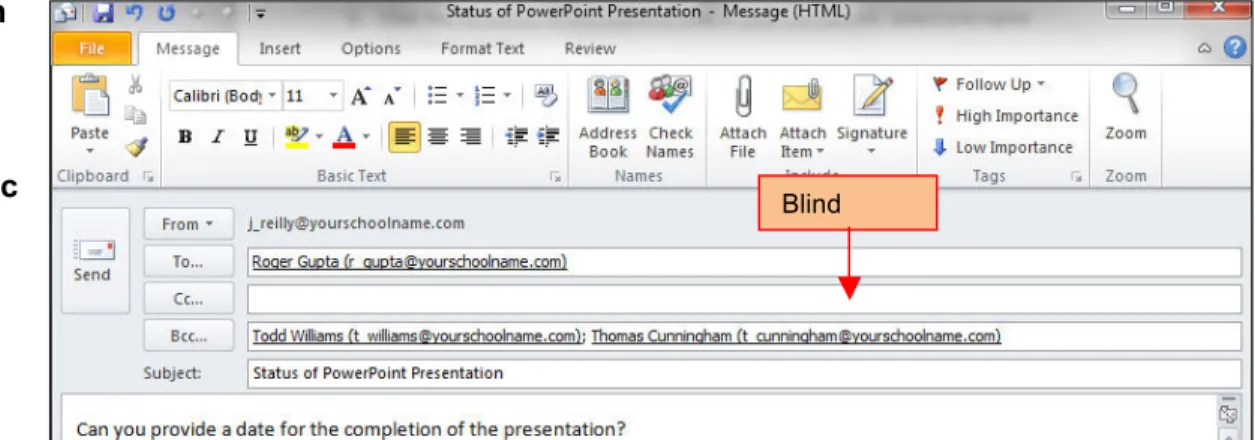
Using To, CC and BCC Fields
Outlook allows you to determine which recipients receive your messages. There are three fields available in the address box: To, Cc and Bcc. To is the box for the primary message recipients. Each message must have at least one address in the To box. The Cc box is for “courtesy copies”. They might be people you want to keep informed about the subject of the e-mail, but do not need to respond. Bcc box is for “blind courtesy copies”. Bcc addresses are not visible to the To or Cc recipients. It is good e-mail etiquette not to show other peoples’ e-mail addresses in a group message. In the exercise your will compose a message to a group, but not show the recipients e-mail addresses to each other.
Step-By Step
1. In the Navigation pane, click Mail. Click New Mail. 2. Click in the Options tab, Bcc in the Show Fields group. 3. Click the To button in the Address field. In your Contact list, select one name for the To field. 4. Select two other
names for the Bcc field.
5. Check the Request a Delivery Receipt. 6. Check the Request a Read Receipt.
7. In the Subject bar, key: Status of PowerPoint Presentation.
8. In the Message area, key: Can you provide a date for the completion of the presentation?
9. iCheck. Your screen should look similar to Figure 3-24. 10. Click Send.
Continue to the next exercise. Did You Know
If you are sending a message to many people, it is good e-mail etiquette not to show all their names and e-mail
addresses. A good method is to use your e-mail address as the To address. Then use the Bcc and add all the other addresses. Your recipients will not see others’ names or addresses.
Blind copies
Figure 3-25
Figure 3-26 Exercise 3-10
Printing Calendar and Contacts
By default, Outlook prints the current day, week, or calendar month. If you want to print specific dates, use the Date Navigator (The small calendar that displays the current month in Calendar. It provides a quick and easy way to move appointments and to view other dates.) to select the dates that you want to show in the printed calendar.
Step-By Step
1. In the Navigation pane, click the Calendar pane. In the Calendar view, click the File tab.
2. Click Print. In Settings, use the preview window to compare the print styles available. To print the complete details of appointments and meetings, click Weekly Agenda Style or Calendar Details Style. For this exercise, click Tri-Fold Style (see Figure 3-25).
3. Click the Print Options button.
4. Click in the Printer Properties drop-down box, and select the printer as directed by your teacher. 5. As directed by your teacher, click Print. 6. To set other print options, such as the paper
orientation or the fonts used, click Print Options.
7. iCheck. Your document should look similar to Figure 3-26.
Exercise continued on next page.
Tech Tip To save paper in this exercise, your teacher may have you print to the Adobe PDF printer. This will create a PDF copy of your print, without using paper.
Figure 3-27
Figure 3-28 Exercise 3-10
Printing Calendar and Contacts continued
8. To print your Contacts Cards, click Contacts from the Navigation pane. 9. In the Contacts view, click File>
Print.
10. In the Print dialog box, select Small Booklet Style (see Figure 3-27). 11. Click Page Setup.
12. Click Header Font. Change the Header font to Comic Sans MS Bold size 10.
13. Click OK. 14. Click OK. 15. Click Preview.
16. iCheck. Your screen should look similar to Figure 3-28.
17. Close Preview and continue to the next exercise.
Figure 3-29
Figure 3-30
Figure 3-31
Exercise 3-11 RSS Feeds
RSS is a format that enables you to receive news feeds, blogs, listings and other data. RSS (Really Simple Syndication) Feeds can be imported into Outlook to allow you to subscribe and read RSS Feeds from a variety of sources. The Feeds arrive into Outlook in folders to allow you to read them.
Step-By Step
1. In the Navigation pane, click Mail. In the Folder
pane, scroll to RSS Feeds.
2. Right-click on RSS Feeds and select Add a New RSS Feed.
3. In the dialog box, key the RSS Feed address as directed by your teacher. For this exercise, your teacher may use
http://feeds.nbclosangeles.com/nbclosangeles/ news/tech/
4. iCheck. You screen should look similar to Figure 3-30. 5. Click Add.
6. In the Mail pane, click on the new RSS Feed.
7. Open the most current Feed. You may want to share a RSS FEED with a friend or co-worker. Click on
Share This Feed on the Ribbon.
8. In the new message, select a recipient. The Subject Box is completed for you. 9. In the Message area, key: This is an
interesting article (see Figure 3-31). Click Send.
10. Close the Mail pane. Continue to the next exercise.
Figure 3-32
Figure 3-33 Figure 3-34
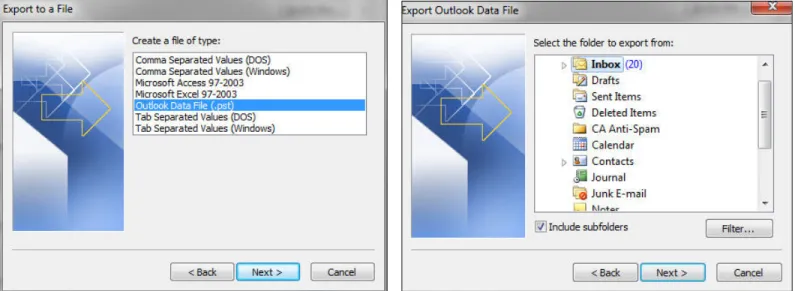
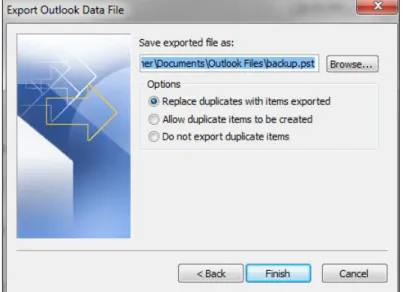
Exercise 3-12 Exporting Outlook Items
You can export contacts to a file that can then be imported into other applications, such as Web mail clients, Excel spreadsheets, or database applications. Additionally, you can make a copy of your Outlook items for safe keeping, or if you are moving to a different computer. The most common export file format is a comma separated value (CSV) file. If you are exporting contacts for use in another copy of Outlook, we recommend that you choose an Outlook Data File (.pst).
Step-By-Step
1. Click the File tab. Click Options. Click
Advanced.
2. Click the Export button, in the Import andExport Wizard, click Export to a file (see Figure 3-32). Click Next. 3. In the Export to a File dialog box, select
Outlook Data File (.pst) (see Figure 3-33). Click Next.
4. In the Export Outlook Data File dialog box, click Inbox (see Figure 3-34). Click
Next.
Figure 3-35
Exercise 3-12
Exporting Outlook Items continued
5. In the Export Outlook Data File dialog box, navigate to the folder location as directed by your teacher. You can save the file on the Desktop. In the File name box, key: your_first_initial_last_name. 6. Click OK.
7. iCheck. Your screen should look like Figure 3-35.
8. Click Finish.
Lesson 3 Concept Review
Open a Microsoft Word document to complete the Concept Review. Save the Word document as Lesson_Three_Review [your first initial last name]
Key Terms AutoArchive Bcc Cc Distribution List Exporting Folders Notes Printing
Read Receipt Reminders RSS Feeds
To
Reviewing Key Terms
Complete the following statements in your Word document. Choose from the Key Terms on the left side to complete the
statements.
1. The ____ hides the names and addresses in a sent message. 2. A (n) _____________ is a group of addresses in one group. 3. If you are getting a new computer, use ________to move your
Outlook items.
4. A (n) ________can be used as a reminder.
5. When your inbox is too full, use ___________ to move your items to another folder.
6. Key Term Activity
Working with a partner, with your teacher’s permission,
research on the Internet- E-mail Etiquette. Look for information about the use of To, Cc and Bcc and when a sender should use these features. What are the advantages and
disadvantages of using each of the fields? Write your findings in your Word document.
Reviewing Key Facts
7. If you receive a Read Receipt Request, are you required to respond?
a. Yes b. No
8. Notes are shown on the Desktop when this program is open: a. Word
b. Excel c. PowerPoint d. Outlook
9. RSS Feeds are short-hand for what term: a. Read Short Stories
b. Request Salami Sandwich c. Really Simple Syndication d. Ridiculously Silly Stories
10. A good place to save an exported Outlook folder is: a. A CD-ROM or DVD-ROM
b. A Network Drive c. A Flash Drive d. Any of the Above.
Figure 3-36 Lesson 3 Practice It Activities-1
Step-By-Step
1. Start Outlook. In the
Navigation pane, click Mail. Begin a new e-mail
message using a recipient provided by your teacher or from your Contacts Cards. 2. In the Subject box, key:
Company Picnic Invitation. 3. In the Message area, key:
The annual company picnic will be held Saturday, July 9, 2011. Please let me know if you can attend. Thank you. 4. In the Options Tab, click
Tracking, check Request a Delivery Receipt, and check Request a Read Receipt. Click the small arrow in the corner of the tracking group.
5. In the Properties dialog box, in Settings, click High. In Sensitivity click Confidential.
6. In Voting and Tracking options, check Use Voting buttons. In the Drop-down select Yes; No; Maybe.
7. In Delivery options, check Have replies sent to: key address provided by your teacher or select a name from your Contact Cards.
8. iCheck. Your screen should look similar to Figure 3-36. 9. Click Close. Click Send.
Figure 3-37
Figure 3-38
Figure 3-39 Lesson 3 Practice It Activities-2
Your supervisor has asked to you maintain, print, and e-mail a weekly department calendar. The printed copy is posted on the break-room bulletin board. The e-mail calendar is sent to all employees in the company. Step-By-Step
1. Open Outlook. In the Navigation pane, click Calendar. To create a new calendar, click Open Calendar on the Manage Calendars group, in the drop-down, select Create New Blank Calendar (see Figure 3-37).
2. In the Create New Folder dialog box, in the Name, key: Department Calendar. Click on Calendar in the Select where to place the folder (see Figure 3-38). Click OK. 3. In the Calendar Navigation pane, uncheck Calendar.
Check Department Calendar. 4. Click in the Work Week view.
5. Click the View tab. Click Time Scale. Click Change Time Zone. This will open the Calendar Options dialog box. 6. In the Work time dialog box, set the Start time for 8:00
AM, End time 5:00 PM, Work week check Mon, Tue, Wed, Thu, Fri. Click OK.
7. Using Figure 3-39 as a guide, enter activities and appointments for each day of one week in the future. Exercise continued on next page.
Figure 3-40
Figure 3-41
Figure 3-42
Lesson 3 Practice It Activities-2 continued
8. To print the Weekly Calendar. In the Calendar view, navigate to the week you have completed activities. Click File>Print>Weekly Calendar Style (see Figure 3-40).
9. iCheck. Your calendar should look similar to Figure 3-41.
10. Click Print as directed by your teacher.
11. To e-mail the weekly calendar to all employees, click in the File tab, click E-Mail Calendar on the Share group.
12. In the Send a Calendar via E-mail dialog box, in the Date Range drop-down, click specify dates. In the Start: use your start date. In the End: use your end date. Click OK.
13. In the e-mail, select the addresses provided by your teacher or use the addresses from your Contact Cards.
14. iCheck. Your screen should look similar to Figure 3-42. 15. Click Send.
Figure 3-43
Figure 3-44 Lesson 3 Practice It Activities-3
Setting Desktop Alerts and Quick Access Toolbar Step-By-Step
1. Click the File tab, click Options,
click Mail.
2. In Message Arrival, check
Display a Desktop Alert (see
Figure 3-43).
3. Click Desktop Alert Settings.
4. In the Desktop Alert Settings
dialog box, select Duration 15
seconds, Transparency 0%.
Click Preview.
5. Click OK.
6. To add buttons to the Quick
Access Toolbar, click
File>Options>Quick Access Toolbar.
7. Click Choose Commands from
drop-down box, select Popular
Commands.
8. In the left dialog box, select
Delete, Meeting, New Contact,
Save as, and click Add>> for each button. These buttons will move to the right dialog box.
9. In the right dialog box, select,
Meeting, Save as. Click Remove
<< for each button. These
buttons will move to the left dialog
box. Click OK.
10. In the Navigation pane, click
Mail. Click on the dropdown arrow in
the QAT.
11. iCheck. Your screen should look similar to Figure 3-44.
12. Close and Exit Outlook.
Message Arrival