Tivoli Storage Manager for Windows
Backup-Archive Clients Installation and
User’s Guide
Tivoli Storage Manager for Windows
Backup-Archive Clients Installation and
User’s Guide
Note
Before using this information and the product it supports, read the general information under “Notices” on page 415.
First Edition (March 2002)
This edition applies to version 5, release 1, modification 0 of Tivoli Storage Manager (5697-ISM, 5698-ISM), Tivoli Storage Manager, Enterprise Edition (5697-ISE, 5698-ISE) and to all subsequent releases and modifications until otherwise indicated in new editions.
Order publications through your Tivoli representative or the Tivoli branch office that serves your locality. Tivoli welcomes your comments. You can send us comments about this book electronically at:
Information sent grants Tivoli a nonexclusive right to use or distribute it in any way Tivoli believes appropriate, without incurring any obligation to you.
Contents
Tables . . . ix
Trademarks . . . xi
About This Book . . . xiii
Conventions Used in This Book . . . xiv
Reading Syntax Diagrams . . . xiv
Related Publications . . . xvii
Summary of Changes for Tivoli
Storage Manager . . . xix
Technical Changes for Version 5.1 - April 2002 . . xix
Chapter 1. Installing Tivoli Storage
Manager
. . . 1
Migrating from Earlier Versions . . . 1
Upgrade Path for Clients and Servers . . . 1
Changes to the Client Service Configuration Utility, Dsmcutil . . . 1
Migrating to the Unicode-Enabled Client . . . . 1
Data Protection for NDMP Version 5.1 Requirements (Enterprise Edition only) . . . . 4
Additional Migration Information . . . 4
Client Environment Requirements . . . 4
Client Components . . . 5
Hardware Requirements . . . 5
Software Requirements . . . 5
Communications Methods . . . 5
Pre-Installation Information . . . 6
Online Startup Information . . . 6
Installing the Software on Your Workstation . . . . 6
Silent Installation . . . 7
Upgrading, Modifying, or Reinstalling the Client 9
Chapter 2. Configuring Tivoli Storage
Manager . . . 11
Creating and Modifying the Client Options File (Required ) . . . 11
Registering Your Workstation with a Server (Required) . . . 13
Using Closed Registration . . . 13
Using Open Registration . . . 13
Creating an Include-Exclude List (Optional) . . . 14
Considerations for Windows NT, 2000, XP, and .NET Unicode-Enabled Clients . . . 15
Using Include-Exclude Options . . . 15
Processing Include and Exclude Options. . . . 21
Processing Rules when Using UNC Names . . . 22
Setting Environment Variables . . . 23
Creating a Shared Directory Options File (Optional) 24 Creating Multiple Options Files. . . 24
Chapter 3. Getting Started . . . 27
Considerations for NT, 2000, XP, and Windows.NET Client Services . . . 27
Permissions Required to Restore Files that Use Adaptive Subfile Backup . . . 28
Tivoli Storage Manager Client Authentication . . . 28
Starting a GUI Session . . . 29
Password and User ID. . . 29
Configuration Wizard . . . 29
Starting a Command Line Session . . . 29
Using Batch Mode . . . 30
Using Interactive Mode . . . 30
Displaying Euro Characters in Command Line Prompt . . . 30
Using Options on the DSMC Command . . . . 31
Starting a Web Client Session . . . 31
Setting User Privileges. . . 33
Installing and Using the Web Client . . . 33
Starting the Client Scheduler Automatically . . . 36
Changing Your Password . . . 36
Sorting File Lists. . . 37
Displaying Online Help . . . 37
Ending a Session . . . 37
Online Forum . . . 38
Other Sources of Online Help . . . 38
Contacting Customer Support . . . 38
Chapter 4. Backing Up Files and
Directories . . . 41
Planning Your Backups . . . 41
Do You Want to Back Up or Archive Files? . . . . 42
Backing Up Files and Directories . . . 42
Full Incremental Backup . . . 43
Incremental-By-Date Backup. . . 45
Full Incremental versus Partial Incremental, Incremental-by-dateand Journal-Based Backups . 46 Selective Backup. . . 46
Pre-Backup Considerations . . . 46
Estimating Backup Processing Time . . . 48
Backing Up Data from the GUI . . . 49
Backing Up Data from the Command Line . . . 50
Displaying Backup Processing Status . . . 52
Performing an Image Backup (Windows 2000 Only) . . . 53
LAN-Free Data Movement . . . 56
Backing Up NAS File Systems . . . 57
Backup: Additional Considerations . . . 57
Backing Up Open Files . . . 57
Backing Up Removable Media Using Labels . . 58
Backing Up Fixed Drives . . . 58
Backing Up NTFS File Spaces . . . 58
Using Universal Naming Convention Names . . 59
Backing Up Microsoft Dfs Files . . . 60
Chapter 5. Restoring Files and
Directories . . . 61
Duplicate File Names . . . 61
Restoring Files Using Universal Naming Convention Names . . . 62
Do You Want To Restore an Active or Inactive Backup? . . . 62
Restoring Data from the GUI . . . 62
Restoring System Objects . . . 63
Restoring Data from the Command Line. . . 63
Restoring Large Amounts of Data . . . 64
Restoring an Image . . . 66
Restoring Data from a Backup Set . . . 67
Performing Point-in-Time Restores. . . 69
Restore: Additional Considerations . . . 70
Authorizing Another User to Restore or Retrieve Your Files . . . 70
Restoring or Retrieving Another User’s Files . . 71
Restoring or Retrieving Your Files to Another Workstation . . . 71
Restoring or Retrieving Files to Another Type of Workstation . . . 72
Restoring a Disk in the Event of Disk Loss . . . 73
Deleting File Spaces . . . 73
Chapter 6. Archiving and Retrieving
Files . . . 75
Archiving Files . . . 76
Performing a GUI Archive . . . 76
Performing a Command Line Archive . . . . 76
Deleting Archive Data . . . 77
Retrieving Archives. . . 77
Retrieving Archives Using the GUI . . . 77
Retrieving Archives Using Commands . . . . 78
Chapter 7. Automating Tasks . . . 79
Specifying Scheduling Options . . . 79
Mobile Dial-Up Support . . . 79
Return Codes from the Command Line Interface . . 80
Starting the Client Scheduler . . . 81
Managing the Client Scheduler Using the Client Acceptor Service. . . 82
Configuring the CAD to Manage the Scheduler 82 Displaying Information about Scheduled Work . . 82
Displaying Information about Completed Work . . 83
Enabling-Disabling Scheduled Commands . . . . 84
Accessing Windows NT Network Drives . . . . 84
Chapter 8. Understanding Storage
Management Policies . . . 85
Using Policy Domains and Policy Sets . . . 85
Using Management Classes and Copy Groups . . . 85
Displaying Information about Management Classes and Copy Groups . . . 86
Copy Group Name . . . 87
Copy Type. . . 87
Copy Frequency . . . 87
Versions Data Exists . . . 88
Versions Data Deleted . . . 88
Retain Extra Versions . . . 88
Retain Only Version . . . 88
Copy Serialization . . . 88
Copy Mode . . . 89
Copy Destination . . . 89
Retain Versions . . . 89
Selecting a Management Class for Files . . . 89
Assigning a Management Class to Files . . . 90
Overriding the Management Class for Archived Files . . . 91
Selecting a Management Class for Directories . . . 91
Binding and Rebinding Management Classes to Files 92 Rebinding Backup Versions of Files . . . 92
Using a Retention Grace Period. . . 92
Chapter 9. Setting Processing Options
95
Creating and Modifying a Client Options File . . . 95Communication Options . . . 96
TCP/IP Options . . . 96
Named Pipes Option . . . 97
Node Options . . . 97
Backup and Archive Processing Options . . . 98
Restore and Retrieve Processing Options . . . . 101
Scheduling Options . . . 102
Format and Language Options . . . 103
Command Processing Options. . . 103
Authorization Options . . . 104
Error Processing Options . . . 104
Transaction Processing Options . . . 104
Web Client Options . . . 105
Setting Options in the Client Options File . . . . 105
Using Options with Commands . . . 106
Entering Options with a Command . . . 107
Client Options Reference . . . 107
Activatekey . . . 108 Autofsrename . . . 109 Backupregistry . . . 111 Changingretries. . . 112 Clusternode . . . 113 Commmethod . . . 114 Commrestartduration . . . 115 Commrestartinterval . . . 116 Compressalways . . . 117 Compression . . . 118 Dateformat . . . 120 Dfsbackupmntpnt . . . 121 Dirmc . . . 122 Domain . . . 123 Domain.image . . . 125 Domain.nas . . . 126 Editor . . . 128 Enablelanfree . . . 129 Enableserverfree . . . 130 Encryptkey . . . 132 Errorlogname . . . 133 Errorlogretention . . . 134 Exclude Options . . . 135 Guitreeviewafterbackup . . . 139 Httpport . . . 140 Httpsport. . . 141 Imagegapsize . . . 142 Imagetype . . . 143 Inclexcl . . . 144 Include Options . . . 146
Incrthreshold . . . 151 Lanfreecommmethod . . . 153 Lanfreetcpport . . . 154 Language. . . 155 Largecommbuffers. . . 156 Localbackupset . . . 157 Managedservices . . . 158 Maxcmdretries . . . 160 Memoryefficientbackup . . . 161 Namedpipename . . . 162 Nasnodename . . . 163 Nodename . . . 164 Numberformat . . . 165 Password. . . 166 Passwordaccess. . . 167 Postschedulecmd/Postnschedulecmd . . . 169 Postsnapshotcmd . . . 171 Preschedulecmd/Prenschedulecmd . . . 172 Presnapshotcmd . . . 174 Queryschedperiod . . . 175 Quiet . . . 176 Replace . . . 177 Resourceutilization . . . 179 Retryperiod . . . 181 Revokeremoteaccess . . . 182 Runasservice . . . 183 Schedcmddisabled. . . 184 Schedlogname . . . 185 Schedlogretention . . . 186 Schedmode . . . 187 Scrolllines . . . 189 Scrollprompt . . . 190 Skipntpermissions . . . 191 Skipntsecuritycrc . . . 192 Snapshotcachelocation . . . 193 Snapshotcachesize . . . 194 Snapshotfsidleretries . . . 195 Snapshotfsidlewait . . . 196 Subdir . . . 197 Subfilebackup . . . 199 Subfilecachepath . . . 200 Subfilecachesize . . . 201 Tapeprompt . . . 202 Tcpbuffsize . . . 203 Tcpclientaddress . . . 204 Tcpclientport . . . 205 Tcpnodelay . . . 206 Tcpport . . . 207 Tcpserveraddress . . . 208 Tcpwindowsize . . . 209 Timeformat . . . 210 Txnbytelimit. . . 211 Usedirectory. . . 212 Verbose . . . 213 Virtualnodename . . . 214 Webports . . . 216
Chapter 10. Using Options with
Commands . . . 219
Entering Options with a Command . . . 219
Archmc . . . 223 Class . . . 224 Deletefiles . . . 225 Description . . . 226 Detail . . . 227 Dirsonly . . . 228 Filelist . . . 229 Filesonly . . . 231 Fromdate . . . 232 Fromnode . . . 233 Fromtime. . . 234 Ifnewer . . . 235 Inactive . . . 236 Incrbydate . . . 237 Incremental . . . 238 Latest . . . 239 Location . . . 240 Mode . . . 241 Monitor . . . 242 Nojournal . . . 243 Noprompt . . . 244 Optfile . . . 245 Pick . . . 246 Pitdate . . . 247 Pittime . . . 248 Preservepath . . . 249 Todate. . . 252 Totime. . . 253 Type . . . 254 V2archive . . . 255
Chapter 11. Using Commands . . . . 257
Starting and Ending a Client Command Session 260 Process Commands in Batch Mode . . . 261
Process Commands in Interactive Mode . . . 261
Entering Client Commands . . . 261
Command Name . . . 261
Options . . . 262
Parameters . . . 262
File Specification Syntax . . . 262
Maximum File Size for Operations . . . 263
Remembering Previous Commands . . . 263
Using Wildcard Characters . . . 264
Entering Commands . . . 264
Client Commands Reference . . . 265
Archive . . . 266 Backup Activedirectory . . . 267 Backup Certserverdb . . . 268 Backup Clusterdb . . . 269 Backup Complusdb . . . 270 Backup Eventlog . . . 271 Backup FRS . . . 273 Backup Image . . . 274 Backup NAS . . . 279 Backup Registry . . . 281 Backup RSM . . . 284 Backup Sysfiles . . . 286 Backup Systemobject . . . 287 Backup Sysvol . . . 288 Backup WMI . . . 289 Cancel Process . . . 290
Cancel Restore . . . 291 Delete Access . . . 292 Delete Archive . . . 293 Delete Filespace . . . 295 Expire . . . 297 Help . . . 298 Incremental . . . 299 Loop . . . 304 Macro . . . 305 Monitor Process . . . 306 Query Access . . . 307 Query Activedirectory . . . 308 Query Archive . . . 309 Query Backup . . . 311 Query Backupset . . . 313 Query Certserverdb . . . 314 Query Clusterdb . . . 315 Query Complusdb. . . 316 Query Diskinfo . . . 317 Query Eventlog . . . 318 Query Filespace . . . 319 Query FRS . . . 321 Query Image . . . 322 Query Inclexcl . . . 323 Query Mgmtclass . . . 324 Query Node . . . 325 Query Registry . . . 326 Query Restore . . . 327 Query RSM . . . 328 Query Schedule . . . 329 Query Session . . . 330 Query Sysfiles . . . 331 Query Systemobject . . . 332 Query Sysvol . . . 333 Query WMI . . . 334 Restart Restore . . . 335 Restore . . . 336 Restore Activedirectory . . . 341 Restore Backupset . . . 342 Restore Certserverdb . . . 345 Restore Clusterdb . . . 346 Restore Complusdb . . . 347 Restore Eventlog . . . 348 Restore FRS . . . 350 Restore Image . . . 351 Restore NAS . . . 353 Restore Registry . . . 355 Restore RSM . . . 358 Restore Sysfiles . . . 359 Restore Systemobject . . . 360 Restore Sysvol . . . 361 Restore WMI . . . 362 Retrieve . . . 363 Schedule . . . 367 Selective . . . 368 Set Access . . . 370 Set Password . . . 372
Appendix A. Backing Up NAS File
Systems Using NDMP. . . 373
Backing up NAS File Systems using the Web Client GUI . . . 374
Performing a Command Line Backup . . . 375
Restoring NAS File Systems . . . 376
Appendix B. SAN-Based Server-Free
Image Backup . . . 379
Server-Free Prerequisites . . . 379
Enabling Server-Free Data Movement . . . 379
Appendix C. Using the Client Service
Configuration Utility (Windows NT,
2000, XP, Windows.NET). . . 381
Installing the Backup-Archive Scheduler Service 381 Using the Client Service Configuration Utility 381 Using the Dsmcutil Command . . . 385
Dsmcutil Commands . . . 385
Dsmcutil Options . . . 392
Appendix D. Journal Service
Configuration . . . 397
JournalSettings Stanza . . . 397 JournalExcludeList Stanza . . . 398 JournaledFileSystemSettings Stanza . . . 399 PreserveDbOnExit Setting . . . 400 deferFSMonStart Setting . . . 401 deferRetryInterval Setting . . . 401 logFSErrors Setting . . . 401 Overriding Stanzas . . . 402Appendix E. Web Client Secure
Socket Layer
. . . 403
Configuring SSL Communications . . . 403
Creating a Key Pair . . . 403
Requesting a Certificate . . . 403
Receiving the Certificate into the Key Ring . . 404
Configuring Web Client for SSL . . . 404
Appendix F. Configuring the
Backup-Archive Client in a Microsoft
Cluster Server Environment . . . 407
Installing the Backup-Archive Client on the Cluster Nodes . . . 407
Configuring the Backup-Archive Client to Process Local Nodes . . . 407
Configuring the Backup-Archive Client to Process Cluster Disk Resources . . . 408
Step 1: Identify the Cluster Groups to Manage 408 Step 2: Configure the Client Options File . . . 408
Step 3: Configure the Scheduler Service . . . 409
Step 4: Creating A Generic Service Resource For Failover . . . 409
Configuring the Web Client in a MSCS Environment . . . 410
Configuring the Web Client To Process Cluster Disk Resources . . . 410
Tables
1. Typographical Conventions . . . xiv
2. Tivoli Storage Manager Client Publications xvii 3. Tivoli Storage Manager Server Quick Start Publications . . . 10
4. Option for Excluding Directories . . . 15
5. Options for Controlling Backup, Archive, Image, and System Object Processing . . . . 16
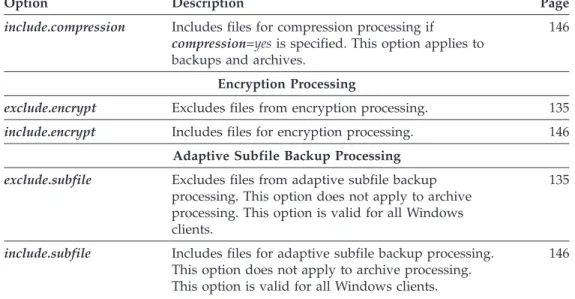
6. Options for Controlling Compression, Encryption, and Subfile Processing . . . 17
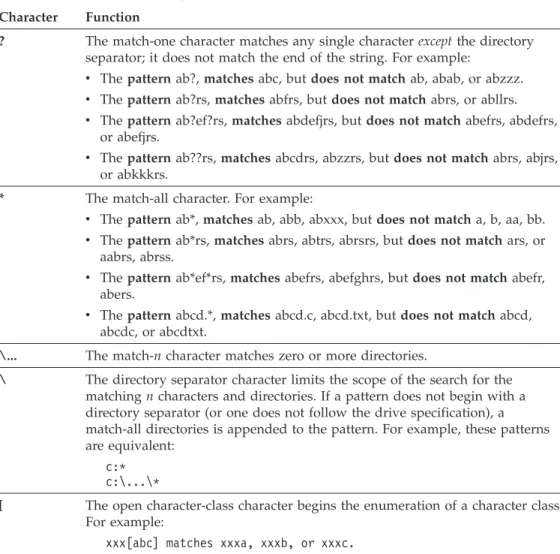
7. Wildcard and Other Special Characters 19 8. Using Wildcard Characters with Include and Exclude Patterns . . . 20
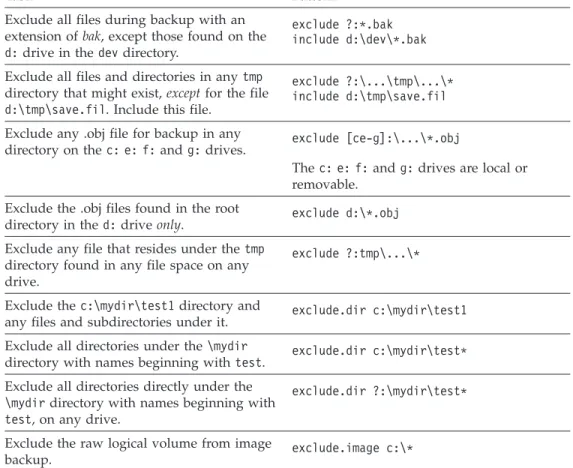
9. Using UNC Names with Include and Exclude Patterns . . . 23
10. Backing Up Files and Directories . . . 41
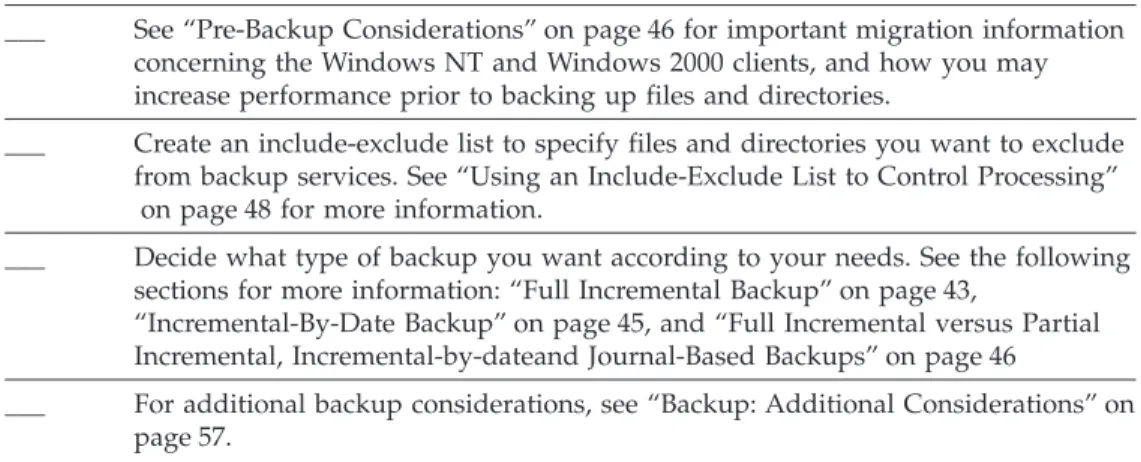
11. Preliminary Steps for Backing Up Files 41 12. UNC examples . . . 60
13. Restoring Files and Directories . . . 61
14. Archiving and Retrieving Files . . . 75
15. Return Codes and Meanings . . . 80
16. Default Values in the Standard Management Class . . . 87
17. TCP/IP Options . . . 96
18. Named Pipes Communication Option . . . . 97
19. Node Options . . . 97
20. Backup and Archive Processing Options 98 21. Restore and Retrieve Processing Options 101 22. Scheduling Options . . . 102
23. Format and Language Options . . . 103
24. Command Processing Options . . . 103
25. Authorization Options . . . 104
26. Error Processing Options. . . 104
27. Transaction Processing Options . . . 104
28. Web Client Options . . . 105
29. Client Command Options . . . 219
30. Entering Commands . . . 257
31. Commands . . . 257
32. Maximum File Size for Backup, Restore, Archive, and Retrieve . . . 263
33. Command Recall and Edit Functions 263 34. Wildcard Characters . . . 264
35. NAS Options and Commands . . . 375
Trademarks
The following terms are trademarks of the IBM Corporation in the United States or other countries or both:
AIX IBM IBMLink OS/390 RACF RISC System/6000 RS/6000 Scalable POWERparallel SP2 S/390 System/390 VisualAge z/OS
UNIX is a registered trademark of The Open Group in the United States and other countries.
Microsoft, Windows, Windows NT, Windows 2000, Windows XP, Windows .NET, and the Windows logo are trademarks of Microsoft Corporation in the United States, other countries, or both.
Jaz and Zip are trademarks or registered trademarks of Iomega Corporation in the United States, other countries, or both.
Java and all Java-based trademarks and logos are trademarks or registered
trademarks of Sun Microsystems, Inc. in the United States, other countries, or both. Tivoli is a trademark of International Business Machines Corporation. in the United States, or other countries, or both.
Other company, product, and service names may be trademarks or service marks of others.
About This Book
IBM Tivoli Storage Manager is a client-server licensed product that provides storage management services in a multi-platform computer environment. The backup-archive client program permits users to back up and archive files from their workstations or file servers to storage, and restore and retrieve backup versions and archived copies of files to their local file systems.
In addition to the backup-archive client, Tivoli Storage Manager includes the following components available on a variety of platforms:
v A server program that permits systems to perform as a backup and archive server for distributed workstations and file servers.
v An administrative client program that you can access from a Web browser or the command line. The program permits an administrator to control and monitor server activities, define storage management policies for backup, archive and space management services, and set up schedules to perform those services at regular intervals.
v An application program interface (API) that permits you to enhance an existing application with storage management services. When an application is registered with a server as a client node, the application can back up, restore, archive, and retrieve objects from storage.
v On Windows platforms, an ODBC driver is available that allows you to use a relational database product such as Lotus Approach to query the database and display the results.
v A Web backup-archive client that permits an authorized administrator, help desk person, or end user to perform backup, restore, archive, and retrieve services using a Web browser on a remote machine.
Unless otherwise specified:
v References to Windows NT also include Windows 2000
v References to Windows 2000 also include Windows XP
v References to Windows XP also include Windows.NET
v References to Windows refer to Windows Me, Windows 2000, Windows XP, and Windows.NET clients.
This book explains how to install the Tivoli Storage Manager clients and how to perform initial setup tasks. For information about installation and levels of operating systems that are supported, refer to the installation chapter for your client. For information about environment variables, refer to the environment variables section for your client.
This book provides information to help you set up and use the backup-archive client on your workstation. You should be familiar with your workstation, your operating system, and your basic system administration.
Tivoli Storage Manager books are translated into other languages. Contact your Tivoli Storage Manager representative for a list of available translations.
Conventions Used in This Book
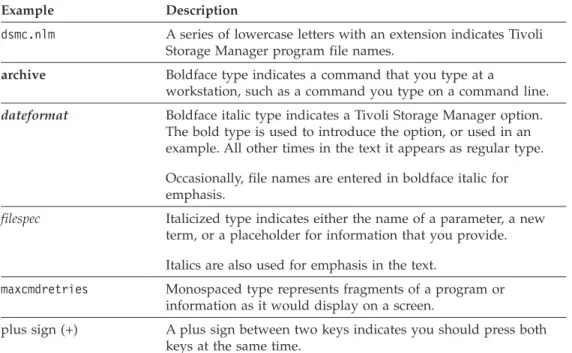
This book uses the following typographical conventions:
Table 1. Typographical Conventions
Example Description
dsmc.nlm A series of lowercase letters with an extension indicates Tivoli Storage Manager program file names.
archive Boldface type indicates a command that you type at a
workstation, such as a command you type on a command line. dateformat Boldface italic type indicates a Tivoli Storage Manager option.
The bold type is used to introduce the option, or used in an example. All other times in the text it appears as regular type. Occasionally, file names are entered in boldface italic for emphasis.
filespec Italicized type indicates either the name of a parameter, a new term, or a placeholder for information that you provide. Italics are also used for emphasis in the text.
maxcmdretries Monospaced type represents fragments of a program or information as it would display on a screen.
plus sign (+) A plus sign between two keys indicates you should press both keys at the same time.
Reading Syntax Diagrams
This section describes how to read the syntax diagrams used in this manual. To read a syntax diagram, follow the path of the line. Read from left to right, and top to bottom.
v The───symbol indicates the beginning of a syntax diagram.
v The───symbol at the end of a line indicates the syntax diagram continues on the next line.
v The───symbol at the beginning of a line indicates a syntax diagram continues from the previous line.
v The───symbol indicates the end of a syntax diagram. Syntax items, such as a keyword or variable, can be:
v On the line (required element)
v Above the line (default element)
Syntax Diagram Description Example Abbreviations:
Uppercase letters denote the shortest acceptable truncation. If an item appears entirely in uppercase letters, it cannot be truncated.
You can type the item in any combination of uppercase or lowercase letters.
In this example, you can enter KEYWO, KEYWORD, or KEYWOrd.
KEYWOrd
Symbols:
Enter these symbols exactly as they appear in the syntax diagram.
* Asterisk { } Braces : Colon , Comma = Equal Sign - Hyphen () Parentheses . Period Space Variables:
Italicized lowercase items (var_name) denote variables.
In this example, you can specify a var_name when you enter the KEYWORD command.
KEYWOrd var_name
Repetition:
An arrow returning to the left means you can repeat the item.
A character or space within the arrow means you must separate repeated items with that character or space.
A footnote by the arrow references the number of times you can repeat the item.
repeat , repeat (1) repeat Notes:
Syntax Diagram Description Example Required Choices:
When two or more items are in a stack and one of them is on the line, you must specify one item.
In this example, you must choose A, B, or C.
A
B C
Optional Choice:
When an item is below the line, that item is optional. In the first example, you can choose A or nothing at all.
When two or more items are in a stack below the line, all of them are optional. In the second example, you can choose A, B, C, or nothing at all. A A B C Defaults:
Defaults are above the line. The default is selected unless you override it. You can override the default by including an option from the stack below the line.
In this example, A is the default. You can override A by choosing B or C. You can also specify the default explicitly.
A
B C
Repeatable Choices:
A stack of items followed by an arrow returning to the left means you can select more than one item or, in some cases, repeat a single item.
In this example, you can choose any combination of A, B, or C.
A B C
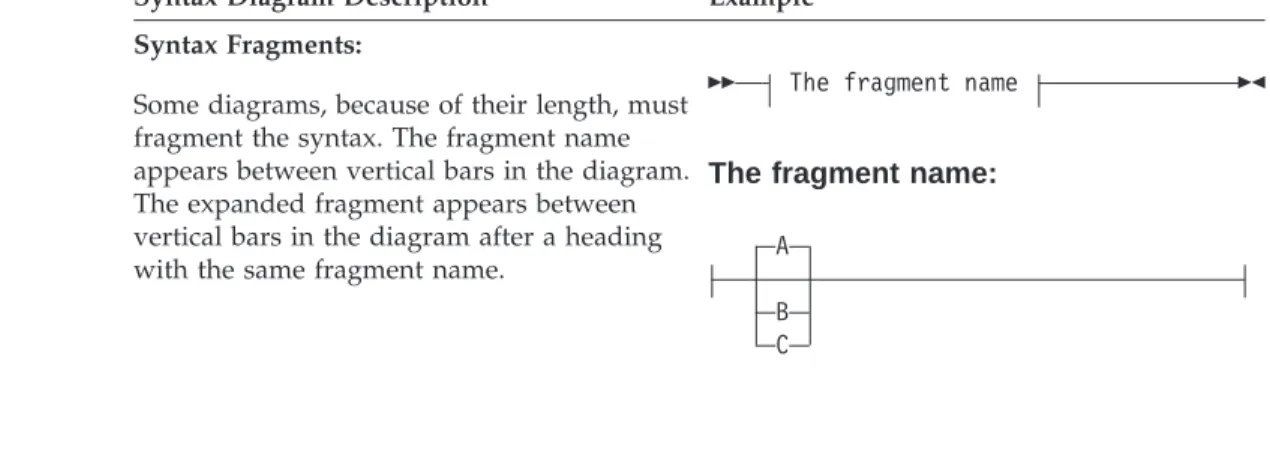
Syntax Diagram Description Example Syntax Fragments:
Some diagrams, because of their length, must fragment the syntax. The fragment name appears between vertical bars in the diagram. The expanded fragment appears between vertical bars in the diagram after a heading with the same fragment name.
The fragment name
The fragment name:
A B C
Related Publications
Included here is a list of the publications that are referred to in this manual.
Table 2. Tivoli Storage Manager Client Publications
Publication Title Order Number
Tivoli Storage Manager Messages GC32-0767
Tivoli Storage Manager for NetWare Backup-Archive Client Installation and User’s Guide
GC32-0786
Tivoli Storage Manager for UNIX Backup-Archive Clients Installation and User’s Guide
GC32-0789
Tivoli Storage Manager for Macintosh Backup-Archive Client Installation and User’s Guide
GC32-0787
Tivoli Space Manager for Unix Using the Hierarchical Storage Management Clients
GC32-0794
Tivoli Storage Manager for Windows Managed System for SAN Storage Agent User’s Guide
GC32-0785
Tivoli Storage Manager Using the Application Programming Interface GC32-0793
Tivoli Storage Manager for AIX Administrator’s Guide GC32-0768
Tivoli Storage Manager for Sun Solaris Administrator’s Guide GC32-0778
Tivoli Storage Manager for Windows Administrator’s Guide GC32-0782
Tivoli Storage Manager for AIX Quick Start GC32-0770
Tivoli Storage Manager for HP-UX Quick Start GC32-0774
Tivoli Storage Manager for OS/390 and z/OS Quick Start GC32-0777
Tivoli Storage Manager for Sun Solaris Quick Start GC32-0780
Tivoli Storage Manager for Windows Quick Start GC32-0784
The Tivoli Storage Manager publications are available on the following CD-ROM: Tivoli Storage Manager Publications Version 5.1, SK3T-8176
Tivoli Storage Manager publications are available in softcopy at the following Web page:
The IBM International Technical Support Center redbooks are available in softcopy on the IBM Redbooks Web site at the following Web page:
http://www.redbooks.ibm.com
You can order hardcopies of all our publications from the IBM Direct Publications Catalog Web site at the following Web page:
Summary of Changes for Tivoli Storage Manager
This section summarizes changes made to the Tivoli Storage Manager product and this publication.
Technical Changes for Version 5.1 - April 2002
Following is a summary of changes since Tivoli Storage Manager Version 4.2:
Support for Cyclical Redundancy Checking (CRC)
Tivoli Storage Manager supports cyclical redundancy checking (CRC) to verify that data is not being corrupted in transfer during a backup or restore session.
Support for Processing Network Attached Storage (NAS) File System Images
Tivoli Storage Manager supports backup and restore of network attached storage (NAS) file system images to tape drives or libraries that are locally attached to NAS file servers. Data Protection for NDMP enables backup and restore support on the Tivoli Storage Manager Windows NT, 2000, XP, and Windows.NET, AIX, and Solaris servers for NAS file servers from Network Appliance. Data Protection for NDMP is available only with IBM Tivoli Storage Manager Enterprise Edition. See “Data Protection for NDMP Version 5.1 Requirements (Enterprise Edition only)” on page 4 for Data Protection for NDMP requirements. See Appendix A, “Backing Up NAS File Systems Using NDMP” on page 373 for information on how to back up and restore NAS file system images using the Web client and command line client.
Support for Logical Volume Backup as a Single Object (Image Backup) on Windows 2000 Client
The Windows 2000 client is enhanced to support a logical volume image backup of file systems and raw volumes. You can use the native GUI, the command line interface, and the Web client GUI to create an image of file systems and raw logical volumes on the Tivoli Storage Manager server. NTFS and FAT32 file systems are supported. The Tivoli Storage Manager server does not track individual files in the file system image. File system images are tracked as individual objects and management class policy will be applied to the file system image as a whole. See “Performing an Image Backup (Windows 2000 Only)” on page 53 for more information.
Support for Online Image Backup of File Systems and Raw Logical Volumes on Windows 2000 Client
The traditional offline image backup prevents access to the volume by other system applications during the operation. For Windows 2000 only: If the Logical Volume Snapshot Agent (LVSA) is installed and configured, Tivoli Storage Manager performs an online image backup, during which the volume is available to other system applications. See “Performing an Image Backup (Windows 2000 Only)” on page 53 for more information.
Support for SAN-Based Server-Free Data Movement
The Windows 2000 client supports SAN-based server-free data movement that off-loads data movement processing from the client and server processor and from the LAN during image backup and restore operations. Data is transferred directly between client disks and SAN-attached storage
devices by a third-party copy function initiated by the Tivoli Storage Manager server. See “Enableserverfree” on page 130 for more information.
Enhanced Web Client Interface
The Web client interface is enhanced to support a JRE 1.3.1 Swing-enabled browser. The Web client facilitates the use of assistive devices for users with disabilities and contains improved keyboard navigation. The native look and feel of the platform running the browser is preserved. See “Starting a Web Client Session” on page 31 for more information.
Multiple Session No Query Restore
The backup-archive clients can now utilize multiple restore sessions for no query restore operations, increasing the speed of restores. This is similar to the multiple backup session support. It exploits the mount point available on the server. If data is backed up on multiple tapes, and if the server has multiple mount points available, then the restore starts a session for each tape, up to the number your administrator configures. See
“Resourceutilization” on page 179 for more information.
Consistent Client Return Codes
Reliable, consistent, and documented return codes have been added to the command line client and the scheduler. This facilitates automation of client operations via user-written scripts. By using the QUERY EVENT command with the FORMAT=DETAILED option, administrators can now distinguish between scheduled backups that completed successfully with no skipped files and scheduled backups that completed successfully with one or more skipped files. Also if you use the processing optionpreschedulecmd to run a command, and that command returns a non-zero return code, the scheduled event will not run. This ensures that scheduled events will not run if prerequisite commands do not complete successfully. See “Return Codes from the Command Line Interface” on page 80,
“Preschedulecmd/Prenschedulecmd” on page 172, and
Chapter 1. Installing Tivoli Storage Manager
The Tivoli Storage Manager backup-archive client helps you protect information on your workstation. Using Tivoli Storage Manager, you can maintain backup versions of your workstation files that you can restore if the original files are damaged or lost. You can also archive workstation files that you do not currently need, preserve them in their current state, and retrieve them when necessary. You can access Tivoli Storage Manager backup and archive features:
v Locally through the native Graphical User Interface (GUI)
v Locally through the native client command line interface
v Remotely or locally through the Web client interface
Migrating from Earlier Versions
Upgrade Path for Clients and Servers
As part of a migration plan from Tivoli Storage Manager version 4.2 to Tivoli Storage Manager version 5.1, Tivoli Storage Manager clients and servers may be upgraded at different times. To help ensure that you can continue your backup and archive activities during the migration, note the following:
v A Tivoli Storage Manager version 4.2 client can perform backup, restore, archive, and retrieve functions to a Tivoli Storage Manager version 5.1 server.
v A Tivoli Storage Manager version 5.1 client can perform backup, restore, archive, retrieve, and query functions to a Tivoli Storage Manager version 4.2 server.
v Data that has been backed up or archived from a Tivoli Storage Manager version 5.1 client to any Tivoli Storage Manager server cannot be restored or retrieved using a Tivoli Storage Manager version 4.2.1 or lower level client.
v All command line administrative clients can administer Tivoli Storage Manager version 4.2 and version 5.1 servers.
v Storage agents and servers must be at the same level of code. When the server is upgraded, the storage agents which are using that particular server must be upgraded as well.
Changes to the Client Service Configuration Utility, Dsmcutil
The following are changes to the Tivoli Storage Manager Client Service Configuration Utility, dsmcutil:
v Beginning with Tivoli Storage Manager version 4.2, dsmcutil supports the configuration of the journal-based backup service.
v The dsmcutil /group option is renamed to /clustername. The /group option continues to work for this release; however, we recommend that you use
/clusternameto ensure future compatibility.
v Tivoli Storage Manager no longer supports the SHOWPW dsmcutil command due to enhanced authentication.
Migrating to the Unicode-Enabled Client
Unicode is a universal character encoding standard that supports the interchange, processing, and display of text that is written in any of the languages of the modern world. Unicode-enabled file spaces provide support for multi-lingual workstations without regard for the current locale. Beginning with Tivoli Storage
Manager version 4.2, the Windows NT, 2000, XP, and .NET clients are Unicode enabled. The Windows NT, 2000, XP, and .NET clients support the Unicode code page for file, directory, and file space names. Unicode is not supported on the Windows Me client.
Benefits of Using the Unicode-Enabled Client
v If you back up or archive objects with a Unicode-enabled client, you can restore or retrieve these objects with a Unicode-enabled client in any other supported language environment. For example, a Japanese Unicode-enabled client can restore files backed up by German Unicode-enabled client.
v The Unicode-enabled client is cross language, meaning that it works with files using different code pages. The Unicode-enabled client can handle a mixture of files from different code pages or locales in the same file space.
v Without the support for storing Unicode-enabled file spaces, some earlier Windows NT and Windows 2000 clients have experienced backup failures. This occurs when file spaces contain names of directories or files in multiple
languages or have names that cannot be converted to the client’s current code page.
How to Migrate to the Unicode-Enabled Client
To migrate to the Windows NT, 2000 version 4.2 client, the server must be a version 4.2.0 or later level server. New clients storing data on the server for the first time require no special set up. In this case, the server automatically stores data in Unicode-enabled file spaces. However, if your client already stores data on the server, you need to plan for the migration of your file spaces to Unicode-enabled file spaces. This involves renaming your file spaces on the server and creating new Unicode-enabled file spaces on the server using the autofsrename option. For detailed information about this option, see “Autofsrename” on page 109.
The administrator can specify three possible values using the server autofsrename option: yes, no, orclient. Note that the server setting for this option overrides the setting on the client.
v If the server specifiesno, the existing file spaces for your node are not renamed or Unicode enabled, even though the Windows NT, 2000 client is installed.
v If the server specifiesyes, and the client performs an incremental backup with
domain=all-local, all file spaces specified in the current operation that are not Unicode enabled are renamed. The Windows NT, 2000 client then creates new Unicode-enabled file spaces.
If the client performs a selective backup, only the file spaces you specify in the current operation are renamed and Unicode enabled.
v If the server specifiesclient, the client can set the autofsrename option in the client options file (dsm.opt) toprompt,yes, orno. If the client sets the option to
no, the file spaces that are not Unicode enabled are not renamed and are not Unicode enabled. If the client specifies prompt, the client prompts you whether to rename file spaces. The client prompts you only once to rename a particular file space.
Optionally, your administrator can rename the file spaces on the server that are not Unicode enabled.
For options and results when using the autofsrename option, see the table below.
Server Option Client Option Result
Server Option Client Option Result
No Prompt, Yes, No Not Renamed
Client No Not Renamed
Client Yes Renamed
Client Prompt Based on User Response
For detailed information about the autofsrename option, see “Autofsrename” on page 109. For additional migration information, see Tivoli Storage Manager for Windows Administrator’s Guide. For additional information about working with the Windows NT and 2000 clients, see:
v “Considerations for Windows NT, 2000, XP, and .NET Unicode-Enabled Clients” on page 15
v “Archive” on page 266
v “Detail” on page 227
v “Incremental” on page 299
v “Query Filespace” on page 319
v “Restore” on page 336
v “Retrieve” on page 363
v “Selective” on page 368
Considerations for Migrating to the Unicode-Enabled Client
When migrating to the Tivoli Storage Manager Windows NT, 2000, XP, or .NET client, please consider the following:
1. To support Unicode functionality, Windows NT, 2000 clients must connect to a version 4.2 server. See Tivoli Storage Manager Installing the Clients, SH26-4119, for further environment and installation information.
2. Ensure that you install the fonts for the languages you want to display. If you do not have the necessary fonts installed, the file names and archive
descriptions may not display properly. However, the Windows NT, 2000, XP, and .NET clients can still back up, restore, archive, and retrieve the files and directories.
3. The Unicode-enabled version of a renamed file space name may be
unreadable if the server cannot display the Unicode name. In this case, use the file space identifier (fsID) of the file space to identify these file spaces on the server. Use the query filespace command with the detail option to display the fsID of a file space. The file information dialog in the native and Web client GUIs also displays the fsID.
4. After installing the V.4.2 Windows NT, 2000, XP, or .NET clients, we
recommend that you perform a full incremental backup to rename all existing file spaces that are not Unicode enabled and back up the files and directories within them under the new Unicode-enabled file spaces.
5. Renamed file spaces remain on the server and managed as stabilized file spaces. These file spaces contain all the original data, which can still be restored until the file spaces are deleted. You can find additional information in the Tivoli Storage Manager for Windows Administrator’s Guide.
6. The server stores information about each node, and once a node logs onto the server using a Windows NT, 2000, XP, .NET client, it cannot log on with a client that does not support Unicode. The server allows only a Windows NT, 2000, XP, .NET client to restore files from a Unicode-enabled file space.
7. When backing up files to a file space that is not Unicode enabled, the
Windows NT, 2000 client skips the files and directories with names containing characters from a code page other than the current locale.
8. If files and directories with names containing characters from a code page other than the current locale were previously backed up with a client that was not Unicode enabled, Tivoli Storage Manager will expire them in the file space that is not Unicode enabled. However, the Windows NT, 2000 client can back up or archive these files to a Unicode-enabled file space.
9. When migrating from a client that is not Unicode enabled to a Unicode Client, filenames with double-byte characters mixed with single-byte characters may be restored in mixed single-byte character set (SBCS) format. This is only a display issue.
10. When a client performs a selective backup of an object and the original file space is renamed, the new Unicode-enabled file space contains only that object. Tivoli Storage Manager will back up all other directories and file spaces during the next full incremental backup.
Data Protection for NDMP Version 5.1 Requirements
(Enterprise Edition only)
Tivoli Storage Manager Enterprise Edition supports backup and restore of network attached storage (NAS) file system images to tape drives or libraries that are locally attached to NAS file servers. Data Protection for NDMP enables backup and restore support on the Tivoli Storage Manager client for Windows NT, 2000, XP, and Windows.NET servers for NAS file servers from Network Appliance. Data Protection for NDMP is available only on IBM Tivoli Storage Manager Enterprise Edition. Data Protection for NDMP requires the following hardware and software:
v Tivoli Storage Manager Version 5.1 server on Windows NT, 2000, XP, .NET, AIX, Sun Solaris, and HP-UX.
v Tivoli Storage Manager Version 5.1 client on Windows NT, 2000, XP, and .NET.
v Network Appliance NAS file server. For supported models and operating systems, refer to:
www.tivoli.com/storage
v Tape drive and tape library. For supported combinations, refer to:
www.tivoli.com/storage
See Appendix A, “Backing Up NAS File Systems Using NDMP” on page 373 for further information, including how to back up and restore NAS file system images using the Web client and command line client.
Additional Migration Information
When you install the Web client, you must install the backup-archive client for the language you want to use.
A command line administrative client is available on all client platforms. The primary intended interface to the server is the Web administrative interface and requires a Web browser. The Web administrative interface is packaged and installed with the server.
Client Environment Requirements
This section contains client environment information, Tivoli Storage Manager client components, and hardware and software requirements for the Windows Me, NT, 2000, XP, and Windows.NET platforms.
Attention
For current information concerning the client environment prerequisites for all Tivoli Storage Manager supported client platforms refer to theREADMEfile that is shipped on the product installation media.
Client Components
v Backup-archive client command line and GUI
v Administrative client command line
v Tivoli Storage Manager API
v Web backup-archive client GUI
v Open Database Connectivity (ODBC) driver
Note: The ODBC driver is installed via a separate package. Please refer to the ODBCINST.TXT file for installation instructions. This file is available in the Tivoli Storage Manager ODBC Driver install package.
Hardware Requirements
v An Intel-based 80486 processor or Pentium-based processor (64-bit windows platform require an Itanium-based processor supporting the ACPI 2.0 64-bit fixed tables )
v Disk space: see the README file that is shipped on the product installation media
v Memory: 32 MB
The online installation instructions display how much space is required for the selected installation options, and how much space is available on the hard disk.
Software Requirements
Windows Me, Windows NT Version 4.0 (SP3, SP4, SP5, SP6, or SP6a), Windows 2000 Professional, Windows 2000 Server, Windows 2000 Advanced Server,
Windows 2000 Datacenter Server, Windows XP Professional (32 bit), Windows XP Professional (64 bit), Windows.Net Standard Server (32 bit), Windows.Net Standard Server (64 bit), Windows.Net Enterprise Server (32 bit), Windows.Net Enterprise Server (64 bit), Windows.Net Datacenter (32 bit), and Windows.Net Datacenter (64 bit)
Note: If you are deploying Active Directory using Windows 2000
Server/Advanced Server/Datacenter, then we recommend installing Service Pack 2. Service Pack 2 is also required for Windows 2000 machines using a Spanish or Italian language environment.
Communications Methods
To use thiscommunication
method: Install this software:
To connect to these Tivoli Storage Manager servers: TCP/IP TCP/IP (Standard with all supported
Windows platforms)
AIX, HP-UX, VM, z/OS, OS/390, Solaris, Windows NT Named Pipes Named Pipes (Standard with Windows NT
and Windows 2000)
Pre-Installation Information
The Tivoli Storage Manager Windows client is included on the desktop client installation CD-ROM in thesetup directory structure.
You can install the clients using any of the following methods:
v Install directly from the CD-ROM.
v Create client images to install.
v Transfer installable files from the CD-ROM to a target workstation. You can copy all of the clients to your server workstation so that client
workstations can get the files from thex:\tsmcli directory. A sample command for Windows is:
xcopy h:\setup\*.* x:\ /s
Note: All of the examples in this chapter use the h drive as the CD-ROM or mounted drive. Substitute h with the CD-ROM drive of your system.
Online Startup Information
You can display online startup information, product manuals, and readmes. On a Web browser:
1. Click File and then click Open File.
2. Select the CD-ROM drive.
3. Select the START.HTM file.
Installing the Software on Your Workstation
Attention
For current installation information, refer to theREADMEfile that is shipped on the product installation media.
Follow these steps to install the software on your Windows Me, NT, 2000, XP, or Windows.NET workstations.
1. Insert the CD-ROM that contains the Tivoli Storage Manager Windows client into your CD-ROM drive. If you have autorun enabled, the installation dialog should start when the CD loads. If the installation dialog does not start
automatically, you can start it manually. Select Run from the Start menu and at the prompt, type:
x:\setupwherex is your CD-ROM drive and click OK.
2. Follow the instructions displayed on the screen.
Note: If files from a previous version are in the installation directory, the installer will replace them. If you want to save the older version’s files, copy them to another directory before you install the new version.
Installation Setup Types:
There are two setup types:
v Choosing Typical installs the minimum necessary to provide normal backup and archive functions. This includes the Backup-Archive Client, the API Runtime files, and the Web Client.
Note: Use the Custom setup type to install the Administrative Client Command Line or support for additional languages.
v Choosing Custom takes you to the Custom Setup window. From this window, you can click on any program feature icon to modify that feature. You can select from the following program features: – Backup-Archive Client
– Backup-Archive Web Client – Client API Runtime Files – Client API SDK Files
– Administrative Client Command Line – Online Information
– Language Support
Notes:
a. The Backup-Archive Client, the API, and the Web Client are interdependent. If you select the Backup-Archive Client, you must also select the API. Similarly, if you select the Web client, you must also select the Backup-Archive Client and the API.
b. The Backup-Archive Client component includes the client
scheduler files. See “Starting the Client Scheduler” on page 81 for more information about the client scheduler.
c. The installer displays the exact amount of disk space that is required for each program feature. Make sure that there is enough disk space on the destination drive for the files you have chosen to install. The installation program will not install to a destination drive with insufficient disk space.
d. If necessary, install support files for your communication method.
3. Click Finish when installation completes.
Notes:
1. If you do not have a dsm.opt file, a setup wizard will launch automatically to help you configure an initial options file. See “Creating and Modifying the Client Options File (Required )” on page 11 for detailed information about configuring an initial options file.
2. If you installed the Web client, see “Starting a Web Client Session” on page 31 for configuration information.
3. Beginning with Version 4.1, the installer no longer installs the response file SETUP.ISS. If you are new to Tivoli Storage Manager, this is not important to you.
For more information on using the ODBC driver and the Administrative client, see Tivoli Storage Manager for Windows Administrator’s Guide, GC32-0782.
Silent Installation
Note: Beginning with Tivoli Storage Manager Version 4.1, the response file SETUP.ISS is no longer installed.
If you are doing a large number of installs, you might want to perform an
unattended or silent install. You can use the following command to silently install the backup archive client from the command line. By placing an appropriate version of this command in a batch script, you can easily perform an identical installation on multiple Windows client workstations. You must enter the command on one line.
msiexec /i
"Z:\tsm_images\TSM_BA_Client\baclient\Tivoli Storage Manager Client.msi" RebootYesNo="No" REBOOT="Suppress" ALLUSERS=1
INSTALLDIR="d:\program files\tivoli\tsm"
ADDLOCAL="BackupArchiveGUI,BackupArchiveWeb,ApiRuntime, AdministrativeCmd,Online_Client_Readmes" TRANSFORMS=1033.mst /qn /l*v "c:\log.txt"
The command and its parameters are as follows:
/i Installs the specified source package (replace with/xto uninstall the package).
″Z:\tsm_images\TSM_BA_Client\baclient\Tivoli Storage Manager Client.msi″
This is the complete path to the source package. Z: is the CD-ROM or network drive containing the installation image.
RebootYesNo=″No″REBOOT=″Suppress″
This specifies not to perform a reboot.
ALLUSERS=1
Specifies that the package is for all users. (required)
INSTALLDIR=″d:\program files\tivoli\tsm″
Specifies the destination path. If you have already installed this product or a previous version of this product on your workstation, then you should use the current installation directory as the destination path for this package.
ADDLOCAL=″BackupArchiveGUI,BackupArchiveWeb,ApiRuntime, AdministrativeCmd,Online_Client_Readmes″
Specifies the features to install. Specify all the components on a single line within quotes, separated by commas, with no spaces before or after the commas. The following backup-archive features are available:
Client Features Feature Description
BackupArchiveGUI Graphical User Interface BackupArchiveWeb Backup-archive Web client
ApiRuntime API Runtimes
ApiSdk API SDK
AdministrativeCmd Administrative Command Line Online_Client_Readmes Client Readmes and HTMLHelp Book
BooksPdf PDF Book
BackupArchiveGuiChs Simplified Chinese GUI support BackupArchiveWebChs Simplified Chinese Web support BackupArchiveGuiCht Traditional Chinese GUI support BackupArchiveWebCht Traditional Chinese Web support BackupArchiveGuiDeu German GUI support
BackupArchiveWebDeu German Web support BackupArchiveGuiEsp Spanish GUI support BackupArchiveWebEsp Spanish Web support BackupArchiveGuiFra French GUI support BackupArchiveWebFra French Web support BackupArchiveGuiIta Italian GUI support BackupArchiveWebIta Italian Web support BackupArchiveGuiJpn Japanese GUI support BackupArchiveWebJpn Japanese Web support BackupArchiveGuiKor Korean GUI support
Client Features Feature Description BackupArchiveWebKor Korean Web support BackupArchiveGuiPtb Portugese GUI support BackupArchiveWebPtb Portugese Web support
TRANSFORMS=1033.mst
Specifies which language transform to use. The following language transforms are available:
Transform Language 1028.mst CHT Traditional Chinese 1031.mst DEU German 1033.mst ENG English 1034.mst ESP Spanish 1036.mst FRA French 1040.mst ITA Italian 1041.mst JPN Japanese 1042.mst KOR Korean 1046.mst PTB Portuguese 2052.mst CHS Simplified Chinese
/qn Specifies to perform the installation silently.
/l*v ″c:\log.txt″
Specifies verbose logging and the name and location of the log file. The installation process creates a program group containing all of the client
components that you selected. To run any of these components, open the Windows
Start menu and select Programs→Tivoli Storage Manager.
If you have multiple client installations on the same system, be careful when changing from one client to another. Environment variables such as DSM_DIR may be shared by more than one installed client.
Upgrading, Modifying, or Reinstalling the Client
Back up any files you want to retain before you reinstall the client.
The reinstall will replace any previous version it finds in the installation directory. If you want to save files from the previous version, you can copy them to another directory. However, the reinstall will not replace an existing dsm.opt file. Instead, the newly reinstalled client will use the existing dsm.opt file.
If you want to install the client files in a directory other than the one where you previously installed them, you should uninstall the previous version before installing the new version. To do this:
1. From the Windows task bar, click Start→Settings→Control Panel→ Add/Remove Programs.
2. Select the Tivoli Storage Manager client from the list of installed programs.
a. For components that were installed using version 4.1 or higher: Click the
Nextbutton until you see a panel containing the Modify, Repair, and
Removeoptions.
1) To remove all components, click Remove and then click the Next button.
2) To remove individual components, select Modify and then click the
Next button. The Custom Setup panel displays:
a) Select the component or components you want to remove and select
This feature will not be available.
b) Complete and close the setup wizard.
3) To fix missing or corrupt files, shortcuts, and registry entries, select the
Repairoption.
b. For components installed prior to version 4.1:The uninstall program displays:
1) From the Windows task bar, click Start→Programs. Open the folder containing the previous version and select Uninstall.
2) Select the items to uninstall from the uninstall list.
3) Click the Remove button.
4) Restart Windows.
Note: If you do not restart Windows prior to installing the new client, some of the new client’s files may be removed the next time you reboot.
4. See “Installing the Software on Your Workstation” on page 6 for instructions on reinstalling.
The Tivoli Storage Manager clients work in conjunction with the Tivoli Storage Manager server. Contact your administrator to obtain backup or archive access to the server, or refer to the following publications to install and configure a Tivoli Storage Manager server:
Table 3. Tivoli Storage Manager Server Quick Start Publications
Publication Title Order Number
Tivoli Storage Manager for AIX Quick Start GC32-0770
Tivoli Storage Manager for HP-UX Quick Start GC32-0774
Tivoli Storage Manager for OS/390 and z/OS Quick Start GC32-0777
Tivoli Storage Manager for Sun Solaris Quick Start GC32-0780
Chapter 2. Configuring Tivoli Storage Manager
Attention
For current configuration information for the Tivoli Storage Manager program product, refer to theREADMEfile that is shipped on the product installation media.
After installation, required configuration tasks include the following:
Task Page
Creating and Modifying the Client Options File (Required ) 11 Registering Your Workstation with a Server (Required) 13
Optional configuration tasks include the following:
Task Page
Creating an Include-Exclude List (Optional) 14
Setting Environment Variables 23
Creating a Shared Directory Options File (Optional) 24
Creating Multiple Options Files 24
Creating and Modifying the Client Options File (Required )
A client options file contains most of the necessary settings for performing backup and archive operations. These settings include the communication protocol you are using and the name of the backup server that you will connect to. When you run the program, if it does not detect an options file, it will automatically launch the configuration wizard to help you create one. If you want to manually start the wizard later, perhaps to modify your options file, follow these steps:
1. Launch the GUI by either double-clicking the TSM Backup Client icon on your desktop, or going to the Windows task bar and clicking Start→ Programs→ Tivoli Storage Manager→ Backup Archive GUI.
2. From the Utilities menu, select Setup Wizard. This will launch the TSM Client Configuration Wizard.
3. On the first panel of the TSM Client Configuration Wizard, make sure Help me
configure the TSM Backup Archive Clientis selected.
4. Follow the prompts to finish creating your options file. Click the Help button if you need assistance completing the wizard. The wizard places an options file nameddsm.optin the same directory where you installed the client files.
Note: You need to know a few technical details, such as the name of the backup server you will be connecting to and the port it listens on, in order to successfully create your client options file. If you do not know this information, contact your local administrator.
You can also modify your options file manually. The install process creates a sample client options file called dsm.smp. If you accepted the default installation
path, this file is in theProgram Files\Tivoli\TSM\configdirectory. The dsm.smp file is a generic configuration file that contains communication parameters that are normally used in a Windows environment. You can use this file as a template when customizing your own options file. First, copy the dsm.smp file to your
Program Files\Tivoli\TSM\baclientdirectory and rename it dsm.opt. Open it in Notepad or your favorite plain text editor and use the following guidelines to customize it for your environment.
One of the options file’s most important purposes is to define the communication protocol used between your workstation and the backup server. Use the
commmethodoption to specify a communication protocol. For example, to use the TCP/IP communication protocol, enter:
COMMmethod TCPIP
You must also specify the TCP/IP server address of the backup server you will connect to using the tcpserveraddress option. For example, you can enter the following:
TCPServeraddress dsmchost.endicott.ibm.com
You may also specify what you want to call your workstation by using the
nodename option. When you register with the backup server during setup, this is the name the server will use for your workstation. If you do not specify a node name, the server will identify your workstation by its host name. You can type
hostnameat a DOS command prompt to see your workstation’s host name. For more information about registration requirements, see “Registering Your
Workstation with a Server (Required)” on page 13.
You can also use the options file to specify authorization, backup and archive processing, and scheduling options. The options specified in your options file are in effect every time you start Tivoli Storage Manager from either the GUI or the command line. However, you can override options temporarily by using the command line.
Your backup server can override your options by using server defined and
enforced client option sets. See Chapter 9, “Setting Processing Options” on page 95 for more information about option processing.
Notes:
1. See “Client Options Reference” on page 107 for detailed information about the supported options for your platform.
2. See “Communication Options” on page 96 for supported communication protocols for your Windows client.
Once you have created an options file, you can use one of the following methods to edit your options file from the GUI:
v Method 1:
v
1. Open the Edit menu and select Preferences.
2. Make any necessary changes, then click OK to save those changes.
v Method 2:
1. Open the Utilities menu and select Setup Wizard.
2. Select the Help me configure the TSM Backup Archive Client checkbox.
Registering Your Workstation with a Server (Required)
Before you can use Tivoli Storage Manager, you must register your client with the server. The process of setting up a node name and password is called registration and is performed by your Tivoli Storage Manager administrator.
There are two types of registration: open and closed. Your administrator chooses the type of registration for your site.
If you plan to use a Web client, you must have an administrative user ID with system privilege, policy privilege, client access authority, or client owner authority. When a new node is registered, an administrative user ID is automatically created for the node. By default, this node has client owner authority.
Using Closed Registration
With closed registration, an administrator must register your workstation as a client node with the server. If your enterprise uses closed registration, you need to provide the following information to your Tivoli Storage Manager administrator:
v Your node name (the value returned by the hostname command or the node name you specified with the nodename option).
v The initial password you want to use, if required.
v Contact information, such as your name, user ID, and phone number. In addition to possibly defining certain options in your options file, your administrator defines the following for you:
v The policy domain to which your client node belongs. A policy domain contains policy sets and management classes, defined by your administrator, that control how Tivoli Storage Manager manages the files you back up and archive.
v Whether you can compress files before sending them to the server.
v Whether you can delete backup and archive data from server storage.
Using Open Registration
With open registration, you can register your workstation as a client node with the server.
The first time you start a session, Tivoli Storage Manager prompts you for information necessary to register your workstation with the server identified in your client options file. You need to supply your node name, a password, and contact information.
When you use open registration:
v Your client node is assigned to a policy domain named standard.
v You can define whether or not to compress files before sending them to the server. See “Compression” on page 118 for more information about the
compressionoption.
v You can delete archived copies of files from server storage, but not backup versions of files.
Creating an Include-Exclude List (Optional)
This is an optional task but an important one. If you do not create an
include-exclude list, Tivoli Storage Manager considers all files for backup services and uses the default management class for backup and archive services. For information on management classes and policy domains, see Chapter 8, “Understanding Storage Management Policies” on page 85.
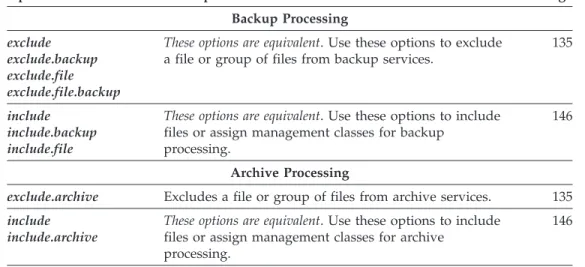
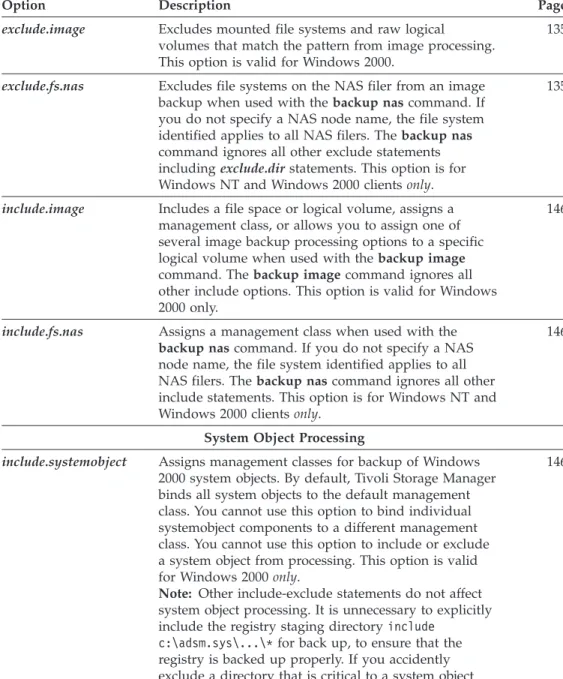
You can create an include-exclude list to exclude a specific file or groups of files from backup services, and to assign specific management classes to files. Tivoli Storage Manager backs up any file that is not explicitly excluded. You should exclude Tivoli Storage Manager client directories from backup services. You can use the query inclexcl command to generate a list of the files that are currently being excluded from backup.
Specify your include-exclude list in your client options file (dsm.opt) . This list can also contain the same statements for including or excluding files which you use with the inclexcl option. The include-exclude statements are not case sensitive. For Windows NT, 2000, XP, or .NET clients: The include-exclude file can be in Unicode or non-Unicode format. If you specify a non-Unicode include-exclude file, the file must be in the same code page that the client is running.
When the client processes include-exclude statements, the include-exclude statements within the include-exclude file are placed at the position occupied by the inclexcl option indsm.opt, in the same order, and processed accordingly. See “Inclexcl” on page 144 for detailed information about specifying an include-exclude file using the inclexcl option.
You can use one of the following methods to create an include-exclude list or specify an include-exclude file:
1. From the client GUI, open the Edit menu and select Preferences. Then, in the Preferences dialog, click the Include/Exclude tab.
2. From the client GUI, open the Utilities menu and select Setup Wizard.
Note: For Windows NT, 2000, XP, or .NET clients: You can specify a Unicode file as an include-exclude file using the preferences editor. However, you cannot create the Unicode file using the preferences editor. See “Considerations for Windows NT, 2000, XP, and .NET Unicode-Enabled Clients” on page 15 for instructions on creating a Unicode include-exclude file.
You can also create an include-exclude list by performing the following steps:
1. Determine your include and exclude requirements
2. Locate the include-exclude section in your client options file
3. Enter your include and exclude statements using the appropriate
include-exclude options as described in “Using Include-Exclude Options” on page 15. Because Tivoli Storage Manager processes your include-exclude list from the bottom of the list up, it is important to enter all your include-exclude statements in the proper order. For example, in the following include-exclude list theincludefile.txtfile is not backed up:
include c:\test\includefile.txt exclude c:\test\...\*
However, in the following include-exclude list the includefile.txtfile is backed up: