Databases:
Building a database
using Access
How to Use This Course Book
This handbook accompanies the taught session for the course. Each section contains a brief overview of a topic for your reference and then one or more exercises.
The Exercises
Exercises are arranged as follows:
A title and brief overview of the tasks to be carried out
A numbered set of tasks, together with a brief description of each A numbered set of detailed steps that will achieve each task
Your lecturer will direct you to the location of files that are needed for the exercises. If you have any problems with the text or the exercises, please ask the lecturer or one of the demonstrators for help.
This book includes plenty of exercise activities – more than can usually be completed during the hands-on sessions of the course. You should select some to try during the course, while the teacher and demonstrator(s) are around to guide you. Later, you may attend follow-up Course Clinics at IT Services, where you can continue work on the exercises, with some support from IT teachers. Other exercises are for you to try on your own, as a reminder or an extension of the work done during the course.
Writing Conventions
A number of conventions are used to help you to be clear about what you need to do in each step of a task.
In general, the word press indicates you need to press a key on the keyboard.
Click, choose or select refer to using the mouse and clicking on items on the screen (unless you have your own favourite way of operating screen features). Names of keys on the keyboard, for example the Enter (or Return) key, are
shown like this ENTER.
Multiple key names linked by a + (for example, CTRL+Z) indicate that the first
key should be held down while the remaining keys are pressed; all keys can then be released together.
Words and commands typed in by the user are shown like this.
Labels and titles on the screen are shown like this.
Drop-down menu options are indicated by the name of the options separated by a vertical bar, for example File|Print. In this example you need to select the option Print from the File menu. To do this, click with the mouse button on the File menu name; move the cursor to Print; when Print is highlighted, click the mouse button again.
A button to be clicked will look like this.
The names of software packages are identified like this, and the names of files to be used like this.
Software Used
Access 2010 WindowsFiles Used
Favourites.accdb SchoolOfMotoring.accdbRevision Information
Version Date Author Changes made
1.0 July 2013 Pamela Stanworth Created
derived from TDAB 1.1 February 2014 Pamela Stanworth Rearranged chapter 3 1.2 August 2014 Pamela Stanworth New course title
Copyright
Pamela Stanworth makes this document and the accompanying PowerPoint presentation available under a Creative Commons licence: Attribution-NonCommercial-ShareAlike CC BY-NC-SA. [email protected] Screenshots in this document are copyright of Microsoft.
The Oxford University logo and crest and the IT Services logo are copyright of Oxford University and may only be used by Oxford University members in accordance with the University’s branding guidelines.
Contents
How to Use This Course Book ... 2
1 Introduction ... 1
1.1. What You Should Already Know ... 1
1.2. What You Will Learn ... 1
1.3. What Is
Access
? ... 1
1.4. Where Can I Get a Copy? ... 1
1.5. Using Office 2010 ... 2
1.6. Using the Database Files for IT Learning Programme Exercises –
Access 2010 ... 3
2 Designing a Simple Database (a Single Table) ... 4
2.1. Some Database Vocabulary for
Access
... 4
2.2. Single or Multiple Tables? ... 4
2.3. The Design Process ... 4
3 Single Table Design – Implementing In
Access
... 5
3.1. Creating a Database ... 5
Exercise 1: Creating a new database file ... 6
3.2. A New Table ... 6
3.3. Defining Fields in Design View ... 7
3.4. Primary Key ... 7
3.5. Data Types ... 8
Exercise 2: Creating a table with fields ... 9
3.6. Using the Table ... 9
3.7. Saving Data Values in the Table? ... 9
3.8. Creating Further New Tables In Design View ... 9
Exercise 3: Using the table to store data (
optional revision
) ... 9
4 Managing Tables and Databases ... 10
4.1. Saving the Table Design ... 10
4.2. Closing the Table ... 10
4.3. Closing the Database File ... 10
4.4. Opening a Database File ... 10
4.5. Deleting a Table ... 10
5 Working With Fields In
Access
... 11
5.1. Adding a Field ... 11
5.2. Changing a Field ... 11
Exercise 5: Creating fields ... 11
5.3. Changing Field Properties ... 11
5.4. Helping the Users to Input Data Accurately ... 13
Exercise 6: Field properties ... 16
5.5. Index (
optional
) ... 17
5.6. Primary Key Field ... 17
Exercise 7: More table properties ... 17
6 A Multi-Table Database Using
Access
... 18
6.1. Designing a Multi-Table Database ... 18
6.2. Creating the Database and the Tables ... 18
6.3. The Relationships Diagram ... 18
Exercise 8: The Relationships diagram ... 18
6.4. Creating a Relationship ... 19
6.5. One-to-Many Relationship ... 20
6.6. A Many-To-Many Relationship ... 20
6.7. A One-To-One Relationship ... 21
Exercise 9: Creating relationships between tables ... 21
7 Working with Relationships in
Access
... 22
7.1. Relationships in a Query ... 22
7.2. Printing the Relationships Diagram ... 22
7.3. Deleting a Relationship ... 22
8 Using Forms to Work on a Database ... 23
8.1. Why Use Forms? ... 23
8.2. Using Forms to Work on Related Data ... 23
8.3. How to Create Usable Forms ... 24
8.4. Exercise 10: Working on data in related tables ... 24
9 What Next? ... 25
9.1. Downloadable Course Materials and More – the IT Portfolio ... 25
9.2. Database Concepts Course Which Precedes This ... 25
9.3. Database Courses Which May Follow This ... 25
Appendix 1: Viruses and Security Levels in
Access
... 26
Why Worry About Viruses? ... 26
Scanning for Viruses ... 26
Access 2010
and Virus Security ... 26
Further Help with Security and Trust Center Settings ... 30
Appendix 2: One to One Relationship ... 31
One to One Relationships in
Access
... 31
Setting Up the Relationships ... 31
Working With The Data ... 32
1
Introduction
Welcome to the course “Databases: Building a database using Access”.
This booklet accompanies the course delivered by the IT Learning Programme at Oxford University. Although the exercises are clearly explained so that you can work through them yourselves, you will find that it will help if you also attend the taught session where you can get advice from the teachers, demonstrators and even each other!
If at any time you are not clear about any aspect of the course, please make sure you ask your teacher or demonstrator for some help. If you are away from the class, you can get help by email from your teacher or from [email protected].
1.1.
What You Should Already Know
This session is one of a series that cover the important aspects of building and managing a database, using MicrosoftAccess as an example.
We will assume that you have already attended the course “Databases: Concepts of database design” (or equivalent), and that you have already designed your tables, with fields, data types and the relationships between them.
The computer network in our teaching rooms may differ slightly from that which you are used to in your College or Department; if you are confused by the
differences, ask for help from the teacher or demonstrators.
1.2.
What You Will Learn
In this session we will cover the following topics: Creating a database with tables and fields in Access
Understanding a database with multiple tables
Understanding and implementing relationships in Access
Related Database courses, should you be interested, are given in Part 9.3.
1.3.
What Is
Access
?
Access is database management software. It enables you to build and maintain a database.
Access 2010 is part of the Microsoft Office 2010 for Windows package. Access is not available for the Mac (Mac users may try FileMaker Pro).
An Access database consists of the data held in a number of tables, plus a number of other objects which are used to manage the data. All these are saved together in a single file. In this course, we will deal with tables, and we will mention forms, queries and reports.
1.4.
Where Can I Get a Copy?
If you have a copy of Microsoft Office Professional 2010, then you already have a copy of Access 2010. If you are unable to find it on your computer, it may not have been installed and you should talk to your IT support contact (or the IT Services Help Desk).
If you are a member of staff, you can obtain a copy of Microsoft Office Professional 2010 from the Online Shop. Students can occasionally obtain
Microsoft Office at a reduced cost: read more at the IT Services website.
1.5.
Using Office 2010
If you have previously used another version of Office, you may find Office 2010
looks rather unfamiliar. “Office 2010: What’s New” is a self-study guide covering the Ribbon, Quick Access Toolbar and so on. This can be downloaded from the IT Portfolio at http://portfolio.it.ox.ac.uk (look in the Access category).
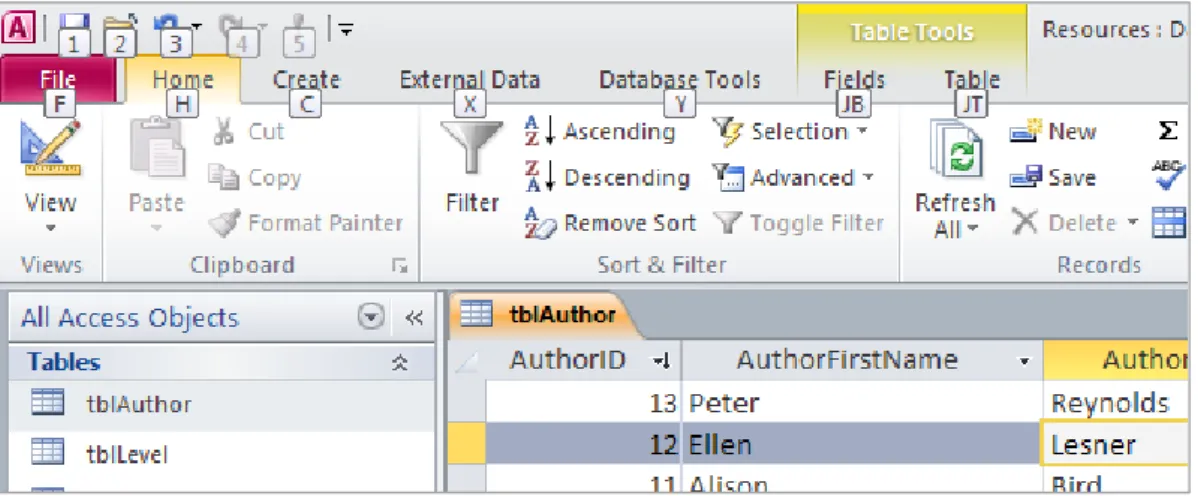
For anyone who prefers not to use a mouse to control software, or who finds a keyboard method more convenient, it is possible to control Office 2010
applications without using a mouse. Pressing ALT once displays a white box with
a letter or character next to each visible item on the Ribbon and title bar (shown in Figure 1).
Figure 1Keystrokes to Control Ribbon Tabs and Title Bar (Press ALT to show these)
After you have typed one of the letters/characters shown, the relevant Ribbon tab or detail appears, with further letters/characters for operating the buttons and controls (shown in Figure 2).
Figure 2Further Keystrokes to Control Buttons
1.6.
Using the Database Files for IT Learning Programme
Exercises – Access 2010
Please note that Access 2010 only trusts files if they have been saved in a “Trusted Location”. The network driveH:, used for most IT Learning Programme courses, has been designated an Access Trusted Location in our teaching rooms. If you make copies of the files for these exercises, and save them on your own computer in a location that is not trusted, you may not be able to carry out all the activities described.
Appendix 1 discusses the question of virus protection and trusting locations further.
2
Designing a Simple Database (a Single Table)
2.1.
Some Database Vocabulary for
Access
A collection of database information is organised into one or more tables. You may think of each table in a grid layout.
Each row of the table is known as a record. There must be one record for each item included in the table – for example, the records may be about the employees in a department, the books in a library or the individual wall paintings in an ancient cave. The order of the records is not important: indeed it is usual to change frequently the order the records are shown in, when analysing the data. No two records can be identical – there must be at least one different value to distinguish them.
Each column of the table is known as a field. Each field contains a different piece of information about the record items – for example, an employee’s date of birth, a book’s author or the dimensions of a painting. All the entries in one column must have the same Data Type e.g. all text or all integer numbers.
The set of tables, along with the queries, forms and reports used to manipulate them, are saved together in one Access file.
2.2.
Single or Multiple Tables?
Initially, we will consider a simple situation where all fields are in one table – all the attributes describe one kind of item. The case of multiple tables is covered later (see Chapter 6 below).
2.3.
The Design Process
When starting on a database project, it is important to plan carefully the structure of the database file and what items are to be included. These decisions about what fields are to be used, and how they are to be assembled into tables and related to one another, will critically affect the way you can analyse the results and
interrogate the data later.
So in planning a database you would prepare a data model, which describes the project, items and types of information to be collected and the relationships between the entities. This must take account of any constraints from the real situation. It is difficult and time-consuming to re-construct a database that has been built in a way that does not properly model the real situation, once data has been entered.
This process is covered in the IT Learning Programme course “Databases: Concepts of database design” (details in part 9.2 below).
3
Single Table Design – Implementing In
Access
3.1.
Creating a Database
Once you have decided on the fields that are needed, and their data types, a new database file must be created using Access, and the fields must be defined in a table.
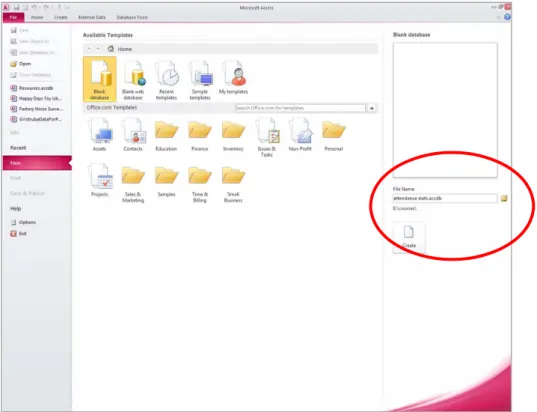
As Access starts, the New File tab of the Ribbon gives options to create a new file. The simplest case is to choose Blank database. The filename and location for the database file must be specified at this point, navigating to a suitable device and folder and entering a filename.
Figure 3Assigning a Filename and Location to a New Database File
Once the database file has been created, the whole of this database work will be stored in this file: table(s), data, forms, queries and reports.
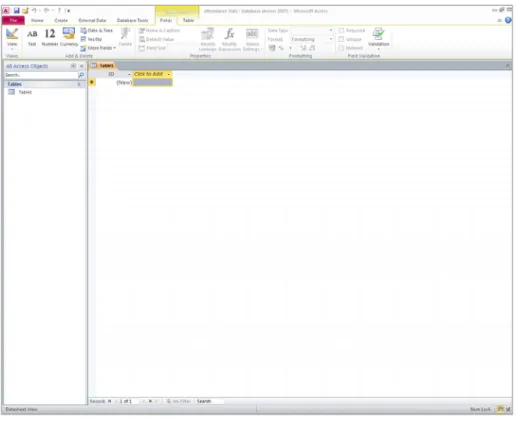
Figure 4A New Table
The Navigation Pane is displayed at the left of the window. This will list any tables in the database, as well as any forms, queries, reports and so on as they are
created.
Exercise 1: Creating a new database file
Now look at this exercise (page 35).3.2.
A New Table
A new blank table is shown (Figure 4), awaiting your data. However, before you start to enter data values, there are some design decisions to be made.
The new table has been provisionally named Table1. When it is first saved, you assign a more interesting table name. Each table requires a name. By convention, table names always begin with tbl.
Similarly, query names begin with qry, form names begin with frm and report names begin with rpt. These Reddick naming conventions can be found at http://mvps.org/access/general/gen0012.htm
Although it is possible in Access to include spaces in object names, it is good practice to avoid spaces. This is because when an object name is included in an expression (perhaps in a calculation), then any spaces are difficult for Access to parse and you must remember to enclose the object name in [square brackets] every time. Without any spaces, the names of tables, forms etc are not ambiguous and expressions are easier for Access (and people) to read. This also applies to the names of fields and controls.
Designers may use a mixture of lower case and capital letters and some
3.3.
Defining Fields in Design View
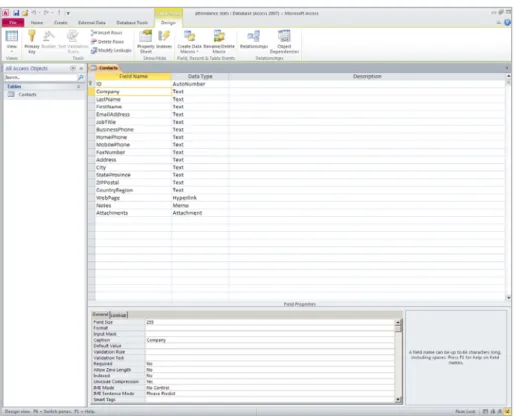
(on the Home tab of the Ribbon) will switch to show the table in Design View. Design View shows a list of the field names that have been set up, each with its data type and its Field Properties. Here you add the names of the fields you require for this table.
Figure 5A Table in Design View
As you click on any row, the Field Properties for that field are listed in the lower window pane. For example, the Field Size specifies the maximum number of characters or digits that the user will be allowed to enter. The Caption is the label that will appear with the field, on forms, reports etc. (this may differ from the field name itself, for instance including spaces and more familiar punctuation). There is no theoretical limit on the number of fields per table, although Access
allows a maximum of 255 fields per table. If you need more than 255 fields in a table, read Appendix 2 about a one-to-one relationship between tables.
3.4.
Primary Key
One of the ready-made fields is set up to be the primary key (more on the importance of this in Part 5.6 below).
In every table, one field must be nominated which has a unique value for every record – this will be used to identify the record unambiguously. This field (or, occasionally, combination of fields) is known as the primary key. This will become essential to the database design when there are two or more related tables.
3.5.
Data Types
Each field is assigned a Data Type – this may be text, a number such as an integer or a fixed length decimal, date & time and so on. All the data in a
particular field (for all the records) must have the same Data Type. If this is not possible, this is an indication that the fields have not been chosen correctly to represent the real situation.
Once data has been entered in a table, the Data Type cannot easily be changed, so the Data Types must be chosen carefully at the planning stage.
Data types available in Access are:
Text This may include words and digits which are not to be used as numbers for calculation
Memo Longer portions of text which will not be sorted or calculated (up to 65,535 characters)
Number Numbers Date/time Dates and/or times
Currency Numbers formatted for currency
Auto number Assigns a fresh counting number as each new record is added (counting numbers can be sequential or randomly chosen) Yes/No Yes and no or a field that can only have one of two values (Yes
is stored as -1, No as 0)
OLE Object A piece of data created in other software, such as an Excel
spreadsheet or a graphic or photo, linked or embedded in the database
Hyperlink Address of a remote location, such as URL Attachment Attach images, data, documents etc
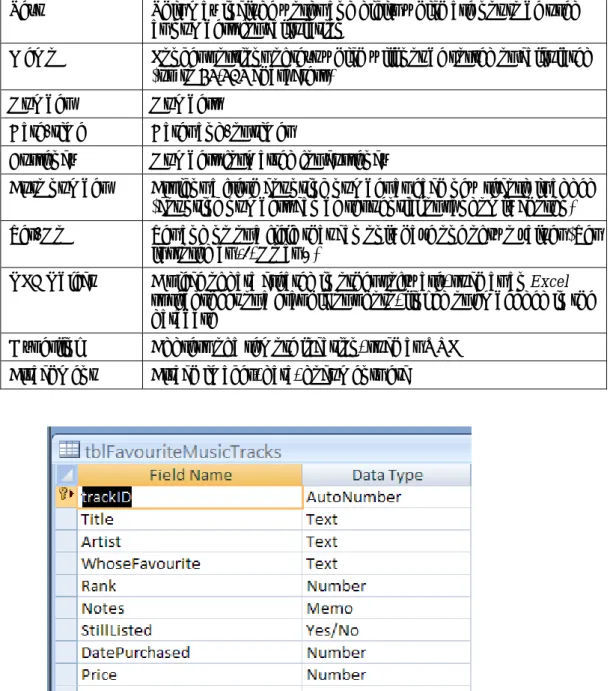
Figure 6 Example of Fields and Data Types
primary key field of each table. The Title field has the Text type. The Notes field is Memo type, allowing the user to enter a quantity of comments; such a field cannot be used for sorting or analysis.
Exercise 2: Creating a table with fields
Now look at this exercise (page 36).3.6.
Using the Table
From Table Design View, clicking will switch to Datasheet View. Here each field appears as a column, and any data values will appear in rows.
The first blank row is shown, ready for the first record to be entered. The mouse or arrow keys can be used to move between the fields of a record. Once some data has been entered in the first record (first row), you can move down and add another record.
The Close button for closing just this table (leaving the database file open) is at the top right of the table window.
3.7.
Saving Data Values in the Table?
The data is saved automatically, without any confirmation from you, as you move from one record to the next , or as you close the table.
3.8.
Creating Further New Tables In Design View
In the Create tab of the Ribbon, will create a new blank table and display it in Design View. In Design View, you can add such fields as are needed (this is covered in Part 5 below).
Exercise 3: Using the table to store data (
optional revision
)
Now look at this exercise (page 37).4
Managing Tables and Databases
4.1.
Saving the Table Design
Clicking on the Quick Access Toolbar or on the File menu will save the table design. If no name has yet been assigned to the table, you will be prompted for one.
Note that does not save the data in a table: data is saved without confirmation when you move to another record.
4.2.
Closing the Table
When some data has been entered, the table can be closed using . There is no command to save the data explicitly at this point, because new or amended data was saved as you moved between records.
You will only be prompted to save the table design if you have made any changes. The table name now appears in the list of All Tables in the Navigation Pane.
4.3.
Closing the Database File
The database file can be closed using on the File menu.
4.4.
Opening a Database File
Selecting on the File menu displays the Open dialog. Here you can navigate to the device and folder where a file has been saved. The file is opened in the usual Windows way e.g. select the filename in the dialog and click
4.5.
Deleting a Table
If a table is unwanted, right-click on its name in the Navigation Pane and select Delete. The table design and any data it contained are deleted.
4.6.
Opening a Table
The bar at the top of the Navigation Pane is used to control the way that lists of the objects in the database file are displayed. All Access Objects is a good choice here, as it lists all tables, forms, queries etc.
To open one table in Datasheet View, double-click the table name or right-click and select Open. To open the table in Design View, select Design View on the right-click context menu.
Exercise 4: A database file with tables
Now look at this exercise (page 39).5
Working With Fields In
Access
5.1.
Adding a Field
Fields can be added to a new or existing table, in Design View.
Figure 7Adding New Fields to a Table
In the first row, the first Field Name is typed. TAB or the arrow keys or mouse
will move to the next column, where the Data Type is chosen from the
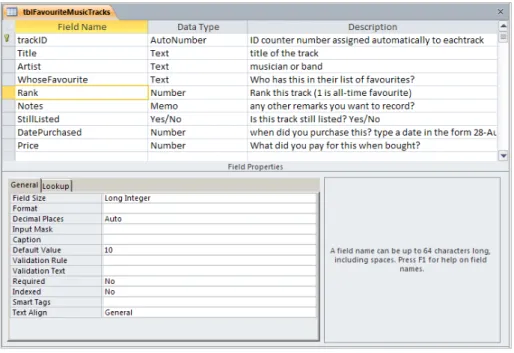
drop-down list of types available. It is good practice to type a Description, which helps other users (and yourself in the future) to understand just what sort of information is expected in this field.
5.2.
Changing a Field
The Field Name of an existing field can be changed by editing in Design View. Similarly the Description can easily be changed.
Although the Data Type can be changed, this may be difficult. Once data has been set up in the table, Access may prevent you changing the data type, if the existing data does not match the new type. It is important to choose the data types carefully at the planning stage, to avoid this difficulty if possible.
Exercise 5: Creating fields
Now look at this exercise (page 40).
5.3.
Changing Field Properties
Field properties can be changed separately for each field, in Design View. While a field is selected in the upper window pane, its Field Properties are listed in the lower window pane. Some properties are assigned by default. Change a property by choosing from a drop-down list or by over-typing the previous value. Data types were discussed in Part 3.5 above.
Note that if you change the data type or certain Field Properties, then any existing data in the table may or may not conform to the new settings. Access offers to check through the data – you should normally accept when this message appears. If any of the data does not conform to the new settings, you will have to edit it directly.
5.3.1.
Number Format
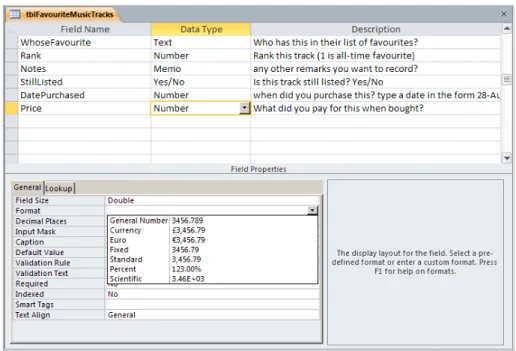
The Number format controls the way a number will be displayed e.g. how many decimal places, with percent or currency symbol. This can be changed in the Properties of the field, where a drop-down list offers a choice of popular formats.
Figure 8Setting the Number Format for a Field
5.3.2.
Date Format
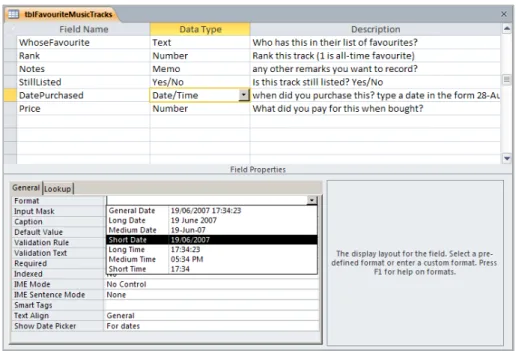
Dates can be entered and displayed in different standard formats. Once a field has been defined as the Date/Time type, the date Format can be set in the Field Properties.
If a field has been defined with the Date/Time type, then when someone uses that field (e.g. clicks on the field in Datasheet View or in a form), a date picker
calendar is automatically displayed. This is often a convenient tool for entering a date. If this is not suitable, change the Show Date Picker property to Never for
Figure 9Setting the Date Format for a Field
5.3.3.
Field Size
Although the Field Size can be changed, this can lead to problems. If existing data is longer than the proposed new data length, then when the data length is
changed Access will truncate the data to fit. It is important to choose the field sizes carefully at the planning stage, before entering data, to avoid this difficulty if possible.
5.4.
Helping the Users to Input Data Accurately
Some Field Properties can be set to help the users when inputting data. If there are rules or constraints on what values are permitted or are possible, these “business rules” can be incorporated in the Field Properties to prevent the user entering invalid data.
Note that these settings may help, but cannot prevent the user entering wrong
data – that responsibility lies with the person working on the data.
5.4.1.
Lookup
A lookup offers the user a limited list of permissible values to choose from, in a drop-down list.
This is set up for a given field using the Lookup Wizard (the command is found lurking at the bottom of the list of Data Types). It is useful to master the building of a lookup, because this will become important when creating relationships between multiple tables (see Part 6.4 below).
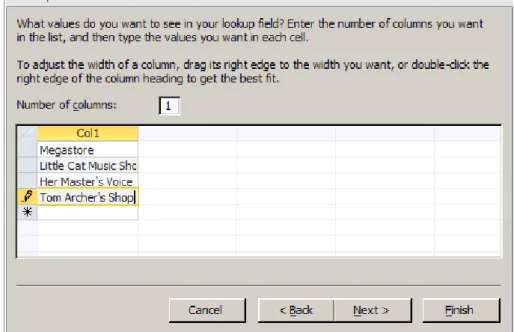
The simplest lookup is one where you type in a few values which you want to appear on the list.
Figure 10Populating the Lookup List
The Lookup Wizard offers the Limit to List option. With this set, the user must choose one of the values offered in the lookup list. With this option cleared, the user may type an alternative value if none of those offered is suitable.
Aside: The Lookup Wizard also offers the Allow Multiple Values option. If you are tempted to use this option, you should instead review the design of your database and consider including a further table or tables, with one-to-many relationships to the present table. Chapter 6 below covers designing a database with multiple tables.
When the user is entering data (e.g. using a form or in Datasheet View), the lookup list appears and they can use the mouse to choose from the values offered. This avoids the problem of a common data value which has to be typed or
possibly mistyped into several records.
Figure 11Using a Lookup List in Datasheet View
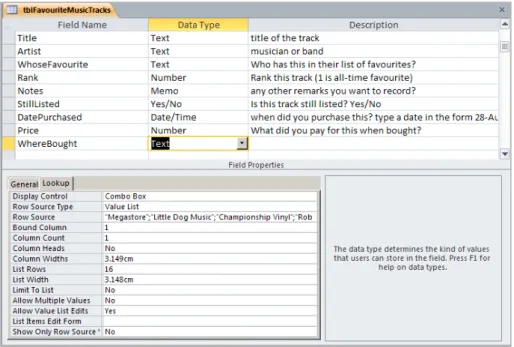
A lookup can be edited further in Table Design View, by changing the Properties on the Lookup tab of the Field Properties.
Figure 12Lookup Properties
5.4.2.
Validation Rule
The allowed values for a particular field may be constrained by the nature of the data (e.g. date of birth not before 1880) or by “business rules” which come from your own knowledge of the project (e.g. only University Members can book on a certain course).
This sort of constraint can be set up in the table design as a validation rule. The validation rule is typed in the Field Properties for the relevant field, as an expression using operators such as < > or =. When the user enters data in this field, Access will apply the rule as a test.
If the user tries to enter a value which does not satisfy the rule, they will see a message suggesting what is expected. This validation text should therefore be a helpful message explaining what data is acceptable.
Figure 13Validation Rule and Validation Text
5.4.3.
Input Mask (
optional
)
An input mask is a pattern which controls the way the data will look, for example in text or date/time fields. The Input Mask Wizard offers some standard data patterns which can be applied to a field.
The wizard is started by clicking in the Input Mask field then clicking .
Figure 14Choosing a Standard Input Mask
The input mask can be edited further, in the Field Properties pane. For example, the mask for Postal Code (shown in Figure 14) expects two letters followed by two numbers in the first part, as in OX23. In the input mask, the L symbol represents a
letter A to Z, entry required.
If you want the users to be able to enter post codes starting with “two letters then one or two numbers”, then one of the L symbols must be replaced by a ? symbol. ? represents a letter A to Z, entry optional. Make this change in the input mask
and then users will be able to enter postcodes such as OX3 6NN.
5.4.4.
Default Value
The default value for a field is a value that will be entered unless the user specifies something else. This might be the start date of the project, or Mr in the Title field
for people records.
The default value can be edited by overtyping in the Field Properties pane.
5.4.5.
Mandatory Field
Setting the Required property to Yes means that the record edit or add process
cannot be completed until a permitted value has been entered for this field.
Exercise 6: Field properties
5.5.
Index (
optional
)
Access can create and maintain an index on a field. This means it keeps account of the order of the values held for each record. If a field has an index, this speeds up sorting and calculations on that field. However, there is a small penalty in the speed of updating the database (e.g. when a new record is added or a value is edited) because Access also updates all the relevant indices. This penalty may not be noticeable with a small database, however it is not good practice to set up an unnecessary index.
In the Properties for a field, the Indexed property can be changed from No to Yes. DuplicatesOK allows two or more records to have the same value for this field
(as for example with surnames). No Duplicates does not allow a record to be
given a value that already exists for another record on this field (may be suitable for National Insurance numbers).
Figure 15Setting an Index on a Field
5.6.
Primary Key Field
On saving a table design, you may be prompted to nominate the primary key. This is a field (or combination) which uniquely defines the record – no other record can have this value for this field. Access uses the primary key to specify which record it is working on.
The primary key can be specified by selecting the field in Design View, then clicking . A key symbol then appears beside that field.
Because the primary key is the field that Access uses for sorting, ordering and matching records, an index is automatically built on the primary key field.
Exercise 7: More table properties
6
A Multi-Table Database Using
Access
6.1.
Designing a Multi-Table Database
A very simple list of data may usefully be managed as a single Access table, however this may not model real situations accurately, so this is an important decision. A better design is to hold information about each kind ofthing in separate tables, making cross-references between them. The various tables are all contained in one Access file. This is known as a relational model.
The reason for this is so as to represent the way the data behaves in the real world situation. A relationship (or join) is set up between two tables, so that each record in one table is related to one or more records in the other table.
This part of the planning must be done carefully, long before the database is set up in Access. It can be very difficult and time-consuming to re-structure into different fields or different tables once the data has been entered.
The fields must be chosen (as discussed in Part 2.3 above) and assigned to a number of related tables. The paper-and-pencil exercise involves thinking about the purpose of the database, which data needs to be recorded and which
questions will be asked at the analysis stage.
It is usually useful to present the tables and their field names as a diagram. This could be a pencil-and-paper sketch, showing all the tables and listing the fields for each table.
The course “Databases: Concepts of database design” covers how to design a multi-table database (see part 9.2 below).
6.2.
Creating the Database and the Tables
Once the design is decided, and you know which tables will be needed, comprising which fields, it is time to set up the model using Access. It is important not to rush into building the Access model until the design has been properly thought through, as it can be difficult to revise a database once it has data in it.
Where a number of related tables are required to model a project, these can each be created separately in Access, as described in Parts 3.1 and 3.8 above. Fields can be added to each table as described in Part 5.1.
6.3.
The Relationships Diagram
The Access Relationships diagram can be shown by clicking on the Database Tools tab. This diagram will show the joins between the tables. In the Show Table dialog, you choose each of the table names in turn and click
. A box for each table appears in the diagram, listing the fields, and these boxes can be rearranged by dragging the title bar or resized by dragging a border.
6.4.
Creating a Relationship
You should already have decided which fields are to be used to make joins between the tables, so refer now to your hand-drawn diagram.
The most direct way to create joins is by dragging in the Relationships diagram. Starting by pointing to the name of a field that is to join, you can drag onto the corresponding field in another table. The direction of dragging is not important. After this dragging action, the Edit Relationships dialog appears.
Figure 16Creating a join by dragging in the Relationships Diagram
As illustrated in Figure 16, the two fields being joined need not have the same field name, although it is often convenient to do so. The field at one end of the join is a primary key and the field at the other end is not.
This is a good point to confirm that Access has correctly interpreted the relationship type. One-to-Many is the most usual type, but if you think Access
has misinterpreted your intentions, it is wise to cancel the dialog and try again.
6.4.1.
Referential Integrity
In the dialog, while setting up a join, you are asked about enforcing referential integrity.
It is usual to Enforce Referential Integrity.
This means your database insists that every foreign key value must find a matching primary key value in the connected table. For example, if referential integrity were enforced in a school classroom scenario, it would not be possible to assign a student to a class until a record had been created for that class.
With referential integrity enforced, if a user tries to create a record in one table, when no corresponding record exists in the related table, a message box will tell them they cannot proceed. They need to work on the related table first, creating a suitable record there, then come back to the present table to create the new record.
If in doubt, you should usually tick the checkbox to Enforce Referential Integrity and choose not to cascade update or delete.
This question, with the cascade options, is discussed further in the Database Design concepts course (see Part 9.2).
Aside: Do not be tempted by the Allow Multiple Values checkbox which appears in some variants of this dialog - if you think you need to enter multiple values for a single field, you should review your database design carefully and consider adding another one-to-many relationship.
Referential Integrity is sometimes called Data Integrity.
6.4.2.
Reviewing the Final Relationships Diagram
Every join must be set up separately in this way, which may mean dragging and dropping between several tables.
Suitable relationships are set up between the tables.
Once the joins have been set up, they appear automatically as lines in the Relationships diagram. Access will use these relationships when queries are created in future.
1 and ∞ symbols appear at the ends of each join line, to show the “one” and “many” parts of the relationship.
Figure 17Relationships Appear When Lookups are Created
6.5.
One-to-Many Relationship
This is the most common type of relationship: one record in a given table relates to several records in the other table. This appears in the Relationships diagram with a
1
symbol at one end and∞
at the “many” end of the join line.In practice, this is modelled by using a pair of two one-to-many relationships with a “mixing” table between. The joins may be created using the same method as described above. In our example this would be a table with one record per exam result. Then there are two one-to-many relationships: each student receives several exam results, and each exam paper was sat by several candidates.
Figure 18Many-to-Many Relationship Between Students and their Subjects Examined
6.7.
A One-To-One Relationship
The procedure for setting up and using a one-to-one relationship is described in Appendix 2.
Exercise 9: Creating relationships between tables
Now look at this exercise (page 45).7
Working with Relationships in
Access
7.1.
Relationships in a Query
When a new query is created, if it includes two or more tables then Access uses any existing join that has already been defined in the Relationships diagram. This will be shown as a joining line in Query Design View. So it is usually convenient to define all relationships in the Relationships diagram, early in the design process when the tables are defined.
It is occasionally appropriate to define a relationship only in one query. This is done by working in Query Design View and dragging a join line between the two corresponding field names.
7.2.
Printing the Relationships Diagram
This diagram is a very useful summary of how your database works. It is well worth printing a copy of the finished diagram, to refer to while you continue work. appears on the Relationship Tools Design tab when the Relationships window is open.
7.3.
Deleting a Relationship
If a relationship is defined in the Relationships diagram, then it can be deleted there. The join line can be selected by clicking it once, then deleted by pressing DELETE.
Once a join has been set up between fields in two tables, neither field can be deleted without first deleting the join in the Relationships diagram.
Beware that if the relationship is also shown in one or more saved queries, then deleting it from the Relationships diagram does not delete the join from
individual queries. However, if you are making major changes to the structure of a database, going as far as editing the relationships between tables, you should perhaps consider deleting any existing queries anyway, and re-building them in the light of the revised model.
A relationship that is shown in a query must be deleted in that query: open the query in Query Design View, select the join line and press DELETE.
8
Using Forms to Work on a Database
8.1.
Why Use Forms?
Once all the tables have been built, and the relationships between them have been set up, it is time to enter some data.
It is good practice to enter and edit data via a form, rather than by typing directly into the table. This is because a form can be designed for people to enter their data easily and efficiently, so as to minimise the chance of mistakes and
transcription errors. Many forms have features which help the user to give correct rather than incorrect values, such as checkboxes, drop-down combo boxes and option buttons.
Any join data is easy to enter by this method, because a combo box (drop-down list box) offers the available values, usually as recognisable text. The user simply chooses the correct name, which is much easier than looking up serial numbers. If just one record is shown at a time, as is common with forms, the user is less likely to type data into the wrong record.
Figure 19Working on Data Using a Simple Form
8.2.
Using Forms to Work on Related Data
Once relationships have been set up between tables, it becomes clear that a table is not a suitable environment for people to work on data. The table is the place where data is stored, but a set of forms are needed to provide a practical user interface.
For example, the table in Figure 20 lists the scores that a group of students achieved in recent exams. Each record (row) shows the score that a particular student achieved in a single subject exam. This information is only
comprehensible for human readers if they have some way of looking up the student names and the subject titles by number: a tedious and risky step.
Figure 20Student Exam Results In A Table
By contrast, Figure 21 shows a form based on the same table (2 views of the form). One record is shown at a time, reducing the risk of mis-entry. The controls for the StudentID and SubjectID have been replaced by combo boxes, each one populated from the relevant table (based on the joins shown in the Relationships Diagram).
Figure 21The Same Exam Data, Working in a Form
8.3.
How to Create Usable Forms
The IT Learning Programme courses, “Databases: Creating a user interface using Access”, covers how to build useful and customised forms (details in part 9.3).
9
What Next?
Now that you have some basic Access skills you may want to develop them further. IT Learning Programme offers a range of resources for study and teaching.
9.1.
Downloadable Course Materials and More –
the IT Portfolio
These course materials are available through the IT Portfolio, at http://portfolio.it.ox.ac.uk .
Each course pack includes the course handbook in pdf form and a zip folder of the exercise files that you need to complete the exercises. Archive versions of the course book may also be useful if you use an earlier version of the software. The IT Portfolio helps you find articles, videos, resources and weblinks for further IT study. For some resources, you will be asked for your Oxford (SSO) username and password.
It may be possible for you to use the facilities at IT Services to work through the exercises in this booklet, or use any of the applications that are available. Contact us on [email protected] for details.
9.2.
Database Concepts Course Which Precedes This
Databases: Concepts of database design9.3.
Database Courses Which May Follow This
Databases: Creating a user interface using Access Databases: Reporting data using AccessDatabases: Querying and analysing data using Access
Read about the content of these courses in the IT Learning Programme Catalogue at www.it.ox.ac.uk/itlp/courses/catalogue
9.4.
Course Clinics
We encourage everyone to work at their own pace. This may mean that you don’t manage to finish all of the exercises for this session. If this is the case, and you would like to complete the exercises while someone is on hand to help you, come along to one of the Course Clinics that run during term time. More details are available from www.it.ox.ac.uk/courses/
9.5.
IT Services Help Centre
The Help Centre is also a good place to get advice about any aspect of using computer software or hardware. For Help Centre opening times, visit
www.it.ox.ac.uk/help/gettinghelp/ and follow links to the General Helpdesk, or contact them by email on [email protected].
Appendix 1:
Viruses and Security Levels in
Access
Why Worry About Viruses?
A virus is malicious code that may arrive from another computer, and copy itself onto your hard disk. Depending on the taste of the person who devised it, it may be just a joke, or it may destroy data or system files. Some viruses send
themselves on to other people via your email setup.
A virus may infect your computer while you are connected to the internet, or it may arrive attached to an email or on a contaminated removable disk, and it may take the form of a macro in an Access database file. It is essential to make
provision for your computer to be scanned frequently for any viruses which may have arrived.
Versions 2003 and 2010 of Access handle this threat in different ways, so make sure you have made suitable settings for your own computer.
Scanning for Viruses
Virus Scanning Software
You should install and use virus-checking software such as Sophos (supported by IT Services). Other popular virus-checkers include McAfee VirusScan and Norton
AntiVirus. Contact the Online Shop or visit www.it.ox.ac.uk for more information about obtaining Sophos at no cost or low cost for University members.
A typical virus-checker scans your computer disks according to a preset schedule. For instance, it may be set to check the hard disk every time you start Windows, or twice a week, or to scan every document on opening. The program detects any viruses, then alerts you and gives the options of deleting the file, putting it in quarantine or perhaps fixing it.
Keeping the List of Viruses Up-to-date
A virus-checking program must be kept up-to-date. It is important to connect frequently to the virus-checking centre (this is typically done via their Internet website). The virus list on your computer is then updated with all viruses known to date, with any antidotes.
Access 2010
1and Virus Security
Access 2010 considers any database file (such as .accdb or .mdb) as a potential route for virus infection. It starts by disabling any automatic content, and then asks you to decide whether to enable it.
This applies to content such as macros and some Control Wizards and ActiveX Controls.
Information about the other levels of protection, and further options for the way
Security Warning Message
When you open a database file using Access 2010, a Security Warning message may appear in a white/yellow bar near the top of the window.
Figure 22Security Warning Message When a Database File is Opened
If you do not expect to use any automatic features, you can safely ignore this message and continue work.
Enabling Automatic Content For Just One Visit
Enable Content on the Security Warning bar gives you the opportunity to enable any automatic content that may be present: only do this if you are sure that the database file comes from a safe source and does not contain any virus or other hostile code.
Note that the decision to Enable this content is effective for this session only. If the database is closed, then the decision will need to be repeated each time it is opened. This may be a convenient and cautious approach to take.
Trusted Locations in
Access 2010
Some locations (folders, drives or devices) can be nominated as Trusted Locations: Access then considers any database files found there to be trusted, and their automatic content is permitted to run.
So you may find it convenient to nominate a folder or area on your computer or your network as being Trusted by Access. Then make sure that all your Access
database files are saved there.
This decision may be reached in consultation with colleagues and other users of the database, and with your local IT support contact. Some departments have a policy about where computer files of different kinds should be saved.
For example, in our teaching rooms, the students’ files are provided for you on a drive known as H:\, and this has been set as a Trusted Location in the installed copies of Access. Computers at IT Services have Sophos virus protection software which is kept up-to-date. If you are in an IT teaching room, you can rely on
Sophos to manage the virus scanning.
The program files for Access are placed in a Trusted Location, by default.
When to Trust a Location for
Access 2010
You should only consider doing this if you do need to use automatic content such as macros, and if you have made very good alternative arrangements to protect the computer from virus attack.
If you are using a University or College-owned computer, take advice from your local IT Support Staff before making a location Trusted. Ensure that you have reputable virus scanning software installed, and that you keep its files of known viruses up-to-date (i.e. it checks at least weekly by connecting to the software provider and downloading the latest lists). Then confirm that the software is configured to scan every file as it is opened.
Only once this is in place can you rely on the virus scanning software to do the virus scanning, and use Access to manage your database files.
Finding the Access Trust Center
You may decide to set Access to Trust a folder or computer storage area. This is done in the Trust Center, which is among the Access Options (found on the
File menu) .
In the left-hand column of the Access Options dialog, choose the Trust Center category. This reveals the button on the right.
Figure 23The Trust Center With the Trust Center Settings Button
How to Trust a Specific Location with
Access 2010
Trusted Locations (found in the category list on the left) shows which locations have already been treated as trusted. Here you can or
. Beware that if you add a location to this list, you are no longer protected from active content saved in that location.
If the location where you plan to save your databases is on a network drive, check Allow Trusted Locations on my network in the same dialog. You should consult the IT support contact who is responsible for the network, before doing this.
Figure 24The List of Trusted Locations
You may also decide to trust subfolders within the chosen location – there is a check box for this in the Trusted Location dialog.
Figure 25Trusting Subfolders in a Trusted Location
Once a folder has been Trusted, save all database .accdb files there.
Sandbox Mode
Note that these choices makes Access run in a controlled and limited way, known as sandbox mode. In sandbox mode, Access will run a reasonable range of
commands and functions. Occasionally, some macros created using older versions of Access may need to be re-written using revised commands which are now permitted.
In sandbox mode, some commands are disabled because they are deemed
potentially unsafe, and could be used maliciously to damage your files or system. A user can only disable sandbox mode by changing keys in the Windows registry, which is not a task for the inexperienced to attempt (if you are not perfectly familiar with working in the Windows registry, don’t experiment: ask someone who has experience, as there is a risk of making the computer unusable).
Further Help with Security and Trust Center Settings
There is a range of further settings available through the Trust Center. Read more about this in Access’ Help.
Appendix 2:
One to One Relationship
One to One Relationships in
Access
It is sometimes necessary to set up a relationship between two tables, where each record in one table matches exactly one record in the other table, and vice versa. This is a one-to-one relationship.
For example, if a table needs more fields than Access permits (max 255 fields in one table), you might set up two tables with a one-to-one relationship between them.
Setting Up the Relationships
The key point is to ensure that the field which relates the two tables cannot have duplicate values in either table.
Step 1. Create both tables, with fields to link
Include a field in one table which will relate to the primary key in the other table (we will refer to these as the pair of linking fields):
Figure 26Tables Whose Fields Will Be Linked
In this example, we will use the Patient field in the tblResults table to link with PatientID field in the tblPatients table. Each patient will have just one set of results.
Step 2. Make the linking fields “no duplicates” in both tables
In both tables, set the Index property of the linking field to be “Yes (No Duplicates)”.
In the table where the linking field is the primary key, it is probably set to “Yes (No Duplicates)” already, since a primary key is not allowed to have duplicate values and Access automatically makes this setting for all AutoNumber fields. In the other table, you will have to set this property of the linking field.
Figure 27Setting “No Duplicates” Property in Both Linking Fields
Step 3. Build a relationship
This is discussed in part 6.4 of the course handbook.
In the Relationships diagram, drag the field name of the linking field from one table and drop it on the corresponding field in the other table.
In the Edit Relationships dialog which appears, check Enforce Referential Integrity but do not check Cascade options. Confirm that Access has read this as a One-to-One type of relationship.
In the Relationships diagram, the join appears. Check that Access marks the join in the Relationships diagram with a 1 at each end:
Figure 28A One-to-One Relationship in the Relationships Diagram
Working With The Data
Step 4. Create a query to re-assemble data that belongs together
Although the data about a particular patient has been split between tables, when you analyse the data you will want to see a patient’s data assembled together. Create a query with both tables, and pick some fields to display.
Figure 29A Query Joining the Two Tables
This presents the data associated with each patient, taken from both tables:
Figure 30Query Results
So although the data is located in two tables, it can be assembled together for viewing and analysis.
Step 5. Create a form based on the query
You don’t want to work on the data in datasheet view.
Create a quick form by first selecting the query name then clicking :
Figure 31An Instant Form Showing Patient Data
Figure 32Working on the Data Using the Form
In this form, you can conveniently enter the name of a new patient, their address and the results of their tests - some of those fields will be stored in one table, some go into another, but you don’t need to think about that when you are working in the form.
Figure 33Data From Both Tables is Available in One Form
Step 7. Confirm that the data has been entered
Look at the raw data in the two tables. You have created a new record in each table, and they are linked together because they concern the same person.
Figure 34Related Data is Stored in 2 Tables
From now on, once you have seen that the data arrives correctly in the two tables, you will want to use the single form whenever working on this data.
Appendix 3: Student Exercises
Exercise 1 Creating a new database file
Start Access
Create a new file
Save the new database
Look at the Navigation Pane
All the files for these exercises have been provided for you on a network drive. Your area of the drive is called drive H:
In the IT teaching rooms, this drive has been set up as an Access Trusted Location
Task 1
Start Access from the Start menu
Step 1
Start the computer if necessary
Step 2
In the Start menu, explore the software available and look for the Microsoft Office folder
Choose Access Step 3
If you are prompted for any user information, just click on OK
Step 4
(On your office or home computer you are likely to start the program using an Access icon on the Desktop, or using the Start button on the Task Bar at the bottom of the screen)
Task 2
Create a new blank database, named
My Music Collection.acc db and save it in drive H: (or in another place as directed by your teacher)
Step 1
Click on
Step 2
In the Blank Database area on the right side of the screen, click and navigate to driveH:
(or another place as directed by your teacher)
Step 3
Enter a new filename My Music Collection
Step 4
Task 3
Leave the file open
Step 1
The new file opens, showing an empty table and the Navigation Pane (but no other saved objects yet)
Step 2
Maximise the window, if necessary
Step 3
Leave the database open for the next exercise
Exercise 2 Creating a table with fields
Create a table
It will need fields for cataloguing a music collection
In Design View, specify some fields
Save the table design
Task 1
Continue working in the file My Music Collection.accdb which you created in the previous exercise
You are going to create a table, to catalogue your collection of music (CD’s, LP’s, MP3’s etc.)
Task 2
Use the blank new table provided
Step 1
Ensure that the new file My Music Collection.accdb is still open
(use File|Open if necessary to find and re-open it)
Step 2
A new blank table is waiting for your data The table is shown in Datasheet View
Step 3
Some nameless fields are provided – do not be tempted to add any data at this stage
Task 3
If, later, you need to create further new tables, use on the Create tab
Task 4
Save the new table as tblRecordings
Step 1
It is good practice to save the table with a
conventionally-chosen name, before adding much information
Step 2
Choose on the File tab Give the table name tblRecordings
Task 6
In Design View, set up
fields for
Titleand
Condition
Step 1
Edit the name of the first field to be: RecordingID
Step 2
Type the name of the next field: Title
Step 3
Type the name of the next field: Condition
Task 7
Complete the data types and descriptions for the fields
Step 1
Confirm that both new fields have the Text data type
Step 2
Type a few words as Description for each field
Task 8
Save the table design
Step 1
Click to save the table design Do not close the table yet
Exercise 3 Using the table to store data (optional revision)
In Datasheet View, add some data
Navigate between fields and between records
Close the table and close the file
Task 1
Continue working in the table tblRecordings which you created in the previous exercise
You are going to add some data, describing your collection of music (CD’s, LP’s, MP3’s etc.)
Task 2
Use the View button on the Home tab, to switch to Datasheet View
Task 3
In Datasheet View, enter data for these recordings, then some more of your own choice:
Step 1
Notice the field names that you have set up are now shown at the tops of the field columns
Step 2
In the first record (the top row), type Revolver in the
Title field
Step 3
You will use the Condition field (column) to record the condition of each record, CD etc.
In the first record, in the Condition field, enter Fair
Step 4
Allow Access to enter a RecordingID number automatically
Step 5
Move down to the next record
Add data for these further recordings, then some others if you wish:
Dark Side of the Moon Good
Super Trouper As New
Bohemian Rhapsody Much used
Marriage of Figaro Good
Task 4
Practice using the mouse and the navigation buttons to move between cells of the table, between fields and between records
Step 1
Use the mouse to move between fields, on the same record
Use the mouse to move to another record
Step 2
Use the arrow keys to move between fields and between records
Step 3
Use TAB and SHIFT+TAB to move between the fields and records
Task 5
Close the table and close the file
Step 1
Click to save the table design
Notice that you do not explicitly save the data: data is saved as you leave each record
Step 2
Click at the top right corner of the table, to close the table
Step 3
Look for the new table name, tblRecordings, in the Navigation Pane
Step 4
Use File|Close Database to close the My Music Collection file
Exercise 4 A database file with tables
Open an existing database file
View the list of tables
Delete a table
Open an existing table in Design View
Task 1
Open Favourites.accdb and look at the tables listed This file will be in drive H: (or in another place as directed by your teacher)
Step 1
Choose File|Open
If necessary, navigate to the network drive H: (or another place as directed by your teacher) Open Favourites.accdb
This database contains some of Tom’s favourite pieces of work
Step 2
Ensure that the Navigation Pane shows all the Access objects, grouped into Tables, Queries, Forms and so on.
If necessary:
click the menu bar at the top of the Navigation Pane under Navigate To Category choose
Object Type
under Filter by Group choose All Access Objects
Notice the list of tables that have already been created in this database, such as tblFavouriteBooks and
tblFavouriteFilms
Task 2
Delete tblFavouriteBooks
Step 1
Select tblFavouriteBooks and press DELETE to delete this table
Task 3
Open tblFavouriteFilms in Design View
Step 1
Right-click on tblFavouriteFilms and click to open this table in Design View
Task 4
Exercise 5 Creating fields
Add some fields to a table
Set Data types for each field
Give Descriptions
Task 1
Continue work on tblFavouriteFilms
Step 1
Ensure that tblFavouriteFilms is open in Design View
This is in Favourites.accdb
Task 2
Add a new field called Director, with a suitable Data Type and Description
Step 1
Click on an empty row in the table design grid In the Field Name column, type Director
Step 2
In the Data Type column, click the drop-down menu and choose Text
Step 3
Type a Description:
Name of the film’s Director
Task 3
Add another field for the date that Tom (or his mum or whoever) first saw this film
Step 1
Click on another empty row
In the Field Name column, type DateSeen
Step 2
In the Data Type column, click the drop-down menu and choose Date/Time
Step 3
In the Description column, type Date you first saw this film
Task 4
Close the table, saving changes to the design when prompted
Step 1
Click on the table title bar
When prompted, agree to save changes to the table design
Exercise 6 Field properties
Set formats for some data fields
Set up a lookup list for a field
Create a validation rule and text for one field
Make one field mandatory
Try the new design in Datasheet View
Task 1
Open
tblFavouriteMusicTracks
Step 1
Select tblFavouriteMusicTracks and open it in Design View
This is in Favourites.accdb
Task 2
Change some data formats: Field size for Title is 100 characters
Title is a mandatory field DatePurchased has the format Medium Date Price has the Currency Data Type
Step 1
Click in the Title field row
In the Field Properties, click in the Field Size row and enter 100
Step 2
Still with the Title selected, click in the Required property and choose Yes
Step 3
At some point, Access offers to check that the data still conforms to the new Data Type you have set: agree to this when asked
Step 4
Click in the DatePurchased field row In the Data Type column, choose Date/Time
In the Field Properties, click in the Format row and use the drop-down menu to choose Medium Date
Step 5
Click in the Price field row Select the Currency Data Type
Task 3
Set up a lookup control to help users choose a person for WhoseFavourite (Do not limit users to the names offered in the list)
Step 1
Select the WhoseFavourite field
The command to start the Lookup Wizard is found lurking at the bottom of the Data Type drop-down Start the Lookup Wizard
Step 2
You will type in the values (one in each row, in one column)
Give some plausible names, such as Edward, William, Clarrie, Emma, Nic, Joe
Step 3