DATABASE SERVER PERFORMANCE USING FULL DISK ENCRYPTION
Executive summary
Because your company’s servers store sensitive information, you understand the importance of guarding against data theft. You also strive to minimize the power demands of your servers. While full disk encryption (FDE) is very powerful—the gold standard for data protection—it has traditionally carried a significant performance price and required power-hungry servers. Many businesses have considered the trade-offs involved and elected to forego the security FDE offers so they can avoid the crippling database performance hit and increased power usage that would accompany it.
Happily, this trade-off is no longer necessary. In our hands-on testing of the new Intel Xeon processor E7-4870, featuring Intel Advanced Encryption Standard New Instructions (AES-NI), we were able to invoke the protection of full disk encryption with minimal performance and power impact. We showed that enabling FDE reduced database performance by only 3.85 percent, a dramatic improvement over the unacceptable 21.89 percent performance decrease FDE caused when we enabled it on a similarly configured legacy server with the previous-generation Intel Xeon processor X7460. In addition, the Intel Xeon processor E7-4870-based server delivered more than four times the performance and approximately four times the performance per watt of the Intel Xeon processor X7460-based server when both ran using FDE.
INTEL REMOVES THE FDE PERFORMANCE HIT
Picture this: Despite your best efforts at security, an entire server hard drive full of sensitive company data is in the wrong hands. The root cause could be as malicious as a criminal removing a server from the building or as
innocuous as an employee failing to wipe the hard drives on a server sent out for repair.2 Once the device is at large, your only hope is that whoever now possesses it cannot access the data it holds. That’s where Intel AES-NI, and FDE come in. But can you run FDE and still achieve acceptable performance?
Based on our findings, the answer is an emphatic “yes.” We measured the database performance of the two servers, both with and without FDE, and present our findings in jobs per minute (JPM). The performance boost of the new Intel Xeon processor E7-4870 using AES-NI was significant enough to allow our server to use FDE and still run database applications quickly.
Performance boost
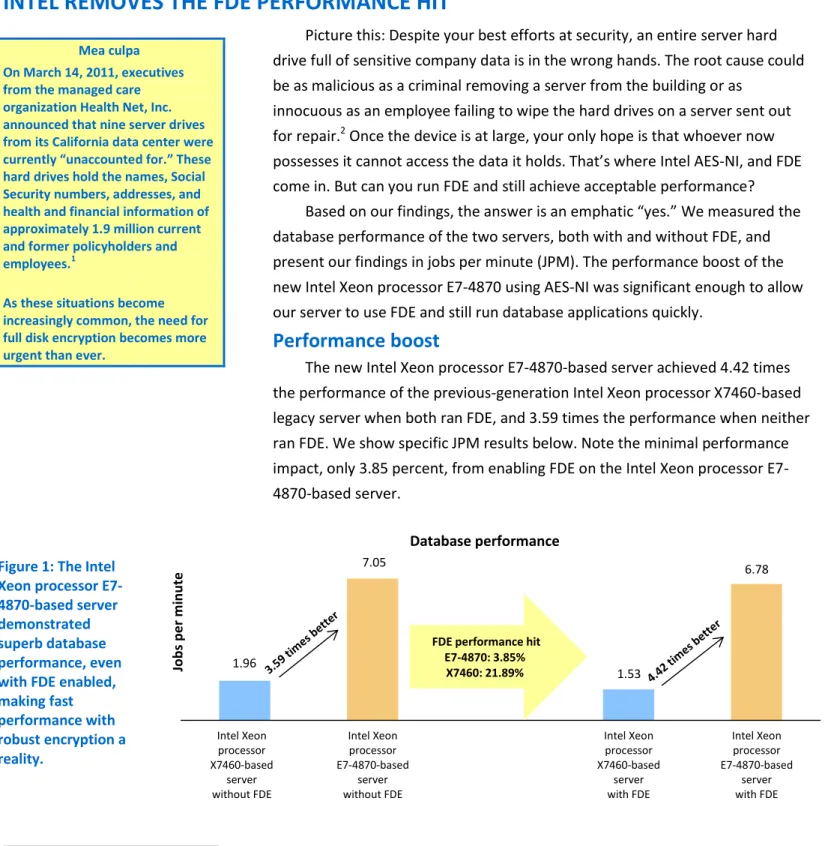
The new Intel Xeon processor E7-4870-based server achieved 4.42 times the performance of the previous-generation Intel Xeon processor X7460-based legacy server when both ran FDE, and 3.59 times the performance when neither ran FDE. We show specific JPM results below. Note the minimal performance impact, only 3.85 percent, from enabling FDE on the Intel Xeon processor E7-4870-based server.
1
http://www.californiahealthline.org/articles/2011/3/15/health-net-reports-data-breach-affecting-19m-current-past-enrollees.aspx
2
In 2009, at the National Archive and Records Administration, this actually happened, resulting in the breach of over 70 million
Mea culpa On March 14, 2011, executives from the managed care organization Health Net, Inc. announced that nine server drives from its California data center were currently “unaccounted for.” These hard drives hold the names, Social Security numbers, addresses, and health and financial information of approximately 1.9 million current and former policyholders and employees.1
As these situations become increasingly common, the need for full disk encryption becomes more urgent than ever.
Figure 1: The Intel Xeon processor E7-4870-based server demonstrated superb database performance, even with FDE enabled, making fast performance with robust encryption a reality. 1.96 7.05 1.53 6.78 Intel Xeon processor X7460-based server without FDE Intel Xeon processor E7-4870-based server without FDE Intel Xeon processor X7460-based server with FDE Intel Xeon processor E7-4870-based server with FDE Jo b s p e r m in u te Database performance
FDE performance hit E7-4870: 3.85% X7460: 21.89%
Performance-per-watt improvement
The Intel Xeon processor E7-4870-based server delivered 3.99 times better performance per watt than the Intel Xeon processor X7460-based server when each ran FDE, and 3.23 times better performance per watt when neither ran FDE. We show specific K-jobs-per-watt results below The performance-per-watt impact of enabling FDE on the Intel Xeon processor E7-4870-based server was minimal, only 4.67 percent.
Faster full disk encryption
We also measured the time each server took to encrypt the data store volume (an eight-disk RAID 5). The Intel Xeon processor E7-4870-based server did so 36.90 percent faster: 53 minutes vs. 84 minutes on the Intel Xeon processor X7460-based server.
INTEL AES-NI AND FDE: PART OF YOUR INSURANCE POLICY AGAINST DATA THEFT
(Note: If you’re already familiar with cryptography, AES-NI, and FDE, you might want to skip to the detailed test results.)From pottery recipes to national security
Cryptography, or the hiding of sensitive information, has existed for as long as people have had something to hide. From its humble origins circa 1500 BC as an encrypted Mesopotamian pottery glaze recipe, the practice of cryptography has evolved, becoming increasingly complex. In 2001, the US Government adopted the Advanced Encryption Standard for protection of classified data.
The AES algorithm uses a symmetric block cipher method to convert data to an unreadable ciphertext; AES then decrypts this ciphertext and converts it into readable plaintext. AES offers a variety of key lengths, the highest of which (192 and 256) are sufficiently strong that the National Security Agency uses Figure 2: The Intel
Xeon processor E7-4870-based server achieved impressive performance- per-watt results, even with FDE enabled.
2.15 6.95 1.66 6.62 Intel Xeon processor X7460-based server without FDE Intel Xeon processor E7-4870-based server without FDE Intel Xeon processor X7460-based server with FDE Intel Xeon processor E7-4870-based server with FDE K -job s p e r wat
t Performance per watt
FDE performance hit E7-4870: 4.67%
them to protect top-secret data. AES was specifically designed to make effective use of computing resources, offering high speed with minimal RAM usage.
New Intel instructions optimize AES
With AES-NI, Intel has created a set of seven new instructions for its new Xeon processor series. Each instruction accelerates the encryption and
decryption process by using processor hardware to speed up portions of the AES algorithms. Four improve encryption and decryption, two improve matrix manipulation and key generation, and one improves carry-less multiplication (which improves error-correcting codes, data deduplication, and general-purpose cyclic redundancy checks).
Additionally, the fact that Intel AES-NI is hardware based means that server drives are less vulnerable to attacks that exploit certain types of data held in the memory of software-based AES. For example, a cache-based software-side channel attack can detect changes in the memory cache, allowing it to identify parts of the cryptographic key value. A server using an AES-NI encrypted hard drive isn’t vulnerable to such attacks because it executes its instructions in hardware.
The end result? Servers powered by the Intel Xeon processor E7-4870 offer faster and more secure AES encryption than servers using previous-generation processors.
FDE helps keep your data safe
Full disk encryption refers to a drive that has been encrypted, either via hardware or via encryption software such as BitLocker, which we used in our testing. Most FDE methods encrypt everything on the drive except the master boot record (i.e., they encrypt swap space, temporary files, etc.). This avoids scenarios where users forget to encrypt certain folders, which unauthorized individuals can access after a data breach. FDE ensures that data on a lost or stolen server hard drive will be unreadable, thus helping your company to comply with the numerous federal and industry regulations designed to protect consumers’ confidential data (see sidebar).
Because any server using FDE must encrypt and decrypt data while also running applications, FDE has typically imposed a substantial performance hit on disk-intensive database operations. The more disk-intensive the activity, the greater the impact FDE has had on servers. Until now.
Getting serious about data loss These US government and industry regulations now enforce strict encryption rules and impose severe penalties on companies who fail to comply:
Health Insurance Portability and Accountability Act of 1996 requires health data to be encrypted. Penalties: 10-year prison sentence and $25,000 maximum yearly fine. Health Information Technology for Economic and Clinical Health Act of 2009 requires companies to notify media and government after unencrypted data is breached, sets encryption standards for data. Sarbanes-Oxley Act requires strict
security guidelines, and defines best practices. Penalties: 10-year prison sentence and $15,000,000
maximum fine.
Payment Card Industry Data Security Standard requires encryption of card and account numbers. Penalty: Fines up to $500,000.
Intel AES-NI speeds up AES encryption.
TEST RESULTS IN MORE DETAIL
Figure 5 shows our detailed test results, with and without FDE, for the older Intel Xeon processor X7460-based server and the newer Intel Xeon processor E7-4870-based server. Higher JPM is better, while lower times and processor utilization are better. We used Benchmark Factory to create our workload.
The Intel Xeon processor E7-4870-based server delivered 3.59 times more JPM than the Intel Xeon processor X7460-based server when neither ran FDE, and delivered 4.42 times more JPM when both ran FDE. The Intel Xeon processor E7-4870-based server utilized its processors more efficiently, using 8.41 percent less of its processor than the Intel Xeon processor X7460-based processor when neither ran FDE, and 7.65 percent less of its processor when both ran FDE.
Benchmark Factory results
Intel Xeon processor-based server Jobs per minute Time to run 132
jobs (seconds)
Processor utilization
Intel Xeon processor X7460-based server without FDE 1.96 4,035 99.39%
Intel Xeon processor X7460-based server with FDE 1.53 5,166 99.09%
Intel Xeon processor E7-4870-based server without FDE 7.05 1,123 91.03%
Intel Xeon processor E7-4870-based server with FDE 6.78 1,168 91.51%
Figure 5: Detailed Benchmark Factory results for the two servers, with and without FDE.
Figure 6 shows the power and K-jobs-per-watt results. Lower power and higher K-jobs-per-watt results are better. The power numbers are
approximately 100 watts higher for the Intel Xeon processor E7-4870-based serveran acceptable tradeoff for a four-fold performance increase. We calculated K-jobs per watt as jobs per minute divided by the wattage. Power and K-jobs-per-watt results
Intel Xeon processor-based server Power (W) K-jobs per watt
Intel Xeon processor X7460-based server without FDE 912.68 2.15
Intel Xeon processor X7460-based server with FDE 924.37 1.66
Intel Xeon processor E7-4870-based server without FDE 1,015.48 6.95
Intel Xeon processor E7-4870-based server with FDE 1,024.22 6.62
Figure 6: Detailed power and K-jobs-per-watt results for the two servers, with and without FDE.
We explain our system specs in Appendix A, our test tools in Appendix B, and our test methodology in Appendix C.
FINAL THOUGHTS
The Intel Xeon processor E7-4870-based servers show how Intel AES-NI increases database performance on server hard drives that are also running FDE, while also saving power. Compared with servers circa 2008 based on the Intel Xeon processor X7460 series, fully encrypted performance improved by over 4 times, along with increased K-jobs per watt and lower total time to encrypt RAID storage. Simply stated, the Intel Xeon processor E7-4870 processor eliminates the either/or choice of great performance or FDE, allowing you to enjoy both.
Encrypting your server drives puts your organization on the right side of numerous government and industry regulations, and makes you more confident in your ability to protect sensitive information. The accompanying performance increase, as well as the decreased processor and power utilization, means you’ll be running demanding database applications at top speeds with FDE.
APPENDIX A – SERVER AND STORAGE CONFIGURATION INFORMATION
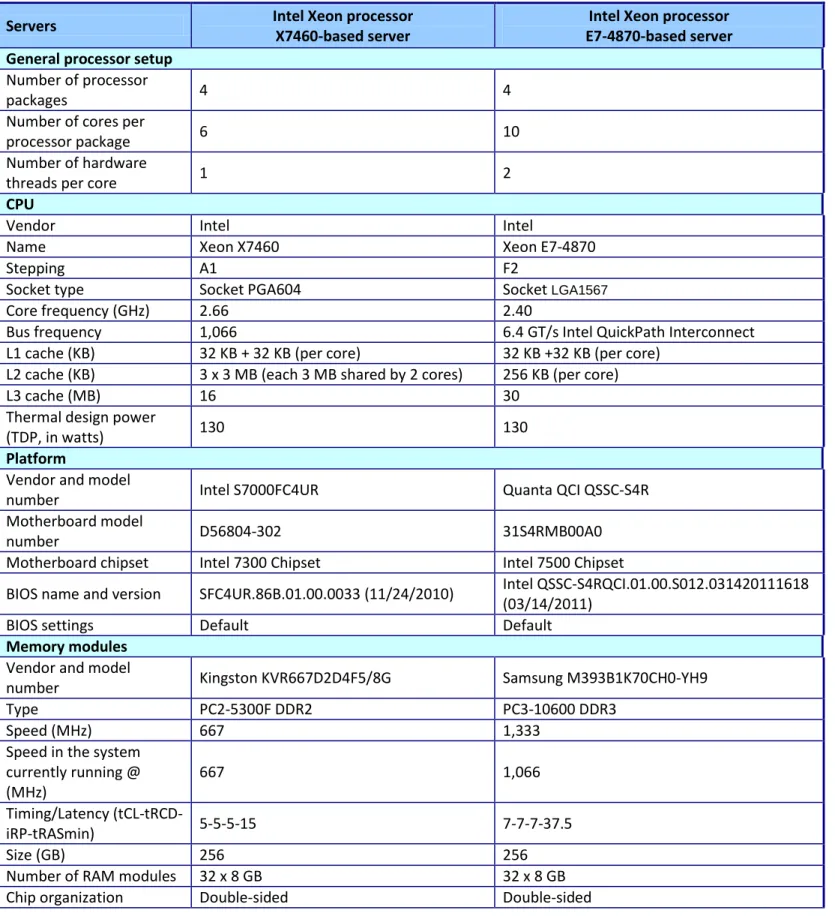
Figure 7 provides detailed configuration information about the test servers.Servers Intel Xeon processor
X7460-based server
Intel Xeon processor E7-4870-based server General processor setup
Number of processor
packages 4 4
Number of cores per
processor package 6 10
Number of hardware
threads per core 1 2
CPU
Vendor Intel Intel
Name Xeon X7460 Xeon E7-4870
Stepping A1 F2
Socket type Socket PGA604 Socket LGA1567
Core frequency (GHz) 2.66 2.40
Bus frequency 1,066 6.4 GT/s Intel QuickPath Interconnect
L1 cache (KB) 32 KB + 32 KB (per core) 32 KB +32 KB (per core) L2 cache (KB) 3 x 3 MB (each 3 MB shared by 2 cores) 256 KB (per core)
L3 cache (MB) 16 30
Thermal design power
(TDP, in watts) 130 130
Platform
Vendor and model
number Intel S7000FC4UR Quanta QCI QSSC-S4R
Motherboard model
number D56804-302 31S4RMB00A0
Motherboard chipset Intel 7300 Chipset Intel 7500 Chipset
BIOS name and version SFC4UR.86B.01.00.0033 (11/24/2010) Intel QSSC-S4RQCI.01.00.S012.031420111618 (03/14/2011)
BIOS settings Default Default
Memory modules Vendor and model
number Kingston KVR667D2D4F5/8G Samsung M393B1K70CH0-YH9
Type PC2-5300F DDR2 PC3-10600 DDR3
Speed (MHz) 667 1,333
Speed in the system currently running @ (MHz) 667 1,066 Timing/Latency (tCL-tRCD-iRP-tRASmin) 5-5-5-15 7-7-7-37.5 Size (GB) 256 256
Number of RAM modules 32 x 8 GB 32 x 8 GB
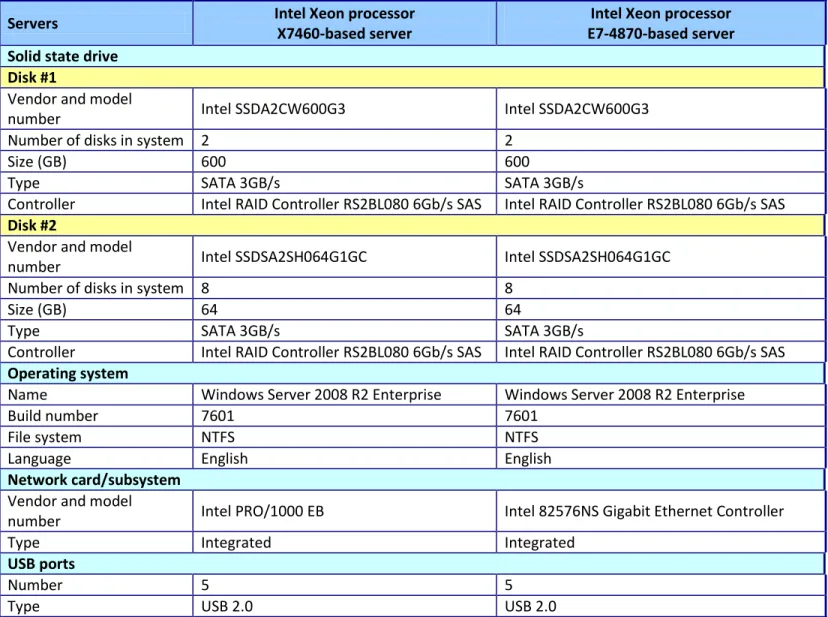
Servers Intel Xeon processor X7460-based server
Intel Xeon processor E7-4870-based server Solid state drive
Disk #1
Vendor and model
number Intel SSDA2CW600G3 Intel SSDA2CW600G3
Number of disks in system 2 2
Size (GB) 600 600
Type SATA 3GB/s SATA 3GB/s
Controller Intel RAID Controller RS2BL080 6Gb/s SAS Intel RAID Controller RS2BL080 6Gb/s SAS Disk #2
Vendor and model
number Intel SSDSA2SH064G1GC Intel SSDSA2SH064G1GC
Number of disks in system 8 8
Size (GB) 64 64
Type SATA 3GB/s SATA 3GB/s
Controller Intel RAID Controller RS2BL080 6Gb/s SAS Intel RAID Controller RS2BL080 6Gb/s SAS Operating system
Name Windows Server 2008 R2 Enterprise Windows Server 2008 R2 Enterprise
Build number 7601 7601
File system NTFS NTFS
Language English English
Network card/subsystem Vendor and model
number Intel PRO/1000 EB Intel 82576NS Gigabit Ethernet Controller
Type Integrated Integrated
USB ports
Number 5 5
Type USB 2.0 USB 2.0
APPENDIX B – THE TEST TOOLS WE USED
In this section, we discuss the tools we used in our tests.Benchmark Factory TPC-H-like workload
We used Quest Software® Benchmark Factory® as our test engine, using its custom load scenario feature to create a TPC-H-like business intelligence database workload. (While Benchmark Factory’s workload is similar to the more widely known Transaction Processing Performance Council (TPC) benchmarks, the results are not directly comparable.) We used Benchmark Factory’s workload because it focuses on decision support systems, which run complex queries, examine large data volumes, and provide answers to important business questions.
The workload results show the time taken in seconds to complete a defined 22-query workload. We call these queries jobs to avoid confusion with metrics from other benchmarks. Taking less time to perform the same task is better. We converted this run time to a jobs-per-minute (JPM) metric, making a repeatable real-world measurement of the actions our servers carried out. We ran six test users for testing, each running the 22 jobs, for a total of 132 jobs. We calculate JPM by multiplying the 132 jobs times 60 (the number of seconds in a minute), and then dividing that number by the run time in seconds.
For more details about the Benchmark Factory software, see http://www.quest.com/benchmark-factory/.
BitLocker
Microsoft includes BitLocker™ full disk Drive Encryption with the following operating systems: Ultimate and Enterprise editions of Windows Vista and Windows 7, and Windows Server 2008 and Server 2008 R2. BitLocker uses 128-bit key AES encryption, and allows you to easily and transparently encrypt entire volumes, either on a single drive or across multiple drives, and to encrypt removable drives. BitLocker automatically encrypts any new files you add to a drive (or drives), and checks the drive(s) for security threats each time you start up the computer. Note that BitLocker locks down the drive if it detects a security hazard, and you must then use a recovery key in gain access to your data. Like all FDE methods, BitLocker exacts a performance hit on any drive that uses it.
To learn more about BitLocker, visit
APPENDIX C – DETAILED TEST METHODOLOGY
Here, we explain the detailed steps we followed to set up our test scenario.
Setting up the servers
We installed a fresh copy of Windows Server 2008 R2 Enterprise Edition on each server.
Installing Windows Server 2008 R2 Enterprise Edition
1. Boot the server, and insert the Windows Server 2008 R2 installation DVD in the DVD-ROM drive. 2. At the Language Selection Screen, click Next.
3. Click Install Now.
4. Select Windows Server 2008 R2 Enterprise (Full Installation), and click Next. 5. Click the I accept the license terms check box, and click Next.
6. Click Custom.
7. Click Drive options (advanced).
8. Ensure you select the proper drive, and click New. 9. Click Apply.
10. Click Next.
11. At the User’s password must be changed before logging on warning screen, click OK. 12. Type Password1 as the new password in both fields, and click the arrow to continue. 13. At the Your password has been changed screen, click OK.
Installing system updates in Windows Server 2008 R2
We installed all available updates on each server using the Windows Update feature.
Installing SQL Server 2008 R2 on the server
1. Insert the installation DVD for SQL Server 2008 R2 (X64) into the DVD drive.
2. If autoplay does not begin the installation, navigate to the SQL Server 2008 DVD, and double-click. 3. If a .NET installation prompt appears, click Yes to enable the .NET Framework Core role.
4. At the SQL Server Installation Center screen, click Installation. 5. Click New installation or add features to an existing installation. 6. At the Setup Support Rules screen, click OK.
7. At the Product Key screen, specify the free Enterprise edition evaluation, and click Next. 8. At the License Terms screen, accept the license terms, and click Next.
9. At the Setup Support Files screen, click Install. 10. At the Setup Support Rules screen, click Next.
11. At the Setup Role screen, choose SQL Server Feature Installation, and click Next.
12. At the SQL Server 2008 R2 Feature Selection screen, select the following features: Database Engine Services, Full-Text Search, Client Tools Connectivity, Client Tools Backwards Compatibility, Management Tools – Basic, Management Tools – Complete, and click Next.
13. At the Installation Rules screen, click Next.
14. At the Instance Configuration screen, leave the defaults, and click Next. 15. At the Disk Space Requirements screen, click Next.
16. At the Server Configuration screen, choose the service account, fill in a password if necessary, and click Next. 17. At the Database Engine Configuration screen, select Mixed Mode, fill in a password for the system administrator
20. At the Installation screen, click Install. 21. At the Complete screen, click Close.
Configuring SQL Server to run Benchmark Factory 6.5
1. Click StartAll ProgramsMicrosoft SQL Server 2008 R2SQL Server Management Studio.
2. Select SQL Server Authentication, type sa and Password1 as your login and password respectively, and click Connect.
3. Use the script below to create a blank database. CREATE DATABASE tpch150s ON PRIMARY (name=tpch150s_data1,filename='e:\tpch150s_data1.mdf',size=30000mb,filegrowt h=100mb), (name=tpch150s_data2,filename='e:\tpch150s_data2.mdf',size=30000mb,filegrowt h=100mb), (name=tpch150s_data3,filename='e:\tpch150s_data3.mdf',size=30000mb,filegrowt h=100mb), (name=tpch150s_data4,filename='e:\tpch150s_data4.mdf',size=30000mb,filegrowt h=100mb), (name=tpch150s_data5,filename='e:\tpch150s_data5.mdf',size=30000mb,filegrowt h=100mb), (name=tpch150s_data6,filename='e:\tpch150s_data6.mdf',size=30000mb,filegrowt h=100mb), (name=tpch150s_data7,filename='e:\tpch150s_data7.mdf',size=30000mb,filegrowt h=100mb), (name=tpch150s_data8,filename='e:\tpch150s_data8.mdf',size=30000mb,filegrowt h=100mb) LOG ON (name=tpch150s_log,filename='c:\logs\tpch150s_log.ldf',size=1000mb,filegrowt h=100mb) GO
ALTER DATABASE tpch150s SET RECOVERY BULK_LOGGED GO
Setting up the client
We installed a fresh copy of Windows 7 Ultimate Edition on the client machine.
Installing Benchmark Factory on the client
1. Right-click BenchmarkFactory_6_5_0_332.msi, and select Install. 2. At the Welcome screen, click Next.
3. Accept the License Terms, and click Next. 4. At the Destination Folder screen, click Next.
5. At the Ready to Install the Program screen, select Yes, install the default repository database, and click Install. 6. At the Installation Wizard Completed screen, click Finish.
7. Click StartAll Programs Quest SoftwareBenchmark Factory for Databases. 8. At the Benchmark Factory repository tables prompt, click OK.
9. At the Load Scenario Wizard screen, click Cancel. 10. Click Help and Select Licensing.
12. Click OK, and click Close. Restart Benchmark Factory.
Configuring Benchmark Factory
1. Click StartAll ProgramsQuest SoftwareBenchmark Factory for Databases. 2. At the Welcome to the Load Scenario Wizard screen, click Next.
3. At the Select Load Scenario screen, select Industry standard benchmarks (TPC-C, TPC-E, TPC-H…), and click Next. 4. At the Select Benchmark screen, select TPC-H, and click Next.
5. At the Select Profile screen, click New.
6. At the Welcome to the Profile Creation wizard screen, click Next. 7. Choose Microsoft SQL Server (Obsolete), and click Next.
8. At the Connection Information screen, enter the server name, select SQL Server Authentication as the Authentication mode, and enter login credentials.
9. Select the TCPH database, and click Next.
10. At the Profile Name screen, enter a name for the newly created profile, and click Next. 11. Click Finish.
12. At the Select Profile screen, select the newly created profile, and click Next.
13. At the Benchmark Scale screen, enter the appropriate benchmark scale, and click Next. 14. Select Create a new Benchmark Factory Script file, and click Next.
15. Uncheck Do you want the job to be automatically submitted to the jobs Queue?, and click Finish. 16. Click Create Objects for TPC-H, click the Submit to jobs queue icon, and click Submit.
Backing up the database
1. Start SQL Server Management Studio by selecting StartAll ProgramsMicrosoft SQL Server 2008 R2SQL Server Management Studio.
2. In the Object Explorer pane, browse to Databases node and right-click the database. 3. Choose PropertiesOptions
4. Scroll down to Restrict Access and choose SINGLE_USER. 5. Click OK, and accept the warning to disconnect other users. 6. Right-click on the database again and choose TasksBack up… 7. Specify the desired path to your backup file.
8. Choose to compress the backup file, and click OK to begin the backup. 9. When the backup is finished, click OK to close the success message.
Executing the benchmark
We completed the following steps each time we executed a full run in order to ensure that each run was uncontaminated by the previous run. We performed three runs on each server to ensure that our results were valid representations of server performance.
Encrypting the data drive
We encrypted the data drive anew for each run to ensure a clean start. 1. Start perfmon.
6. Click Yes on the pop-up. 7. Click Next.
8. Start power for encryption. 9. Wait 2 minutes.
10. Click Start to begin encrypting.
Starting the run
Once the drive finished encrypting, we performed the following steps to run Benchmark Factory:
1. Click StartAll ProgramsSQL Server 2008 R2SQL Server Configuration Manager, and start the SQL service. 2. Start perfmon.
3. Start power recording. 4. Open Benchmark Factory
5. Queue up the 10 minute wait task. 6. Queue up the Power task.
7. Queue up the 10 minute wait task. 8. Queue up the six user task.
9. Wait until Benchmark Factory finishes.
Cleaning up after the run
Once Benchmark Factory finished, we performed the following steps to restore the server to its beginning state. Be sure to re-encrypt the data drive before running Benchmark Factory again.
1. On the server, pull up the SQL manager and drop the database (tpch150s) by choosing Delete and checking Close existing connections.
2. Click StartAll ProgramsSQL Server 2008 R2SQL Server Configuration Manager, and stop the SQL service. 3. Wait for memory and CPU utilization to stabilize.
4. Open the disk manager, and delete the data drive (E). 5. Reboot the server.
6. Log into the RAID console. 7. Click the Logical tabVD_0.
8. Right-click the RAID, and click Delete.
9. Go to the dashboard wizard, and select the raid controller (non-embedded). 10. Create a new virtual drive.
11. Click Advanced.
12. Choose RAID 5 and “Auto” Power-save mode from the dropdown menus. 13. Select all drives, and click Add.
14. Click create drive group. 15. Click Next.
16. Choose Full Initialization, No read ahead policy, Always write back, and disabled disk cache policy from the dropdown menus.
17. Click Create drive. 18. Click Yes on the pop-up. 19. Click Next.
20. Click Finish.
21. Format the drive once the RAID has finished forming. Choose GPT on the popup, and click OK. 22. Choose New Simple Volume.
24. Click Next.
25. Label the volume, and uncheck Quick Format. 26. Click Next.
27. Click Finish.
28. Click StartAll ProgramsSQL Server 2008 R2SQL Server Configuration Manager, and start the SQL service. 29. Open the management studio.
30. Open FileRecent files sql_files\restore150s.sql.
RESTORE DATABASE [tpch150s] FROM DISK = N'C:\tpch150s.bak' WITH FILE = 1, NOUNLOAD, STATS = 1
GO
USE [master] GO
ALTER DATABASE [tpch150s] SET AUTO_CREATE_STATISTICS OFF GO
ALTER DATABASE [tpch150s] SET AUTO_UPDATE_STATISTICS OFF GO
ALTER DATABASE [tpch150s] SET DATE_CORRELATION_OPTIMIZATION ON GO
31. Click Execute.
32. When SQL is finished, click StartAll ProgramsSQL Server 2008 R2SQL Server Configuration Manager, and stop the SQL service.
ABOUT PRINCIPLED TECHNOLOGIES
Principled Technologies, Inc. 1007 Slater Road, Suite 300 Durham, NC, 27703
www.principledtechnologies.com
We provide industry-leading technology assessment and fact-based marketing services. We bring to every assignment extensive experience with and expertise in all aspects of technology testing and analysis, from researching new technologies, to developing new methodologies, to testing with existing and new tools.
When the assessment is complete, we know how to present the results to a broad range of target audiences. We provide our clients with the materials they need, from market-focused data to use in their own collateral to custom sales aids, such as test reports, performance assessments, and white papers. Every document reflects the results of our trusted independent analysis.
We provide customized services that focus on our clients’ individual requirements. Whether the technology involves hardware, software, Web sites, or services, we offer the experience, expertise, and tools to help our clients assess how it will fare against its competition, its performance, its market readiness, and its quality and reliability.
Our founders, Mark L. Van Name and Bill Catchings, have worked together in technology assessment for over 20 years. As journalists, they published over a thousand articles on a wide array of technology subjects. They created and led the Ziff-Davis Benchmark Operation, which
developed such industry-standard benchmarks as Ziff Davis Media’s Winstone and WebBench. They founded and led eTesting Labs, and after the acquisition of that company by Lionbridge Technologies were the head and CTO of VeriTest.
Principled Technologies is a registered trademark of Principled Technologies, Inc. All other product names are the trademarks of their respective owners.
Disclaimer of Warranties; Limitation of Liability:
PRINCIPLED TECHNOLOGIES, INC. HAS MADE REASONABLE EFFORTS TO ENSURE THE ACCURACY AND VALIDITY OF ITS TESTING, HOWEVER, PRINCIPLED TECHNOLOGIES, INC. SPECIFICALLY DISCLAIMS ANY WARRANTY, EXPRESSED OR IMPLIED, RELATING TO THE TEST RESULTS AND ANALYSIS, THEIR ACCURACY, COMPLETENESS OR QUALITY, INCLUDING ANY IMPLIED WARRANTY OF FITNESS FOR ANY PARTICULAR PURPOSE. ALL PERSONS OR ENTITIES RELYING ON THE RESULTS OF ANY TESTING DO SO AT THEIR OWN RISK, AND AGREE THAT PRINCIPLED
TECHNOLOGIES, INC., ITS EMPLOYEES AND ITS SUBCONTRACTORS SHALL HAVE NO LIABILITY WHATSOEVER FROM ANY CLAIM OF LOSS OR DAMAGE ON ACCOUNT OF ANY ALLEGED ERROR OR DEFECT IN ANY TESTING PROCEDURE OR RESULT.
IN NO EVENT SHALL PRINCIPLED TECHNOLOGIES, INC. BE LIABLE FOR INDIRECT, SPECIAL, INCIDENTAL, OR CONSEQUENTIAL DAMAGES IN CONNECTION WITH ITS TESTING, EVEN IF ADVISED OF THE POSSIBILITY OF SUCH DAMAGES. IN NO EVENT SHALL PRINCIPLED TECHNOLOGIES, INC.’S LIABILITY, INCLUDING FOR DIRECT DAMAGES, EXCEED THE AMOUNTS PAID IN CONNECTION WITH PRINCIPLED TECHNOLOGIES, INC.’S TESTING. CUSTOMER’S SOLE AND EXCLUSIVE REMEDIES ARE AS SET FORTH HEREIN.