Introducing
Silverlight 1.1
by Todd Anglin
Copyright © 2007 O'Reilly Media, Inc. ISBN: 9780596515836
Released: October 2, 2007
In this Short Cut, we'll take a close look at Silverlight 1.1 and bring clarity to this bleeding-edge technology. First we'll take a broad look at the new concept of Rich Internet Applications and how Sil-verlight fits into that picture. Then we'll examine how you work with Silverlight 1.1, highlighting tools, concepts, and code that you will need to build these in-teractive applications. Finally, we'll take a practical look at using Silverlight 1.1 to build a custom control, pulling all of the concepts and tools together.
Join ASP.NET Master and Telerik Chief Technical Evangelist Todd Anglin and the Telerik Team as they guide you to understanding Silverlight 1.1.
Contents
Understanding Silverlight 1.1 ... 2 What Is Silverlight 1.1? ... 7 An Overview of Rich Internet
Applications ... 9 Working with Silverlight 1.1 ... 13 Building Applications with
Silverlight 1.1 ... 60 Conclusions ... 75 Resources ... 75
Understanding Silverlight 1.1
Even though Silverlight 1.0 has now been released, many developers are awaiting the arrival of Silverlight 1.1 before taking a serious look at this new technology. Silverlight 1.1 will add the .NET dimension to Microsoft's new Rich Internet Ap-plication platform, enabling the global community of .NET developers to apply their VB, C#, and other CLR language skills to writing Silverlight applications. But there's no need to wait; you can take Silverlight for a test drive today.
Before we can begin to understand Silverlight 1.1, we first need to understand Silverlight in general. As Microsoft succinctly puts it, "Silverlight is a cross-browser, cross-platform plug-in developed by Microsoft for delivering the next generation of .NET-based media experiences and Rich Internet Applications (RIAs) for the Web." But where did it come from and how does it compare to other new tech-nologies like WPF? In this section, we'll review the history of the Silverlight project and compare Silverlight 1.1 to Silverlight 1.0 and WPF to gain a clear understand-ing of this new rich client framework.
The Short History of Silverlight
Microsoft unveiled Silverlight for the first time in late 2005 at PDC 2005. At the time, it was introduced as Windows Presentation Foundation Everywhere (WPF/ E), a subset of WPF technology that would work across platforms, delivered by the browser.
Almost a year later Microsoft released the first Silverlight CTP to the public. The December 2006 CTP version of Silverlight was very basic, enabling only JavaScript and XAML declarations to develop Silverlight applications. The February CTP improved upon the December release and for the first time started to attract serious attention from the Microsoft developer community. It added many new features, such as keyboard input (KeyUp/KeyDown), mouse cursor support, simple text metrics, and a unique full-screen mode. The February CTP in many ways kicked off the Silverlight buzz, with tutorials, articles, and even third-party frameworks all building on this early preview.
Despite the new popularity, many developers were still skeptical that Silverlight had any real potential. With only simple support for JavaScript and XAML, de-velopers viewed Silverlight as a basic solution for media applications on the Web and much too weak to challenge perennial cross-browser plug-ins like Flash. Then came MIX07.
On April 30th, at MIX07 in Las Vegas, Microsoft announced two new versions of
its Silverlight technology (in addition to the new "Silverlight" name): Silverlight 1.0 beta and Silverlight 1.1 alpha. The beta was an expected update to the February
CTP that had been around for a while, but the real excitement revolved around the 1.1 alpha announcement. Microsoft revealed that the 1.1 alpha version of Sil-verlight would enable SilSil-verlight development using the .NET Framework, and it would sport a flexible programming model that supports C#, VB, AJAX ASP.NET, and many other CLR languages. Finally, the future of Silverlight was revealed, and .NET developers truly began to recognize the power of programming client-side applications with .NET.
In addition to the excitement generated by the .NET announcement at MIX, the official "Silverlight" name shocked many people after a series of clever Microsoft code names (like Avalon and Indigo) succumbed to W*F product names by their release (such as Windows Communications Foundation, Windows Workflow Foundation, and Windows Presentation Foundation). For developers, Silverlight was a welcome change to the bland names that seemed to be dominating Microsoft development products. Furthering the cleverness of the name, all client files in Silverlight have the "AG" prefix, which is the atomic symbol for silver.
In the time that has passed since MIX, Microsoft has continued to develop and promote Silverlight. Silverlight 1.0, now available as an official release, has changed little since the MIX conference, and Silverlight 1.1 has definitely stolen much of the Silverlight press. Unfortunately, at the time of this writing Microsoft has yet to finalize the features, available .NET classes, or release date for Silverlight 1.1. For now, all Silverlight 1.1 work is being done on refreshed alpha bits, but a beta will likely be available around the end of the year or early 2008.
Comparing Silverlight 1.0 and Silverlight 1.1
There are two Silverlight versions (so far), the first of which was recently released in September 2007:
• Silverlight 1.0: The freshmen Silverlight version is limited to running JavaScript only in the browser and it lacks any built-in UI controls. To achieve data input with Silverlight 1.0, the browser's native UI controls must be overlaid on top of the Silverlight Canvas. Silverlight 1.0 also lacks any concept of a control model, but some third-party developers have built frameworks on top of Sil-verlight 1.0 that reduce this shortcoming. Support for data formats is also limited, with native support for POX (plain old XML) and JSON only. Silver-light 1.0 is focused on delivering rich media experiences and paving the way for widespread distribution of the auto-updating Silverlight plug-in.
• Silverlight 1.1: The second iteration of Silverlight will be very different from its predecessor. It will offer a flexible programming model that supports C#, VB, IronPython, and IronRuby (among other languages). The added support
for .NET programming in Silverlight 1.1 will make it much easier for exist-ing .NET developers to write Silverlight applications, and it will make it easier to integrate Silverlight with existing web applications. At the time of this writ-ing, Microsoft has not announced when Silverlight 1.1 will ship.
Both Silverlight versions will have a number of similarities, including:
• Fast media capabilities thanks to a powerful new rendering engine (originally codenamed "Jolt"). This engine will enable high-quality audio and video to be easily delivered to all major browsers including Internet Explorer, Apple Safari, and Mozilla Firefox running on Mac OS X or Microsoft Windows.
• Silverlight supports playback of VC-1 video content across all supported browsers without requiring the Windows Media Player ActiveX control or Windows Media browser plug-ins.
• Silverlight provides a graphics system similar to WPF that integrates multime-dia, graphics, animations, and interactivity into a single runtime. XAML, or Extensible Application Markup Language, can be used to create the vector graphics and animations used in Silverlight apps.
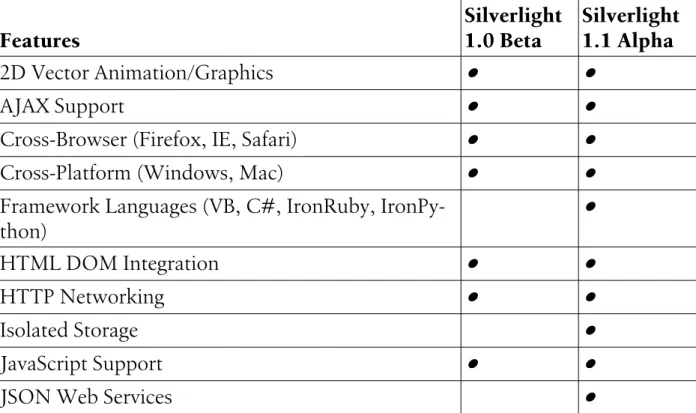
The Features Matrix below (Table 1) provides an overview of which runtime is required to use specific features in Silverlight applications.
Table 1. Silverlight Runtimes Feature Matrix
Features Silverlight 1.0 Beta Silverlight 1.1 Alpha 2D Vector Animation/Graphics ● ● AJAX Support ● ●
Cross-Browser (Firefox, IE, Safari) ● ●
Cross-Platform (Windows, Mac) ● ●
Framework Languages (VB, C#, IronRuby,
IronPy-thon) ●
HTML DOM Integration ● ●
HTTP Networking ● ●
Isolated Storage ●
JavaScript Support ● ●
Features Silverlight 1.0 Beta Silverlight 1.1 Alpha LINQ to Objects ●
Managed Control Framework ●
Managed HTML Bridge ●
Managed Exception Handling ●
Media – Content Protection ●
Media – 720P High Definition (HD) Video ● ●
Media – Audio/Video Support (VC-1, WMV, WMA,
MP3) ● ●
Media – Image Support (JPG, PNG) ● ●
Media Markers ● ●
Rich Core Framework (e.g. Generics, etc.) ●
Security Enforcement ●
Silverlight ASP.NET Controls (asp:media, asp:xaml) ● ●
Type Safety Verification ●
Windows Media Server Support ● ●
XAML Parser (based on WPF) ● ●
XMLReader/Writer ●
Comparing Silverlight 1.1 and WPF
Silverlight, formerly WPF/Everywhere, has a close relationship with the WPF framework. These technologies share a few key ingredients, but their target plat-form and scope are very different. WPF is a mature, fully scaled rendering and presentation technology targeted at the desktop. It allows a lot of computing-in-tensive UI concepts, like 3D rendering, and therefore depends on hardware acceleration for fast execution. Silverlight, on the other hand, is a young alpha technology (which means it is not feature complete) targeted at the browser. Like WPF, it utilizes XAML to create its UI markup, but the power of its rendering engine is considerably less than the full desktop WPF.
The differences between WPF and Silverlight can best be understood in the fol-lowing comparison chart (Table 2):
Table 2. Silverlight 1.1 compared to WPF
Silverlight WPF
Works on different operating systems – Windows, Mac OS, and Linux.
Requires Windows XP SP2, Windows Server 2003 SP1, or Window Vista. Runs inside a hosted process. In other
words, it must run inside of a browser, which means the technology targets the Web.
You can develop fully scaled WPF ap-plications that run independently from a browser. You can also remote-ly distribute and execute a WPF ap-plication inside of a browser via XBAP (XAML Browser Applications).
Web oriented by nature, not targeted for development of offline applications.
Targeted primarily at Windows desk-top applications.
Does not require .NET to be installed on the client.
Requires .NET 3.0 or later to be in-stalled on the client.
The managed code runtime is implemen-ted as a plug-in for different browsers (sim-ilar to Flash technology).
Implemented as a part of .NET 3.0 or later.
Supports multiple web browsers:
• Internet Explorer and Firefox on Win-dows; no support currently for Safari on Windows
• Firefox and Safari on Mac OS X Windows Vista and Windows XP Service Pack 2, Microsoft Internet Explorer 6, Windows Internet Explorer 7, Firefox 1.5.0.8 and 2.0.x, Apple Mac OS X, Firefox 1.5.0.8 and 2.0.x, Apple Safari 2.0.4.
Supports XBAP (XAML Browser Ap-plications) execution only on Win-dows (currently MS .NET runs only on Windows) and requires Internet Explorer 6 or later.
NET 2.0: Windows 2000 Service Pack 3, Windows XP Service Pack 2, Win-dows Vista; .NET 3.0: WinWin-dows Vista and Windows XP Service Pack 2; In-ternet Explorer 6, Windows InIn-ternet Explorer 7.
Supports media playback natively as part of the technology.
Requires Windows Media Player 10 or later for media playback.
Supports a subset of XAML. There are se-rious limits in the alpha release, such as the lack of resources.
Supports full XAML specification.
Supports JavaScript and managed languag-es like C# and VB.NET. Also supports managed versions of scripting languages
Supports only managed languages (C#, VB, J#, etc.)
Silverlight WPF
(through the Dynamic Language Runtime or DLR) like managed JavaScript, IronRu-by, and IronPython.
Prerequisites (the browser plug-in) size is around 6 MB for the Windows platform and around 10 MB for Mac.
Prerequisites size (.NET 3.0 or later, etc.) is more than 50MB.
Does not render 3D graphics. Incorporates 3D technology. Release date TBA; likely 2008. Released in November of 2006.
On a final note regarding WPF and Silverlight, it is a common misconception among .NET developers that Silverlight will enable them to directly place their WPF applications on the Web. In reality, the lightweight implementation of both the XAML rendering engine and .NET in Silverlight will make this a challenge. You will be able to share some of the XAML markup between your WPF and Silverlight applications, but porting a WPF application to the Web on Silverlight will not be an automatic or quick process.
What Is Silverlight 1.1?
Silverlight 1.1 is Microsoft's second planned release of the Silverlight platform. Silverlight 1.1's biggest change from Silverlight 1.0 is the inclusion of a compact version of the .NET Framework, complete with the .NET Framework 3.0 Common Language Runtime. By adding .NET to Silverlight, Microsoft will make it easy for developers to reuse their existing programming skills to work with designers and quickly create rich applications for the Web.
And even though Silverlight 1.1 will bring .NET to the client, it can be easily in-tegrated with many existing web technologies and backend web platforms. That means Silverlight will integrate with your existing infrastructure and applications, from IIS and .NET to Apache and PHP to simple JavaScript and XHTML on the client. Silverlight will not be a tool exclusive to ASP.NET web sites, which should result in broader adoption of the new technology.
Still, one of the key benefits of Silverlight 1.1 is that it can execute any .NET lan-guage, including C# and VB.NET. Unlike the CLR included with the "nor-mal" .NET Framework, multiple instances of the core "Silverlight CLR" can be hosted in a single process. With this, the layout markup in the Silverlight XAML (.xaml) file can be augmented by code-behind code with all programming logic written in any .NET language.
Silverlight 1.1 ships with a "lightweight" version of the full .NET Framework, which features—among other classes—extensible controls, XML Web Services, networking components, and LINQ APIs. This class library is a subset of (and is considerably smaller than) the .NET Framework's Base Class Library, which ena-bles the Silverlight plug-in to be a fast and small download. For security, all Silverlight code runs in a sandbox environment that prevents invoking platform APIs, protecting user computers from malicious code. Silverlight 1.1 also adds support for DRM in media files, a fact that will make some people happy and others cringe.
In addition to the .NET Framework classes, Silverlight 1.1 also ships with a subset of the WPF UI programming model, including support for shapes, documents, media, and WPF animation objects. Silverlight 1.1 alpha does not ship with many WPF UI controls, though, so out-of-the-box controls are still very limited. Fur-thermore, in the current Silverlight 1.1 builds, the UI controls do not have any ability to bind to data. Microsoft says that the data binding limitations are strictly temporary and future builds of Silverlight 1.1 will eliminate the problem. Count on future Silverlight releases adding more UI controls, data binding support, and a much-needed automated layout manager to the Silverlight mix.
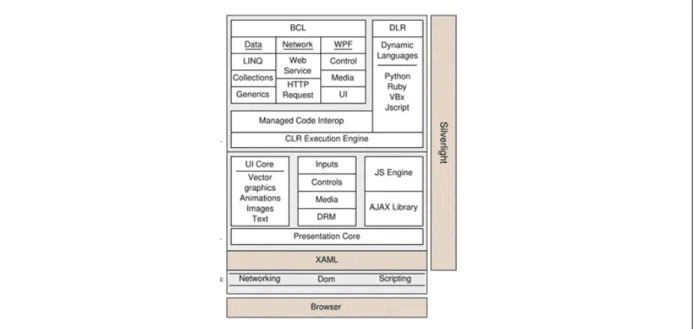
Figure 1 illustrates the Silverlight framework model. Figure 1. Silverlight framework model
An Overview of Rich Internet Applications
We have mentioned "Rich Internet Applications" a few times so far in the context of Silverlight, but what exactly is a "RIA" web application? And why would you want to adopt the RIA model for your own web development?
RIAs are web applications that have the features and functionality of traditional desktop applications. RIAs typically transfer the processing necessary for the user interface to the web client but keep the bulk of the data processing (such as main-taining the state of the program, the data, etc.) on the application server.
Traditional web applications center all activity on a client-server architecture, where a thin client (the web browser) interacts with a powerful server. Under this system, all processing is done on the server and the client is used only to display static HTML content. The biggest drawback with this system is that all interaction with the application must pass through the server. That means data must be sent to the server, the server must respond, and then the page must be reloaded on the client with the server's response. By moving more of this processing to client-side technology that can execute instructions on the client's computer, RIAs can cir-cumvent this slow, synchronous loop for many user interactions.
Benefits of Rich Internet Applications
One of the primary benefits of Rich Internet Applications is that they can offer user-interface behaviors that are not obtainable using only the HTML controls available in standard browser-based web applications. With a RIA platform, web applications are no longer limited by what the browser can do. Rather, they can implement any user interaction that the new RIA platform can support, such as drag-and-drop behaviors, smooth animations, and client-side calculations. While some of these interactions are possible without a RIA platform, the RIA approach is typically much more responsive and consistent across platforms.
The benefits of RIAs are not strictly looks, though. Using a client engine can also produce other performance benefits:
• Client/server balance. RIAs shift the balance of computing resources for web applications from the server to the client. This frees up resources on the web server, enabling the same server hardware to handle more concurrent user ses-sions. On the flip side, it requires that your users have computers that are powerful enough to execute complex client-side code, which generally is not a problem in this day and age.
• Asynchronous communication. The RIA client engine can interact with the server asynchronously—that is, without waiting for the user to perform an
in-terface action like clicking on a button or link. This feature enables RIA designers to move data between the user's PC and the server without making the user wait for the transfer to finish, similar to what Ajax is doing on the Web today.
• Network efficiency. Network traffic may also be significantly reduced in a RIA because an application-specific client engine can be more intelligent than a standard web browser when deciding what data needs to be exchanged with servers. Transferring less data for each interaction can speed up individual re-quests and responses, in turn reducing overall network load. Use of asynchro-nous prefetching techniques, however, can neutralize or even reverse this potential benefit. Because code cannot anticipate exactly what every user will do next, pre-fetching extra data, not all of which is actually needed by many users, is common.
Shortcomings of Rich Internet Applications
While Rich Internet Applications offer some compelling advantages over current approaches to web development, there are a number of drawbacks that plague the technology—not the least of which is the requirement for a browser plug-in to function (in most cases). Among the more serious drawbacks of RIAs are:
• Sandbox. Because RIAs run within a sandbox, they have restricted access to system resources. If users modify their systems or have reduced permissions that alter a RIA's ability to access system resources, RIAs may fail to operate correctly.
• Disabled scripting. RIAs usually require JavaScript or another scripting lan-guage to operate on the client. If the user has disabled active scripting in his browser, the RIA may not function properly, if at all.
• Script download time. Although it does not always have to be installed, the additional client-side intelligence (or client engine) of RIA applications needs to be delivered by the server to the client. While much of this is usually auto-matically cached, it needs to be transferred at least once. Depending on the size and type of delivery, client engine download time may be unpleasantly long, especially for users with slower Internet connections. Some RIA developers can lessen the impact of this delay by compressing scripts and by staging delivery over multiple pages of an application. For client engines that require a plug-in to be installed, this is not an option.
• Loss of visibility to search engines. Search engines may not be able to index the text content of RIA applications. This can be a major problem for web appli-cations that depend on search engine visibility for their success.
• Dependence on an Internet connection. While the ideal network-enabled re-placement for a desktop application would allow users to be "occasionally connected," wandering in and out of hotspots or from office to office, today the typical RIA requires network connectivity.
RIA Technologies
Microsoft's Silverlight is certainly one of the newest entries in the RIA space, but it is not the only show in town. There are a number of platforms on the market that enable developers to create RIA applications, including the perennial favorite, Adobe Flash. Some of the top RIA platforms available today are:
• Microsoft Silverlight: Plug-in-based Microsoft technology is going head-to-head with other browser plug-in RIAs like Adobe Flash Player. Silverlight provides a rich graphics and animation display via XAML integration, and it also includes support for multimedia and HTML interaction. With version 1.1, the .NET framework will be included, enabling client-side programming with managed languages like C#. Like Adobe Flash Player, Silverlight code runs in a sandbox without direct access to platform APIs for security.
• Adobe Flash Player and Adobe Flex: Another way to build Rich Internet Ap-plications—and probably the most popular to date—is Adobe Flash Player. These technologies are cross-platform and quite powerful for creating rich cli-ent-side interactions. Adobe Flex provides the option to create Flash UIs by compiling MXML, an XML-based interface description language. But perhaps the largest advantage of the Flash RIA platform is the install base of the plug-in, which at last count is installed on 98 percent of the world's computers. • AJAX Frameworks: Ajax, or Asynchronous JavaScript and XML (or
XmlHttpRequest), is a script-based RIA approach. JavaScript is the program-ming language with which Ajax calls are made, and the XmlHttpRequest browser object enables the asynchronous communication with the server. Data re-trieved using this technique is commonly formatted using XML, though it is not a requirement. Ajax has quickly risen in popularity since it is supported by all modern browsers without requiring additional plug-ins. Like other RIAs, though, it is not well suited for search engine optimization or handling clients that have disabled client-side scripts.
• Adobe® AIR™: Adobe AIR (Adobe Integrated Runtime), previously code-named Adobe "Apollo," is a cross-operating system runtime that allows web
application developers to use their existing web development skills with RIA technologies (such as Flash/Flex, JavaScript/Ajax, and HTML) to build and deploy RIAs to the desktop. While not entirely RIA, this technology is closely related to rich applications technology since it targets the same developers. • JavaFX: JavaFX is a new offering from Sun Microsystems that complements
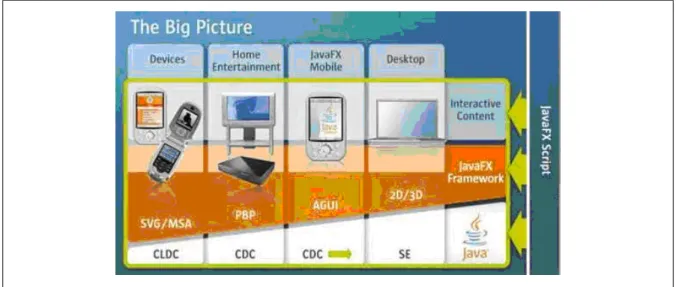
the Java family of tools (see Figure 2). It addresses the growing demand in the Java community for RIA tools and technologies to deliver rich content to the client. Today the technology spans two releases: JavaFX Script and JavaFX Mobile. JavaFX Script gives Java developers the power to quickly create con-tent-rich applications for the widest variety of clients, including mobile devices, desktops, and home electronics units. In theory, content creators now have a simple way to develop content for any Java-enabled device. JavaFX Mobile, on the other hand, is a complete software system for mobile devices.
• Google Gears: Google Gears is beta software offered by Google to enable offline access to services that normally work only online. It installs a database engine, based on SQLite, on the client system to locally cache web application data. Google Gears-enabled pages use data from the local cache rather than from the online service. Using Google Gears, a web application may periodically syn-chronize the data in the local cache with the online service whenever a network connection is available. If a network connection is unavailable, the synchroni-zation is deferred until a network connection is established. This allows Google Gears-enabled web applications to work disconnected from the Internet, mak-ing them more like their robust desktop counterparts. While not entirely RIA, this technology is closely related to rich applications technology, as it addresses the key problem of application connectivity.
Working with Silverlight 1.1
Now that Silverlight 1.1 is well understood and the differences between it and Silverlight 1.0 and WPF are clear, we need to dive deeper into the framework. In this section, we'll look at the inner workings of Silverlight 1.1, first reviewing the tools that have been designed to work with Silverlight, then reviewing the Silver-light design model, and finishing with a look at the SilverSilver-light development model.
Tools
The next-generation tools being created by Microsoft have Silverlight development in mind. From the Expression products on the design side that make XAML editing a breeze to the new Visual Studio 2008 Silverlight integration, Microsoft is doing everything it can to make it easy for developers to adopt their new RIA framework. For many developers, these tools are already part of their normal development workflow, which is another key benefit Silverlight offers over traditional compet-itors like Flash.
Tools for Designers: Microsoft Expression Blend
The Expression suite of products is a relatively new offering from Microsoft, so these tools are less likely to exist in current workflows than their development counterparts. The Expression products were first introduced under codenames like "Acrylic," "Quartz," and "Sparkle" in September 2005, but since then Microsoft has made it clear that it is serious about creating tools for designers that rival long-time leader Adobe (which has acquired Macromedia since the Expression tools were originally introduced). Led by industry veteran Forest Key, who has previ-ously worked for both Industrial Light and Magic and Adobe Systems, Microsoft definitely has the ability to deliver powerful new products that integrate seamlessly into the XAML/Silverlight workflow.
Microsoft Expression Blend, previously Expression Interactive Designer, previ-ously codenamed Sparkle, is a collaboration tool for visually creating and editing XAML files. It is primarily used for designing interactions and animations; Ex-pression Design is Microsoft's product designed for actually creating the visual assets that you animate in Blend. Everything created in Blend can be viewed and edited directly in Visual Studio 2008, so it is the perfect tool for enabling collabo-ration between developers and designers.
Like Visual Studio, Blend works with projects that can contain any number of files and visual assets. Blend is used primarily to edit.xaml files, enabling you to use a vast array of tools to manipulate XAML assets on a canvas. Any changes you make to a project in Blend—whether it's changing an existing file or adding a new XAML file—are instantly available in Visual Studio. Developers can even open the same
project in Visual Studio that designers use in Blend, completely eliminating the friction that usually exists between designer projects and developer projects.
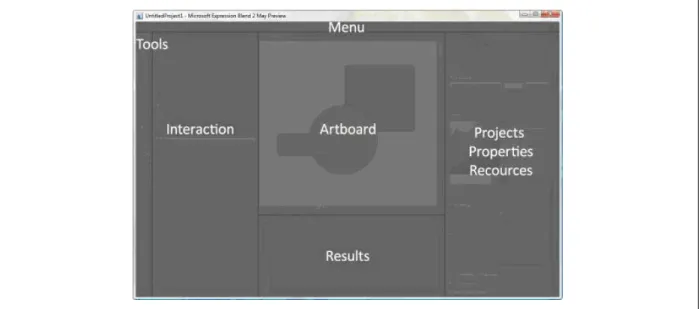
Workspace
Blend has a vector-based modular workspace consisting of several elements— Menu, Toolbox, and Artboard—and a few panels, such as Projects, Results, and Properties (see Figure 3). The presentation is a mix between Visual Studio and existing visual designer products (like Adobe Flash), so it is an easy product for developers and designers to learn.
Workspace Areas
Let's take a closer look at the different workspace areas in Expression Blend, fo-cusing on the tools that are available for working with Silverlight:
• Menu area: All Expression Blend commands and items are placed in the menu area, which still adheres to the "classic" menu model. Expression Blend has not adopted the RibbonBar approach for presenting commands and it is unclear whether the product will eventually shift to the newer UI model.
• Toolbox area: Blend's toolbox for Silverlight includes various instruments for manipulating objects, such as selecting, viewing, and changing appearance. Unlike other programs for graphic manipulations, in Blend tools can only change existing properties. The properties of the objects are initially set in the Properties panel. In other words, while in most graphic software the "paint bucket" tool is used to assign a certain fill to an object, in Blend the paint bucket copies the properties of the currently selected fill object to another object on Figure 3. Microsoft Expression Blend workspace overview
the artboard. This affects all properties—the fill, the stroke, and the opacity mask—and is a key difference between Blend and "normal" design products. • Interaction panel: This panel handles all animation, interaction, and layout
properties. Using these tools, you can easily add motion and interaction to your XAML. The artboard is where the XAML is visually displayed on the Canvas, so any layout changes you make or animations you apply can be seen live in that area.
• Results panel: To help you debug your XAML files, the results panel shows output and errors in the XAML code. This concept is much more familiar to developers than designers, so this feature is more likely to be used by developers that find themselves working in Blend.
• Projects panel: The Projects panel allows you to organize and manage the files in your project. This interface is virtually identical to its counterpart in Visual Studio, so it should be very familiar to developers. Also familiar to developers is the Properties panel, which gives you complete control over the visual ap-pearance of an object.
• Resources panel: This panel is the place where available resources for the project are stored. Unfortunately, in the May CTP of Blend, you cannot create resour-ces for Silverlight. This is a problem that will likely be addressed in a future update to the Blend product.
When a XAML file is opened in Blend, it is displayed in a separate window on the Blend artboard. Each window has two views: Design View and XAML View. The ability to switch between Design and XAML View helps you check the results of your code writing or see what code is generated when you create things visually. This is another very developer-oriented feature that is unique to the Blend graphics program, made possible by the open, XML-based markup that is used to define XAML objects.
Blend also has two predefined workspaces: Design Workspace (shortcut key F6) and Animation Workspace (shortcut key F7). The main difference between the two is that in the animation workspace, the Objects and Timeline panel positions horizontally to accommodate the timeline. There are a few additional shortcuts that make navigating the Blend workspace a breeze. If you need more artboard space for your project, you can quickly decrease the tools and panels size from Tools > Options > Workspace Zoom. Also, familiar to Adobe users, you can use the Tab key to toggle the visibility of all workspace panels. Figure 4 illustrates the design workspace; Figure 5 shows the animation workspace.
Objects
In Silverlight, you have the ability to work with a variety of objects—vector shapes, text, raster images, audio, and video. Each object is wrapped in a Canvas element
that defines its top-left position.
Objects can be edited in many ways: they can be moved, copied, pasted, deleted, aligned, animated, transformed, grouped, and ungrouped. Grouping is a very im-portant operation in Blend since it allows you to address many objects as one. Each group has its own XAML canvas.
Figure 4. Expression Blend design workspace
Objects are arranged on the artboard by markup order. When a new object is created, it appears on top of all other objects, and its markup is added to the bottom of the XAML file. You can track how objects are ordered in the Objects and Time-line panel. By default the object on top of the canvas actually appears at the bottom of the list of objects in the Objects panel. This closely tracks the XAML order, but it can be visually confusing. If you wish to arrange objects in the Objects panel by Z order, simply click the arrow pointing down in the bottom-left corner of the Objects panel (see Figure 6).
Drawing
Though Expressions Design is Microsoft's primary tool for creating complex graphics, Blend's toolset allows you to draw most of the basic XAML shapes: line, curve, freeform path, rectangle, and ellipse. Blend has no dedicated tool for cre-ating a polygon shape, though, so you will have to use code to draw one in Blend. For information on this topic, refer to Silverlight Design Model of this Short Cut.
Appearance
The visual appearance of an object in Silverlight is defined by common properties like Fill, Stroke, Opacity Mask, Foreground, Background, Opacity, and Visibility.
Different objects have different properties: • Shapes have Fill, Stroke, and Opacity Mask.
• Text objects can have Foreground and Opacity Mask, but not Stroke or Fill.
• Images and video can only have Opacity Mask.
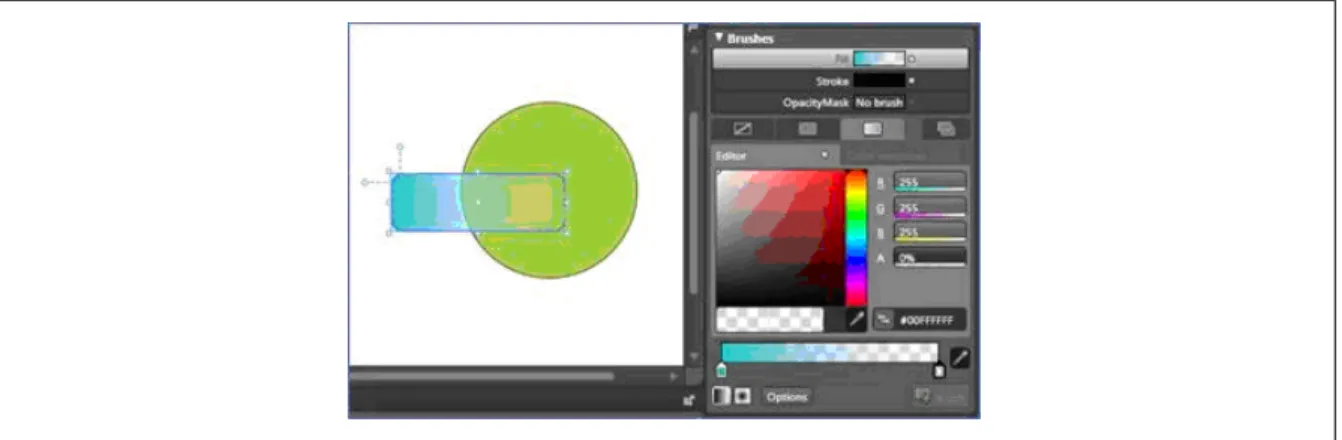
Brushes
Blend uses brushes (see Figure 7) to paint objects, a concept similar to the brushes used in GDI+ graphics creation. Brushes can be set to fill, stroke, and opacity mask properties. Blend exposes three types of brushes for Silverlight: No Brush,
Solid Color Brush, and Gradient Brush. In the code behind, you can create more brushes, which we'll discuss in more detail later in this Short Cut.
• No Brush means that the selected property is not painted. It allows you to make shapes with no stroke, no fill, or no opacity mask.
• Solid Color Brush paints a property in a solid color.
• Gradient Brush paints a property in one, two, or more colors in gradation. A Gradient Brush can be linear or circular.
Visibility, Opacity, Transparency, and Opacity Mask are similar properties, and
they all apply to an object's visible appearance. The differences are described as follows:
• Visibility allows showing and hiding objects completely without deleting them from the project. With the visibility property, objects can appear
visi-ble, hidden, or collapsed. This property is used mainly for creating interactions and animations in cases when the object should appear on or disappear from the page.
• Opacity affects the transparency of the whole object and ranges from 0 to 100
percent. This enables you to easily create semitransparent objects, which is a convenient way to make inactive button states.
• Transparency changes the alpha value of an object's attributes (such as the Stroke or Fill), unlike opacity, which applies changes at the object level. Also
unlike opacity, transparency is not an object property. Rather, it is applied to
each color, making it very useful for creating complex and realistic shading. • Opacity Mask links the object visibility to the opacity mask brush (see
Fig-ure 8).
When the object is set to a solid color brush opacity mask, the result is identical to setting opacity directly on the object. If you use a gradient brush opacity
mask, though, you can create powerful effects like reflection (see Figure 9). Figure 7. XAML brushes applied to shapes in Blend
Modifying and Transforming Objects
In Blend, you can translate, scale, rotate, skew, and flip objects by using the Se-lection Tool or by using the Transform Category (Figure 10) under the Properties panel.
• Translating an object means changing the object's position along the X and Y axes. This is different from moving the object on the artboard using the selec-tion tool, which changes the posiselec-tion of the object relative to its parent canvas by Top and Left values. To translate an object, you should change the X and Y
values in the Transform panel.
Figure 8. Opacity masks applied to shapes in Blend
Figure 9. Opacity masks used to create reflections in Blend
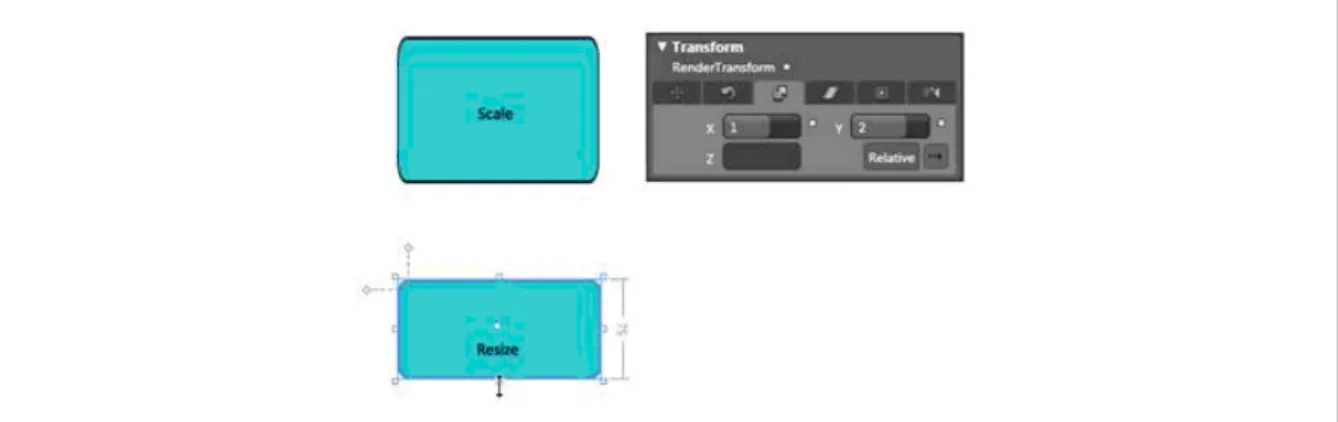
• Resizing an object means changing its Width and Height properties without applying a transformation, while scaling it transforms the object's shape. Re-sizing is essentially scaling with constrained proportions (see Figure 11). • Rotating an object (Figure 12) can easily be done using its handles and the
selection tool. When rotating visually with this tool, the object is rotated around its center point to whatever angle you desire. This is the same as chang-ing the angle value for an object in the Transform panel.
• Skewing an object (Figure 13) can be done by modifying the X or Z coordinates on the Skew tab in the Transform panel or by using the Selection tool. Like rotation, either approach produces the same results.
Figure 11. Resizing shapes versus scaling
Figure 12. Rotating an object in Expression Blend
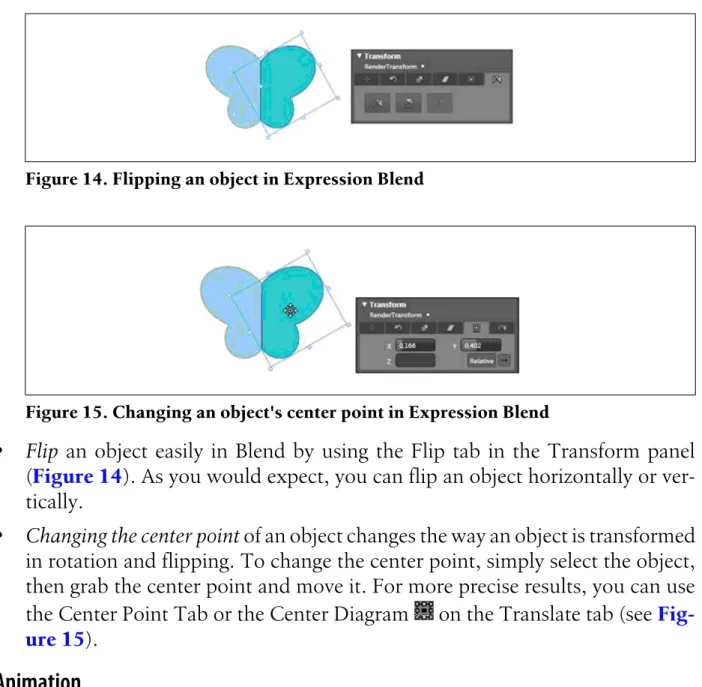
• Flip an object easily in Blend by using the Flip tab in the Transform panel (Figure 14). As you would expect, you can flip an object horizontally or ver-tically.
• Changing the center point of an object changes the way an object is transformed in rotation and flipping. To change the center point, simply select the object, then grab the center point and move it. For more precise results, you can use the Center Point Tab or the Center Diagram on the Translate tab (see Fig-ure 15).
Animation
Animations in Blend are based on keyframes recorded in a timeline. Keyframes define object property changes at specific points in time, a concept that is familiar to most motion graphics designers. The animation manifests from the interpola-tion of the changes occurring between the keyframes. If you want to create an animation of an object moving from point A to point B on the artboard ( Fig-ure 16), you must simply add two keyframes to the timeline—the first contains the object at point A, the second displays the object at point B. Animations are controlled from the Object and Timeline panel.
To create an animation, first create a new timeline by clicking the plus button next to the Timeline drop-down in the Objects and Timeline Panel. Then select the object you wish to animate on the artboard and create a new keyframe by clicking the "Create New Keyframe" button .
Figure 14. Flipping an object in Expression Blend
Next, define a timeframe for your animation. You can do this by dragging the yellow marker in the Timeline panel or by manually setting the timer located next to the "Create New Keyframe" button.
By now you should see something that looks like Figure 17.
To continue your animation, click the "Create New Keyframe" button again. Now you have the first and the second keyframe in your animation. Transform or modify the selected object to create your animation—you can move, rotate, flip, change the color appearance, etc. Just make sure that the yellow marker in the Timeline panel is pointing to the keyframe you wish to edit. All animation changes are applied to the keyframe under the yellow marker. To preview your animation, click on the Play button on the upper portion of the Timeline panel.
Tools for Developers: Visual Studio 2008
Unlike Blend, the Visual Studio product line is a well-established Microsoft tool. Most developers tasked with building Silverlight applications are likely already using Visual Studio in their daily workflows. The goal of this section is to demon-strate a good practice for successfully developing Silverlight applications using products that are in both alpha and beta stages, respectively. Visual Studio 2008 will ship toward the end of 2007, and Silverlight 1.1 should be in beta by early 2008. In addition to looking at Visual Studio 2008 tools, we will also briefly take a look at Visual Studio and Expression Blend integration.
Figure 16. Object moving from point A to point B.
Before we get started, it is important to identify which of the many preview bits are required to build Silverlight applications. Download and install these bits to prepare for successful Silverlight 1.1 development:
• Visual Studio 2008 Beta 2 http://msdn2.microsoft.com/en-us/vstudio/ aa700831.aspx
• Silverlight 1.1 Alpha Refresh for Windows This is the distributable required to run Silverlight applications. http://www.microsoft.com/silverlight/license-win-dev.aspx
• Silverlight Tools Alpha for Visual Studio 2008 Beta 2 This package is an add-on to the Beta 2 release of Visual Studio 2008 that provides tools for Microsoft Silverlight 1.1 alpha. It provides a Silverlight project system for developing Silverlight applications using C# or Visual Basic. http://www.microsoft.com/
downloads/details.aspx?familyid=b52aeb39-1f10-49a6-85fc-a0a19cac99af&displaylang=en
• Silverlight 1.1 Alpha SDK Contains useful documentation and exam-ples.http://msdn.microsoft.com/vstudio/eula.aspx?
id=c8bf88e7-841c-43fd-c63d-379943617f36
You can create Silverlight projects directly in Visual Studio 2008. Visual Studio and Expression Blend are designed to work together, and you can easily move back and forth between them, but we will discuss that process later. For now, we will focus on how to start creating a Silverlight application in Visual Studio.
To begin a new Silverlight project, open Visual Studio 2008 Beta 2 and choose File > New Project (see Figure 18). Select Silverlight under Project types (currently projects are available for C# and VB.NET), and select Silverlight project on the right under Templates. A new project will be created when you click the OK but-ton.
The project will be created with all of the basic items you need to begin creating a Silverlight application, such as a default XAML file and an HTML file with a Sil-verlight host (Figure 19).
Integration of Visual Studio 2008 projects with Blend
In Visual Studio 2008 you can seamlessly switch to Blend while editing XAML files by simply selecting the file in the Solution Explorer, right-clicking, and selecting "Open in Expression Blend." Your XAML file will open in Blend where you can visually edit your XAML markup (Figure 20).
If you are working with a CTP or Beta of Visual Studio 2008, you will notice that projects and solutions that are created or edited in Visual Studio "Orcas" cannot be successfully reloaded inside Expression Blend. To overcome this issue, the Ex-pression team at Microsoft made a utility that you can use to configure ExEx-pression Blend for Visual Studio 2008 betas. This tool can be used with the Expression Blend 2 May Preview, and it is available at http://blogs.msdn.com/expression/ attachment/2972363.ashx. If you uninstall Visual Studio 2008 (after configuring Blend for VS2008 with this tool), the Blend product will stop working until re-configured for Visual Studio 2005 using the same tool.
We will take a more detailed look at using Visual Studio to create a Silverlight project later in this Short Cut and in the accompanying webcast. In any event, by Figure 18. Creating a new Silverlight 1.1 application in Visual Studio
using Microsoft Expression Blend and Microsoft Visual Studio, designers and de-velopers can collaborate effectively, using their unique skills to easily create Silverlight applications and controls.
Silverlight Design Model
The core of Silverlight markup, in both 1.0 and 1.1, is XAML. XAML was intro-duced with WPF, and it represents a whole new way of defining graphic objects compared to the years to GDI-based graphics development. In this section, we will take a detailed look at all of the available XAML objects in Silverlight 1.1, giving you a solid foundation in the basics of XAML markup.
Shapes
Currently Silverlight supports six vector shape elements: Rectangle, Ellipse, Line, Polygon, Path, and Polyline. Following is a detailed look at each shape,
com-plete with sample code and images showing you how each shape is created. • Rectangle: Describes a square or rectangular shape. Common properties are
Width, Height, RadiusX, and RadiusY. The last two allow you to control the
corner curvature of the Rectangle.
XAML
<Rectangle Fill="#FF144907" Stroke="#FF000000" StrokeThickness="5" RadiusX="5" RadiusY="5" Width="180" Height="90" />
Figure 20. With a single click in the Solution Explorer, the context menu enables you to edit a XAML file directly in Blend
• Ellipse: Describes an oval or circular shape. Common properties are Width and
Height, which control the horizontal and vertical diameter of the Ellipse,
re-spectively.
XAML
<Ellipse Fill="#FF144907" Stroke="#FF000000" StrokeThickness="5" Width="120" Height="120" />
• Line: Common properties are X1, Y1, X2, and Y2. Point (X1, Y1) defines the
beginning of the line, while point (X2, Y2) marks its end. Most elements have
fill and stroke properties, but a Line only has the stroke property.
XAML
<Line X1="10" Y1="10" X2="150" Y2="150" Stroke="#FF000000" StrokeThickness="5" />
• Polygon: Describes a collection of points. The obvious and most important
property for this shape is the Points property. Each point is defined in
comma-separated pairs (such as 5,5), comma-separated from any other point by a space. Points are relative to the top left of the shape's parent canvas.
XAML
<Polygon Points="20,20 50,150 110,110 120,15 50,0" Fill="#FF144907" Stroke="#FF000000" StrokeThickness="5" />
• Path: Used to describe complex shapes. The Data property defines the visual appearance of the element. Unlike Polygon's, Path shapes enable more complex
XAML
<Path Data="M 10,100 C 0,0 300,0 250,100z" Fill="#FF144907" Stroke="#FF000000" StrokeThickness="5" />
• Polyline: Describes a collection of points that might or might not be connected.
Like the Polygon, the most important property is the Points property. Points are defined just like Polygons, with comma-separated pairs separated by spaces.
XAML
<Polyline Points="0,0 0,100 100,100 100,0" Stroke="#FF000000" Fill="#FF144907" StrokeThickness="5" />
All of these shapes could be rendered on a single canvas by using the complete XAML markup in Example 1.
Example 1. Complete XAML markup for all basic shapes
<Canvas xmlns="http://schemas.microsoft.com/client/2007"
xmlns:x="http://schemas.microsoft.com/winfx/2006/xaml" >
<Rectangle Fill="#FF144907" Stroke="#FF000000" StrokeThickness="5" RadiusX="5" RadiusY="5" Width="180" Height="90" Canvas.Left="153.722" Canvas.Top="-16.086" /> <Ellipse Fill="#FF144907" Stroke="#FF000000" StrokeThickness="5" Width="120" Height="120" Canvas.Left="0" Canvas.Top="0"/>
<Line X1="10" Y1="10" X2="150" Y2="150" Stroke="#FF000000" StrokeThickness="5" Canvas.Left="216.357" Canvas.Top="-16.086"/>
<Polygon Points="20,20 50,150 110,110 120,15 50,0" Fill="#FF144907" Stroke="#FF000000" StrokeThickness="5"
Canvas.Left="63" Canvas.Top="-16.086"/>
<Path Data="M 10,100 C 0,0 300,0 250,100z" Fill="#FF144907" Stroke="#FF000000" StrokeThickness="5" Canvas.Left="63" Canvas.Top="35.5" Height="Auto" />
<Polyline Points="0,0 0,100 100,100 100,0" Stroke="#FF000000" StrokeThickness="5" Width="Auto" Height="Auto" Canvas.Top="17.5"
Canvas.Left="66.857"/> </Canvas>
Brushes
Now that you understand the basic shape elements available to Silverlight, it is important to understand how to style the objects. In this section we will take a detailed look at Brushes that enable you to manipulate the Fill, Stroke, and
Opacity Mask properties on an object, thus improving an element's visual
appear-ance. Currently Silverlight supports five brushes: SolidColorBrush, LinearGradient Brush, RadialGradientBrush, ImageBrush, and VideoBrush.
• SolidColorBrush: Used to paint an element with a solid color. Applicable for
both Fill and Stroke properties. As with many properties in XAML, there are
multiple ways to achieve the same result, which is illustrated in the following code sample.
XAML
<Rectangle Fill="#FF490707" Stroke="#FF000000" StrokeThickness="5" RadiusX="10" RadiusY="10" Width="180" Height="90" />
Or:
<Rectangle Stroke="#FF000000" StrokeThickness="5" RadiusX="10" RadiusY="10" Width="180" Height="90" >
<Rectangle.Fill>
<SolidColorBrush Color="Red" /> </Rectangle.Fill>
</Rectangle>
XAML supports both hexadecimal fill colors (like "#FF000000") and defined fill colors (like "Red"). Using either value is valid in XAML markup and your choice will depend on the level of precision that you need in your color selec-tion. Among the colors that can be set by their string representations are:
Black, Blue, Brown, Cyan, DarkGray, Gray, Green, LightGray, Magenta, Orange, Purple, Red, Transparent, White, and Yellow.
• LinearGradientBrush: Draws a gradient along a line. This line is horizontal by
XAML
<Rectangle Width="200" Height="100" Stroke="Black"> <Rectangle.Fill>
<LinearGradientBrush>
<GradientStop Color="Orange" Offset="0.0" /> <GradientStop Color="Red" Offset="0.20" /> <GradientStop Color="Blue" Offset="0.40" />
<GradientStop Color="SkyBlue" Offset="0.60" /> <GradientStop Color="Green" Offset="0.80" /> <GradientStop Color="LimeGreen" Offset="1" /> </LinearGradientBrush>
</Rectangle.Fill> </Rectangle>
Using the StartPoint and EndPoint properties, you can change the position of
the line.
<LinearGradientBrush StartPoint="0,0" EndPoint="1,0">, will produce the following effect.
• RadialGradientBrush: Draws a gradient along a circle. Customizing the
gradi-ent can be done by setting the GradientOrigin, Center, RadiusX, and RadiusY
properties.
XAML
<Rectangle Width="200" Height="100" Canvas.Left="25" Canvas.Top="200"> <Rectangle.Fill>
<RadialGradientBrush GradientOrigin="0.5,0.5" RadiusX="0.5" RadiusY="0.5">
<GradientStop Color="Yellow" Offset="0.0" /> <GradientStop Color="Orange" Offset="0.5" /> <GradientStop Color="Red" Offset="1.0" />
</RadialGradientBrush> </Rectangle.Fill>
</Rectangle>
• ImageBrush: Fills a shape with an image from a file. By default the image
stretches itself in order to fill the shape. Setting the Stretch property enables
the developer to change the stretching mode.
XAML
<Rectangle Width="200" Height="100" Stroke="Black" > <Rectangle.Fill>
<ImageBrush ImageSource="telerikLogo.png" Stretch="Fill"/> </Rectangle.Fill>
</Rectangle>
• VideoBrush: The VideoBrush depends on the MediaElement for its video stream,
so using a VideoBrush requires that you first add a MediaElement to your markup.
The MediaElement should be configured with the video that you want to display and then the VideoBrush should be configured to display the MediaElement
source. Furthermore, the MediaElement needs to have an Opacity set to 0 so that is does not appear on the screen when a video brush is used. The
MediaElement is examined in more detail later in this Short Cut, but
Exam-ple 2 demonstrates how it is used with the VideoBrush and applied to a
Rectangle.
Example 2. XAML MediaElement and VideoBrush applied to a Rectangle
<MediaElement x:Name="mediaSource" Source="telerik.wmv" AutoPlay="true" Opacity="0" />
<Rectangle Width="200" Height="100" Stroke="Black" > <Rectangle.Fill>
<VideoBrush SourceName="mediaSource" /> </Rectangle.Fill>
</Rectangle> Transformations
Silverlight supports four transformations: RotateTranform, ScaleTransform, SkewTransform, and TranslateTransform.
XAML
<Rectangle RenderTransformOrigin="0.5,0.5" Fill="Green" Stroke="Black" StrokeThickness="5" RadiusX="10" RadiusY="10" Width="160" Height="80"> <Rectangle.RenderTransform> <TransformGroup> <RotateTransform Angle="45"/> </TransformGroup> </Rectangle.RenderTransform> </Rectangle>
• ScaleTransform: Setting the ScaleX and ScaleY properties will resize the element
by the factor you specify. Setting ScaleX to 2.0 stretches the element to 200 percent of its original width. A ScaleY value of 0.5 shrinks the height of the
element by 50 percent.
ScaleX = 1.5 ScaleY = 1.5 ScaleX = 1.0 ScaleY = 1.0
XAML
<Rectangle RenderTransformOrigin="0.5,0.5" Fill="Green" Stroke="Black" StrokeThickness="5" RadiusX="10" RadiusY="10" Width="160" Height="80"> <Rectangle.RenderTransform>
<TransformGroup>
<ScaleTransform ScaleX="1.5" ScaleY="1.5"/> </TransformGroup>
</Rectangle.RenderTransform> </Rectangle>
• SkewTransform: Stretches the coordinate space in a non-uniform manner. SkewTransform is typically used when you want to simulate 3D in a 2D space.
XAML
StrokeThickness="2.5" RadiusX="10" RadiusY="10" Width="100" Height="50"> <Rectangle.RenderTransform>
<TransformGroup>
<SkewTransform AngleX="-50" AngleY="0"/> </TransformGroup>
</Rectangle.RenderTransform> </Rectangle>
• TranslateTransform: Very useful for moving objects. Use the X property of the TranslateTransform to specify the amount, in pixels, to move the element along the X-axis. Use the Y property to specify the amount, in pixels, to move the
element along the Y-axis.
X = 250, Y = 50
XAML
<Rectangle RenderTransformOrigin="0.5,0.5" Fill="Green" Stroke="Black" StrokeThickness="5" RadiusX="10" RadiusY="10" Width="160" Height="80"> <Rectangle.RenderTransform> <TransformGroup> <TranslateTransform X="250" Y="50"/> </TransformGroup> </Rectangle.RenderTransform> </Rectangle>
Text, Image, and Media
• TextBlock: Text in Silverlight is usually displayed by using a lightweight control
called TextBlock.
XAML
<TextBlock Text="Hi, I am a TextBlock!" />
Common TextBlock properties are Width, Height, Text, FontFamily, FontSize, Foreground, and TextWrapping.
XAML
<TextBlock Width="150" Height="100" TextWrapping="Wrap" FontFamily="Verdana" FontSize="22" Text="Hi, I am a TextBlock!" />
Setting the TextBlock property can also be done in the following way:
XAML
<TextBlock>Hi, I am a TextBlock</TextBlock>
• Image: Images in Silverlight are displayed using the Image control. For this
con-trol to work, all you need to specify is the source image. One of the key limitations of the Image control, though, is that it supports only JPEG and PNG
images. It is unclear if this limitation will be addressed in future updates to the control.
XAML
<Image Source="telerikLogo.png" />
Some of the more important properties of the Image control are Width, Height, Source, and Stretch. By default the Stretch property is set to Uniform. This means that the image will be resized according to the size of the Image control.
XAML
<Image Width="100" Height="50" Source="telerikLogo.png"/>
The Stretch property also supports None, Fill, Uniform, and UniformToFill.
XAML
<Image Width="100" Height="75" Source="telerik.png" Stretch="None"/> <Image Width="100" Height="75" Source="telerik.png" Stretch="Fill"/> <Image Width="100" Height="75" Source="telerik.png" Stretch="Uniform"/> <Image Width="100" Height="75" Source="telerik.png" Stretch="UniformToFill"/>
• MediaElement: Displaying audio or video in Silverlight is done by using the
MediaElement control. Like the Image control, all you have to set is the Source
property of the control.
XAML
<MediaElement Source="telerik.wmv"/>
Some of the more important properties of the MediaElement control are Width, Height, Source, Stretch, and Volume. By default the Stretch property is set to Uniform, but just as with the Image control, this property can be changed. If a
video file is used as a source, it will be automatically resized according to the size of the MediaElement control.
The MediaElement currently supports video and audio formats listed in Table 3.
Table 3. MediaElement supported file types
Video Audio
WMV1: Windows Media Video 7 WMA 7: Windows Media Audio 7
WMV2: Windows Media Video 8 WMA 8: Windows Media Audio 8
WMV3: Windows Media Video 9 WMA 9: Windows Media Audio 9
WMVA: Windows Media Video Advanced Pro-file, non-VC-1
MP3: ISO/MPEG Layer-3 WMVC1: Windows Media Video Advanced
Profile, VC-1
MediaElements also support playlists in the form of Advanced Stream Redirector
(ASX) files. Such files typically have an .asx, .wax, .wvx, .wmx, or .wpl extension.
Animations
Animation timelines are represented in XAML by a Storyboard element. In order to access the animation in your code behind file, you need to put the animation inside the <Canvas.Resources></Canvas.Resources> tag. You can access the Story
board in code via its name, which is specified in the x:Name attribute (such as
x:Name="Timeline1"). Some of the most important attributes of an animation are x:Name, BeginTime, Storyboard.TargetName, Storyboard.TargetProperty, KeyTime, and Value. Let's look at each of these critical properties in detail:
• BeginTime: Shows the exact time the animation begins. It can be any valid time
span value (hours/minutes/seconds).
XAML
BeginTime="00:02:00"
• Storyboard.TargetName: Specifies the name of the XAML element that is going to be animated. The name of the XAML element is, again, set by the x:Name
attribute.
XAML
<Rectangle x:Name="rectangle1" ... ></Rectangle> Storyboard.TargetName="rectangle1"
• Storyboard.TargetProperty: Specifies the transformation that is going to be
applied. In Example 3, we use the TranslateTransform transformation in order
to move the rectangle 110 pixels (Value="110") to the right (Translate Transform.X) in a matter of 1 second (KeyTime="00:00:01").
Example 3. Using XAML to animate a rectangle
<Canvas.Resources> <Storyboard x:Name="Timeline1"> <DoubleAnimationUsingKeyFrames BeginTime="00:00:00" Storyboard.TargetName="rectangle" Storyboard.TargetProperty="(UIElement.RenderTransform).(TransformGroup. Children)[0].(TranslateTransform.X)">
<SplineDoubleKeyFrame KeyTime="00:00:00" Value="0"/> <SplineDoubleKeyFrame KeyTime="00:00:01" Value="110"/> </DoubleAnimationUsingKeyFrames>
</Storyboard> </Canvas.Resources>
<Rectangle x:Name="rectangle" Fill="Green" Stroke="Black" StrokeThickness="5" RadiusX="5" RadiusY="5" Width="180" Height="90" RenderTransformOrigin="0.5,0.5" > <Rectangle.RenderTransform> <TransformGroup> <TranslateTransform X="0" Y="0"/> </TransformGroup> </Rectangle.RenderTransform> </Rectangle>
Silverlight 1.1 Development Model
By this point, you should have a clear understanding of the basic building blocks that are used in Silverlight programming. You've seen how Microsoft is creating new graphics tools and enhancing existing development tools to make Silverlight development easy for both designers and developers. Now we'll start putting these individual blocks together and take a broader look at the Silverlight development model.
Hosting Silverlight in HTML
When a user visits a page that uses Silverlight for the first time, the Silverlight plug-in is plug-installed plug-in the user's browser (if the user allows it) and the necessary Silverlight runtime files are deployed. With the runtime installed on the client, Silverlight applications eliminate any functional dependency on a specific server-side tech-nology (such as PHP, ASP, or JSP). That means Silverlight applications can be hosted in any page type that renders valid HTML markup to the browser.
To use the Silverlight plug-in in your web page, you will need the following files: • Silverlight.js: This JavaScript file is provided and supported by Microsoft and
defines the createObject and createObjectEx methods that you call to
instan-tiate the Silverlight control in an HTML page. It also provides code to handle the client user experience if the Silverlight plug-in is not installed or if the ver-sion is older than required. You host this file on your site (or deploy it to the client), but you typically do not modify its existing methods. You could add methods and code to this file that are specific to your application, but modifi-cations are not supported by Microsoft.
• Xaml file (page.xaml, for example): This file contains the application XAML declaration. This XAML file is referenced by the createSilverlight or create SilverlightEx method calls contained in the Silverlight.js file. It defines the UI
that will appear as the Silverlight content. The root element tag includes at minimum xmlns definitions that are required for a working Silverlight-based application. Canvasis the typical root element because it provides the widest
support for UI composition. If your Silverlight-based application uses managed code for event handling, the root element should include an x:Class attribute,
which enables you to reference handlers that are defined in your managed code from XAML.
• Code behind file (page.xaml.(cs/vb))
This file contains the managed code that will be executed by the plug-in on the client. This is one of the major changes in Silverlight 1.1; Silverlight 1.0 does not support code behind execution.
To instantiate the Silverlight plug-in, a few basic steps are required, several of which are new to the Silverlight 1.1 alpha refresh:
1. Reference the Silverlight.js file in the head section of the html page:
HTML <head>
<script type="text/javascript" src="Silverlight.js"></script> </head>
2. Place the following HTML code where you want the Silverlight plug-in to be displayed : HTML/JavaScript <div id="silverlightcontrolhost" > <script type="text/javascript"> Silverlight.createObjectEx({ source: "Page.xaml", parentElement: document.getElementById("SilverlightControlHost"), id: "SilverlightControl", properties: { width: "100%", height: "100%", version: "1.1", enableHtmlAccess: "true" }, events: { } }); </script> </div>
The available properties are:
• width: The width of the Silverlight plug-in
• height: The height of the Silverlight plug-in
• version: The required plug-in version that should run the application
• background: The background color of the plug-in
• isWindowless: Whether the plugin is displayed as window-less
• framerate: Maximum number of frames to render per second
• ignoreBrowserVer: Enables/disables checking for supported Silverlight
browsers and browser versions
• inplaceInstallPrompt: Whether the in-place install prompt appears if the
• enableHtmlAccess: Whether the hosted content in the Silverlight control has access to the browser Document Object Model (DOM)
The available events are:
• onLoad: Specifies the event handling function for the control's OnLoad event
• onError: Specifies a user-defined JavaScript error handling function that
is invoked when an error is generated in the Silverlight runtime compo-nents
3. Add JavaScript to your page that provides focus to the Silverlight control when the page loads. The approach for providing focus to the Silverlight control has changed in the Silverlight 1.1 alpha.
HTML/JavaScript document.body.onload = function() { var silverlightControl = document.getElementById('SilverlightControl'); if (silverlightControl) silverlightControl.focus(); }
The Basics of a Silverlight 1.1 Project
When creating a Silverlight 1.1 project in Visual Studio 2008, you should choose to create a new "Silverlight Project" from the available project templates. When the project is created, several files are added by default that are basic to a Silverlight application:
• TestPage.html: This is a sample HTML page that hosts the Silverlight XAML. This file can be replaced by your own Silverlight hosting pages, so it is not required for a Silverlight project to function.
• TestPage.html.js: This is a JavaScript file with specific code needed to create a Silverlight object from the Page.xaml file. This JavaScript file uses a function that is declared in the Silverlight.js file to create the new Silverlight instance on the page at runtime. This JavaScript could also be included directly in the HTML file, so using this approach is a matter of choice.
• Silverlight.js: This is the JavaScript file with general code for creating Silverlight objects. The same JavaScript file is distributed with every Silverlight applica-tion, and it is required for a Silverlight application to work correctly.
• Page.xaml: This is the XAML file that is hosted by default in the TestPage.html file. This file contains all Silverlight XAML markup that has been created in Expression Blend or Visual Studio.
• Page.xaml.cs/Page.xaml.vb: This is the "code behind" of the Page.xaml file. This file compiles into an assembly that is referenced by default in the Page.xaml file. The class defined in this file is that specified in the x:Class value
in Page.xaml. For example, in the following code snippet, the class "Page" de-fined in the code behind is referenced in the x:Class attribute in the XAML file.
Page.xaml XAML <Canvas x:Name="parentCanvas" xmlns=http://schemas.microsoft.com/client/2007 xmlns:x=http://schemas.microsoft.com/winfx/2006/xaml Loaded="Page_Loaded" x:Class="MyProject.Page;assembly=ClientBin/MyProject.dll" ... Page.xaml.cs/.vb C# namespace MyProject {
public partial class Page : Canvas {
public void Page_Loaded(object o, EventArgs e) {
// Required to initialize variables InitializeComponent(); } } } VB Namespace MyProject
Public Partial Class Page Inherits Canvas
Public Sub Page_Loaded(ByVal o As Object, ByVal e As EventArgs) 'Required to initialize variables
InitializeComponent(); End Sub
End Class End Namespace
When the application is loaded, the first method that will be executed is the
Page_Loaded method. You should place any initialization instructions in this
method. Code behind files for XAML that execute managed code on the client are new to Silverlight 1.1, though not required. Silverlight 1.0 does not support this type of code behind approach.
When you deploy your Silverlight application, you should upload all the files ex-cept the code behind files to your web server. Your code behind code will be