© 2012 EMS Database Management Solutions
Server
All rights reserved.
This manual documents EMS Data Generator for SQL Server, version 3.0.x.x
No parts of this work may be reproduced in any form or by any means - graphic, electronic, or mechanical, including photocopying, recording, taping, or information storage and retrieval systems - without the written permission of the publisher.
Products that are referred to in this document may be either trademarks and/or registered trademarks of the respective owners. The publisher and the author make no claim to these trademarks.
While every precaution has been taken in the preparation of this document, the publisher and the author assume no responsibility for errors or omissions, or for damages resulting from the use of information contained in this document or from the use of programs and source code that may accompany it. In no event shall the publisher and the author be liable for any loss of profit or any other commercial damage caused or alleged to have been caused directly or indirectly by this document.
Use of this documentation is subject to the following terms: you may create a printed copy of this documentation solely for your own personal use. Conversion to other formats is allowed as long as the actual content is not altered or edited in any way.
Document generated on: 06.12.2012
Table of Contents
Part I Welcome to EMS Data Generator!
6
...7 What's new ...8 System requirements ...9 Installation ...10 Registration ...12 How to register Data Generator
...13 Version history
...15 EMS Data Generator FAQ
...17 Other EMS Products
Part II Wizard Application
24
...25 Using wizard application
... 26 Getting started
... 27 Step 1 - Setting connection properties
... 29 Step 2 - Selecting databases and tables
... 31 Step 3 - Specifying generation param eters
... 33 Setting type-specific properties
... 33 INTEGER field parameters
... 36 FLOAT field parameters
... 39 DATE field parameters
... 42 STRING field parameters
... 46 BLOB field parameters
... 49 BIT field parameters
... 52 View ing table DDL
... 53 Data Preview
... 55 Step 4 - Setting generation options
... 56 Step 5 - Start of data generation process
... 58 Step 6 - Editing generation script
...60 Using configuration files
... 61 Saving configuration file
... 62 Save Template options
... 63 Loading configuration file
...64 Setting program preferences
... 65 Setting general options
... 67 Setting default constraints
... 69 Setting program language
... 71 Defining interface style
... 73 Trees and lists
... 75 Edit controls ... 77 Check boxes ... 79 Buttons ... 81 Page controls ... 83 Group boxes
... 85 Fonts
Part III Console Application
88
...89 Using console application
Part IV Appendix
91
...91 Data generation mode
...92 Configuration file format
...95 Find Text dialog
...97 Replace Text dialog
Part
1
Welcome to EMS Data Generator!
EMS Data Generator for SQL Server is a powerful utility for generating test data into one or several SQL Server database tables simultaneously, with script saving and editing capabilities. The wizard application allows you to define tables and fields for generating data, set value ranges, generate string fields by mask, load values for BLOB fields directly from files, set lists of values manually, get sets of values from SQL queries and perform other operations with test date in a simple and direct way. The distribution of the utility also provides you with the console application which allows you to generate data in one-touch by using data generation templates.
Visit our web-site: http://www.sqlmanager.net for details.
Key features: · Unicode support
· Localisable user-friendly wizard interface
· Ability to save and edit data generation script, without actual script execution · Generating data into several tables of different databases at one host
· Support for all SQL Server data types including UNIQUEIDENTIFIER, BIT, SQL_VARIANT and TIMESTAMP
· Various data generation modes for each field including list, random, incremental data generation and more
· Ability to use SQL query results as the list of values for data generation · Ability to get data from another field for data generation
· Ability to preview the data grid for each table
· Automatic control over referential integrity for data generation into linked tables · Ability to disable triggers associated with the tables during data generation · Wide variety of generation parameters for each field type
· Ability to set NULL values for a specified percent of cases · Ability to empty tables before data generation
· Possibility of saving all the generation parameters specified within the current wizard session
· The command-line utility to generate data using the configuration file
Product information:
Homepage: http://www.sqlmanager.net/en/products/mssql/datagenerator Support Ticket
System:
http://www.sqlmanager.net/support
1.1
What's new
Version Release Date
Data Generator for SQL Server 3.0 July 2, 2008
What's new in EMS Data Generator? · Implemented Unicode support
· Added options for data generation to SQL script: appending to an existing file; viewing/editing script
· Added options allowing one to disable triggers associated with the tables during data generation
· Added options for generating the same data into several columns · Added options for generating string data according to sample text · Implemented data preview
· Added options for generating data into dependent fields related as 1:n (n records will be generated into the dependent table field for each record of the primary table) · Data generation is now performed within a separate thread
· Other minor improvements and bug-fixes
See also: Version history
1.2
System requirements
System requirements for Data Generator for SQL Server
· 300-megahertz (MHz) processor; 600-megahertz (MHz) or faster processor recommended
· Microsoft® Windows NT4 with SP4 or later, Microsoft® Windows 2000, Microsoft® Windows 2000 Server, Microsoft® Windows XP, Microsoft® Windows 2003 Server, Microsoft® Windows 2008 Server, Microsoft® Windows Vista, Microsoft Windows 7, Microsoft Windows 8
· 64MB RAM or more; 128MB or more recommended · 20MB of available HD space for program installation
· Super VGA (800x600) or higher-resolution video adapter and monitor; Super VGA (1024x768) or higher-resolution video adapter and monitor recommended
· Microsoft® Mouse or compatible pointing device
· Microsoft Data Access Components (MDAC) or SQL Server Native Client · Possibility to connect to any local or remote SQL Server™
1.3
Installation
If you are installing Data Generator for SQL Server for the first time on your PC: · download the Data Generator for SQL Server distribution package from the download
page available at our site;
· unzip the downloaded file to any local directory, e.g. C:\unzipped;
· run MsDataGenSetup.exe from the local directory and follow the instructions of the installation wizard;
· after the installation process is completed, find the Data Generator shortcut in the corresponding group of Windows Start menu.
If you want to upgrade an installed copy of Data Generator for SQL Server to the latest version:
· download the Data Generator for SQL Server distribution package from the download page available at our site;
· unzip the downloaded file to any local directory, e.g. C:\unzipped; · close Data Generator application if it is running;
· run MsDataGenSetup.exe from the local directory and follow the instructions of the installation wizard.
See also:
1.4
Registration
To make it easier for you to purchase our products, we have contracted with share-it! registration service. The share-it! order process is protected via a secure connection and makes online ordering by credit/debit card quick and safe. The following information about share-it! is provided for your convenience.
Share-it! is a global e-commerce provider for software and shareware sales via the Internet. Share-it! accepts payments in US Dollars, Euros, Pounds Sterling, Japanese Yen, Australian Dollars, Canadian Dollars or Swiss Franks by Credit Card (Visa, MasterCard/ EuroCard, American Express, Diners Club), Bank/Wire Transfer, Check or Cash.
If you have ordered EMS software online and would like to review your order information, or if you have questions about ordering, payments, or shipping procedures, please visit our Customer Care Center, provided by Share-it!
Please note that all of our products are delivered via ESD (Electronic Software Delivery) only. After purchase you will be able to immediately download the registration keys or passwords and download links for archives of full versions. Also you will receive a copy of registration keys or passwords by e-mail. Please make sure to enter a valid e-mail address in your order. If you have not received the keys within 2 hours, please, contact us at [email protected]
To obtain MORE INFORMATION on this product, visit us at http://sqlmanager.net/en/ products/mssql/datagenerator
Product distribution
Data Generator for SQL Server (Business license) + 1-Year Maintenance*
Register Now! Data Generator for SQL Server (Business license) + 2-Year Maintenance*
Data Generator for SQL Server (Business license) + 3-Year Maintenance* Data Generator for SQL Server (Non-commercial license) + 1-Year
Maintenance*
Data Generator for SQL Server (Non-commercial license) + 2-Year Maintenance*
Data Generator for SQL Server (Non-commercial license) + 3-Year Maintenance*
Data Generator for SQL Server (Trial version) Download
Now! *EMS Maintenance Program provides the following benefits:
need to renew your maintenance.
You can easily reinitiate/renew your maintenance with our online, speed-through
Maintenance Reinstatement/Renewal Interface. After reinitiating/renewal you will receive a confirmation e-mail with all the necessary information.
See also:
1.5
How to register Data Generator
To register your newly purchased copy of EMS Data Generator for SQL Server, perform the following:
· receive the notification letter from Share-it! with the registration info; · enter the Registration Name and the Registration Key from this letter;
· make sure that the registration process has been completed successfully – check the registration information at the startup page.
See also: Registration
1.6
Version history
Product name Version Release date
Data Generator 2005 for SQL Server Version 2.3.0.1 February 7, 2007 Data Generator 2005 for SQL Server Version 2.2.0.1 June 26, 2006 Data Generator 2005 for SQL Server Version 2.1.0.1 August 8, 2005 Data Generator 2005 for SQL Server Version 2.0.0.1 April 12, 2005 MS SQL Data Generator Version 1.0.0.1 May 14, 2003 Full version history is available at http://www.sqlmanager.net/products/mssql/ datagenerator/news.
Version 2.3
· Wizard interface has become more user-friendly · Added the 'Clear tables before generation' option · Implemented encrypted passwords storage · Increased data generation speed
· Improved data generation for tables with Foreign keys · Minor bug-fixes and improvements
Scroll to top Version 2.2
· The 'Commit every...' option added
· Added the ability to load lists of values from TXT and CSV files · The console version now creates log files
· System tables are not displayed any more
· Fixed a bug concerned with applying default constraints · Increased generation speed for string fields
· Improved floating point values generation
· Fixed the error with data generation for non-"dbo" tables
Scroll to top Version 2.1
· Improved processing of table relationships
· Now you can generate incremental data for date fields · Formula-based random data generation for integer fields · Minor interface improvements
· Fixed the bug when ordering tables related by foreign keys · Fixed the bug concerned with refreshing metadata
· Fixed the bug concerned with generation of NULL values
Scroll to top Version 2.0
· Completely rewritten source code · More user-friendly wizard interface
· Retrieving values for data from SQL queries · Foreign keys support
· The opportunity to empty tables before data generation · The ability to set NULL values for certain percent of cases · String fields data generation by mask
· Incremental data generation for float fields · Getting values for BLOB fields from files · A number of bugs fixed
Scroll to top Version 1.0
Basic features:
· Generating data to several tables simultaneously · Most SQL Server data types supported
· Generating as many records as you want · Defining fields for generating data
· Easy-to-use wizard interface
· Adjustable parameters for each field type including minimum and maximum value for integer types, minimum and maximum length, start and end char for string fields, etc. · The possibility of saving all the generation parameters used within the current wizard
session
· The command-line utility to generate data using the template file and more...
Scroll to top
See also: What's new
1.7
EMS Data Generator FAQ
Please read this page attentively if you have questions about EMS Data Generator for SQL Server.
Table of contents
· What is Data Generator for SQL Server?
· What do I need to start working with EMS Data Generator for SQL Server?
· What is the easiest way to configure the template files for the console application of Data Generator?
· How can I register the product?
· Are there any limitations implied in the trial version as compared with the full one?
Question/answer list
Q: What is Data Generator for SQL Server?
A: Data Generator for SQL Server is a powerful utility for generating test data to several SQL Server database tables at once. The wizard application allows you to define tables for generating data, set value ranges, generate char fields and BLOBs, and many other features to generate test data in a simple and direct way. The utility also provides you with the console application which allows you to generate data in one touch by using generation templates.
Q: What do I need to start working with EMS Data Generator for SQL Server?
A: First of all you must have a possibility to connect to some local or remote SQL Server to work with Data Generator for SQL Server. You can use the following link to
download the server: http://www.microsoft.com/downloads/. Besides, you need your computer to satisfy the system requirements for Data Generator for SQL Server.
Q: What is the easiest way to configure the template files for the console application of Data Generator?
A: You can configure the template files for each table or export type visually using the MS SQL Data Generator wizard. Set the required generation options at Step 4 of the wizard, click the 'Tools' button and select the 'Save Template' popup menu item. All the options will be saved to the template file which can be used later in the console application.
Q: How can I register the product?
A: If you have already purchased Data Generator for SQL Server, you can register the product by entering the appropriate registration information. Please refer to Registration and How to register EMS Data Generator for details.
Q: Are there any limitations implied in the trial version as compared with the full one?
A: The trial version of the utility admits to the maximum of 100 records to be generated at a time. In all other respects it does not differ from the full version as far as the functionality is concerned. That is, you can test all the features implemented in Data Generator for SQL Server within the 30-day trial period.
Scroll to top
1.8
Other EMS Products
Quick navigationMySQL Microsoft SQL PostgreSQL InterBase / FireBird
Oracle IBM DB2 Tools & components MySQL
SQL Management Studio for MySQL
EMS SQL Management Studio for MySQL is a complete solution for database administration and development. SQL Studio unites the must-have tools in one powerful and easy-to-use
environment that will make you more productive than ever before!
SQL Manager for MySQL
Simplify and automate your database development process, design, explore and maintain existing databases, build compound SQL query statements, manage database user rights and manipulate data in different ways.
Data Export for MySQL
Export your data to any of 20 most popular data formats, including MS Access, MS Excel, MS Word, PDF, HTML and more.
Data Import for MySQL
Import your data from MS Access, MS Excel and other popular formats to database tables via user-friendly wizard interface.
Data Pump for MySQL
Migrate from most popular databases (MySQL, PostgreSQL, Oracle, DB2, InterBase/Firebird, etc.) to MySQL.
Data Generator for MySQL
Generate test data for database testing purposes in a simple and direct way. Wide range of data generation parameters.
DB Comparer for MySQL
C ompare and synchronize the structure of your databases. Move changes on your development database to production with ease.
DB Extract for MySQL
C reate database backups in the form of SQL scripts, save your database structure and table data as a whole or partially.
SQL Query for MySQL
Analyze and retrieve your data, build your queries visually, work with query plans, build charts based on retrieved data quickly and more.
Data Comparer for MySQL
C ompare and synchronize the contents of your databases. Automate your data migrations from development to production database.
Microsoft SQL
SQL Management Studio for SQL Server
EMS SQL Management Studio for SQL Server is a complete solution for database administration and development. SQL Studio unites the must-have tools in one powerful and easy-to-use environment that will make you more productive than ever before!
SQL Manager for SQL Server
Simplify and automate your database development process, design, explore and maintain existing databases, build compound SQL query statements, manage database user rights and manipulate data in different ways.
Data Export for SQL Server
Export your data to any of 20 most popular data formats, including MS Access, MS Excel, MS Word, PDF, HTML and more
Data Import for SQL Server
Import your data from MS Access, MS Excel and other popular formats to database tables via user-friendly wizard interface.
Data Pump for SQL Server
Migrate from most popular databases (MySQL, PostgreSQL, Oracle, DB2, InterBase/Firebird, etc.) to Microsoft® SQL Server™.
Data Generator for SQL Server
Generate test data for database testing purposes in a simple and direct way. Wide range of data generation parameters.
DB Comparer for SQL Server
C ompare and synchronize the structure of your databases. Move changes on your development database to production with ease.
DB Extract for SQL Server
C reate database backups in the form of SQL scripts, save your database structure and table data as a whole or partially.
SQL Query for SQL Server
Analyze and retrieve your data, build your queries visually, work with query plans, build charts based on retrieved data quickly and more.
Data Comparer for SQL Server
C ompare and synchronize the contents of your databases. Automate your data migrations from development to production database.
Scroll to top PostgreSQL
Data Export for PostgreSQL
Export your data to any of 20 most popular data formats, including MS Access, MS Excel, MS Word, PDF, HTML and more
Data Import for PostgreSQL
Import your data from MS Access, MS Excel and other popular formats to database tables via user-friendly wizard interface.
Data Pump for PostgreSQL
Migrate from most popular databases (MySQL, SQL Server, Oracle, DB2, InterBase/Firebird, etc.) to PostgreSQL.
Data Generator for PostgreSQL
Generate test data for database testing purposes in a simple and direct way. Wide range of data generation parameters.
DB Comparer for PostgreSQL
C ompare and synchronize the structure of your databases. Move changes on your development database to production with ease.
DB Extract for PostgreSQL
C reate database backups in the form of SQL scripts, save your database structure and table data as a whole or partially.
SQL Query for PostgreSQL
Analyze and retrieve your data, build your queries visually, work with query plans, build charts based on retrieved data quickly and more.
Data Comparer for PostgreSQL
C ompare and synchronize the contents of your databases. Automate your data migrations from development to production database.
Scroll to top InterBase / Firebird
SQL Management Studio for InterBase/Firebird
EMS SQL Management Studio for InterBase and Firebird is a complete solution for database administration and development. SQL Studio unites the must-have tools in one powerful and easy-to-use environment that will make you more productive than ever before!
SQL Manager for InterBase/Firebird
Simplify and automate your database development process, design, explore and maintain existing databases, build compound SQL query statements, manage database user rights and manipulate data in different ways.
Data Export for InterBase/Firebird
Export your data to any of 20 most popular data formats, including MS Access, MS Excel, MS Word, PDF, HTML and more
Data Import for InterBase/Firebird
Import your data from MS Access, MS Excel and other popular formats to database tables via user-friendly wizard interface.
Data Pump for InterBase/Firebird
InterBase/Firebird.
Data Generator for InterBase/Firebird
Generate test data for database testing purposes in a simple and direct way. Wide range of data generation parameters.
DB Comparer for InterBase/Firebird
C ompare and synchronize the structure of your databases. Move changes on your development database to production with ease.
DB Extract for InterBase/Firebird
C reate database backups in the form of SQL scripts, save your database structure and table data as a whole or partially.
SQL Query for InterBase/Firebird
Analyze and retrieve your data, build your queries visually, work with query plans, build charts based on retrieved data quickly and more.
Data Comparer for InterBase/Firebird
C ompare and synchronize the contents of your databases. Automate your data migrations from development to production database.
Scroll to top Oracle
SQL Management Studio for Oracle
EMS SQL Management Studio for Oracle is a complete solution for database administration and development. SQL Studio unites the must-have tools in one powerful and easy-to-use
environment that will make you more productive than ever before!
SQL Manager for Oracle
Simplify and automate your database development process, design, explore and maintain existing databases, build compound SQL query statements, manage database user rights and manipulate data in different ways.
Data Export for Oracle
Export your data to any of 20 most popular data formats, including MS Access, MS Excel, MS Word, PDF, HTML and more.
Data Import for Oracle
Import your data from MS Access, MS Excel and other popular formats to database tables via user-friendly wizard interface.
Data Pump for Oracle
Migrate from most popular databases (MySQL, PostgreSQL, MySQL, DB2, InterBase/Firebird, etc.) to Oracle
DB Extract for Oracle
C reate database backups in the form of SQL scripts, save your database structure and table data as a whole or partially.
SQL Query for Oracle
Analyze and retrieve your data, build your queries visually, work with query plans, build charts based on retrieved data quickly and more.
Data Comparer for Oracle
C ompare and synchronize the contents of your databases. Automate your data migrations from development to production database.
Scroll to top DB2
SQL Management Studio for DB2
EMS SQL Management Studio for DB2 is a complete solution for database administration and development. SQL Studio unites the must-have tools in one powerful and easy-to-use environment that will make you more productive than ever before!
SQL Manager for DB2
Simplify and automate your database development process, design, explore and maintain existing databases, build compound SQL query statements, manage database user rights and manipulate data in different ways.
Data Export for DB2
Export your data to any of 20 most popular data formats, including MS Access, MS Excel, MS Word, PDF, HTML and more.
Data Import for DB2
Import your data from MS Access, MS Excel and other popular formats to database tables via user-friendly wizard interface.
Data Pump for DB2
Migrate from most popular databases (MySQL, PostgreSQL, Oracle, MySQL, InterBase/Firebird, etc.) to DB2
Data Generator for DB2
Generate test data for database testing purposes in a simple and direct way. Wide range of data generation parameters.
DB Comparer for DB2
C ompare and synchronize the structure of your databases. Move changes on your development database to production with ease.
DB Extract for DB2
C reate database backups in the form of SQL scripts, save your database structure and table data as a whole or partially.
SQL Query for DB2
Analyze and retrieve your data, build your queries visually, work with query plans, build charts based on retrieved data quickly and more.
Data Comparer for DB2
C ompare and synchronize the contents of your databases. Automate your data migrations from development to production database.
Scroll to top
Tools & components
Advanced Data Export
Advanced Data Export C omponent Suite (for Borland Delphi and .NET) will allow you to save your data in the most popular office programs formats.
Advanced Data Export .NET
Advanced Data Export .NET is a component suite for Microsoft Visual Studio .NET 2003, 2005, 2008 and 2010 that will allow you to save your data in the most popular data formats for the future viewing, modification, printing or web publication. You can export data into MS Access, MS Excel, MS Word (RTF), PDF, TXT, DBF, C SV and more! There will be no need to waste your time on tiresome data conversion - Advanced Data Export will do the task quickly and will give the result in the desired format.
Advanced Data Import
Advanced Data Import™ C omponent Suite for Delphi® and C ++ Builder® will allow you to import your data to the database from files in the most popular data formats.
Advanced PDF Generator
Advanced PDF Generator for Delphi gives you an opportunity to create PDF documents with your applications written on Delphi® or C ++ Builder®.
Advanced Query Builder
Advanced Query Builder is a powerful component suite for Borland® Delphi® and C ++ Builder® intended for visual building SQL statements for the SELEC T, INSERT, UPDATE and DELETE clauses.
Advanced Excel Report
Advanced Excel Report for Delphi is a powerful band-oriented generator of template-based reports in MS Excel.
Advanced Localizer
Advanced Localizer™ is an indispensable component suite for Delphi® for adding multilingual support to your applications.
Source Rescuer
EMS Source Rescuer™ is an easy-to-use wizard application for Borland Delphi® and C + +Builder® which can help you to restore your lost source code.
Part
2
Wizard Application
Data Generator for SQL Server wizard application provides easy-to-use wizard interface to set all data generation parameters visually.
· Using wizard application · Using configuration files · Setting program preferences
See also:
2.1
Using wizard application
Go through the steps of the wizard and follow the wizard instructions to generate test data for your needs.
· Getting started
· Step 1 - Setting connection properties · Step 2 - Selecting databases and tables · Step 3 - Specifying generation parameters · Step 4 - Setting generation options
· Step 5 - Start of data generation process · Step 6 - Editing generation script
See also:
2.1.1
Getting started
This is how Data Generator for SQL Server wizard application looks when you first start it.
This page allows you to view registration information. If you have not registered Data Generator for SQL Server yet, you can do it by pressing the Enter Registration Code... button and specifying your registration information.
When you are done, press the Next button to proceed to Step 1.
See also: Registration
2.1.2
Step 1 - Setting connection properties
At this step you should enter the necessary settings to establish connection to SQL Server.
Connection settings
First select the connection type: local or remote.
Local connection is used to connect to SQL Server launched on the same machine where Data Generator for SQL Server is running.
The Remote mode allows you to connect to SQL Server launched on another computer in the network.
By default the program uses local connection. It is indicated by radio-button Local selected. If you wish to establish remote connection, you should select the Remote radio-button. For remote connection you should also enter SQL Server host name in the Host field.
Please note that if Microsoft® SQL Server™ is installed as a named instance, you should specify 'Remote' as the connection type and enter the name of your machine and the instance name in the 'Host' field in the following format:
computer_name\sqlserver_instance_name (e.g. "MYCOMPUTER\SQLEXPRESS").
Authentication Type
Specify the type of SQL Server authentication to be used for the connection: SQL Server
or Windows authentication. It is strongly recommended to avoid using SQL Server authentication with "sa" as the login.
If SQL Server has been selected as the authentication type, you should also provide
Please note that you should have sufficient privileges to write to the destination database on SQL Server.
2.1.3
Step 2 - Selecting databases and tables
At this step you should select tables for test data generation.
First you should select a database from the Select Database drop-down list at the top of the window.
In the Available Tables list you can see all the tables belonging to the selected database. To select a table, you need to move it from the Available Tables list to the Selected Tables list. In this list tables are displayed with their full names:
<database_name>.<table_name>. To cancel table selection, just remove it from the Selected Tables list. Use the buttons or drag-and-drop operations to move the tables from one list to another.
Hint: To select multiple tables, hold down the Shift or Ctrl key while selecting the table names.
Please note that the order of data generation for tables depends on their position in the Selected Tables list. This might be critical in case of generating data for linked tables. You can change their order by dragging tables across the list.
When you press the Next button at this step, Data Generator for SQL Server analyzes the order of data generation to avoid referential integrity conflicts and advises you to set
a new order for data generation.
2.1.4
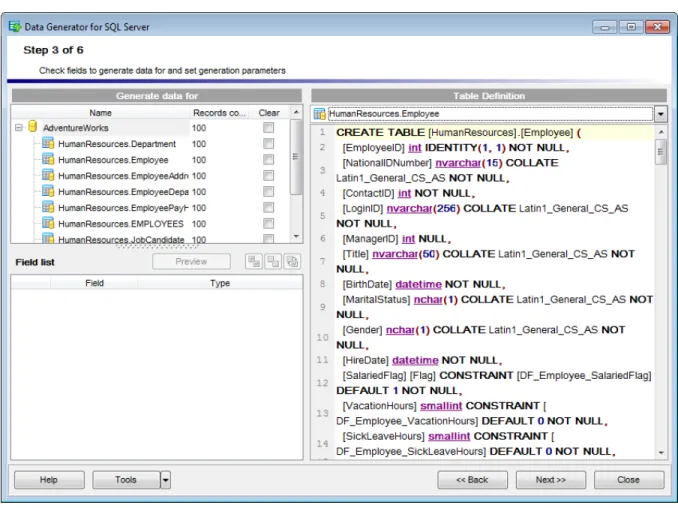
Step 3 - Specifying generation parameters
At this step you can select fields for generating data and set various data generation parameters.
Selected tables are displayed in the Generate data for tree at the top-left side of the window. Table fields and their types are listed in the grid of the Field list area below.
Records count
Set the number of data records to be generated for each table.
Clear
Set this flag for a table to empty the table before data generation.
Disable triggers
This column is visible if there are active triggers on one or more tables selected for data generation. Set a flag for a table to disable triggers associated with the table during data generation.
Preview
Click the Preview button to browse the selected table data in the preview mode.
When you select a table in the Generate data for tree, you can set data generation parameters for each of its fields within the Generation properties area at the right side
of the window. Use the and the buttons to manage fields within the Field list area. For each field you can set the following:
Set NULL value in ... % of cases
Check this option and specify the percentage of NULL values for the field, if necessary.
Other generation parameters vary according to the data type of the selected field: · FLOAT field parameters
· INTEGER field parameters · DATE field parameters · STRING field parameters · BLOB field parameters · BIT field parameters
If a field is part of a foreign key, you can select one of the following options for this field:
Generate data from the dependent field
Values for the field will be taken from the corresponding field(s) of the foreign table(s).
Generate data from list / SQL-query Ratio 1:N
If this option is selected you should specify the N value using the spin-edit box below. Data will be generated into the field related as 1:N, i.e. n records will be generated into the foreign table for each record of the primary table.
2.1.4.1 Setting type-specific properties 2.1.4.1.1 INTEGER field parameters
Integer fields are used for exact numeric data storage. Values for this field can be generated randomly, incrementally, or they can be taken from a fixed list of values or
SQL query, or from an existing table field of the same data type.
The Generation properties panel allows you to define preferences for generating values for integer field types.
Select Data generation mode as follows:
Generate random data
The value is generated randomly within the defined interval (the minimum and the maximum values).
Use formula
This option allows you to correct your data according to a formula; x is a randomly generated value here. Addition, substraction, multiplication, dividing and exponentiation
operations (+,-,*,/,^) can be used.
Generate incremental data
Specify the Initial value and the Increment properties to generate an ordered incremented sequence of values.
Get Data from List / SQL query
This panel allows you to define the list of values to generate integer data from. You can enter these values directly into the editor by selecting the List of Values option.
To add a single value, use the Add Value button.
To load a list of values from an existing external file, use the Load from file button. To save the list to an external file, use the Save to file button.
To remove a single value, use the Delete Value button. To remove all items from the list, use the Clear button.
You can also specify whether the values are to be taken in random order or in the order they have been inputted.
Alternatively, you can set the SQL Query option and input an SQL query into the editor, and the resulting dataset will be used as the list for data generation.
Get data from Field
This option allows you to specify a field to generate data from: use the Table and Field drop-down lists to select the source table and field that will be used to take data for generation.
2.1.4.1.2 FLOAT field parameters
Float fields are used for approximate numeric data storage. Values for this field can be generated randomly, incrementally, or they can be taken from a fixed list of values or
SQL query, or from an existing table field of the same data type.
The Generation properties panel allows you to define preferences for generating values for floating point numeric field types.
Select Data generation mode as follows:
Generate random data
Here you can define the number of digits and the precision for the result randomly generated values.
Get data from List / SQL query
This panel allows you to define the list of values to generate floating point numeric data from. You can enter these values directly into the editor by selecting the List of Values option.
To add a single value, use the Add Value button.
To load a list of values from an existing external file, use the Load from file button. To save the list to an external file, use the Save to file button.
To remove a single value, use the Delete Value button. To remove all items from the list, use the Clear button.
You can also specify whether the values are to be taken in random order or in the order they have been inputted.
Alternatively, you can set the SQL Query option and input an SQL query into the editor, and the resulting dataset will be used as the list for data generation.
Get data from field
This option allows you to specify a field to generate data from: use the Table and Field drop-down lists to select the source table and field that will be used to take data for generation.
2.1.4.1.3 DATE field parameters
Date fields are used for temporal values storage. Values for this field can be generated
randomly, incrementally, or they can be taken from a fixed list of values or SQL query, or from an existing table field of the same data type.
The Generation properties panel allows you to define preferences for generating date values for date field types.
Select Data generation mode as follows:
Generate random data
Set the date range by defining the minimum and the maximum values. Check the Include Time option to generate non-zero random time in addition to the date.
Generate incremental data
Specify the Initial Value and the Increment properties to generate an ordered incremented sequence of dates. The incremented value is day.
Get data from list / SQL query
This panel allows you to define the list of values to generate temporal data from. You can enter these values directly into the editor by selecting the List of Values option.
To add a single value, use the Add Value button.
To load a list of values from an existing external file, use the Load from file button. To save the list to an external file, use the Save to file button.
To remove a single value, use the Delete Value button. To remove all items from the list, use the Clear button.
You can also specify whether the values are to be taken in random order or in the order they have been inputted.
Alternatively, you can set the SQL Query option and input an SQL query into the editor, and the resulting dataset will be used as the list for data generation.
Get data from Field
This option allows you to specify a field to generate data from: use the Table and Field drop-down lists to select the source table and field that will be used to take data for generation.
2.1.4.1.4 STRING field parameters
String fields are used for text data storage. The values are sorted and compared on the basis of the collation of the character set assigned to the column. Values for this field can be generated randomly (with constraints or mask used), incrementally, or they can be taken from a fixed list of values or SQL query, or from an existing table field of the same data type.
The Generation properties panel allows you to define preferences for generating string values for string-based field types.
Select Data generation mode as follows:
Generate random data
String random data can be generated in two ways - by using constraints or by typing the mask.
· Using constraints
Set the Min length, Max length values to define the minimum and the maximum length for generated values. You can also specify the Start char and the End char segments to be used for string values generation.
· Using mask
Check the option to generate values by mask. Use the Masks window to create and edit various masks for string data generation:
- the 'A' and the 'a' characters are replaced with a random letter (from 'A' to 'Z' and from 'a' to 'z');
- the 'N' character is replaced with a random digit; - '{n}' results in iteration of the last sign n times;
- the character after the '\' symbol is interpreted as a common character.
All the rest of the mask characters will be moved to the result value without changes.
Generate incremental data
Specify the Initial value and the Increment properties to generate an ordered incremented sequence of values.
Get data from list / SQL query
This panel allows you to define the list of values to generate string data from. You can enter these values directly into the editor by selecting the List of Values option. To add a single value, use the Add Value button.
To load a list of values from an existing external file, use the Load from file button. To save the list to an external file, use the Save to file button.
To remove a single value, use the Delete Value button. To remove all items from the list, use the Clear button.
You can also specify whether the values are to be taken in random order or in the order they have been inputted.
Alternatively, you can set the SQL Query option and input an SQL query into the editor, and the resulting dataset will be used as the list for data generation.
Use of the Sample text option allows you to generate fragments of previously defined text into the string field. To define sample text used by default, see the Default
Get data from Field
This option allows you to specify a field to generate data from: use the Table and Field drop-down lists to select the source table and field that will be used to take data for generation.
2.1.4.1.5 BLOB field parameters
A BLOB is a binary large object that can store a variable amount of data. You can
generate values for this field randomly or choose to take them from a specified list of files or SQL query, or from an existing table field of the same data type.
The Generation properties panel allows you to define preferences for generating values for BLOB field type.
Select Data generation mode as follows:
Generate random data
Set the Min length, Max length values to define the minimum and the maximum length for generated values.
To add a file, use the Add Value button.
To load a list of file paths from an existing external file, use the Load from file button.
To save the list to an external file, use the Save to file button. To remove a single file, use the Delete Value button.
To remove all items from the list, use the Clear button.
You can also specify whether the files are to be taken in random order or in the order they have been inputted.
Alternatively, you can set the SQL query option and input an SQL query into the editor, and the resulting dataset will be used as the list for data generation.
Get data from Field
This option allows you to specify a field to generate data from: use the Table and Field drop-down lists to select the source table and field that will be used to take data for generation.
2.1.4.1.6 BIT field parameters
SQL Server Bit fields can store either TRUE or FALSE values. You can generate values for this field randomly or choose to take them from a specified list of values or SQL query, or from an existing table field of the same data type.
The Generation properties panel allows you to define preferences for generating values for Bit field type.
Select Data generation mode as follows:
Generate random data
Specify the ratio between True and False values in randomly generated data.
Get data from list / SQL query
This panel allows you to define the list of values to generate bit data from. You can enter these values directly into the editor by selecting the List of Values option.
To add a single value, use the Add Value button.
To save the list to an external file, use the Save to file button. To remove a single value, use the Delete Value button.
To remove all items from the list, use the Clear button.
You can also specify whether the values are to be taken in random order or in the order they have been inputted.
Alternatively, you can set the SQL Query option and input an SQL query into the editor, and the resulting dataset will be used as the list for data generation.
Get data from Field
This option allows you to specify a field to generate data from: use the Table and Field drop-down lists to select the source table and field that will be used to take data for generation.
2.1.4.2 Viewing table DDL
When you select a database in the Generate data for tree, you can select a table belonging to the database and view its DDL structure within the Table Definition area at the right side of the window.
Hint: If more convenient, you can select the Show DDL for table in hint option (available in the General section of the Preferences dialog) to enable hints that popup when the mouse cursor is positioned over the table names within the Generate Data for area.
Table Definition
The drop-down list at the top contains the tables that were selected for data generation at Step 2. Select a table to view its DDL.
2.1.4.3 Data Preview
The Preview window allows you to browse the selected table data in the preview mode.
Note: The data in preview are selected randomly according to specified parameters and are not actually inserted into the table, i.e. a different set of values will be generated into the table.
To open the window, click the Preview button available at Step 3.
The grid contains all selected columns with data that will be generated according to the parameters you have specified at Step 3. If more convenient, you can change the order of the columns by dragging their headers horizontally.
Click a column caption to sort items by values of this column in the ascending or the descending mode.
If necessary, you can filter records in the grid in either of the following ways:
· click the Arrow-Down button next to the column caption to display the drop-down list and select any of the column values to filter records by this value of the selected column;
· click the Arrow-Down button next to the column caption to display the drop-down list, then select the Custom item and build a simple filter using the Custom Filter dialog.
Select a logical operator for checking the column values (like, is less than, is greater than
, etc.) and set a value to be checked by this operator in the corresponding box on the right.
If necessary, you can set the second condition and specify the relation between the two conditions: whether both of them should be satisfied (AND) or just any of them (OR). Use the '_' character to represent any single symbol, and use the '%' character to represent any series of symbols in the condition string.
2.1.5
Step 4 - Setting generation options
At this step you can specify data generation options.
Action
Specify the action to be taken at the next step of the wizard:
Execute statements
Select this option to execute the script for data generation.
Save data generation script to file
Select this option if you only need to save the script for data generation to a file, without the script execution.
Execute statements and save data generation script to file
Select this option to execute the script for data generation and save it to a file.
File name
This box is enabled if the Save data generation script to file or Execute statements and save data generation script to file option is selected. Type in or use the Explorer button to specify the path to the *.sql file to store the SQL script.
2.1.6
Step 5 - Start of data generation process
This step informs you that all data generation parameters are set, and you can start the generation process.
If everything is correct, press the Generate button to start the process. If you want to change something, you can return to any of the wizard steps using the Back button.
The Generating... dialog indicates the amount of generated records, elapsed time, the number of errors (if any) and visually represents the percentage of data generated.
Use the Send to background button to run the process in the background mode, the Minimize button to minimize the application to Windows Task bar, or the Cancel button to stop the generation process.
During data generation the Generation Log area displays the log of performed operations and errors (if any).
When the process is completed, you can use the View SQL file in editor and the Save log to file buttons to edit the data generation script at Step 6 of the wizard and save the generation log content to an external text file respectively.
Do not forget to save data generation options if you need to repeat the generation process with the same (or similar) settings later.
2.1.7
Step 6 - Editing generation script
This step of the wizard allows you is provided for working with the result SQL script for data generation.
For your convenience the code folding, syntax highlight and a number of other features for efficient SQL editing are implemented.
The context menu of the editor area contains most of the standard text-processing functions (Cut, Copy, Paste, Select All) and functions for working with the script as a whole, e.g. you can move the cursor to a particular line, set markers, toggle bookmarks, etc.
Implementation of the Find Text and the Replace Text dialogs contributes to more efficient work with the SQL code.
· format the selected code using SQL Formatter to make the code easier to read; · use the Quick Code features: select a character, toggle a comment for a code
fragment, toggle case of the selected text, indent/unindent lines in the script.
Press the Back button to return to any of the previous steps (the content of the editor area will not be lost).
If you press the Save button, the script will be saved to an external file.
Pressing the Close button will result in closing the application (before closing Data Generator will prompt for saving changes).
2.2
Using configuration files
Data Generator for SQL Server allows you to store its settings in external *.gtm files if you need to repeat data generation process several times.
You can load previously saved configuration settings to the application wizard if you need to make some changes before data generation, or you can run it with the console
application for quicker generation.
· Saving configuration file · Loading configuration file
See also:
Using wizard application Setting program preferences
2.2.1
Saving configuration file
Data Generator templates are saved within the Save template options dialog. To open this dialog, press the Tools button and select the Save Template popup menu item.
Please note that you can only save data generation options at the Specifying generation parameters step or at the last step of Data Generator for SQL Server wizard.
· Save Template options · Loading configuration file
2.2.1.1 Save Template options File name
Specify the template file name and select its location using the button to open the Save As... dialog.
Comment
2.2.2
Loading configuration file
Data Generator templates are loaded within the Open template dialog. To open this dialog, press the Tools button and select the Load template popup menu item.
Please note that you can reopen a template at any step of the wizard using the corresponding popup menu item of the Tools menu.
· Saving configuration file · Save Template options
2.3
Setting program preferences
Data Generator for SQL Server provides full customization of the program interface by setting various options within the Preferences dialog. This chapter is intended to inform you how to use these options.
General options
These options define general behavior of Data Generator for SQL Server
Default constraints
This page allows you to set the constraints for field values used by default in the generation process.
Language
This page allows you to select a language to be applied for your copy of Data Generator for SQL Server.
Interface
This branch contains several pages with a number of options allowing you to customize the application interface style according to your liking.
See also:
Using wizard application Using configuration files
2.3.1
Setting general options
This page allows you to define general options of the application.
Number of records to generate
Sets the quantity of records generated by default.
Commit every ... records
Specifies the number of records in each block of the generation script to be supplemented with the COMMIT statement.
Number of records to preview
Sets the quantity of records used in the Data Preview window by default.
Confirmation on exit
Enables/disables confirmation upon exiting the program.
All fields selected by default
Check this option to include all fields into the data generation process by default.
BLOB fields selected by default
Uncheck this option if you need to exclude BLOB fields from the generation process by default.
Clear tables before generation
Set this option to empty tables before data generation.
Save passwords
Setting this option allows you to save passwords used for access to the databases automatically upon closing the application. Please note that checking this option saves the latest password used for connection to the database.
Show DDL for table in hint
This option enables/disables hints that popup when the mouse cursor is positioned over the table names within the Generate Data for area at Step 3.
Show databases
This option enables/disables the 'Select Database' drop-down list at Step 2 of the wizard. If you check this option, you can select the database from the list, otherwise you must type the database name manually.
Disable identity fields by default
When this option is checked the SET IDENTITY_INSERT OFF statement is generated on the server before data generation.
See also:
Setting default constraints Setting program language Defining interface style
2.3.2
Setting default constraints
On this page you can define the default constraints for all supported data types.
Set NULL value in ... % of cases
This option allows you to specify the percentage of records that will remain NULL by default.
Default Integers
Use this tab to set the desired minimum and maximum integer values to be generated.
Default Floats
Use this tab to set the number of digits and the precision for the floating point numeric values.
Default Strings
Use this tab to set the range of characters to be used for generating string values (for example, from "A" to "z") and their minimum/maximum length.
Include new line
Windows new line
Select this option to specify Windows-style line feeds.
Sample Text
If more convenient, you can input any string that will be used as sample text. You can choose to generate sample text when setting generation parameters for strings.
Default Date
Use this tab to set the date range by defining the minimum and the maximum values. Check the Include Time option to generate non-zero random time in addition to the date.
Date format
Type in or use the drop-down list to specify the preferable date format.
Default Time
Use this tab to set the time range by defining the minimum and the maximum values.
Time format
Type in or use the drop-down list to specify the preferable time format.
See also:
Setting general options Setting program language Defining interface style
2.3.3
Setting program language
The Language page is provided for managing Data Generator localization files.
You can create your own *.lng files similar to those available in the %program_directory% \Languages folder, add them to the list of available languages and set the new language as the program interface language.
Available languages
Lists all the languages available for localization and the corresponding *.lng files. Double-click a language in the list to edit its name or the *.lng file.
Language directory
Use the button to specify the directory where the *.lng files are stored by default.
Load files
This button is used for searching for *.lng files in the Language directory and adding all them to the Available languages list.
Setting general options Setting default constraints Defining interface style
2.3.4
Defining interface style
The Interface section of the Preferences dialog allows you to customize the application interface style to your liking.
· Trees and lists · Edit controls · Check boxes · Buttons · Page controls · Group boxes · Fonts
Use the Scheme name drop-down list to select an interface scheme according to your liking: Classic, Office XP style, Windows XP native style, etc.
It is also possible to create one's own interface scheme, if necessary:
· set your preferences within the available branches of the Interface node (Trees and Lists, Edit Controls, Check Boxes, Buttons, Page controls, Group Boxes, Fonts); · return to the Interface page and click the Save As button;
Note: For your convenience the previews illustrating the changes are displayed in the Sample area of each branch of the Interface node.
See also:
Setting general options Setting default constraints Setting program language
2.3.4.1 Trees and lists
Use the Trees and lists section to view and edit the corresponding options.
Look & feel
This setting determines the manner in which tree and list elements are painted. Use the drop-down list to select the painting style that will be applied to the trees and lists:
Standard Flat UltraFlat
Hide selection
This option specifies how selected tree nodes and list items are displayed when focus leaves the tree or list control.
If this option is enabled, selected nodes look like other nodes. Otherwise, selected nodes/ items are highlighted within the tree/list.
Hide focus rectangle
This option determines whether a focus rectangle is displayed around the focused tree node or list item within the tree or list control.
If this option is disabled, the focused node/item is not highlighted but the focus rectangle is displayed around it.
Native style
This option determines whether the native Windows style will be applied to the trees and lists.
The option has the highest priority for trees and lists. If this option is selected, the tree nodes and list items are painted according to the native Windows style, regardless of other painting settings.
Note: The Native style option is currently supported for the Windows® XP operating system only. See also: Edit controls Check boxes Buttons Page controls Group boxes Fonts
2.3.4.2 Edit controls
Use the Edit controls section to customize the appearance of various Data Generator for SQL Server edit controls: Border style, Button style, Button transparency, etc.
Border style / Button style
Use these drop-down lists to specify the style around an editor (the edit control borders) and select the painting style that will be applied to the edit control buttons (ellipsis button, arrow-down combo-box button, etc.) respectively:
None Single Thick Flat 3D UltraFlat Button transparency
Represents the button transparency mode within an editor. Use the drop-down list to specify the transparency that will be applied to the edit control buttons (ellipsis button, arrow-down combo-box button, etc.):
None (a button is always displayed in a non-transparent fashion)
Inactive (a button is drawn when the editor has focus or when the mouse cursor is positioned over the button; otherwise, the button is transparent)
Always (a button is always transparent)
Hide inactive (a button is drawn only when the editor has focus; otherwise, the button is invisible)
Hide unselected (a button is drawn when the editor has focus or when the mouse cursor is positioned over the editor region; otherwise, the button is invisible).
Edges
This group defines which edges are displayed within an editor. Check/uncheck the boxes to hide/show individual edges of the edit controls:
Left (if unchecked, the left border edge is invisible)
Right (if unchecked, the right border edge is invisible)
Top (if unchecked, the top border edge is invisible)
Bottom (if unchecked, the bottom border edge is invisible)
Hot track
This option specifies whether editor items are highlighted when the mouse cursor is positioned over an edit control. Select this option to highlight an edit control in response to mouse movements.
Shadow
If this option is selected, a shadow is displayed for the edit controls.
Native style
This option determines whether the native Windows style will be applied to the edit controls.
The option has the highest priority for edit controls. If this option is selected, the edit controls are painted according to the native Windows style, regardless of other painting settings.
Note: The Native style option is currently supported for the Windows® XP operating system only.
See also: Trees and lists Check boxes Buttons Page controls Group boxes Fonts
2.3.4.3 Check boxes
Use the Check boxes section to customize the border style and the appearance of
check boxes and radio buttons.
Border style
This setting determines the manner in which check box and radio group borders are painted. Use the drop-down list to select the painting style that will be applied to the check boxes and radio groups:
None Single Thick Flat 3D UltraFlat Hot track
This option specifies whether check boxes are highlighted when the mouse cursor is positioned over the check box controls. Select this option to highlight check boxes in response to mouse movements.
Shadow
Native style
This option determines whether the native Windows style will be applied to the check boxes and radio buttons.
The option has the highest priority for check boxes and radio buttons. If this option is selected, the check boxes and radio buttons are painted according to the native Windows style, regardless of other painting settings.
Note: The Native style option is currently supported for the Windows® XP operating system only.
See also: Trees and lists Edit controls Buttons Page controls Group boxes Fonts
2.3.4.4 Buttons
Use the Buttons section to customize Data Generator buttons.
Button kind
This setting determines the manner in which a button is painted. Use the drop-down list to select the painting style that will be applied to buttons:
Standard Flat UltraFlat
Native style
This option determines whether the native Windows style will be applied to the buttons. The option has a higher priority than the Button kind setting. If this option is selected, the buttons are painted according to the native Windows style, otherwise the Button kind selection is applied.
Note: The Native style option is currently supported for the Windows® XP operating system only.
Trees and lists Edit controls Check boxes Page controls Group boxes Fonts
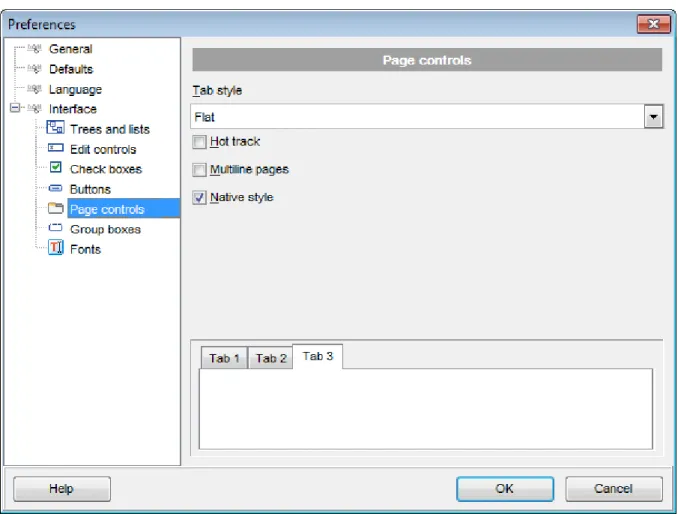
2.3.4.5 Page controls
Use the Page controls section of the Preferences dialog to customize the style of all Data Generator page controls.
Tabs are visual elements of tab controls. Their purpose is to identify pages and switch between them. Once a tab is clicked, the corresponding page is selected.
Pages are container controls that represent the contents of tab controls. Tab controls contain a single page, whose context is to be updated each time the selected tab changes. Page controls contain the number of pages equal to the number of tabs.
Tab style
Use the drop-down list to select the painting style that will be applied to the tab controls:
Tabs (tabs are painted as notebook tabs)
Buttons (the selected tab is painted as a pressed button, other tabs are painted as released buttons)
Flat (tabs are painted as notebook tabs, but appear lowered slightly)
Hot track
This option specifies whether tab captions are highlighted when the mouse pointer hovers over tabs. Select this option to enable tab highlighting.