Linux Virtual Server Tutorial
Horms (Simon Horman) –
[email protected]
VA Linux Systems Japan, K.K. –
www.valinux.co.jp
with assistance from
NTT Comware Corporation –
www.nttcom.co.jp
July 2003. Revised March 2004
http://www.ultramonkey.org/
Abstract
The Linux Virtual Server Project (LVS) allows load balancing of networked services such as web and mail servers using Layer 4 Switching. It is extremely fast and allows such services to be scaled to service 10s or 100s of thousands of simultaneous connections. The purpose of this tutorial is to demonstrate how to use various features of LVS to load balance Internet services, and how this can be made highly available using tools such as such as heartbeat and keepalived. It will also cover more advanced topics which have been the subject of recent development including maintaining active connections in a highly available environment and using active feedback to better distribute load.
Introduction
The Linux Virtual Server Project (LVS) implements layer 4 switching in the Linux Kernel. This allows TCP and UDP sessions to to be load balanced between multiple real servers. Thus it provides a way to scale Internet services beyond a single host. HTTP and HTTPS traffic for the World Wide Web is probably the most common use. Though it can also be used for more or less any service, from email to the X Windows System.
LVS itself runs on Linux, however it is able to load balance connections from end users running any operating system to real servers running any operating system. As long as the connections use TCP or UDP, LVS can be used.
LVS is very high performance. It is able to handle upwards of 100,000 simultaneous connec-tions. It is easily able to load balance a saturated 100Mbit ethernet link using inexpensive commodity hardware. It is also able to load balance saturated 1Gbit link and beyond using higher-end commodity hardware.
1
LVS Basics
This section will cover the basics of how LVS works. How to obtain and install LVS, and how to configure for its main modes of operation. In short it will cover how to set up LVS to load balance TCP and UDP services.
Terminology
Linux Director: Host with Linux and LVS installed which receives packets from end users and forwards them to real servers.
End User: Host that originates a connection.
Real Server: Host that terminates a connection. This will be running some sort of daemon such as Apache.
A single host may be act in more than one of the above roles at the same time.
Virtual IP Address (VIP): The IP address assigned to a service that a Linux Director will handle.
Real IP Address (RIP): The IP address of a Real Server.
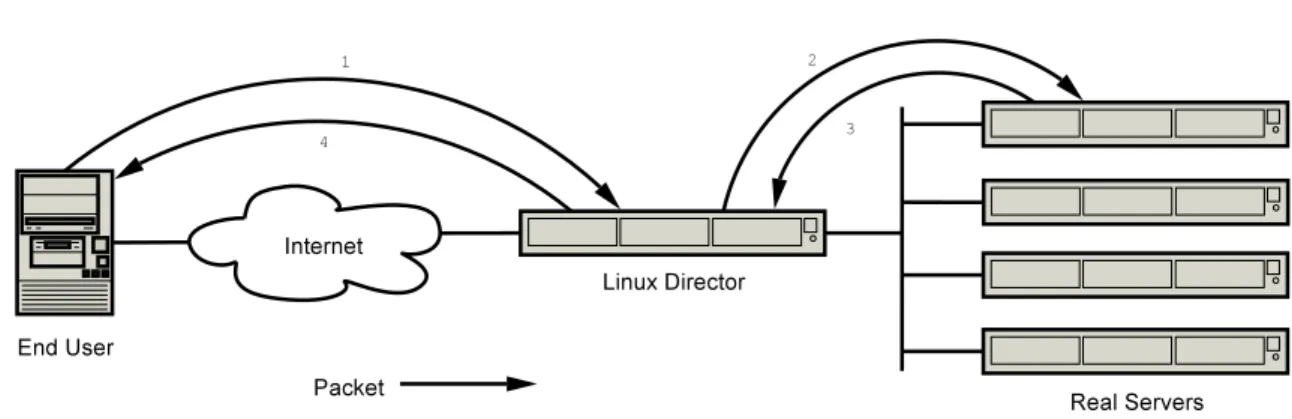
Layer 4 Switching
Figure 1: LVS NAT
Layer 4 Switching works by multiplexing incoming TCP/IP connections and UDP/IP datagrams to real servers. Packets are received by a Linux Director and a decision is made as to which real server to foward the packet to. Once this decision is made subsequent packets to for the same connection will be sent to the same real server. Thus, the integrity of the connection is maintained.
Forwarding Packets
The Linux Virtual Server has three different ways of forwarding packets; network address translation (NAT), IP-IP encapsulation (tunnelling) and direct routing.
• Network Address Translation (NAT): A method of manipulating the source and/or
desti-nation port and/or address of a packet. The most common use of this is IP masquerading which is often used to enable RFC 1918[2] private networks to access the Internet. In the context of layer 4 switching, packets are received from end users and the destination port and IP address are changed to that of the chosen real server. Return packets pass through the linux director at which time the mapping is undone so the end user sees replies from the expected source.
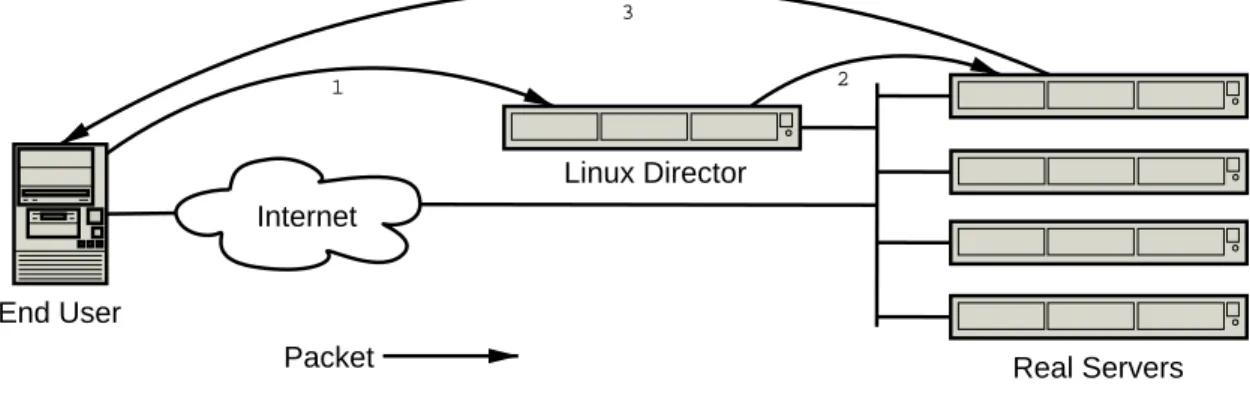
• Direct Routing: Packets from end users are forwarded directly to the real server. The IP
packet is not modified, so the real servers must be configured to accept traffic for the virtual server’s IP address. This can be done using a dummy interface or packet filtering to redirect traffic addressed to the virtual server’s IP address to a local port. The real server may send replies directly back to the end user. Thus, the linux director does not need to be in the return path.
• IP-IP Encapsulation (Tunnelling): Allows packets addressed to an IP address to be
redirected to another address, possibly on a different network. In the context of layer 4 switching the behaviour is very similar to that of direct routing, except that when packets are forwarded they are encapsulated in an IP packet, rather than just manipulating the ethernet frame. The main advantage of using tunnelling is that real servers can be on a different networks.
Internet
1
3
2
End User
Real Servers Linux Director
Packet
Figure 2: LVS Direct Routing
Virtual Services
On the Linux Director a virtual service is defined by either an IP address, port and protocol, or a firewall-mark. A virtual service may optionally have a persistance timeout associated with it. If this is set and a connection is received from the same IP address before the timeout has expired, then the connection will be forwarded to the same real server as the original connection.
• IP Address, Port and Protocol: A virtual server may be specified by:
– An IP Address: The IP address that end users will use to access the service. – A port: The port that end users will connect to.
– A protocol. Either UDP or TCP.
• Firewall-Mark: Packets may be marked with a 32-bit unsigned value using ipchains or
iptables. The Linux Virtual Server is able to use use this mark to designate packets destined for a virtual service and route them accordingly. This is particularly useful if a large number of contiguous IP based virtual services are required with the same real servers. Or to group persistence between different ports. For instance to ensure that a given end user is sent to the same real server for both HTTP and HTTPS.
Scheduling
The virtual service is assigned a scheduling algorithm that is used to allocate incoming connec-tions to the real servers. In LVS the schedulers are implemented as separate kernel modules. Thus new schedulers can be implemented without modifying the core LVS code.
There are many different scheduling algorithms available to suit a variety of needs. The simplest are round robin and least connected. These work using a simple strategy of allocating connections to each real server in turn and allocating connections to the real server with the least number of connections respectively. Weighted variants of these schedulers allow connections to be allocated proportional to the weighting of the real server, more powerful real servers can be set with a higher weight and thus, will be allocated more connections. More complex scheduling algorithms have been designed for specialised purposes. For instance to ensure that requests for the same IP address are sent to the same real server. This is useful when using LVS to load balance transparent proxies.
Installing LVS
Some distributions, such as SuSE ship with kernels that have LVS compiled in. In these cases installation should be as easy as installing the supplied ipvsadm package. At the time of writing Ultra Monkey provides packages built against Debian Sid (Unstable) and Woody (Stable/3.0) and Red Hat 7.3 and 8.0. Detailed information on how to obtain and install these packages can be found on www.ultramonkey.org. The rest of this section will discuss how to install LVS from source as it is useful to understand how this process works.
Early versions of LVS worked with Linux 2.2 series kernels. This implementation involved extensive patching of the Kernel sources. Thus, each version of LVS was closely tied to a version of the Kernel. The netfilter packet filtering architecture[4] which is part of the 2.4 kernels has allowed LVS to be implemented almost exclusively as a set of kernel modules. The result is that LVS is no longer tied closely to an individual kernel release. LVS may also be compiled directly into the kernel. However, this discussion will focus on using LVS as a module as this approach is easier and more flexible.
1. Obtain and Unpack Kernel
It is always easiest to start with a fresh kernel. You can obtain this from www.kernel.org. This example will use the 2.4.20 kernel. It can be unpacked using the following command which should unpack the kernel into the linux-2.4.20 directory.
tar -jxvf linux-2.4.20.tar.bz2
2. Obtain and Unpack LVS
LVS can be obtained from www.linuxvirtualserver.org. This example will use 1.0.9. It can be unpacked using the following command which should pack the kernel into the
ipvs-1.0.9 directory.
tar -zxvf ipvs-1.0.9.tar.gz
3. Apply LVS Patches to Kernel
Two minor kernel patches are required in order for the LVS modules to compile. To apply these patches use the following:
cd linux-2.4.20/
patch -pq < ../ipvs-1.0.9/linuxkernel_ksyms_c.diff patch -pq < ../ipvs-1.0.9/linuxnet_netsyms_c.diff
A third patch is applied to allow interfaces to be hidden. Hidden interfaces do not respond to ARP requests and are used on real servers with LVS direct routing.
patch -pq < ../ipvs-1.0.9/contrib/patches/hidden-2.4.20pre10-1.diff
4. Configure the kernel
First ensure that the tree is clean:
make mrproper
Now configure the kernel. There are a variety of ways of doing this includingmake menuconfig,
make xconfig and make config. Regardless of the method that you use, be sure to compile in netfilter support, with at least the following options. It is suggested that where possible these options are built as modules.
Networking options --->
Network packet filtering (replaces ipchains) <m> IP: tunnelling
IP: Netfilter Configuration --->
<m> Connection tracking (required for masq/NAT) <m> FTP protocol support
<m> IP tables support (required for filtering/masq/NAT) <m> Packet filtering
<m> REJECT target support <m> Full NAT
<m> MASQUERADE target support <m> REDIRECT target support
<m> NAT of local connections (READ HELP) (NEW) <m> Packet mangling
<m> MARK target support <m> LOG target support
5. Build and Install the Kernel
As the kernel has been reconfigured the build dependencies need to be reconstructed.
make dep
The kernel and modules may now be build using:
make bzImage modules
To install the newly built modules and kernel run the following command. This should in-stall the modules under/lib/modules/2.4.20/and the kernel in/boot/vmlinuz-2.4.20
make install modules_install
6. Update boot loader
In the case of grub is used as the boot loader then a new entry should be added to /etc/grub.conf. This example assumes that the /boot partition is /dev/hda3. Existing entries in /etc/grub.conf should be used as a guide.
title 2.4.20 LVS root (hd0,0)
kernel /vmlinuz-2.4.20 ro root=/dev/hda3
If the boot loader is lilo then a new entry should be added to /etc/lilo.conf. This example assumes that the/partition is/dev/hda2. Existing entries in/etc/lilo.conf
should be used as a guide.
image=/boot/vmlinuz-2.4.20 label=2.4.20-lvs read-only
root=/dev/hda2
Once /etc/lilo.conf has been updated run lilo.
lilo
Added Linux-LVS * Added Linux
Added LinuxOLD
7. Reboot the system.
8. Build and Install LVS
The commands to build LVS should be run from the ipvs-1.0.9/ipvs/ directory. To build and install use the following commands. /kernel/source/linux-2.4.20 should be the root directory that the kernel was just built in.
make KERNELSOURCE=/kernel/source/linux-2.4.20 all
make KERNELSOURCE=/kernel/source/linux-2.4.20 modules_install
9. Build and Install Ipvsadm
Ipvsadm is the user-space tool that is used to configure LVS. The source can be found in the ipvs-1.0.9/ipvs/ipvsadm/ directory. To build and install use the following commands.
make all make install
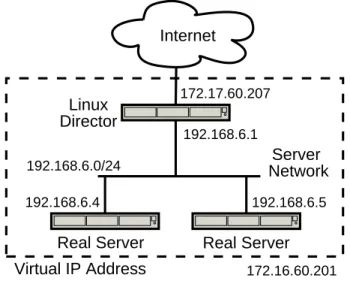
LVS NAT
LVS NAT is arguably the simplest way to configure LVS. Packets from real servers are received by the linux director and the destination IP address is rewritten to be one of the real servers. The return packets from the real server have their source IP address changed from that of the real server to the VIP.
Linux Director
Real Server
Server Network
Real Server
192.168.6.0/24
192.168.6.1
192.168.6.4 192.168.6.5
172.16.60.201
Virtual IP Address
172.17.60.207
Internet
Figure 3: LVS NAT Example
Linux Director
• Enable IP forwarding. This can be done by adding the following to /etc/sysctl.conf
and then running sysctl -p.
• Bring up 172.17.60.201 on eth0:0. This is best done as part of the networking
configu-ration of your system. But it can also be done manually.
ifconfig eth0:0 172.17.60.201 netmask 255.255.0.0 broadcast 172.17.255.255
• Configure LVS
ipvsadm -A -t 172.17.60.201:80
ipvsadm -a -t 172.17.60.201:80 -r 192.168.6.4:80 -m ipvsadm -a -t 172.17.60.201:80 -r 192.168.6.5:80 -m
Real Servers
• Make sure return packets are routed through linux director. Typically this is done by
setting the VIP on the server network the default gateway.
• Make sure that the desired daemon is listening on port 80 to handle connections from
end-users.
Testing and Debugging
Testing can be done by connecting to 172.17.60.201:80 from outside the server network. Running a packet tracing tool on the linux directors and real servers is very useful for debugging purposes. Many setup problems can be resolved by tracing the path of a connection and observing at which step packets fail to appear. Using Tcpdump will be discussed here as an example, there are variety of tools available for various operating systems.
The following trace shows a connection being opened by an end user 10.2.3.4 to the VIP 172.17.60.201 which is forwarded to the real server 192.168.6.5. It shows packets being received by the linux director and then forwarded to the real server and vice versa. Note that the packets forwarded to the real server still have the end user’s ip address as the source address. The linux director only changes the destination IP address of the packet. Similarly replies from the real servers have the destination address set to that of the end user. The linux director only rewrites the source IP address of reply packets so that it is the VIP.
tcpdump -n -i any port 80
12:40:40.965499 10.2.3.4.34802 > 172.17.60.201.80: S 2555236140:2555236140(0) win 5840
<mss 1460,sackOK,timestamp 16690997 0,nop,wscale 0> 12:40:40.967645 10.2.3.4.34802 > 192.168.6.5.80:
S 2555236140:2555236140(0) win 5840
<mss 1460,sackOK,timestamp 16690997 0,nop,wscale 0> 12:40:40.966976 192.168.6.5.80 > 10.2.3.4.34802:
S 2733565972:2733565972(0) ack 2555236141 win 5792
<mss 1460,sackOK,timestamp 128711091 16690997,nop,wscale 0> (DF) 12:40:40.968653 172.17.60.201.80 > 10.2.3.4.34802:
S 2733565972:2733565972(0) ack 2555236141 win 5792
12:40:40.971241 10.2.3.4.34802 > 172.17.60.201.80:
. ack 1 win 5840 <nop,nop,timestamp 16690998 128711091> 12:40:40.971387 10.2.3.4.34802 > 192.168.6.5.80:
. ack 1 win 5840 <nop,nop,timestamp 16690998 128711091> ctrl-c
ipvsadm -L -n can be used to show the number of active connections.
ipvsadm -L -n
IP Virtual Server version 1.0.9 (size=4096) Prot LocalAddress:Port Scheduler Flags
-> RemoteAddress:Port Forward Weight ActiveConn InActConn TCP 172.17.60.201:80 rr
-> 192.168.6.5:80 Masq 1 7 3
-> 192.168.6.4:80 Masq 1 8 4
ipvsadm -L --statswill show the number of packets and bytes sent and received per second.
ipvsadm -L -n --stats
IP Virtual Server version 1.0.9 (size=4096)
Prot LocalAddress:Port Conns InPkts OutPkts InBytes OutBytes -> RemoteAddress:Port
TCP 172.17.60.201:80 114 1716 1153 193740 112940
-> 192.168.6.5:80 57 821 567 94642 55842
-> 192.168.6.4:80 57 895 586 99098 57098
ipvsadm -L --rate will show the total number of packets and bytes sent and received.
ipvsadm -L -n --rate
IP Virtual Server version 1.0.9 (size=4096)
Prot LocalAddress:Port CPS InPPS OutPPS InBPS OutBPS
-> RemoteAddress:Port
TCP 172.17.60.201:80 56 275 275 18739 41283
-> 192.168.6.5:80 28 137 137 9344 20634
-> 192.168.6.4:80 28 138 137 9395 20649
ipvsadm -L --zero will zero all the statistics counters.
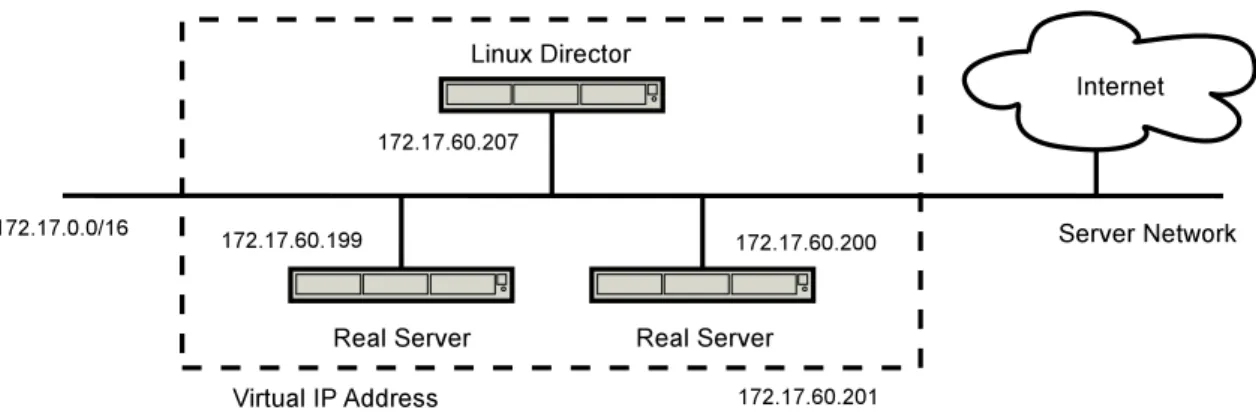
LVS Direct Routing
LVS Direct Routing works by forwarding packets, unchanged, to the MAC addresses of real servers. As the packet is unmodified the real servers need to be configured to accept traffic addressed to the VIP. This is most commonly done by using a hidden interface.
As the incoming packets are not modified by the linux director the return packets do not need to pass through the linux director. Thus, higher throughput can be obtained. It is also easier to load balance services for end users on the same local network as the return packets can be sent directly to the end user rather than forcing them to go through the linux director.
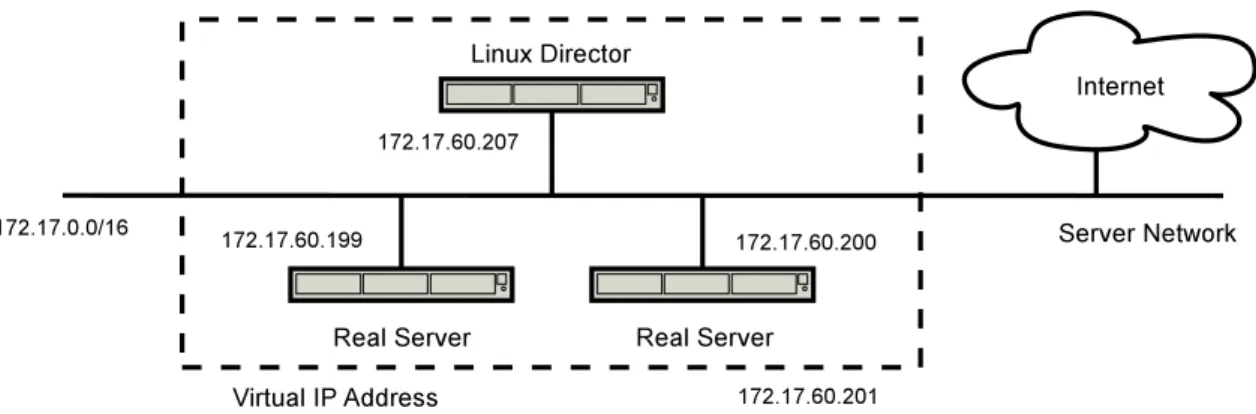
Figure 4: LVS Direct Routing Example
Linux Director
• Enable IP forwarding. This can be done by adding the following to /etc/sysctl.conf
and then running sysctl -p.
net.ipv4.ip_forward = 1
• Bring up 172.17.60.201 on eth0:0. This is best done as part of the networking
configu-ration of your system. But it can also be done manually.
ifconfig eth0:0 172.17.60.201 netmask 255.255.0.0 broadcast 172.17.255.255
• Configure LVS
ipvsadm -A -t 172.17.60.201:80
ipvsadm -a -t 172.17.60.201:80 -r 172.17.60.199:80 -g ipvsadm -a -t 172.17.60.201:80 -r 172.17.60.200:80 -g
• The real servers can send reply packets directly to the end users without them needing
to be altered by the linux director. Thus, the linux director does not need to be the gateway for the real servers.
However, in some situations, for instance because the linux director really is the gateway to the real server’s network, it is desirable to route return packets from the real servers via the linux director. The source address of these packets will be the VIP. However the VIP belongs to an interface on the linux director. Thus, it will drop the packets as being bogus.
There are several approaches to this problem. Probably the best is to apply a kernel patch supplied by Julian Anastasov which add proc entries that allow this packet-dropping behaviour to be disabled on a per-interface basis. This patch can be obtained from http://www.ssi.bg/˜ja/#lvsgw
Real Servers
• Make sure return packets are not routed through linux director unless you have patched
the kernel as described above.
• Make sure that the desired daemon to handle connections from end-users is listening on
port 80
• Bring up 172.17.60.201 on the loopback interface. This is best done as part of the
networking configuration of your system. But it can also be done manually. On Linux this can be done using the following command.
ifconfig lo:0 172.17.60.201 netmask 255.255.255.255
Note that the netmask should be 255.255.255.255, regardless of the actual netmask of the network that 172.17.60.201 belongs to. This is because on the loopback interface the all addresses covered by the netmask are bound to the interface. The typical case is 127.0.0.1 with a netmask of 255.0.0.0 which sets up the loopback interface to accept all of 127.0.0.0/8. Thus, as we only want lo:0 to accept packets for 172.17.60.201 the netmask must be 255.255.255.255.
• Hide loopback. On Linux real servers it is neccessary to hide the loopback interface
to prevent them from responding to ARP requests for the VIP. This can be done by applying the hidden interface patch discussed in the Installing LVS section. To activate the patch, add the following lines to/etc/sysctl.conf and then run sysctl -p.
# Enable configuration of hidden devices net.ipv4.conf.all.hidden = 1
# Make the loopback interface hidden net.ipv4.conf.lo.hidden = 1
Testing and Debugging
Testing can be done by connecting to 172.17.60.201:80 from any network.
Debugging can be done using ipvadm and packet tracing as per LVS NAT. However, note that when the packets are forwarded no address translation takes place. Also note that as the return packets are not handled by LVS – they are sent directly to the end user by the real server – the outgoing packet and byte statistics will be zero.
LVS Tunnel
LVS tunnelling works in a very similar manner to direct routing. The main difference is that packets are forwarded to the real servers using IP encapsulated in IP, rather than just sending a new ethernet frame. The main advantage of this is that real servers may be on a different network to the linux director.
Figure 5: LVS Tunnel Example – Same Topology as the LVS Direct Routing Example
Linux Director
• Enable IP forwarding. This can be done by adding the following to /etc/sysctl.conf
and then running sysctl -p.
net.ipv4.ip_forward = 1
• Bring up 172.17.60.201 on eth0:0. Again, this is best done as part of the networking
configuration of your system. But it can also be done manually.
ifconfig eth0:0 172.17.60.201 netmask 255.255.0.0 broadcast 172.17.255.255
• Configure LVS
ipvsadm -A -t 172.17.60.201:80
ipvsadm -a -t 172.17.60.201:80 -r 172.17.60.199:80 -i ipvsadm -a -t 172.17.60.201:80 -r 172.17.60.200:80 -i
• If you wish to use the linux director as a gateway router for the real servers, which is
not necessary, please see information on how to patch the kernel to do this in the direct routing section.
Real Servers
• Make sure return packets are not routed through linux director unless you have patched
the kernel as described in the direct routing section.
• Make sure that the desired daemon is running on port 80 to accept connections from
the end-users.
• Bring up 172.17.60.201 on tunl0. Again, this is best done as part of the networking
ifconfig tunl0 172.17.60.201 netmask 255.255.255.255
• Enable forwarding and hide loopback. This can be done by adding lines to/etc/sysctl.conf
and then running sysctl -p.
net.ipv4.ip_forward = 1
# Enable configuration of hidden devices net.ipv4.conf.all.hidden = 1
# Make the tunl0 interface hidden net.ipv4.conf.tunl0.hidden = 1
Testing and Debugging
Testing can be done by connecting to 172.17.60.201:80 from any network. Debugging is as per LVS direct routing.
2
High Availability
LVS is an effective way to load balance networked services. Typically this means that several servers will act, as far as end-users are concerned, as if they were a single server. Unfortunately, the more servers that are in the system, the greater the chance that a single server will fail. Thus, it is important to make use of high availability techniques to ensure that the virtual service is maintained even if individual servers fail.
Heartbeat
Heartbeat be used to monitor a pair of linux directors and ensure that one of them owns the VIP at any given time. It works by each host periodically sending a heartbeat message. If no heartbeat message is received for a predetermined period of time then the host is considered to have failed. When this occurs resources can be taken over. Heartbeat has a modular design that allows arbitrary resources to be defined.
For the sake of this discussion we will be using an IP address as a resource. When fail-over occurs the IP address is obtained using a method known as IP address take-over. This works by the newly activated linux director sending gratuitous ARP packets for the VIP. All hosts on the network should receive these ARP packets and thus send subsequent packets for the VIP to the new linux director.
Heartbeat can be obtained from www.linux-ha.org. It can also be installed by using the packages provided or built from source using the following commands.
./ConfigureMe build make
Sample Configuration
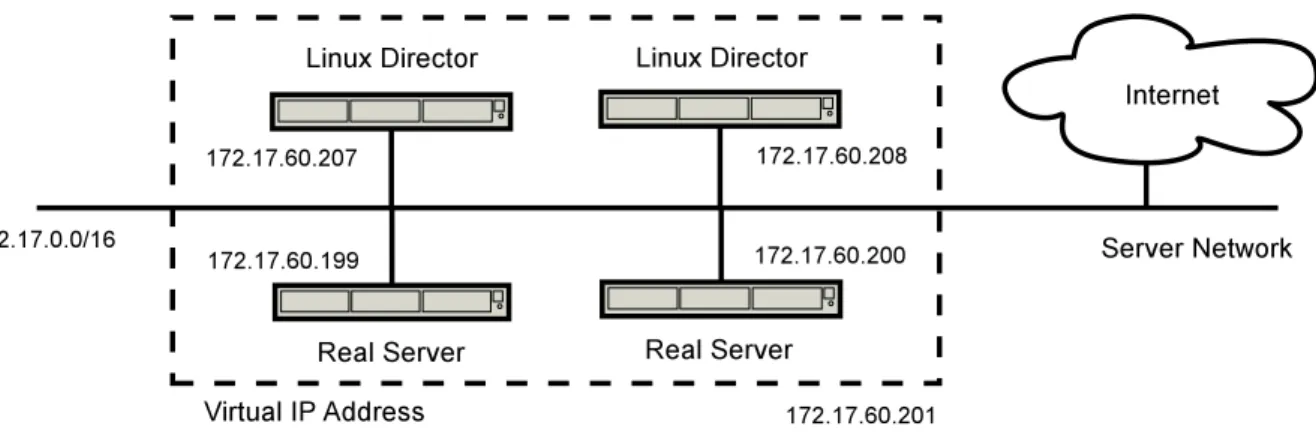
Figure 6: Heartbeat Example
Configuration is done using three files that can be found in /etc/ha.d.
• ha.cf: This configures the base parameters for heartbeat such as which interfaces to
use for communication, how often to send messages and where to write logs to. Note that the node names used must match the output of uname -non the member nodes.
logfacility local0 keepalive 2
deadtime 10 warntime 10 initdead 10 nice_failback on
mcast eth0 225.0.0.7 694 1 1 node walter
node wendy
• haresources: Sets the resources that are managed by heartbeat.
walter 172.17.60.201/24/eth0
• authkeys: Sets the security mechanism for inter-heartbeat communication. This file
must be mode 600.
auth 2
2 sha1 ultramonkey
LVS should be configured the same way on both linux directors. For this example the LVS tunnel configuration discussed earlier will be used. Direct Routing and NAT may also be used. As the VIP, 172.17.60.201 is managed by heartbeat it should not be brought up on the linux directors by other means.
Heartbeat should be started on both linux directors. After a few moments the VIP should be brought up on whichever linux director is the master.
Testing and Debugging
Reboot the active linux director and observe that the other linux director takes over. You can examine the progress of the take-over by examining the logs sent to syslog, typically found in
/var/log/messages. As nice failback is on, the currently active linux director will now act as the master and when the failed linux director comes back online it will act as a standby.
Ipfail
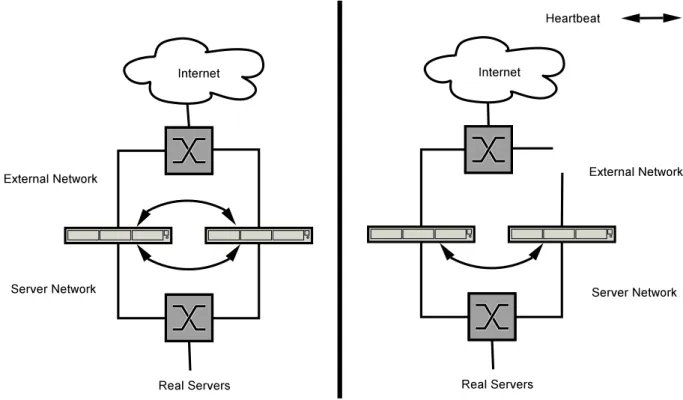
The design of heartbeat is such that if any communication channel is available to a host, then it will be considered to be available. This is not always the desired behaviour. For example if a pair of hosts have links on the internal and external network, it may be desirable for fail-over to occur if either link fails on one host. After all it can no longer communicate route traffic between end users and the real servers.
Figure 7: Heartbeat without IPfail
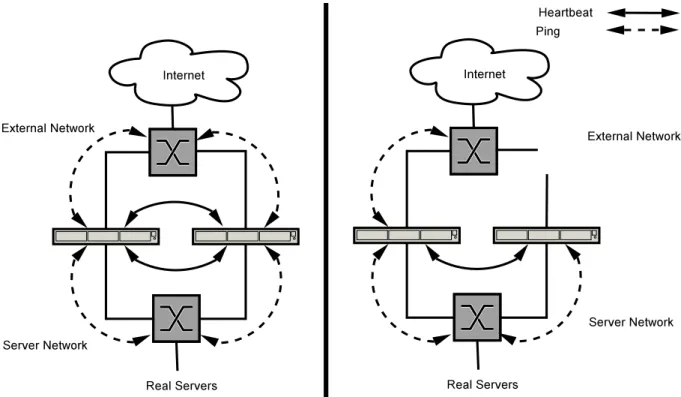
The ipfail plug-in for heartbeat makes this possible by monitoring one or more external hosts known as a ping node. Typically this would be a router or the switch itself. The ping node is treated as a quorum device. That is, if a host cannot access a ping node, it is not eligible to hold any resources. Thus, if an interface fails on the active linux director, then one of the ping nodes should become unavailable and fail-over will occur.
The ipfail module is shipped as part of heartbeat. Additional information is available from
http://pheared.net/devel/c/ipfail/. In the long term this will be integrated into the heartbeat documentation.
Figure 8: Heartbeat with IPfail
Sample Configuration
To use ipfail with the heartbeat setup discussed previously, the following should be added to heartbeat’s ha.cf file.
ping 172.17.0.254
respawn hacluster /usr/lib/heartbeat/ipfail
A ping directive should be added for each ping node. I have only defined one for the external network, as there are no suitable quorum devices on the internal network in this demonstration. The respawn directive tells heartbeat to run /usr/lib/heartbeat/ipfail as user hacluster. To rerun it if it exits with a status other than 100, and to kill it when heartbeat exits.
After adding these options heartbeat needs to be restarted.
/etc/init.d/heartbeat restart
Testing and Debugging
Ldirectord
Heartbeat is used to monitor the health of linux directors. Ldirectord can be used to monitor the health of real servers and manipulates the LVS kernel table accordingly. Ldirectord and heartbeat are often used in tandem to create a high availability LVS cluster.
Ldirectord checks services on the real servers by connecting to them, making a known request and checking the result for a known string. Checks are provided for HTTP, HTTPS, FTP, IMAP, POP, SMTP, LDAP and NNTP. Additional checks can be added by modifying the code, which is usually quite straight forward. In fact many of the checks incorporated by ldirectord have been supplied as patches by users.
The check semantics above are known as a negotiate check. Another type of check, the connect check, simply checks to make sure a connection can be opened to the service on the real server. This is useful if there is not a check for the protocol supplied by ldirectord.
Sample Configuration
Ldirectord is configured using the ldirectord.cf file. It has global directives which either set global options, such as where to log errors to, or defaults for the virtual services. The virtual services encapsulate a virtual service provided by LVS. The virtual services contain the real servers which are checked.
# Global Directives checktimeout=10 checkinterval=2 autoreload=no logfile="local0" quiescent=yes
# Virtual Server for HTTP virtual=172.17.60.201:80
fallback=127.0.0.1:80 real=192.168.6.4:80 masq real=192.168.6.5:80 masq service=http
request="index.html" receive="Test Page" scheduler=rr
protocol=tcp
checktype=negotiate
Ldirectord may be started by running the ldirectord command, the ldirectord init script or by adding it as a resource to heartbeat. There is no particular advantage to the latter as ldirectord can happily run on the master and stand-by linux directors at the same time.
Once ldirectord has started the LVS kernel table will be populated.
IP Virtual Server version 1.0.7 (size=4096) Prot LocalAddress:Port Scheduler Flags
-> RemoteAddress:Port Forward Weight ActiveConn InActConn TCP 172.17.60.201:80 rr
-> 192.168.6.5:80 Masq 1 0 0 -> 192.168.6.4:80 Masq 1 0 0 -> 127.0.0.1:80 Local 0 0 0
By default ldirectord uses the quiescent feature of LVS to add and remove real servers. That is, when a real server is to be removed its weight is set to zero and it remains part of the virtual service. This has the effect that exiting connections to the real server may continue, but no new connections will be allocated. This is particularly useful for gracefully taking real servers offline. This behaviour can be changed to remove the real server from the virtual service by setting the global configuration option quiescent=no.
Testing and Debugging
Testing can be done by bringing the real servers up and down. By changing the contents of the known URL that is being requested such that it does not contain the expected string. By killing the daemon that serves end-users’ requests. Or by powering down the host all together. In each case ldirectord should update the LVS kernel table accordingly which can be examined using ipvsadm -L -n. Ldirectord also logs its activities, the configuration above sets these logs to be written to syslog, typically they will show up in /var/log/syslog.
For extra debugging information ldirectord can be run in debugging mode, in which case it will log verbosely to the terminal and will not detach from the terminal. This is done by using the -d command line option. This example starts ldirectord in debugging mode with the configuration file ldirectord.cf, which should be in /etc/ha.d/. Debugging can be terminated using ctrl-c.
ldirectord -d ldirectord.cf start
Keepalived
Keepalived provides an implementation of the VRRPv2 protocol which is specified in RFC 2338[1]. It is an alternative method of managing a VIP on a network so that it is owned by only one host at any given time. This can be used to switch between active and stand-by linux directors. VRRPv2 works on a simple state engine. Hosts advertise their availability. The highest priority host wins the resource and advertises this fact. All other nodes then go into the backup state. There is another implementation of VRRPv2 for Linux from http://off.net/ jme/vrrpd/. How-ever, at the time of writing the keepalived implementation appears to be much more complete. Keepalived also features service level monitoring of real servers and manipulates the LVS kernel table accordingly. The service tests that are implemented are:
• TCP CHECK: Check to make sure a connection can be opened to the service on the
real server.
• HTTP GET: Fetch a known URL from the real server and compare the checksum of the
page to the expected checksum.
• SSL GET: SSL version of HTTP GET
• MISC CHECK: Check using an external script.
It also provides an API to implement new checks.
The VRRPD and LVS/Health-Check features can be used individually or in combination. Keepalived is available from keepalived.sourceforge.net. It compilation is quite straight forward using./configure and make. A .spec file for Red Hat is also provided. Packages for Debian are available in the main Debian tree.
To configure keepalived /etc/keepalived/keepalived.conf should be modified. This file is divided up into sections.
• global defs: Global definitions such as where to send email alerts, if at all, and the name
of the cluster.
• vrrp instance: Encapsulates a set of virtual IP addresses associated with a particular
interface. Each instance should have a unique id.
• vrrp sync group: Groups together vrrp instances such that all the instances will be owned
by a single host at any given time. This can be used to ensure that virtual IP addresses on different interfaces always end up on the same machine.
• virtual server: A virtual service handled by LVS.
• real server: A real server to check. Contained within a virtual server.
Note that the VRRP implementation works on a master/slave system. So each vrrp instance should be marked as a ”MASTER” on one node and a ”SLAVE” on the other nodes. During testing, it did not appear possible to configure keepalived to have behaviour analogous to heartbeat’s nice failback. That is a node will hold a resource until it fails, in which case another node will take it over until it in turn fails. It was also found that the slave nodes should be given a lower priority than the master to avoid spurious fail-overs.
Sample Configuration
For the sake of brevity, the example configuration files are in Appendix A.
To create the checksums for the configuration file, the genhash programme can be used. Genhash will connect to the server and request the URL. It will then produce a lot of output, showing you how the data that is being used to construct the checksum. The final line is the checksum which should be included in keepalived.conf. For example, to generate the hash for the URL http://192.168.6.5:80/ the following command is used.
genhash -s 192.168.6.5 -p 80 -u / [ lots of output omitted ]
90bfbce6bc089a41f1fddca9aeaba452
To start keepalived run the keepalived daemon or init script. Messages are logged to syslog and typically can be found in/var/log/message. After a few moments the LVS kernel table should be populated on both machines. This can be inspected using ipvsadm.
ipvsadm -L -n
IP Virtual Server version 1.0.7 (size=4096) Prot LocalAddress:Port Scheduler Flags
-> RemoteAddress:Port Forward Weight ActiveConn InActConn TCP 172.17.60.201:80 lc
-> 192.168.6.5:80 Masq 1 0 0
-> 192.168.6.4:80 Masq 1 0 0
On the master machine the virtual ip addresses should have been added. This can be checked using the ip command.
ip addr sh [ lo: omitted ]
2: eth0: <BROADCAST,MULTICAST,UP> mtu 1500 qdisc pfifo\_fast qlen 100 link/ether 00:50:56:4f:30:19 brd ff:ff:ff:ff:ff:ff
inet 172.17.60.207/16 brd 172.17.255.255 scope global eth0 inet 172.17.60.201/32 scope global eth0
3: eth1: <BROADCAST,MULTICAST,UP> mtu 1500 qdisc pfifo\_fast qlen 100 link/ether 00:50:56:4f:30:1a brd ff:ff:ff:ff:ff:ff
inet 192.168.6.3/24 brd 192.168.6.255 scope global eth1 inet 192.168.6.1/32 scope global eth1
If a fail-over occurs the same addresses should appear on the slave, and then back on the master once it is restored.
3
New Developments
Active Feedback
Ldirectord, keepalived and other tools monitor the health of real servers. The weight parameter allows the relative capacity of real servers to be taken into account. However, these tools do not monitor the real-time serving capacity of the real servers and do not allocate connections proportional to this.
This can be particularly problematic in situations where some connections require significantly more resources on a real server than others. For instance, if some connections are a plain HTML file fetched from disk, or more likely memory. While other connections involve processing of information, such a scaling an image or retrieving part of the page from a database.
Feedbackd implements a framework that allows real-time information from from the real servers to determine how many connections they should be allocated relative to each other. As such, feedbackd implements an active feedback system. Feedbackd is available from http://www.redfishsoftware.com.au/projects/feedbackd/
Feedbackd has two key components, feedbackd-agent which runs on the real servers and mon-itors their serving capacity. The monitoring is modular so arbitrary checks can be defined. The default check supplied simply monitors CPU load using /proc/stat. The second component, master runs on the linux directors. It collates information from the feedbackd-agent’s which connect and manipulates the weights of the real servers in the LVS kernel table accordingly.
It was found that a little bit of massaging was required to get it to compile. Also made minor enhancements were made to allow feedbackd-master to be restarted without giving ”address in use” errors and to allow feedbackd-agent to timeout the master. The latter is a work around to allow feedbackd to work with Active/Stand-By Linux Directors. Both of these changes have been forwarded to the author and will hopefully show up in the next version.
The only configuration required for feedbackd-master is to establish the LVS virtual services that will be used. This is done using ipvsadm. There is no need to add the real servers as this will be done by feedbackd-master by matching the protocol and port information sent by the feedback-agents running on real servers. As such feedbackd can be used to add and remove real servers on the fly without any configuration of the linux director. For example:
ipvsadm -A -t 172.17.60.201:80
To start feedbackd-master simply run the daemon on the command line. No init script is supplied with the current distribution.
Feedbackd-Agent is configured by modifying /etc/feedbackd-agent.conf. In this file the Linux Director running feedbackd-master is specified as are the services that the real server should join.
director = 192.168.6.1 service = http
protocol = TCP port = 80
module = cpuload.so forwarding = NAT
Again, to run feedbackd-agent simply run the command on the command-line.
Testing
As a primitive test, one of the real servers can be loaded manually and the effects of this on the LVS table on the linux director can be observed using ipvsadm. An in-depth analysis of the effects of using feedbackd can be found in Jeremy Kerr’s paper on the feedbackd[3].
Connection Synchronisation – Existing Solution
Configuring two linux directors in an active/stand-by configuration is a useful way to provide high availability. If the active linux director fails, the stand-by can automatically take over the IP address of the virtual services and the cluster can continue to function. However, when such a fail-over occurs connections that are currently in progress are terminated.
This is because the stand-by linux director does now know anything about these connections. By synchronising connection information between the active and stand-by linux directors this problem can be averted. Thus, when a stand-by linux director becomes the active linux director, it will have information about the currently active connections and will be able to continue to forward their packets. The critical piece of information required is which real server to forward packets for a given connection to. This information is quite small and thus can be synchronised with little overhead.
There is an implementation of connection synchronisation within the current LVS code. It works on a master/slave system whereby the linux director configured as the master sends synchronisation information for connections. The linux directors configured as slaves receive this information and update their LVS connection table accordingly.
A connection is synchronised once the number of packets passes a threshold (3) and then every frequency (50) packets. The synchronisation information for the connections are added to a queue and periodically flushed. The synchronisation information for up to 50 connections can be packed into a single packet. The packets are sent to the slaves using multicast. Sending and receiving synchronisation information by the master and slaves respectively is done by a kernel thread. The kernel synchronisation thread is started on the master and slaves using the following commands.
ipvsadm --start-daemon master # Run on the Master Linux Director ipvsadm --start-daemon backup # Run on the Slave Linux Director
Testing and Debugging
The synchronisation of connections can be monitored using ipvsadm -L -c -n, which lists LVS connection table. Connections should first appear on the master linux director. Then after a few moments, when synchronisation has occurs, they should also appear on the slaves.
ipvsadm -L -c -n # On the Master Linux Director IPVS connection entries
pro expire state source virtual destination TCP 01:00 TIME_WAIT 172.16.4.222:34939 172.17.60.201:80 192.168.6.5:80 TCP 01:01 TIME_WAIT 172.16.4.222:34940 172.17.60.201:80 192.168.6.4:80 TCP 15:00 ESTABLISHED 172.16.4.222:34941 172.17.60.201:80 192.168.6.5:80
ipvsadm -L -c -n # On the Slave Linux Director IPVS connection entries
TCP 01.20 ESTABLISHED 172.16.4.222:34939 172.17.60.201:80 192.168.6.5:80 TCP 01.23 ESTABLISHED 172.16.4.222:34940 172.17.60.201:80 192.168.6.4:80 TCP 08.99 ESTABLISHED 172.16.4.222:34941 172.17.60.201:80 192.168.6.5:80
The output shows two connections on the master linux director that are in the TIME WAIT state, that is they have been closed by the end-user. It also shows one connection in the ESTABLISHED state, that is the end-user and the real-server still have an open connection to each other.
Each of these connections have been synchronised to the slave. Note that on the slave, all the connections are in the ESTABLISHED state. This is due to an optimisation in the LVS code whereby connections are only synchronised when they are in the ESTABLISHED state. This cuts down unnecessary synchronisation overhead as the state of the connections on the slave is not critical.
You can further monitor which linux director is handling connections by adding the following iptables rule to each linux director.
iptables -A INPUT -d 172.17.60.201 -j ACCEPT
This can be monitored using iptables -L INPUT -v -n.
iptables -L INPUT -v -n # On the Active Linux Director Chain INPUT (policy ACCEPT 1553 packets, 211K bytes)
pkts bytes target prot opt in out source destination 5 1551 ACCEPT all -- * * 0.0.0.0/0 172.17.60.201
iptables -L INPUT -v -n # On the Stand-By Linux Director Chain INPUT (policy ACCEPT 2233 packets, 328K bytes)
pkts bytes target prot opt in out source destination 0 0 ACCEPT all -- * * 0.0.0.0/0 172.17.60.201
To test that connection synchronisation is working correctly open a connection to the virtual service while the master linux director is active. Then cause fail-over to occur, this can be done by a variety of means including powering down the master linux director. At this point the connection should stall. Once the VIP has failed over to the slave linux director the connection should continue.
Streaming is a useful way to test this, as streaming connections by their nature are open for a long time. It also provides intuitive feedback as the video and/or music pause and then continue. It is of note that by increasing the buffer size of the streaming client software the pause can be eliminated.
Problems
The main problem with this implementation is the master/slave relationship. If the master Linux Director fails and then comes back on line, then connections to the slave will not be synchronised to the master. The next time that a fail-over occurs, this will cause cause connec-tions to be terminated. This could be avoided by starting and stopping the master and backup daemons as fail-overs occur. But a peer to peer relationship between the synchronisation daemons would be a cleaner approach.
Connection Synchronisation – New Solution
To improve this situation I have written a new synchronisation daemon for LVS. It works on a peer to peer basis where any node may send or receive synchronisation information.
The new synchronisation daemon runs in user-space rather than the kernel. Information is received from LVS in the kernel via a netlink socket. It is then sent to other nodes using multicast UDP. When a daemon receives information over multicast it reverses this process by sending the information into LVS in the kernel via a netlink socket.
The idea of moving the code to the user-space was to allow more sophisticated synchronisation processing to take place. This is easier to implement and in many ways more appropriately done in user space than the kernel. Given that synchronisation is not a particularly intensive task, there is no particular advantage to keeping it in the kernel.
The code comprises:
• Modified LVS kernel modules - to allow the synchronisation daemon to get information
about connections. This has been done by allowing LVS to have arbitrary synchroni-sation methods defined and inserted as modules. The default behaviour is the existing master/slave in-kernel daemons.
• Kernel Patch - to register the new netlink socket
• libip vs user sync: Convenience library for communicating using the netlink socket. • ip vs user sync simple: Simple synchronisation daemon implemented using this
frame-work.
Available from www.ultramonkey.org
Running
Installing and compiling is a bit tricky as this is new code and there are a number of support libraries required. Once built, make sure that the LVS kernel synchronisation daemons are not running using ipvsadm --stop-daemon and start the user-space daemon from the command line or using the ip vs user sync simple init script.
Testing and Debugging
Debugging messages for ip vs user sync simple are sent to syslog by default and are typically written to/var/log/messages. If the daemon is not functioning correctly, it is recommended to run it with the debug option enabled and have messages logged to the terminal. This can be done my modifying ip vs user sync simple.conf or on the command line.
ip_vs_user_sync_simple debug log_facility
-Testing is as for the existing connection synchronisation code described previously. However, as there is no master/backup relationship connections can be maintained through multiple fail-overs.
Active-Active
Active/Stand-By Linux Directors offer good way to provide high availability. However, if one assumes that a linux director does not fail or get taken down for maintenance very often, then most of the time one linux director will be idle. Arguably this is a waste of resources. It also means that the maximum throughput of the network is limited to that of one linux director. Having Active-Active linux directors addresses this problem by allowing more than one linux director to load balance connections, for the same virtual services, at the same time.
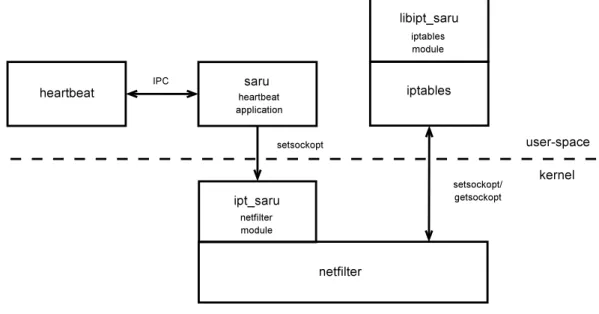
Figure 9: Active-Active Block Diagram
I have made an implementation of this which works as follows:
• Each linux director is given the same hardware and IP address
– This means that all the linux directors will receive packets for connections for the virtual service.
– It also means that there is no longer any need for ip address fail-over or VRRPv2.
• A heartbeat helper, Saru runs with heartbeat on each linux director.
– Heartbeat doesn’t allocate any resources, just provides a mechanism to determine which linux directors are available.
– Saru uses this information to divide the space of all possible incoming connections between the linux directors.
– This is done by electing a master which will make the allocations.
– The allocations are done by dividing up blocks of source or destination ports or addresses.
• A netfilter kernel module is used to only accept packets as dictated by Saru.
Running
Saru can be run directly from the command line or using its own init script. Messages are logged to syslog after startup and these typically appear in/var/log/messages. Saru can log more verbosely by setting the debug option, either insaru.conf or directly on the command line. For debugging purposes this option is recommended in conjunction with having saru log to the terminal.
saru debug log_facility
-By default saru waits 30 seconds after startup before joining the cluster. This is to allow time for connection synchronisation to occur when a Linux Director boots up. This can be configured at run time, again either in saru.conf or directly on the command line.
The MAC and IP address of an interface can be set using the ip command.
ip link set eth0 down
ip link set eth0 address 00:50:56:14:03:40 ip link set eth0 up
ip route add default via 172.16.0.254
ip addr add dev eth0 192.168.20.40/24 broadcast 255.255.255.0
Rules to filter out all traffic to the VIP that are not accepted by Saru are inserted using the iptables command. These rules assume that connection synchronisation will be used, If this is not the case then netfilter’s connection tracking should be used to ensure that a given connection will always be handled by the same linux director.
iptables -F
iptables -A INPUT -d 172.17.60.201 -p tcp -m saru --id 1 -j ACCEPT iptables -A INPUT -d 172.17.60.201 -p udp -m saru --id 1 -j ACCEPT
iptables -A INPUT -d 172.17.60.201 -p icmp -m icmp --icmp-type echo-request \ -m saru --id 1 --sense src-addr -j ACCEPT
iptables -A INPUT -d 172.17.60.201 -p icmp -m icmp --icmp-type ! echo-request \ -j ACCEPT
If LVS-NAT is being used then the following rules are also required to prevent all the Linux Directors sending replies on behalf of the the real servers.
iptables -t nat -A POSTROUTING -s 192.168.6.0/24 -d 192.168.6.0/24 -j ACCEPT iptables -t nat -A POSTROUTING -s 192.168.6.0/24 -m state --state INVALID \
-j DROP
iptables -t nat -A POSTROUTING -s 192.168.6.0/24 -m state --state ESTABLISHED \ -j ACCEPT
iptables -t nat -A POSTROUTING -s 192.168.6.0/24 -m state --state RELATED \ -j ACCEPT
iptables -t nat -A POSTROUTING -s 192.168.6.0/24 -p tcp -m state --state NEW \ --tcp-flags SYN,ACK,FIN,RST SYN -m saru --id 1 -j MASQUERADE
iptables -t nat -A POSTROUTING -s 192.168.6.0/24 -p udp -m state --state NEW \ -m saru --id 1 -j MASQUERADE
iptables -t nat -A POSTROUTING -s 192.168.6.0/24 -p icmp \ -m icmp --icmp-type echo-request -m state --state NEW \ -m saru --id 1 --sense dst-addr -j MASQUERADE
iptables -t nat -A POSTROUTING -s 192.168.6.0/24 -p icmp \
-m icmp --icmp-type ! echo-request -m state --state NEW \ -j MASQUERADE
iptables -t nat -A POSTROUTING -s 192.168.6.0/24 -j DROP
Testing and Debugging
Which linux director is accepting packets for an individual connection can be monitored using
ipvsadm -L INPUT -n -v. The output below shows a connection that was load balanced by Linux Director A.
ipvsadm -L INPUT -n -v # On Linux Director A
Chain INPUT (policy ACCEPT 92541 packets, 14M bytes) pkts bytes target prot opt in out source destination
5 1551 ACCEPT tcp -- * * 0.0.0.0/0 172.17.60.201 saru id 1 sense src-port 0 0 ACCEPT udp -- * * 0.0.0.0/0 172.17.60.201 saru id 1 sense src-port
0 0 ACCEPT icmp -- * * 0.0.0.0/0 172.17.60.201 icmp type 8 saru id 1 sense src-addr 0 0 ACCEPT icmp -- * * 0.0.0.0/0 172.17.60.201 icmp !type 8
0 0 DROP all -- * * 0.0.0.0/0 172.17.60.201
ipvsadm -L INPUT -n -v # On Linux Director B
Chain INPUT (policy ACCEPT 92700 packets, 15M bytes) pkts bytes target prot opt in out source destination
0 0 ACCEPT tcp -- * * 0.0.0.0/0 172.17.60.201 saru id 1 sense src-port 0 0 ACCEPT udp -- * * 0.0.0.0/0 172.17.60.201 saru id 1 sense src-port
0 0 ACCEPT icmp -- * * 0.0.0.0/0 172.17.60.201 icmp type 8 saru id 1 sense src-addr 0 0 ACCEPT icmp -- * * 0.0.0.0/0 172.17.60.201 icmp !type 8
5 1551 DROP all -- * * 0.0.0.0/0 172.17.60.201
Conclusion
LVS is an effective way to implement clustering of Internet services. Tools such as heartbeat, ldirectord and keepalived can be used to give the cluster high availability. There are a number
of other techniques that can be used to further enhance LVS clusters including using active feedback to determine the proportion of connections allocated to each of the real servers. As well as connection synchronisation and active active techniques to multiple linux directors to better work together.
LVS itself is a very powerful tool and has many features that were not within the scope of this presentation. These include; firewall marks to group virtual services, specialised schedul-ing algorithms and various tunschedul-ing parameters. Beyond that there is much scope for further expanding the functionality of LVS to meet the new needs of users and to reflect the ever increasing complexity of the Internet.
Appendix A
Sample Configuration files for keepalived
Sample configuration file for keepalived master.
global_defs { notification_email { [email protected] } notification_email_from [email protected] smtp_server 210.128.90.2 smtp_connect_timeout 30 lvs_id LVS_DEVEL }
vrrp_sync_group VG1 { group {
VI_1 VI_2
} }
vrrp_instance VI_1 { state MASTER interface eth0 virtual_router_id 51 priority 100 advert_int 1 authentication { auth_type PASS auth_pass 1111 } virtual_ipaddress { 172.17.60.201 } }
vrrp_instance VI_2 { state MASTER interface eth1 virtual_router_id 52 priority 100 advert_int 1 authentication { auth_type PASS auth_pass 1111
}
virtual_ipaddress { 192.168.6.1 }
}
virtual_server 172.17.60.201 80 { delay_loop 6 lb_algo lc lb_kind NAT nat_mask 255.255.255.0 !persistence_timeout 50 protocol TCP
real_server 192.168.6.4 80 { weight 1 HTTP_GET { url { path / digest 55fd843c4e99e96c1ef28e7dbb10c51b } connect_timeout 3 nb_get_retry 3 delay_before_retry 3 } }
real_server 192.168.6.5 80 { weight 1 HTTP_GET { url { path / digest 90bfbce6bc089a41f1fddca9aeaba452 } connect_timeout 3 nb_get_retry 3 delay_before_retry 3 } }
sorry_server 127.0.0.1 80 }
Sample Configuration file for keepalived (Slave)
global_defs { notification_email { [email protected] } notification_email_from [email protected] smtp_server 210.128.90.2 smtp_connect_timeout 30 lvs_id LVS_DEVEL }
vrrp_sync_group VG1 { group {
VI_1 VI_2
} }
state SLAVE interface eth0 virtual_router_id 51 priority 100 advert_int 1 authentication { auth_type PASS auth_pass 1111 } virtual_ipaddress { 172.17.60.201 } }
vrrp_instance VI_2 { state SLAVE interface eth1 virtual_router_id 52 priority 100 advert_int 1 authentication { auth_type PASS auth_pass 1111 } virtual_ipaddress { 192.168.6.1 } }
virtual_server 172.17.60.201 80 { delay_loop 6 lb_algo lc lb_kind NAT nat_mask 255.255.255.0 !persistence_timeout 50 protocol TCP
real_server 192.168.6.4 80 { weight 1 HTTP_GET { url { path / digest 55fd843c4e99e96c1ef28e7dbb10c51b } connect_timeout 3 nb_get_retry 3 delay_before_retry 3 } }
real_server 192.168.6.5 80 { weight 1 HTTP_GET { url { path / digest 90bfbce6bc089a41f1fddca9aeaba452 } connect_timeout 3 nb_get_retry 3 delay_before_retry 3 } }
References
[1] S. Knight et al. Rfc 2338: Virtual router redundancy protocol. http://www.ietf.org/, April 1998.
[2] Y. Rekhter et al. Rfc 1918: Address allocation for private internets. http://www.ietf.org/, February 1996.
[3] Jeremy Kerr. Using dynamic feeback to optimise load balancing decisions. http://www.redfishsoftware.com.au/projects/feedbackd/lca-paper.pdf, January 2003. [4] Netfilter Core Team. Netfilter – firewalling, nat and packet mangling for linux 2.4.