Publishing History
March 1986: First Edition March 2002: Second Edition
Copyright © 2002 Paul Blackwell.
This document may be copied and printed for personal use. It may not be distributed for profit in whole or part, or modified in any way. Electronic copies may be made for personal use. Electronic copies may not be published. The right of Paul Blackwell to be identified as the Author and Illustrator of this work has been asserted in accordance with the Copyright, Designs and Patents Act 1988.
The latest electronic version of this book may be obtained from: http://www.brighthelm.org/
Ye Small Print—Cautionary Note and Disclaimer
Combat re-enactment in any form carries an element of risk (hey they used to do this for real!) Even making armour can be hazardous, if you drop a hammer on your foot, cut yourself on a sharp piece of metal or do something even more disastrous! It must be pointed out, therefore, that if you partake in silly hobbies such as these you do so at your own risk!
The advice and information in this booklet is given in good faith (most having been tried out by the author) however as I have no control over what you do, or how you do it, I can accept no liability for injury suffered by yourself or others while making or using armour.
Ye Nice Note
Having said all that I’ll just add that I’ve been playing for ages and am still in one piece and having fun.
Table of Contents
Introduction ...1
Materials ...3
Tools...7
Saftey ...13
Leather Working Techniques ...15
Metal Working Techniques... 17
More Advanced Metal Working Techniques ...19
Padding...23
Head ...29
Neck ...41
Body ...45
Arms ...53
Hands...65
Legs...77
Shields...87
Maintaining Armour ...93
Authenticity ...95
Fighting Styles ...97
Aftermath ... 101
Stepping out into the world of medieval combat recreation can, like any other sport, be somewhat daunting. To start with where do you get all the equipment you need, especially all that nice shiny armour? Well here are your options: 1. Borrow it (a good way to start if spare stuff is available)
2. Buy it new (can be expensive)
3. Buy it second hand (cheaper but will it fit or be worn out already?) 4. Make it yourself.
5. Any combination of the above!
This booklet is a primer for those who want to try the fourth option; it sets out to show you how to make simple, but practical, armour. Beware though, armour making can become a hobby in its own right and this book is but an introduction! In time you may want to make even fancier, more complex and more authentic armour, in the meanwhile this book should get you out on the field! Enjoy.
Before you begin armouring
Decide what you need! This may seem obvi-ous but experience has shown that people can rush out, make something entirely inap-propriate, then wonder why no one will let them play in it! Sad but true. To avoid this first check out what the local armour requirements are — read the rules, ask a marshal or another fighter, people like tohelp (more fighters equals more fun). A lot can be learnt by simply talking to experienced fighters. “Oh you don’t want one of those — they weigh a ton — stops you running about! Want to buy my old one?” Try and decide on a style that will suit both the way you want to look and the way you want to fight then start
thinking about how to achieve it. The sketch to the right shows what is generally required. (For more information see Chapters 18 and 20.)
Fitting
World wide period armours were made out of just about anything; cloth, metal, leather, bone, horn, bamboo; basically if it was available and it worked it was used! European armours tend to be less esoteric and generally stick to metal and leather over cloth. When looking for materials shop around, look for off cuts, remnants, or consider buying in bulk. Armour doesn’t have to cost a fortune.
Steel
Sheet steel is easily obtainable these days; look in the Yellow Pages under Metal Stockists. In the 1800s Sir Henry Bessemer invented a new process for making steel. Modern steel is therefore very different to period stuff; in fact it’s a lot better! Mild Steel is the easiest and cheapest to get hold of and the most conven-ient to work. For one thing you can easily cold work it - which means you don’t need a forge. Mild steel contains less than 0.25% carbon, has a non-fibrous struc-ture and will take a high polish - it does rust however. It comes as either bright rolled sheets which are shiny and hence easiest to polish or hot rolled, which are marginally easier to work and come in a black colour. Galvanised steel is mild steel with a coating on it to stop it rusting which is fine until you scratch it; it is a nasty grey colour and isn’t suitable for anything that involves a lot of shape changing. I tend to avoid the stuff! Stainless steel comes to a variety of specifications; it’s more expensive than mild and more difficult to work, however, if you get the right stuff it won’t rust. If you plan to do anything dramatic to stainless you will need to anneal it, which will require heat, more of which later.
Mild steel is the best stuff to start off with. It is sold in sheets (generally 2 x 3 meters) of various thicknesses. To be confusing these are often referred to as gauges — of course there are different gauge systems from around the world and
1.0 20 Edging shields, body plates Light weight, dents easily
Thickness (mm) Gauge (UK) Used For Notes
Arms, legs Elbows, knees, helms
Helms Starting to get heavy! 18 16 14 1.2 1.5–1.6 2.0
Will dent, but isn't too heavy Nice for dishing, can be used
for arms and legs
Mild Steel for Armour
the British gauge system changed when we went metric! Best way round this is to tell the stockist what thickness you want and let him sort out the rest! The table below gives you an idea of what is suitable; the 1.5 to 1.6 mm for 16 gauge is because the old imperial stuff was 1.6mm and the new metric is 1.5. You can still get stuff rolled to the old size if you are lucky! Toughness wise stainless is roughly equivalent to the next gauge up of mild steel.
Leather
Leather is a wonderful material for making armour out of. It can be shaped, left soft to act as a pad, made hard so as to be armour in its own right or just cut into straps to hold everything together! Leather can be purchased from leather factors, warehouses, re-enactors markets (good cheap supplies) or through craft outlets. As with everything else shop around.
Rivets
The vast majority of your armour is going to be held together by rivets. Look in Yellow Pages under fasteners. Ironmongers, DIY centres, craft shops and leather fittings retailers may also sell certain types. Rivets come very cheap if you buy in bulk (50 plus) rather than in little packers of 10 or so.
Mild steel rivets come in a variety of sizes and lengths — I’ve ended up with a huge variety! I mainly use 3/16 inch diameter, that’s 4.8 mm for you metric types. Length wise I keep lots of 1/4 inch for riveting two pieces of metal together and 3/8 inch for riveting three bits, articulations and the like. It’s also worth keeping a few really long ones, you can cut down, for that annoying job where the ones you have don’t quite reach. The only other diameter I use a significant number of is 1/8 inch (2.4 mm), for fingers on gauntlets and other fine work.
Tubular rivets with a head size of around 1/2 inch (13 mm) are useful. There is a special tool for setting these things — I find that putting them onto something flat and hitting them with a hammer works fine! The double headed type shown above are superior to the thin back type as they last longer and you can put them in upside down without going, “Darn, that looks wrong!”
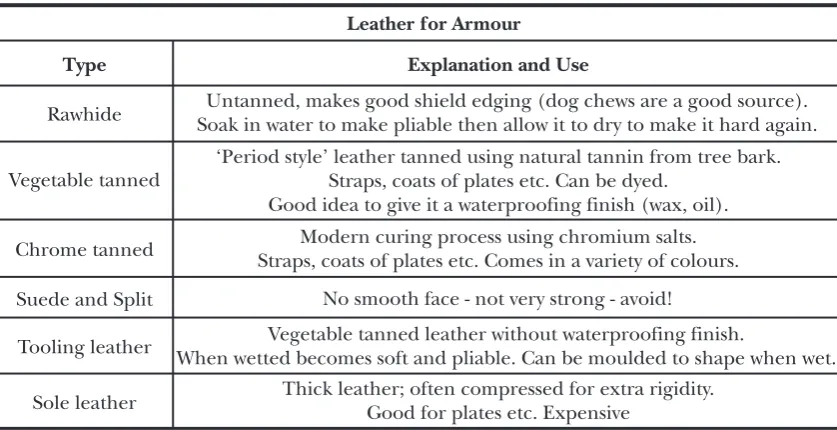
Rawhide Soak in water to make pliable then allow it to dry to make it hard again.Untanned, makes good shield edging (dog chews are a good source).
Type Explanation and Use
Modern curing process using chromium salts. Straps, coats of plates etc. Comes in a variety of colours. Vegetable tanned
Chrome tanned Suede and Split
‘Period style’ leather tanned using natural tannin from tree bark. Straps, coats of plates etc. Can be dyed.
Good idea to give it a waterproofing finish (wax, oil).
Thick leather; often compressed for extra rigidity. Good for plates etc. Expensive
Leather for Armour
Vegetable tanned leather without waterproofing finish.
When wetted becomes soft and pliable. Can be moulded to shape when wet. Tooling leather
No smooth face - not very strong - avoid!
MATERIALS
Wood
Plywood makes good shields — obtainable from any DIY shop, builders mer-chant or the like.
Brass
Expensive, heavy and not strong enough for important pieces; brass is however great for decoration.
Aluminium
Not at all period. However sometimes turns up as scrap and can be used to make lightweight body plates or the like. Dural, aircraft grade aluminium alloy, is much tougher and can be used to make shields.
Thermoplastic
Not period, surprise! Ideal for lightweight body plates or hidden stiffeners under leather or cloth; sort of inauthentic hard leather. Great for keeping your total armour weight down so as to avoid excess baggage charges when flying to events around Europe. Can shatter if it gets too cold, for exaple, Finland in winter. Guess how I found that out?
Cloth
Used to make undergarments or to hold armour together as in coat of plates and the like. Markets, material remnant shops, re-enactors markets, charity shops, sewing shops and the like are good places to look for materials at reasonable prices. If you are looking for canvas you can also try a tent maker or camping shop.
Flat Head Mild Steel ('cos they wreck rattan swords less!)Helms
Type Material Use Looks Like
Articulations ('cos they look nice!)
Decoration
Riveting onto leather or cloth. Not authentic but great for straps,
buckels, etc. Mild Steel
Brass Alaminium, often
coated to give Brass effect) Round Head
Flat/Round
Tubular
Can't find a rivet? Cut a nail down! Mild Steel
Nails
Riviting onto leather or cloth —very cheap! Mild Steel
Roofing Nails
You are going to have to acquire a few basic tools, as you progress you will prob-ably acquire a few more! New tools can be expensive so start looking around second hand tool shops, junk shops, steam rallies, agricultural or engineering auctions or tool sales. You will also need a place to work, somewhere where the noise won’t drive the neighbours mad. You are also going to need somewhere with a good floor or you will hammer through it! A shed or garage is fine.
Hammers
You will need a hammer to rivet with; a small ballpein, about a pound weight, is ideal. You will also need a soft hammer to bend things with, look for a relatively hefty rubber or rawhide mallet. These you should be able to find easily. It’s also useful to have a thumping stick for bashing things like nails or cold chisels; basi-cally a fairly heavy hammer whose face you don’t mind chewing up!
For shaping work you will need hammers with polished faces. Any marks you put into them will be transferred to your work so keep them separate from the gen-eral use hammers. A dishing hammer (for making elbows, knees etc.) is a must; anything relatively hefty with a curved face will do. A large round end ballpein can be used, although the curve will be a bit extreme, or you could always grind a flat faced hammer down a bit. It is probably better though to look for a pur-pose made dishing hammer. Purchasing one new is a good investment although finding one second-hand shouldn’t be too much of a problem. Collecting a vari-ety of dishing hammers will be very useful. A planishing hammer is used to
smooth surfaces and remove hammer marks; any flat-faced hammer will do. If you need to do any raising you will need a hammer for this; a large purpose rais-ing hammer is best but the back of a cross pein can be used.
Formers
You will now need something to hammer onto. No don’t rush out and buy an anvil — they can be helpful but are hardly essential, unless you want to be a blacksmith as well. Instead find yourself a tree stump. If you cut a slight hollow into one part of the top this will form a dishing block. The rest can be used for hammering onto. Also look for pieces of hardwood as these can be cut into very useful shapes for forming things around. Other things to keep your eyes open for are lengths of metal tube (for bending things over or
around), bowling balls and odd chunks of metal. Be inventive, failing that buy some stakes — these come in a variety of shapes and sizes, the mushroom shaped being probably the most useful. Unless you are rich buy them second hand.
Riveting Block
You will need a smooth, flat, hard, surface to rivet onto. If you want to use round head rivets you will need a rivet snap of the correct size. I use an old lump of stainless steel with curved holes drilled into it.
Workbench
Something for marking things out on, holding a vice or clamps, bashing things on etc. Get something the right height. (Workmates tend to be very low.) I made mine out of an old bed frame and scrap wood.
Vice
For holding things like formers, what you’re filing, what you want to thump and a hundred other jobs. The easiest to get is an engineers vice; unfortunately these don’t like being thumped! Instead try to get a leg vice, some times called a blacksmiths vice, they are fairly common second hand and are designed to be hammered onto. Mount it onto your work-bench.
Cutters
invest-TOOLS
ment. A decent cutter is perhaps the most awkward tool to find at a reasonable price.
The cheapest tool I’ve ever seen used was a cold chisel. Simply chisel the shapes out on an anvil, then grind them into something useable. Very noisy and time consuming — not recommended.
At the bottom end of the more practical range of tools is the humble hack saw — cheap, cheerful but will take you forever. You can use an electric jigsaw but they tend to be very noisy and rather time consuming as well. Make sure you use the correct blade and support the steel to prevent it bouncing around.
Snips, sometimes sold as Tinsnips or Shears will cut thin steel but you will need a gigantic pair to cut 1.2mm or above with any ease. This is actually very period. Compound action snips or Aviation snips give you a mechanical advantage when cutting; they only handle up to 1.2mm steel though.
Once upon a time just about every engineer-ing shop in Britain had a pair of Record wheel cutters — then someone invented power tools. You can still occasionally find them second hand, though as one dealer said “They are as common as rocking horse shit.” They oper-ate like a giant can opener and can cut lines, curves or complex shapes into 1.6mm or thin-ner steel. They are supposed to mount into a special block, though I’ve never seen one, but a vice works fine. They also come with an extra handle so you can use them hand held; great for cutting sheets in half. If you see a pair buy them! A similar machine is a Sykes Pickavant Mini Cutter which can also handle up to 16 gauge mild steel.
made by Falcon Tools that claims to cut up to 1.5mm steel but have never tried one. Good hunting!
Hole Maker
To put rivets in you need holes. For cloth push a sharp point through, thus cut-ting as few fibres as possible. For leather get a punch — belt punches are far superior to the hand punches, with the rotating head, which tend to bend if used a lot. For metal a good old electric drill does fine; use HSS drills not wood work-ing ones, or if you want to drill stainless use Boron Carbine tipped drills. If you put a leather washer on the drill next to the chuck you will prevent it scratching if you push your drill in too far. Period armourers probably punched their holes, the modern equivalent is to use a hand punch such as a ‘Whitney metal punch’. I invested in one of their “No.5 junior hand punch” sets a few years ago and found it saved a lot of time and effort! It punches 3/32 to 9/23 inch holes in up to 16 gauge steel. You will also need a centre punch to mark where your holes will go (and give a drill tip something to start off on). After years of cursing the auto-matic spring loaded punches I gave up and went over to using a good old solid punch and a hammer. So much for modern technology.
Files
A hand file will remove rough edges, finish or shaping your piece or remove that awkward little bit that is jamming things — a small round file will correct that hole that isn’t quite in the right place. Files come in a variety of shapes and degrees of coarseness — it’s worth having a selection. Keep them clean with a file brush (to stop the teeth clogging) and always use them with a handle.
Polishing
A simple polishing and fine grinding machine can be made by mounting a foam sanding wheel on the front of an electric drill. If you mount the drill in a stand things work even better! 150 grit fine belts will remove sharp edges and do fine shaping; when they get worn they can be used to polish. DIY shops only sell 150 or less grit. The less the number the coarser the paper. Tool shops sell finer grades normaly for belt sanders but they fit wheels, just check the diameter when you buy. I find 220 or 280 grit give a nice finish.
A fine polishing machine can be made from a cheap bench grinder. Take the grinding wheels off and replace them with mops. OK they don’t run up to the same speed as a proper polishing machine but they cost a tenth of the price and don’t need a three phase electric supply! If you put a Sisal mop on one side, a stitched cloth finishing mop on the other and use stainless steel polishing com-pound you can get a mirror finish with a bit of effort.
Other useful bits
TOOLS
If you are going to do something do it well and do it safely. Wear leather gloves whenever possible to stop you getting cuts; hey they even make ones with Kevlar in these days. Throw away sharp edged off cuts, swarf, etc. somewhere safe; not the floor or the bench you are about to put your hand. Remove sharp edges before holding bits with your hands and before wearing it! Wear eye protection especially when drilling, grinding, sanding or polishing. Wear a dust mask when polishing, sanding, grinding, etc. When drilling make sure the item is held firmly and remove any swarf caused by the drilling. Ear protectors are a good idea especially when dishing or using a noisy cutter. Wear toe protection foot-wear and foot-wear sensible clothing.
Armouring is fun; injuring yourself isn’t! DIY shops and industrial clothing/ safety shops will sell protective bits — they are a good inexpensive investment, Honest!
Lots of books have been written on sewing, leather and metal work so it doesn’t really make sense to repeat all that information here! Pop down to the library and have a browse - the bits in the next few sections are really just notes to get you started. For a useful book list see Chapter 20.
Shaping
Leather is a flexible material and can generally just be bent to shape. Hard leather such as sole leather needs to be made flexible by wetting it. When wet tooling leather can, surprise-surprise, be tooled (pressed down on to give interesting patterns). When making straps and the like remember that leather stretches — add a few extra holes!
Cuir Bouilli
If you soak vegetable (natural) tan leather, stretch it around a former, wood is good, then dry it slowly in a low oven it goes rock hard. Polish it on the outside to keep water out and you have a nice piece of armour.
Riveting
There are two purposes to riveting. The first is to hold things firmly together, as on a helmet, the other is to form a pivot, as in an articulated knee.
For a firm fit drill a hole in both pieces the same diameter as your rivet then pein the rivet fully down to the inner plate. For an articulation make the hole one size bigger than the rivet and pein the head over lightly. A washer on the inside is help-ful. A leather washer between the two plates surfaces has sev-eral purposes, it holds the two moving surfaces apart giving them room to move, stops the rivet falling out (if its a tight fit on the shank) when you turn everything over for peining and allows you to keep the rivet loose without rattling.
Peining simply involves hammering the end of the rivet to form a second head — bring on the ball pein hammer! Place the rivet through the holes in your pieces with the head on the out-side. Place the head down onto a hard flat surface, into a rivet snap or into a cut out that matches its head. Now using the ball
end of the hammer hit the top of the exposed shank to mushroom it. Smooth out the pein using the flat face of the hammer. Remember this is the inside of your armour — you want something smooth and relatively flat pointing at your skin don’t you?
Bending
It’s very easy to push a bit a metal and bend it at that point; what is trickier is to get a curve over the entire length. Long bends are best achieved by hammering down over a former; a bit of metal tube, a log, pipe, stake, whatever — provided it’s curved. Start by curving the entire length. Don’t worry unduly about how much just get the metal moving. Now hammer it some more, push it with your hand, and hammer it back if you have gone too far, until you reach the desired shape. Use a soft mallet to avoid marking the metal.
Dishing
Think of a piece of clay; if you push your thumb into it a number of times you can squeeze it out into a bowl shape. If you push it into a bowl shaped former it is even easier to form it. This is in essence what you are going to do with your piece of steel using a hammer and a dishing block.
There are two theories of dishing depending on whether you are a Tinsmith or a Silversmith. One says work from the outside in, the other says work from the middle out; I find it makes no difference.
To dish a piece first mark some guide lines; when you start you may want to draw lots of concentric lines, when you get more experienced you may just want to mark the centre. Place the piece over your dishing hole and start hammering around your guidelines. Holding the piece in a glove cuts down the vibrations to your hand, ear defenders cut down the noise to your ears.What ever you do don’t put your hand between the block and the bit you are about to hit. I’ve seen it done — ouch! Work evenly around the shape. On each pass (time round the entire piece) try to even out the hammer marks from the previous pass. If the piece starts to bend dramatically, in a fashion you don’t want, straighten it out either by putting it in the vice and pulling or by hitting it over a stake with a flat-faced hammer. If the edges start to crinkle, flatten them out immediately over a former with a flat-faced hammer (otherwise the metal may crack). If your surface is uneven either finish it off by doing a final pass on a flat surface or by planishing (see later). A selection of hammers, with different curves to their faces makes life easier. Dish-ing can be done onto a flat metal surface, such as the face of an anvil. This is very noisy!
Polishing
Annealing
This is heating metal to stress relieve it. If you hammer repeatedly on a piece of metal it will work harden and become less pliable and more brittle. Mild steel is remarkably resistant to this — stainless steel isn’t! For steel, to relieve the stress-ing, heat the offending piece to red heat using a forge, or blowtorch then allow it to cool slowly. Note that brass and other materials work differently — look them up before you start.
Raising
Think of the piece of clay again, this time fold it down over your thumb squeezing the folds flat as you go. Raising can be consid-ered the superior forming technique because, unlike dishing, it does not thin the piece out as you go. It also requires the most work; lots of hammering leads to work hardening, even on a relatively small piece, so annealing may well be required. You dish on the inside and raise on the outside of the piece. Most
period pieces were probably raised; most modern pieces are probably dished. For raising you will need a stake that is a bit of bar stock or the like you can hold in the vice to fold your metal down onto. Before you start, mark the area to be raised; as with dishing the number of lines you use will depend on your experience with the tech-nique. There are several ways of working all of which use the same premise — place the piece at an angle against the stake, strike the portion projecting above the stake to drive it down. You can start at the top or bottom of the area to be raised. You can also start by crimping the edge (bit like a bottle cap) by hammering it into a V shaped former, in which case you start raising from the inner
edge. Work in circles driving the metal evenly down. After each complete pass anneal the metal and start again driving it further down. Finish by planishing.
Edge Rolling & Wire edging
One of the primary ways of strengthening pieces and persuading them to stay in shape while others clout them with swords, axes and the like. There are two ways of rolling, with the roll on the outside or inside, and wire edging is just a roll with some-thing solid in the middle; which you use depends on personal choice and what period you are trying to reproduce. All three methods start off the same way fold/raise a lip onto the top of the piece; about 1cm is good but it will vary depending on wire thickness, effect you want. The important thing is that it is even and flat especially at the ends, which fold easily, and around curves in the middle, which require more raising. As always work in stages and work evenly. Next bend the lip over in a curve; if you are wire edging, trap the wire under the lip as you bring it down. Again the trick is to work in stages and work evenly. If you push a section down
on its own it’s liable to crease and ruin the effect. For a roll on the outside that’s it. For a roll on the inside you have to push the roll back. To do this finish your roll on a former with a notch cut in it the same size as your roll.
Planishing
Or how to polish with a hammer. Planishing gives you a nice even surface without grinding or the like. Useful for getting surfaces flat, blending hammer marks in or getting rid of the odd mistake. Simply place your piece, outside facing up, over a former of the same shape and hit it with a flat polished hammer. Do this to the entire surface, working evenly, to achieve the desired effect. Think lots of little strikes not one huge one. What you hit onto only has to match the shape where you hit it so a bar with its top ground can be used for a large piece. Dome stakes have various curves on them so you can move you piece about to get a match.
Welding
ADVANCED METAL WORKING TECHNIQUES
local tech college course to learn more. Failing that ask a friend with a welder to do it for you; Hey, who said you had to do all the work?
Articulations
You will need articulations to make all those nice shoulders, gauntlets, elbows and knees with the neatly fitting lames. However many starting armourers shy away from them as being, “horribly complicated!” This is largely due to a misconception of what an
articula-tion is; consider “Articulate, (a) Having joints; connect by, divide with, joints.” So anything holding two plates apart and allowing them to move can be consid-ered an articulation. Riveting a piece of leather between two plates articulates them—and you can’t get much simpler that that can you? Well actually you can! Lacing the pieces of your arm armour onto your gamberson controls the dis-tance between them and their relative movements—who said this was compli-cated?
Leather Straps
Leather straps provide movement on a wide variety of period armours. Consider the following when using them:
1. Rivets pull through leather—use a washer next to the leather to spread the load.
2. Don’t make your straps to narrow or they will break!
3. Don’t make your straps out of very thin leather or they will break!
4. One long strap is easier than lots of little ones!
5. The plates will need room to move; if the edge of the plate is millimetres away from the rivet in the next plate it will only be able to move millimetres!
Sliding rivets
These provide a ‘side to side’ or ‘up and down’ type of movement. To produce a sliding rivet simply file one rivet hole (generally the inside one) into a slot them loosely rivet the plates in place; you generally need a sliding joint on both sides the get the plates to move. Useful hints:
1. The slot goes in the direction of movement - it can be a curve if necessary.
Rotating joints
These are particularly useful on elbows and knees. The trick is to get the plates to articulate smoothly to a certain point then lock against each other and stop. If they don’t lock they will keep moving and gap; gaps allow weapons to get in. Gaps are bad!
The diagram to the right shows how the lames work; the upper lame is shown rotated fully out, the lower one rotated fully in. Note how the cur-vature of the lame matches that of the cop when it is in the fully out position.
Everything depends on where you place the rivet holes:
1. Rivet holes are symmetrical; if the hole on the right side of the lame is 1cm in the hole on the left should be 1cm in.
2. Note how, with the lower plate fully in, the line of rivet holes are on a curve not a straight line.
3. In the fully in position the lame project below the surface of the cop, therefore you
need to allow room for it between you and the cop, that is the cop isn’t a skintight fit to the joint.
Because you need to build your armour around your padding you need to know how to make it first!
Gamberson
This supplies basic padding under the body armour and something to hang your arm armour off. Some people rely on their gamberson (with a few minor additions such as a kidney belt) as their torso protection. This gives them excellent mobility at the expense of protection. If you are learning to fight, as well as armour, you are liable to get hit a lot so body armour might not be a bad idea—your choice! Making a gamberson is a sewing job; go get a needle and thread or borrow a sewing machine. The material you make it from should be relatively tough (it’s going to take a beating),
adsorbent (you are going to sweat into it), colour fast (unless you want to start a new fashion in oddly coloured flesh) and washable (see sweating above). Period gambersons were made from multiple layers of cloth stitched together or padded with raw wool or similar material, modern ones often use an internal fill of cotton or polyester batting to achieve the same look with less weight. A descrip-tion of an arming doublet of the 15th century is “a dowbelet of ffustean (a type of heavy woollen broad cloth) lyned with satene cutte full of hoolis”. A heavy outer material, such as canvas or calico, is therefore appropriate with a softer lining next to the skin. For extra ventilation you can add buttonholes down the quilting seams.
The shape of your gamberson (see illustrations above) depends on the period you are trying to portray. From a practical point of view it should allow you to
move. Arm movement is especially important; if you can’t cross your arms in front of you or move your arm above your head the design is too constricting. A pattern that will work well for most gambersons is as follows:
1. Take measurements as shown to the left. A= 1/2 upper chest (arm to arm) A’= 1/2 upper back (armpit to armpit)
B= 1/4 chest measurement C= 1/4 waist measurement
D= 1/4 hips measurement plus 2 to 5 cm E= collarbone to waistline
F= waistline to bottom of skirt G= back of neck to waistline
H= waistline to bottom of skirt (back)
Note that the waistline in the late medieval period tended to be higher than today’s and was
measured just under the ribs. This will give you the basic torso. For earlier period gambersons the measurement C should be about
the same as measurement D giving a tubular trunk. Later period tended to have a more pronounced waistline following the whims of fashion, in which case measurement C should be a rather snug fit. For a flared skirt increase measurement D. Remember to keep the armholes large for ease of movement. 2. Cut out one set of
panels, baste together (long, easily removable stitches) and try it on. Go through your range of fighting motions and make sure that it does not pinch or bind. Cut and modify to suit then remove the stitches, add 5 to 8cm extra (2 -3 inches) to the measurements to allow for the quilting then use the adjusted pieces as patterns to cut the rest of the cloth.
3. You can make gambersons out of pre-quilted cloth, or you can sew your own quilting - simply cut two identical panels, one of the outer and one of the inner fabric, machine stitch rows down them then stuff the rows with whatever you have at hand.
4. Cut out, sew and pad arms in the same manner. These can be attached to the body either by hand stitching or by points and ties, which have the advantage of leaving the armpits open and venti-lated.
PADDING Sewing an arming point
1. Work from the right (outer) side of the fabric. Make a circle of stab stitching round the eyelet position; finish by bringing the needle up just outside the circle.
2. Now push a sharp point (scalpel, scissors point, stiletto...) into the centre of the circle and start forcing it through, working from both sides alternately until the hole is almost as big as the outline stitching.
3. Put the needle down through the hole and back out a little fur-ther round, whipping over the edge of the hole and the outline stitching. Pull each stitch tightly as you go round. The stitches should just touch as they pass through the hole and radiate out a little.
4. To finish off make one or two small stab stitches from back to front, then lose the end in the stitching at the back. You should have a firm slightly raised ring.
The best thread to use is firm cotton or linen thread, 40 gauge or thicker; syn-thetic threads fray too much for hand sewing.
Limb Padding
Joint Padding
Joints are susceptible to damage and should therefore be well protected. Extra protection can be built into your under garment; an extra pad worn under the armour, such as one from a sport like hockey or skate boarding; or padding added to the inside of the armour, such as sleeping mat foam. Again experiment until good protection and mobility are achieved.
Helmet Padding
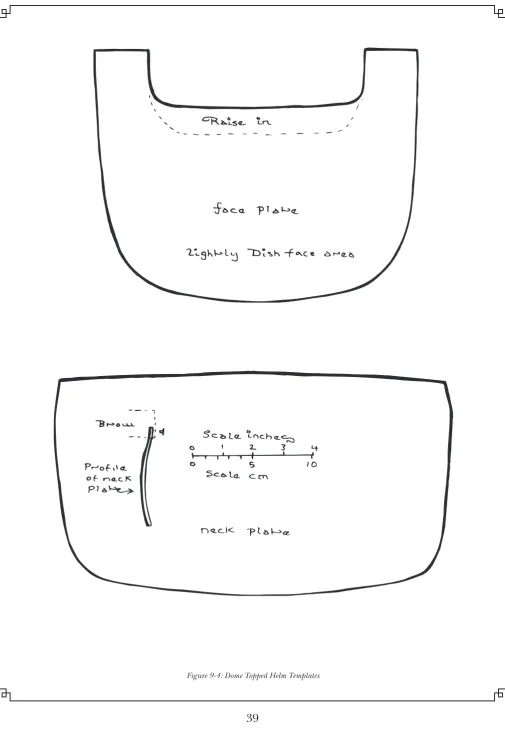
The amount of padding required depends on how hardand how often you expect to be hit on the head. (For further information see Chapter 18.) The way you pad it depends on personal choice, there are three basic ways; line it with foam or felt, build the padding into a coif (close fitting cap) or else build a leather suspension ring like the inside of a modern combat helmet. Of course you can always use combinations of the above. To keep things simple I’ll just describe padding for the most extreme case, tourney fighting. For this you need a layer of closed cell (backpacking sleeping mat) foam with either, extra reinforcing pads (made of less dense foam) or a coif.
Padding the Pot and Great Helms is fairly straight forward. Cut the foam to the shape of the individual panels of metal and fit them inside. First put in a layer of closed cell foam against the steel. Then add open cell (mattress or packing type) foam where needed to make a snug fit.
To pad a curved top helm make a liner as follows: 1. Measure the circumference of your helm
at about brow level. This gives you your base line. Next measure up from the brow to the crown of the helmet (the top most point). This gives the height. Divide the baseline into four segments and turn each segment into a triangle with rounded edges. Measure the depth of the rest of the helm and add this to the bottom of the triangles. Allow a hole for the face. 2. Cut the resulting shape from closed cell
foam. Trim as necessary to get a good fit inside your helmet then duct tape together.
3. Take strips of open cell foam and put a strip across the brow, at the back of the head, at each side and put a disk of foam at the top. Leave plenty of room between strips for air circulation.
PADDING
Don’t glue your padding fully in - you may need to tighten your rivets or take a dent out—try a removable liner or Duct Tape instead.
Gauntlet Padding
When designing helms beware of gaps between head and neck armour and sword sized holes at the throat! Helmets should be made from at least 16-gauge steel. Making a cardboard template and adjusting this to fit your head, rather than playing with bits of steel, saves a lot of time and effort!
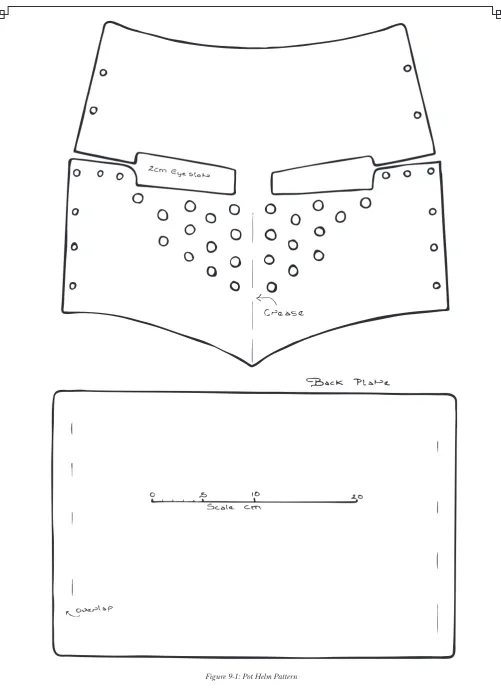
Pot Helm
I designed this helm as an exercise in minimalist cutting—it only has three plates
1. Cut the front and back plates as shown on the pattern, figure 9-1. To cut the eyeholes drill a series of holes around the inside of the slots. Cut between the holes with a hacksaw or cold chisel then file the remain-ing points back to the marked line.
2. Curve the plates as shown. The crease at the front is simply
achieved by bending the plate over a flat edge. 3. Bend the top of the face plate down so that tab
B covers tab A. Rivet them together, on both sides, using the holes nearest to the eye slot (don’t rivet the other hole yet). Pein rivets on inside of helmet.
4. Rivet the front plate over the back plate. The front plate should reach the line labelled overlap on the template. Don’t rivet the very top of the helm, or you won’t be able to get the top plate on! You can use one of the lower rivets on each side to hold a chinstrap in place.
5. Turn the helm over onto the steel sheet and trace around the outside of the helm. Add about 2 cm
HEAD
overlap to this and cut the resultant shape out. This is the top plate for the helm.
6. Make a series of evenly spaced holes, 1 cm from the edge, approximately 3.5 cm apart around the circumference of the top plate. Cut around these holes, up to the edge mark line, so as to turn the overlap area into tabs. Using a soft face hammer bend the tabs down so the touch the sides of the helm.
7. Place the top plate on the bottom plate and rivet them together through the tab nearest the front crease. Next rivet the tab at the rear and then one tab on either side of the helm thereby holding the top plate evenly in place.
8. Rivet the rest of the tabs. The Tab method is the easiest way to fit the top plate; an alternate method, using less cutting but more hammer-ing, is to raise the overlap down (see Raised Helm Top).
9. Curl the back edge and sides of the helm to prevent them hitting your shoulders.
10. Pad inside of helm - especially the top, these helms made great “mace landing pads!”
Raised Helm Top
Want even less cutting? Then raise the top plate edge over: 1. Turn the helm over onto the steel sheet and trace
around the outside of the helm. Add about 2 cm overlap to this and cut the resultant shape out. This is the top plate for the helm.
2. Mark the overlap onto both sides of the plate. Draw a few intermediate lines on the outer surface.
3. Cut a 2.5 cm wide grove into a thick piece of wood. Using this as a former beat the overlap into V shaped crin-kles.
4. Take a raising hammer (a cross pein with the back smoothed will do) and a convenient stake (ideally with a curved face and a flat end). Place the top plate onto the stake so that the marked edge is at the lip of the stake. Strike the overlap, immediately next to the marked line, so as to force the
metal at this point down onto the surface of the stake. This will force the metal inwards. Strike in an identical manner evenly all around the top of the overlap until you come back to were you started. 5. Move the top plate further out (this is where those
HEAD
each time until you reach the far edge of the overlap. This is one pass; now anneal the piece.
6. Starting at the inner edge each time do enough passes to bring the overlap into the correct shape to fit the helmet top. Note: you have to raise more at the back than at the front.
7. When the plate is the right shape planish the hammer marks out by placing the lip over the stake and striking it evenly with a flat faced hammer. If the top plate is not entirely flat, a likely event espe-cially on your first try, place it upside down onto a flat wooden surface and beat it into a better shape. Hammer or file the lower edge until it is even. 8. Rivet in place. Enjoy.
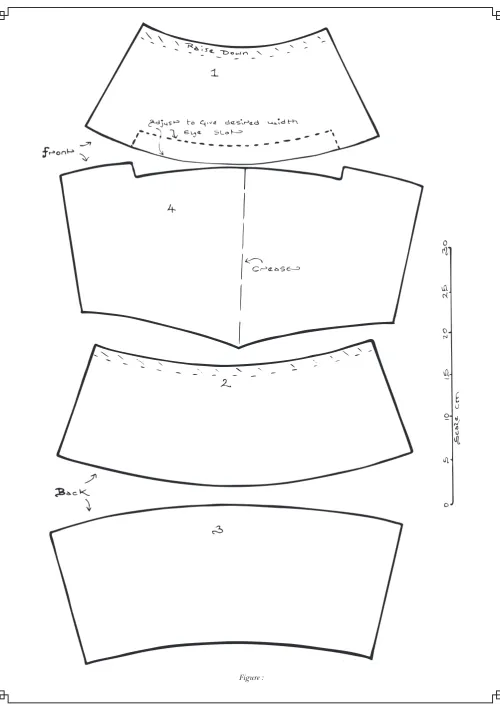
Great Helm
This helm can use either of the last two methods of attaching the top plate or the method given below. Isn’t choice a wonderful thing?
1. Scale up the templates over page to fit your head, transfer them to steel then cut them out.
2. Crease the centre line of plate 4; curve the plates to the shapes shown bellow.
3. Make the upper half; place plate 1 over plate 2 with a 20 mm overlap and rivet them together with four rivets. Leave room for rivets at the top (for the top plate) and at the bottom (for plates 4 & 5).
4. Check that the upper half fits your head; it will be difficult to change after the next stage! It should be slightly egg shaped (I’ve yet to meet anyone with a round head.)
6. Turn the upper half over onto the steel sheet and trace around the outside of the helm. Add about 2 cm overlap to this and cut the result-ant shape out. This is the top plate for the helm.
7. Dish the top plate to meet the raised curve on the upper half. This shouldn’t be an extreme bowl shape, just a gentle curve. Rivet the top plate inside the upper half.
8. Take plate 3 and curve the upper edge inwards a little by hammering it over a suitable former.
9. Rivet plate 3 to the rear of the upper half. Don’t rivet at the very end because you will need this space to rivet the front plate on! If you rivet the two ends then the middle you can adjust the shape of the overlap, with a suitably large hamme, to ensure a good fit all round for the rest of the rivets.
10. Bend the two tabs on plate 4 inwards so that they match the curve on the bottom of plate 1then rivet the plate to the rest of the helmet. 11. If necessary file the eye slot to give an even gap. Cut a small nasal bar
and rivet it across the centre of the eye slot. Pad and enjoy.
HEAD
Breaths and Eye Slots
The breaths, being the holes/slots in the front of the helmet, serve several pur-poses; the primary one being to allow you to breath! Breaths also allow you to see downwards without moving your head and give your sweat a chance to escape. Period helms often had the breaths on only one side, useful for preventing lances gaining a grip during a tourney but detrimental to ventilation and vision. I would suggest holes on both sides, under the eye slot and around the nose and mouth area. The cheek and chin areas will more than likely be covered by padding so don’t extend the holes too far around. When drilling breaths remember to remove the burrs from the inside of the helm! You can drill/cut the breaths before you rivet the face plate on.
Dome Topped Helm
Variations in design will allow this type of helm to be used for a wide variety of periods and fighting styles.
Two basic frame designs are described below - many more are pos-sible, however, the logic behind them remains the same. A brow band goes around the head. Strips are attached to this, which pass over the head from back to front and from side to side, to form a frame. Dished side plates are then inserted into the frame to form the dome. Additional pieces are then added to give face, cheek and or neck pro-tection
Crusader Style
This frame design has a relatively shallow brow band and narrow frame strips. The top of the frame comprises a back and front strip and two side strips, which are joined at the top by another small plate at the top.
1. Decide on the details of the design.
2. Measure around your head, add a bit for padding (see Chapter 18) and use this to make a template for the brow band.
3. Measure across the top of your head, and again allowing for padding, cut templates for the back and front strips and the joining piece. Tape the templates together, bend into an egg shape to fit your head then use this to work-out the size of the sidepieces. Here are a few useful tips: a) A 2 cm overlap gives space for riveting. The strips
all need this at both ends.
b) Because your head is oval, not round, the side strips will be shorter than the front/back ones.
c) Having all the strips the same width makes cutting a lot easier! d) Make the strips longer to achieve a more pointy look.
5. Mark the back point and centre side points on the brow band; use these to mark the rivet hole positions for attaching the frame strips then drill the holes. Bend the brow band to shape.
6. Bend the frame strips to shape; if they are wide you will have to dish them a bit. Dish the joining plate.
7. Match the frame up, use the holes in the brow band to mark the rivet hole positions in the strips. Drill holes in the strips and joining plate. 8. Bolt everything together. You now have the basic frame shape.
9. Place a piece of card inside one of the holes in the frame and draw round the hole. Remove the card, add enough space all round for rivets (a couple of centimetres or so) and you now have a template for your filler plates. Note that the sides of the filler plate are not identical, this means a front plate is the mirror image of a back plate.
10. Cut four filler plates then dish them to fit the holes. Make sure you dish the right side for the plate to fit, see note above! It helps if you number them—this way they don’t get mixed up.
11. For each plate:
a) Remove bolts from around hole then place plate inside. Check the fit; re-dish/planish until happy.
b) Mark the rivet hole positions through the frame. Remove the plate them check the holes are in sensible places i.e. not right next to the edge! If necessary refit.
c) When satisfied with fit cut off any excess metal from the filler plate (more than 1 cm from the rivet line) then drill a few of the holes (a couple top and bottom is good).
d) Rivet the plate in place.
e) Drill and rivet the other holes. You can try and drill all the holes before you fit the plate but I find inaccuracies in marking and drilling move things enough so that after riveting a few holes the rest no longer quite line up.
f) The dome is now finished.
12. Cut out a back plate, if required—the illustration this comes from shows a front plate and mail worn over the rest of the head to protect the back and neck. Curve the back plate then dish out the bottom to give the shape shown. Rivet this in place. If you want an early period look cover the back plate with leather.
13. Cut out the front plate and drill breath holes. Curve the plate then dish the top (below eye) section in.
HEAD
Coppergate Style
This frame design has a deep brow band with eye holes cut into it, a single strip passing from front to back and two side strips which rivet under the front-back one.
Dome construction is the same as for the previous helm except:
1. Measure across the top of your head, and allowing for padding, cut a template for the top strip. Tape the top strip and brow band templates together then use this to workout the size of your sidepieces. Note that the mid point, where
the side strips joint the top strip, is not in the middle of the top strip! This is because the front, especially if it has a nasal overlaps the brow band more than the back. If you mark the positions of the top of the brow band onto the top strip then the mid point is halfway between them.
2. The strips are wider on this design and so will need to be lightly dish/bend to shape.
3. The front of the top strip goes over the brow band; eve-rything else goes under.
HEAD
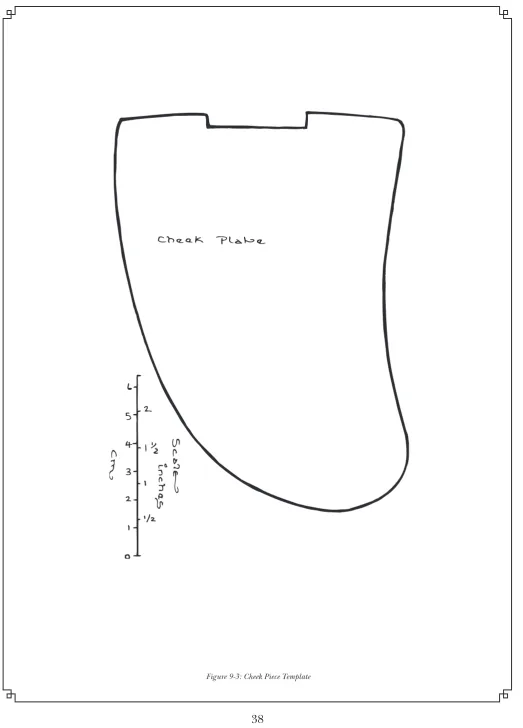
Hinged cheeks
1. Cut out and lightly dish the cheek pieces. 2. Take a strip of metal (about 3.5 cm wide),
cut in half then fold each half in two over a rod. Hacksaw/file as shown. Drill two rivet sized holes through each half.
3. Cut a piece of rod the same width as the strip to form a pin. Cut a slot into the top of cheek
piece and the brow rim to fit the hinge. Join the two halves of the hinge, insert the pin then rivet onto helm and cheek piece. You don’t need to pein the pin as the slots prevent the pin falling out.
Chin Strap
There are several vulnerable areas around the neck. The front of the throat is open to spears, halberds and other thrusting weapons, the side of the neck may take a misaimed head shot and there is a little bump at the back
of the neck that can leave you paralysed if it gets hit hard. Body armour, including a gamberson with a collar, can help protect some of these areas but specific armour is best.
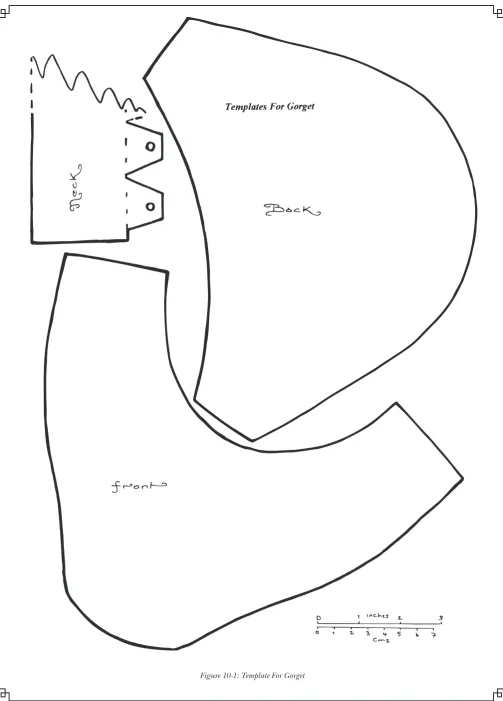
Leather Gorget
This is a simple neckband with added protection front and back. 1. Size then cut out the shapes shown from thick leather.
The neckband goes all the way around the neck—only a small bit is shown on the template to save space!
2. Rivet the three parts together and add a buckle.
3. If you don’t have a collar on your gamberson pad the neck area.
4. Wear under your body armour.
Bevoir
A popular style from the fifteenth century. A bevoir should be shaped to fit your neck, face and nose (which it should miss!) and the lower part of your helm. Designs vary from ones that cover most of the face to the relatively small one as described below.
1. Cut the neck plate from steel; don’t worry about the other one yet!
2. Dish the front, in the area shown. Bend the sides around to fit your neck, then bend them in a little more as forming the lip tends to straighten them out a bit. As you dish the metal below the marked area it will begin to crease; don’t attempt to flat-ten it, just push it down to start forming the lip.
NECK
3. Raise the lip to fit your shoulders/top of chest. Don’t raise it too far so it sticks up in the air! Dish the sides of the neck plate to give the profile shown.
4. Now take a piece of card and make a template for the lower plate. Take note of how the card bends to accommodate both the neckpiece and your chest - because you are about to copy this in steel. If your bending/raising was a little uneven mark which way up the lower plate fits on the template!
5. Cut the lower plate from steel then bend to fit the neck plate. 6. Loosely rivet the two pieces together then add a strap and buckle.
Notes
Particularly vulnerable areas on the body are the kidneys, groin, spine, collar-bone and ribs. Under the armpit hurts too but I’ve yet to find a way of armouring there!
Kidney belt
This is simply a wide leather belt that covers the kidneys and some of the lower back and stomach. A less wide ver-sion can be worn under other body armour to act as extra protection over the kidneys. It also makes a convenient thing to hang your leg armour off.
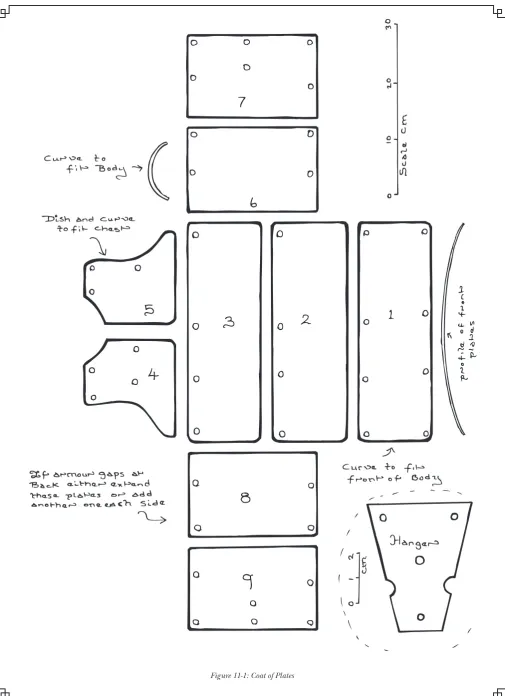
Coat of Plates
Excavation of graves from the battle of Wisby in 1361 revealed a number of Coats of Plates; a popular fourteenth century style of body armour often worn as re-enforcement over mail. The design given here is based on Wisby number 6 (the simplest) with the tie loops from number 1 to make it more comfortable to wear. If you look up the reference in Chapter 20 you can get a lot more patterns! The plates mount onto the inside of a coat, shaped a bit like a Poncho, which goes over the head and buckles at the back. This simple style leaves the top of the spine exposed but you could always add an extra plate or two to cover things there!
1. Make the coat. This can be cut from leather or sewn from canvas with a material covering on the outside. The coat should be fairly sturdy—its going to take a beating!
2. Cut out and shape the plates. These can be made from thin steel, thick or Cuir Bouilli leather or thermo plastic. Note how the
BODY ARMOUR
vidual plates and the rows overlap, coats of plates work by spreading the force of an impact over several plates.
3. Drill rivet holes in plates. Rivet the plates to the inside of the coat in numerical order. Remember, if the rivet holes on a plate will be cov-ered the plate needs to be riveted on before the covering plate! The rivets can be plate or as ornate as those on armour number 7.
4. Rivet the straps and tie loops in place; a key ring makes a good circu-lar attachment point for the laces.
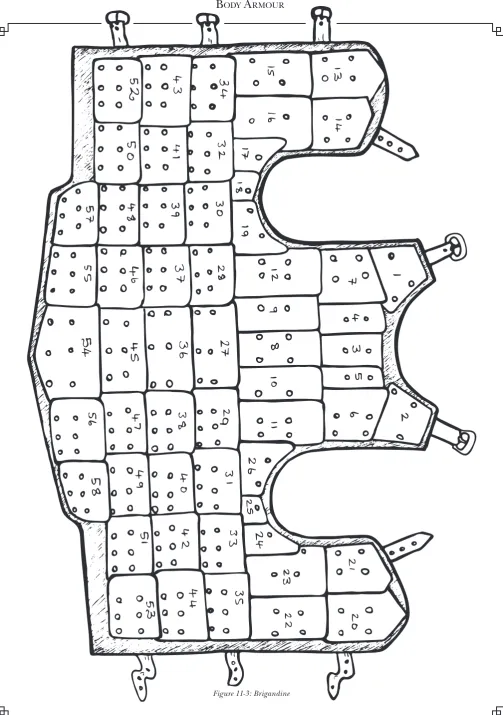
Brigandine
A front opening style of body armour popular in the 15C. If you are not wearing mail it’s a good idea to add tassets, plates covering the hips, using the diagram in figure 11-2. This design is based on one found at Chalcis and gives very good overall protection. As with the Coat of Plates, the plates can be made from thin steel, thick or Cuir Bouilli leather or thermo plastic. Making the shoulder plates of leather makes it more comfortable to wear. Rather than show pat-terns for lots of very similar plates I’ve simply given an internal view of the completed coat then the dimensions and shapes of a few of the plates. To size the coat to fit first measure your body length and circumference then scale up the diagram, in figure 11-3, to these dimensions. From this, and the diagrams, in figure 11-4, you should be able to work out the various plate sizes.
1. Sew the coat from cloth and canvas or cut from leather. It opens at the front and at both shoulders.
3. Now rivet the plates to the coat in the order that they are numbered. 4. Add buckles at front and at shoulders.
BODY ARMOUR
BODY ARMOUR
Your arms move into target range every time you attack someone! Armouring them is therefore a good idea, especially if you favour two-handed weapons. When making patterns for forearms be careful to allow room for wrist rotation; a common problem is making them too long. Likewise with the upper arm allow room for the biceps; your upper arm changes shape when you flex it—if not go to the gym.
Splint Vanbrace
An early design for protecting the forearm. 1. Scale then cut the splints from steel.
2. Rivet splints onto two leather straps that both keep the plates in place and hold them on your arm.
3. Add buckles and wear.
Cuir Bouilli Forearm Guard
This design protects the forearm and part of the elbow.
1. Carve a block of wood into a former the shape of your padded forearm.
2. Scale template to your arm then cut from a piece of thick natural tan/tooling leather. Don’t make it too close fitting or you won’t be able to get your arm in it after hardening! 3. Soak leather in water until it becomes malleable then stretch
it around the wooden former. Hold in place with carpet pins. If you want you can now make pretty patterns all over it; look up carving in a leather working book!
4. Place into a warm oven and allow to dry slowly.
5. Remove from former. Either shave off area with pinholes, use them for decorative stitching or to stitch a lining in place. Drill holes for laces.
6. Cover with wax to waterproof.
Articulated Elbow
An articulated elbow will join the forearm and upper arm protection while allow-ing the elbow to flex. When workallow-ing out how to get articulations to work it is easier to use a separate wing (one less bit to get in the way). Once the technique is established the cop and wing can be made in one piece. After making a couple of these you will get an eye for where the articulation points should be, and all will be easy.
1. Size the elbow cop as shown then cut it out from steel.
2. If cop and wing are one piece then shape the wing part, see details later.
3. Mark the bend and centre working lines onto the inside of the cop. Note that as the cop goes further around the outside of the arm than the inside, the bend line is not in the midway between the ends.
4. Start dishing the cop around where the two working lines meet.
ARMS
6. Continue working, dishing the metal and bending by hand as neces-sary until the correct shape to fit your elbow is formed.
7. Planish the edges, and anywhere else that is a bit uneven, to give a smooth finish.
8. Drill four articulation points. Note how they are at the same height on both sides.
9. Cut two lames. If you cut them from cardboard first you will be able to adjust the size to fit your cop with ease. You will also be able to see how they articulate or where they might catch. Trying things out with cardboard first saves a lot of time. Once satisfied with the size and how they move transfer the design to steel.
10. For each lame:
a) Dish the lame to fit the cop.
b) Mark the articulation points through the holes in the cop. c) Check for movement; watching your marks through the holes in
the cop as you rotate the lame in and out.
d) Adjust until a smooth, non gaping movement is obtained. e) Drill one hole, place a bolt through it, then recheck the second
hole. Once satisfied drill the second and bolt in place.
11. Mate the cop with the upper and lower arm guards. Drill two holes in each lame then articulate the arm pieces to the cop in the same manner as you articulated the lames to the cops.
12. Once satisfied with the articulation replace the bolts with rivets. Don’t worry if you get a lame wrong first time around; unbolt it throw it away and try again! This way you
can ensure everything works before you rivet on a lame that won’t fit the rest of your arm or decides to gap. If using sep-arate wings shape then rivet in place. Depending on how well your articulation works/ fits you may need to rivet a strap across the centre to hold it in place.
Wings
ARMS
Hidden Elbow
This is simply a metal cop that can be worn behind a shield or under clothing to protect the elbow.
It is made in an identical fashion to the articulated one above and held in place by a leather strap.
Floating Elbow Cop
This is an elbow protector that is laced to the gamberson independently of the fore-arm and upper fore-arm protection.
1. Scale then cut the cop from steel (yes it is basically a rectangle).
2. Dish the hashed area of cop to fit elbow; it needs to be dished more in the centre than the edges.
3. Continue dishing until a curved cop shape is formed. As you work the outer edges will be forced out to form wings. Accentuate this shape by planishing them on a stake. Try to get a crisp fold edge between the dished part and the outer wings. 4. Roll the edges of the wings to
strengthen the cop.
5. Drill lacing holes, two sets in the outer side and one in the inner. 6. Hold in place, on gamberson, with
three sets of points.
Splinted Upper and Lower Arm Guards.
These are made of leather reinforced with steel strips. The two pieces are held together by an articulated elbow or pointed individually to the arm under a float-ing cop. They give good lightweight protection.
1. Scale patterns to fit arm then cut from heavy weight leather.
2. Work out attachment points for straps and points. The straps should hold it to your arm without restricting move-ment; the upper part laces to your gam-berson so the holes in it should line up with your arming points.
ARMS
as box packaging. Remember to allow space for your elbow protec-tion.
4. Drill holes for rivets—it’s easier to do strap and strip holes at the same time—then rivet strips and straps in place
5. Rivet to elbow and/or lace to points on gamberson.
Plate Arms
Full plate arms offer excellent protection but are rather heavy and prone to taking dents! Cuir Bouilli arms can be constructed to similar patterns (no edge roll). They work in the same way as the splinted arms above but, because the material they are made of is less flexible, they require a hinged opening to fit around your arm.
1. Scale patterns to arm then cut from steel. Allow for edge roll at cuff but ensure wrist can still move.
2. Curve plates to fit arm.
3. Roll wrist edge on both halves of forearm plates. File edges to ensure both halves fit together well.
4. Make and fit hinges; these are simply a piece of leather riveted to the back of the plates or you could make a metal hinge as per the Cop-pergate helm design if you prefer.
5. Add closure straps and buckles.
6. Rivet to elbow or lace to points on gamberson.
If you want something lighter, whilst giving equivalent protection, you could sub-stitute thermoplastic for the steel. Leave off the edge roll and then cover in thin leather or fabric before adding the closure straps.
Upper Sleeve
This forms an extra protection for the upper part of the arm and the shoulder.
Padded
1. Make three layers, a tough outer one, an inner one of quilted padding and a liner. 2. Sew them together
then attach to shoulder with points.
Brigandine
1. Make cloth outer as shown. 2. Line with small plates.
ARMS
Shoulder Guard
This design works equally well with steel, Cuir Bouilli or thermoplastic. The description below uses steel; adapt as necessary. Shoulder guards can either be laced to the gamberson or strapped to the body armour or neck guard.
1. Scale patterns to fit then cut from steel.
2. Bend plates to fit your arm. The top plate needs to be lightly dished to fit the shoulder.
3. Drill holes as shown then rivet leather straps in place to allow plates to articulate. The bottom plates are joined with two straps. They join to the shoulder plate with a single strap.
4. Rivet buckle strap in place to hold shoulder guard to upper arm.
Shoulder With Sliding Rivets
A later period design using sliding rivets (see Chapter 7) to provide the necessary articulation. Remember the holes need to be one drill size larger than the rivets and the slots need to be the same width as the holes.
1. Scale patterns to fit then cut from steel.
2. Bend plates to fit your arm. Plate 1 needs to be lightly dished to fit the shoulder.
3. Note how the plates go together; plate 2 goes over plates one and three. Plate 4 goes under plate 3. Next note the position of the slid-ing rivets; the slots for articulation are cut in the covered plate. Drill-ing a hole then filDrill-ing makes the slots, to give the correct amount of articulation. If you simply bolt the plates together you will be able to check the articulation as you go.
4. Once you are satisfied with the fit/movement rivet everything together.
ARMS
Your hands are delicate and vulnerable to impact during combat; it therefore makes sense to protect them! To be fully effective the protection should cover the thumb, fingertips, fingers, back and side of hand, thumb and wrist. If the edges of the gauntlet are in contact with the weapon then the force of any blow striking the hand will be spread onto the weapon rather than the hand itself—this is a good thing!
Wisby Fingered Gauntlet
This is based upon 14th century remains unearthed
in Gotland. The cuff, which is missing on the orig-inal, is my own design. The entire gauntlet con-sists of 29 plates, which are riveted onto the out-side of a leather glove. In fact the most difficult part of the construction is making the padded glove! If you are lucky enough to have small hands then find two pairs of gloves that fit inside each other. Build the gauntlets on the larger, outer pair
and use the inner pair to adsorb the impact of any blow that strikes home. If however, you have large hands you will either have to attach a layer of leather to the top of an existing glove or else sew a large outer glove.
Assembling the gauntlet is very simple.
1. Mark out all the bits, bar the knuckle plates onto your steel and cut them out. 2. Mark, dish, then cut out the knuckles. 3. Bend everything to shape and raise the
finger tip plates over at the ends 4. Rivet everything together.
HANDS
Hourglass Gauntlet
A design in which the folded and raised edges impart a lot of strength.
1. Cut out the templates for the three main pieces and adjust to fit your hand. Check that, with glove on and padding in place, your hand can fit through the wrist hole and that the gauntlet fits your sword.
2. When satisfied with the fit, cut the various pieces from steel.
3. Roll the hand plate into an oblong-based cone (as shown on the diagram in figures 13-2 to 13-4).
4. For the next piece you will need a former with a V notch in it. Place the plate over this and hammer down the area shown. This should then match the shape of the
hand between the thumb and base of the forefinger. 5. Roll the wrist plate, again into an oblong cone, and
then raise the bottom out to match the base of the hand plate. This is fairly tricky and must be done correctly or else the gauntlet will not have its full strength. Check the shape of the two plates in rela-tion to each other and your hand. Remember that you must be able to get your hand into the gauntlet! If the opening is now too small bend the plates out into larger ovals and use a bigger joining plate. You will find a little dishing around the base of the thumb helps the gauntlet go on.
6. Temporarily bolt the two plates together. Then shape the joiner piece (which
is fun as it bends in every con-ceivable direction at once!). Finally rivet the three pieces together.
7. Roll the cuff of the wrist plate.
9. Now cut the fingerplates. There are two per finger and another two for the thumb. The plate size will, of course, vary from finger to finger; the sizes shown are just a guide.
10. Curve the plates to fit the fingers, raise the back of the fingertip plate to give the shape shown above, and then drill the rivet holes. Next cut a piece of leather to go over the top of each finger and line the inside of the fingerplates with felt (or other padding).
11. Rivet the plates to the leather and glove as illustrated.
The rivets are fitted as follows: