OpenOffice.org Base
Macro Programming
By
Andrew Pitonyak
Last Modified
Copyright
This document is Copyright © 2005-2009 by its contributors as listed in the section titled
Authors. You can distribute it and/or modify it under the terms of the Creative Commons Attribution License, version 2.0 or later (http://creativecommons.org/licenses/by/2.0/). All trademarks within this guide belong to their legitimate owners.
Authors
Andrew PitonyakFeedback
Maintainer: Andrew Pitonyak [[email protected]]
Please direct any comments or suggestions about this document to: [email protected]
Acknowledgments
I find it difficult to properly credit all of my sources, because so many people are helpful in an en devour of this size. There are, however, a few people who do indeed stand out in my mind as having provided significant encouragement.
I have no explanation as to precisely why my wife Michelle allows me to spend so much time working with OpenOffice.org. Perhaps she is really the person that you should thank for my productivity. I Love you Michelle, you complete me.
All of the people with whom I have interacted at Sun Microsystems have been very tolerant and patient with my endless questions. In the creation of this document, Frank Schönheit, however stands out in this regard. Mr. Schönheit spends a lot of time helping people with problems and questions, and most notable for me, he answers my questions. Thank you Frank! There is a large community volunteering their time with OpenOffice.org. Drew Jensen has stood out in my mind as an incredibly prolific and knowledgeable individual. Drew clearly has vast experience using database products, and he has brought this vast experience to the OOo community. He has created numerous excellent examples on the OOo Forums and mailing lists. Thank you Drew.
There is a large community of helpers, who are simply too numerous to mention. I owe you all a thank you for your help and encouragement. In the general community, however, I will single out G. Roderick Singleton, who helps numerous people every day on the mailing lists. He also very proactive in keeping the documentation up-to-date. Mr. Singleton, I thank you for all of your help as well.
Date Comment
9/23/06 Integrated changes from Jo <[email protected]> 3/13/07 Moved document to a new format.
4/4/07 Discovered that I did NOT transfer the macros. 1/30/08 Comments related to fields in forms.
2/18/08 New changes coming for OOo 3.0; watch out!
Information Page... 2
Copyright...2
Authors... 2
Feedback...2
Acknowledgments... 2
Table of Contents... v
1. Introduction...1
1.1. Introductory comments... 1
1.2. Document organization and introduction... 1
1.3. Prepare for big changes in OOo 3.0... 2
2. Storing images (binary data) in Base...4
2.1. Create the initial Base document... 4
2.1.1. Using the GUI...4
2.1.2. Using a macro... 4
2.1.3. Using a macro to open the wizard... 5
2.2. Create the table...5
2.2.1. Using the GUI...5
2.2.2. Using a macro... 6
2.2.3. Using SQL statements to modify tables...8
2.2.4. Refresh the tables...8
2.2.5. Creating and deleting tables using SQL...9
2.2.6. Increase a field's length... 11
2.3. Create a form...11
2.3.1. Using the GUI...11
2.3.2. Using a macro... 13
2.4. Open a form using a macro... 17
2.5. Accessing the binary data... 20
2.5.1. Adding binary data...20
2.5.2. Extracting binary data...22
3. One-To-Many relationships...25
3.1. Create the tables... 25
3.1.1. Create the DEALER table... 25
3.1.2. Create the ITEM table... 26
3.2. Define the data relationships...28
3.3. Add data to the DEALER and ITEM tables... 29
4. Forms... 32
4.1. The internal object model... 32
4.1.1. A control's shape is in the draw page...32
4.1.2. A draw page contains forms... 33
4.1.3. A control's data model is in a form... 34
4.1.4. A control's view model is in the controller... 35
4.1.7. Control connected to a database...37
4.1.8. Control model summary... 38
4.2. Database Forms act like a result set... 38
4.2.1. Duplicate record macro... 39
4.3. Show one item and the corresponding dealer...42
4.4. Use a combo box with the dealer id... 44
4.5. Use a list box with the dealer name... 45
4.6. Relations in a single table... 47
4.6.1. Solution... 47
4.6.2. Solution characteristics... 48
4.7. Use a “help and fill” button... 49
5. Many-to-many relationships... 50
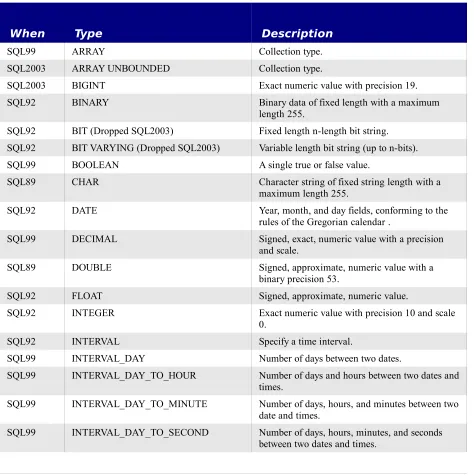
6. Database fields... 51
6.1. Storing numbers... 54
6.1.1. Integer numbers... 54
6.1.2. Floating point numbers... 55
6.1.3. NUMERIC and DECIMAL types... 56
6.2. Bit and Boolean Types... 56
6.3. Date and time... 57
6.4. Text data...57
6.5. Binary data... 58
6.6. Other data type... 58
6.7. Database sequences and auto-value fields... 58
7. A few easy database definitions...60
7.1. Schema... 61
8. Database connections... 62
8.1. Obtain a database context...62
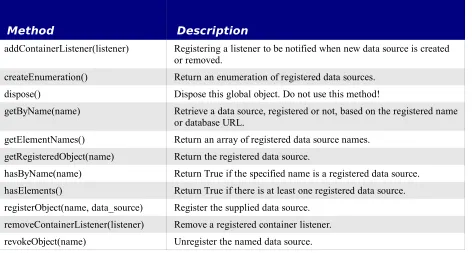
8.1.1. Registered data sources... 63
8.1.2. Unregistering a data source... 63
8.1.3. Registering a data source...64
8.2. Connect to a database...64
8.3. Connect using an interaction handler...65
8.4. Connections... 65
8.4.1. Extended SDB connections... 67
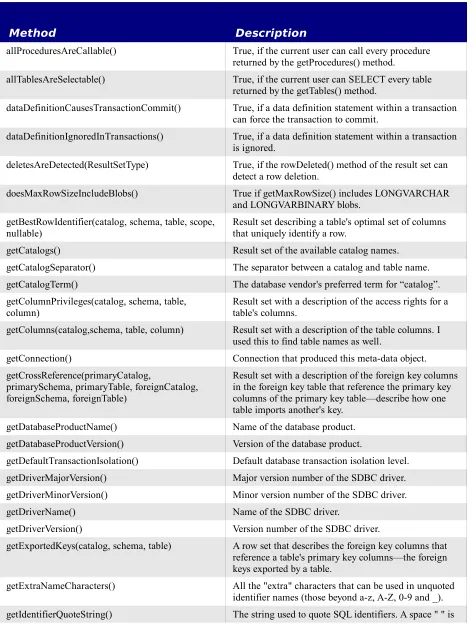
8.4.2. Meta-data...67
8.4.3. Inspecting the meta-data...74
8.4.4. GetBestRowIdentifier... 81
8.4.5. GetColumnPrivileges... 82
8.4.6. GetColumns... 83
8.4.7. GetExportedKeys... 84
8.4.8. GetIndexInfo...86
8.4.9. GetPrimaryKeys...87
8.4.11. GetTables...88
8.4.12. GetTypeInfo()...88
8.4.13. GetUDTS...89
8.4.14. GetVersionColumns... 90
8.5. Connections ...91
8.6. Connections without a data source...92
8.6.1. Delimited text files... 96
8.6.2. Fixed width text files...98
8.6.3. Help, I still can not import my CSV file... 103
8.6.4. Address books... 105
8.6.5. MySQL using JDBC... 105
8.6.6. Paradox using ODBC... 106
8.6.7. Conclusion... 108
9. Connecting to MySQL using JDBC...109
10. Mailmerge... 111
11. Copying an entire database...112
12. General utility macros... 113
12.1. Choose a directory... 114
12.2. Get a document's directory...115
12.3. Choose a file... 115
12.4. Finding a (loaded) OOo document... 117
12.5. Append to an array... 119
12.6. Compare data in an array...119
12.7. Create a property...120
12.8. Create a Point and a Size...120
12.9. Append a data array to a Calc document... 121
12.10. Dynamically call object methods... 122
12.11. Display numeric constants as meaningful text... 125
12.12. Select from a list in a list box... 127
13. Database utility macros... 129
13.1. Quoting table and field names... 129
13.2. Convert between an UNO Date and a Basic Date...129
13.3. Convert a result set to an array of data... 131
13.4. Create and populate a dialog from a result set... 134
14. Tips and tricks... 136
14.1. Limit the number of returned records...136
15. Connect to a Base document using JDBC... 139
Appendix A. Stuff I Own... 143
A.1. Tables... 143
A.1.1. Category... 143
A.1.2. Dealer...143
A.2. Forms...144
A.2.1. Item Two Tables... 144
A.2.2. Item One Table... 146
A.2.3. Item Fields... 147
A.3. Add an image macro... 148
A.4. Delete an image macro... 149
A.5. Replace an image macro... 150
A.6. Extract an image macro... 152
A.7. Clean the database... 153
A.8. Things to do...153
1.1. Introductory comments
Although I was going to write a book on this subject, I have been discouraged from completing this project. I opted, instead, to create this somewhat fragmented, less time intensive document. Hopefully you will find it useful.
This document is not even remotely finished. If you find errors, or have some favorite additions, then please do the following:
1) Download the latest version of the document.
2) Make note of the “Last Modified” date (Thursday, March 12, 2009 at 08:29:19 PM) and the revision number (35) so that I will know if you have the latest document version, which makes my life much easier.
3) Time permitting, warn me ahead of time so that I can send you the latest version if I have not posted it.
4) Use Edit > Changes > Record to turn on edit tracking.
5) I attempted to use the the styles and formatting recommended at the OOo Authors web site (see http://www.oooauthors.org/). The primary difference is that I do not embed place graphics in a frame with the caption. I prefer them to be in their own paragraph and not in a frame. I experienced bugs related to using frames for this, which caused me to lose information from this document; the information is still missing today. 6) Send the modified document to me.
I will incorporate the changes into the latest document and reformat the document to be compliant with the OOo Authors web site criteria if required. I really do appreciate bug reports, and if you desire to add sections or material, I am open to that as well. Thanks to Szymon Nikliborc, who provided the first bug report.
1.2. Document organization and introduction
The database component in OpenOffice.org (OOo) contains numerous complexities. In some ways the vast capabilities are mature, and in others they are not. I have solved many problems using Base and I add them to this document as I solve them and as I have time to add them. The advantage is that all of the problems end up in a single document. The disadvantage, however, is that coverage is disjointed and not consistent. Sometimes I assume that you know nothing about Base, and at other times I might assume that you are an expert user.
I, Andrew Pitonyak, was unable to find significant documentation dealing specifically with binary data stored in a Base document, so I decided to figure out how it works. This
The document also contains buttons that call the macros contained in this document. For obvious reasons, if this document is converted to a different format, such as a PDF or DOC, the macros will be lost and the buttons will not call the macros. In other words, if you are reading a PDF version of the document, the buttons don't work.
The initial section dealing with binary data provides easy steps for creating your first database. The binary section also demonstrates many useful methods such as creating and opening forms using macros.
This document contains a library named AndrewBase, which contains the main macros shown in this document. Buttons are inserted throughout the document to call the macros shown in the text. When OOo loads a document, only the Standard library is loaded, which means that the macros stored in the AndrewBase library are not available to be called from a button. The standard library contains helper macros, that wrap calls to the macros of interest. A typical helper macro, CallCreateBinaryDB, is shown in Listing 1. All helper macros start by calling LoadDBLibs, which loads the library containing the worker macros.
Listing 1: Macro used to create the empty Base document.
Const sDBBaseName$ = "BaseFieldDB.odb"
Sub LoadDBLibs()
If NOT BasicLibraries.isLibraryLoaded("AndrewBase") Then
BasicLibraries.LoadLibrary("AndrewBase")
End If End sub
Sub CallCreateBinaryDB()
LoadDBLibs()
CreateBinaryDB(GetSourceCodeDir() & sDBBaseName, True) End Sub
Notice that the computer code uses syntax highlighting as is done by the Basic IDE. I feel that this enhances the readability of the code, so I wrote a macro that will search the entire
document for computer code, and then create syntax highlighting.
1.3. Prepare for big changes in OOo 3.0
In OOo 2.x, a Base document can not contain macros, but the contained reports and forms can. In OOo 3.x, this is to be reversed; a Base document can contain macros and contained reports and forms can not.
http://wiki.services.openoffice.org/wiki/Macros_in_Database_Documents
that was last active before the database document became active. With version 3.x,
ThisComponent will always be the component which was active when the macro was invoked. This holds no matter whether the macro is located in the database document's or in the
application's Basic library. Also, it holds no matter whether the active component is a database document or any of its sub components. In particular, the various designers are also available as ThisComponent.
The variable ThisDatabaseDocument will be introduced for basic macros embedded in a Base document, and always refer to the Base document.
In this section, we will create a database that contains a field of type Image. An Image field is really a “long variable binary” field, which means that it can contain any type of binary data, not just images. If I choose to store images in my binary field, then I can use an Image viewing control in a form to see the images—and seeing the pretty picture allows for immediate feedback that things are working.
2.1. Create the initial Base document
You need a base document that will contain the image data.
2.1.1. Using the GUI
Use the following step by step instructions to create a sample database for use. 1) Use File > New Database to open the new database wizard.
2) Select the Create a new database radio button and click Next.
3) Select the No, do not register the database radio button, the Open the database for editing
checkbox, and click Finish.
4) Name the database ImageDB and click Save.
2.1.2. Using a macro
Creating a Base document using a macro is easy, but it is easy to make a mistake in the details. There are a few key items to create a Base document.
1) Use the DatabaseContext to create an empty data source.
2) Set the data source URL to sdbc:embedded:hsqldb for an internal HSQL database.
3) Obtain the database document from the data source and save it. You can not add tables to a Base document until after it has been saved.
The macro in Listing 2 demonstrates how to create a Base document. If the database URL is not specified, then a dialog asks for a file name. The filter list, which contains the Base file extensions is obtained from Listing 59, and then the macro in Listing 58 displays the dialog asking for the new database name. Use the Create Database button to run the wrapper method which calls CreateBinaryDB (see Listing 1 and Listing 2); this will create the
BaseFieldDB.odb file in the same directory used by this document (see Listing 57).
Listing 2: Create an empty Base document.
REM Use "Option Compatible", or you can not use a default argument.
Sub CreateBinaryDB(Optional dbURL$ = "", Optional bVerbose = False)
Dim oDBContext 'DatabaseContext service.
Dim oDB 'Database data source.
REM No URL Specified, get one.
If dbURL = "" Then dbURL = ChooseAFile(OOoBaseFilters(), False)
REM Still No URL Specified, exit.
If dbURL = "" Then Exit Sub
If FileExists(dbURL) Then
If bVerbose Then Print "The file already exists." Else
If bVerbose Then Print "Creating " & dbURL
oDBContext = createUnoService( "com.sun.star.sdb.DatabaseContext" )
oDB = oDBContext.createInstance()
oDB.URL = "sdbc:embedded:hsqldb"
oDB.DatabaseDocument.storeAsURL(dbURL, Array())
End If End Sub
2.1.3. Using a macro to open the wizard
This is a little snippet that I have not tested, but according to Sevastian Foglia ([email protected]), the following should work:
Listing 3: Start the Base document wizard using a macro.
sURL = "private:factory/sdatabase?Interactive"
doc = StarDesktop.loadComponentFromURL(sURL, "_blank", 0, args)
2.2. Create the table
The image database is intentionally very simple (see Table 2). The field names use uppercase characters and contain no spaces because it simplifies the SQL—you do not have to quote the field names in SQL statements. The annoying thing about quoting, is that the same quote character is not always used. The query builder might require that non-uppercase characters be quoted using a double quote character ("), but an SQL statement in a macro might require a back-tic (`). A macro that deals with this problem is demonstrated in Listing 77.
Table 2. Fields in the binary table.
Field Field Type Comment
ID Integer [INTEGER] Table's primary key
NAME Text [VARCHAR] Name for the data, most likely, a file name. DATA Image [LONGVARBINARY] The binary data.
2.2.1. Using the GUI
Now, create the table to hold the image. Select Tables from the left hand side and then choose the
1) Set the Field Name to ID. 2) Set the Field Type to Integer. 3) Set Auto Value to Yes.
4) Right click to the left of the field name and choose Primary Key. 2) Create the name field.
1) Set the Field Name to NAME.
2) Set the Field Type to Text [VARCHAR]. 3) Set Entry required to Yes.
4) Set Length to 255. 3) Create the image field.
1) Set the Field Name to DATA. 2) Set the Field Type to Image. 3) Set Entry required to No.
4) Leave the Length at the default value of 2147483647.
Use File > Save to save the table. Name the table BINDATA, and then use File > Close to close the table design window.
Caution Saving the table saves the table definition into the Base document, but the document itself has not been saved. You must also save the Base document.
2.2.2. Using a macro
Use the Create Binary Tables button to run the macro in Listing 4. If the table exists, it will be deleted and recreated. Also, if the document does not yet exist, it will be created. The macro uses the standard OOo API.
Listing 4: Create a table in a Base document using the API.
REM Create the database specified by dbURL. If it REM does not exist, then it is created.
REM If bForceNew is True, then an existing table is deleted first. REM If bVerbose is True, progress messages are printed.
Sub CreateBinaryTables(dbURL As String, _
Optional bForceNew = False, _
Optional bVerbose = False)
Dim sTableName$ 'The name of the table to creat.
Dim oTable 'A table in the database.
Dim oTables 'Tables in the document
Dim oTableDescriptor 'Defines a table and how it looks.
Dim oCols 'The columns for a table.
Dim oCol 'A single column descriptor.
Dim oCon 'Database connection.
Dim oBaseContext 'Database context service.
Dim oDB 'Database data source.
REM If the database does not exist, then create it.
If NOT FileExists(dbURL) Then
CreateBinaryDB(dbURL, bVerbose)
End If
REM Use the DatabaseContext to get a reference to the database.
oBaseContext = CreateUnoService("com.sun.star.sdb.DatabaseContext")
oDB = oBaseContext.getByName(dbURL)
oCon = oDB.getConnection("", "")
oTables = oCon.getTables()
sTableName$ = "BINDATA"
If oTables.hasByName(sTableName$) Then
If bForceNew Then
If bVerbose Then Print "Deleting table " & sTableName
oTables.dropByName(sTableName)
oDB.DatabaseDocument.store()
'oCon.close()
'Exit Sub
Else
If bVerbose Then Print "Table " & sTableName & " already exists!" oCon.cose()
Exit Sub
End If
End If
REM For now, this should always be True
If NOT oTables.hasByName(sTableName$) Then
oTableDescriptor = oTables.createDataDescriptor()
oTableDescriptor.Name = sTableName$
oCols = oTableDescriptor.getColumns()
oCol = oCols.createDataDescriptor()
oCol.Name = "ID"
oCol.Type = com.sun.star.sdbc.DataType.INTEGER
oCol.IsNullable = com.sun.star.sdbc.ColumnValue.NO_NULLS
oCol.IsAutoIncrement = True
oCol.Precision = 10
oCol.Description = "Primary Key" oCols.appendByDescriptor(oCol)
oCol.Name = "NAME"
oCol.Type = com.sun.star.sdbc.DataType.VARCHAR
oCol.Description = "Filename" oCol.Precision = 255
oCol.IsAutoIncrement = False
oCol.Name = "DATA"
oCol.Type = com.sun.star.sdbc.DataType.LONGVARBINARY
oCol.Precision = 2147483647
oCol.IsNullable = com.sun.star.sdbc.ColumnValue.NULLABLE
oCol.Description = "Binary Data" oCols.appendByDescriptor(oCol)
oTables.appendByDescriptor(oTableDescriptor)
End If
REM Do not dispose the database context or you will NOT be able to
REM get it back without restarting OpenOffice.org.
REM Store the associated document to persist the changes to disk.
oDB.DatabaseDocument.store()
oCon.close()
If bVerbose Then Print "Table " & sTableName & " created!"
End Sub
TIP In my testing, I wanted to completely delete an OOo Base document and start over. Unfortunately, after using a Base document, OOo holds the file open, so OOo must be shutdown and restarted before the document can be deleted. This is a known bug in OOo version 2.0 and should be fixed in OOo 2.01.
2.2.3. Using SQL statements to modify tables
You can create and manage tables using SQL statements rather than the OOo API. The SQL statements differ depending on the back-end database system, so the SQL is database dependent —this is never a good thing. The OOo API does a good job of insulating you from the system specific details. Unfortunately, some things just can not be done using the API. For example, as of OOo version 2.0, you can only set default values to a constant value. It is not possible to default a time or date field to the current date or time—this is trivial using SQL.
2.2.4. Refresh the tables
Care must be taken when using SQL to modify a table, because the OOo GUI will not
automatically notice that changes have been made. You must refresh the internal OOo structures. You can use View > Refresh Tables from the OOo Base GUI. A kind macro programmer will perform this task in the macro that modifies the database structure. Refreshing the table view should be simple.
Listing 5: Refresh the tables in an OOo Base document should be simple.
oCon.getTables().refresh()
Unfortunately, calling refresh (see Listing 5) does not always work; in my limited testing, it did not properly update when deleting tables, and it sometimes worked when adding a table. Using a dispatch (see Listing 6), worked for my few test cases. Unfortunately, the database must be loaded in the GUI to use a dispatch; hopefully this will be fixed in version 2.01. ??
Listing 6: Refresh the tables in an OOo Base document using a dispatch.
REM the normal OOo API, which does not give OOo an opportunity to REM notice that the table structure has changed. Tell OOo to REM refresh the table view.
Sub RefreshTables(sURL$, oCon)
Dim oDoc 'Document to refresh.
Dim oDisp 'Dispatch helper.
Dim oFrame 'Current frame.
REM This should be the same as
REM oCon.getTables().refresh()
REM but it is not...
oDoc = FindComponentWithURL(sURL, False)
If NOT IsNULL(oDOC) AND NOT IsEmpty(oDoc) Then
oDisp = createUnoService("com.sun.star.frame.DispatchHelper")
oFrame = oDoc.getCurrentController().getFrame()
oDisp.executeDispatch(oFrame,".uno:DBRefreshTables", "", 0, Array())
End If End Sub
2.2.5. Creating and deleting tables using SQL
The macro in Listing 7 performs the following tasks, which means that it demonstrates how to do them using SQL:
1) Determine if a table exists. To determine how to do this, I examined the meta data from the connection (see Listing 35 and following).
2) Delete a table. 3) Create a new table.
If the table exists, it is deleted and then the macro returns. If the table does not exist, then it is created. If any forms or other items rely on this table, then they will also be deleted; you have been warned.
Listing 7: Create a table in a Base document using the API.
REM Create the database specified by dbURL. If it REM does not exist, then it is created.
REM If bForceNew is True, then an existing table is deleted first. REM If bVerbose is True, progress messages are printed.
Sub CreateBinaryTablesUseSQL(dbURL As String, _
Optional bForceNew = False, _
Optional bVerbose = False)
Dim sTableName$ 'The name of the table to creat.
Dim oTable 'A table in the database.
Dim oTables 'Tables in the document
Dim oTableDescriptor 'Defines a table and how it looks.
Dim oCols 'The columns for a table.
Dim oCol 'A single column descriptor.
Dim oCon 'Database connection.
Dim oBaseContext 'Database context service.
Dim oDB 'Database data source.
Dim oResult 'Restul of executing an SQL statement.
Dim nCount As Long 'Counting variable.
Dim oStmt
Dim sSql$
REM If the database does not exist, then create it.
If NOT FileExists(dbURL) Then
CreateBinaryDB(dbURL, bVerbose)
End If
REM Use the DatabaseContext to get a reference to the database.
oBaseContext = CreateUnoService("com.sun.star.sdb.DatabaseContext")
oDB = oBaseContext.getByName(dbURL)
oCon = oDB.getConnection("", "")
oStmt = oCon.createStatement()
sTableName$ = "BINDATA"
REM First, check to see if the table exists!
sSql = "select count(*) from INFORMATION_SCHEMA.SYSTEM_TABLES " & _
"where TABLE_NAME='" & sTableName & "' " & _
"AND TABLE_SCHEM='PUBLIC'"
nCount = 0
oResult = oStmt.executeQuery(sSql)
If NOT IsNull(oResult) AND NOT IsEmpty(oResult) Then
oResult.Next()
nCount = oResult.getLong(1)
End If
If nCount <> 0 Then
If bForceNew Then
If bVerbose Then Print "Deleting table " & sTableName
REM The default behavior is to use RESTRICT rather than CASCADE.
REM RESTRICT prevents the deletion if other things depend on
REM this table.
sSql = "DROP TABLE " & _
DBQuoteName(sTablename, oCon) & _
"IF EXISTS CASCADE" oStmt.executeQuery(sSql)
RefreshTables(dbURL$, oCon)
oCon.close()
Exit Sub
Else
If bVerbose Then Print "Table " & sTableName & " already exists!" oCon.close()
Exit Sub
End If
End If
REM I did not quote the field names because I know that
REM they are all uppercase with nothing special about them.
sSql = "CREATE TABLE " & _
DBQuoteName(sTableName, oCon) & _
"(ID INTEGER NOT NULL IDENTITY PRIMARY KEY, " & _
" DATA LONGVARBINARY NULL)"
oStmt.executeQuery(sSql)
If bVerbose Then Print "Created table in " & dbURL
RefreshTables(dbURL$, oCon)
REM Do not dispose the database context or you will NOT be able to
REM get it back without restarting OpenOffice.org.
REM Store the associated document to persist the changes to disk.
oDB.DatabaseDocument.store()
oCon.close()
If bVerbose Then Print "Table " & sTableName & " created!"
End Sub
2.2.6. Increase a field's length
I needed to increase the length of a field, but was unable to save my change. OOo offers to delete the field and insert a new field. This removes all data associated with that field. I used the
following method to increase the length of the text field. In the following example, I modify the field named “COMMENT” in the ITEM table.
1) From the Base document, right click on the table and choose edit.
2) Rename the COMMENT field to something else such as COMMENT1 and save the change.
3) Add a new field named COMMENT with the desired length or properties and save the change.
4) From the Base document, use Tools > SQL to open the Execute SQL Statement dialog. 5) Enter the desired SQL statement to copy the content from field COMMENT1 to
COMMENT; I used “UPDATE ITEM SET COMMENT=COMMENT1”. Remember that ITEM is the table name.
6) Open the ITEM table and verify that the data has been copied.
7) From the table design window (remember right click on the table and choose edit), delete the old COMMENT1 field leaving only the new COMMENT field.
These steps may require a few changes if the field is used someplace else (for example, in a relation set using Tools > Relationships.
2.3. Create a form
2.3.1. Using the GUI
TIP To add an Image control to view an Image field, you must manually edit the form after using the form wizard.
1) Create the initial form using the Wizard
1) Select Forms on the left hand side and then choose the Use Wizard to Create Form
task.
2) Set the tables or queries field Table:BINDATA.
3) Click on the >> button to add all available fields to the form. This will only include the ID and NAME field. Image fields are not included in the wizard in OOo version 2.0. 4) Click Next to continue to the sub forms page.
5) Click Next to continue without creating a sub form.
6) Select the Columnar for a single record per form and click Next. If you click Finish, the form will automatically be saved using the name BINDATA, which corresponds to the table name.
7) Ignore the data entry mode and click Next. 8) Ignore the styles and click Next.
9) Set the name to “BINDATAImage” and click Finish.
2) The form is automatically opened for editing. Close the form using File > Close. 3) Now, open the form in edit mode and add an Image control.
1) Select Forms on the left hand side.
3) The Form Controls toolbar should already be visible. You can check this using View > Toolbars; there should be a check mark next to Form Controls.
4) Click on the more controls icon ( ) to open the more controls toolbar.
5) Click on the Image control icon ( ) and then draw out the control on the form. Be warned that the Image control icon is very similar to the Image Button icon.
6) Right click on the newly inserted control and choose Control to open the control properties dialog.
7) On the Data tab, set the Data field to DATA, which contains the binary data. If we happen to store non-image data, this is likely to be a problem for the image control, which now expects this data to be an image. Do not use this form if you store non-image data in the DATA field.
8) Use File > Save to save the form into the Base document. 9) Use File > Close to close the form.
4) The form has only been saved into the Base document, but now you must save the Base document. Use File > Save to save the Base document.
2.3.2. Using a macro
Stated simply, a form is a document that contains controls. In this case, the controls are connected to a database. The document's draw page contains shapes and forms. Each control is associated with a shape, the shape dictates where the shape is displayed. The macro in Listing 8 creates a simple form, which is very similar to the form created using the form wizard; there are a few notable differences, however.
The macro in Listing 8 creates one shape for each control. There is a separate shape for each data control and each label. The form wizard creates an additional GroupShape for each control/label pair. The group shape is used to keep a data control with its label. When the form is in design mode and you select a control, you are selecting the shape. If a control is grouped with its label, you select the two controls together because you are selecting the group shape rather than the individual controls. The disadvantage is that you can not easily select a specific control or its label to edit the individual properties—use the form navigator to select each individual component, even when they are grouped with others.
Another thing to consider is that a form does not really imply that a Writer document is used. My guess is that you should be able to create and store a Calc document into a Base document. If you try this, let me know how it works. ??
Listing 8: Create and add a form to a Base document.
Sub AddBinForm(sDBURL$, sTableName$)
Dim oDoc 'Newly created Form document
Dim oDrawPage 'Draw page for the form document.
Dim s$ 'Generic temporary string variable.
Dim oDBDoc 'The Base database document.
Dim sDBName$ 'Name portion from sDBURL.
Dim sFormURL$ 'URL where the temporary form is stored.
Dim oFormDocs 'Form documents in the Base document.
Dim sFormName$ 'Form name as stored in the Baes form documents.
Dim oDocDef 'Document defition of the form stored in Base.
Dim NoArgs() As new com.sun.star.beans.PropertyValue
Dim oProps(2) as new com.sun.star.beans.PropertyValue
REM Create a new document for the form.
s$ = "private:factory/swriter"
oDoc = StarDesktop.LoadComponentFromURL(s$, "_default", 0, NoArgs())
REM The form will in edit mode, rather than design mode, by default.
oDoc.ApplyFormDesignMode = False
Dim oViewSettings
oViewSettings = oDoc.CurrentController.ViewSettings
oViewSettings.ShowTableBoundaries = False
oViewSettings.ShowOnlineLayout = True
REM Get the document's draw page and force the top level form to
REM exist and be named "Standard".
oDrawPage = oDoc.DrawPage
If oDrawPage.Forms.Count = 0 Then
s$ = "com.sun.star.form.component.Form" oDBForm = oDoc.CreateInstance(s$)
oDrawpage.Forms.InsertByIndex (0, oDBForm)
Else
oDBForm = oDrawPage.Forms.GetByIndex(0)
End If
oDBForm.Name = "Standard"
REM Cause the form to use the table as a datasource.
oDBForm.DataSourceName = sDBURL
oDBForm.Command = sTableName
oDBForm.CommandType = com.sun.star.sdb.CommandType.TABLE
REM Service names for controls.
Dim sLabel$ : sLabel = "com.sun.star.form.component.FixedText" Dim oControl 'A control to insert into the form.
Dim oShape 'Control's shape in the draw page.
Dim oLControl 'Label control.
Dim oLShape 'Label control's shape in the draw page.
REM Anchor the controls to paragraphs.
Dim lAnchor As Long
lAnchor = com.sun.star.text.TextContentAnchorType.AT_PARAGRAPH
REM Insert the ID label
oLControl = oDoc.CreateInstance(sLabel$)
oLControl.Label = "ID" oLControl.Name = "lblID"
oLShape = oDoc.CreateInstance("com.sun.star.drawing.ControlShape")
oLShape.Size = createSize(1222, 443)
oLShape.Position = createPoint(1000, 1104)
oLShape.AnchorType = lAnchor
oLShape.control = oLControl
REM Do not add the label control yet!
REM Insert the ID formatted text field
s$ = "com.sun.star.form.component.FormattedField" oControl = oDoc.CreateInstance(s$)
oControl.LabelControl = oLControl
oControl.BackgroundColor = 14540253 oControl.Border = 1
oControl.DataField = "ID"
oControl.EffectiveMax = 2147483647 oControl.EffectiveMin = -2147483648 oControl.EnforceFormat = True
oControl.HideInactiveSelection = True
oControl.Name = "fmtID" oControl.TreatAsNumber = True
oShape = oDoc.CreateInstance("com.sun.star.drawing.ControlShape")
oShape.Size = createSize(2150, 651)
oShape.Position = createPoint(2522, 1000)
oShape.AnchorType = lAnchor
oShape.control = oControl
oDrawpage.Add(oLShape)
oDrawpage.Add(oShape)
REM Insert the Name label
oLControl = oDoc.CreateInstance(sLabel)
oLControl.Label = "NAME" oLControl.Name = "lblName"
oLShape = oDoc.CreateInstance("com.sun.star.drawing.ControlShape")
oLShape.Size = createSize(1222, 443)
oLShape.Position = createPoint(1000, 1954)
oLShape.AnchorType = lAnchor
oLShape.control = oLControl
REM Insert the Name text field
oControl.BackgroundColor = 14540253 oControl.Border = 1
oControl.DataField = "NAME" oControl.LabelControl = oLControl
oControl.Name = "txtNAME"
oShape = oDoc.CreateInstance("com.sun.star.drawing.ControlShape")
oShape.Size = createSize(8026, 651)
oShape.Position = createPoint(2522, 1850)
oShape.AnchorType = lAnchor
oShape.control = oControl
oDrawpage.Add(oLShape)
oDrawpage.Add(oShape)
REM Add the Image control
s$ = "com.sun.star.form.component.DatabaseImageControl" oControl = oDoc.CreateInstance(s$)
oControl.BackgroundColor = 14540253 oControl.Border = 1
oControl.DataField = "DATA" oControl.Name = "imgDATA"
oShape = oDoc.CreateInstance("com.sun.star.drawing.ControlShape")
oShape.Size = createSize(10504, 7835)
oShape.Position = createPoint(2522, 3332)
oShape.AnchorType = lAnchor
oShape.control = oControl
oDrawpage.Add(oShape)
REM At this point, we have a Form, which is a Writer document.
REM Store the stand alone form to disk. This form is usable as is.
REM Use some methods from the Tools library.
If NOT GlobalScope.BasicLibraries.isLibraryLoaded("Tools") Then
GlobalScope.BasicLibraries.LoadLibrary("Tools")
End If
sDBName = GetFileNameWithoutExtension(sDBURL, "/")
sFormName = "Form_" & sTableName
s$ = DirectoryNameoutofPath(sDBURL, "/") & "/"
sFormURL = s$ & "Form_" & sDBName & "_" & sTableName & ".odt"
REM Store the form to disk and then close the document.
oDoc.StoreAsUrl(sFormUrl, NoArgs())
oDoc.close(True)
REM Now, convert the form on disk to a document defition and
REM store it in a Base document.
oDBDoc = FindComponentWithURL(sDBURL$, True)
oFormDocs = oDBDoc.getFormDocuments()
If oFormDocs.hasByName(sFormName) Then
Print "Removing " & sFormName & " from the database" oFormDocs.removeByName(sFormName)
oProps(0).Name = "Name" oProps(0).Value = sFormName
oProps(1).Name = "Parent" oProps(1).Value = oFormDocs()
oProps(2).Name = "URL" oProps(2).Value = sFormUrl
s$ = "com.sun.star.sdb.DocumentDefinition"
oDocDef = oFormDocs.createInstanceWithArguments(s$, oProps())
oFormDocs.insertbyName(sFormName, oDocDef)
Print "Added " & sFormName & " to the database"
End Sub
2.4. Open a form using a macro
The macro in Listing 9 performs the following operations: 1) Open a database document.
2) Allow the user to select a form.
3) Open the form using the macro OpenFormInDB1().
Listing 9: Choose and open a form from a database.
Sub ChooseAndOpenFormInDB(sDBURL$)
Dim oDoc
Dim oForms
Dim sFormName$
Dim s$
REM Find the database document and open it if required.
oDoc = FindComponentWithURL(sDBURL$, True)
If IsNULL(oDoc) OR IsEmpty(oDoc) Then
Print "The document was not found" Exit Sub
End If
REM Choose a form to open!
oForms = oDoc.getFormDocuments()
If oForms.getCount() < 1 Then
Print "The database contains no forms" ElseIf oForms.getCount() = 1 Then
REM If there is ONLY one form, then open the one form!
Dim x()
x() = oForms.getElementNames()
sFormName = x(0)
Else
s$ = "Choose A Form To Open"
sFormName = DialogSelectItem(oForms.getElementNames(), s$)
End If
If sFormName = "" Then Exit Sub
The form can now be loaded as shown in Listing 10. The form can be loaded in design mode without an active connection, but it is required for all other modes.
You will not be asked to choose a form if the database only contains one form.
Listing 10: Load a form from a database using LoadComponentFromURL.
Function OpenFormInDB1(sDBURL$, sFormName$)
Dim oDBDoc 'The database document that contains the form.
Dim oFormDef 'com.sun.star.sdb.DocumentDefinition of the form.
Dim oFormDocs 'The form documents container. Dim oFormDoc 'The actual form document. Dim oCon 'Database connection.
Dim oParms() As New com.sun.star.beans.PropertyValue
Dim oBaseContext 'Global database context service.
Dim oDataBase 'Database obtained from the database context.
REM Find the database document and open it if required. oDBDoc = FindComponentWithURL(sDBURL$, True)
If IsNULL(oDBDoc) OR IsEmpty(oDBDoc) Then
Print "The document was not found"
Exit Function
End If
oFormDocs = oDBDoc.getFormDocuments()
If NOT oFormDocs.hasByName(sFormName) Then
Print "The database does not have a form named " & sFormName Exit Function
End If
oFormDef = oDBDoc.getFormDocuments().getByName(sFormName)
REM Without this, the form opens and then disappears!
REM This is a bug that will hopefully be fixed in OOo version 2.0.1. REM oDummyFormDef is defined in the main module.
oDummyFormDef = oFormDef
oBaseContext = CreateUnoService("com.sun.star.sdb.DatabaseContext")
oDataBase = oBaseContext.getByName(sDBURL)
oCon = oDataBase.getConnection("", "")
REM OpenMode is rumored to support "open", "openDesign", REM and "openForMail"
AppendProperty(oParms(), "OpenMode", "open")
AppendProperty(oParms(), "ActiveConnection", oCon)
oFormDoc = oFormDocs.loadComponentFromURL(sFormName, "", 0, oParms())
OpenFormInDB1() = oFormDoc
REM If you close the connection, then the form loses its connection. REM The requirement of an Active connection should be removed, REM hopefully in version 2.0.1.
REM This really looks like a resource leak, but I have not checked. REM oCon.close()
End Function
TIP The macro in Listing 10 obtains a reference to the database document using the method FindComponentWithURL(). The database document is available from the database context using the DatabaseDocument property.
oDataBase = oBaseContext.getByName(sDBURL)
oFormDoc = oDataBase.DatabaseDocument
In OOo version 2.0.1, you should be able to load a form without loading the document. In OOo version 2.0, this causes a crash.
Internally, loadComponentFromURL() performs an execute on the form definition object. The macro in Listing 11, demonstrates how to use the execute method. A connection is not required to open the form in design mode, but it is for all other modes (see Listing 12).
Listing 11: Load a form by executing the form definition.
Function OpenFormInDB2(sDBURL$, sFormName$)
Dim oDBDoc 'The database document that contains the form.
Dim oFormDef 'com.sun.star.sdb.DocumentDefinition of the form.
Dim oFormDocs 'The form documents container.
Dim oFormDoc 'The actual form document.
Dim oBaseContext 'Global database context service.
Dim oDataBase 'Database obtained from the database context.
Dim oCon 'Database connection.
Dim oParms() As New com.sun.star.beans.PropertyValue
REM Find the database document and open it if required.
oDBDoc = FindComponentWithURL(sDBURL$, True)
If IsNULL(oDBDoc) OR IsEmpty(oDBDoc) Then
Print "The document was not found" Exit Function
End If
oFormDocs = oDBDoc.getFormDocuments()
If NOT oFormDocs.hasByName(sFormName) Then
Print "The database does not have a form named " & sFormName
Exit Function
End If
oFormDef = oDBDoc.getFormDocuments().getByName(sFormName)
oBaseContext = CreateUnoService("com.sun.star.sdb.DatabaseContext")
oDataBase = oBaseContext.getByName(sDBURL)
'oCon = oDataBase.getConnection("", "")
AppendProperty(oParms(), "ActiveConnection", oCon)
Dim identifier as Long
identifier = oFormDef.createCommandIdentifier()
Dim UcbCommand as new com.sun.star.ucb.Command
UcbCommand.Name = "openDesign" 'Or "open" or "openForMail"
Dim Arguments as new com.sun.star.ucb.OpenCommandArgument2
Arguments.Mode = com.sun.star.ucb.OpenMode.DOCUMENT
UcbCommand.Argument = Arguments
Dim environment as Object
OpenFormInDB2() = oFormDoc
End Function
The macro in Listing 12 demonstrates how to open a form with the current connection. The onClickOpenForm method would be called from a form in the same Base document.
Listing 12: Load a form by executing the form definition.
Sub onClickOpenForm ( oEvent as variant )
OpenForm(oEvent, "Form Name") End sub
Sub OpenForm( oEvent as variant, aFormName as string) as variant
Dim args(1) As New com.sun.star.beans.PropertyValue
Dim container as variant
Dim oCon
oCon = oEvent.Source.Model.Parent.ActiveConnection
container = oCon.Parent.DatabaseDocument.FormDocuments
args(0).Name = "ActiveConnection" args(0).Value = oCon
args(1).Name = "OpenMode" args(1).Value = "open"
container.loadComponentFromURL(aFormName,"_blank",0,args()) End Sub
2.5. Accessing the binary data
2.5.1. Adding binary data
Adding binary data using a macro is pretty easy. Unfortunately, it is not possible with Ooo version 2.0 to use an output stream directly, you must first read the data into an array of bytes. ?? check this in version 2.04.
Listing 13: Add binary data to a table.
Sub InsertImage(sDBURL$, sFileURL$)
Dim sFileName$ 'File to save in the database.
Dim oData() 'Array of bytes.
Dim lLen As Long 'Number of bytes in the file.
Dim oDB 'Database object.
Dim oStream
Dim oSimpleFileAccess
Dim oBaseContext
Dim oStatement
Dim sSQL$
Dim oCon
Dim s$
If NOT FileExists(sFileURL) Then
Print "Sorry, " & sFileURL & " does not exist" Exit Sub
If NOT FileExists(sDBURL) Then
CreateBinaryDB(sDBURL, True)
End If
CreateBinaryTables(sDBURL, False, False)
REM Load the Tools library
If NOT GlobalScope.BasicLibraries.isLibraryLoaded("Tools") Then
GlobalScope.BasicLibraries.LoadLibrary("Tools")
End If
REM Call methods in the Tools library to parse the path.
sFileName = FileNameOutOfPath(sFileURL, "/")
oBaseContext = CreateUnoService("com.sun.star.sdb.DatabaseContext")
oDB = oBaseContext.getByName(sDBURL)
oCon = oDB.getConnection("", "")
s$ = "com.sun.star.ucb.SimpleFileAccess" oSimpleFileAccess = createUnoService(s$)
oStream = oSimpleFileAccess.openFileRead(sFileURL)
REM Get the total length and then dimension the array.
lLen = oStream.getLength()
ReDim oData(0 To lLen-1)
oStream.readBytes(oData(), lLen)
REM Use a prepared statement to insert the data.
REM Notice that I do not set the ID because it is
REM an auto-value field.
sSQL = "insert into BINDATA (NAME, DATA) values (?, ?)" oStatement = oCon.PrepareStatement(sSQL)
oStatement.SetString( 1, sFileName)
REM I should be able to simply use the stream
REM but there is a bug that prevents this. Too bad!
'oStatement.setBinaryStream(2, oStream, oStream.getLength())
oStatement.setBytes(2, oData(), lLen)
oStatement.ExecuteUpdate()
oStream.closeInput()
Print "Inserted " & sFileName
oCon.close()
Exit Sub End Sub
The following example, selects a specific file and inserts the file into a database. Although the macro name implies that an image is inserted, any file can be inserted. You can add the same file many times, the macro neither knows, nor cares. It is likely to be a problem when you try to extract data, however.
Listing 14: Select a file and add it to the database.
Sub CallInsertImage()
Dim sFileURL$
Dim sDBURL$
LoadDBLibs()
sFileURL = ChooseAFile(GraphicFilters(), True)
If sFileURL = "" Then
Exit Sub
End If
sDBURL = GetSourceCodeDir() & sDBBaseName
InsertImage(sDBURL$, sFileURL$) End Sub
2.5.2. Extracting binary data
Extracting a binary file is easier than adding a binary file. The difficult part is determining which file to extract. The following steps are performed in this example:
1) Connect to the database.
2) The database has a field/column, which contains a list of file names. When a graphic is added to the database, the name field is set to contain the file name of the graphic. A result set is generated, which contains a sorted list of graphic file names from the database. 3) Use the macro in Listing 83 to select a file name from the result set.
4) If the file exists, the chooseAFile() macro from Listing 58 allows the user to select a
different file.
5) If the file does not exist, then it is written into the same directory containing this document. For obvious reasons, you should add data to the database before you try to extract it.
Listing 15: Extract a binary file from the database.
Sub ExtractBinaryFile(sPathURL$, sDBURL$)
Dim sFileName$ 'File to save from the database.
Dim oDB 'Database object.
Dim oStream
Dim oSimpleFileAccess
Dim oBaseContext
Dim oStatement
Dim oResult
Dim sSQL$
Dim oCon
Dim sURL$
Dim s$
If NOT FileExists(sDBURL) Then
Print "The DB does not exist, sorry" Exit Sub
End If
oBaseContext = CreateUnoService("com.sun.star.sdb.DatabaseContext")
oDB = oBaseContext.getByName(sDBURL)
oCon = oDB.getConnection("", "")
oStatement = oCon.createStatement()
oResult = oStatement.executeQuery(sSQL)
sFileName = SelItemFromResult(oResult, 1, 100)
If sFileName = "" Then
oCon.close()
Exit Sub
End If
sSQL = "SELECT DATA FROM BINDATA WHERE NAME='" & sFileName & "'" oResult = oStatement.executeQuery(sSQL)
If Not IsNull(oResult) Then
oResult.next()
REM I could get a byte array, but this is easier.
oStream = oResult.getBinaryStream(1)
If oResult.wasNull() Then
Print "The image was NULL" Else
s = "com.sun.star.ucb.SimpleFileAccess" oSimpleFileAccess = createUnoService(s)
sURL = sPathURL & sFileName
If FileExists(sURL) Then
sURL = ChooseAFile$(GraphicFilters(), False, sURL)
End If
If sURL <> "" Then
oSimpleFileAccess.writeFile(sURL, oStream)
Print "Wrote " & sURL
End If
End If
End If
oCon.close() End Sub
?? Open a document directly into OOo!
I decided to write this chapter because I have difficulties figuring out the best way to represent associated data in forms. By associated data, I mean a one to many, or many to many relationship. Every attempt is made to spell things out in detail, so that even a first timer can at least follow along. Things may become a bit more difficult when macros are introduced.
For the one-to-many relationship, consider a simplified inventory that associates items to a dealer. The assumption is that each item comes from one, and only one dealer.
You need a base document that will contain the data. Use the following step by step instructions to create a sample database for use.
1) Use File > New Database to open the new database wizard. 2) Select the Create a new database radio button and click Next.
3) Select the No, do not register the database radio button, the Open the database for editing
checkbox, and click Finish.
4) Name the database OooBaseAssociateData.odb and click Save.
3.1. Create the tables
The first table contains the dealer information (see Table 3). The database is intentionally very simple. A “useful” table is likely to contain more information. The field names use uppercase characters and contain no spaces.
Table 3. Fields in the DEALER table.
Field Field Type Comment
ID Integer [INTEGER] Table's primary key
NAME Text [VARCHAR] Dealer name.
Maintaining “simple” theme, the item table is also very simple (see Table 4). The DEALER field links back to the ID field in the DEALER table.
Table 4. Fields in the ITEM table.
Field Field Type Comment
ID Integer [INTEGER] Table's primary key
ITEM Text [VARCHAR] Item name.
3.1.1. Create the DEALER table
Select Tables from the left hand side and then choose the Create Table in Design View task. Enter the fields in the table design window.
1) Create the primary key. 1) Set the Field Name to ID. 2) Set the Field Type to Integer. 3) Set Auto Value to Yes.
4) Right click to the left of the field name and choose Primary Key. 2) Create the name field.
1) Set the Field Name to NAME.
2) Set the Field Type to Text [VARCHAR]. 3) Set Entry required to Yes.
4) Keep the default length of 50.
Use File > Save to save the table. Name the table DEALER, and then use File > Close to close the table design window.
3.1.2. Create the ITEM table
Although the ITEM table is easily created using the same method used to create the DEALER table, it is always instructive to learn a new method; creating the ITEM table from the DEALER table. Select Tables from the left hand side to view the existing tables.
1) Right click on the DEALER table and choose copy.
2) Right click near the DEALER table, but not on the table and choose paste. 1) Change the Table name from DEALER to ITEM
2) There is no data in the DEALER table yet, but we only need to copy the Definition. 3) Do not check Create primary key, this will create a new primary key that we do not
want.
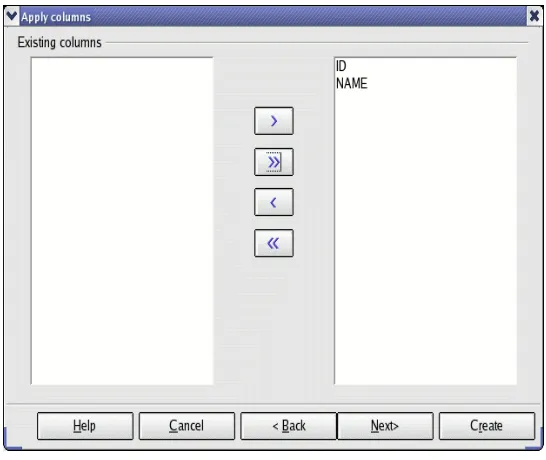
4) Click Next to open the Apply columns dialog.
Figure 1: Use the arrows to copy the fields.
[image:34.612.169.442.62.292.2]4) Use the Type formatting dialog to set the field types. The existing field types are fine as is, including using ID as the primary key. Click Create to create the ITEM table.
Figure 2: Set the field types.
5) Add the DEALER field to the ITEM table.
1) Right click on the ITEM table and choose Edit. 2) Set the Field Name to DEALER.
3) Set the Field Type to Integer. 4) Set Entry required to Yes. 5) Leave Auto value as No.
6) Set the Default value to 0 (zero, not a letter). ?? In OOo version 2.0, this seems to corrupt the database after it has been saved and reloaded.
7) Use File > Save to save the table modifications to the Base document. 8) Use File > Close to close the table design window.
3.2. Define the data relationships
As already stated, it is assumed that each item comes from one, and only one dealer. Use Tools >
Relationships to open the Relationship window. When the relationship design window opens, the
Add Tables dialog also opens (see Figure 3). Add both the DEALER and the ITEM table to the Relationship design window by selecting each table and clicking the Add button. When you are finished adding tables, click the Close button to close the Add tables dialog.
Figure 3: Add tables to the relationship design window.
To create a one-to-many relationship from, click on the ID field in the DEALER table and drag it to the DEALER field in the ITEM table. A line is drawn between the tables that illustrates the connection (see Figure 4).
Figure 4: Create a one-to-many relationship.
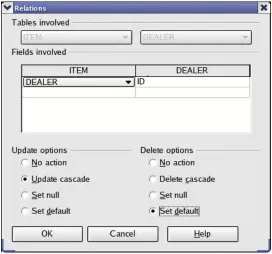
The established relationship indicates that each record in the ITEM table corresponds to a single record in the dealer table. On the other hand, each record in the DEALER table corresponds to zero or more records in the ITEM table. Assume that item 7 refers to dealer 3, and you try to delete dealer 3; what happens? Double click on the relationship line to open the Relationship dialog.
The Relationship dialog allows you to specify what to do if the dealer ID is updated (changed) or deleted. The default behavior is to do nothing. If I choose to use an Update cascade, then if I change dealer 3 to have a new identifier, then all records in the Item table are updated to use the new value. If Delete cascade is set, then deleting dealer 3 causes every item that refers to dealer 3 to be deleted. Set the update action to Update cascade and the delete action to Set default (see
Figure 5)—remember that the default value for the DEALER field in the ITEM table is 0. Use
Figure 5: Set the update and delete actions.
3.3. Add data to the DEALER and ITEM tables
[image:36.612.170.442.63.317.2]To provide examples, it is important that the tables contain data. Enter the sample data from Table 5 into the DEALER table.
Table 5: Sample data in the DEALER table.
ID NAME
0 Unknown
1 Dealer 1
2 Dealer 2
3 Dealer 3
4 Dealer 4
5 Dealer 5
Figure 6: Open the DEALER table for editing.
The ID field is an AutoValue field, and it is shown as such in the table (see Figure 7). The table is currently empty, and a new empty record is ready to be added. You can not place the cursor in the ID field and enter a value because this is an AutoValue field. Place the cursor in the NAME field and enter the value “Unknown” and press the Enter key. The ID field is automatically given the value of zero. As you enter new values, the ID field will increment by one each time. While entering data using the table view, can not enter a value for the ID field. You can, however, change an ID after entering the record.
Figure 7: Empty DEALER table, waiting for data.
The internal database remembers the value used in the ID field, which is then used to provide the next automatic ID value. The important thing to remember, is that the next value is one larger than the largest value used so far, not one greater than the largest value that is currently in the database. So, if you change an entry from 4 to 100 and then back to 4, the next automatic value will be 101. With SQL, you can set the value to any value that you desire.
TIP The described behavior assumes that the Base document references an internal HSQLDB database—this is the default.
Table 6: Sample data in the ITEM table.
ID NAME Dealer
0 Unknown 0
1 Item 1 3
2 Item 2 1
3 Item 3 1
4 Item 4 3
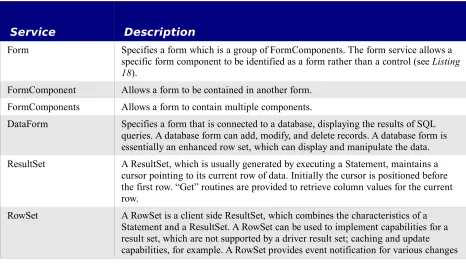
At a high level, a form is a Writer document containing controls attached to a database. A control can be a button, a list box, a text input box, or one of many other control types. When I speak of a form at a high level, I refer to the entire Writer document. This is what you load when you open a form.
To a form designer, the high level “form”, which is a Writer document, contains things called forms. Each form is associated with a specific table in a database. Each form can contain controls and other forms. When a form is contained in another form, it is called a sub-form.
4.1. The internal object model
Macro programmers need to understand the internal object model, which can be rather confusing —which is a shame because it is not as confusing as many people seem to think. If you are not a macro programmer, you might want to skip this section. Unfortunately, much of the interesting stuff requires the use of macros.
4.1.1. A control's shape is in the draw page
A Writer document contains a draw page. All shapes are contained in the draw page. There is a special type of shape called a control shape, which corresponds to a single control. To change the size or location of a control, find the corresponding control shape and modify it. The Form wizard groups each control with its corresponding label in a group shape object. It is, therefore,
important that any code that searches for control shapes looks inside group shapes.
Listing 16: Finding control shapes in a Writer document. Dim oDrawPage
Dim oShape
Dim i%
Dim sGroupShape
Dim sControlShape
sGroupShape = "com.sun.star.drawing.GroupShape" sControlShape = "com.sun.star.drawing.ControlShape"
oDrawPage = ThisComponent.getDrawPage()
For i = 0 To oDrawPage.getCount() - 1 oShape = oDrawpage.getByIndex(i)
If oShape.supportsService(sGroupShape) Then
REM The group shape supports the methods getCount()
REM and getByIndex() to obtain the contained shapes.
REM You should probably use a recursive routine to
REM extract the shapes, because the contained shape
REM may be another group shape. REM Dim o
REM For j = 0 To oShape.getCount() -1
REM Print o.control.name
REM Next
ElseIf oShape.supportsService(sControlShape) Then
REM Access the control model using oShape.Control REM Print oShape.control.name
End If
Next
4.1.2. A draw page contains forms
A draw page contains forms, and forms contain controls and other forms. It is easy, therefore, to find a named form or control.
Listing 17: Find a named form or control.
REM oObj can be a generic draw page, a form components object, a REM form, or a Writer document. This routine will find any REM form component, which means a form or a control.
Function findForm(oObj, sName$)
Dim sForm$ : sForm = "com.sun.star.form.component.Form" Dim sForms$ : sForms = "com.sun.star.form.FormComponents" Dim sComp$ : sComp = "com.sun.star.form.FormComponent" Dim oForm
Dim i%
Dim x
REM Extract the forms from a generic draw page.
If oObj.supportsService("com.sun.star.drawing.GenericDrawPage") Then
findForm() = findForm(oObj.getForms(), sName$)
Exit Function
End If
REM If the object is an office document, assume that it is a Writer
REM document. If this is a Calc document, then the object has more
REM than one draw page. I am too lazy to worry about this now.
If oObj.supportsService("com.sun.star.document.OfficeDocument") Then
findForm() = findForm(oObj.getDrawPage().getForms(), sName$)
Exit Function
End If
REM If this is a form component, then it has a name.
REM Check to see if the name is the search name.
If oObj.supportsService(sComp) Then
If oObj.getName() = sName Then
findForm() = oObj
Exit Function
End If
End If
REM If this object contains components, then search it.
If oObj.supportsService(sForms) Then
REM Enumerate forms and controls.
For i = 0 To oObj.getCount()-1 x = oObj.getByIndex(i)
If NOT IsNull(oForm) AND NOT IsEmpty(oForm) Then
findForm() = oForm
Exit For
End If
Next
Else
End If End Function
4.1.3. A control's data model is in a form
Every control contains data such as the text that is displayed. The object that encapsulates this information is called the model. The control's model is contained in a form. Use the control's model to enable or disable the control.
The complete form/control hierarchical structure is as follows: A Writer document contains a draw page. The draw page contains shapes and forms. Each form can contain control models and other forms. Rather than provide a lengthy explanation, I provide an example macro.
Listing 18: Inspect control models in a form.
REM oObj can be a generic draw page, a form components object, a REM form, or a Writer document. The lead name usually starts as "".
Function getControlNames(oObj, ByVal sLeadName$) As String
Dim sForm$ : sForm = "com.sun.star.form.component.Form"
Dim sForms$ : sForms = "com.sun.star.form.FormComponents"
Dim sControl$ : sControl = "com.sun.star.form.FormControlModel"
Dim s$ Dim i% Dim x
REM Extract the forms from a generic draw page.
If oObj.supportsService("com.sun.star.drawing.GenericDrawPage") Then
getControlNames() = getControlNames(oObj.getForms(), sLeadName)
Exit Function
End If
REM If the object is an office document, assume that it is a Writer REM document. If this is a Calc document, then the object has more REM than one draw page. I am too lazy to worry about this now. If oObj.supportsService("com.sun.star.document.OfficeDocument") Then
Dim oForms : oForms = oObj.getDrawPage().getForms()
s = getControlNames(oForms, sLeadName)
getControlNames() = s Exit Function
End If
REM Add the current form name to the lead name if, and only if, REM the argument is a form.
If oObj.supportsService(sForm) Then
sLeadName = sLeadName & oObj.getName()
ElseIf NOT oObj.supportsService(sForms) Then
getControlNames() = ""
End If
REM Enumerate forms and controls. For i = 0 To oObj.getCount()-1
x = oObj.getByIndex(i)
If x.supportsService(sControl) Then
s = s & sLeadName & " : " & x.getName() & CHR$(10)
ElseIf x.supportsService(sForms) Then
If sLeadName = "" Then
s = s & getControlNames(x, sLeadName)
Else
s = s & getControlNames(x, sLeadName & ".")
End If
End If
Next
getControlNames() = s
End Function
4.1.4. A control's view model is in the controller
Every visible document has a current controller. The controller handles user interaction. To cause a control to become visible, or invisible, use the control's view model returned from the controller. The controller has the method getControl(), which accepts a control model as an argument. In other words, you must get a control model before you can get the view model from the controller. When a control calls an event handler, it passes an event as an argument. The source property of the event contains the control's view model. The data model is obtained by using the getModel() method on the view model.
Listing 19: A very simple event handle; it does nothing.
Sub ButtonEventHandler(oEvent)
oEvent.Source 'Control's view model. oEvent.Source.getModel() 'Control's data model.
End Sub
The current controller is obtained from the Writer document. If you have a form, but not the parent Writer document, you can work your way back to the containing parent document as follows:
Listing 20: Get the containing parent document from a form.
Function getDocumentFromForm(oForm)
Dim x
Dim sForm$ : sForm = "com.sun.star.form.FormComponent" Dim sDoc$ : sDoc = "com.sun.star.document.OfficeDocument"
If NOT oForm.supportsService(sForm) Then
Exit Function
End If
x = oForm
Do While NOT x.supportsService(sDoc)
x = x.getParent()
Loop
End Function
4.1.5. Enabling and setting controls visible – an example
As a final example to illustrate how to access controls in a form, consider a macro that enables, or disables, all controls in a specific form (see Listing 21). First, the document is obtained from the form objects using the macro in Listing 20. Each control data model is obtained from the form. The data model is enabled, or disabled, depending on the bEnable argument. A disabled control is still visible in a form, but it is shown in a subdued color. The data model is used to obtain the view model from the document controller. The view model is then set visible, or invisible.
Listing 21: Toggle all controls in a form visible and enabled.
REM oForm - Form on which to work.
REM bEnable - Enable, or disable, every control in the form. REM bVisible - Set every control visible, or invisible. REM bRecurse - If true, recurse into subforms.
Sub EnableControls(oForm, bEnable As Boolean, _ bVisible As Boolean, _ bRecurse As Boolean)
Dim sForm$ : sForm = "com.sun.star.form.component.Form"
Dim sForms$ : sForms = "com.sun.star.form.FormComponents"
Dim sControl$ : sControl = "com.sun.star.form.FormControlModel"
Dim oController
Dim oDoc
Dim i%
Dim x
oDoc = getDocumentFromForm(oForm)
oController = oDoc.getCurrentController()
For i = 0 To oForm.getCount()-1
x = oForm.getByIndex(i)
If x.supportsService(sControl) Then x.Enabled = bEnable
oController.getControl(x).Visible = bVisible
ElseIf x.supportsService(sForms) Then
If bRecurse Then EnableControls(x, bEnable) End If
Next End Sub
4.1.6. Finding a control from an event – an example
Consider a text table with a button in the first column of every row. Each button in the table calls the same macro. The macro wants to know which cell contained the button. The solution to the problem is as follows:
1) Obtain the view model from the event using oEvent.Source.
3) Enumerate the shapes on the draw page. This code is not really safe because every shape is assumed to be a control shape.
4) Obtain the data model from the control shape using oShape.control. 5) Use EqualUNOObjects to compa