University of New Orleans University of New Orleans
ScholarWorks@UNO
ScholarWorks@UNO
University of New Orleans Theses and
Dissertations Dissertations and Theses
12-17-2004
Wearable Personal Data Information Capture System
Wearable Personal Data Information Capture System
Jiangpeng Shi
University of New Orleans
Follow this and additional works at: https://scholarworks.uno.edu/td
Recommended Citation Recommended Citation
Shi, Jiangpeng, "Wearable Personal Data Information Capture System" (2004). University of New Orleans Theses and Dissertations. 197.
https://scholarworks.uno.edu/td/197
This Thesis is protected by copyright and/or related rights. It has been brought to you by ScholarWorks@UNO with permission from the rights-holder(s). You are free to use this Thesis in any way that is permitted by the copyright and related rights legislation that applies to your use. For other uses you need to obtain permission from the rights-holder(s) directly, unless additional rights are indicated by a Creative Commons license in the record and/or on the work itself.
WEARABLE PERSONAL DATA INFORMATION CAPTURE SYSTEM
A Thesis
Submitted to the Graduate Faculty of the University of New Orleans in partial fulfillment of the requirements for the degree of
Master of Science in
Department of Computer Science
by Jiangpeng Shi
B.S., University of International Business and Economy, 2000
Table of Contents
Chapter
1 Introduction... 1
1.1 Wearable Personal Data Information Capture System ... 3
1.2 The Motivation of the Project ... 5
1.3 What we do in this project ... 5
1.4 About Sharp Zaurus SL5600 ... 5
2 Audio Capture ... 8
2.1 Capture Audio Data ... 8
2.1.1 About Digit Audio ... 8
2.1.2 Digit Audio Under Linux... 9
2.2 Pause and Resume Audio Capture Automatically ... 13
2.3 Save raw data as .wav ... 16
2.4 Audio Compression ... 19
2.4.1 Audio Compression for WPDICS... 19
2.4.2 MP3 and LAME... 19
2.4.3 MP3 Encoder Programming ... 21
2.4.3.1 Initialize the encoder...21
2.4.3.2 Set internal configurations...22
2.4.3.3 Encode some data ...23
2.4.3.4 Flush the buffers and free the internal data structures ...24
2.5 Conclusion ... 26
3 Visual Capture ... 27
3.1 Visual Data Capture ... 27
3.1.1 About Visual Data Capture ... 27
3.1.2 Image Capture under Linux ... 30
3.2 Image File Format... 37
3.2.1 PPM File Format... 38
3.2.2 JPEG File Format... 40
3.3 Conclusion ... 45
4 System Integrity ... 47
4.1 Cross Compiler ... 47
4.2 Compile Our Program with Cross Compiler ... 48
5 Conclusion ... 51
5.1 Experience with the Prototype ... 51
5.2 Conclusion and Future Work ... 52
Reference ... 55
List of Figures
Figure
1.1 The imagination scheme of a WPDICS ... 2
1.2 Head-wearing WPDICS... 2
1.3 Sharp Zaurus SL5600 ... 6
1.4 Terminal of Zaurus SL 5600... 7
2.1 Open and read sound device ... 10
2.2 Audio waveform under 8 bit, 8KH and mono ... 11
2.3 Audio waveform under 32bit, 44KH and stereo ... 11
2.4 Sample code for setting sample ... 12
2.5 binary data of a piece of silent audio ... 14
2.6 binary data of a piece of “un-silent” audio ... 15
2.7 sample code for implementation of auto-pause ... 16
2.8 Sample code for writing a wave file header... 18
2.9 Sample of modifying file header... 18
2.10 Audio File Size in Megabytes... 20
2.11 Initialize the encoder... 22
2.12 Set encoder’s parameters ... 22
2.13 Set internal configurations ... 23
2.14 Sample code of function lame_encoder() ... 24
2.15 Sample code for encoding... 25
3.1 Scheme of image capture ... 28
3.2 Image sensor chip ... 29
3.3 Scheme of CCD with value of each photosite ... 29
3.4 Sample code of fixed device driver ... 31
3.5 Sample code of opening video device ... 31
3.6 Getting information from device ... 32
3.7 160x120 dpi ... 33
3.8 640x480 dpi ... 33
3.9 Sample code of setting image capture window... 34
3.10 Test the capability of scaling ... 34
3.11 Set the image’s properties... 35
3.12 Replacement value of depth and palette ... 35
3.13 Definition of palette ... 36
3.14 Capture image by calling “read”... 37
3.15 PPM files in hex... 38
3.16 Save image as PPM file ... 39
3.17 320x240, JPG format ... 40
3.18 320x240, PPM format ... 41
3.20 Step 1 of Jpeg compression... 44
3.21 Step2 to Step4 of Jpeg compression ... 45
3.22 Step5 to Step7 of Jpeg compression ... 46
4.1 type of output produced by gcc... 50
Abstract
This thesis is motivated by development of The Wearable Personal Data Information Capture System (WPDICS), which is used to support the "physical" data stream requirement on a person as they experience daily life, including visual and audio information. To fit the acquirement of “wearable”, the system should be very tiny in size and very low cost.
Chapter 1
Introduction
1.1 Wearable Personal Data Information Capture System (WPDICS):
WPDICS is a system that can preserve our memories as we experience them and in the way we experience them.
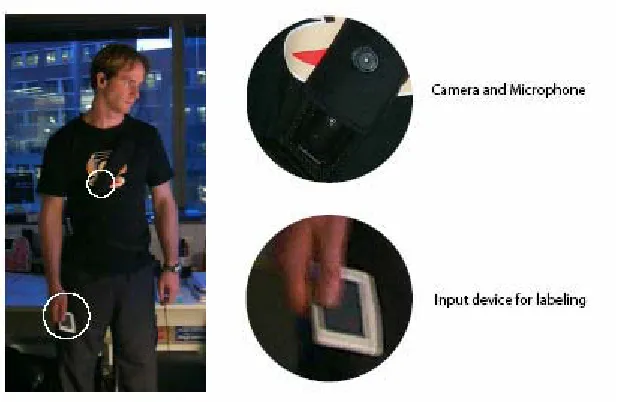
Figure 1-1: the imagination scheme of a WPDICS
Figure 1-2 shows another possible implementation of WPDICS. The pin-hole camera and microphone can be head-mounted unit, and connected to the power and storage device via a power and data cable. The user can wear the camera and microphone around head, and power and storage box around the waist. [1]
The WPDICS is not a "wearable computer" in the sense of providing computing resources to the user. It is a data acquisition system, which is only used for grabbing “physical” data, including audio and video data, and storing them to memory media.
1.2 The motivation of the project
In our life, a lot of things deserve to remember. For example, we may want to remember entire talk and every audience’s face when we present in an important conference. Or, a person on a wonderful trip doesn’t want to lose any images on his trip. But nobody can hold a camera and recorder all the way. When a man gets 100 years old, he has nothing but his memory to prove to himself that he has a lot of bright spot in his life. A businessman may hope to remember every word from opponent in a fierce negotiation. There are too many things we should remember when we experience our daily life. But there is no way that we can hold a digital camera or recorder with us anytime and anywhere. What we can do now is only remember it by our own brain. [2]
Unfortunately, our memories are not that reliable in our brains. First, when we get older, we have less and less memory capability. Some our memory is inevitably lost. Second, our real life is getting more complex. So it is even harder to remember things clearly. Missing and confusion are quite common. Last, even we can remember something, and we don’t lose this part of memory forever, but we can’t really “see” or “hear” what we remember in our memory. We can only think them in our brain. This is not going to be a clear replay, and not shareable.
our life. Now a camera and recorder and do this job. But there is no way that we can carry a camera and recorder everyday. Even we can, we will have tones of video tape and cassettes in our home after couple of years.
This is the motivation of this thesis. All problems can be solved if we have a portable personal data information capture system. The operational concept for WPDICS is as follows. The user puts WPDICS on and starts recording data. At anytime, the user can stop the device and upload the data to a PC and recharge or replace the battery. The device listens for voice, especially the user's voice, and tries to capture complete conversations within privacy considerations. Data can be recorded in different quality rate depending on user’s choice. The higher record rate gets the better quality but consumes more storage space. Data can also be recorded in different priority level. When the storage is short, the lower priority level data will be replaced by higher rate data. The data is stored in a very efficient file format which can save storage space. The software uses a record algorithm to pause and resume the recording automatically, which can save power and storage space. The software also has a user interface which should provide inputs to enter personal preference concerning "level of priority", "quality rate", or “reset”, etc.
1.3 What we do in this project:
In this project, we conduct a basic feasibility analysis for the WPDICS system using commercially available components. The components can be configured using a modular architecture and not constrained by size, weight, and power limitations. The component we used in this project is Sharp Zaurus SL 5600 PDA. Based on this component, we will focus on the efficient data capture and storage, and application integrity.
Since Sharp Zaurus uses Linux 2.4.18 as its operation system kernel, our first step is to simulate data capture under Linux OS. We choose Redhat 9.0 Linux as our development platform.
First, we conducted research of how to capture audio data. The basic of audio capture is the study of programming /dev/dsp. Under linux, the audio data captured by dsp is “raw’ data, which is binary data and the most common audio file is a .wav file, which contains raw audio data. It has good quality but very huge storage size. To save storage space, we should find a more space-save audio file format. So, after we can capture audio data, we also need to convert the data file into a specific storage format. After this part, then we do similar research of how to capture and store visual data.
The second step is an integrated design, where we will try to transplant the application to the PDA. In these step, the program running under PC must be re-compiled using cross-compiler for the PDA, with good compatibility.
1.4 About Sharp Zaurus SL 5600:
even though at the top level it looks like any PDA OS. Figure 1-3 shows the overview picture of this PDA and Figure 1-4 shows the picture of its terminal.
The reason we choose Sharp Zaurus is because of flexibility and the versatility of its Linux OS. The Zaurus SL-5600 runs Linux embedded OS Qtopia Linux, providing a powerful and open operating environment--allowing many Linux developers to write applications for the SL-5600. It makes programming easier than any other PDA. With a few simple changes, you can have your Zaurus SL-5600 and desktop Linux looking exactly alike. This profits us to transplant application developed under desktop into PDA and makes the application integration easier.
Figure 1-4: Terminal of Zaurus SL 5600 1.4 outline of this thesis:
This thesis falls into 5 chapters. This is the first chapter and in this chapter we just give a brief introduction of the thesis.
In chapter 2, we implement an audio data capture and MP3 encoding algorithm under Linux.
In chapter 3, we solved the problems of image data capture. We will write program for image capture using webcam, and save the image data with the format which has best trade-off between quality and file size.
Chapter 4 is system integration. In this chapter, we tested audio and image capture program on PDA.
Chapter 2
Audio Capture
2.1 Capture Audio data:
2.1.1 About Digital Audio:
First, let’s see the principle of audio capture. In a general way, to capture a piece of audio data by computer, we just need to convert analog sound signal to digital sound signal. We can call this process as Analog to Digital Conversion, and this is the most commonly used method to represent real voice via computer. DSP (digital signal processor), which is a codec device in sound card, is the kernel device used in audio digitalization. In sound card, DSP is a specialized processor chip optimized for digital signal analysis. It can be a dedicated DSP chip, or may implement the functions with a number of discrete devices. It always contains two devices: A/D (Analog to Digital Converter) and D/A (Digital to Analog Converter). Opening for read-only access allows you to use the A/D converter for sound input. Opening for write only will access the D/A converter for sound output. So, we can capture audio data by reading from DSP. [3]
number of channels and sample size. Another important parameter is sample rate, which means the number of samples the DSP can capture in a constant time intervals.
2.1.2 Audio Programming Under Linux
Under Linux, the capture of audio data is enabled by of reading /dev/dsp. DSP is the digital sampling and digital recording device, and probably the most important for multimedia applications. It can produce sound by writing to the device accesses the D/A converter; and can also record sound by reading the device activates the A/D converter. Reading from DSP is the technique we use in this project to capture audio data.
After opening a DSP device, reading from the DSP device returns digital sound samples obtained from the A/D converter. Analog data is converted to digital samples by the A/D converter under control of the kernel sound driver and stored in a buffer internal to the kernel. When an application program invokes the read system call, the data is transferred to the calling program's data buffer. It is important to understand that the sampling rate is dependent on the kernel driver, and not the speed at which the application program reads audio data. [4]
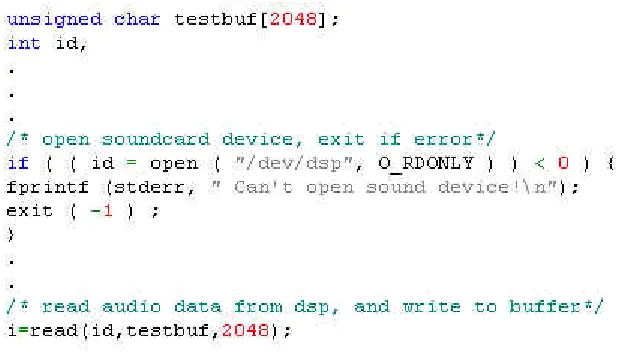
The implementation of the open and read operation on DSP device is very simple. Figure 2-1 shows the sample C code of open and read operation of /dev/dsp.
Figure 2-1 Open and read sound device
There are three parameters associated with each sample which can affect the size and quality of audio data: sample size,sample rate, and the number of channels (mono or stereo). These parameters are set to default values each time the device is opened. The default sample size is 8-bit, using one channel, and sample rate is 8 kHz. If you don't like the defaults, you can change them through ioctl calls. These parameters can be modified after opening the sound device before any calls to read or write. This modification affects the size and quality of each sample, and also affects the size and quality of audio files which contain a lot of samples. In fact, the “raw data” audio files, like .wav files, consist of two parts: data part and file header. Data part contains a lot of
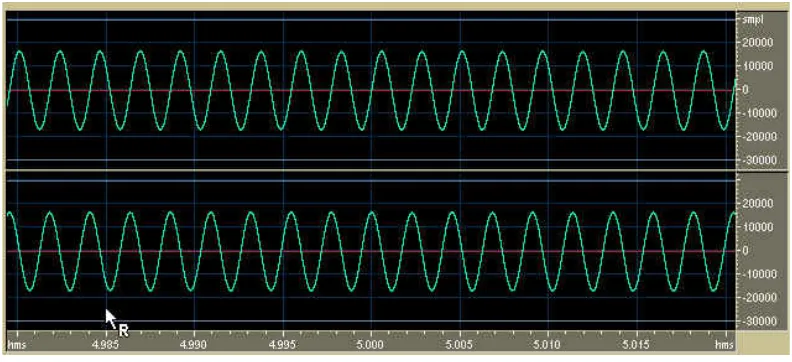
size is a very important aspect of it quality: the bigger size, the better quality. Sample rate is the number of samples DSP can get in a constant time intervals. A higher value ofsample rate can result better audio quality but a larger file. Figure 2 and Figure 2-3 show the waveform model of digital audio data under different sample size, sample rate and channels.
Figure 2-2: audio waveform under 8 bit, 8KH and mono
6L]HE\WHV VDPSOHVL]HVDPSOHUDWHFKDQQHOVWLPHSHULRG
It is possible for user of WPDICS to change the record rate and get different audio quality by modifying these parameters. The system call “ioctl” for the DSP device is used to change the value of sample size, sample rate and channels:
SNDCTL_DSP_SETFMT: Sets the sample size, in bits.
SNDCTL_DSP_CHANNELS: Sets the number of channels--1 for mono, 2 for stereo.
SNDCTL_DSP_SPEED: Sets the sampling rate in samples per second.
Figure 2-4 shows the code for setting sample size, number of channels and sample rate before read from /dev/dsp.
2.2 Pause and Resume Audio Capture Automatically
When users use WPDICS to capture audio data, they may face such a situation: there must be long silent periods. It is wasteful to capture the silent part and store them into an audio file because the power and storage capacity is limited. So it is necessary to design an audio algorithm which can stop the audio capture when the silence exceeds a time period and restart when the silence is broken. To solve this problem, let’s take a look how to generate an audio file.
As we talked before, reading from the DSP device returns digital sound samples obtained from the A/D converter, and those samples are written to a buffer. The programmer can decide the buffer’s size, like 1024 or 2048 Bytes. When the buffer is full, the data in this buffer will be written into an audio file, like, a .wav file, then the buffer fills with the next batch of sample data. This process is in a loop so the data in buffer which obtained from A/D are appended to the audio file one after the other, until user stops it. Then we can see that only the process “writing audio file from buffer” decides the size of file; and the DSP and A/D just hear from outside.
If we can stop writing when there is silence, and restart writing when the silence is broken (like putting the transmission in neutral gear), then the useless silence can be squeezed out from an audio data file. To do this, we should look at binary audio data file first.
Figure 2-5 binary data of a piece of silent audio
marked back to “un-silent”, and the status of writing process is set back to “writable” and writing is restarted.
Figure 2-6 binary data of a piece of “un-silent” audio
There is no standard critical point of silence and un-silence in this project. We analyzed a lot of binary data sample, and we found the sum of sample values difference in an un-silent buffer is much larger than that is a silent one. The gap is so huge that we can pick a value in a very easy way. By experience, we choose 400 as the critical point value: if the sum of value difference is less than 400 in a buffer, this buffer is a “silent” buffer; or else it would be an “un-silent” buffer.
Figure 2-7 sample code for implementation of auto-pause
2.3 Saving the raw data audio as a .wav
The audio data returned by reading audio device (DSP) is a group of raw data, which is not in any file format. Wave file is the simplest file format to save those data.
The Wave file format is Windows' native file format for storing digital audio data. It has become one of the most widely supported digital audio file formats on the PC due to the popularity of Windows and the file’s simple format.
minus the 8 bytes for the "RIFF" and length (4 bytes). The last 4 bytes in RIFF chunk is ASCII characters “WAVE”. The length of this chunk is 12 Bytes.
The next part is the format chunk, which contains file’s format information. This first 4 bytes in this chunk is ASCII characters “fmt ”. In the next 4 bytes we find the value 0x00000010 which is the length of the format chunk: it is always constant at 0x10. The next 2 bytes indicate the file is mono or stereo: 0x0001 is mono and 0x0002 is stereo. Next 2 bytes indicate the number of channels: 0x0001 for 1 channel and 0x0002 for 2 channels. Next 4 bytes indicate the sample rate and next 4 for number of bytes per second. Next 2 bytes indicate BPS (Bytes Per Sample): 1=8 bit Mono, 2=8 bit Stereo or 16 bit Mono, 4=16 bit Stereo. Last 2 bytes in this chunk indicate the number of bits per sample. The total length of this chunk is 24 bytes.
Figure 2- 8 Sample code for writing a wave file header
This function finished the part of header, because this function is called before writing sound data into file, so, at this time, we still don’t have the exact file length. We can only have the file length after writing data to the file. Next function is used to finish the file length part of header each time after we write to the file. Figure 2-9 shows this function.
After this step, raw data generated from DSP in written into a wave file.
2.4 Audio Compression
2.4.1 Audio Compression for WPDDCS
Normally, audio data captured by A/D and DSP are stored as raw data, and the simplest raw data file format is, as we use in this project, is .wav file. Raw data file is a high quality and large size file format. WPDICS is not a studio device, so high quality is not very important issue to us. To save more storage space, audio compression is necessary.
Audio compression is a form of data compression designed to reduce the size of audio data files. As with other specific forms of data compression algorithms, there exist two main categories: "lossless" and "lossy" to achieve the compression effect. Lossless audio compression is an audio compression algorithm in which no data is lost. By this algorithm, the audio quality is pretty high but the size is big too. The primary users of lossless compression are audio engineers and those consumers who have high-standard for audio quality. Lossy algorithm suffers audio quality when a file is compressed, but the ratio of compression is very high. This makes lossy-compressed files not welcome for audio engineering applications. But it is a right choice for WPDICS, as a less than a megabyte can store about a more than minute's worth of audio at very good quality.
2.4.2 MP3 and LAME
process is typically based on psycho-acoustic coding theory, which means human listener will not notice the data removal anyway.
In this project, we choose MP3 (actually only the encoding part), which is a popular open standard compression algorithm, as our compression codec. The reason to choose MP3 is that it has a high compression ratio, low quality loss, and it is supported by almost all the audio players. Figure 2-8 shows the comparison of audio file size of .wav file and MP3 file. [5]
Figure 2-10 Audio File Size in Megabytes
the middle of May 2000, the LAME project reimplemented the last of the ISO source code so compiling the recent versions of LAME no longer requires the ISO source code. In this project, we choose the LAME 3.93 as our reference. We will develop a simple MP3 encoding program which can convert a .wav file into MP3 file. The program should be tested on Linux desktop, and on the Zaurus PDA (we will talk about this part in chapter 4).
2.4.3 MP3 Encoder Programming:
The details of how to convert a .wav file to MP3 file is very complicated and in this project, we will not focus on the theory of MP3 encoding algorithm. Lame 3.93 provides a library, which contains routines of MP3 encoding. Our task is to write a frontend encoder program which can use this library to do compression.
For all MP3 encoding, each of following steps should be done: [7] 1. Initialize the encoder and set default encoder parameters 2. Set internal configuration
3. Encode some data.
4. Flush the buffers and return a final few MP3 frames. 5. Free the internal data structures.
We will introduce the outline of encoder programming along with our program code, following these steps.
2.4.3.1: Initialize the encoder:
initialize the input file and output file. The following figure is the code of encoder initialization.
Figure 2-11 Initialize the encoder
Although all the parameters are set to default, we still can reset them as necessary. The following is the code how to set encoder’s parameters.
Figure2-12 Set encoder’s parameters
2.4.3.2: Set internal configurations:
do this we only need to call routine lame_init_params(gf). The following is the sample code.
Figure 2- 13 Set internal configurations
It is very easy to finish this step just by one function call. But the actual procedure in this routine is very complicated. The following is the jobs done by this function: [7] 1. Set some CPU related flags
2. Check if we are mono->mono, stereo->mono or stereo->stereo 3. Compute bitrate and output samplerate:
4. Set some options which depend on output samplerate 5. Compute the actual compression ratio
6. Set mode based on compression ratio All these steps are the
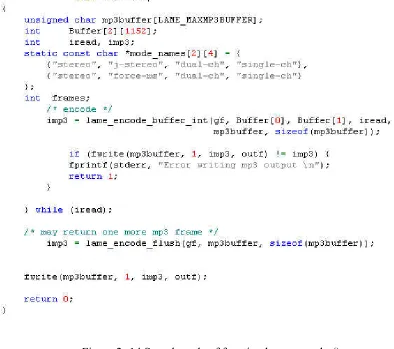
2.4.3.3: Encode some data:
this project, we just hack and simplify the source code. The main routine in this function is lame_encode_buffer_int(), which is defined in lame.c, part of library. The following figure is the code of this routine:
Figure 2- 14 Sample code of function lame_encoder()
2.4.3.4: Flush the buffers and free the internal data structures
The routine lame_encode_flush() will flush internal PCM sample buffers, then MP3 buffers. The calling of this function may return a final few MP3 frames.
internal data structure, and then free the internal data structure. The all encoding process end.
Now, we have successfully finished the whole MP3 encoding process. In fact, the actual encoding computation in these steps is very complicated, but it is not necessary in this project to show the details of that. Our goal is simply to implement the MP3 encoder. The following figure shows the sample code of frontend encoder.
2.5 Conclusion
Now, we can capture audio data by a microphone, and convert the data into MP3. As a conclusion, we can outline the work in this chapter as following:
1. Capture audio data by reading /dev/dsp
2. Write grabbed audio into a file from internal buffer 3. Add automatically pause and restart recording algorithm 4. Add file header to the file to generate a wave file
5. Convert wave file to MP3 using Lame MP3 algorithm
Chapter 3
Visual Capture
3.1 Visual Data Capture
3.1.1 About Visual Data Capture
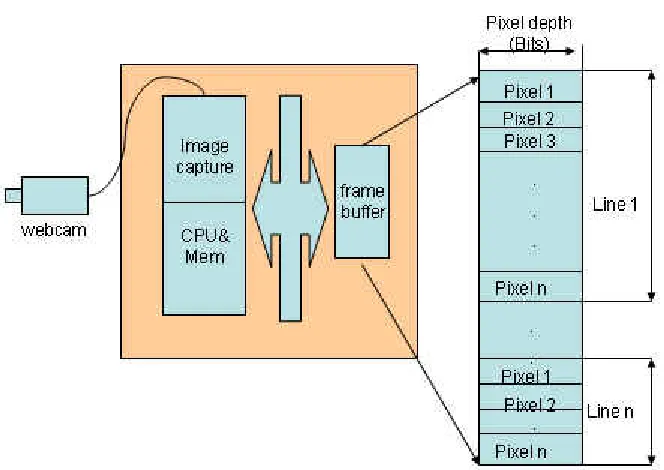
Visual information is even more important than audio data. More than 70% of the information people get is from their visual system. In our proposal, we try to implement a video capture application under Zaurus, which can simulate WPDICS’s video recording function. But, unfortunately, Sharp Zaurus SL 5600 doesn’t support video recording and playing. So in this project, we will try to develop an application which can grab images by periodically, which can simulate digital video. Further more, there are a number of file formats used to store a set of images, and we will find out the best one for WPDICS.
In this project, we are not going to learn how to digitize a picture in details. We just take an overview of how to grab and store a picture under Linux and implement a simple application of image capture.
Figure 3-1 scheme of image capture
Figure 3-2 Image sensor chip
Figure 3-3 Scheme of CCD with value of each photosite
3.1.2 Image Capture Under Linux
First, we test image capture under Linux desktop.
All the video programming under Linux is based on Video4Linux (V4L), which is the kernel driver for all video devices. Similar to audio devices under Linux, all the video device are in form of device files, which can be read and write directly. The capture of image is by means of reading device /dev/video, in the same way as opening and reading from a normal file. [8]
In this project, the webcam we are using is Intel CS330 USB Webcam. Unlike Windows, Linux doesn’t have built-in USB webcam driver program by itself; and manufacturer of webcam normally doesn’t provide driver for Linux OS either. So, to get thing started, we need to install device driver for webcam. We choose the SPCA50X USB Camera Linux Driver from www.sourceforge.net, which is a GNU/Linux kernel driver for USB cameras based on Sunplus spca50 and some spca5 chipsets. This is an open source package, which supports our Intel CS330 USB webcam. After compile and loading the driver, the USB camera is ready to use. [9] Note: We found a problem of the driver when we try to compile it: the source code provided from http://sourceforge.net/projects/spca50x/ doesn’t compile under Red Hat 9.0, because in Red Hat 9.0, the API of mmap() is changed. There are 4 argument in mmap() function in RH9, whereas there are 3 in others. The simplest way to fix this problem is add a new argument to the source code of driver: spca50x.c. Figure 3-4 shows the sample code: the argument struct vm_area_struct *vma in the function
Figure 3-4 sample code of fixed device driver
Now the driver is compiled and loaded, the webcam is ready to use. We will talk about how to capture image under Linux.
1. Open video device:
This step is relatively easy: use the open function to return a device descriptor. If the call to open was a success, then device descriptor will contain a valid handle to the device. If the call failed, then device descriptor will be set to -1. Device name will generally be /dev/video, but this may be different (e.g. /dev/video0) depending upon how VFL is configured on your system. In our project, the device name is /dev/video0. Figure 3-5 shows the sample code of open from video device file.
2. Get information of device:
This step is optional, but it is a good idea to check the capabilities of the device if your program may be running on different machines or with different devices. We can communicate to the VFL device via ioctl system calls. This step can provide us the capabilities of the device such things, for example, maximum and minimum capture dimensions, the actual capture size, the color depth, and so on. This information is very important to an image’s definition and storage size, and this will be discussed in a later section. The Figure 3-6 shows the sample code query the device for its capabilities:
Figure 3-6 Getting information from device
3. Set the width and height of the capture image:
Figure 3-7 160x120 dpi
Figure 3-8 640x480 dpi
On the other hand, the capture window size decides image’s storage size, in some degree. The size of raw data captured by a webcam (with 8bit color depth) can be calculated by the following formulation:
Size=width * height*3/ (byte)
configuration via system call ioctl too. The sample code in Figure 3-9 will show how to set the width and height of the capture image.
Figure 3-9 Sample code of setting image capture window
Not every device supports image scaling, therefore it is important to test for this capability. So, it would be necessary to test for this capability before we set the scale. The code in Figure 3-10 shows the test for scaling capabilities
Figure 3-10 test the capability of scaling
4. Set other properties of image:
the best capture effect. The sample code in Figure 3-11 will set the image properties, for example, brightness, depth and palette for capture. Because there are many other fields in the video_picture structure, we first read the default values into the structure and then set the fields whose values we want to change.
Figure 3-11 set the image’s properties
The value of depth should match the value of palette, or else the settings are not going to work. Figure 3-12 shows some common replacement values for depth and palette, and Figure 3-13 shows the definition of palette.
Figure 3-13 definition of palette
For the details of all the possible image property setting, see the VFL API documentation /usr/src/linux/Documention/vdieo4linux/API.html.
5. Capture image frames by using system call “read”:
So far, our capture device has been configured for the type of image it will capture and we have queried this information from the video device. Now we can talk about capturing images from the video device.
simplest way to do this is using function free(). The code in Figure 3-14 shows the how to capture an image via system call “read”.
Figure 3-14 capture image by calling “read”
6. Close the VFL device:
At this point, the process of image capture is finished. Actually, the job is still not done here. We have to save the captured buffer into an image file. The format of image file is very important to WPDICS, so we will talk about this in next section.
After capture the image, the last step is close the V4L device. This is very simple:
close (camera->dev);
3.2 Image file format
Now, an image is successfully captured. The next problem is how to save the image data.
There are too many different image file formats in use. Here we only talk about two of them: PPM and JPEG file. The reason of choosing these two types is:
In this section, we will learn their features and how to implement them.
3.2.1.
PPM file format:
PPM, which stands for portable pixel map, is a simple color graphics format. It is always used as an intermediate format for storing color bitmap information generated by video device. It uses 24 bit per pixel, 8 for red, 8 for blue, and 8 for green.
A PPM file consists of two parts: file header and raw image data. The header consists of at least three parts: The first part is a magic PPM identifier, which can be "P3" or "P6". The next part consists of the width and height of the image as ASCII numbers. The last part of the header gives the maximum value of the color components for the pixels, this allows the format to describe more than single byte (0..255) colour values. For example, a header of a PPM file can be:
P6 160 120 255
Another part of PPM file, is the image data, which generated by image sensor and A/D converter. Figure 3-15 shows a part of PPM file in its Hex. From this figure, we can see the first line is file header, and the rest is raw data.
Figure 3-15 PPM files in hex
programmer, it is very easy to save a captured image in PPM format. The code in Figure 3-16 will save image data from a buffer into a PPM file.
Figure 3-16 save image as PPM file
From code above, we can see the process of saving raw image data from buffer to a PPM file is pretty easy: just put the binary data from buffer to the file.
Although it is very easy to write and analyze programs to process PPM format, it has a huge shortcoming. It should be noted that this format is very inefficient. The reason is that this format is highly redundant, while containing a lot of information that the human eye can't even discern. This makes the size of PPM file very huge. It is apparent that PPM file format does not fit WPDICS’ limit storage space, even though it is easy to process.
3.2.2. JPEG file format:
JPEG is a standard method of lossy image compression based on the DCT transform. The file format which uses this compression algorithm is commonly also called JPEG or .JPG. The name stands for Joint photographic Experts Group. Actually, JPEG itself doesn’t specifies how to compress a graphic image, but how an image is transformed into a stream of bytes. A further standard, created by the Independent JPEG Group, called JFIF (JPEG File Interchange Format) specifies how to produce a file suitable for computer storage and transmission from a JPEG stream. So, in common usage, a "JPEG file" generally means a JFIF file. JFIF also provides program API to implement the JPEG, which is used in this project. This is the right format for those photo images which must be very small files, for example, for WPDICS.
Figure 3-17 320x240, JPG format
images, very good compression levels can be obtained with no visible change, and remarkably high compression levels are possible if the image quality is not very important. It often compressed by 90%, or to only 1/10 of the size of the original data. Figure 3-17 and Figure 3-18 shows two images captured under same window size, but respectively in PPM and JPG format.
Figure 3-18 320x240 PPM format
From above two pictures, we can find there are no major visible differences between them. But the size of this to picture is a big difference. The table in Figure 3-19 shows the different size of PPM and JPG file, which captured under same capture window size.
JPG compression has such a high efficiency because it is intentionally designed to be lossy, designed to give very small files without the requirement for full recoverability. JPG modifies the image pixel data (color values) to be more convenient for its compression method. The redundancy detail which doesn’t effect visual quality and compress well can be ignored, without visible quality change. This allows amazing size reductions, but when we open the file and expand the data to access it again, it is no longer the same data as before. The lost of data breaks the integrity of original file, but, in out project, this is not a big problem.
3. Implementation of JPEG compression:
The detail of JPEG compression algorithm is very complicated. We don’t focus on the theory of this algorithm in this project. What we want to do is how to implement JPEG compression under Linux.
It is not too hard to implement JPEG compression under Linux. Red Hat 9 has a set of library routines for reading and writing JPEG image files and Independent JPEG Group provides a software package contains open source C program to implement JPEG image compression and decompression. The program for JPEG compression in this project is written under reference of those open source program.
The following are the rough outlines of a JPEG compression operation. [10]
1. Specify the destination file (eg, .jpg)
2. Compression object allocation and initialization
3. Set parameters for compression
5. Compressing….
while (scan lines remain to be written) jpeg_write_scanlines(...);
6. Finish compress:
7. Release the JPEG compression object
We will show how to achieve these steps along with our program code. The following is the code and description to implement the jpeg compression.
Figure 3-22 Step5 to step7 of Jpeg compression
3.3 Conclusion:
Now we can capture images under Linux with a webcam. As a conclusion, we can roughly outline the image capture operation under Linux into three steps:
1. Select appropriate video device, and device driver for Linux. 2. Implement image capture operation under Linux
3. Choose appropriate image file format, and implement image compression.
real live “image recorder”. We also can add a time stamp to the file name of each captured image, which can record the “environment” more clearly.
Chapter 4
System Integration
Now we can record audio data and compress them into MP3 files; and we also can capture image and save them as .jpeg file. To simulate WPDICS performance, we need to integrity those applications to our test component: Zaurus SL5600 Linux PDA.
4.1 Cross Compiler:
Normally, programs are developed and compiled on one computer, then distributed to other computers to be used. When the host system (the one the compiler is running on, a IBM laptop in our project) and the target system (the one the resulting programs will run on, Zaurus SL5600 PDA) are not compatible systems, the process called cross compilation is necessary.
In our project, the target system Zaurus SL5600 uses Intel Xscale 400MHz as its processor, which is a low power-consumption ARM embedded processor. This processor is not compatible with our host system, which using Intel Pentium processor. The executables compiled and produced on host system can’t run directly on the Zaurus. And Zaurus SL5600 doesn’t provide a native set of compilation tools. So, to integrate our application to Zaurus, we have to do cross compilation.
ARM-Linux cross compiler. To set up ARM-ARM-Linux cross compiler in host system, we need followed resource. These resources are available in Zaurus’s developer site.
1. gcc-cross-sa1100-2.95.2-0.i386.rpm (gcc compiler for ARM architecture)
2. binutils-cross-arm-2.11.2-0.i386.rpm (binary utilities for ARM architecture)
3. glibc-arm-2.2.2-0.i386.rpm (GNU C libraries for ARM architecture)
4. linux-headers-arm-sa1100-2.4.6-3.i386.rpm (Linux header files for ARM architecture)
Next, we'll install the RPMs. To do this, we only need to use installation method: rpm -Uvh filename.rpm
After the installation, we can use arm-linux-gcc compile and link our program instead of gcc. [11]
4.2 Compile Our Program With Cross Compiler
The programs in this project can be categorized into 4 parts: audio capture, MP3 encoding, and image capture, jpeg compression. All of them have to be compiled by cross compiler. The situation of their compilation are little different.
Compilation of audio capture and image capture parts are simple. The program of audio capture and image capture are written by very basic C language. To compile them, just use arm-linux-gcc instead of gcc. The program can be compiled and linked well by the cross compiler.
compile our encoder by cross compiler, we should compile this library using cross compiler. To compile library, we only need substitute gcc with arm-linux-gcc. We can do this by following command:
export CC= “/opt/Embedix/tools/bin/arm-linux-gcc”
After this, we can compiler the program by “make” command. Then we can compile the library by provided Makefile. After library is compiled, we can simply compile and link our encoder by using arm cross compiler directly.
Another part is jpeg compression program. The situation here is a little different to compilation of MP3 compiler. In Linux, there is a built-in jpeg library. So, when we use gcc to compile this program, we can call library directly in compile command and don’t need to compile library first:
Gcc –ljpec –o cam cam.c
But this built-in library is not compiled by cross compiler and ARM cross compiler can not identify it. We can’t call this library correctly when we using cross compiler. So to compile jpeg compression program, we need to re-compile the library by cross compiler first.
In this project, at first we find the source code for jpeg library, and compile them with cross compiler. Independent JPEG Group provides a software package which contains source code for the library. Then we just compile the library. This step is similar to what we did with MP3 encoder. After library is compiled, we can compile and link our program by using following command:
All the program in this project can be compiled and linked by using ARM cross compiler. After we have compiled the program, check the type of the output file with the file command. The followed two pictures show the result of checking. Figure 4-1 shows the result of executable produced by gcc and Figure 4-2 shows executable produced by ARM cross compiler.
Figure 4-1 type of output produced by gcc
Figure 4-2 type of output produced by arm-linux-gcc
Chapter 5
Conclusion
5.1 Experience with the prototype
All the data capture programs are tested under PC with Linux OS and Sharp Zaurus SL5600.
In audio part, the data capture program and MP3 encoding program successfully run under Linux PC. The audio capture application can record voice and generate a wave file for every 15 second. The wave files use actual time when the file is produced as it file name. After wave files are generated, they will be encoded into same name MP3 files immediately. The time used for MP3 encoding is very short, which definitely doesn’t affect next round recording. So, the results of running are a sequence of MP3 files with time stamp as their file name.
seconds is a little long for the WPDICS, but, the picture quality is good enough when the capture window size is set to 320x240. So we don’t have to set the capture size as 640x480.
In 320x240, each jpeg file size is only 11KB. So, if we take 1 picture per second, the total size of pictures for 1 minute is only 660K.
We also test the program in Sharp Zaurus SL 5600 PDA. The audio capture program runs very well in the PDA: it can record voice and produce wave audio file. And the automatically pause and restart part is successful too.
The problem is about MP3 encoding. It takes too much long to finish the MP3 encoding. We tried to encode an 850KB wave file. The encoding process finished successfully, and encoded MP3 file is 84K. But the process took about 6 hours. The reason is the big difference of computing capability between PDA’s processor and PC’s CPU. Sharp Zaurus SL 5600 uses Xscale embedded processor, which is designed for low power consumption. It’s computing capability is similar to Pentium I. This is not fast enough to do a complex computing, like MP3 encoding.
We can’t test image capture application in PDA, because we don’t have camera for this PDA.
5.2 conclusion and future work
As a conclusion, the design of WPDICS is not impossible, even though it still need some work.
Second, the results about data file size are also very good. Based on test, we only need less than 11MB for 1 hour continuous audio recording, and 40MB for 1 hour snapshot, with speed 1 picture per second. So, if we run audio and image recording together, for 24 hours continuous recording, the total storage requirement is only 1.2GB. As we know, it is so easy to get a memory media like this for any portable handheld. And to hard driver for PC, this number is really low. Maybe we can record several years’ data and save it in a 100GB hard disk.
The problem we need to solve is how to low the time consumption of MP3 encoding. We pretty there is no way to finish this step only by computing using PDA’s processor. The best way to solve this problem is to use hardware to finish the MP3 encoding process. This is not impossible, because there are already several MP3 recorder pens available in the market, so the hardware technology of MP3 encoder is not a big problem.
Actually, besides the MP3 encoder hardware, we still have some work space on this project. First, we can implement a video capture instead of image capture. To do this, we need to choose a handheld platform which supports video play. Based on this, we can find an appropriate video file format for WPDICS. This is also possible: we test some video clips, and we can get about 30 minutes video clip with size less than 10M using .RM format.
Reference
[1] A. Helal, S. E. Moore, and B. Ramachandran,
"An Integrated Navigation System for Visually Impaired and Disabled", http://www.harris.cise.ufl.edu/projects/publications/wearableConf.pdf. [2] Brian Clarkson, "Life Patterns: structure for wearable sensors", MIT Media
Laboratory, http://web.media.mit.edu/~clarkson/thesis.pdf. [3] Jeff Tranter,
Linux Multimedia Guide, First Edition September 1996 ISBN 1-56592-219-0 [4] Linux Sound How-To, http://www.tldp.org/HOWTO/Sound-HOWTO/
[5] Audio file solution, http://www.audiofilesolutions.com/comparison_table.htm [6] Linux MP3 How-To, http://www.mp3-howto.com/
[7] Lame project: http://sourceforge.net/project/showfiles.php?group_id=290 [8] Video For Linux resource: http://www.exploits.org/v4l/
[9] SPCA50X USB Camera Linux Driver, http://spca50x.sourceforge.net/spca50x.php [10] The Independent JPEG Group's JPEG Open Source:
ftp://ftp.uu.net/graphics/jpeg/jpegsrc.v6b.tar.gz