Building Applications With DUIM
Release 1.0
Dylan Hackers
CONTENTS
1 Copyright 3
2 Preface 5
2.1 About this manual . . . 5
2.2 Running examples in this manual . . . 5
2.3 Further reading . . . 6
3 Introduction 7 3.1 Overview of the DUIM libraries . . . 7
3.2 The DUIM programming model . . . 7
4 Designing A Simple DUIM Application 11 4.1 Introduction . . . 11
4.2 Design of the application. . . 11
4.3 Creating the basic sheet hierarchy . . . 11
5 Improving The Design 15 5.1 Defining a project . . . 15
5.2 Starting the application. . . 16
5.3 Adding a default callback . . . 16
5.4 Defining a new frame class. . . 17
5.5 Adding a tool bar . . . 20
5.6 Adding a status bar . . . 21
5.7 Gluing the new design together . . . 21
5.8 Creating a dialog for adding new items . . . 23
6 Adding Menus To The Application 25 6.1 A description of the menu system . . . 25
6.2 Creating a menu hierarchy . . . 25
6.3 Gluing the final design together . . . 28
7 Adding Callbacks to the Application 33 7.1 Defining the underlying data structures for tasks . . . 33
7.2 Specifying a callback in the definition of each gadget . . . 35
7.3 Defining the callbacks . . . 37
7.4 Enhancing the task list manager . . . 53
8 Using Command Tables 55 8.1 Introduction . . . 55
8.2 Implementing a command table . . . 55
8.3 Re-implementing the menus of the task list manager . . . 56
9 A Tour of the DUIM Libraries 61 9.1 Introduction . . . 61 9.2 A tour of gadgets . . . 62 9.3 A tour of layouts . . . 74 9.4 A tour of sheets. . . 77 9.5 A tour of frames . . . 78
9.6 Where to go from here . . . 83
10 Source Code For The Task List Manager 85 10.1 A task list manager using menu gadgets . . . 85
10.2 A task list manager using command tables . . . 93
11 Indices and tables 101
Building Applications With DUIM, Release 1.0
Contents:
CHAPTER
ONE
COPYRIGHT
Copyright © 1995-2000 Functional Objects, Inc. Portions copyright © 2011 Dylan Hackers.
Companies, names and data used in examples herein are fictitious unless otherwise noted.
Permission is hereby granted, free of charge, to any person obtaining a copy of this software and associated documen-tation files (the “Software”), to deal in the Software without restriction, including without limidocumen-tation the rights to use, copy, modify, merge, publish, distribute, sublicense, and/or sell copies of the Software, and to permit persons to whom the Software is furnished to do so, subject to the following conditions:
The above copyright notice and this permission notice shall be included in all copies or substantial portions of the Software.
THE SOFTWARE IS PROVIDED “AS IS”, WITHOUT WARRANTY OF ANY KIND, EXPRESS OR IMPLIED, INCLUDING BUT NOT LIMITED TO THE WARRANTIES OF MERCHANTABILITY, FITNESS FOR A PAR-TICULAR PURPOSE AND NONINFRINGEMENT. IN NO EVENT SHALL THE AUTHORS OR COPYRIGHT HOLDERS BE LIABLE FOR ANY CLAIM, DAMAGES OR OTHER LIABILITY, WHETHER IN AN ACTION OF CONTRACT, TORT OR OTHERWISE, ARISING FROM, OUT OF OR IN CONNECTION WITH THE SOFT-WARE OR THE USE OR OTHER DEALINGS IN THE SOFTSOFT-WARE.
Other brand or product names are the registered trademarks or trademarks of their respective holders.
CHAPTER
TWO
PREFACE
2.1 About this manual
This manual,Building Applications using DUIM, provides an introduction to developing your own windowed appli-cations using Open Dylan and, in particular, the interface-building functionality provided by the DUIM library suite. It is designed to complementGetting Started with Open Dylan, which provides information on using the Open Dy-lan development environment, and theDUIM Reference Manual, which provides a complete reference to the DUIM library suite. You are advised to look atGetting Started with Open Dylanbefore reading this manual in any depth. This manual is divided into several parts:
Introductionprovides an introduction to the concepts behind the DUIM libraries, and their intended use.
The chapters Designing A Simple DUIM Application through to Adding Callbacks to the Application provide an extended example of how to use DUIM to design the user interface to an application. A simple working application is developed from first principles, and this is used as an illustration of some of the most useful features provided by the DUIM libraries. Designing A Simple DUIM Applicationprovides an initial design for the application,Improving The Designimproves on this initial design. Adding Menus To The Applicationshows you how you can add a menu system to an application and Adding Callbacks to the Applicationdemonstrates how to give the application some useful functionality.Using Command Tablesintroduces the concept of command tables, by re-implementing some of the functionality already described inAdding Menus To The Application. For reference, the full source code of the application described in these chapters is provided inSource Code For The Task List Manager.
A Tour of the DUIM Librariesprovides an overall tour of what is available in the suite of DUIM libraries. It provides much less detail than the chapters covering application development, but covers a broader spectrum of functionality. This chapter can be seen as a general introduction to the material covered in theDUIM Reference Manual.
The material provided inA Tour of the DUIM Libraries is reasonably independent from the material provided in ChaptersDesigning A Simple DUIM ApplicationtoAdding Callbacks to the Application, and if you wish, you can read through the tour before looking at the example application. Whichever order you approach them in, you should expect some repetition of subject matter, however.
2.2 Running examples in this manual
Naturally, when developing your own DUIM applications, you create, edit, and compile files of source code, and organize them as projects based on Dylan libraries and modules, just as you would when developing Dylan code that uses any other library. When developing your application, you can also take advantage of the development environment to make this process smoother, and to execute sections of code using the interactor. Many of the examples in this manual can be run directly from the interactor. Furthermore, this manual assumes that you are reasonably familiar with the development environment provided by Open Dylan. If you are not, please refer to theGetting Started with Open Dylanmanual.
When developing your own projects using the New Project wizard, new modules that use the DUIM library, and any other relevant libraries are created for you. You may also like to use the Dylan Playground to experiment safely with your development code while keeping your project-specific modules clean. You can open the Dylan Playground by choosingTools > Open Playgroundfrom the Dylan the main window.
The full source code for both versions of the application is provided as part of the Open Dylan installation. To load them into the environment, chooseTools > Open Example Projectand look in the Documentation category, at the examples labeled Task List.
2.3 Further reading
For more information about DUIM, you should refer to the DUIM Reference Manual. This provides complete reference material on all the libraries and modules provided by DUIM. A wide variety of examples are also provided as part of the standard installation. These can be loaded into the environment by choosingTools > Open Example Projectfrom the main window.
CHAPTER
THREE
INTRODUCTION
3.1 Overview of the DUIM libraries
The Dylan User Interface Manager (DUIM—pronounced “dwim”) is a Dylan-based programming interface that pro-vides a layered set of portable facilities for constructing user interfaces.
While DUIM provides an API to user interface facilities for the Dylan application programmer, it is not itself a window system toolkit. DUIM uses the service of the underlying window system and UI toolkits as much as possible. DUIM’s API is intended to insulate the programmer from most of the complexities of portability, since the DUIM application need only deal with DUIM objects and functions regardless of their operating platform (that is, the combination of Dylan, the host computer, and the host window environment).
DUIM is a high level library that allows you to concentrate on how the interface looks and behaves rather than how to implement it on a particular platform. It abstracts out many of the concepts common to all window environments. The programmer is encouraged to think in terms of these abstractions, rather than in the specific capabilities of a particular host system. For example, using DUIM, you can specify the appearance of output in high-level terms and those high-level descriptions are turned into the appropriate appearance for the given host. Thus, the application has the same fundamental interface across multiple environments, although the details will differ from system to system.
3.2 The DUIM programming model
The Dylan User Interface Manager (DUIM) provides a complete functional interface so that you can use Open Dylan to develop and build graphical user interfaces (GUIs) for your applications. It comprises a suite of libraries, each of which provides a specific set of components necessary for developing a GUI.
DUIM has a simple overall design, ensuring that developers who are relatively new to Dylan can produce results quickly and effectively. At the same time, the design is robust enough to allow more experienced developers to extend and use DUIM in non-standard ways when required, in order to produce specific behavior.
Because it is completely written in Dylan, DUIM is able to harness all the power of the Dylan language. This means not only the clean object-oriented design of Dylan, but also the power of functionality such as macros and collections, together with the concise nature of the language syntax. This makes it easy to implement quite complicated GUI designs from the ground up, using small, clear pieces of code. This is in contrast to other GUI design libraries that have to rely on a much more verbose underlying language, such as C, which in turn leads to more complex GUI code that is harder to improve upon and maintain.
In the functionality that it provides, DUIM has a number of goals:
3.2.1 It should be as easy to use as possible.
As well as providing the minimum feature set necessary to build a GUI, DUIM provides functionality that lets you use common GUI features easily.
3.2.2 It should be as compact as possible.
DUIM does not provideso muchfunctionality that either you, or the environment, is swamped in complexity.
3.2.3 It should be as portable as possible.
It should be relatively easy to compile code in, and for, as many different hardware and software configurations as possible.
DUIM provides support for all the controls available in every modern GUI environment, and also allows you to develop your own controls as required. As far as possible, DUIM code is not specific to any particular platform, and whenever possible, controls native to the target environment are used in the resulting executable. This has two important consequences for your code:
By using controls native to the target environment, it is easy to develop an application that has the correct look and feel for your platform.
It enables DUIM code to be compiled and run on any platform for which a DUIM backend has been implemented. A DUIM interface is built fromframes ; each window in your application is represented by a frame. Each frame contains a hierarchy ofsheets, in which each sheet represents a unique piece of your window (the menu bar, buttons, and so on). DUIM also handles the event loop for you, allowing you to write methods to handle just the events you wish to treat specially.
The components of the sheet structure itself consist of three types of DUIM object:
• Gadgets, which are discrete GUI controls such as buttons, panes, and menus. These are the basic behavioral element of a GUI, and provide methods to handle events such as mouse clicks.
• Layouts, which are controls that, rather than having a physical appearance on screen, describe the arrangement of the sheets that are their children.
• User-defined sheets, which are implemented by you rather than by DUIM itself.
To implement a user-defined sheet, you create a new class and write methods to handle the different events that it receives, such as repainting itself, supporting mouse events, or handling the clipboard.
To develop an application using DUIM, you typically have to define a number of classes of frame (one for every kind of window or dialog in your application). The definition of each frame class contains a description of the sheet hierarchy that describes the contents of the frame, together with any slots and initial values that are required by the frame class. Once the frame classes are defined, you need to define callback functions that are invoked when certain events occur within the scope of the sheet hierarchy, such as mouse button clicks or textual input. These callback functions encapsulate the behavior of the application.
The chaptersDesigning A Simple DUIM Application toUsing Command Tablesprovide an extended tutorial that illustrates the basic and most common principles involved in building a GUI for a simple application.
As well as a rich set of GUI controls, DUIM provides support for the following features that are required in GUI design:
• DialogsYou can build your own dialogs, wizards, and property frames using pre-supplied DUIM classes. In addition, a number of convenience functions are provided which let you add common dialogs (such as file requesters) to your GUI without having to design the dialog from scratch.
Building Applications With DUIM, Release 1.0
• GraphicsDUIM provides portable models for colors, fonts, images, and generic drawing operations.
• EventsDUIM provides portable models for keyboard handling and mouse handling, to simplify the process of writing your own event handling routines.
• Layouts DUIM makes it easy to lay out groups of controls in a variety of standard ways, letting you arrange controls in columns, rows, or tables. DUIM takes care of any necessary calculations, ensuring that the size of each control, and the spacing between controls, is correct, without the need for any explicit layout calculation on your part.
CHAPTER
FOUR
DESIGNING A SIMPLE DUIM APPLICATION
4.1 Introduction
The next few chapters of the manual introduce you to some of the most important DUIM concepts, and show you how to go about designing and implementing a simple DUIM application. On a first read through, you should work through each chapter in turn, since each chapter relies heavily on the information in the previous chapters.
4.2 Design of the application
For the purposes of this example, the application developed is a simple task list manager. The design of the application attempts to achieve the following goals:
• The design is simple enough that the principles of the programming model should not be obscured by the code itself.
• The design attempts to use the most common elements of the various DUIM libraries. • The design is extensible, so that you can customize it to your own needs.
A task list manager was chosen because it is representative of the sort of GUI application that you will probably want to develop. Although the overall design is quite simple, it demonstrates several commonly used elements and techniques, and is easily extensible beyond the scope of this manual, should you wish to experiment with the code. The concept of a task list manager is familiar to the majority of readers, so you can study the code and the programming model, without having to spend time figuring out what the application itself is supposed to do.
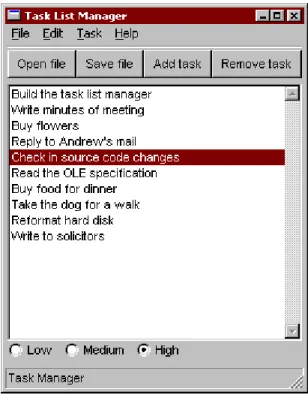
The final task list manager is shown inDesigning A Simple DUIM Application. To load the code for the final design into the environment, chooseTools > Open Example Projectfrom any window in the environment, and load the Task List 1 project from the Documentation category of the Open Example Project dialog.
The task list manager is very simple to use. You create a list of things that you need to do, assigning a priority to each task as you create it. The application can display the tasks in your list sorted in a variety of ways. You can save your task list to a file on disk, and open files of the same type.
The task list manager demonstrates the use of menus and a variety of button, list, and text controls.
4.3 Creating the basic sheet hierarchy
This section shows you how to create gadgets and sheets that make up the overall visual design of the interface. It shows you how to improve upon an initial design, but does not go into any details on the callbacks necessary for the application; at the end of this section you have an initial visual design.
Figure 4.1: The Task List Manager Application
4.3.1 Placing all the elements in a single layout
The main part of the task list manager is a list box that is used for displaying the tasks that you add in the course of using the program. For the initial design, there are buttons that let you add and remove tasks from the list, and a text field into which you type the text for new tasks.
To begin with, the following code creates all these elements, and places them in a single window, one above the other.
make(<column-layout>,
children: vector (make (<list-box>, items: #(), lines:15),
make (<text-field>, label: "Task text:"),
make (<push-button>, label: "Add task"),
make (<push-button>,
label: "Remove task"))); You might notice a number of problems with this initial design:
Firstly, the items have all been created correctly, but the resulting window is not particularly attractive. In order to improve the appearance, you need to rearrange the elements in the window by making better use of the layout facilities provided by DUIM.
Secondly, the application does not yet look very much like a typical Windows application. Rather than individual buttons, the application should have a tool bar, and it is not common to have a text field in the main window of an application. There is no menu bar. Currently, the application has more of the feel of a dialog box, than a main application window. These issues are addressed later on in the example.
4.3.2 Redesigning the layout
To address the issue of layout first, you should group the text field and theAdd taskbutton in a row; since the two elements are inherently connected (the task you add is the one whose text is displayed in the text field), it makes sense
Building Applications With DUIM, Release 1.0
to group them visually as well.
The following code creates the necessary row layout: horizontally ()
make (<text-field>, label: "Task text:");
make (<push-button>, label: "Add task"); end
Note that the macrohorizontallyhas been used here. This macro takes any expressions that are passed to it and creates a row layout from the results of evaluating those expressions. The macroverticallyworks in a similar way, creating a column layout from its arguments. Useverticallyto combine the row layout you just created with theRemove taskbutton that still needs to be incorporated:
vertically () horizontally ()
make (<text-field>, label: "Task text:");
make (<push-button>, label: "Add task"); end;
make (<push-button>, label: "Remove task"); end
Finally, you need to add this sheet hierarchy to another row layout, so that the main list box for the application is on the left, and the sheet hierarchy containing the buttons and text field is on the right:
horizontally ()
make (<list-box>, items: #(), lines: 15); vertically ()
horizontally ()
make (<text-field>, label: "Task text:");
make (<push-button>, label: "Add task"); end;
make (<push-button>, label: "Remove task"); end;
end
In the last few steps, you have exclusively usedhorizontallyandvertically. In fact, it does not matter if you use these macros, or if you create instances of<row-layout>and<column-layout>explicitly usingmake. Note: You may have to resize the window to see everything.
4.3.3 Adding a radio box
There is one aspect of the initial design that you have not yet incorporated into the structure: the radio box. This serves two purposes in the application:
1. It lets you choose the priority for a new task. 2. It displays the priority of any task selected in the list. The code to create the radio box is as follows:
make (<radio-box>, label: "Priority:", items: #("High", "Medium", "Low"), orientation: #"vertical");
Notice that theorientation:init-keyword can be used to ensure that each item is displayed one above the other. It is probably best to place the radio box immediately below theRemove taskbutton. To do this, you need to add the definition for the radio box at the appropriate position in the call tovertically.
(horizontally ()
make (<list-box>, items: #(), lines: 15); vertically ()
horizontally ()
make (<text-field>, label: "Task text:");
make (<push-button>, label: "Add task"); end;
make (<push-button>, label: "Remove task");
make (<radio-box>, label: "Priority:", items: #("High", "Medium", "Low"), orientation: #"vertical");
end);
4.3.4 Using contain to run examples interactively
You can use the functioncontainto run any of the examples above using the interactor available in the Dylan environment. This function lets you see the results of your work immediately, without the need to compile any source code or build a project, and is extremely useful for experimenting interactively when you are developing your initial ideas for a GUI design.
Thecontainfunction takes any expression that describes a hierarchy of sheets as an argument. It creates a frame which contains this sheet hierarchy, and displays the resulting frame on the screen.
Thus, to run any of the code segments shown in this chapter, simply pass them tocontainas an argument. Here are two examples, adapted from earlier examples in this chapter, as illustrations of how to usecontain.
contain (horizontally ()
make (<text-field>, label: "Task text:");
make (<push-button>, label: "Add task"); end);
contain (make (<text-field>, label: "Task text:"));
At this point, take a few minutes to go back over this chapter and practice usingcontainto run the code fragments that have already been discussed.
CHAPTER
FIVE
IMPROVING THE DESIGN
The simple layout hierarchy described in Creating the basic sheet hierarchy has a number of problems associated with it, all of which revolve around the fact that the task list manager does not yet look very much like a standard Windows application. Although it is a simple design that does not warrant a complicated user interface, the design you have already seen looks more like a dialog box than an application window.
This section shows you how to improve on the basic design, adding a menu bar and replacing the buttons with a proper tool bar. It also shows you how to move the text field into a separate dialog that pops up when you click theAdd task button in the tool bar.
From this point on, the interface is defined more formally, using frames. Up to now, the layout hierarchy has been presented informally, and you have used contain to display the layout interactively. This is fine for code that you want to evaluate once only, perhaps using the interactor, but for permanent code, a more rigorous framework is preferable.
5.1 Defining a project
From this point on, you should put the code for the task list manager into a project, rather than evaluating pieces of code using the interactor. Please refer to theGetting Started with Open Dylanfor complete details on how to manage projects using the environment; this section provides brief details that tell you how to create a project specifically for the task list manager application. Use the New Project wizard to create a GUI application, and call the project task-listwhen prompted. The New Project wizard offers the option of generating template source code to help you get started. For this example, you must ensure that this option is switchedoff(this is the default setting).
Two versions of the task list manager are included with Open Dylan, so that you can load the code straight into the environment if you wish. These are available in the Open Example Project dialog, in the Documentation category. You can display this dialog by choosingTools > Open Example Projectfrom the environment. The two versions included represent the state of the task list manager at the end ofAdding Callbacks to the Application, and at the end ofUsing Command Tables.
Note: Please note that both projects have the same name within the source code—task-list—and you should not load them both into the environment at the same time.
The number of source code files in a given project, and the names you give them, is entirely up to you. For the purposes of this example, you will use the files suggested by the New Project wizard. When you use the New Project wizard, Open Dylan will create a number of files for a project namedtask-list.
module.dylanandlibrary.dylan These files define the library and modules for the project. For the purposes of this application, you can ignore these files.
task-list.dylan Add non-GUI-specific code to this file.
Finally, you need to create the following new file usingFile > New, and add it to the project using theProject > Insert Filecommand. Make sure that this file is the last one listed in the project window.
frame.dylan Add the GUI-specific code to this file.
5.2 Starting the application
As you add source code to the files in your project, there will be times when you want to build the project to test it. This section defines some methods that let you run the application in a clean way. Add these methods toframe.dylan. The frame class that is used to implement the task list manager is called<task-frame>. This class will be intro-duced inDefining a new frame class. You can define a method to create an instance of<task-frame>as follows: define method start-task () => ()
let frame = make(<task-frame>); start-frame(frame);
end method start-task;
This method is provided as a convenient way to create the frame and then start its event loop. It returns when the event loop shuts down.
Note: Obviously, you should not call this method until you have defined a frame class called<task-frame>. Finally, you can start the application with the following method, and its subsequent call:
define method main (arguments :: <sequence>) => ()
// handle the arguments
start-task(); end method main;
begin
main(application-arguments()) // Start the application!
end;
Make sure that this is the very last definition in the fileframe.dylan, and remember thatframe.dylanshould itself be the last file listed in the project window.
Once you have added these methods to your code, you can compile and link the code, and run the application to test it, using the appropriate commands in the Dylan environment.
Note that, unlike languages such as C, Dylan does not insist on a single entrance point to an application such as the one given here. All the same, it is still good practice to define one if you can. The main difference between the use of the methodmainhere, and the use of themainfunction in C, is in the arguments that need to be passed. In C, you need to pass two generic arguments:argc, which specifies the number of arguments you are passing, andargv, an array of strings that define the arguments themselves. In Dylan, however, you only need to pass the second of these arguments; since any Dylan collection already knows its own size, you do not need to pass the number of arguments as an additional parameter.
5.3 Adding a default callback
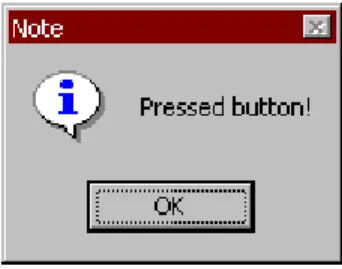
Nothing is more frustrating than designing a user interface that does not respond to user input. Although, in the early stages at least, the user interface does nothing particularly useful, you can at least define a “not yet implemented” message that can be used until you define real behavior for the application.
The definition of the function that gives you this default behavior is as follows:
Building Applications With DUIM, Release 1.0
define function not-yet-implemented (gadget :: <gadget>) => () notify-user("Not yet implemented!", owner: sheet-frame(gadget)) end function not-yet-implemented;
Add this function toframe.dylan.
You can call this function from any gadget in the task list manager by defining it as the activate callback for each gadget. There are several types of callback, and this is the type that is used most in the task list manager. You can define the activate callback for any gadget using theactivate-callback:init-keyword. More information about callbacks is given inAdding Callbacks to the Application, in which some real callbacks are defined, to make the task list manager do something more substantial.
5.4 Defining a new frame class
To begin with, define a frame class using the layout hierarchy you have already created. Although it might seem redundant to implement an inelegant layout again, it is easier to illustrate the basic techniques using a design you are already familiar with. In addition, there are several elements in the design that can be reused successfully.
Add the code described in this section toframe.dylan.
Defining a new class of frame is just like defining any Dylan class, except that there are several extra options available beyond the slot options normally available to define class. Each of these extra options lets you describe a particular aspect of the user interface. To define the new frame class, use the following structure:
define frame <task-frame> (<simple-frame>)
// definitions of frame slots and options go here
end frame <task-frame>;
In this case,<task-frame>is the name of the new class of frame, and‘‘<simple-frame>‘‘ is its superclass. Like ordinary Dylan classes, frame classes can have any number of superclasses, with multiple superclasses separated by commas. The superclass of any “standard” frame is usually<simple-frame>. If you were designing a di-alog box, its superclass would be<dialog-frame>. If you were designing a wizard, its superclass would be <wizard-frame>.
Adding slots to a frame class is exactly the same as adding slots to a standard Dylan class. You can define slot names, init-keywords, init-functions, default values, and so on. For this example, you are not defining any slots.
Each user interface element in the new class of frame is specified as a pane with a name and a definition. A pane is a sheet within a layout, and you can think of panes as sheets that represent concrete classes in an interface (as opposed to abstract classes). In effect, specifying a pane allows you to group together existing gadgets into some meaningful relationship that effectively creates a new gadget, without actually defining a gadget class.
The name is used to refer to the pane, both from within the frame definition itself, and from other code. The pane definition includes code to create the interface element. A pane specification also includes a place to declare a local variable that can be used within the pane’s definition to refer to the surrounding frame.
The following code fragment defines the two buttons, the text field, the radio box, and the list box from the initial design:
pane add-button (frame)
make(<push-button>, label: "Add task",
activate-callback: not-yet-implemented); pane remove-button (frame)
make(<push-button>, label: "Remove task", activate-callback: not-yet-implemented); pane task-text (frame)
make(<text-field>, label: "Task text:",
activate-callback: not-yet-implemented); pane priority-box (frame)
make (<radio-box>, label: "Priority:", items: #("High", "Medium", "Low"), orientation: #"vertical",
activate-callback: not-yet-implemented); pane task-list (frame)
make(<list-box>, items: #(), lines: 15, activate-callback: not-yet-implemented);
Note that the definition of each element is identical to the definitions included in the original layout described in Creating the basic sheet hierarchy (except that activate callbacks have been added to the code). Adding(frame) immediately after the name of each pane lets you refer to the frame itself within the frame definition using a local variable. This means that you can refer to any pane within the frame using normal slot syntax; that is, a pane called my-panecan be referred to asframe.my-panethroughout all of the definition of the frame class. This ability is essential when you come to layout each pane in the frame itself.
In addition, you need to define the layout in which to place these panes. This is itself just another pane, and its definition is again identical to the original layout described in Creating the basic sheet hierarchy, with one exception; rather than defining each element explicitly, you just include a reference to the relevant pane that you have already defined using normal slot syntax, thus:
pane task-layout (frame) horizontally () frame.task-list; vertically () horizontally () frame.task-text; frame.add-button; end; frame.remove-button; frame.priority-box; end; end;
To describe the top-level layout for the frame, you need to refer to this pane using thelayoutoption, as follows: layout (frame) frame.task-layout;
You actually have a certain amount of freedom when choosing what to define as a pane in the definition of a frame class. For example, the layout in thetask-layoutpane actually contains a number of sub-layouts. If you wanted, each one of these sub-layouts could be defined as a separate pane within the frame definition. Note, however, that you only have to “activate” the top-most layout; there should only be one use of thelayoutoption.
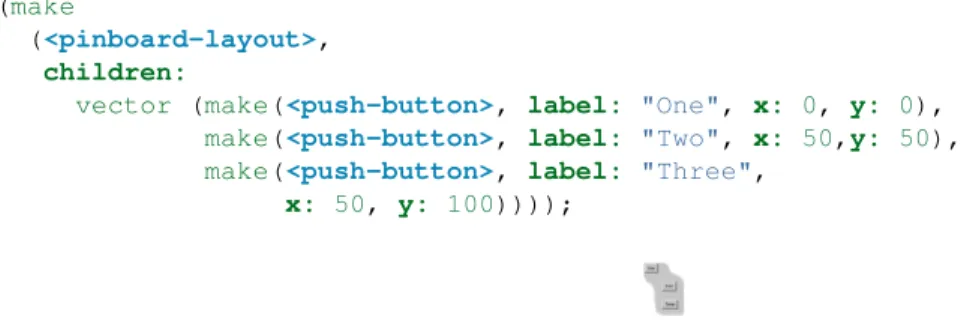
Similarly, you are free to use whatever programming constructs you like when defining elements in your code. Just as in the earlier examples, you could define the layouts with explicit calls to make, rather than by using the horizontallyandverticallymacros. Thus, the following definition oftask-layoutis just as valid as the one above:
pane task-layout (frame)
make(<row-layout>,
children: vector(frame.task-list,
make(<column-layout>,
children: vector(make(<row-layout>,
children: vector(frame.task-text, frame.add-button))))));
Notice that this construct is rather more complicated than the one using macros!
Throughout this section, you may have noticed that you can identify a sequence of steps that need to occur inside the
Building Applications With DUIM, Release 1.0
definition of a frame. It is good practice to keep this sequence in mind when writing your own frame-based code: 1. Define the content panes
2. Define the layout panes 3. Use thelayoutoption
If you glue all the code defined in this section together, you end up with the following complete definition of a frame class.
define frame <task-frame> (<simple-frame>) pane add-button (frame)
make(<push-button>, label: "Add task",
activate-callback: not-yet-implemented); pane remove-button (frame)
make(<push-button>, label: "Remove task", activate-callback: not-yet-implemented); pane task-text (frame)
make(<text-field>, label: "Task text:", activate-callback: not-yet-implemented); pane priority-box (frame)
make(<radio-box>, label: "Priority:", items: #("High", "Medium", "Low"), orientation: #"vertical",
activate-callback: not-yet-implemented); pane task-list (frame)
make (<list-box>, items: #(), lines: 15, activate-callback: not-yet-implemented); pane task-layout (frame)
horizontally () frame.task-list; vertically () horizontally () frame.task-text; frame.add-button; end; frame.remove-button; frame.priority-box; end; end;
layout (frame) frame.task-layout;
keyword title: = "Task List Manager"; end frame <task-frame>;
Note the addition of atitle: keyword at the end of the definition. This can be used to give any instance of the frame class a title that is displayed in the title bar of the frame’s window when it is mapped to the screen.
At this stage, the application still has no real functionality, and there is no improvement in the interface compared to the initial design, but by defining a frame class, the implementation is inherently more robust, making it easier to modify and, eventually, maintain.
If you want to try running your code, remember that you need to define some additional methods to create a frame instance and exit it cleanly. Methods for doing this were provided inStarting the application. If you define these methods now, you can create running versions of each successive generation of the application as it is developed.
5.5 Adding a tool bar
So far, you have seen how to experiment interactively to create an initial interface design. You have also seen how you can take that initial design and turn it into a more rigorous definition, for use within project source code, using a frame class. However, the design of the interface still leaves a lot to be desired, and the application still does not do anything. In this section, you start to look at improving the overall design of the interface.
To begin with, add a tool bar to the interface of the application. Most modern applications have a tool bar that runs along the top edge of the main application window, beneath the application menu bar. Tool bars contain a number of buttons that give you quick access to some of the most common commands in the application. Each button has a label that designates its use, or, more often, a small icon. Although you have already added buttons to the interface that perform important tasks, they have the appearance of buttons in a dialog box, rather than buttons in the main window of an application. The solution is to use a tool bar.
Adding a tool bar to the definition of a frame class is very similar to defining the overall layout of the panes in a frame class. You need to create the tool bar as a pane in the frame definition, and then incorporate it using thetool-bar clause, as shown below:
pane task-tool-bar (frame)
make(<tool-bar>, child: ...);
// ...more definitions here...
tool-bar (frame) frame.task-tool-bar;
A tool bar has a layout as its child, and each button in the tool bar is defined as a child of that layout. You can either define each button within the definition of the tool bar itself, or, more appropriately, define each button as a pane in the frame, and then refer to the names of these panes in the tool bar definition.
In fact, the buttons you defined in the earlier interface design can be used just as easily in a tool bar as they can within the main layout of the application itself. However, first you must remove the buttons from the task-layout pane of the definition of<task-frame>. (If you fail to do this, DUIM attempts to use the same buttons in two different parts of the interface, with undefined results.) A complete definition of a simple tool bar containing two buttons is as follows: pane task-tool-bar (frame)
make(<tool-bar>,
child: horizontally () frame.add-button; frame.remove-button end);
// ...more definitions here...
tool-bar (frame) frame.task-tool-bar;
A tool bar that only contains two buttons is on the lean side, however, so let’s add two more buttons to open a file and save a file to disk.
pane open-button (frame)
make(<push-button>, label: "Open file",
activate-callback: not-yet-implemented); pane save-button (frame)
make(<push-button>, label: "Save file",
activate-callback: not-yet-implemented);
// ...more definitions here...
pane task-tool-bar (frame)
make(<tool-bar>,
child: horizontally () frame.open-button; frame.save-button;
Building Applications With DUIM, Release 1.0
frame.add-button; frame.remove-button end);
// ...more definitions here...
tool-bar (frame) frame.task-tool-bar;
More commonly, an icon is used to label buttons in a tool bar, rather than a text label. You can do this by supplying an instance of<image>to thelabel:init-keyword when you define the button, rather than an instance of<string>. So now the application has a tool bar. Somewhat oddly, it does not yet have a menu bar or a system of menus — most tool bars represent a subset of the commands already available from the application’s menu system. A menu system is added to the task list manager inAdding Menus To The Application.
5.6 Adding a status bar
As well as a tool bar, most applications have a status bar. This is a bar that runs along the bottom edge of the main application window, and displays information about the current status of the application. At its most basic, a status bar provides a label that displays text of some sort. In many applications, status bars contain a number of different fields, providing a wide range of functionality. At their most complex, a status bar may have several different labels that display information about the current state of the application, and labels that display help for the currently selected menu command.
It is worth adding a very simple status bar to the task list application. This contains a label that could eventually be used to display the name of the file currently loaded into the application. Adding a status bar to the definition of a frame class is very similar to adding a tool bar: you need to define a pane that describes the status bar, and then you need to incorporate it using thestatus-barclause.
pane task-status-bar (frame)
make(<status-bar>, label: "Task Manager");
// ...more definitions here...
status-bar (frame) frame.task-status-bar;
Now you have added a status bar to the application. The next step is to glue all the pieces together once again to create your modified frame design.
5.7 Gluing the new design together
In improving the initial design of the application, you have added a tool bar and a status bar. Adding a tool bar, in particular, has obviated the need for some of the elements that you added to the earlier version of the frame design. In this section, you throw away those elements that are no longer needed, and add in the new elements, to create a new, improved design for the frame class.
One part of the initial design you have not yet improved on is the radio box that shows the priority of any task in the list. Ideally, rather than using a radio box, you would display the priority of each task alongside the task itself, within the list box. For now, however, keep the radio box.
pane priority-box (frame)
make(<radio-box>, items: $priority-items, orientation: #"horizontal", label-key: first, value-key: second, value: #"medium", activate-callback: not-yet-implemented);
Notice that the orientation is no longer constrained to be vertical. In the new design, a horizontal radio box looks better. By default, the orientation of a radio box is horizontal, so you could just completely remove the initialization of the orientation:init-keyword from the definition of the pane. In general, though, if you care about the orientation of a gadget, you should specify it explicitly, so leave the init-keyword in the pane definition, and change its value, as shown above.
Next, notice that the items are now specified using a named constant, rather than by embedding literals in the pane definition. The definition of this constant is as follows:
define constant $priority-items = #(#("Low", #"low"),
#("Medium", #"medium"), #("High", #"high"));
Add the definition for this constant toframe.dylan.
Using lists of string and symbol values in this constant lets you assign values to the individual components of the radio box elegantly, in conjunction with the other improvements to the definition ofpriority-box.
• Thelabel keyis a function which is passed an entry from the sequence and returns a string to use as the label. Assigning firstto the label key of priority-boxensures that the first element from each sub-list of $priority-items(the string) is used as the label for the appropriate item. Thus, the first button in priority box is labeled “Low”.
• Thevalue keyis a function which is passed an entry and returns the logical value of the entry.
Assigningsecondto the value key ofpriority-boxensures that the second element from each sub-list of $priority-items(the symbol) is used as the value for the appropriate item. Thus, the first button in priority box has the value#"low".
Lastly,priority-boxis given a default value: #"medium". This ensures that the button labeled “Medium” is selected by default wheneverpriority-boxis first created.
The definitions foradd-button,remove-button, andtask-listremain unchanged from the initial design. In addition, you need to add the definitions foropen-buttonandsave-buttondescribed inAdding a tool bar. You also need to add in the definitions for the tool bar and status bar themselves, as described inAdding a tool barand Adding a status bar.
The definition for task-layout has become much simpler. Because you have added buttons to the tool bar, the main layout for the application has reduced to a single column layout whose children are task-listand priority-box.
The definition for the new design of the frame class now looks as follows (button definitions vary slightly for the Task List 2 project, see A task list manager using command tables):
define frame <task-frame> (<simple-frame>)
// definition of buttons
pane add-button (frame)
make(<push-button>, label: "Add task",
activate-callback: not-yet-implemented); pane remove-button (frame)
make(<push-button>, label: "Remove task", activate-callback: not-yet-implemented); pane open-button (frame)
make(<push-button>, label: "Open file", activate-callback: not-yet-implemented); pane save-button (frame)
make(<push-button>, label: "Save file", activate-callback: not-yet-implemented);
// definition of radio box
Building Applications With DUIM, Release 1.0
pane priority-box (frame)
make (<radio-box>, items: $priority-items, orientation: #"horizontal", label-key: first, value-key: second, value: #"medium", activate-callback: not-yet-implemented);
// definition of tool bar
pane task-tool-bar (frame)
make(<tool-bar>, child: horizontally () frame.open-button; frame.save-button; frame.add-button; frame.remove-button end);
// definition of status bar
pane task-status-bar (frame)
make(<status-bar>, label: "Task Manager");
// definition of list
pane task-list (frame)
make (<list-box>, items: #(), lines: 15, activate-callback: not-yet-implemented);
// main layout
pane task-layout (frame) vertically ()
frame.task-list; frame.priority-box; end;
// activation of frame elements
layout (frame) frame.task-layout; tool-bar (frame) frame.task-tool-bar; status-bar (frame) frame.task-status-bar;
// frame title
keyword title: = "Task List Manager"; end frame <task-frame>;
Note that this definition does not incorporate the originaltask-textpane defined inDefining a new frame class. In fact, this part of the original interface is handled differently in the final design, and is re-implemented inCreating a dialog for adding new items.
5.8 Creating a dialog for adding new items
You may be wondering what has happened totask-text, the text field in which you typed the text of each new task. In the new design, this is moved to a new dialog box that is popped up whenever you choose a command to add a new task to the list. This section shows you how to define this dialog.
The methodprompt-for-taskbelow creates and displays a dialog that asks the user to type the text for a new task. The definition oftask-textis very similar to the definition you provided in the initial design, with the exception that the activate callback exits the dialog, rather than calling thenot-yet-implementedfunction.
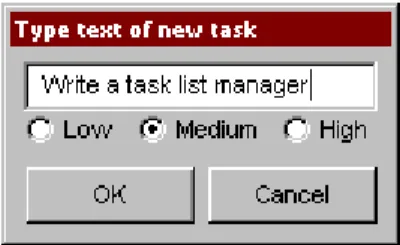
The method takes two keyword arguments: a title, which is assigned a value by default, and an owner, which is used as the owner for the dialog that is displayed byprompt-for-task. Note that the title is never explicitly set by any calls toprompt-for-taskin the task list manager; it is provided here as an illustration of how you can provide a default value for a keyword argument, rather than requiring that it either always be passed in the call to the method, or
Figure 5.1: The dialog box created by the prompt-for-task method
that it be hard-wired into the code.
The method returns two values: the name of the new task, that is, the text that the user types into the text field, and the priority of the new task.
Add this method toframe.dylan. define method prompt-for-task
(#key title = "Type text of new task", owner) => (name :: false-or(<string>),
priority :: false-or(<priority>)) let task-text = make(<text-field>,
label: "Task text:",
activate-callback: exit-dialog); let priority-field = make(<radio-box>,
items: $priority-items, label-key: first, value-key: second, value: #"medium"); let frame-add-task-dialog = make(<dialog-frame>,
title: title, owner: owner, layout: vertically () task-text; priority-field end, input-focus: task-text); if (start-dialog(frame-add-task-dialog))
values(gadget-value(task-text), gadget-value(priority-field)) end
end method prompt-for-task;
Notice that the dialog used in theprompt-for-taskmethod is created inline within the method definition. In this particular case, the dialog is only ever needed within the context ofprompt-for-taskand so it is not necessary to usedefine frameto create a distinct class of frame specifically for this dialog.
Note also thatOKandCancelbuttons are generated automatically for a dialog box; you do not need to define them explicitly.
Later on, the activate callback you define for theadd-buttonpane calls this method, then inserts the return value into the listtask-list.
CHAPTER
SIX
ADDING MENUS TO THE APPLICATION
Now it is time to consider adding some menus to your application. There are two basic ways that you can create a system of menus for your application:
• Design a hierarchical series of panes using the<menu-bar>,<menu>, and various menu buttons classes, and glue the elements of this design together in the correct order.
• Use a command table.
In this chapter, the first of these methods is demonstrated. For information about command tables, refer toUsing Command Tables. Before discussing the first method listed above, the overall design of the menu system for the task list manager is discussed.
6.1 A description of the menu system
Before implementing the menus for the task list manager, it is worth describing what you are going to implement. The menu system of the task list manager comprises four menus: aFilemenu,Editmenu,Taskmenu, andHelp. Each of these menus contains a number of commands, as follows:
• File menu TheFilemenu contains four commands that operate on the files loaded into the task list manager. TheOpencommand opens a new file. TheSavecommand saves the currently loaded file to disk. TheSave As command saves the currently loaded file to disk under a new name. TheExitcommand quits the task application completely.
• Editmenu TheEditmenu contains the standard clipboard commands:Cut,Copy, andPaste.
• Taskmenu TheTaskmenu contains two commands that operate on individual tasks. TheAddcommand adds a new task to the list. TheRemovecommand removes the selected task from the list.
• Helpmenu In a full-blown application, you would use commands in theHelpmenu as one hook into your online help system (other hooks being provided by buttons in dialog boxes and the F1 key). In this application, the Helpmenu contains a single command that simply displays a simple About dialog for the application.
6.2 Creating a menu hierarchy
As you might expect, creating a menu hierarchy in a frame definition is a matter of defining a series of panes for the frame. At the top-most level in the menu hierarchy is the menu bar itself. The menu bar contains each menu defined for the application and each menu contains the menu commands that themselves perform operations. Once the panes have been defined, the menu bar needs to be included in the frame using themenu-barclause.
First of all, you can create a pane that defines the menu bar itself as follows:
pane task-menu-bar (frame)
make(<menu-bar>,
children: vector(frame.file-menu, frame.edit-menu, frame.task-menu, frame.help-menu));
Next, define the File and Tasks menus themselves: pane file-menu (frame)
make(<menu>, label: "File",
children: vector(frame.open-menu-button, frame.save-menu-button, frame.save-as-menu-button, frame.exit-menu-button)); pane edit-menu (frame)
make(<menu>, label: "Edit",
children: vector(frame.cut-menu-button, frame.copy-menu-button, frame.paste-menu-button)); pane task-menu (frame)
make(<menu>, label: "Task",
children: vector(frame.add-menu-button, frame.remove-menu-button)); pane help-menu (frame)
make(<menu>, label: "Help",
children: vector(frame.about-menu-button));
Finally, you need to define the menu commands themselves. A command that appears on a menu is defined as an instance of<menu-button>, and so there is a strong similarity between these buttons and some of the buttons already defined. DUIM also generates mnemonics for each menu item; thus, the items appear asFileandEdit, and so forth. (Note that themake-keyboard-gesturefunction that appears below is defined inKeyboard accelerators.)
// Commands in the File menu
pane open-menu-button (frame)
make(<menu-button>, label: "Open...",
activate-callback: not-yet-implemented,
accelerator: make-keyboard-gesture(#"o", #"control"), documentation: "Opens an existing file.");
pane save-menu-button (frame)
make(<menu-button>, label: "Save",
activate-callback: not-yet-implemented,
accelerator: make-keyboard-gesture(#"s", #"control"), documentation: "Saves the current file to disk."); pane save-as-menu-button (frame)
make(<menu-button>, label: "Save As...", activate-callback: save-as-file,
documentation: "Saves the current file with a new name."); pane exit-menu-button (frame)
make(<menu-button>, label: "Exit",
activate-callback: not-yet-implemented,
accelerator: make-keyboard-gesture(#"f4", #"alt"), documentation: "Exits the application.");
//Commands in the Edit menu
pane cut-menu-button (frame)
make(<menu-button>, label: "Cut",
activate-callback: not-yet-implemented,
accelerator: make-keyboard-gesture(#"x", #"control"),
Building Applications With DUIM, Release 1.0
documentation: "Cut the selection to the clipboard."); pane copy-menu-button (frame)
make(<menu-button>, label: "Copy",
activate-callback: not-yet-implemented,
accelerator: make-keyboard-gesture(#"c", #"control"), documentation: "Copy the selection to the clipboard."); pane paste-menu-button (frame)
make(<menu-button>, label: "Paste",
activate-callback: not-yet-implemented,
accelerator: make-keyboard-gesture(#"v", #"control"),
documentation: "Paste the selection in the clipboard at the current position.");
//Commands in the Task menu
pane add-menu-button (frame)
make(<menu-button>, label: "Add...",
activate-callback: not-yet-implemented, accelerator: make-keyboard-gesture
(#"a", #"control", #"shift"), documentation: "Add a new task.");
pane remove-menu-button (frame)
make(<menu-button>, label: "Remove",
activate-callback: not-yet-implemented, accelerator: make-keyboard-gesture
(#"d", #"control", #"shift"),
documentation: "Remove the selected task from the list.");
//Commands in the Help menu
pane about-menu-button (frame)
make(<menu-button>, label: "About",
activate-callback: not-yet-implemented, accelerator: make-keyboard-gesture(#"f1"), documentation:
"Display information about the application.");
Once you have defined the menu bar and all the children that it is to contain, you need to activate the menu bar in the frame by including the following towards the end of the frame definition.
menu-bar (frame) frame.task-menu-bar;
The definitions of these menu buttons demonstrate two interesting new features: the use of keyboard accelerators, and the use of documentation strings.
6.2.1 Documentation strings
Documentation strings let you provide brief online help for gadgets such as menu buttons. You can specify a documen-tation string for any gadget using thedocumentation: init-keyword. Although you can make whatever use you want of these strings, using thegadget-documentationandgadget-documentation-settermethods, documentation strings for menu buttons are used in status bars without any need for special action on your part. If you display a menu and move the mouse pointer over the items in the menu, then the documentation string defined for each item is displayed in the status bar of the frame for as long as the mouse pointer is over the menu item. It is generally good practice to supply documentation strings for all the menu items in a frame. Documentation strings for other gadgets become tooltips in Windows.
6.2.2 Keyboard accelerators
Keyboard accelerators let you define a combination of keys that can be pressed in order to invoke the activate callback of a gadget. This means that you can access the functionality of an application without having to choose commands from menus using the mouse, and can make it much quicker to use an application you are familiar with.
To specify a keyboard accelerator, you need to specify an alphanumeric character, or a function key, together with any modifier keys (such as the CONTROL or ALT keys) that should be held down while the alphanumeric character is pressed. You actually create a keyboard accelerator by calling themakemethod on<keyboard-gesture>, though to make it a little easier, define the function below, which is used in the definition of each menu button. define function make-keyboard-gesture
(keysym :: <symbol>, #rest modifiers) => (gesture :: <keyboard-gesture>)
make(<keyboard-gesture>, keysym: keysym, modifiers: modifiers) end function make-keyboard-gesture;
Add this definition to the fileframe.dylan.
The keyboard accelerators defined demonstrate the several useful points about keyboard accelerators:
• Whenever possible, use standard keyboard accelerators for standard application commands on your platform. Here, you use CONTROL+O to open a file, CONTROL+S to save a file, and CONTROL+X, CONTROL+C, and CONTROL+V respectively forCut,Copy, andPaste.
• As well as standard alphanumeric characters, you can use function keys as keyboard accelerators.
• As well as the more common CONTROL key, you can use the ALT and SHIFT keys as modifiers, though you should not use the SHIFT key as the sole modifier.
• You can use more than one modifier key at once.
• If you wish, you need not use any modifier keys at all, as is the case with the (slightly non-standard) keyboard accelerator for theAboutcommand.
6.3 Gluing the final design together
You can now add the definitions of the menu bar, menus, and menu buttons, to the definition of the<task-frame> class, to give the code shown below. At this stage, the only thing missing from the final application are real callback functions. Callbacks are dealt with inAdding Callbacks to the Application.
Note that the final definition of<task-frame>includes the definition of a slot:frame-task-list. This takes an instance of the class<task-list>as a value, the default value being an empty<task-list>. Although it has not been referred to so far, this class will be used as the basic data structure in which task lists are stored, and a more complete description of these data structures is given in Defining the underlying data structures for tasks. It transpires that defining theframe-task-listslot is essential for some of the file handling routines that are described in Handling files in the task list manager.
define frame <task-frame> (<simple-frame>)
slot frame-task-list :: <task-list> = make(<task-list>);
// definition of menu bar
pane task-menu-bar (frame)
make(<menu-bar>,
children: vector(frame.file-menu, frame.edit-menu,
frame.task-menu, frame.help-menu));
Building Applications With DUIM, Release 1.0
// definition of menus
pane file-menu (frame)
make(<menu>, label: "File",
children: vector(frame.open-menu-button, frame.save-menu-button,
frame.save-as-menu-button, frame.exit-menu-button)); pane edit-menu (frame)
make(<menu>, label: "Edit",
children: vector(frame.cut-menu-button, frame.copy-menu-button,
frame.paste-menu-button)); pane task-menu (frame)
make(<menu>, label: "Task",
children: vector(frame.add-menu-button, frame.remove-menu-button));
pane help-menu (frame)
make(<menu>, label: "Help",
children: vector(frame.about-menu-button));
// definition of menu buttons
// Commands in the File menu
pane open-menu-button (frame)
make(<menu-button>, label: "Open...",
activate-callback: not-yet-implemented,
accelerator: make-keyboard-gesture(#"o", #"control"), documentation: "Opens an existing file.");
pane save-menu-button (frame)
make(<menu-button>, label: "Save",
activate-callback: not-yet-implemented,
accelerator: make-keyboard-gesture(#"s", #"control"), documentation: "Saves the current file to disk."); pane save-as-menu-button (frame)
make(<menu-button>, label: "Save As...", activate-callback: save-as-file, documentation:
"Saves the current file with a new name."); pane exit-menu-button (frame)
make(<menu-button>, label: "Exit",
activate-callback: not-yet-implemented,
accelerator: make-keyboard-gesture(#"f4", #"alt"), documentation: "Exits the application.");
//Commands in the Edit menu
pane cut-menu-button (frame)
make(<menu-button>, label: "Cut",
activate-callback: not-yet-implemented,
accelerator: make-keyboard-gesture(#"x", #"control"), documentation: "Cut the selection to the clipboard."); pane copy-menu-button (frame)
make(<menu-button>, label: "Copy",
activate-callback: not-yet-implemented,
accelerator: make-keyboard-gesture(#"c", #"control"), documentation: "Copy the selection to the clipboard."); pane paste-menu-button (frame)
make(<menu-button>, label: "Paste",
activate-callback: not-yet-implemented,
accelerator: make-keyboard-gesture(#"v", #"control"), documentation:
"Paste the selection in the clipboard at the current position.");
//Commands in the Task menu
pane add-menu-button (frame)
make(<menu-button>, label: "Add...",
activate-callback: not-yet-implemented, accelerator: make-keyboard-gesture
(#"a", #"control", #"shift"), documentation: "Add a new task.");
pane remove-menu-button (frame)
make(<menu-button>, label: "Remove",
activate-callback: not-yet-implemented, accelerator: make-keyboard-gesture
(#"d", #"control", #"shift"), documentation:
"Remove the selected task from the list.");
//Commands in the Help menu
pane about-menu-button (frame)
make(<menu-button>, label: "About",
activate-callback: not-yet-implemented, accelerator: make-keyboard-gesture(#"f1"), documentation:
"Display information about the application.");
// definition of buttons
pane add-button (frame)
make(<push-button>, label: "Add task",
activate-callback: not-yet-implemented); pane remove-button (frame)
make(<push-button>, label: "Remove task", activate-callback: not-yet-implemented); pane open-button (frame)
make(<push-button>, label: "Open file", activate-callback: not-yet-implemented); pane save-button (frame)
make(<push-button>, label: "Save file", activate-callback: not-yet-implemented);
// definition of radio box
pane priority-box (frame)
make (<radio-box>, items: $priority-items, orientation: #"horizontal", label-key: first, value-key: second, value: #"medium", activate-callback: not-yet-implemented);
// definition of tool bar
pane task-tool-bar (frame)
make(<tool-bar>,
child: horizontally () frame.open-button; frame.save-button;
Building Applications With DUIM, Release 1.0
frame.add-button; frame.remove-button end);
// definition of status bar
pane task-status-bar (frame)
make(<status-bar>, label: "Task Manager");
// definition of list
pane task-list (frame)
make (<list-box>, items: #(), lines: 15, activate-callback: not-yet-implemented);
// main layout
pane task-layout (frame) vertically ()
frame.task-list; frame.priority-box; end;
// activation of frame elements
layout (frame) frame.task-layout; tool-bar (frame) frame.task-tool-bar; status-bar (frame) frame.task-status-bar; menu-bar (frame) frame.task-menu-bar;
// frame title
keyword title: = "Task List Manager"; end frame <task-frame>;
CHAPTER
SEVEN
ADDING CALLBACKS TO THE APPLICATION
At this point, the task list manager still does very little. If you try running the code (as described in Starting the application), and interacting with any of the elements in the GUI (clicking on a button, choosing a menu command, and so on), then only the “not yet implemented” message is displayed. This section shows you how to remedy this situation, by adding callback functions to the task list manager.
Getting the application to respond to mouse events such as clicking on a button or choosing a menu command consists of two things:
For each gadget in the GUI, you need to specify which callbacks to use. There are several different types of callback, depending on the type of event for which you want to define behavior.
You need to define the callback functions themselves. These are the functions that are invoked when a particular callback type is detected, and are the functions you use to define the correct behavior for your application.
In addition, you need to set up the basic data structures that allow you to work with tasks in your application.
At this point, you may be wondering exactly what a callback is, and why they are used to respond to application events, rather than event handlers. If you have developed GUI applications using other development environments, you may be more used to writing event handlers that work for a whole class of objects, and discriminating on which instance of a class to work on at any one time by means of case statements.
Writing event handlers in this way can be cumbersome. It turns out to be much simpler to define a function that works only for a particular instance of a class, and then refer to this function when defining the class instance. This function is what is referred to as a callback. This makes the source code for your application much clearer and easier to write, and the only price you pay is that you have to specify a callback for each gadget when you define the gadget itself. In fact, DUIM provides a complete protocol for defining and handling events of all descriptions. However, you only need to use this protocol if you are creating new classes of gadgets, for which you need to define the event behavior, or new classes of events (for example, support for different input devices or notification of low resources). If you are just using gadgets, then you only ever need to use callbacks.
7.1 Defining the underlying data structures for tasks
Before defining any real callbacks, it is time to consider how you can represent task lists, and the information contained in them. This is essential, not just for handling tasks within the application, but for saving task lists to disk, and loading them back into the application.
Add the code described in this section totask-list.dylan.
There are two basic kinds of object that you need to model: task lists and tasks. A task list is a collection of one or more tasks. The best way to represent these is by defining a<task-list>class and a<task>class.
The definition of<task-list>, below, contains three slots: task-list-tasks
This slot specifies a sequence of tasks that are contained in the task list. Each object in the sequence will be an instance of<task>. The default for new task lists is an empty stretchy vector. An init-keyword has been specified so that this slot can be set when an instance of the class is initialized.
task-list-filename
This slot specifies the file on disk to which the task list has been saved, if it has been saved at all. The default for new task lists is#f, since the task list has not yet been saved to disk. An init-keyword has been specified so that this slot can be set when an instance of the class is initialized.
task-list-modified?
The purpose for this slot is less obvious. It is useful to flag whether or not a task list has been modified so that, for instance, theSavecommand in the application can be disabled if the task list is unmodified. There is no init-keyword defined for this class, because you only ever want to use the supplied default value for new instances of<task-list>.