Using HP Rapid Deployment
Pack to Deploy Citrix
MetaFrame XP FR2 on ProLiant
Servers
June 2002
16SM-0602A-WWEN Prepared by:
eInfrastructure Business Unit Compaq Computer Corporation
Contents
Introduction ... 3 Compaq Adaptive
Infrastructure ... 6 Compaq Solutions for an
Adaptive Infrastructure ... 7
Abstract: Server deployment can be a complicated, time-consuming task, and can be particularly frustrating if changing business needs require the deployment or redeployment of a large number of servers quickly and reliably.
Rapid Deployment Pack ... 13 RDP Networking
Considerations ... 28 Setting Up an RDP
Environment ... 31
Booting Client Machines ... 47 As a key component of the HP Adaptive Infrastructure strategy, HP has developed the ProLiant Essentials Rapid Deployment Pack (RDP) to automate repetitive tasks such as deploying, redeploying and configuring servers. During high-volume deployments, RDP improves the overall consistency of server configurations while significantly reducing IT resource requirements.
Using Scripted Events to Deploy a Citrix MetaFrame XP FR2 Server Farm... 64 Using Imaging to Deploy a Citrix MetaFrame XP Server Farm ... 77 Summary ... 84
RDP is an integrated HP and Altiris solution that automates server software provisioning, allowing businesses to quickly and easily deploy MetaFrame XP Feature Release 2 on the latest ProLiant BL and DL servers from the new HP. As business needs change – even temporarily – RDP facilitates the redeployment of servers and applications on the server farm.
Notice
This publication does not constitute an endorsement of the product or products that were tested. The configuration or configurations tested or described may or may not be the only available solution. This test is not a determination of product quality or correctness, nor does it ensure compliance with any federal, state or local requirements.
Compaq, the Compaq logo, ActiveAnswers, SmartStart, Compaq Insight Manager, and ProLiant are trademarks of Compaq Information Technologies Group, L.P. in the U.S. and/or other countries.
Microsoft, Windows, and Windows NT are trademarks of Microsoft Corporation in the U.S. and/or other countries.
Intel, Pentium, Intel Inside, and Celeron are trademarks of Intel Corporation in the U.S. and/or other countries.
All other product names mentioned herein may be trademarks of their respective companies.
Compaq shall not be liable for technical or editorial errors or omissions contained herein. The information is provided “as is” without warranty of any kind and is subject to change without notice. The warranties for Compaq products are set forth in the express limited warranty statements accompanying such products. Nothing herein should be construed as constituting an additional warranty.
©2002 Compaq Information Technologies Group, L.P.
Using HP Rapid Deployment Pack to Deploy Citrix MetaFrame XP FR2 on ProLiant Servers White Paper prepared by eInfrastructure Business Unit
First Edition (June 2002)
Introduction
Typically, servers can be labor-intensive to configure and deploy. Maintaining servers can also be labor-intensive but if the administrator should delay an update or fail to apply new software, both security and availability may be affected. To further challenge the administrator, business needs and the demand for particular applications are constantly changing, making it critically important to adapt quickly to new requirements for computing, network or storage resources. To allow customers to maximize their existing IT investments while adapting easily to the changes necessary to remain competitive, Compaq has invested in the creation of an adaptive infrastructure.
The following technologies are at the heart of Compaq’s Adaptive Infrastructure strategy:
• Virtual presence and control provides the capability to access and manage resources securely, regardless of where the resources are located.
• Automated systems provisioning provides the capability to automate deployment and change management processes.
• Intelligent fault resilience provides the capability to minimize exposure to unplanned downtime by automatically predicting, diagnosing and responding immediately to fault conditions – or even potential faults.
• Dynamic resource scaling provides the capability to deliver resources dynamically – when and wherever needed.
The following section provides more information on automated systems provisioning, the subject of this White Paper.
Rapid Deployment Pack
Automated systems provisioning is a key component of an Adaptive Infrastructure, allowing the automation of resource-intensive lifecycle tasks such as deploying and redeploying software, making management changes and quickly bringing servers online.
Compaq’s ProLiant Essentials Rapid Deployment Pack (RDP) is a key enabler to automated systems provisioning. RDP is a software deployment solution that facilitates the installation, configuration, and deployment of software to multiple servers via a GUI-based console using either scripting or imaging technology. Server configuration time is significantly reduced, making it possible to deploy large numbers of servers rapidly and consistently.
The RDP solution uses the following components and technologies:
• Altiris eXpress software (licensed by Compaq) creates and deploys server images.
• Compaq SmartStart Scripting Toolkit facilitates unattended server installation and configuration, radically simplifying high-volume deployments.
• The Pre-boot Execution Environment (PXE) technology embedded in new Compaq ProLiant
BL, DL and ML servers allows these machines to be booted and managed remotely before the operating system is installed and running.
This White Paper
This White Paper provides detailed instructions for using RDP to automate the deployment of a MetaFrame XP FR2 server farm on ProLiant BL and DL servers, providing recommendations where appropriate. Additionally, the White Paper offers general recommendations on RDP configurations.
Compaq and Citrix jointly carried out extensive testing to validate RDP’s ability to function seamlessly in various production environments. However, it should be noted that MetaFrame XP FR2 may be deployed in a wide variety of customer environments; not all configurations are specifically covered in this document.
The White Paper is intended to introduce the reader to RDP, demonstrate the scalability of the solution, and provide detailed instructions on using RDP to deploy MetaFrame XP FR2 on Compaq ProLiant BL and DL servers through either imaging or scripting technology. Information is included on the following topics:
• Compaq Adaptive Infrastructure
An overview of Adaptive Infrastructure technologies
• Compaq solutions for an Adaptive Infrastructure
Overviews of ProLiant Essentials Software, Insight Manager 7, Remote Insight Lights Out, provisioning tools
• Remote Deployment Pack
Descriptions of the following:
– The basic components of an RDP architecture
– AClient and BootWorks client software
– Managing client machines
– Implementation scenarios
• RDP networking consideration
Describes issues with subnets and routing, performance, and multicasting
• Setting up an RDP environment
Provides instructions for the following activities:
– Setting up each of the RDP components
– Supplying DOS files needed to boot client machines to BootWorks
– Installing ProLiant Installation Module
• Deploying a Citrix MetaFrame XP server farm – using scripts
Provides instructions for the following activities:
– Prerequisites
– Deploying Windows 2000
– Renaming client machines
– Adding client machines to a domain
– Deploying MetaFrame XP FR2 and applications
– Testing the server farm
• Deploying a Citrix MetaFrame XP server farm – using images
Provides instructions for the following activities:
– Prerequisites
– Using a Reference Server with a Microsoft Access Data Store
– Using a Reference Server with Oracle, SQL, or DB2
– Deploying the image
– Renaming client machines
– Adding client machines to a domain
– Verifying licenses on the client machines
• Summary • Appendix A
Lists the features of MetaFrame XP FR2
• Appendix B
Sample scripts
• Appendix C
Compaq Adaptive Infrastructure
Compaq continues to develop tools, build platforms, and initiate partnerships with other industry leaders to create a truly adaptive IT infrastructure. Compaq’s Adaptive Infrastructure blueprint allows businesses to adapt to changing market conditions, conserve valuable human and IT resources, and rapidly respond to customers.
Figure 1 illustrates the four technologies that power Compaq’s Adaptive Infrastructure.
Figure 1: Key components of an Adaptive Infrastructure
Table 1 provides an overview of the interrelated Adaptive Infrastructure technologies.
Table 1. Overview of Adaptive Infrastructure Technologies
Technology Description
Virtual presence and control Virtual presence and control provides the underlying foundation for the other three key technologies of an Adaptive Infrastructure, giving businesses the ability to access and manage their IT infrastructures from anywhere at any time.
Virtual presence and control is delivered by Compaq tools such as
Integrated Lights-Out (iLO) and Integrated Administrator.
Automated system provisioning Automated system provisioning gives businesses the ability to automate deployment and version control.
Automated system provisioning is delivered by Compaq tools such as
Rapid Deployment Pack and ActiveUpdate.
Intelligent fault resilience Intelligent fault resilience gives businesses the ability to minimize exposure to unplanned downtime.
Intelligent fault resilience is built into ProLiant servers; hot-pluggable drives, fans, power supplies, PCI boards and memory tolerate hardware failure with no downtime or data loss. Compaq software tools such as
Insight Manager 7 can diagnose, predict and respond immediately to fault conditions.
Table 1. Overview of Adaptive Infrastructure Technologies(continued)
Dynamic resource scaling Dynamic resource scaling gives businesses the ability to deliver
computing, storage or network resources dynamically – when and where needed.
Dynamic resource scaling is delivered by Compaq tools such as
Resource Partitioning Manager.
The following section provides more information on Compaq software and hardware for an Adaptive Infrastructure.
Compaq Solutions for an
Adaptive Infrastructure
This section describes Compaq solutions that can be used to implement an Adaptive
Infrastructure, providing more information on the following software and hardware products:
• ProLiant Essentials Software • Insight Manager 7
Compaq
ProLiant
Essentials Software
ProLiant Essentials packs (shown in Figure 2) offer essential software for an Adaptive Infrastructure.
Figure 2: ProLiant Essentials software for an Adaptive Infrastructure
The following ProLiant Essentials packs are available:
• ProLiant Essentials Foundation Pack
The Foundation Pack contains the basic software needed by every customer to install, configure, and manage ProLiant servers as part of an Adaptive Infrastructure. Included with each ProLiant server, the Foundation Pack conveniently creates a single source for the tools and support software normally offered to customers.
The Foundation Pack (formerly the ProLiant Server Setup and Management Kit) includes
• ProLiant Essentials Value Pack
The Value Pack contains optional software offerings that extend the functionality of an Adaptive Infrastructure to meet specific business needs.
– Rapid Deployment Pack is an integrated Compaq and Altiris solution that automates the process of deploying and provisioning server software, allowing customers to adapt quickly and easily to changing business needs.
– Integrated Lights-Out (iLO) Advanced Pack offers a license key that unlocks the advanced feature set of Compaq Remote Insight Lights-Out solution. iLO allows the administrator to install, configure, monitor, provision, and troubleshoot remote ProLiant
servers from anywhere, anytime, using a standard Web browser.
– Workload Management Pack features Compaq Resource Partitioning Manager, which allows the administrator to control the size and physical location of system resources available to individual applications, services, and other processes.
The following sections describe Compaq hardware offerings for an Adaptive Infrastructure.
Compaq
Insight Manager
7
Insight Manager 7, the core of ProLiant Essentials Foundation Pack, maximizes system uptime, simplifies system software maintenance and provides powerful monitoring and control of an Adaptive Infrastructure. Through a standard Web browser, the administrator can view a wealth of information on the status of the system, as shown in Figure 3.
Insight Manager 7 SP1 extends the Insight Manager 7 feature set with new capabilities for managing blade servers and blade infrastructure, new inventory and asset tracking capabilities, and the ability to control device discovery through discovery filters.
The following section describes the optional Compaq Remote Insight Lights-Out feature.
Compaq Remote Insight Lights-Out
Compaq Remote Insight Lights-Out Edition (RILO) is an option that facilitates remote server management in corporate data centers and remote sites, offering browser access to Compaq servers through a seamless, hardware-based, OS-independent virtual graphical remote console.
A RILO board (shown in Figure 4) can be installed in each server in the server farm to support headless manageability.
Figure 4: The RILO board and the remote console
RILO can be used to achieve remote server management in a lights-out1 environment – powering the server on or off, resetting or provisioning the server with RDP.
Table 2 provides an overview of the features of RILO.
Table 2. RILO Feature Overview
Feature Description
Remote Console The Remote Console (shown in Figure 4) offers the following capabilities:
• Providing access to the server’s files system and drives
• Updating the server’s software and hardware settings
• Installing and configuring applications on the server
• Viewing the server’s screen – even when the operating system is locked up or the system has crashed
• Viewing the server’s startup, boot, and shutdown sequences
Virtual Floppy Drive A Virtual Floppy Drive allows the server to boot from a standard floppy drive in a remote machine. In addition, the Virtual Floppy drive enables the following provisioning functionality:
• Remote OS installation
• Remote ROM updates
• When used with SmartStart Scripting Toolkit, unattended server provisioning Virtual Power Button A Virtual Power Button allows selected server models to be powered on and off
remotely.
Remote Reboot The Remote Reboot feature enables a cold reboot.
Note: Compaq Integrated Lights-Out (iLO) Standard or Advanced may be integrated with the system board of newer, high-end Compaq servers.
The following section provides more information Compaq provisioning tools.
Provisioning Tools
Compaq’s rapid deployment strategy is to automate the labor-intensive tasks that must be performed over the lifecycle of a server (as shown in Figure 5), offering the customer tools for planning and managing change.
Table 3 lists provisioning tools offered by Compaq.
Table 3. Provisioning Tools
Lifecycle Phase Tool Description
Plan Compaq offers sizing and configuration utilities to help plan deployments.
Deploy Compaq offers provisioning tools to meet a variety of business needs.
• ProLiant Essentials Rapid Deployment Pack is an integrated Compaq and Altiris solution that can automate the deployment and provisioning of software to large numbers of servers from a central location.
• Compaq SmartStart facilitates the quick, reliable deployment of individual servers.
SmartStart’s Scripting Toolkit radically simplifies high-volume server deployment by
delivering a hands-off, unattended installation and configuration solution. The Scripting Toolkit offers a flexible method for creating standard scripts that automate many of the manual steps in the installation and configuration process.
Administrators can take advantage of customizable, pre-configured scripts or develop their own scripts for particular deployments.
The Scripting Toolkit supports the deployments of ProLiant BL, DL and ML servers, as well as certain legacy models2, and is available for download on the Compaq website.
• Remote Deployment Utility offers an easy-to-use interface for the installation of Compaq software products on individual local or remote machines. A GUI allows the administrator to deploy Support Paqs; a command-line interface facilitates the scripted installation of individual software components.
• Integrated Lights-Out (iLO) Advanced Pack offers remote control capabilities for resources located in data centers and remote sites. The administrator can install, configure, monitor, update, and troubleshoot remote ProLiant servers from anywhere, anytime, using a standard Web browser.
• Resource Partitioning Manager is an easy-to-use, GUI-enabled tool that extends the Windows 2000 operating system to give the administrator the power to dynamically optimize ProLiant servers. The administrator can view and manage the network as a logical pool of computing resources, deploying and redeploying software to meet particular business needs.
Operate Version Control Repository Manager, a feature of Compaq Insight Manager 7, catalogs software downloaded by ActiveUpdate or from the Compaq website. Version Control Repository Manager works with Version Control Agents on each server to support intelligent version management.
Redeploy Compaq offers tools to notify IT personnel proactively when an update is available.
• Compaq ActiveUpdate is an advanced Web-based application that notifies the administrator when an update is available, then offers an automatic download.
• Compaq Product Change Notification is a subscription program that allows the administrator to keep up with the pace of change. The program provides 30 – 60 days advanced warning of updates, eliminating the costs associated with unexpected change.
Rapid Deployment Pack
ProLiant Essentials Rapid Deployment Pack (RDP) offers the administrator a new generation of tools for the easy, automated deployment of single or multiple servers through a central
management console. The rapid deploying (or redeployment) of operating systems and
applications is a simple as dragging-and-dropping predefined images or scripts on to the target machines.
RDP integrates the following powerful products:
• Altiris eXpress
The Altiris eXpress Deployment Solution supports low- or high-volume server deployments (or redeployments) through scripting, imaging, or a combination of both. A central
management console with an intuitive Graphical User Interface (GUI) allows scripts and images to be dragged-and-dropped to the appropriate servers.
RDP includes advanced features that can detect and server blades based on their physical rack, enclosure and bay locations – no server system has ever been this easy to deploy or redeploy! After sliding new servers into an enclosure, the administrator can use RDP to deploy single or multiple3 servers in less than an hour.
In addition, the advanced rip-and-replace feature allows blade servers to be redeployed or replaced automatically.
• ProLiant Integration Module for Altiris eXpress
The Integration Module includes the following components:
– The latest version of the Compaq SmartStartScripting Toolkit
– Optimized drivers and management agents
– Pre-configured deployment events and scripts in the central management console; these time-savers can be customized to meet particular needs
RDP is especially designed to take advantage of the new ProLiant BL servers. Advanced features can detect and display server blades based on physical rack, enclosure and bay locations. When a new blade is installed, RDP automatically deploys a predefined image.
Note: RDP is available for purchase on the Compaq website. Click Buy.
Using RDP for Automated System Provisioning
RDP offers automated system provisioning, an essential component of an Adaptive Infrastructure. RDP automates repetitive tasks such as configuring and deploying servers, providing an easy-to-implement server deployment solution with the following benefits:
• Rapid, reliable unattended provisioning of hundreds to thousands of servers
• A standard method for booting to the network
• The ability to maintain and apply server configurations
RDP greatly reduces deployment times, allowing businesses to respond rapidly to changing workloads.
This Section
This section provides information on the following topics:
• RDP components • Client software • Deploying images • Implementation scenarios
RDP Components
Figure 6 illustrates the components of a basic RDP architecture.
Figure 6: Block diagram of the basic RDP architecture
Console
The Deployment Server Console offers remote management capabilities, such as taking control of client machines, deploying images, and installing or removing applications. The Console tracks client status and allows the administrator to easily create, edit, or schedule tasks.
The Console can wake up a client machine or send a message to the client to carry out a particular task.
The Console includes the following applications:
• Rapid Install
Rapid Install creates software deployment packages.
• Boot Disk Creator
Boot Disk Creator creates an image that can boot a client machine using one of the following methods:
– From the network
– From a diskette for a local deployment
– From the client machine’s hard drive
• Image Explorer
Image Explorer allows the administrator to view and modify images.
The Console can reside on a PC; there may be multiple Consoles in a single RDP system.
Deployment Server
The Deployment Server controls workflow in an RDP system, registering configuration information on each client and sending events and tasks to the appropriate clients when scheduled.
A single Deployment Server manages all client machines in a particular RDP system. Multiple RDP systems can be used to manage different groups of client machines; however, if multiple Deployment Servers are installed on the same network, client machines are managed as a single RDP.
Multicasting
RDP multicasting is enabled by default on the Deployment Server, allowing IP data to be sent to a virtual group of client machines using a single IP destination address.
• Each client multicasts a request packet to locate the Deployment Server (rather than using the Deployment Server’s IP address). This feature is useful, for example, when the RDP system is first deployed in a lab, then moved to a production environment where the Deployment Server may have a different IP address.
• The Deployment Server uses a multicast to deploy an image simultaneously to multiple clients, saving bandwidth.
Deployment Server Database
The Deployment Server Database is the heart of the Deployment Server system, storing information about client machines, events and more.
The Deployment Server Database is a Windows machine running either Microsoft SQL Server 7, or higher, or Microsoft Data Engine (MSDE).
Note: MSDE is included at no charge with Altiris eXpress and may be used to create the Deployment Server Database if SQL Server is unavailable.
The information stored on the Deployment Server Database includes the following:
• General
The machine name and MAC address
• Hardware
Asset tag and serial numbers, memory size, and more
• Configuration
TCP/IP and user information
• Services
Windows services installed
• Devices
Windows devices installed (such as NICs, keyboard, monitor)
• Applications
Applications installed, with publisher, product ID and more
• Location
Site, contact name, phone, e-mail, department, mail-stop
Databases for multiple RDS systems can exist on a single machine; however, a Deployment Server can communicate with only one database.
File Server
The File Server (also known as the Deployment Server Access Point) stores image files, registry files, script files, and more.
DHCP Server
Dynamic Host Configuration Protocol (DHCP) is an Internet protocol that allows a client machine to obtain a temporary IP address from a pool of addresses administered by a DHCP Server.
An RDP environment that supports Pre-boot Execution Environment (PXE) requires the use of a DHCP server, which supplies the address of the Boot Server (the PXE Server) to the client.
PXE Server
Pre-boot Execution Environment (PXE) – pronounced “Pixie” – is a component of Intel’s Wired for Management (WfM) specification. WfM functionality includes manageability features, remote wake up, power management, and the capability to use the network as a boot device.
In an RDP environment, the PXE Server allows PXE-enabled client machines to download and boot from a preconfigured boot image4, eliminating the need to visit each machine with a floppy diskette. The client machine does not need to be running an operating system or Altiris Client for DOS (BootWorks).
Note: PXE capability is required for the remote management of headless client machines5, such
as ProLiant BL servers.
The client machine automatically obtains the IP address of the PXE Server from the DHCP Server. The PXE Server points to the appropriate boot image in the File Server, which becomes a boot device in the same way as a hard drive, a CD-ROM drive or a floppy drive.
There can be an unlimited number of PXE Servers in an RDP system.
Client Machine
A client machine is a server that can be managed from the Console. The following conditions apply:
• Any server running a supported Windows operating machine can become a client machine.
• A client machine can be managed by only one Deployment Server at a time.
• The client machine requires continuous access to the Deployment Server; no remote management is possible if access is interrupted.
• A client that is not PXE-enabled must be booted manually prior to each deployment or redeployment.
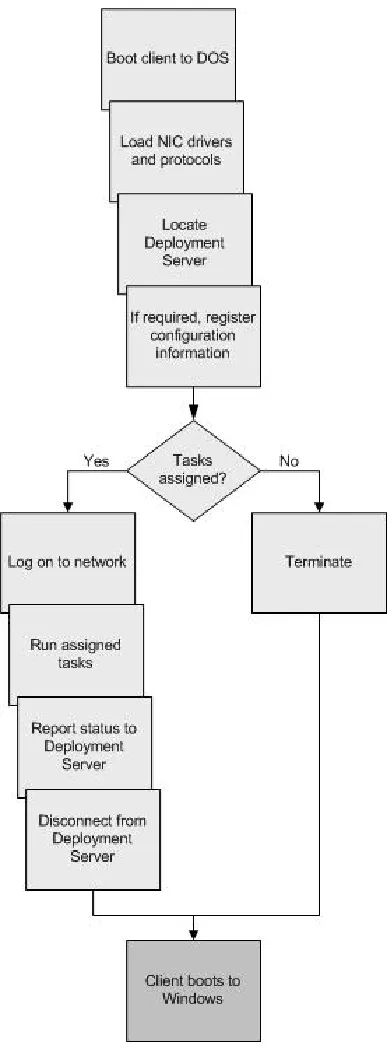
PXE-enabled client
A PXE-enabled client with no operating system installed or running can be booted over the network (as shown in Figure 7).
Figure 7: Boot sequence for a PXE-enabled client machine
New Compaq servers – including ProLiant BL, DL and ML models – include PXE capability. Legacy servers can become PXE-enabled by upgrading to the appropriate Network Interface Card (NIC). For example, the Compaq NC3123 Fast Ethernet NIC includes a ROM option that can be
flashed to provide PXE capability.
For a PXE-enabled client machine, the NIC must be the first device in the boot order. Refer to the particular hardware set-up manual for information on configuring the client machine to support PXE. The Compaq website offers additional guidelines for configuring ProLiant DL320 and DL360 servers.
Registering with the Deployment Server
Client Software
Altiris eXpress includes the following client software:
• Altiris Client for DOS (BootWorks) is a DOS-based boot image that may be uploaded to the client machine from the File Server. BootWorks allows the client machine to be managed from the Console until the client’s operating system is running.
• When the operating system is running, Altiris Client for Windows(AClient) allows the client machine to be managed from the Console using images and/or scripts. AClient can load new software, reboot, power off, and more. With AClient running, BootWorks is no longer functional.
Both clients communicate with the Deployment Server; BootWorks also communicates with the File Server.
Either client can register the machine’s address name, serial number, MAC address and other information with the Deployment Server, which is then able to manage the machine through the Console.
Note: Altiris client software should not be installed on the same machine as a management server (such as a Deployment Server, a Deployment Server Database or a PXE Server).
The following sections provide more information on AClient and BootWorks.
AClient
AClient is a Windows 2000 and Windows NT 4.0 utility that allows individual client machines to be managed from the Console.
IMPORTANT: For maximum manageability, AClient should be installed on all servers in the server farm; network connections between the servers and the Deployment Server must be maintained.
After the operating system is running on the client machine, AClient supports the following activities:
• Registering configuration and profile information
• Supporting a remote boot, if needed, to run an event
• Deploying or redeploying servers and applications
• Pre-configuring or post-configuring the client
BootWorks
BootWorks is a DOS client that allows low-level management tasks to be performed on a client machine with no operating system running.
BootWorks can be executed from the following locations:
• Memory
The BootWorks executable can be downloaded from the network to a PXE-enabled client machine (as shown in Figure 8). BootWorks runs in the client machine’s memory.
This is the typical method for an RDP environment.
Figure 8: Running BootWorks from memory
• Network
The client machine boots to DOS, then runs BootWorks from a network drive (as shown in Figure 9).
With this method, the BootWorks executable is not installed on the local drive. The client must be booted manually using a floppy diskette each time the administrator wishes to deploy an image.
Note: BootWorks is required each time the client machine is provisioned because a new script or image is used; the operating system is not available to control the machine.
• Hard drive
The BootWorks executable is installed on the local hard drive. By default, the executable is stored in a hidden portion of the hard drive’s production partition; optionally, the
administrator can install the executable in a dedicated partition.
Note: The boot images used for each of these methods are not interchangeable. The
administrator must identify the desired method before creating the image (refer to the procedure
later in this White Paper).
Managing Client Machines
RDP supports the following methods for managing client machines:
• Imaging
Imaging (or cloning) is a method used to deploy operating systems, servers or applications. To replicate an exact configuration (an image), the administrator takes a snapshot of all or part of a hard drive, or a set of files, then, through the Console, deploys this image on selected client machines.
• Scripting
Scripting integrates batch files, utilities and configuration files to create a list of commands (a script) that, through the Console, can be executed without user intervention. SmartStart
Scripting Toolkit offers a flexible method for creating standard scripts that automate many of the manual steps in the installation and configuration process. Administrators can take advantage of customizable, pre-configured scripts or develop their own scripts for particular deployments.
The Configuration script, a sample script provided by Compaq, includes the tasks required to load the Windows 2000 operating system, with hardware and software settings, and links. This script can be edited to suit a particular environment.
Table 4 compares imaging and scripting.
Table 4. Comparison between Imaging and Scripting
Characteristic Imaging Scripting
Methodology A snapshot is taken of all or part of a hard drive, or a set of files; using RDP the snapshot can be replicated on other machines.
Batch files, utilities and configuration files are used to create a list of commands that can be executed by RDP without user intervention.
Benefits Imaging is fast; a Windows 2000 deployment typically takes less than ten minutes.
Scripting is flexible; the same script can be used without modification for a number of different server models.
Disadvantages Imaging lacks flexibility; a unique image is required for each hardware
configuration.
Scripts are time-consuming and complicated to create and maintain.
Scripting is slower; a Windows 2000 deployment can take 90 minutes or more.
Assigning Tasks or Events
Through the Console, the administrator can assign tasks – either individually or in sequence – to selected client machines to be queued (using the Deployment Server Database) or performed in real-time.
Note: A sequence of tasks is known as an event.
Table 5 provides examples of tasks and events that can be performed through the Console:
Table 5. Sample Tasks and Events
Queued Real-time
Console!Deployment Server Database!
Deployment Server Console!Deployment Server
Create one of the following tasks or events; assign to desired client machines; schedule:
• Imaging
• Installing or removing applications
• Backing up or restoring registries or user profiles
• Obtain remote control of the client
• Initiate a file copy session with the client
• Open a chat session with the client
• Execute a command on the client
• Re-boot, shutdown, and more
The following section illustrates different RDP implementation scenarios.
Implementation Scenarios
This section suggests RDP configurations to meet various business needs.
Small Configuration
The RDP configuration shown in Figure 11 is suitable for a small business or a test environment with a single subnet.
Figure 11: A small configuration, with all management servers on a single machine
All management components are implemented6 on a single server.
PXE-enabled client machines added to this configuration automatically connect to the PXE server, load the appropriate image, and appear in the Console. These client machines can then carry out assigned tasks or events.
To allow the new client machines to be managed through the Console, AClient must be installed7 on each machine.
Medium Configuration
The RDP configuration shown in Figure 12 is suitable for a medium business with multiple subnets.
Figure 12: A medium configuration, with PXE and DHCP Servers for each subnet
PXE-enabled client machines added to this configuration automatically connect to the PXE server, load the appropriate image, and appear in the Console. These client machines can then carry out assigned tasks or events.
To allow the new client machines to be managed through the Console, AClient must be installed on each machine.
Enterprise Configuration
The RDP configuration shown in Figure 13 is suitable for an enterprise that needs to control software deployment from a central location. The enterprise environment can include branch offices and remote sites; if the environment includes multiple data centers, the Distributed Environment is more appropriate.
Figure 13: An enterprise configuration, with multiple Deployment Servers
Distributed Configuration
The RDP configuration shown in Figure 14 is suitable for an enterprise that wishes to control software deployment from a central location. The environment includes multiple data centers, scaling this configuration beyond the scope of the Enterprise Configuration described above.
RDP Networking Considerations
This section discusses networking challenges associated with the implementation of RDP in a large or complex corporate environment. This section provides information on the following topics:
• Subnets and routing
• Performance
• Multicasting
Subnets and Routing
Table 6 summarizes the challenges associated with implementing RDP across multiple subnets.
Table 6. Challenges Associated with Subnets and Routing
Challenge Comments
Using a single Deployment Server
PXE uses a broadcast-based communication protocol8 and is dependent on DHCP. For an environment with multiple subnets, routers must be configured to pass the broadcast packets.
Using multicasts If a multicast is used to connect AClient to the Deployment Server in an environment with multiple subnets, routers must be configured to pass the multicast packets. Alternatively, AClient can use a specific IP address to locate the Deployment Server.
Using a single DHCP/PXE Server
A single DHCP/PXE Server can service multiple subnets but the subnets should be located in the same general area.
Using PXE over a WAN Using PXE over an entire WAN is undesirable due to timing and latency issues associated with broadcasting. For this reason, there should be at least one DHCP/PXE Server at each location.
Performance
Administrators are challenged to maintain the bandwidth available for production activities while expediting server deployments. One solution is to implement RDP on a dedicated network; Table 7 offers additional suggestions.
Table 7. Performance Challenges
Challenge Comments
Transferring gigabytes of data
Deploying a server can involve the transfer of gigabytes of data. For an RDP environment with frequent deployments, Compaq recommends using a 100Mb network link (minimum) to reduce the risk of saturation.
Limiting bandwidth Altiris eXpress offers several methods for limiting the bandwidth used for deployment activities.
• Image multicasting
The image is sent across the network to multiple client machines simultaneously. Refer to the procedure below for instructions on configuring multicasting for a particular environment.
• Scheduling
Events can be scheduled to take place during off-peak hours when more bandwidth is available.
• Throttling
Configuring Multicasting
Follow these steps to configure multicasting for a particular environment.
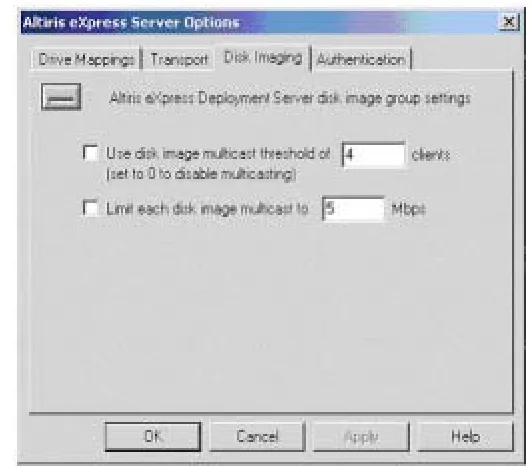
1. Select Control Panel!Altiris eXpress Server Options.
2. At the Altiris eXpress Server Options dialog box; select the Disk Imaging tab (as shown in Figure 15).
Figure 15: Selecting the appropriate multicasting option
3. Select the appropriate multicasting option:
– Enable multicasting to an unlimited number of client machines Clear the Use disk image multicast … check box.
– Enable multicasting when a set number of machines is exceeded
To use multicasting when deploying an image to more than a set number client machines, check the Use disk image multicast … check box. Enter the desired number in the clients field.
Note: If the specified number of client machines is not exceeded, the image is deployed to each machine individually.
– Disable multicasting
Setting Up an RDP Environment
This section provides step-by-step instructions for setting up a simple RDP environment that places the Deployment Server, Console, Deployment Server Database, PXE Server and File Server on the same machine (as shown in Figure 11: A small configuration, with all management servers on a single machine.)
Instructions are provided for the following stages of the RDP environment set-up:
• Installing RDP
Setting up each of the RDP components
• Supplying DOS files
Supplying the DOS files required to boot the client machine to run BootWorks
• Installing ProLiant Installation Integration Module
Populating the Deployment Server with Compaq software components
Installing RDP
The first stage in setting up an RDP environment is the installation of RDP on the machine designated as the Deployment Server. This section provides information on installation prerequisites and system requirements, followed by step-by-step installation instructions.
Prerequisites
To prepare for the RDP installation, gather the following software and associated documentation:
• The RDP CD-ROM
• Windows 2000 CD-ROM
• A Windows 95/98 boot diskette or CD-ROM (for DOS files)
• Altiris license key file – an Altiris software license is not included with RDP and must be purchased separately; for more information, click register on the Altiris website
IMPORTANT: If your RDP environment includes a PXE Server, make sure that a DHCP Server is running on the LAN before the software is installed.
System Requirements
Make sure that the Deployment Server meets the following hardware requirements:
• Processor with Intel Pentium III or higher
• Microsoft Windows 2000 Server or Advanced Server installed and running
Instructions
1. Insert the RDP CD-ROM into the Deployment Server’s CD-ROM drive.
2. At the Compaq Software License Agreement screen (shown in Figure 16), click Agree.
Figure 16: Agreeing to the RDP end-user license agreement
3. At the Rapid Deployment Pack screen (shown in Figure 17), click Install Software.
Figure 17: Selecting the option to install RDP software
5. At the installation-type selection screen (shown in Figure 18), Compaq recommends selecting simple install to place the Deployment Server, Console, Deployment Server Database, PXE Server and File Server on the same machine (as shown in Figure 11: A small configuration, with all management servers on a single machine).
Note: The RDP environment with all management servers on a single machine is simple to install, easy to use, and requires minimal computing resources. More complex environments can be configured to meet particular business needs. To review or edit the installation process, select custom install.
Figure 18: Selecting the “simple install” option
6. At the Altiris Software License Agreement screen (shown in Figure 19), click Agree.
7. At the Deployment Server Client Access Point Information screen (shown in Figure 20), perform the following steps:
a. Either accept the default directory or enter the name of the directory on the File Server where you wish to install the Altiris files.
b. Check the Create ‘eXpress’ share box so that the network share is automatically created.
c. Enter the location of the Altiris license key file in the License file field.
Note: The license key file is not part of RDP and must be purchased separately from Altiris. However, RDP includes a seven-day, ten-user license that is activated if no entry is made in the License key field.
d. Click Next.
Figure 20: Creating a network share for the Altiris files and activating the Altiris software license
8. At the Deployment Server Information screen (shown in Figure 21), perform the following steps:
e. Specify where you wish to install the Deployment Server – either on this or a remote machine.
f. Specify the IP address of the Deployment Server.
g. Specify the path for the Deployment Server.
h. Either accept the default username for the File Server’s service account or enter a new username; enter a password for this account.
i. Click Next.
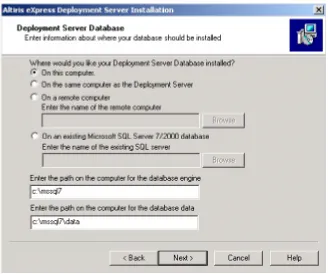
9. At the Deployment Server Database screen (shown in Figure22), perform the following steps:
a. Specify where you wish to install the Deployment Server Database – on this machine, on the same machine as the Deployment Server, on a remote machine, or on an existing SQL database.
b. Specify the path to the database engine.
c. Specify the path to the database data.
d. Click Next.
10. At the Gathering Information screen (shown in Figure 23), enter the credentials of the user with administrative rights over the SQL database.
Click Next.
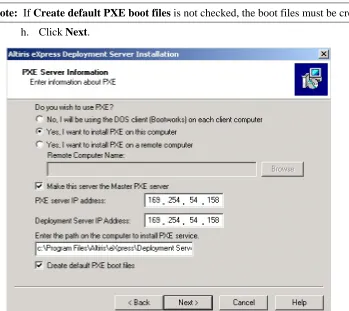
11. At the PXE Server Information screen (shown in Figure 24), perform the following steps: a. Specify if you wish to deploy a PXE server or if you wish to install BootWorks on
each client machine.
b. Specify where you wish to install the PXE Server – on this server or on a remote server.
c. If appropriate, specify that this is the master PXE Server.
d. Specify the IP address of the PXE Server.
e. Specify the IP address of the Deployment Server.
f. Specify the path to the PXE Server.
g. Check the Create default PXE boot files box.
Note: If Create default PXE boot files is not checked, the boot files must be created manually.
h. Click Next.
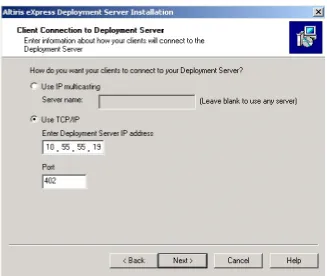
12. At the Client Connection to Deployment Server screen (shown in Figure 25), specify the method used by client machines to connect to the Deployment Server, either:
– The Use IP multicasting option allows each client to send a TCP/IP multicast to locate the Deployment Server, or
– The Use TCP/IP option requires you to enter the IP address of the Deployment Server.
Click Next.
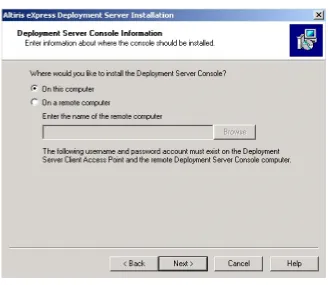
13. At the Deployment Server Console Information screen (shown in Figure 26), specify where you wish to install the Console – either on this or a remote machine.
Click Next.
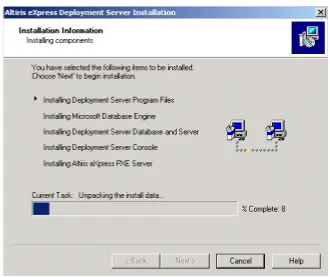
14. The Installation Information screen (shown in Figure 27) lists the RDP components to be installed.
Select Next to begin the installing the RDP components.
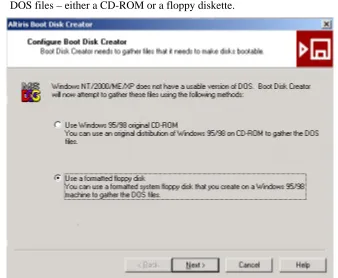
Supplying DOS Files
As part of the setup of the RDP environment, the Configure Boot Disk Creator tool is invoked automatically so that the administrator can supply particular DOS files – either from a Windows 95/98 CD-ROM, or from a formatted floppy diskette created from a Windows 95/98 installation.
Note: Windows 2000 does not include a usable version of DOS.
Instructions
This procedure provides instructions for supplying DOS files that are needed in the RDP environment.
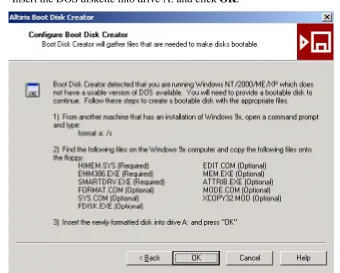
1. At the Configure Boot Disk Creator screen (shown in Figure 28), specify the source of the DOS files – either a CD-ROM or a floppy diskette.
2. The next Configure Boot Disk Creator screen (shown in Figure 29) displays instructions for copying DOS files from a Windows 95/98 installation – HIMEM.SYS, EMM386.EXE, and SMARTDRV.EXE, which are required, and a number of optional files.
Insert the DOS diskette into drive A: and click OK.
Figure 29: Creating a DOS diskette from a Windows 95/98 installation
This completes the setup of the RDP environment. You can now install the ProLiant Integration Module.
Installing
ProLiant
Integration Module
ProLiant Integration Module for Altiris eXpress populates the Deployment Server with the following software components:
• The latest version of SmartStart Scripting Toolkit, Compaq optimized drivers and management agents
• The latest versions of Compaq optimized drivers and management agents
• Events and scripts created by Compaq to be loaded into the Console
Instructions
1. Insert the RDP CD-ROM into the Deployment Server’s CD-ROM drive.
2. At the Rapid Deployment Pack screen (shown in Figure 30), click ProLiant Integration Module for Altiris eXpress.
Figure 30: Selecting the option to install ProLiant Integration Module
3. Select Install Software.
5. At the Welcome! screen (shown in Figure 31), click Agree.
6. The Event Selection screen (shown in Figure 32) allows you to add one or more events to the Console. Select from the following categories:
– Windows 2000 scripted install events
Select the appropriate server models for your RDP environment: ProLiant BL 10e or
ProLiant DL/ML or both. – Linux scripted install events
Clear all Linux check boxes.
– SmartStart Toolkit and operating system imaging events Select all Windows check boxes; clear all Linux check boxes.
– SmartStart Toolkit hardware configuration events Select all check boxes.
Click Next.
7. The OS CD Copying screen (shown in Figure 33) requires you to gather specified OS media – for this installation, the Windows 2000 CD-ROM.
Insert the Windows 2000 CD-ROM into the Deployment Server’s CD-ROM drive.
Click Next to copy the Windows 2000 \i386 directory.
Figure 33: Specifying the OS distribution that is required to complete the installation
8. Click Finish.
This completes the set-up of the RDP environment. An RDP icon appears on the desktop; click this icon to invoke the Console.
The next section provides instructions for booting client machines to BootWorks.
Booting Client Machines
This section provides step-by-step instructions for managing client machine’s boot options – from creating a new boot configuration to plugging in client machines.
Instructions are provided for the following activities:
• Creating a new boot configuration
Generating boot files to boot client machines to the BootWorks executable
• Configuring the Managed PC option
Allowing newly-booted client machines to run assigned jobs
• Plugging in new blade servers
Creating a New
Boot Configuration
This section provides instructions for creating a new boot configuration (with no client machines registered with the Deployment Server). The boot files created by this procedure are used to boot client machines to the BootWorks executable.
Note: A new boot configuration must be recreated if different Network Interface Cards (NICs) are installed.
Instructions
Follow these steps to create files that can boot a client machine with no operating system installed or running to the BootWorks executable.
1. Select Tools!Boot Disk Creator from the Console (as shown in Figure 34).
2. At the Boot Disk Creator dialog box (shown in Figure 35), select Create a new configuration, then click OK.
Figure 35: Selecting the option to create a new configuration
3. At the Welcome screen (shown in Figure 36), enter a name for the new configuration, and then click Next.
4. The Client Installation screen (shown in Figure 37) allows you to specify one of the following options for running the BootWorks executable:
– The BootWorks boot disk option creates either:
– For a PXE-enabled client machine, a boot file that is downloaded from the File Server, allowing BootWorks to run in the client machine’s RAM, or
– For a non-PXE-enabled client machine, boot diskettes that allow the client machine to run BootWorks from a network share (the File Server).
– The BootWorks install package option installs BootWorks on the client machine’s hard drive.
Click Next.
5. At the File Server Type screen (shown in Figure 38), select the Microsoft Windows option, specifying that the File Server is running Windows. Click Next.
6. At the Network Adapters screen (shown in Figure 39), select the Network Interface Card (NIC) that is installed in the client machine. Click Next.
Note: For a ProLiant BLe10 server, check the Use Intel universal NIC driver for Preboot Execution Environment (PXE) check box.
For a ProLiant DL server, clear the check box, then select Compaq Ethernet or Fast Ethernet NIC.
7. At the TCP/IP Protocol Settings screen (shown in Figure 40), select the Obtain an IP address from a DHCP server option, which causes the client machine to automatically obtain an IP address from the DHCP Server.
Click Next.
8. At the Altiris eXpress Server Communication screen (shown in Figure 41), select the Use TCP/IP to connect to Altiris eXpress server to specify the IP address of the Deployment Server. Click Next.
9. At the Network Connection screen (shown in Figure 42), enter the following network settings for the client machine:
– Domain/Workgroup
– User name
– Password
Click Next.
10. At the Network Drive Mappings screen (shown in Figure 43), select the Manually create drive maps option, allowing you to manually map a drive path to the network share (File Server).
Figure 43: Selecting the option to manually create drive maps
11. The Finish screen (shown in Figure 44) summarizes the new configuration. If acceptable, select Finish to save the configuration.
12. Boot Disk Creator requires you to specify the media used to save the new configuration (as shown in Figure 45).
– Select Create PXE boot file for PXE-enabled client machines.
– Select Create floppy disk sets for non-PXE-enabled clients.
Click OK.
Figure 45: Selecting the option to create a PXE boot file
13. At the Create a PXE Boot File screen (shown in Figure 46), accept the default PXE boot file location – the network share. Click Next.
14. The next Altiris Boot Disk Creator screen (shown in Figure 47) displays the location of the PXE boot file in the network share. Click Close.
15. The next Altiris Boot Disk Creator screen (shown in Figure 48) allows you to add optional DOS utilities (such as EDIT.COM, MEM.EXE or DOSKEY.EXE) to the new configuration.
Note: You can include these optional utilities only if you selected the BootWorks install package (see Step 4) to install BootWorks on the client machine’s hard drive.
Configuring the Managed PC Option
The Console’s PXE Configuration tool allows the administrator to manage PXE boot menu options and control the PXE Server’s response to a boot request from a client machine. This procedure makes sure that client machines run assigned jobs when booting.
Instructions
1. From the Console, select Tools!PXE Configuration.
2. Specify the name or IP address of the PXE Server – RDP in the example shown in Figure 49.
3. At the PXE Configuration Utility screen (shown in Figure 50), select the Boot Configuration tab.
Move Altiris BootWorks (Managed PC) to the top of the Menu Items list, then click Edit.
Note: Client machines run the item at the top of the list when booting. If the Local Boot item is at the top of the list, jobs assigned to managed PCs at boot-time are not run.
4. The Menu Item Properties dialog box (shown in Figure 51) displays the properties of Altiris BootWorks (Managed PC).
Verify that the IP address of the Deployment Server is correct, then click OK.
Figure 51: Verifying the IP address of the Deployment Server
5. At the Boot Configuration tab (shown in Figure 52), click OK.
Plugging in new Blade Servers
After being plugged in, new blade servers boot automatically. The machines are recognized by the Deployment Server and appear in the Console. Figure 53 shows a sample Console screen where five new blade servers – COMPAQ-Enclosure-01-1 through –5 – are displayed.
Note: ProLiant DL servers must be powered up before being recognized.
Figure 53: A Console display, showing five new client machines – blade servers named COMPAQ-Enclosure-01-1 through –5
Using Scripted Events to Deploy a
Citrix MetaFrame XP FR2 Server Farm
This section provides instructions for using scripted events to deploy Windows 2000 to a group of client machines – in this example, Compaq ProLiant BL servers in a group named 1P Blades. Note: Compaq successfully used the same procedure on ProLiant DL servers after substituting
ProLiant DL/ML events for ProLiant BL10e events. Instructions are provided for the following activities:
• Prerequisites
• Deploying Windows 2000 to a group of client machines
• Renaming the client machines and adding these machines to a particular domain • Deploying Citrix MetaFrame XP FR2 and applications to the client machines • Running the license utility script
• Testing the server farm
Prerequisites
Carry out the following activities before initiating a scripted Windows 2000 install:
1. Verify that RDP environment has been set up according to the instructions supplied earlier in this White Paper.
2. Verify that Windows 2000 Service Pack 2 files from the CD-ROM’s \i386 directory have been copied to the following Deployment server directory during the RDP installation:
C:\Program Files\Altiris\eXpress\Deployment Server\ deploy\cds\windows\w2k\i386
3. Customize the Windows 2000 Unattend.txt file for your environment.
Deploying Windows 2000
1. Follow these steps to customize the sample ProLiant BL10e Scripted Install for Microsoft Windows 2000event for your environment (this process is identical for DL/ML servers, using the sample ProLiant ML/DL Scripted Install for Microsoft Windows 2000):
Note: For example, you may need to update the location of the Unattend.txt file.
a. Select the ProLiant BL10e Scripted Install for Microsoft Windows 2000 event in the Console.
b. Review the tasks (shown in Figure 54) that make up the event.
c. To edit a particular task, select the task, then click Edit.
2. Using the Console, drag-and-drop the customized event on to the 1P Blades group (as shown in Figure 55).
3. When the Schedule Event dialog box (shown in Figure 56) pops up, schedule the deployment event.
– Select the Run this event immediately option for immediate execution.
– Select the Schedule this event option to schedule the event for later deployment.
Click OK.
Figure 56: Scheduling the event to run immediately
Windows 2000 is immediately deployed on to all client machines in the 1P Blades server group. The next section provides instructions for adding the client machines to an existing domain.
Adding Renamed Client Machines
to a Domain
This procedure provides instructions for using a scripted event to rename the client machines in 1P Blades, and then adding the machines to a domain named CTXSCPQ.
1. Follow these steps to configure a new event: a. In the Console, right-click Events.
b. Click New Event to pop up a New Event dialog box in the Console.
c. Right-click the New Event box.
d. Click Rename.
Figure 57 shows the new event displayed in the Console.
2. Follow these steps to configure the new event to rename the client machines: a. Right-click Join servers to domain.
b. Click Properties.
c. Click Add.
d. Click Change Configuration (as shown in Figure 58).
e. At the Define Configuration Set dialog box (shown in Figure 59), click Define Range, allowing you to specify a convenient range of names for the client machines in 1P Blades.
Figure 59: Clicking Define Range to invoke the Computer Name Range dialog box
f. At the Computer Name Range dialog box (as shown in Figure 60), create the desired names – 1PBLE1, 1PBLE2, … , in this example.
– Enter the appropriate Fixed text for the names.
– Enter the appropriate Range start value; check Append if you wish to append the range start value to the fixed text.
Click OK.
3. Follow these steps to define the domain user account that will be used to join the client machines to the domain:
a. Click User Account, which is located in the pane at the left of the Define Configuration Set dialog box (shown in Figure 61).
Figure 61: Defining a domain user account
b. Enter the appropriate User Name, Password, and (User) Groups.
4. Follow these steps to specify the domain that you wish the renamed clients to join: a. Select Domain in the Define Configuration Set dialog box (shown in Figure 62).
b. Enter the name of the domain you wish the renamed servers to join – CTXSCPQ in this example.
Figure 62: Entering the name of the domain you wish the renamed client machines to join
c. Click OK to close the Define Configuration Set dialog box.
d. Click OK to close the Event Properties dialog box.
5. Drag-and-drop the Join servers to domain event on to 1P Blades server group.
Deploying Citrix MetaFrame XP FR2
This section provides instructions for using a scripted event to deploy MetaFrame XP FR2 to a group of client machines – in this example, Compaq ProLiant BL servers in a group named 1P Blades.
The administrator should be aware of major differences (listed in Table 8) between the installation of MetaFrame XP FR2 and earlier versions of MetaFrame.
Table 8. Differences Between the Installation of MetaFrame XP FR2 and earlier versions
Area MetaFrame XP FR2 Earlier Version
Installation file MFXP001.msi located in \MF on the CD-ROM or share
Setup.exe located in \W2K\MF on the CD-ROM or share
Remapped files Achieved using the Citrix-provided utility; drive remapping can no longer be achieved using an unattended script.
Achieved within the installation process; could be scripted using the MetaFrame Unattend.txt file.
This White Paper describes a MetaFrame XP FR2 deployment. The following sections list prerequisites and provide step-by-step instructions.
Prerequisites
IMPORTANT: Citrix recommends remapping drives before installing MetaFrame XP FR2. Citrix does NOT recommend remapping drives after the installation.
With MetaFrame XP FR2, remapped drives can no longer be scripted; the Remap Drives utility on the MetaFrame XP FR2 CD-ROM must be used.
Carry out the following activities before deploying MetaFrame XP FR2.
1. Microsoft Windows Installer 2.0 application and management service is required to install MetaFrame XP FR2. Download Windows Installer 2.0 from the Microsoft website, then copy to a network share point.
2. Ensure that the MetaFrame XP FR2 CD-ROM is available or MetaFrame XP FR2 has been copied to a network share point.
3. The administrator can map a drive from each client machine to the network share or the CD-ROM drive for easy reference within the scripts. Drive mapping can be scripted via an RDP script or use Universal Naming Convention (UNC).
4. Customize the Unattendedtemplate.txt file for your particular environment. This file is located in the following MetaFrame XP FR2 CD-ROM directory:
FR2\support\install
Instructions
Perform the following procedure to create scripts for deploying Citrix MetaFrame XP FR2 to selected client machines.
Note: These instructions can also be used to provide guidelines for creating a script to deploy applications.
1. Follow these steps to create an event to install Windows Installer 2.0 on each selected client machine.
a. Create a new event named WinInstall 2.
b. Click Add on the right-hand side of the Console.
c. Select Distribute Software.
d. Browse to the network share where Windows Installer 2.0 (InstMsiW.exe) is located. The Package Properties dialog box pops up with appropriate location selected in the Filename field – G:/InstMsiW.exe in this example (as shown in Figure 63).
Figure 63: Selecting the Windows Installer 2.0 executable
e. Click OK to close the dialog box.
2. Follow these steps to create an event called FR2 Scripted Install to deploy MetaFrame XP FR2 on selected client machines:
a. Create a new event named FR2 Scripted Install.
b. Click Add on the right-hand side of the Console.
c. Select Run Script.
d. Check the Run this script option.
e. Verify that the client machine has a drive mapped to the network share containing the MetaFrame XP FR2 CD-ROM – drive G: in this example.
f. At the Script Task Properties dialog box (shown in Figure 64), enter the following information on one line in the Run this script field:
G:\support\install\unattendedinstall.exe G:\mf\mfxp001.msi G:\support\install\XPFR2_unattendedtemplate.txt
Figure 64: Entering the script
g. Click OK to close the Script Task Properties dialog box.
Running the License Script
You can create a script to run the Citrix CLicense Utility (as shown in Figure 65) toadd the following Citrix licenses to the server farm:
• MetaFrame XP product license
• MetaFrame XP connection license
• MetaFrame XP FR2 license
NOTE: The Product Code can be scripted through the unattendedtemplate.txt file.
Figure 65: Running the CLicense Utility Script
Testing the Server Farm
Follow these instructions to test the integrity of the server farm:
1. Using a command line, enter qfarm /online to verify that all client machines have joined the server farm.
2. From the Citrix Management Console, verify that you can enumerate all applications and servers.
3. Publish the appropriate applications and verify that load balancing is functioning.
Using Imaging to Deploy a
Citrix MetaFrame XP Server Farm
This section provides step-by-step instructions for using an image to deploy Windows 2000 to a group of client machines – in this example, Compaq ProLiant DL servers in a server group named MetaFrame XP FR2 servers.
IMPORTANT: An image can only be deployed on a client machine that is identical to the machine from which the image was captured. For example, an image