FORTUNE:WORO
™
REFERENCE GUIDE
Reference Guide
I:
FORTUNE
3:!~~~~a~
No part of this document may be copied, photocopied, reproduced, translated, or reduced to any electronic medium or machine-readable form without prior consent in writing from Fortune Systems Corporation. For full details of the terms and conditions for using Fortune software, please refer to the Fortune Systems Corporation Customer Software License Agreement.
Copyright © 1984, 1985 Proximity/Merriam-Webster Linguibase, by Proximity Technology, Inc.
Copyright © 1984, 1985 Proximity/Collins Linguibase by Proximity Technology, Inc.
Copyright © 19.84, 1985 William Collins Son & Co., Ltd. by Merriam-Webster Inc. The information in this document is subject to change without notice and should not be construed as a commitment by Fortune Systems Corporation. Fortune Systems Corporation assumes no responsibility for any errors that may appear in this document. This document describes features available with Fortune:Word
release 3.0.
This document contains samples of names, addresses, and products used to illustrate the features and capabilities of Fortune:Word. Any similarity to the names, addresses or products of actual individuals or companies is purely coincidental.
Fortune is a registered trademark and Fortune:Word., Fortune:Windows, and
FOR:PRO are trademarks of Fortune Systems Corporation.
Reg. U.S. Pat. & Tm. Off.
Consult an authorized Fortune Representative for copies of manuals and technical information.
1006922-01
1 The Fortune:Word Menu Structure 1-1
The Menu Structure 1-1
The Main Menu 1-2
Moving the Marker 1-3
Document Summary Screen 1-4
Editing Screen 1-5
Print Document Menu 1-6
Printer Control Menu 1-7
Index Menu 1-8
Document Index Screen 1-9
Filing Menu 1-10
Document Processing Tools Menu 1-11
Spelling Tools 1-12
Hyphenation and Pagination Menu 1-13
Footnote Processing Menu 1-15
Table of Contents Generator Menu 1-16
Index Generator Menu 1-17
Document Assembly Menu 1-18
Records Processing Menu 1-19
Forms Processing 1-20
Glossary Functions Menu 1-20
Supervisory Functions Menu 1-21
2
Functions, Features, and Keys 2-1Adding Words to an Exception Dictionary 2-1
Alt 2-1
Alternate Format Line 2-1
Alternating Headers or Footers 2-1
Creating an Alternating Header or Footer 2-2
Printing Alternating Headers or Footers 2-2
Archiving 2-3
Archive Diskette Preparation 2-4
Assigning an Archive Diskette Name 2-4
Copying a Document to an Archive Diskette 2-5
Retrieving a Document From an Archive Diskette Copying or Moving Text to a Full Archive Diskette
Arrow Keys Attach Glossary
Attaching a Glossary from the Glossary Functions Menu Attaching a Glossary Using the Shortcut Code
Attaching a Glossary From a Document Index Attaching a Glossary While Editing a Document
Author
Automatic Processing
Automatic Saving of Editing Changes Background Processing
Backspace Banner
Block Copy, Move, Delete Text with Even Columns
Columns with an Uneven Right Margin Columns with Decimal Tab Symbols
Copying a Block of Text with Even Columns Moving a Block of Text with Even Columns Deleting a Block of Text with Even Columns Copying a Block of Text with Uneven Columns Moving a Block of Text with Uneven Columns Deleting a Block of Text with Uneven Columns Copying a Block of Text with Decimal Tabs Moving a Block of Text with Decimal Tabs Deleting a Block of Text With Decimal Tabs Putting a Block of Text at the End of the Line
Copying or Moving a Block of Text Between Documents
Bold Bookmarks
Adding a Bookmark Returning to a Bookmark Deleting a Bookmark
Bottom Margin Cancel
Capitalization in Exception Dictionaries Case Conversion
Center
Centering Text Removing Centering
Moving the Cursor to the Next Center Symbol
Change Library
Changing Libraries From the Supervisory Functions Menu
Changing Exception Dictionaries 2-39
Column Break 2-39
Columns 2-39
Command 2-40
Comments 2-41
On the Document Summary Screen 2-41
In Glossary Documents 2-42
In Exception Dictionaries 2-42
Control (CTRL) 2-42
Control Glossary 2-42
Converting Uppercase to Lowercase and Lowercase to Uppercase 2-43
Copy 2-43
Copying Text Within a Document 2-43
Copying Text Between Documents 2-44
Copying Text Between Windows 2-44
Copying Text with Attributes 2-45
Copying Blocks of Text 2-45
Copying a Document on the System Disk 2-46
Copying a Document From the Filing Menu 2-46
Copying a Document Using the Shortcut Code 2-46
Copying a Document Using the Index 2-46
Creating a New Document 2-47
Creating a New Glossary 2-48
Creation Library 2-48
CTRL 2-48
Cursor 2-48
Basic Cursor Movement 2-49
Cursor Movement Keys 2-51
Cursor Mode 2-54
Dec Tab 2-54
Using the Decimal Tab 2-55
Changing a Decimal Tab Position 2-55
Removing a Decimal Tab From Text 2-56
Using Decimal Tabs with Whole Numbers 2-56
Setting a Format Line for Whole Numbers 2-57
Using Decimal Tabs with Decimal Numbers 2-57
Setting Tab Stops for Columns that Contain Decimal Points 2-57
Using Decimal Tabs for Columns Containing Text 2-59
Using Spaces with Decimal Tabs 2-59
Underlining or Double Underlining Numbers in a Decimal
Tab Format 2-60
Delete 2-61
Deleting a Document 2-61
Deleting a Document From an Archive Diskette 2-62
Deleting a Document From the System Disk Deleting a Document From the System Disk
Using the Shortcut Code
Deleting a Document From the System Disk or an Archive Diskette Using the Index
Describe Bin Feeder Destination Document Detach Glossary
Detaching a Glossary From the Glossary Functions Menu Detaching a Glossary Using the Shortcut Code
Document Assembly
Using Include Statements for Document Assembly Using Nested Include Statements
Procedures for Using an Include Statement Using the Document Assembly Selection
Document Format Document Index Document Index Screen
Document Name
Document Summary
Printing a Document Summary
Document Title Double Underline Down Arrow
Editing a Document
Editing a Document From the Main Menu Editing a Document Using the Shortcut Code
Editing a Document From the Index (System Disk Only) Editing a Document from a Fortune:Word Window Editing a Document From the Global Menu
Editing a Document From a Shell Ending Editing
Editing an Old Glossary
Editing a Glossary From a Menu
Editing a Glossary Using the Shortcut Code Editing a Glossary From an Index
Ending Editing of a Glossary
The Editing Screen
Entry
Screen Message Areas End of Document Line
Exception Dictionary
Creating an Exception Dictionary
Adding Words to an Exception Dictionary Changing Exception Dictionaries
Adding Syllable Points to an Exception Dictionary
Execute Feed Filing Flashing Mode Footer Footnote Processing Placement Processing Sequence Underlined Superscripted Preceded By Followed By
Spacing Between Footnotes Separator Line
Minimum Number of Text Lines Per Page Process From Page, Process Through Page Canceling From Footnote Processing
Changing the Footnote Processing Menu Defaults with the Prototype Document
Footnoting
How Fortune:Word Footnote Reference Numbers Work Entering Footnote References in a Document
Copying Footnote References Moving Footnote References Deleting Footnote References
Reentering Footnote References that Have Been Deleted Going to a Footnote Page
Entering Footnote Text
Footnote Pages and Format Lines Line Spacing in a Footnote Document Using Multiple-Column Format Lines Returning to a Footnote Reference
Finding Out How Many Footnote References are in a Document
Printing a Document with Footnotes
Format
Adding an Alternate Format Line
Adding a Copy of an Alternate Format Line Changing a Format Line
Deleting a Format Line
Right-Flush Tab Stops
Format Archive Disk Format Defaults Format Document Format Line
The Primary Format Line
Deleting and Inserting the Primary Format Line Alternate Format Lines
Alternate Format Line Numbers
Copying or Moving Format Lines From Another Document Wide Documents
Page Breaks and Format Lines
When to Modify an Existing Format Line Deleting a Format Line
Exceeding the Maximum Number of Alternate Format Lines
Forms Processing
Creating a Form Template Document Filling in the Form
Using the End of Form Options Menu
Function Keys GL
Global Search and Replace Glossary
Entry Syntax Keywords
Creating a Glossary Document Using Glossary Functions Correcting Verification Errors
Creating a Glossary Document Using Create New Document Creating a Glossary Entry by Example
Using a Glossary Entry
Go To Page Header Help
Accessing Help From Menu Screens Accessing Help for Spelling Tools Accessing Help From an Editing Screen
Help for Commands
Accessing Help for Commands Leaving Help for Commands
Highlighting Text
Highlighting Text Backward Highlighting Text Forward
Left Margin, Line Length, and Right Margin
Center, Tabs, Indents, Dec Tabs, and Right-flush Tabs Font
Pitch
Justified and Unjustified Right Margin
Hot-Zone Length
Hypenation and Pagination
Using Hyphenation and Pagination Performing Interactive Hyphenation Performing Interactive Pagination
Performing Pagination on a Multiple-Column Document Performing Hyphenation and Pagination on
a Document Containing Footnotes
Hyphens Generated Hyphen Regular Hyphen Optional Hyphen Required Hyphyen Indent Generated Indent
Changing Indent Position Removing an Indent Using Indent
Index
Accessing an Index While Editing a Document Displaying an Index From the Main Menu Displaying an Index Using Shortcut Codes Copying an Index
Printing an Index
Displaying Document Information From the Short-Format Index
Storing a Document or Glossary Name
Index Generator Input Document Output Document Word-List Document
Insert
Using the Index Generator From the Main Menu Using the Index Generator with the Shortcut Code
Inserting Text Canceling an Insert
Inserting or Deleting Text while in Insert Mode
The Keyboard Keywords Layout Left Arrow Left Margin Library
Changing the Library From the Main Menu Changing the Library Using the Shortcut Code
Changing the Library Using the Index (System Disk Only) Changing the Library Using the Index Shortcut Code Returning to the Home Library Using the Shortcut Code Viewing a Listing of Documents in a Library From the Index Moving a Document to a Different Library
Creating a Sublibrary Removing a Library
Limitations and Restrictions Maximum Number of Pages
Maximum Number of Format Lines Maximum Length of Format Line
Number of Processes in Background Mode Searching for Text with Attributes
Length of Glossary Entries
Length of Fdds and Records in a Records Processing List Document
Line Length Line Spacing Lines Per Inch List Document Lock
Margins
Top Margin Bottom Margin
Calculating the Bottom Margin From Header and Text Length
Left Margin Right Margin
Marker Math
Entering Math Mode
Entering Numbers in the Current Result Field Definition of a Numeric Field
Selecting a Number From a Numeric Field Entering the Current Result into Text
Saving or Clearing the Current Result in Keyboard Input Mode
Merge Mode
Adding Emphasis to Existing Text Adding Emphasis While Typing Removing Emphasis From Text
Move
Moving Text Within a Document Moving Text Between Documents Moving Text with Attributes Moving Blocks of Text
Moving Documents Between Libraries Moving Documents to Archive
Multiple Columns
Entering Text in Multiple Columns
Moving the Cursor in Multiple-Column Documents
Using Hyphenation and Pagination with Multiple Columns
Naming a Document Next Scm
Note Note Page Operator
Optional Column Break Optional Page Break Output Document Overstrike
Ownership of Documents Page
Adding an Optional Page or Column Break Adding a Required Page or Column Break
Removing an Optional or Required Page or Column Break
Page Break
Optional Page Breaks Required Page Breaks
Page Length Page Mode Page Numbering
Adding Page Numbering to a Header or Footer Printing a Document with Page Numbering
Password Protecting a Fortune:Word Document Assigning a Password
Changing a Password Removing a Password
Pathname Pitch Prev Scm Print Document Banner Copy Feed
First Footer Page First Header Page Footer Begins on Line Format
LPI
Left Margin No. of Originals Paper
Paper Length Pitch
Print From Page Print Thru Page Print Wheel No. Printer Number Starting as Page No. Style
Summary To File
Print Queue
Print Wheel Number Printer Control
Changing Positions in the Print Queue Removing a Document From the Print Queue Suspending Printing
Restarting a Suspended Job Printing Single Pages
Accessing the Print Queue During Editing
Printer Number Printer Setup Printing
Printing a Document From the End of Edit Options Menu Printing a Document From an Index
Printing Multiple Documents From an Index Printing All Documents in a Library From an Index Printing to a File
Using Hyphenation and Pagination with Proportional Space
Prototype Document
Each Library Has a 0000 Prototype Document Editing the Default Prototype Document Setting Printing Standards
Changing the Footnote Processing Menu Defaults with the Prototype Document
Creating Your Own Prototype Documents Suggestions For Naming Prototype Documents Copying Prototype Documents to Preserve Text
Using an Existing Document as a Prototype Document
Records Processing List Document Format Document Control Glossary Output Document Using Records Processing
Refreshing the Screen Display Removing an Archive Disk Removing a Library
Removing and Restoring Screen Display Renaming a Document
Renaming a Document From the Filing Menu Renaming a Document Using the Shortcut Code Renaming a Document From the Index
Replace
Required Column Break Required Page Break Required Space Restarting Printing Restoring a Page
Retrieving From an Archive Disk Return
Reverse Video Right Arrow Right-flush Tab
Using the Default Right-flush Tab Stop Using Right-flush Tab Stops You Set
Restoring Screen Symbols to the Editing Screen
Scrolling Search
Search Forward Search Backward
Search From the Beginning Repeating or Revising a Search Searching for Text with Attributes Wildcard Search
Sentence Mode
Shell Escapes to the Operating System
Accessing an Operating System Shell From the Document Editing Screen
Redirecting the Standard Output of an Operating System Command to the Editing Screen
Accessing an Operating System Shell From Any Menu
Sheet Feeder Shift Short Format Shortcut Codes Sort Records Fields
Format Rules for Text to be Sorted Sorting Numeric Fields
Sorting More Than One Field How to Sort
Source Document Space Bar
Spacing Spelling Tools
Spelling Checker Spell Editor Spelling Markers
Using Spelling Checker in Interactive Mode Making Spelling Corrections
Using Spell Editor
Status Lines
Turning Off the Status Line Information
Stop
Subscript and Superscript Subscript
Superscript
Tab
Table of Contents Generator Temporary Files
Text Emphasis Text Length
Setting or Changing the Text Length
Title To File
Typing Over Text Underline
Unjustified Text Up Arrow Verify Glossary
Verifying a Glossary From the Main Menu Verifying a Glossary Using the Shortcut Code
Vertical Scrolling Vertical Spacing Wildcard Search Windowing
Adding a Window
Jumping Between Windows Flipping Between Windows Closing Windows
Help in Windows
Word-List Document Word Mode
Word Wrap Work Page
3 Error Messages
Preventing Errors Memory Errors
Error Messages in Alphabetical Order
Appendix A Troubleshooting
Corrupted Documents
What to do if the Terminal Hangs Temporary Files
Searching for Text with Attributes
Appendix B Operating System Information B-I
Fortune:Word File Structure B-I
Fortune:Word Document Control Codes B-3
Fortune:Word Library Structure B-3
Inodes and Archiving B-II
Suspended Printing Settings B-II
Permissions and Ownership of Files B-12
Appendix C Protecting Documents and Libraries Col
Fortune Systems Security Col
Password Protection C-2
The Fortune:Word File Structure C-3
Ownership Permissions C-3
File Permissions C-6
Appendix D Setting the LANGUAGE Variable for
Multilingual Fortune:Word D-I
The Language Variable D-2
Customizing Your Fortune:Word Language Environment D-3
Appendix E Changing the ASCII Collating Sequence E-I
The ASCII Collating Sequence E-I
The Case-Insensitive ASCII Collating Sequence E-I
Changing the Case-Insensitive ASCII Collating Sequence E-4
The Fortune Systems Character Sets E-5
The Structure of the Character Table File E-6
Creating the Character Table File E-9
Error Messages E-19
Summary E-19
Appendix F How to Access Alternate Character Sets F-I
The Fortune Systems Character Sets F-I
Entering Alternate Characters in a
Fortune:Word Document F-2
Using Fortune:Word Glossaries with
Alternate Character Sets F-3
Index IN-I
This guide is a learning and reference tool on all Fortune:Word features. You can learn Fortune:Word as you work, referring to specific functions in the alphabetical listing in Chapter 2 of this guide as needed. You can also teach yourself
Fortune:Word by using How to Use Fortune:Word, a self-paced learning guide.
This guide contains examples of all the screens, and explanations for every function, feature, key, screen symbol, and error message in Fortune:Word. Two additional manuals provide detailed information on two Fortune:Word functions that are described briefly in this guide: Glossary and Records Processing.
• The Fortune: Word Glossary Users Guide describes how to create and use glossary documents in which you can save text and keywords for later recall.
• The Fortune: Word Records Processing Users Guide describes how to use Records Processing to quickly produce customized form letters, labels, or lists.
Records Processing can also be used as a simple database management system.
HOW THIS BOOK IS ORGANIZED
This book has three chapters, six appendices, and an index. Following is a brief description of each part:
Chapter 1: The Fortune:Word Menu Structure contains an overview of the primary Fortune:Word menus, and includes a brief explanation of how to access and perform activities from these menus.
Chapter 2: Functions, Features, and Keys contains an alphabetical listing of Fortune:Word functions, features, and keys with step-by-step instructions on how to perform each procedure.
Chapter 3: Error Messages contains an alphabetical listing of Fortune: Word error messages.
Appendix B: Operating System Information contains information about the Fortune:Word file and library structure and how it relates to the operating system.
Appendix C: Protecting Documents and Libraries contains information about using operating system ownership and permissions to control Fortune:Word
document and library security.
Appendix D: Setting the LANGUAGE Variable for Multilingual
Fortune:Word contains information on how to set the LANGUAGE variable if you have a different language version of Fortune:Word.
Appendix E: Changing the ASCII Collating Sequence contains information on how to change the order of the collating sequence, or add special characters such as accented letters so they are sorted correctly.
Appendix F: Accessing Alternate Character Sets in Fortune:Word contains information on how to display special characters from alternate character sets on a Fortune terminal.
CONVENTIONS USED IN THIS GUIDE
The following conventions are used throughout this guide:
• The names of keyboard functions and editing keys you press are capitalized, as shown in the following examples:
RETURN SEARCH INDENT EXECUTE
• The four directional arrow keys that move the cursor are identified as follows:
UP DOWN LEFT RIGHT
• To perform certain Fortune:Word functions, you hold down one key while you press a second key. This combination of keystrokes is shown in the following way:
Press SHIFT/COPY Press SHIFT/MERGE Press CTRL/y
In the examples above, you hold down SHIFT while you press COpy or MERGE, and hold down CTRL while you press y.
• Words or phrases you type are in boldface type, as shown in the following example:
Type rad
Type rad
• Screen prompts, messages, and menu selections are in italic type, as shown in the following examples:
Press EXECUTE to continue
Select Edit Old Document from the Main menu
• Fortune:Word document names are in bold type as shown in the following example:
Prototype document 0000 contains the system defaults
• In general, when the word "select" is used in a step, the specific keystrokes required to make that selection are not included as part of the step, as shown in the following example:
From the Main menu select Print Document
RELATED FORTUNE DOCUMENTS
Following is a list of other Fortune pUblications that will be of interest to you:
• How to Use Fortune:Word
• Fortune: Word Glossary Users Guide
• Fortune: Word Records Processing Users Guide • FOR'PRO Users Guide
• Using Fortune Terminals
The Fortune:Word Menu Structure
Before you can use Fortune:Word, you must install it and back it up. To do this, follow the instructions in the release letter or the operating system manual. This chapter introduces the Fortune:Word menu structure.
THE MENU STRUCTURE
3/87
When you select Fortune:Word from the Fortune Systems Global menu, the Fortune Systems Word Processing menu appears. This menu is referred to in this guide as the Main menu. The Main menu lists the Fortune:Word activities you can choose. Fortune: Word functions are organized into groups of screens.
When you select an activity from the Main menu, you see another screen with additional selections you can choose. Prompts and error messages are displayed occasionally on some screens to guide you through a selected activity or function.
On-screen help can be accessed by pressing the Help key. The list of help topics provides specific information for each function.
• Help for Menus is displayed when you press HELP from a menu screen
• Help for Editing is displayed when you press HELP from an editing screen
• Help for Spelling Tools is displayed when you press HELP while you are using Spelling Checker
interactively
Once you have become familiar with the Fortune:Word menu structure, you can use shortcut codes to bypass menus and go directly to the function you want to perform.
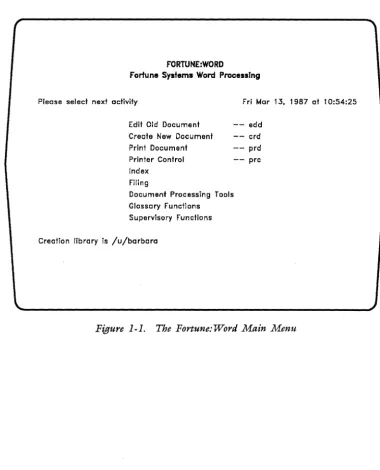
The Main Menu
The Main menu, shown in Figure 1-1, displays Fortune:Word activities available to you. Selecting any activity on
r
\.
this menu leads to another screen, which may itself be a menu and lead to still another screen.
FORTUNE:WORD
Fortune Systems Word ProcessIng
Please select next activity Fri Mar 13, 1987 at 10:54:25 Edit Old Document
Create New Document Print Document
- - add
- - crd Printer Control
Index Filing
Document Processing Tools Glossary Functions Supervisory Functions
Creation library is /u/barbara
- - prd - - prc
Figure 1-1. The Fortune: Word Main Menu
[image:23.513.64.444.116.585.2]Moving The Marker
3/87
The marker is the bright rectangle on a menu screen. You use the marker to select the activity you want to
perform. There are several ways to move the marker to your selection. The keys you can use are described below. These keys work in the same way on all menu screens.
Key you press
UP
DOWN
SPACE (Space bar)
RETURN
a, b, c, and so forth
EXECUTE
CANCEL
Results
Moves the marker up one selection at a time and from the top item to the bottom item.
Moves the marker down one selecti0n at a time and from the bottom item to the top item.
Works the same way as DOWN and
RETURN.
When a menu has more than one section, moves the marker from section to section. When a menu has only one list of
selections, works the same way as DOWN and SPACE.
Moves the marker to the next selection that begins with that letter.
Selects the activity at the marker location.
Ends the selected activity. If you press CANCEL from the Main menu, you exit Fortune: Word.
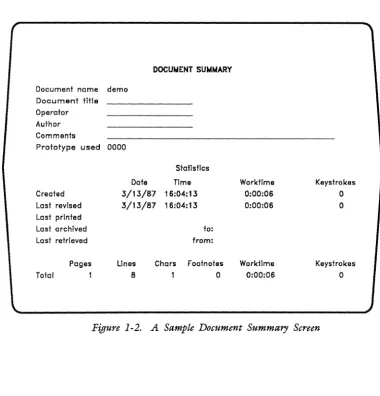
Document Summary Screen
Each document has a Document Summary screen. This screen has fields in which you can enter information about the· document. You can revise information at the top of the screen any time the screen is displayed. The bottom part of the screen shows system-maintained document
statistics. A Sample Document Summary screen is shown in Figure 1-2.
DOCU~ENT SUt.4~ARY
Document name demo Document title Operator Author Comments
Prototype used 0000
Statistics
Date Time Creeted
Lest revised Last printed Last archived Last retrieved
3/13/87 16:04:13 3/13/87 16:04:13
to: from:
Pages
1
Lines 8
Chars Footnotes
Total
o
Worktime 0:00:06 0:00:06
Worktime 0:00:06
Keystrokes
o
o
[image:25.512.67.447.145.541.2]Keystrokes
o
Figure 1-2. A Sample Document Summary Screen
Fortune: Word Reference Guide 1-4 3/87 '"
on
'" N
Editing Screen
Use the editing screen to create and edit documents. The elements of this screen are shown in Figure 1-3.
(
Doc demo Page 1 line 1 Pos 1
word Format 1 Spacing 1 Length 54 -1024
1 (1 ~"'" ~ 1 ... ~ .... ~2 ... ~ .... ~3 ... ~ .... ~4 ... ~ .... ~5 ... ~ .... ~6 .... ~
=
= = = = = = = =
=
=
==
==
==
==
==
==
==
==
=(Document End)
o
"'
~~---~, ~
Figure 1-3. A Sample Editing Screen
Print Document Menu
Use the Print Document menu to set some of the page-layout features and all of the printing features in Fortune:Word. The screen is divided into two parts, an upper half and a lower half.
To move the marker and make a change on the upper half of the menu, use RETURN, NEXT SCRN, PREY SCRN, UP, or DOWN. Use the default numbers that display on the
r
\
screen, or type over the numbers in any field with new numbers.
In the lower half of the screen, you move the marker from one column to another with RETURN, NEXT SCRN, PREY SCRN, LEFT, or RIGHT. You change the setting within a column by pressing SPACE or UP and DOWN.
Figure 1-4 shows a sample of the Print Document Screen.
PRINT DOCUMENT
Document name Itr.smlth
Print from page Print thru page
Starting as page no.
First header page 1_
First footer page 1_
Footer begins on line 61_
Please select one from each column
Pitch Format Feed Style Summary
10 Unjustified Tractor Final No
12 Justified Sheet Draft Yes
15 With notes One bin Two bins
Paper length Left margin No. of originals
Printer number Print wheel no.
LPI Paper Banner
6 Std No
8 Bin 1 Yes
[image:27.513.66.445.271.592.2]10 Bin 2 Alt
Figure 1-4. A Print Document Screen
66_
10_ 1
1_ 1_
To file Copy
No Yes
Yes No
~
Fortune: Word Reference Guide 1-6
3/87
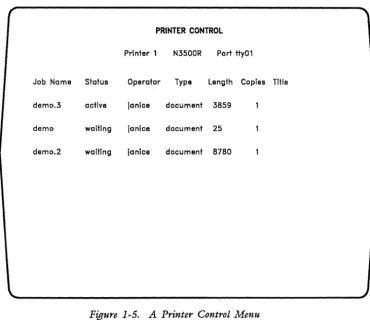
Printer
Control Menu
Printer Control menus, one for each printer connected to your system, show the jobs in the print queues and allow you to:
• Suspend printing by pressing STOP
• Move the documents to a different position in the queue using MOVE
• Remove a document from the print queue using DELETE
• Start printing by pressing GO TO PAGE if printing is suspended or single sheet feeding is selected
Figure 1-5 shows a sample Printer Control menu.
N "'
[image:28.512.59.430.263.583.2]~,-____________________________________________________________ -,J ~
Figure 1-5. A Printer Control Menu
If you have more than one printer connected to your
system, use the NEXT SCRN and PREV SCRN keys to move between the Printer Control menus.
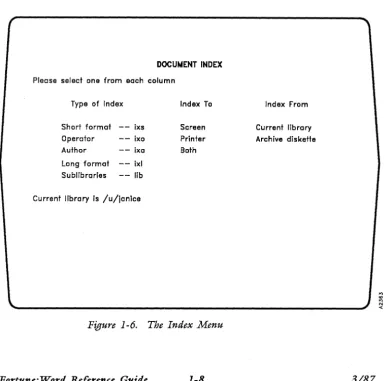
Index Menu The Index menu displays a list of the documents in a library or on an archive diskette, and a list of
sublibraries on the system disk. You can print any Document Index listing.
f
\
You can choose to see either a short list containing only the document names or a long list containing more comprehensive information about each document.
Figure 1-6 shows the Index menu.
DOCUMENT INDEX
Please select one from each column
Type of Index
Short format - - ixs Operator - - ixo Author - - ixa
Long format - - ixl Sublibraries - - lib
Current library is /u/janice
Figure 1-6.
Index To
Screen Printer Both
The Index Menu
Index From
Current library Archive diskette
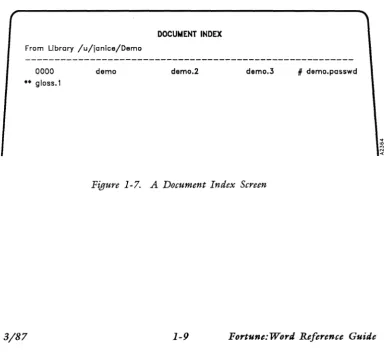
[image:29.513.74.466.240.621.2]Document Index Screen
When you make a selection from the Index menu, a Document Index screen is displayed. In addition to seeing a list
of documents in alphabetical order, you can use the Document Index screen to perform other useful functions. From this screen you can:
• Attach a glossary • Copy a document • Delete a document • Edit a document
• Perform single or multiple filing functions • Print an index
• Rename a document
• Send single or multiple documents to the printer • View additional document information
Figure 1-7 shows a sample Document Index screen in short format.
DOCUNENT INDEX From Library /u/janice/Dema
0000
•• gloss.1
3/87
demo demo.2 demo.3 # dema.passwd
Figure 1-7. A Document Index Screen
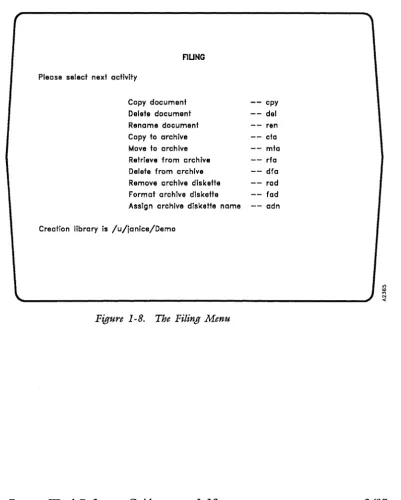
[image:30.508.55.443.281.632.2] [image:30.508.58.442.281.630.2]Filing Menu The Filing menu contains selections for managing
documents, including copying documents to and from an archive diskette. Figure 1-8 shows the Filing menu.
,
FlUNG
Please select next activity
Copy document Delete document Rename document Copy to archive Move to archive Retrieve from archive Delete from archive Remove archive diskette Format archive diskette Assign archive diskette name
[image:31.509.65.467.109.609.2]Creation library is /u/janice/Demo
Figure 1-8. The Filing Menu
Fortune: Word Reference Guide 1-10
- - cpy - - del - - ren - - cta - - mta - - rfa - - dfa - - rad - - fad - - adn
Document Processing Tools Menu
r
The Document Processing Tools menu, shown in Figure 1-9, allows access to additional functions that make word
processing easier.
DOCUWENT PROCESSING TOOLS
Please select next activity
\.
3/87
Spelling Tools
Hyphenation and Pagination Footnote Processing Table of Contents Generator Index Generator
Document Assembly Records Processing Forms Processing
Creotion library is /u/lanice/Demo
- - hyp - - fnp - - toc - - ixg - - das - - rpr - - fpr
"' "' '" N
..: Figure 1-9. The Document Processing Tools Menu
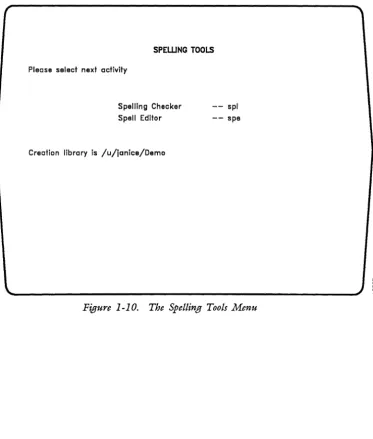
Spelling Tools
r
The Spelling Tools feature allows you to check your document for errors in spelling and word usage. You can use exception dictionaries to add special terminology or names to the list of words available with Fortune: Word. Figure 1-10 shows the Spelling Tools menu.
SPEWNG TOOLS
Please select next activity
Spelling Checker Spell Editor
Creation library is /u/janice/Demo
- - spl -- spe
....
"'
~,-
____________________________________________________________
~JS
Figure 1-10. The Spelling Tools Menu
[image:33.510.79.453.142.581.2]Hyphenation and
Pagination Menu
Hyphenation and Pagination allows you to hyphenate and paginate a document either separately or at the same time. When you use Hyphenation and Pagination interactively, you choose where to put the hyphens and page breaks. When you select automatic or background mode, Fortune:Word chooses the hyphenation points and positions the page breaks automatically. The Hyphenation and Pagination menu is shown in Figure 1-11.
r
HYPHENATION AND PAGINATION
Please enter the following information Document name demo
Perform: Hyphenation Pagination Both
Hot zone length 3_ Text length 54_
Exception Dictionary
Na
Yes
Process fram page , _ through page ~
Processing
Interactive Automatic Background
,
;g
\'-______________________________________________________________ --'J
~Figure 1-11. The Hyphenation and Pagination Menu
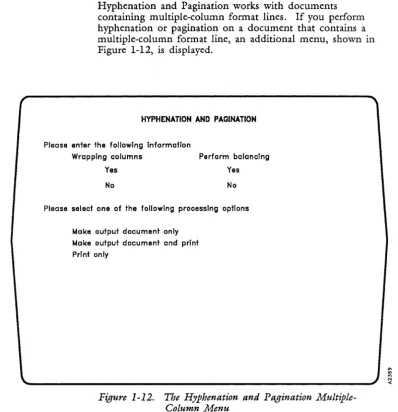
[image:34.508.60.433.154.475.2]r
Hyphenation and Pagination works with documents containing multiple-column format lines. If you perform hyphenation or pagination on a document that contains a multiple-column format line, an additional menu, shown in Figure 1-12, is displayed.
HYPHENATION AND PAGINATION
Please enter the following information
Wrapping columns Perform balancing
Yes Yes
No No
Please select one of the following processing options
[image:35.509.62.461.52.464.2]Make output document only Make output document and print Print only
Figure 1-12. The Hyphenation and Pagination Multiple-Column Menu
Footnote
Processing
Menu
You use Footnote Processing to format a document containing footnotes. Use this selection before you print the document with its footnotes. The Footnote Processing menu is shown in Figure 1-13.
FOOTNOTE PROCESSING
Document name fntest.l
Placement Processing Sequence Underlined
Footnotes Automatic Prefix In neither
Endnotes Background 1.2.3 .... starting with l _ In footnote a.b.c .... starting with a _ In document A.B.C .... starting with A- In both
•••••••••... - - each page
Superscripted Followed by Spacing between footnotes Separator line
Yes Character 0 Character
No Nothing Q Length 15_
Space H Lines before 1_
Preceded by Two spaces 1 Lines after
Indent W
Nothing Tab 2
Tab Return 3
Indent Two returns
Minimum number of text lines per page 18_
Process from page 1_ Process thru page 8_
Figure 1-13. The Footnote Processing Menu
o
"
'" N
<
[image:36.510.69.437.131.431.2]Table of Contents Generator Menu
The Table of Contents Generator allows you to automatically create a table of contents with up to six levels of headings. You edit a document to enter codes indicating which headings you want in the table of contents. The Table of Contents Generator processes the coded document, numbers the headings and subheadings if you want, and places dot leader lines or spaces between the headings and page numbers. Figure 1-14 shows the Table of Contents Generator menu.
TABl..[ OF CONTENTS GENERATOR
Please enter the following document names
Input document _ _ _ _ _ _ _ _ _ _ _ _ _ _
Output document _ _ _ _ _ _ _ _ _ _ _ _ _ _
Select one option from each column
Begin entries fill entries with Number each entry?
flush left Indented
Spaces Periods
yes no
Figure 1-14. The Table of Contents Generator Menu
[image:37.510.64.453.122.587.2]Index Generator Menu
The Index Generator compares a document containing a list of index words against the text of another document. It
then generates an index document containing an
alphabetically sorted list of words and the page numbers on which these words appear in the input document. Figure 1-15 shows the Index Generator menu.
INDEX GENERATOR
Please enter the following document names
Input document
Word list document _ _ _ _ _ _ _ _ _ _ _ _ _
Output dacument
Figure 1-15. The Index Generator Menu
Document Assembly Menu
Document Assembly allows you to automatically assemble different Fortune:Word documents into an output document. This makes it easy to combine standard paragraphs in the order you want without having to retype them or copy them between documents.
You can use Document Assembly from the Records Processing menu, or select it from the Document Processing Tools menu. Figure 1-16 shows the Document Assembly menu.
DOCUMENT ASSEMBLY
Please select ane of the following processing options
Make output document only Make output document and print
Print only
Figure 1-16. The Document Assembly Menu
Records Processing Menu
Records Processing allows you to merge a document containing a list of items such as addresses with a format document such as a letter. This makes it easy to process mass mailings or inventory lists.
Using specially created glossary entries, you can sort and select from a list document to tailor the output to your specific needs.
You can also automatically include text or data from other documents in the output document. Figure 1-17 shows the Records Processing menu.
RECORDS PROCESSING
Please enter the following document names
3/87
List document
Format document ________________________ ___
Control glossary entry
Please select one of the following processing options
Make output document only Make output document and print Print only
Figure 1-17. The Records Processing Menu
[image:40.508.61.433.224.540.2]Forms Processing
Glossary Functions Menu
Forms Processing allows you to create a special
Fortune:Word document that can act as a template. Forms Processing does not have a separate menu. Instead the form template you have created is used as a menu. The cursor moves only to the areas of the form where information can be entered.
The Fortune:Word glossary function provides a way to save frequently used text in a special document called a
glossary. The Glossary Functions menu, shown in Figure i-i8, allows you to edit, create, attach, detach, or verify a glossary.
GLOSSARY FUNCTIONS
Please select next activity
Edit Old Glassary Create New Glassary Verify glossary Attach glossary Detach glossary
Creation library is /u/training
- - 8g1
- - cgl
- - vgl - - agl
- - dgl
Figure 1-18. The Glossary Functions Menu
[image:41.509.70.470.184.556.2]Supervisory Functions Menu
r
The Supervisory Functions menu shown in Figure 1-19 includes all functions concerning libraries and the Describe Bin Feeder function.
SUPERVISORY FUNCTIONS
,
Please select next activity
Change library Make library Remove library Assign password Describe bin feeder
Creation library is /u/ianice/Demo
- - chi - - mkl - - rml - - apw - - bin
<0
::;
[image:42.508.66.429.102.404.2]'---'~ ~
Figure 1-19. The Supervisory Functions Menu
Functions, Features, and Keys
This chapter explains how each function, feature, and key is used in Fortune:Word. The items are arranged in alphabetical order. Most items contain brief
step-by-step instructions. In general, when the word "select" is used in a step, the specific keystrokes
required to make that selection are NOT included as part of the step. Any limitations, restrictions, or
information that might affect the operation of other functions are also noted.
ADDING WORDS TO AN EXCEPTION DICTIONARY
See "Exception Dictionary."
ALT
The Alt key has no use in Fortune:Word.
ALTERNATE FORMAT LINE
See "Format" and "Format Line."
ALTERNATING HEADERS OR FOOTERS
3/87
You can print different headers and footers on
odd-numbered and even-numbered pages. See also "Headers" and "Footers."
Creating an
Alternating
Header or
Footer
Printing
Alternating
Headers or
Footers
1. From the editing screen, press GO TO PAGE.
2.
Type h or H for header page, f or F for footer page.3. Type the text for the header or footer of
odd-numbered pages, ending the text with a RETURN.
4. Press MERGE, SHIFT/MERGE, and RETURN. This
indicates where the odd-numbered header or footer stops and the even-numbered header or footer begins.
5. Remember to include the same number of Returns above and below the MERGE, SHIFT/MERGE, and RETURN if you want the vertical spacing of the headers and footers to be the same on both left-facing and right-facing pages.
6. Type the text for the header or footer of even-numbered pages.
7. Press CANCEL to leave the document, or use GO TO PAGE to return to the body of the document.
1. From the Main menu, select Print Document.
2.
Type the name of the document you want to print.3. Press RETURN or EXECUTE. The Print Document screen is displayed.
4. In the Starting as page no. field, type an odd
page number to print the odd header or footer first, or an even page number to print the even header or footer first.
5. Complete the rest of the print selections.
6. Press EXECUTE.
ARCHIVING
3/87
Archiving is the process of saving documents on a flexible diskette prepared for archiving and of
retrieving those documents from the diskette. Flexible diskettes are also called archive diskettes or floppy diskettes.
There are three ways to perform archiving functions:
• From the Filing menu
• From a Document Index screen generated by an index selection
• With shortcut codes
When you archive documents from a Document Index screen, you have three choices. You can:
• Archive documents one at a time
• Archive multiple documents, selecting which documents to archive
• Archive the entire contents of a library
Archiving involves moving, copying, or retrieving
documents. Moving removes a document from the system disk and puts it on an archive diskette, or vice versa. Copying leaves a copy on the system disk and puts a copy on the archive diskette, or vice versa. Retrieving
copies the document from the archive diskette to the system disk.
Since there are several ways you can archive in Fortune:Word, a brief outline of this section is presented next.
• Preparing and naming archive diskettes
• Copying to an archive diskette:
• From the Filing menu • Using a shortcut code
• From a Document Index, single document • From a Document Index, multiple document • From a Document Index, by library
Archive Diskette Preparation
Assigning an Archive Diskette Name
• Moving documents to an archive diskette using the methods under copying above
• Removing an archive diskette
• Retrieving documents from an archive diskette using the methods under item 2 above
• Copying or moving text to a full archive diskette
The simplest methods are explained first, then the more complicated procedures. The steps are usually repeated so you can refer to the method you want.
Before you use an archive diskette the first time, you must prepare the diskette by formatting it. When you format an archive diskette, the computer divides it into parts that it can identify for storing information.
WARNING: If you format an archive diskette that contains documents, those documents are permanently erased.
1. Select Filing from the Main menu.
2. Select Format Archive Diskette from the Filing
menu.
3. Insert the archive diskette and press EXECUTE. You are warned that any documents stored on the diskette will be destroyed by the formatting process. To stop the process, press CANCEL and remove the diskette.
4. To continue, press EXECUTE.
5. During formatting, the screen displays the message
(Formatting). When the process is complete, press
EXECUTE. The diskette is assigned the default name
Formatted diskette.
You can assign an identifying name to an archive diskette. (If you prefer, you can use an archive
diskette without naming it.) When you format a diskette through Fortune:Word, it is assigned the default name
Copying a Document to an Archive Diskette
"Formatted diskette." You can change that name at any time.
A diskette name may be a maximum of 32 characters, including spaces. Use any name you want that simplifies your filing system.
1. From the Filing menu, select Assig1t archive diskette name.
2. Follow the instructions on the screen for inserting the diskette.
3. Type the diskette name, using a maximum of 32 characters, and press RETURN or EXECUTE.
There are three ways to copy a document to an archive diskette:
• From the Filing menu
• By using the shortcut code cta
• From a Document Index screen
When you copy a document to an archive diskette, you are making an exact copy of that document. The original document remains on the system disk, ready for further work.
Copying a 1. Select Copy to Archive from the Filing menu.
Document to
an Archive 2.
Diskette Using the Filing
Menu 3.
Follow the instructions on the screen for inserting the diskette.
The name of the last document you edited, if any, appears as the default for Source document name.
Use this document name or type a new name of 11 or fewer characters.
4. Press RETURN or EXECUTE.
5. The name of the document you selected is displayed as the Destination document name. Use this name
or type a new name.
6. Press RETURN or EXECUTE.
7. If the document name you select is on the archive diskette, press EXECUTE to overwrite the version on the diskette with the version on the system disk. To save both versions on the archive diskette, type a different name and press RETURN or EXECUTE.
8. You can continue to copy documents to the archive diskette by repeating the steps above until you are finished.
Copying a l. From any menu, press COMMAND.
Document to
an Archive 2.
Diskette Using
the Shortcut 3.
Code
Copying a l.
Document to
an Archive 2.
Diskette Using the Index
Type eta.
Follow steps 2 through 8 above.
Select Index from the Main menu.
From the Document Index menu, select Type of Index, index to Screen, and index from Current library; then press EXECUTE.
3. When the Document Index appears on the screen, move the marker to the document you want to copy.
4. Press SHIFT/COPY.
5. Follow the instructions on the screen for inserting the diskette.
6. The name of the document you selected appears as the
Destination document name. Use this name or type
a new name.
7. Press RETURN or EXECUTE.
8. If the document name you select is on the archive diskette, press EXECUTE to overwrite it with the version on the system disk. To save both versions on the archive diskette, type a different name and press RETURN or EXECUTE.
9. You can continue to copy documents to the archive diskette by moving the marker to a document name and pressing SHIFT/COPY. Press CANCEL to return to the Index menu when you are finished.
Copying 1. Select Index from the Main menu.
Multiple
Documents to 2. From the Document Index menu, select Type of Index, index to Screen, and index from Current library; then press EXECUTE.
an Archive Diskette Using the Index
3/87
3. When the Document Index appears on the screen, move the marker to the name of a document you want to copy.
4. Press EXECUTE.
5. Repeat steps 3 and 4 until all the documents you want to copy are highlighted. If you want to exclude a document you have highlighted, move the marker to the document name and press STOP.
6. Press COMMAND SHIFT/COPY.
7. Follow the instructions on the screen for inserting the diskette.
8. If no document names are duplicated on the archive diskette, documents are automatically copied in alphabetical order. If a selected document is already on the archive diskette, press EXECUTE to overwrite it. To save both versions on the archive diskette, enter another name and press RETURN or EXECUTE.
If you do not want to be notified each time a
document will be overwritten, press SHIFT/EXECUTE when you see the message Press EXECUTE to overwrite or Enter another name. Any document that is in use
is not copied and the messages Document in use and Press any key to continue are displayed.
If the diskette is full, a warning message is displayed. Press any key to continue, then press CANCEL to stop the process.
9. When the process is complete, the highlighting is removed from the selected document names. Names of documents that could not be copied remain
highlighted. Press CANCEL to exit from the Document Index screen when you are finished.
Copying l. From any menu, press COMMAND.
Multiple
Documents to 2. Type a shortcut code that accesses a Document Index screen such as ixs, ix!, ixa, or ixo.
an Archive Diskette Using
the Shortcut 3. Follow steps 3 through 8 above. Code
Copying a 1. Select Index from the Main menu.
Library to an
Archive 2. From the Document Index menu, select Type of Index, index to Screen, and index from Current library; then press EXECUTE.
Diskette Using the Index
3. When the Document Index is displayed, press MODE SHIFT/COPY.
4. Follow the instructions on the screen for inserting the diskette.
5. If no document names are duplicated, documents are automatically copied to the archive diskette. If a selected document is already on the archive diskette, press EXECUTE to overwrite it. To save both versions on the archive diskette, enter another name and press RETURN or EXECUTE.
Moving a Document to an Archive Diskette
If you do not want to be notified each time a
document is to be overwritten, press SHIFT/EXECUTE when you see the message Press EXECUTE to overwrite or Enter another name. Any document that is in use
is not copied and the messages Document in use and Press any key to continue are displayed. Names of
documents that could not be copied remain highlighted.
If the diskette is full, a warning message is displayed. Press any key to continue, then press CANCEL to stop the process.
There are three ways to move a document to an archive diskette:
• From the Filing menu
• By using the shortcut code mta
• From a Document Index screen (if not an archive index)
When you move a document to an archive diskette, the document is removed from the system disk.
Moving a 1. Select Move to archive from the Filing menu.
Document to
an Archive 2. Follow the instructions on the screen for inserting the diskette.
Diskette Using the Filing
Menu 3. The name of the last document you edited, if any, appears as the default for Source document name.
Use this document name or type a new name.
3/87
4. Press RETURN or EXECUTE.
5. The name of the document you selected is displayed as the Destination document name. Use this name
or type a new name.
6. Press RETURN or EXECUTE.
7. If the document name you select is on the archive diskette, press EXECUTE to overwrite the version on the diskette with the version on the system disk. To save both versions on the archive diskette, type a different name and press RETURN or EXECUTE.
8. You can continue to move documents to the archive diskette by repeating steps 1 and 3 through 7 until you have finished.
Moving a 1. From any menu, press COMMAND.
Document to
an Archive 2. Type mta.
Diskette Using
the Shortcut 3. Follow steps 2 through 8 above. Code
Moving a 1. Select Index from the Main menu.
Document to
an Archive 2. From the Document Index menu, select Type of Index, index to Screen, and index from Current library; then press EXECUTE.
Diskette Using the Index
3. When the Document Index is displayed, move the marker to the document you want.
4. Press SHIFT/MOVE.
5. Follow the instructions on the screen for inserting the diskette.
6. The name of the document you selected is displayed as the Destination document name. Use this name
or type a new name.
7. Press RETURN or EXECUTE.
8. If the document name you select is on the archive diskette, press EXECUTE to overwrite it ,with the version on the system disk. To save both versions on the archive diskette, type a different name and press RETURN or EXECUTE.
Moving a Document from an Archive Diskette to the System Disk Using the Index
3/87
9. You can continue to move documents to the archive diskette by moving the marker to a document name and pressing SHIFT/MOVE. Press CANCEL to return to the Index menu when you are finished.
If you move a document from an archive diskette to the system disk, the document is removed from the archive diskette and placed on the system disk. No backup copy of that document exists unless there is another copy on a different archive diskette. Documents are moved from the archive diskette to your current library. Make sure you are in the correct library before you follow the steps below. See "Change Library."
1. Select Index from the Main menu.
2. From the Document Index menu, select Type of Index, index to Screen, and index from Archive diskette; then press EXECUTE.
3. Follow the instructions on the screen for inserting the diskette.
4. When the Document Index appears on the screen, move the marker to the document you want to move.
5. Press SHIFT/MOVE.
6. The name of the document you selected is displayed as the Destination document name. Use this name
or type a new name.
7. Press RETURN or EXECUTE.
8. If the document name you select is in your current library, press EXECUTE to overwrite it with the version on the archive diskette. To save both
versions, type a different name and press RETURN or EXECUTE.
Moving 1. Select Index from the Main menu.
Multiple
Documents to 2. From the Document Index menu, select Type of Index, index to Screen, and index from Current library; then press EXECUTE.
an Archive Diskette Using the Index
3. When the Document Index is displayed, move the marker to the name of a document.
4. Press EXECUTE.
5. Repeat steps 3 and 4 until all the documents you want to move are highlighted. If you want to remove highlighting, move the marker to the document name and press STOP.
6. Press COMMAND SHIFT/MOVE.
7. Follow the instructions on the screen for inserting the diskette.
8. If a selected document is already on the archive diskette, press EXECUTE to overwrite the document. To save both versions, type another name and press RETURN or EXECUTE. If no document names are duplicated, documents are automatically moved to the archive diskette. If you do not want to be notified each time a document is overwritten, press
SHIFT/EXECUTE. Any document that is in use is not moved and the messages Document in use and Press any key to continue are displayed.
9. As each document is moved to the archive diskette, its name is removed from the Document Index. Names of documents that are not moved remain highlighted. When this process is complete, press CANCEL to leave the Document Index screen.
Moving 1. From any menu, press COMMAND.
Multiple
Documents to 2.
an Archive Diskette Using
the Shortcut 3.
Code
Type a shortcut code that accesses a Document Index screen such as ixs, ix!, ixa, or ixo.
Follow steps 3 through 8 above.
Fortune: Word Reference Guide 2-12 3/87
Moving All l. Select Index from the Main menu.
Documents on
an Archive 2. From the Document Index menu, select Type of Index, index to Screen, and index from Archive diskette; then press EXECUTE.
Diskette to a Library Using the Index
Removing an Archive Diskette
3/87
3. Follow the instructions on the screen for inserting the diskette.
4. When the Document Index is displayed, press MODE SHIFT/MOVE.
5. If a selected document is already on the system disk, press EXECUTE to overwrite it. To save both versions, type another name and press RETURN or EXECUTE.
If no document names are duplicated, documents are automatically moved to the system disk. If you do not want to be notified each time a document is overwritten, press SHIFT/EXECUTE. Any document that is in use is not moved and the messages
Document in use and Press any key to continue
are displayed. Names of documents that could not be moved remain highlighted.
Before physically removing an archive diskette from the diskette drive, you must tell the system that you are going to remove it. This is logically unmounting the diskette. There are three ways to tell the system you are ready to remove an archive diskette:
• Leave Fortune:Word by pressing CANCEL from the Fortune: Word Main menu
• Select Remove archive diskette from the Filing
menu
• Use the shortcut code rad from any menu
NOTE: When you mount an archive diskette from a Document Index screen, the diskette is automatically unmounted as you leave the Document Index screen.
Removing an Archive Diskette from the Filing Menu
Removing an Archive Diskette from Any Menu Using the Shortcut Code
Retrieving a Document from an Archive Diskette
Retrieving a Document from an Archive Diskette Using the Filing Menu
l.
2.
l.
2.
3.
From the Filing menu, select Remove archive diskette.
When the system beeps, remove the archive diskette and press EXECUTE.
From any menu, press COMMAND. (NOTE: The Document Index screen is not a menu.)
Type rad.
When the system beeps, remove the archive diskette and press EXECUTE.
There are three ways to retrieve a document from an archive diskette:
• From the Filing menu
• By using the shortcut code rfa • From a Document Index screen
When you retrieve a document from an archive diskette, you are copying that document into the current library on the system disk. A copy of the document remains on the archive diskette.
l.
2.
3.
Select Retrieve from archive from the Filing menu.
Follow the instructions on the screen for inserting the diskette.
Type the name of the document you want to retrieve and press RETURN or EXECUTE.
4. The name of the document you selected is displayed as the Destination document name. Use this name
or type a new name.
5. Press EXECUTE.
6. If the document name you select is in your current library, press EXECUTE to overwrite the document with the version on the archive diskette. To save both versions, type a different name and press RETURN or EXECUTE.
Retrieving a 1. From any menu, press COMMAND.
Document from
an Archive 2. Type rfa.
Diskette Using
the Shortcut 3. Follow steps 2 through 6 above. Code
Retrieving a 1. Select Index from the Main menu.
Document from
an Archive 2. From the Document Index menu, select Type of Index, index to Screen, and index from Archive diskette; then press EXECUTE.
Diskette Using the Index
3/87
3. Follow the instructions on the screen for inserting the diskette.
4. When the Document Index appears on the screen, move the marker to the document you want to retrieve.
5. Press SHIFT/COPY.
6. The name of the document you selected is displayed as the Destination document name. Use this name
or type a new name.
7. Press RETURN or EXECUTE.
8. If the document name you select is in your current library, press EXECUTE to overwrite the document with the version on the archive diskette. To save both versions, type a different name and press RETURN or EXECUTE.