Administrator’s Guide
January 2001 Edition
© 2001 WebTrends
® CorporationWebTrends Corporation makes no representations or warranties with respect to the contents or use of this manual, and specifically disclaims any express or implied warranties of merchantability or fitness for any particular purpose. Further, WebTrends Corporation reserves the right to revise this publication and to make changes to its content at any time, without obligation to notify any person or entity of such revisions or changes.
Further, WebTrends Corporation makes no representations or warranties with respect to any WebTrends Corporation product, and specifically disclaims any express or implied warranties of merchantability or fitness for any particular purpose. Further, WebTrends Corporation reserves the right to make changes to any and all parts of WebTrends Corporation products at any time, without obligation to notify any person or entity of such changes.
Trademarks
AuditTrack, CommerceTrends Reporting Server, and WebTrends are registered trademarks of WebTrends Corporation.
Additional trademarks of WebTrends Corporation include: ClusterTrends, DBTrends, Enterprise Reporting Server, Enterprise Suite, Enterprise Suite for Lotus Domino, FastTrends, Log Analyzer, Firewall Suite, Security Analyzer, Virtual WebTrends, WebTrends Live, VRM, and WebTrends Professional Suite.
Other brands and their products are trademarks or registered trademarks of their respective holders.
Product Support
If you should have any questions during the installation or use of WebTrends Enterprise Reporting Server, please refer to the WebTrends Corporation Knowledge Base online at: http://www.webtrends.com/products/webtrend/support.htm.
If you are unable to resolve the problem, do not hesitate to contact our Product Support Department: Telephone: (503) 223-3023, Fax: (503) 294-7130.
Ch. 1 Introduction . . . 1
About the Reporting Server . . . 1
Reporting Server features . . . 1
New features . . . 2
Documentation and Help . . . 3
What typographic changes mean . . . 3
Making documentation available to non-administrators . . . 3
Getting help in the program . . . 4
Additional resources . . . 4
Ch. 2 Installing and Setting Up . . . 5
Overview . . . 5
Before You Begin . . . 5
System requirements . . . 5
Browser requirements . . . 6
Installing on Windows NT . . . 6
Installing the Reporting Server. . . 6
Configuring the Reporting Server service . . . 7
Giving your account necessary rights . . . 7
Installing on Windows 2000 . . . 8
Installing the Reporting Server. . . 8
Installing on Linux . . . 9
Using the Linux installation script. . . 9
Using the Red Hat Packet Manager (RPM) . . . 12
Installing on Solaris . . . 14
Using the Solaris installation script . . . 15
Using the Solaris installation package . . . 17
Installing upgrades . . . 18
Installing an upgrade using the script. . . 18
Installing an upgrade using the Solaris package . . . 18
Running the Reporting Server . . . 19
Registering the Reporting Server . . . 19
Uninstalling the Reporting Server . . . 21
Uninstalling Linux versions. . . 21
Uninstalling Linux, using the RPM . . . 21
Uninstalling Solaris versions . . . 22
Uninstalling Solaris packages . . . 22
Windows NT versions. . . 23
Installing Program Add-Ons . . . 23
(NT) Purchasing and installing Add-Ons . . . 24
(UNIX) Purchasing and installing Add-Ons . . . 24
Ch. 3 Using Profiles . . . .25
About Reporting Server analysis . . . 25
Preparing to analyze web site activity . . . 26
Adding a profile . . . 26
Analyze Now, Re-analyze, and recovering archived data . . . 51
Specifying a schedule for reporting . . . 56
Specifying the location for reports . . . 56
Specifying the database directory . . . 58
Selecting URL Search and Replace definitions . . . 59
Selecting URL Parameter Analysis definitions . . . 60
Selecting Content Group definitions. . . 61
Selecting Path Analysis definitions. . . 61
Copying a Profile . . . 62
Editing a Profile . . . 62
Deleting a Profile . . . 62
Monitoring profile status . . . 63
Changing the profiles displayed in the main console . . . 64
Ch. 4 Using Filters. . . 67
How they work . . . 67
How filters are processed . . . 67
Adding an Include or Exclude Visit Filter . . . 68
Adding an Include or Exclude Hit Filter . . . 76
Editing a Filter . . . 80
Deleting a filter . . . 82
Filter Parameter Descriptions . . . 83
Visit Filter Parameters . . . 83
Hit Filter Parameters . . . 85
Browser . . . 87
Cookie . . . 87
Multi-homed domain . . . 88
Day of Week . . . 88
Hour of Day . . . 88
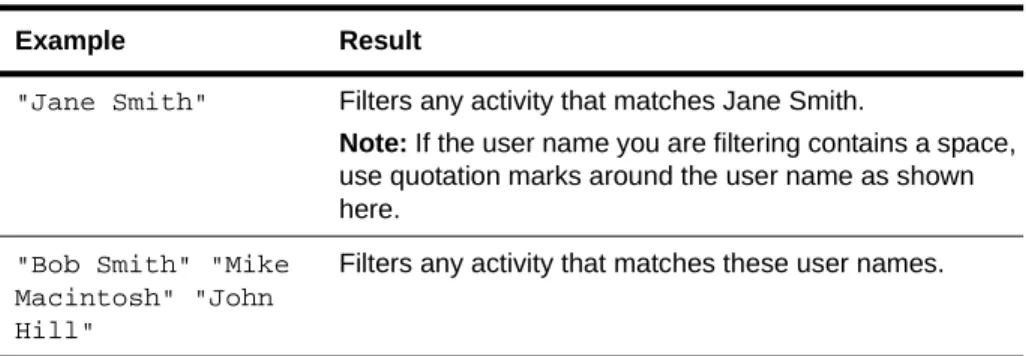
Authenticated User Name . . . 89
Return Codes . . . 89
Ad Views and Clicks . . . 90
HTTP Methods . . . 91
Address . . . 91
Ch. 5 Using Intranet Configuration . . . 93
About Intranet Configuration . . . 93
Scenario: Creating definitions for your organization . . . 94
Adding an Intranet Domain . . . 94
Ch. 6 Using Ad Views and Clicks . . . 97
Tracking Internet Advertising . . . 97
Defining an advertisement to track . . . 98
Ch. 7 Building Reports . . . .103
Reports and Profiles . . . 103
How reports are built . . . 104
How Reporting Server works . . . 104
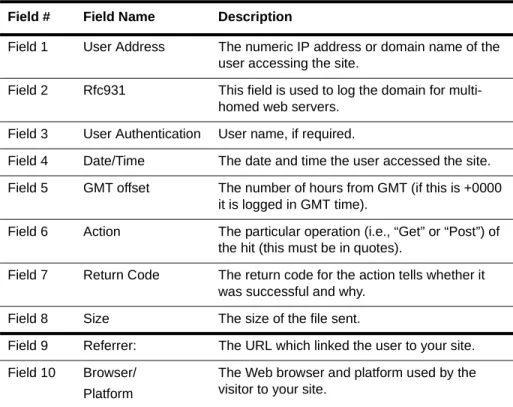
Understanding log files . . . 104
Understanding profiles . . . 105
Understanding Product and Marketing definitions . . . 106
Setting up the Reporting Server . . . 106
Build a Report. . . 107
Pre-generated and on-demand reporting . . . 110
Pre-generated reports . . . 110
On-demand reports . . . 110
On-demand reports . . . 111
Using the job queue . . . 112
Viewing profile history . . . 114
Converting reports to Microsoft Word or Microsoft Excel . . . 115
Working with Report Templates . . . 116
Customizing reports . . . 116
Adding report templates . . . 116
Changing the report color. . . 119
Changing the report language . . . 120
Editing a report template . . . 120
Deleting a report template . . . 121
Report data and Help Cards . . . 121
Ch. 8 Configuring Program Options . . . .123
Overview . . . 123
Defining General options . . . 123
Archiving profile data . . . 124
Defining the web site locale . . . 125
Defining the profile directory. . . 126
Defining file types. . . 129
Adding or Editing File Types . . . 130
Defining FTP settings. . . 131
Defining domain groups . . . 133
Defining FTP log file cache settings. . . 134
Defining report server settings . . . 135
Defining the database directory . . . 137
Selecting a report template . . . 138
Defining the reports to maintain . . . 139
Specifying the reporting method . . . 140
Pre-generated reports . . . 140
On-demand reports . . . 140
Changing the report header . . . 142
Defining a schedule for processing . . . 143
Configuring system performance settings . . . 144
Selecting a DNS lookup method . . . 145
Defining proxy server settings . . . 147
Configuring web server settings. . . 148
Ch. 9 Using Advanced Features . . . 161
URL search and replace definitions . . . 161
Using URL replacement for shopping cart applications . . . 161
How tracking mechanisms affect analysis . . . 162
Using URL replacement to group pages . . . 163
Creating a URL replacement definition . . . 164
Path analysis . . . 166
Content groups . . . 168
Analyzing activity for a dynamic site . . . 168
About URL parameter analysis definitions . . . 169
Ch. 10 Setting User Access . . . .173
Overview . . . 173
Creating a user account . . . 173
Modifying a user account . . . 175
Ch. 11 Running from the Command Line . . . .177
About the Command Line Capability . . . 177
Directory Structure . . . 178
Command Line Options . . . 179
Scripts . . . 179
wtrs.server . . . 179
wtengine.server . . . 180
. . . 180
Syntax . . . 180
Executables . . . 180
wtrs . . . 180
Syntax . . . 181
Recommended Steps for Using Command Line Settings . . . 182
Hierarchy of settings. . . 182
Configuring Program Settings . . . 183
Audit . . . 183
archives . . . 183
Cookie . . . 184
Defaults . . . 186
reports . . . 193
Performance. . . 194
maxtablesizes. . . 195
language. . . 196
Profile . . . 197
on-demand report settings . . . 202
proxy. . . 202
Interface . . . 204
maxtablesizes . . . 206
Feedback . . . 207
UNIX . . . 207
Configuring Web Server Settings . . . 210
Audit . . . 210
Remote Configuration . . . 210
Authentication . . . 212
UNIX . . . 212
Setting Up User Accounts and Permissions . . . 213
Userinfo . . . 213
Permissions . . . 214
Permission Example: User Value of 1 . . . 215
Permission Example: User Value of 15 . . . 216
filter[n] . . . 217
profile . . . 217
restrictions . . . 217
Working with Profiles . . . 217
Server[n] . . . 218
Profile . . . 218
Filters . . . 225
Working with Content Groups . . . 232
Default Content Group . . . 232
Content Group definition . . . 233
Working with Path Analysis Settings . . . 234
Default Path Analysis settings . . . 235
Path Analysis definition settings . . . 235
Working with URL Parameter Analysis Settings . . . 236
Default URL Parameter Analysis settings . . . 236
Working with URL Search and Replace Definitions . . . 237
Default URL Search and Replace . . . 238
URL Replacement definition. . . 238
Defining Advertisements to Track . . . 240
Ad Views and Ad Clicks syntax . . . 241
Setting Up Your Intranet Domains . . . 241
Modifying Search Engines . . . 242
SearchEngines . . . 242
Engine settings. . . 243
Appendix A. Glossary . . . .245
Appendix B. Optimizing and Troubleshooting . . . .263
Investigating Errors . . . 263
Using the wtrs.err file . . . 263
Using the wt.remote.err file . . . 263
Using the wtrs.audit file . . . 263
Using the profile status log . . . 264
Fixing Error 500 Server Error . . . 265
Web server fails to initialize . . . 265
Profiles fail to initialize . . . 265
Conflicting file permissions. . . 267
File handle allocation . . . 267
Database location. . . 267
Factors impacting space and memory . . . 267
Symbolic links (UNIX). . . 268
Connecting through the Remote Interface . . . 268
Problems creating a Microsoft Word report from Internet Explorer . . . 269
Dates for reports are unexpected. . . 269
Analyze Now, Re-analyze, and recovering archived data . . . 269
Special considerations for configuring the Reporting Server . . . 274
Default configuration . . . 274
Using multiple web servers and storing results on another machine . . . . 275
Appendix C. Regular Expression Syntax . . . 277
Regular Expression Components . . . 277
Basic elements . . . 277
Qualifying characters . . . 278
Building Regular Expressions . . . 279
Matching order rules . . . 280
Comparing Regular Expressions and Wildcards . . . 281
Appendix D. System and Error Messages . . . 283
The Profile Status Log . . . 283
Common Messages . . . 283
Appendix E. “Silent” Installation . . . 297
Important Notes . . . 297
"Silent" install instructions for Solaris/Linux . . . 298
Installing as root . . . 298
"Silent" install instructions for Windows NT . . . 299
1
About the Reporting Server
WebTrends Enterprise Reporting Server provides real-time Web visitor analysis on an ongoing basis—and more sophisticated analysis when necessary—for users with high traffic and multiple clients, such as Internet Server Providers, server farms, and large enterprises. The built-in web server publishes reports automatically, making them available to remote users through their web browsers. In addition to the browser-based user interface, the program can also be run and configured from the command line. See
“Running from the Command Line” on page 177 for details.
Administrators can manage all aspects of the Reporting Server remotely. The Reporting Server creates comprehensive summary reports on web site visitor behavior. The reports, which can be viewed remotely via a browser, are a key asset for quickly judging site performance, response trends, and so forth.
The Reporting Server should be installed on a system that can access the web server log files either locally, through a mounted drive, or transferred using FTP. The platform of the client machines viewing reports is irrelevant, as long as the correct web browser is installed. See “System requirements” on page 5 for browser requirements.
Reporting Server features
The Reporting Server has the following features:
• Web Server Traffic Analysis—Reports on all aspects of your web site’s activity, including how many people are visiting your web site, where they come from, and what pages interest them most.
• Support for Multiple Servers—Creates reports, using ClusterTrends™ technology, for sites hosted by multiple servers. ClusterTrends can be implemented if you have a Server Add-On license.
• Report Template Designer—Use this to choose the colors, fonts, layouts, and content for your reports.
• Comprehensive Reports—Automatically create and maintain reports at regular intervals, eliminating the need to run several individual reports manually. Generate weekly, monthly, quarterly, and yearly reports that focus on the content you choose.
• User Access Management—Grant permissions and default settings on an individual basis. A range of permissions is possible, from program-wide access as an administrator to reporting ability with viewing report access. You can pre-configure profile settings for any or all users, making their work easier. Users only view the reports and program features they have access to.
• Remote Configuration—Remote access to reports, profile settings, user accounts, and all other program features remotely.
• Customizable Interface—Assign the dialog boxes that the user will have access to. Many dialog boxes in the interface are optional and can be disabled for non-administrators. You decide if those dialog boxes are visible to your users.
• Profile archiving—Back up profile databases at regular intervals, which you can use to restore the profile at a later date.
• Advanced features—Create global definitions that make your analysis more informative. Advanced features deal with pages that you want to group together, shopping cart software that prevents you from getting accurate reports, dynamic pages, and frequently traveled paths through your site.
New features are added frequently. Refer to our web site at http://www.webtrends.com for the latest information.
New features
This version of the Reporting Server includes:
• Pre- and post-processing function, which allows administrators to add tasks which the Reporting Server can start prior to or after completing a profile analysis. See “Pre- and post-processing” on page 43.
• Enhanced filter functions. See Chapter 4, "Using Filters" on page 67. • Enhanced reporting. See “Building Reports” on page 103 for details. • Changes to how the Reporting Server performs URL parameter analysis,
Documentation and Help
What typographic changes mean
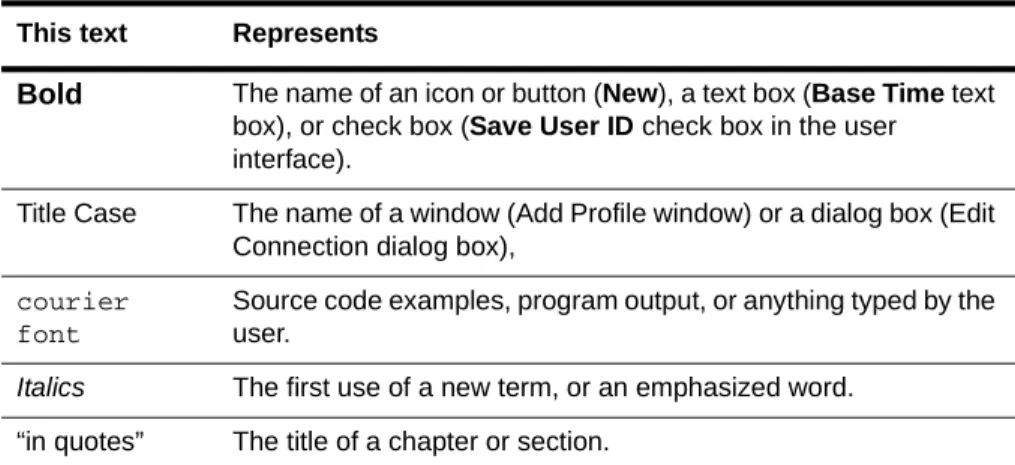
The following table describes the typographic changes used in this guide. Table 1-1. Typographical Changes
See the Glossary in the Reporting Server online help, or at the WebTrends web site to clarify any terms used in the Reporting Server or the
documentation which may be new to you.
Making documentation available to non-administrators
A user guide for non-administrators is also available. We urge you to make the User’s Guide available on your intranet or network.The user guide can be viewed online using Adobe Acrobat. If you purchased the CD-ROM version of the Reporting Server, you can get the .pdf file from the CD. Otherwise, you can download the manual from the Support section of the WebTrends Corporation web site.
To download the .pdf version of this manual:
1. Open your browser.
2. Type following URL: http:// www.webtrends.com.
3. From the WebTrends Corporate home page, click Support. This text Represents
Bold The name of an icon or button (New), a text box (Base Time text box), or check box (Save User ID check box in the user interface).
Title Case The name of a window (Add Profile window) or a dialog box (Edit Connection dialog box),
courier font
Source code examples, program output, or anything typed by the user.
Italics The first use of a new term, or an emphasized word.
The Product Support Page opens (Figure 1-1), showing a selection of WebTrends documentation available for download.
Figure 1-1. Documentation list on Product Support page
4. Under the Technical Library heading, click Manuals to view the manuals available for download.
Getting help in the program
The Reporting Server provides online help to guide you through the program. Look for the Help button in the upper right of the program dialog box. You can also open the help from the Main Console by selecting the Help menu.
Additional resources
For definitions of terms used in the Reporting Server, see Appendix A, "Glossary" on page 245.
The WebTrends portal for Internet and Intranet professionals is a great resource for Web related information, industry news, reviews, and other useful information. Visit http://www.WebTrends.net to see for yourself.
2
Overview
This chapter contains installation instructions for the Reporting Server. For unattended, or "silent" installation instructions, please see Appendix E, "Silent Installation" on page 297.
Before You Begin
Please be sure to complete the following:
• Review the system and browser requirements below to ensure optimum performance of the Reporting Server on your system. • Have any valid serial numbers for the product, Add-On licenses, or
subscriptions.
• Have two ports available for the analysis engine and the remote interface.
You can then choose from the following installation paths to install the product:
• “Installing on Windows NT” on page 6
• “Installing on Windows 2000” on page 8
• “Installing on Linux” on page 9
• “Installing on Solaris” on page 14
System requirements
Windows NT/Win 2000
You can run the Reporting Server on any Windows NT 4.x system or above. You can install and run the program with the following minimum system requirements, although more will be needed in order to analyze large log files:
• 60 MB available disk space
• 128 MB memory
Although the program does not have to be installed on each of your web servers, Webtrends Corporation recommends running it on a separate, dedicated system which has NFS-mount access to all the logs.
Linux
You can run the Reporting Server on any Intel platforms running Red Hat 6.0 or above.
Solaris
You can run the Reporting Server on a Sun Ultra workstation or Sun SPARCstation system running Solaris 2.6, 2.7, or 2.8.
Browser requirements
You can run the Reporting Server user interface on Solaris, Linux, Windows NT, or other Win32 systems running Netscape Navigator 4.5 or above or Microsoft Internet Explorer 4.01 or above.
Installing on Windows NT
Installing the software on Windows NT is a three-part process: • Installing the Reporting Server
• Configuring the Reporting Server service • Giving your account necessary rights
Installing the Reporting Server
To install the Reporting Server:
1. Insert the Reporting Server CD-ROM into your CD-ROM drive. If your system is set up to use auto-run, the setup program is automatically launched. If not, choose Run from the File or Start menus and type:
X:\setup
where x is the drive letter of your CD-ROM drive.
3. Before the Reporting Server program files are copied to your system, the Software License Agreement is presented. If you agree to the stated terms, click Accept. Otherwise, click Cancel to exit the setup program without installing the software.
Configuring the Reporting Server service
If you will be accessing log files through network shares, you must first configure the Reporting Server service to log on under your user account. Afterward, you must give your account the necessary rights (See “Giving your account necessary rights” on page 7).
To configure the Reporting Server service:
1. Open the Windows Control Panel.
2. Select Services, and then select Enterprise Reporting Server from the list.
3. Click Startup. The Services dialog box opens.
4. Select This Account. Specify the account to use, and type the password for the account.
Giving your account necessary rights
To give your account necessary rights:1. Open the Windows NT User Manager by selecting Programs >
Administrative Tools > User Manager.
2. Select the account that you specified in the previous procedure, then select Policies > User Rights.
3. Select the Show Advanced User Rights check box.
4. Select Act as part of the operating system from the Right list.
5. If your user account isn’t listed, click Add. Add your account and click
OK.
6. Repeat steps 4 and 5 for the Log on as a service right.
7. Click OK to close the User Rights Policy dialog box.
8. In the User Manager window, double-click on Administrators. If your account isn’t listed, add it.
9. Click OK to close the Group Properties window. The installation of the Reporting Server is complete.
Important: WebTrends Corporation strongly recommends that all users review the releasenotes.txt file to read up-to-the-minute information on this latest version of the software.
Installing on Windows 2000
Installing the software on Windows 2000 is a three-part process: • Installing the Reporting Server
• Configuring the Reporting Server service • Giving your account necessary rights
Installing the Reporting Server
To install the Reporting Server:
1. Insert the Reporting Server CD-ROM into your CD-ROM drive. If your system is set up to use auto-run, the setup program is automatically launched. If not, choose Run from the File or Start menus and type:
X:\setup
where x is the drive letter of your CD-ROM drive.
2. Before the Reporting Server program files are copied to your system, the Software License Agreement is presented. If you agree to the stated terms, click Accept. Otherwise, click Cancel to exit the setup program without installing the software.
3. Follow the on-screen instructions to install the Reporting Server.
4. When the installation is complete, you will be given onscreen
instructions for configuring the WebTrends Reporting Server service, and giving your account necessary rights. Complete these
Important: WebTrends Corporation strongly recommends that all users review the releasenotes.txt file to read up-to-the-minute information on this latest version of the software.
Installing on Linux
Choose from the following two ways to install the Reporting Server: • Use the installation script (see below).
• Use the Red Hat Package Manager (RPM) (See “Using the Red Hat Packet Manager (RPM)” on page 12).
Note: The Bourne shell or Bourne-like shell must be available to install the
Enterprise Reporting Server.
Using the Linux installation script
The installation script installs the files and configures program settings in one process.
Note: You can be install either as root, or non-root, when running the installation script.
To install the Reporting Server using the installation script:
1. Type:
mkdir <tempdirectoryname>
where tempdirectoryname is the directory used to uncompress and un-tar the files needed for installation.
2. Type:
3. Select one of the following paths: • If you are using uncompress,
a) type:
cp <source path>/wt-ers-3.5-linux.i586.tar.z . b) type
uncompress wt-ers-3.5-linux.i586.tar.z
to uncompress the files. • If you are using gzip,
a) type:
cp <source path>/wt-ers-3.5-linux.i586.tar.gz . b) type:
gunzip wt-ers-3.5-linux.i586.tar.gz to uncompress the files.
4. Type:
tar -xvf wt-ers-3.5-linux.i586.tar
5. Type:
cd wt-ers-3.5
6. Type:
./install.wt-ers
The Software License Agreement is displayed. Press Enter to view the complete text.
7. Type: accept
if you consent to the Software License Agreement. The installation begins.
Press CTRL-C if you do not accept the Software License Agreement.
8. If you are not logged on as root, you are warned that you cannot install the program as a service. Press CTRL-C to cancel, or Enter to proceed with the installation.
9. A message describes the user authentication options. Press Enter when you have reviewed the explanation.
10. Press Enter to accept the default directory for the Reporting Server.
The default directory is /usr/local/webtrends. To install the program in another location, type the new path.
Type Y to verify that you want to use the specified directory.
11. Provide any valid Reporting Server serial number(s) that you have. If
you are upgrading from a previous version, type any new serial numbers you may have acquired. (For example, if you purchased a subscription with your upgrade, provide that number as well.) Type each number separately followed by Enter.
12. Type the port number for the user interface. This is the port through
which a user’s browser can access the Reporting Server. If you are installing as root, the default port is 1099. The default port for non-root users is 1024. Make sure the port is not used by any other service. Type Y to verify the port number.
13. If you would like to install samples, type Y. Otherwise, type n. Note: You can install the samples at a later time.
14. Type the user name of the administrator performing the installation. 15. Type the port number that the user interface can use to communicate
with the analysis engine. It must be a different port than you specified in Step 12. The default port is 9999. To accept it, press Enter.
Enter Y to verify that this is the port that you want to use.
16. If installing as root, you can specify how you want to start the
Reporting Server. (This message will not appear if you are not installing as root.)
• Type Y to start the Reporting Server when you boot the system. • Type n if you want to start it manually.
17. A message tells you that you can use the wtrs.server script to stop or
restart the program. Press Enter to continue.
18. A message asks if you want to start the Reporting Server now. Type Y
to start. Otherwise, type n.
19. A message explains that you can use the wtengine.server script to
start or stop the user interface, and the wtrs.server script to start or stop both the user interface and the Reporting Engine. Press Enter when you have reviewed information about the services available.
20. Type Y to review the release notes. Otherwise, type n.
21. The installation is now complete. A message displays the URL for the
opening server interface.
Note: To run the Reporting Server, launch your browser and type the name of the machine, followed by a colon and the port you specified during installation. For example: http://server:1096.
Using the Red Hat Packet Manager (RPM)
You can run the RPM from the Reporting Server CD-ROM.
Important: You must be installed as root to run the RPM.
To install the Reporting Server:
1. Type:
mkdir <tempdirectoryname>
where tempdirectoryname is the directory used for installation.
2. Type:
cd <tempdirectoryname>
3. Locate the package, wt-ers-linux.i586.rpm, on the CD-ROM. By default, it can be found on [usr/local/webtrends.] Type:
rpm -i wt-crs-ers-linux.i586.rpm
4. The welcome screen appears. Click Enter to proceed with the installation.
5. The Software License Agreement appears. Click Enter to accept.
Note: The installation will not continue if you do not accept the license agreement.
6. User authentication information appears. Click Enter to continue.
7. Provide any valid Reporting Server serial number(s) that you have. If you are upgrading from a previous version, type any new serial numbers you may have acquired. (For example, if you purchased a
subscription with your upgrade, provide that number as well.) Type each number separately followed by Enter.
8. If you have Oracle databases installed, and want to generate reports using an Oracle database, type Y.
If you are not configuring the Reporting Server to work in conjunction with an Oracle database, type n, and go to Step 12.
To configure the Reporting Server to use an Oracle database:
9. Type the Oracle user name. This will be the Linux user on the Oracle services.
Type Y to verify the user name.
10. Type the port number for the user interface. This is the port through
which a user’s browser can access the Reporting Server. If you are installing as root, the default port is 1099. The default port for non-root users is 1024. Make sure the port is not used by any other service. Type Y to verify the port number.
11. Enter the name of the Oracle administrator.
Type Y to verify the administrator name. To complete the Reporting Server configuration:
12. Type the port number that the user interface can use to communicate
with the analysis engine. It must be a different port than you specified in Step 10. The default port is 9999. To accept it, press Enter.
13. Enter Y to verify that this is the port that you want to use. 14. If installing as root, you can specify how you want to start the
Reporting Server. (This message will not appear if you are not installing as root.)
• Type Y to start the Reporting Server when you boot the system. • Type n if you want to start it manually.
15. A message tells you that you can use the wtrs.server script to stop or
restart the program. Press Y to continue.
16. A message asks if you want to start the Reporting Server now. Type Y
to start. Otherwise, type n.
18. You are given the opportunity to change permissions. Click Enter to
accept the current settings.
19. A message explains that you can use the wtengine.server script to
start or stop the user interface, and the wtrs.server script to start or stop both the user interface and the Reporting Engine. Press Enter when you have reviewed information about the services available.
20. Type Y to review the release notes. Otherwise, type n.
21. The installation is now complete. A message displays the URL for the
opening server interface.
22. When you are ready to configure program settings, run configure.sh,
which takes you through the program setup.
Installing an upgrade using the RPM
To upgrade your existing version of the Reporting Server, install the program in the same directory. During the installation, a backup of wtremote.ini and wtm_wtx.ini are made. The new settings in these files are merged with the existing ones.
To install the upgrade:
1. From the CD-ROM drive, type:
rpm -U wt-crs-ers-linux.i586.rpm
2. When you are ready to configure program settings, run configure.sh, which takes you through the program setup.
Installing on Solaris
Choose from the following two ways to install the Reporting Server:
• Use the installation script from a set of tarred files (See “Using the Solaris installation script” on page 15).
• Use the Solaris package (See “Using the Solaris installation package” on page 17).
Note: The Bourne shell or Bourne-like shell must be available to install the Reporting Server.
• Any valid serial numbers for the product, Add-On licenses, or subscriptions.
• Two ports that are available for the analysis engine and the remote interface.
Using the Solaris installation script
The installation script installs the files and configures the program in a single process.
To install the Reporting Server:
1. Type:
mkdir <tempdirectoryname>
where tempdirectoryname is the directory used to uncompress and untar the files needed for installation.
2. Type:
cd <tempdirectoryname>
3. Type:
cp <source path>/wt-ers-solaris.sparc.tar.z
4. Type:
wt-ers-solaris.sparc.tar.z
5. Type:
tar -xvf cp <source path>/wt-ers-solaris.sparc.tar.z
6. Type:
cd wt-ers
7. Type:
./install.wt-ers
8. The Software License Agreement is displayed. Press Enter to view the complete text of the Agreement.
9. At the end of the Software License Agreement, you are asked to accept its terms.
• Type accept if you consent to the Software License Agreement. The installation begins.
• Press CTRL-C if you do not accept the Software License Agreement.
10. If you are not logged on as root, you are warned that you cannot
install the program as a service. Press CTRL-C to cancel, or Enter to proceed with the installation.
11. A message describes the user authentication options. Press Enter
when you have reviewed the explanation.
12. Provide any valid Reporting Server serial number(s). If you are
upgrading from a previous version, type any new serial numbers you may have acquired. (For example, if you purchased a subscription with your upgrade, provide that number as well.)
Type each number separately followed by Enter.
13. The next screen confirms the directory the software will be installed
to. Type Y to accept the default directory for the Reporting Server. The default directory is /usr/local/webtrends. To install the program in another location, type the new path.
14. Type the port number to use for the user interface.
This is the port through which user’s browsers can access the Reporting Server. If you are installing as root, the default port is 99. If you are installing as non-root user, the default is 1024. Make sure the port that you specify is not used by another service.
15. Type Y to verify the port number.
16. Type the user name of the person performing the installation. The
user you specify is given administrator rights for the Reporting Server.
17. Type the port number that the user interface can use to communicate
with the analysis engine. It must be a different port than you specified in Step 14. The default port is 9999. To accept it, press Enter. Type Y to verify that this is the port that you want to use.
18. If you are installing as root, you can to specify how you want to start
the Reporting Server. (This message will not appear if you are not installing as root.) Type Y to start the Reporting Server automatically at system bootup. Otherwise, type n.
19. A message is tells you that you can use the wt-ers.server script to
stop or restart the program. Press Enter to continue.
20. A message asks if you want to start the Reporting Server now. Type Y
to start. Otherwise, type n.
21. A message explains that you can use the wt-ers_ui.server script to
start or stop the user interface, and the wt-ers.server script to start or stop both the user interface and the Reporting Engine. Press Enter when you have reviewed information about the services available.
Note: See “Running from the Command Line” on page 177 for more information.
22. Type Y to review the releasenotes.txt file. Otherwise, type n.
23. The installation is now complete. A message displays the URL for the
opening server interface.
Note: To run the Reporting Server, launch your browser and type the name of the machine, followed by a colon and the port you specified during installation. For example, http://server:1096
Using the Solaris installation package
To install the Reporting Server using the Solaris package:
1. Type:
mkdir <tempdirectoryname>
where tempdirectoryname is the directory used to uncompress and untar the files needed for installation.
2. Type:
cd <tempdirectoryname>
3. Type:
cp <source path>/wt-ers-3.5-sparc.pkg.tar.gz
4. Type:
gunzip wt-ers-3.5-sparc.pkg.tar.gz
tar -xvf wt-ers-3.5-sparc.pkg.tar
6. Type:
cd wt-ers-3.5
7. Type:
pkgadd -d /wtct-3.5
The package installs the program files.
8. When you are ready to configure program settings, run configure.sh from the wt-ers-3.5-sparc directory. This takes you through the setup process. Refer to “Using the Solaris installation script” on page 15 for details.
Installing upgrades
Installing an upgrade using the script
To upgrade your existing version of the Reporting Server, install the program in the same directory. During the installation, a backup of wtremote.ini and wtm_wtx.ini are made. The new settings in these files are merged with the existing ones.
Installing an upgrade using the Solaris package
To install the upgrade:1. Type:
mkdir <tempdirectoryname>
where tempdirectoryname is the directory used to uncompress and untar the files needed for installation.
2. Type:
cd <tempdirectoryname>
3. Type:
cp <source path>/wt-ers-3.5-solaris.sparc.tar.gz
4. Type:
gunzip wt-ers-3.5-solaris.sparc.tar.gz
tar -xvf wt-ers-3.5-solaris.sparc.tar
6. Type:
cd wt-ers-3.5
7. Type:
pkgadd -a -d /wt-ers-3.5
Running the Reporting Server
Once the Reporting Server is installed, you can run it through your browser. To run the Reporting Server:
1. Open an Internet Explorer or Netscape Navigator browser.
2. Type the name of the machine where the Reporting Server is installed, followed by a colon and the port that you specified during installation. For example: http://server:1099.
3. The Reporting Server Login screen opens. Click the Login button.
4. Type the user name you specified during the installation. At this point, you can leave the password text box blank.
Note: After installation, you should specify a password in your.usr file. See “Overview” on page 173 for details.
5. The Limited Demonstration screen opens. Specify whether you want to download a trial code or purchase a full version. Once you
complete the trial registration form or purchase a full version, you are emailed a trial code or product serial number.
6. Type the code you are given in the Trial Code or Product Serial
Number text box. Click Submit.
Registering the Reporting Server
Register your product using one of the procedures described here.
• If you downloaded a trial version from the our web site, see “Limited Demonstration Mode” on page 20.
• If you want to buy the Reporting Server, see “Purchasing the Reporting Server” on page 20.
• If you purchased the product, see “Registering your purchase” on page 21.
Limited Demonstration Mode
When you download the Reporting Server from the WebTrends Corporation web site, the product runs in limited demonstration mode. This lets you review program features and run reports using the sample profiles.
In this mode, you cannot report on your own log files. To run the Reporting Server using your own log files, you must register for a trial code.
To register for a trial code:
1. Select Help > Product Information.
2. Click the Register Trial button.
3. Complete the registration form, and click Submit. A trial code is created for you and displayed in the browser screen. It is also sent to your email address.
4. Copy the trial code.
5. Return to the Product Information screen, and paste the code into the
Trial Code or Product Serial Number text box. 6. Click Submit.
Trial Mode
Once you've registered the trial code, the Reporting Server runs in trial mode. This means that you can report on your own logs for 30 days. After 30 days, you can only run log files that contain dates preceding the expiration of the product.
Purchasing the Reporting Server
If you are running a trial version and you would like to purchase it, you can buy it through the WebTrends web site, over the phone, or by fax or mail. To learn more about purchasing options:
1. Select Help > Product Information. The Product Information screen opens.
2. Click the Purchase Information button. The Ordering Options screen provides information on each method of purchasing the product.
Registering your purchase
Once you purchase the product, you’ll get a product serial number which you must type in the Product Serial Number text box on the Product Information screen.
Uninstalling the Reporting Server
If at any time you want to remove the Reporting Server from your system, use the procedure described here.
Uninstalling Linux versions
To uninstall the Reporting Server:1. If the Reporting Server is running, stop it by typing: <install dir> ./wtrs.server stop
2. If the Reporting Server is configured to run as a service, type: rm /etc/rc.d/init.d/S99
Note: You must be logged in as root to remove this file.
3. Type:
rm -rf <install dir>
where <install dir> is the directory where the Reporting Server is installed.
Uninstalling Linux, using the RPM
To uninstall the Reporting Server:<install dir> ./wtrs.server stop
where <install dir> is the directory where the Reporting Server is installed.
2. If the Reporting Server is configured to run as a service, type: rm /etc/rc.d/init.d/S99
Note: You must be logged in as root to remove this file.
3. Type:
rm /etc/rc.d/init.d/wtct
4. Type:
rm /etc/rc.d/rc3.d/S99wtct
5. Type:
rm /etc/rc.d/rc5.d/S99wtct
The Reporting Server has been deleted from your system.
Uninstalling Solaris versions
To uninstall the Reporting Server:
1. If the Reporting Server is running, stop it by typing: <install dir> ./wtrs.server stop
2. If the Reporting Server is configured to run as a service, type: rm /etc/rc3.d/S99
Note: You must be logged in as root to remove this file.
3. Type:
rm -rf <install dir>
where <install dir> is the directory where the Reporting Server is installed.
Uninstalling Solaris packages
To uninstall the Reporting Server:1. If the Reporting Server is running, stop it by typing: <install dir> ./wtrs.server stop
2. If the Reporting Server is configured to run as a service, type: rm /etc/rc3.d/S99
Note: You must be logged in as root to remove this file.
3. Type:
rm /etc/init.d/wt-ers
4. Type:
rm /etc/init.d/rc3.d/S99wt-ers
Windows NT versions
The Reporting Server includes a standard Windows uninstall program. Use the steps described here if you did not install the WebTrends plug-ins. To begin uninstalling the program, complete these steps:
1. Select Start > Settings > Control Panel. The Windows Control Panel opens.
2. Select Add/Remove Programs from the Windows Control Panel.
3. In the Install/Uninstall tabbed view, select WebTrends Reporting Server from the list of existing programs.
4. Click Add/Remove. The Uninstall program walks you through the removal of the program from your system.
Installing Program Add-Ons
When you first install the Reporting Server, you have the ability to analyze log files from a single web server. If you wish to analyze log files for additional web servers, you must purchase the appropriate number of Server Add-Ons. The easiest way to order the correct number of Add-Ons is by contacting your sales representative. WebTrends Corp. Sales can be reached by telephone: (503) 294-7025.
(NT) Purchasing and installing Add-Ons
1. When you order the Add-Ons, write down the license code that you are given. You must submit the codes to run the installation.
2. Download the Add-On from the web site. Enter the license code when you are prompted.
3. The Add-On installation program looks for the Reporting Server program location and installs the new license.
(UNIX) Purchasing and installing Add-Ons
1. When you order the Add-Ons, write down the license code that you are given.
Note: You must know the license code to run the installation.
2. Select Help > License Add-Ons. Enter the license code you were given. The new license is activated.
3
About Reporting Server analysis
Reporting Server reports are based on profiles which define the location of your web server log file and how the log file should be analyzed. A profile provides the following data:
• Whether your web site resides on a single server or on multiple servers (including server clusters)
• Log file type and location
• Home page location and default pages for your site • Filters to apply
• Which cookie to use
• Whether you are creating pre-generated or on-demand reports • Which reporting template to use
• Report header settings • Reports to create
• Schedule for updating reports • DNS lookup method
• Users who can access the profile • Location for report data
Important: If you have been granted administrative rights, you can add, edit, and modify all profiles, even those created by other users. If you have not been granted administrative rights, many of the options explained in this chapter may not be available to you.
Preparing to analyze web site activity
To set up a new profile to analyze your site’s activity, you’ll need to answer the following questions:
• Does your site reside on a single server or on multiple servers?
If your site is on more than one server (such as in a server cluster configuration), you’ll need to know the location of the servers and where your logs reside on the servers. Also, be sure you have the proper licensing if you are reporting on activity for multiple servers. • Where are log files stored? You’ll need the exact file path to your
log files.
• What is the naming convention used for log files? For example,
log files might be named according to date followed by a .log
extension (such as 990111.log). If log files are compressed they may have a .zip, .gz, or .tar extension.
• What is the rotation of your log files? You’ll need to know if they
are rotated, and if so, on what schedule: daily, monthly, and so on.
Note: You must purchase and install a Server Add-on with ClusterTrends to analyze web sites whose logs reside on multiple servers.
Adding a profile
This section walks you through configuring a profile using the Profile Add wizard. These screens can also be accessed through the Profile Edit dialog box.
Important: If you are using the Reporting Server’s Campaign Analysis feature, you must configure your profile to include the Marketing Campaign definitions and Product definitions you want included in reports for this profile. While you can always edit a profile to include new definitions, it is most efficient to have these definitions in place before you build a profile that uses them.
To add a new profile to the Reporting Server:
1. From the Main Console, click New on the toolbar. The Site Configuration dialog box opens (Figure 3-1).
Figure 3-1. Site Configuration dialog box
2. Specify your site’s configuration:
• Select My web site is on one physical machine if your web site resides on one server.
• Select My web site is on multiple physical machines if your web site is on more than one server. With the ClusterTrends Add-On, the Reporting Server can analyze web site activity for sites that reside on multiple servers.
Click Next to save your settings and continue.
3. The Profile Add dialog box opens with the General tab showing (Figure 3-2). Type a name for the profile in the text box. This name also serves as a default profile title in generated reports.
Figure 3-2. Profile Add dialog box
4. Specify how much of the log to analyze.
• Select From the start of the log file to analyze the entire log file. • Select From the following date to analyze the log beginning
with the date specified. Type the date in day/month/year format. Click Next. The Log File Path dialog box opens (Figure 3-3 on page 29).
Specifying log file location
Important: This is the most important step in creating a profile. Without the location of the log file, the program cannot access or analyze the activity on your web site.
Figure 3-3. Log File Path dialog box
5. If you are analyzing log file data which is stored on multiple or clustered servers, please see “Setting up servers for ClusterTrends profiles” on page 32 for instructions. If you are analyzing log file data which is stored on a single server, continue with Step 6 below.
6. Click Browse to navigate to the directory that contains the file you want to analyze. The file name is displayed in the Current File text box.
7. Click Add to move the current file to the files list.
8. Repeat steps 7 and 8 until you have created the file list that you want to use in your profile.
9. Click one of the following:
• Append adds the files in the Files List to the text in your existing
clicking Append adds to any already specified in the Log File URL Path.
• Replace uses the files in the Files List to replace your existing
entry.
Note: If you get a message stating that the profile has failed to initialize, verify that the log file path that you entered is correct. See “Understanding log files” on page 104 for an overview of log files.
10. If the specified log files are accessed using FTP and the server
requires the user to authenticate, type the login information in the
User name and Password text boxes.
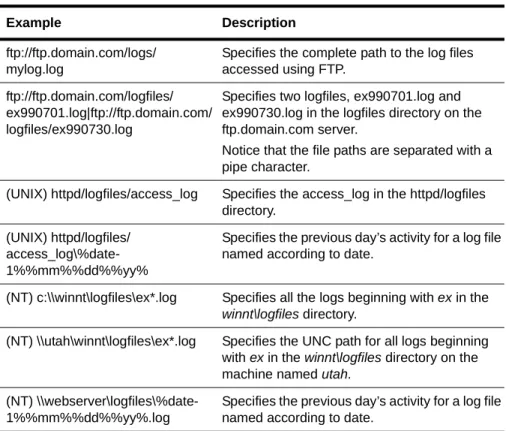
The following table provides examples of how to format your entry. Table 3-1. Log file URL path format examples
Example Description
ftp://ftp.domain.com/logs/ mylog.log
Specifies the complete path to the log files accessed using FTP.
ftp://ftp.domain.com/logfiles/ ex990701.log|ftp://ftp.domain.com/ logfiles/ex990730.log
Specifies two logfiles, ex990701.log and ex990730.log in the logfiles directory on the ftp.domain.com server.
Notice that the file paths are separated with a pipe character.
(UNIX) httpd/logfiles/access_log Specifies the access_log in the httpd/logfiles directory.
(UNIX) httpd/logfiles/ access_log\%date-1%%mm%%dd%%yy%
Specifies the previous day’s activity for a log file named according to date.
(NT) c:\\winnt\logfiles\ex*.log Specifies all the logs beginning with ex in the winnt\logfiles directory.
(NT) \\utah\winnt\logfiles\ex*.log Specifies the UNC path for all logs beginning with ex in the winnt\logfiles directory on the machine named utah.
(NT) \\webserver\logfiles\%date-1%%mm%%dd%%yy%.log
Specifies the previous day’s activity for a log file named according to date.
11. When you have completed configuring the log file location
information, click Next to continue with the Profile Add wizard. (In Profile Edit mode, click OK to save your changes.)
Specifying home page location and file names
12. The next Profile Add screen is the Home dialog box (Figure 3-4). (In Profile Edit mode, click Edit on the toolbar, then select the Home tab to open.)
Note: To include page titles in reports, you must also check the HTML Page Titles text box in the General options tab.
Figure 3-4. Home dialog box
13. In the Home Page File Names text box, type the file names that the
specific file name. Separate multiple file names with spaces. You can type up to 255 characters.
Specifying default home pages lets you report all references to the home page whether or not the visitor specifically included the file name. This makes the home page hit count more accurate.
14. In the web site URL text box, specify the URL to the root of your web
site, including the access method (http://, ftp://, or file:///).
Suppose that you specified your home page file name as default.htm and the web site URL as http://www.WebTrends.com.
• A hit to http://www.WebTrends.com/ is identified as: http://www.WebTrends.com/default.htm
• A hit to http://www.WebTrends.com/reports/ is identified as: http://www.WebTrends.com/reports/default.htm
15. Select the profile to work with, and click Edit.
16. Select the General dialog box, and click in the Disable Profile check
box.
17. Click OK. The profile is disabled until you clear the Disable Profile
text box.
Setting up servers for ClusterTrends profiles
If your web site resides on more than one server such as a server cluster or farm, set up the servers to analyze here. For each server, specify the location of the log files.
Note: If you are not using the ClusterTrends product in conjunction with the Reporting Server, this wizard will not appear.
Complete these steps:
18. Select the ClusterTrends profile to work with, and click Edit. 19. Select the List of Servers tab.
20. Select the log file format from the list. The Server Names list includes
any servers that have been defined for this web site.
21. Click Add to define a new server. The Specify New Server dialog box
22. Type a name to identify the server in the Server Name text box. 23. Type the path to the log file in the Log File Path text box. Logs that
are accessed using FTP should be identified by using the following syntax:
ftp://ftp.domain.com/filepath
where domain.com is the FTP server and filepath is the complete path to the log files. Type each log file path on a separate line.
24. If the log files are accessed using FTP and the server requires users
to authenticate, provide the authentication information in the user name and Password fields.
25. Click Next to continue. (In Profile Edit mode, click OK to save your
settings.)
Specifying filters
26. The next Profile Add page is Filters. (In Profile Edit mode, click Edit,
then select the Filters tab to open). The Filters dialog box opens (Figure 3-5).
Figure 3-5. Filters dialog box
27. See “Adding an Include or Exclude Visit Filter” on page 68, or “Adding an Include or Exclude Hit Filter” on page 76 for details on configuring filters.
When you have completed configuring filters, click Next. (In Profile Edit mode, click OK to save your settings.)
Specifying the cookie to use
28. The next Profile Add screen is the Cookies dialog box (Figure 3-6 on page 35).
Figure 3-6. Cookies dialog box
The Reporting Server uses cookies to identify unique user sessions during the analysis. A cookie is a file sent with the page requested from the server to the visitor. Cookies are stored on the visitor’s system. The stored cookie is then included in subsequent requests to your site by this visitor and is recorded in the log file, enabling you to uniquely identify the visitor. Activating cookies makes user session data more accurate because each visitor is clearly distinguished.
29. If you want to use cookies in the analysis for this profile, click in the Use Cookies To Identify User Sessions check box.
30. Select one of the following:
-- Use WebTrends plug-in cookie—If a WebTrends extended
logging plug-in is installed on your web server, you can use the WebTrends cookie to track user sessions.
-- Use this cookie—If your site uses several cookies, enter the
cookie you use for tracking user sessions here.
For example, if you are using Microsoft SiteServer, you might have cookies that look like this:
SITESERVER=ID=CookieValue1; SITESERVER=GUID=CookieValue2
If the GUID is the cookie that you want to use to identify user sessions, then you should enter SITESERVER=GUID here. -- Use entire cookie field—This will include all cookies from
your site in this profile’s analysis.
Click Next. (In Profile Edit mode, click OK to save your settings.)
31. You can edit Advanced Features from the Profile view. Click Configure to launch the Advanced Features dialog box. For details
on configuring the Advanced Features, refer to the following sections: • Content Groups (see “Content groups” on page 168)
• Path Analysis (see “Path analysis” on page 166)
• URL Parameter Analysis (“About URL parameter analysis definitions” on page 169)
• URL Search and Replace (“Path analysis” on page 166)
• Advertising Views (see Chapter 6, "Using Ad Views and Clicks" on page 97)
• Intranets (see Chapter 5, "Using Intranet Configuration" on page 93)
32. Click Next to continue.
33. The Reporting Methods dialog box opens (“Reporting Method dialog box” on page 37).
Figure 3-7. Reporting Method dialog box
34. Select the reporting method you want to use:
• Pre-generated Reports—Reports are generated on a schedule.
• On-demand Reports—Reports are generated dynamically upon
user request.
Note: For details on pre-generated and on-demand reports, please see
“Pre-generated and on-demand reporting” on page 110.
Click Next to continue.
Figure 3-8. Report Template dialog box
36. Report templates define the content, language, and style for the
report. For details on report templates, see “Adding report templates” on page 116. Select the template you want to use from the drop-down list:
• Complete CTRS Report • CTRS Executive Summary • Marketing Report
• System Administrator Report • WebMaster Report
Click Next to continue.
37. The Report Header dialog box opens (Figure 3-9). (In Profile Edit mode, click Edit, then select the Report Header tab.)
Figure 3-9. Report Header dialog box
38. Type or browse to set the following options:
• Report Image—Specifies which graphic to include in the report
header.
• Report Image Alt—Specifies the text that is displayed if the
image isn’t available or as the graphic is loading.
• Associated URL—Specifies the URL to load when a visitor clicks
on the Report Image.
39. When you have completed your Report Header settings, click Next.
(In Profile Edit mode, click OK to save and close the window.)
40. The Next Profile Add screen is the Reports dialog box (Figure 3-10). (From Profile Edit mode, click Edit, then select Report Types.)
Figure 3-10. Reports dialog box
41. Select the report intervals that you want to maintain by clicking in the
appropriate Report Types boxes.
42. For each report type, specify the number of reports to save from the
corresponding Reports to Store list.
Note: If you run a large number of reports, you might limit the number of reports that are saved. Using this option, you can select the number of reports saved for each interval. For example, you might want to keep one month’s worth of daily reports at a time; once the report for February 1 is created, the report for January 1 is deleted, and so on. When
determining how many reports to store, consider how much disk space you want to devote to reports and how long you want to save them. A report using the Complete Summary template as it was installed needs 1 MB.
43. Click Next. (In Profile Edit mode, click OK to save your changes.) 44. The next Profile Add screen is the Memory Usage dialog box
(Figure 3-11).
Figure 3-11. Memory Usage dialog box
45. Optional: If you want to limit the sizes of the following tables, enter the
limiting number in the Visitor Tracking, Top Companies, Top
Documents, and Top Forms text boxes.
Here is an example of what happens when you put a limit on an internal table, using Top Companies as an example. If the Top Companies limit is set to 10,000, then RS will track the first 10,000 organizations visiting your web site. After the first 10,000
organizations have been put into the internal table, no new organizations will be added to the table. However, activity by organizations already in the table will continue to be tracked.
Limiting Top Companies is usually the first option. This table typically uses more memory than all tables except Visitor Tracking. Limiting Top Companies affects only the "Most Active Organizations" section of the report.
Limiting Visitor Tracking is usually the second option. Tracking visitors is important enough that RS includes a low memory usage method of tracking visitors. The low memory usage method will track who has visited your site and how many times they have visited, but will not track things like exactly when the visits occurred, how long they lasted, how many pages were viewed in each visit, etc.
For most sites, limiting Top Documents and Top Forms should not be necessary. If large amounts of memory are being used by these tables, other avenues should be explored before limiting the tables sizes. This includes looking at the definitions for document types, looking at extensions that are excluded from being treated as forms, and using URL Search & Replace to remove dynamic content that is not contributing useful information to the report.
46. The next Profile Add screen is the Report Scheduler dialog box
Figure 3-12. Report Scheduler dialog box
47. In the Initial Start Time field, specify when you want reports to begin. 48. Select how often to update the report from the Interval drop-down list. 49. Click Next. (In Profile Edit mode, click OK to save your changes.)
Pre- and post-processing
Figure 3-13. Pre-processing dialog box
51. Use the pre-processing feature to run a file immediately prior to a
scheduled analysis. You can configure the Reporting Server to not run the scheduled analysis should the pre-processing command fail. Pre-processing is configurable on a per-profile basis.
Select the Pre-processing checkbox if you want to have the Reporting Server run a file prior to analyzing this profile.
52. Browse to the application you want to run. 53. Enter the pathname to the working directory.
54. Enter any command line parameters you want to use. Command-line
options include: • isenabled = false
• application =
Application to execute parameters • parameters =
Parameters for said application [optional] • workingdirectory =
Directory to execute application [optional] • ignorereturncode = true
Continue to processes and perform no comparison on return code
• returncode = 0
Space or command delimited string of return codes [all success or failure]
• returncodetype = success
Compare resulting return codes to specified return codes with '==' or '! ='. The will allthe user to have return codes be success or failure code. Options are success or failure, defaults to success.
55. You can ask the Reporting Server to consider return codes. To use
this option, select the Check return codes radio button. Enter your settings, and click OK to save. (You may need to scroll down to view all the settings available to you.)
56. Click Next to continue.
Figure 3-14. Post-processing dialog box
58. Use the post-processing feature to run a file immediately after an
analysis. Post-processing is configurable on a per-profile basis. Select the Post-processing checkbox if you want to have the Reporting Server run a file after completing this analyzing this profile.
59. Browse to the application you want to run. 60. Enter the pathname to the working directory.
61. Enter any command line parameters you want to use. Command-line
options include:
• isenabled = false Use specified pre or post process command
• application = Application to execute
• parameters = Parameters for said application [optional]