© 2012 HPCC Systems. All rights reserved
HPCC Data Tutorial
Boca Raton Documentation Team
Copyright © 2012 HPCC Systems. All rights reserved
We welcome your comments and feedback about this document via email to <[email protected]> Please include
Documentation Feedback in the subject line and reference the document name, page numbers, and current Version Number in the text of the
message.
LexisNexis and the Knowledge Burst logo are registered trademarks of Reed Elsevier Properties Inc., used under license. Other products and services may be trademarks or registered trademarks of their respective companies. All names and example data used in this manual are fictitious. Any similarity to actual persons, living or dead, is purely coincidental.
Introduction ... 4
The ECL Development Process ... 4
Working with Data ... 5
The Original Data ... 5
Begin Coding ... 10
Publishing your Query ... 18
Compile and Publish the Roxie Query ... 22
© 2012 HPCC Systems. All rights reserved
Introduction
The ECL Development Process
This tutorial provides a walk-through of the development process, from beginning to end, and is designed to be an introduction to working with data on any HPCCSystems HPCC1. We will write code in ECL2to process our data and query it.
This tutorial assumes:
• You have a running HPCC. This can be a VM Edition or a single or multinode HPCC platform • You have the ECL IDE3 installed and configured
In this tutorial, we will: • Download a raw data file
There are links to data file available at http://hpccsystems.com/community/docs/data-tutorial-guide
The download is approximately 30 MB (compressed) and is available in either ZIP or .tar.gz format. Choose the appropriate link.
• Spray the file to a Data Refinery cluster HPCC clusters "spray" data into file parts on each node.
A spray or import is the relocation of a data file from one location to an HPCC cluster. The term spray was adopted due to the nature of the file movement – the file is partitioned across all nodes within a cluster.
• Examine the data and determine the pre-processing we need to perform • Pre-process the data to produce a new data file
• Determine the types of queries we want • Create the queries
• Test the queries
• Deploy them to a Rapid Data Delivery Engine (RDDE) cluster, also know as a Roxie cluster.
1High Performance Computing Cluster (HPCC) is a massively parallel processing computing platform that solves Big Data problems. See http://
www.hpccsystems.com/Why-HPCC/How-it-works for more details.
2Enterprise Control Language (ECL) is a declarative, data centric programming language used to manage all aspects of the massive data joins,
sorts, and builds that truly differentiate HPCC (High Performance Computing Cluster) from other technologies in its ability to provide flexible data analysis on a massive scale.
Working with Data
The Original Data
In this scenario, we receive a structured data file containing records with people's names and addresses. The HPCC also supports unstructured data, but this example is simpler. This file is documented in the following table:
Field Name Type Description
FirstName 15 Character String First Name
LastName 25 Character String Last name
MiddleName 15 Character String Middle Name
Zip 5 Character String ZIP Code
Street 42 Character String Street Address
City 20 Character String City
State 2 Character String State
This gives us a record length of 124 (the total of all field lengths). You will need to know this length for the File
Spray process.
Load the Incoming Data File to your Landing Zone
A Landing Zone (or Drop Zone) is a physical storage location defined in your HPCC's environment. A daemon (DaFileSrv) must be running on that server to enable file sprays and desprays.
For smaller data files, maximum of 2GB, you can use the upload/download file utility in ECL Watch (a Web-based interface to your HPCC platform). The sample data file is ~100 mb.
1. Download the sample data file from the HPCC Systems portal.
The data file is available from links found on http://hpccsystems.com/community/docs/data-tutorial-guide. The download is approximately 30 MB (compressed) and is available in either ZIP or tar.gz format (OriginalPerson.tar.gz or OriginalPerson.zip)
© 2012 HPCC Systems. All rights reserved
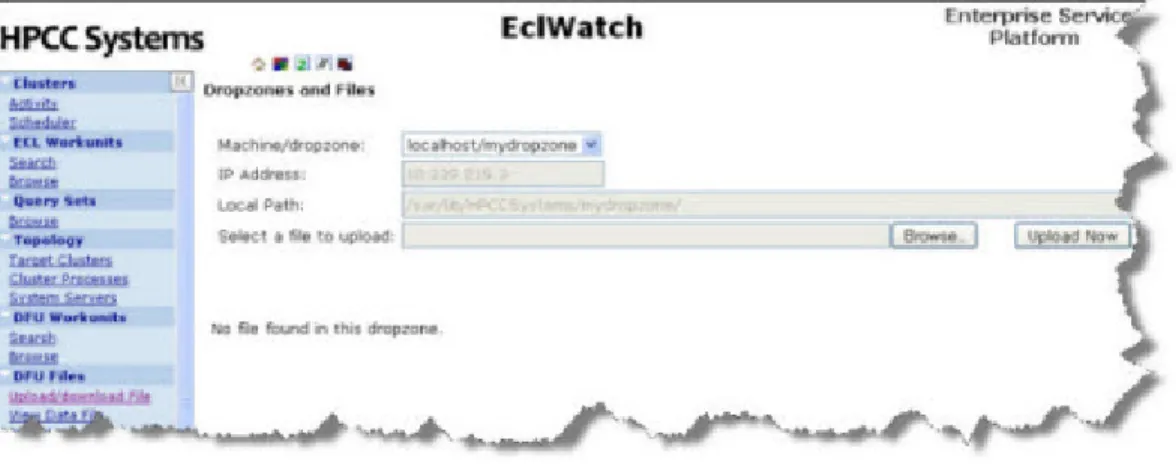
4. From ECL Watch page, click on the Upload/download File link in the menu on the left side.
Figure 1. Upload/download
Once you click on the Upload/download file link, it will take you to the Dropzones and Files page, where you can choose to Browse your machine for a file to upload:
Figure 2. Dropzones and Files
5. Press the Browse button to browse the files on your local machine, select the file to upload and then press the
Open button.
6. Press on Upload Now to complete the file upload.
Spray the Data File to your THOR Cluster
To use the data file in our HPCC cluster, we must first “spray” it to a Thor cluster. A spray or import is the relocation of a data file from one location to a Thor cluster. The term spray was adopted due to the nature of the file movement – the file is partitioned across all nodes within a cluster.
In this example, the file is on your Landing Zone and is named OriginalPerson.
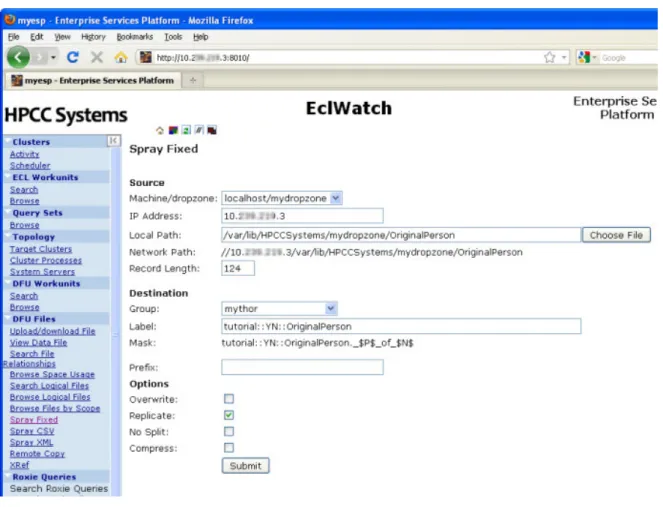
We are going to spray it to our Thor cluster and give it a logical name of tutorial::YN::OriginalPerson where YN are your initials. The Distrubuted File Utility maintains a list of logical files and their corresponding physical file locations. 1. Open ECL Watch in your browser using the following URL:
http://nnn.nnn.nnn.nnn:pppp (where nnn.nnn.nnn.nnn is your ESP Server’s IP Address and pppp is the port. The default port is 8010)
2. Click on the Spray Fixed hyperlink under the DFU Files menu on the left. The DFU Spray Fixed page displays.
3. Using the Source Machine/dropzone drop-down list, select the Landing Zone where the file was placed. In the VM or Community Edition, there is only one Landing Zone.
The IP Address is automatically filled and the Local Path is partially filled with the default folder on your landing zone.
4. Complete the Local Path to include the complete file name or use the Choose File button to select the file from a list of files in the folder. (The file to choose is OriginalPerson)
5. Fill in the Record Length (124).
6. Fill in the Label using the naming convention described earlier: tutorial::YN::OriginalPerson (remember, YN are your initials).
© 2012 HPCC Systems. All rights reserved
7. Make sure the Replicate box is checked.
Note: If replication is disabled in your Thor settings, this checkbox does not appear.
Figure 3. Dropzones and Files
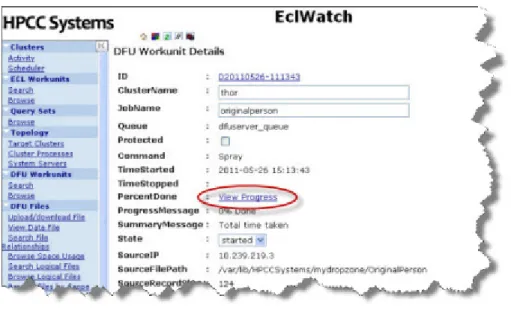
9. Click on the View Progress hyperlink
Figure 4. View Progress
The Workunit progress page displays.
Figure 5. Spray Complete
© 2012 HPCC Systems. All rights reserved
Begin Coding
In this portion of the tutorial, we will write ECL code to define the data file and execute simple queries on it so we can evaluate it and determine any necessary pre-processing.
1. Start the ECL IDE (Start >> All Programs >> HPCC Systems >> ECL IDE ) 2. Log in to your environment
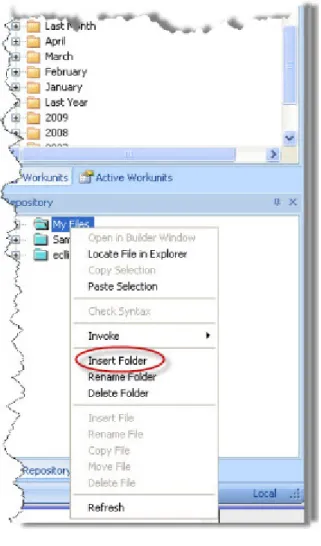
For purposes of this tutorial, let’s create a folder called TutorialYourName (where YourName is your name). 3. Rt-Click on the My Files folder in the Repository window, and select Insert Folder from the pop-up menu.
4. Enter TutorialYourName(where YourName is your name)for the label, then press the OK button.
Figure 7. Enter Folder Label
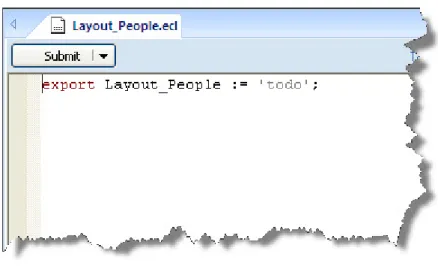
5. Rt-Click on the TutorialYourNameFolder, and select Insert File from the pop-up menu. 6. Enter Layout_People for the label, then press the OK button.
Figure 8. Insert File
A Builder Window opens.
© 2012 HPCC Systems. All rights reserved
7. Write the following code in the Builder workspace:
EXPORT Layout_People := RECORD STRING15 FirstName; STRING25 LastName; STRING15 MiddleName; STRING5 Zip; STRING42 Street; STRING20 City; STRING2 State; END;
Figure 10. Code in Builder Window
8. Press the syntax check button on the main toolbar (or press F7). It is always a good idea to check syntax before submitting.
Figure 11. Check Syntax
Examine the Data
In this section, we will look at the data and determine if there is any pre-processing we want to perform on the data. This is the step in the development process where we convert the raw data into a form we can use.
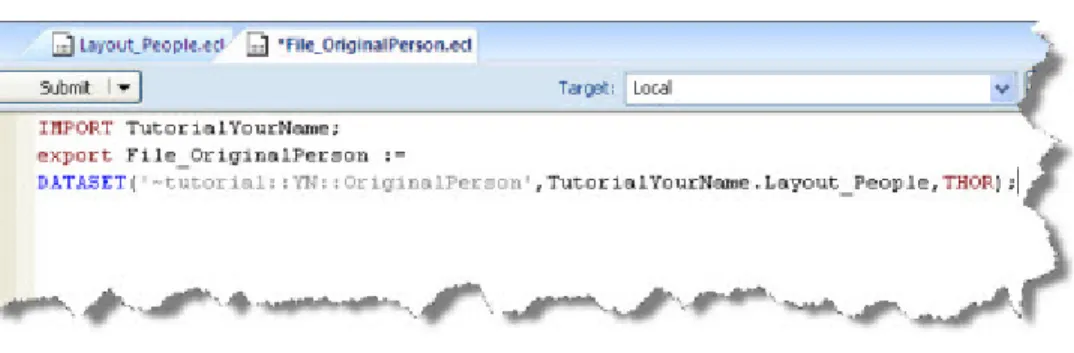
1. Rt-Click on the TutorialYourName Folder, and select Insert File from the pop-up menu. 2. Enter File_OriginalPerson for the label, then press the OK button.
Figure 12. Insert File
A Builder Window opens.
3. Write the following code (remember to replace YNwith your initials):
IMPORT TutorialYourName; EXPORT File_OriginalPerson :=
DATASET('~tutorial::YN::OriginalPerson',TutorialYourName.Layout_People,THOR);
© 2012 HPCC Systems. All rights reserved
7. Make sure the selected cluster is your Thor cluster, then press the Submit button. Note that your target cluster might have a different name.
Figure 14. Target Thor
8. When the Workunit completes, it displays a green checkmark .
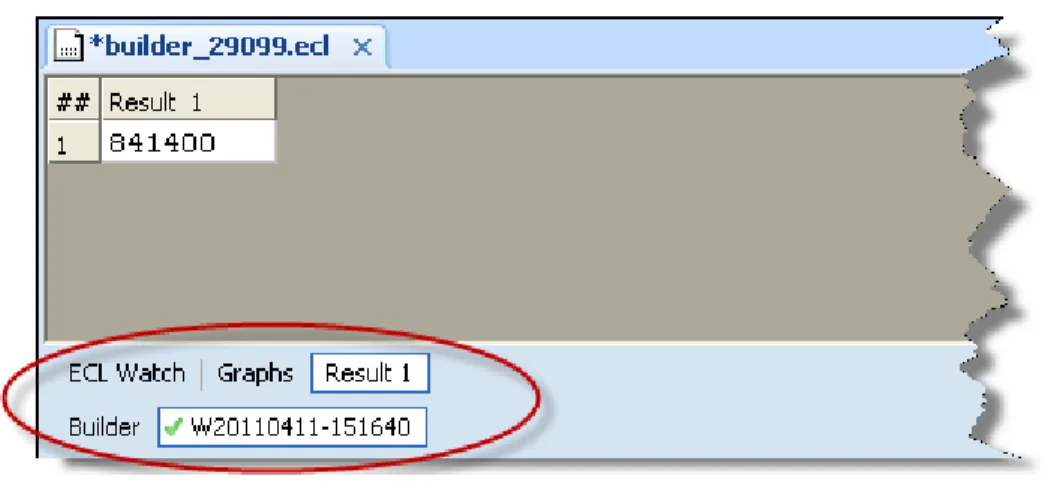
9. Select the Workunit tab (the one with the number next to the checkmark) and select the Result 1 tab (it may already be selected).
Figure 15. Result tab
This shows us that there are 841,400 records in the data file.
10.Select the Builder tab and change COUNT to OUTPUT, as shown below:
IMPORT TutorialYourName;
OUTPUT(TutorialYourName.File_OriginalPerson);
Note: The modified portion is shown in bold.
12.When it completes, select the Workunit tab, then select the Result 1 tab.
Figure 16. Output Results
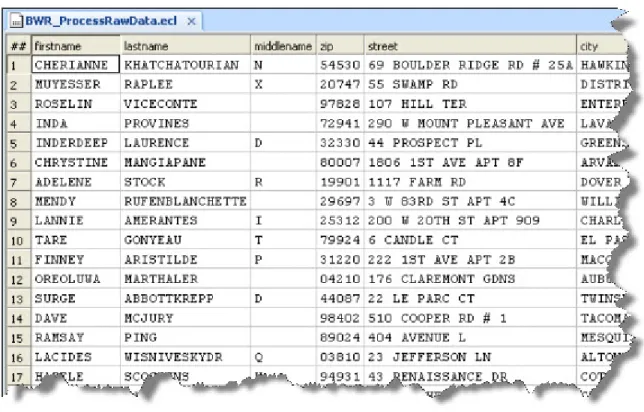
Notice the names are in mixed case.
For our purposes, it will be easier to have all the names in all uppercase. This demonstrates one of the steps in the basic process of preparing data (Extract, Transform, and Load—ETL) using ECL.
13.Close the Builder Window.
Process the Data
In this section, we will write code to convert the original data so that all names are in uppercase. We will then write this new file to our Thor cluster.
1. Rt-Click on the TutorialYourName Folder, and select Insert File from the pop-up menu.
© 2012 HPCC Systems. All rights reserved
OUTPUT(UpperedDataset,,'~tutorial::YN::TutorialPerson',OVERWRITE);
3. Check the syntax, if no errors press the Submit button.
4. When it completes, select the Workunit tab, then select the Result 1 tab.
Figure 17. Process Result
The results show that the process has successfully converted the name fields to uppercase. 5. After you examine the results, close the Builder window.
Using our New Data
Now that we have our data in a useful format and the file is in place, we can write more code to use the new data file. We will determine the indexes we will need and create them. For this tutorial, let’s assume the field we need to index is the Zip code field.
In the DATASET definition, we will add a virtual field to the RECORD structure for the fileposition. This is required for indexes.
1. Insert a File into the TutorialYourName Folder. Name it File_TutorialPerson and write this code (changing YN to your initials):
IMPORT TutorialYourName; EXPORT File_TutorialPerson :=
DATASET('~tutorial::YN::TutorialPerson', {TutorialYourName.Layout_People,
2. Check the syntax, if no errors press the Submit button. 3. When it completes, it displays a green checkmark .
Index the Data
Next, we will define the INDEX.
1. Insert a File into your Tutorial Folder. Name it IDX_PeopleByZip and write this code (changing YN and YourName as before):
IMPORT TutorialYourName; EXPORT IDX_PeopleByZIP :=
INDEX(TutorialYourName.File_TutorialPerson,{zip,fpos},'~tutorial::YN::PeopleByZipINDEX');
2. Check the syntax.
Next, we will build the index file.
3. Insert a File into the TutorialYourName Folder and name it BWR_BuildPeopleByZip and write this code (replacing YourName with your name):
IMPORT TutorialYourName;
BUILDINDEX(TutorialYourName.IDX_PeopleByZIP,OVERWRITE);
4. Check the syntax and if there are no errors, press the Submit button. 5. Wait for the Workunit to complete, then close the Builder Window.
Build a Query
Now that we have an index file, we will write a query that uses it.
1. Insert a File into your Tutorial Folder. Name it BWR_FetchPeopleByZip and write this code (changing YourName as before): IMPORT TutorialYourName; ZipFilter :='33024'; FetchPeopleByZip := FETCH(TutorialYourName.File_TutorialPerson, TutorialYourName.IDX_PeopleByZIP(zip=ZipFilter), RIGHT.fpos); OUTPUT(FetchPeopleByZip);
© 2012 HPCC Systems. All rights reserved
Publishing your Query
Now that we have created an indexed query, the next step is to enable access to it through a Web interface.
Our STORED variables provide a means to pass values as query parameters. In this example, the user can supply the ZIP code so the results are people from that ZIP code.
1. Insert a File into the TutorialYourName Folder and name it FetchPeopleByZipService 2. Write this code (changing YourName as before):
IMPORT TutorialYourName;
STRING10 ZipFilter := '' :STORED('ZIPValue'); resultSet :=
FETCH(TutorialYourName.File_TutorialPerson, TutorialYourName.IDX_PeopleByZIP(zip=ZipFilter), RIGHT.fpos);
OUTPUT(resultset);
3. Check the syntax, and save the file. 4. Press the Submit button.
6. Press the Publish button, you may need to scroll down the main window.
Figure 18. Publish Workunit
© 2012 HPCC Systems. All rights reserved
Execute using WsECL
Now that the query is published, we can run it using the WsECL Web service. WsECL provides a Web-based interface to your published query. It also automatically creates an entry form to execute the query.
Using the following URL:
http://nnn.nnn.nnn.nnn:pppp (where nnn.nnn.nnn.nnn is your ESP Server’s IP address and pppp is the port. Default port is 8002)
Figure 20. WsECL
2. Click on the fetchpeoplebyzipservice.1 hyperlink. The form for the service displays.
Figure 21. Service Form
3. Provide a zip code (e.g., 33024) in the zipvalue field, , select Output Tables from the droplist, then press the
Submit button.
The results display.
© 2012 HPCC Systems. All rights reserved
Compile and Publish the Roxie Query
The final step in this process is to publish the indexed query to a Rapid Data Delivery Engine (Roxie) Cluster. We will recompile the code with Roxie as the target cluster, then publish it to a Roxie cluster.
1. In the ECL IDE, select the Builder tab on the FetchPeopleByZipService file builder window, 2. Using the Target droplist, select Roxie as the Target cluster.
Figure 23. Target Roxie
3. In the Builder window, in the upper left corner the Submit button has a drop down arrow next to it. Select the arrow to expose the Compile option.
Figure 24. Compile
5. When the workunit finishes, it will display a green circle indicating it has compiled.
Figure 25. Compiled
Publish the Roxie query
Next we will publish the query to a Roxie Cluster.
1. Select the workunit tab for the FetchPeopleByZipService that you just compiled. 2. Select the ECL Watch tab.
© 2012 HPCC Systems. All rights reserved
3. Press the Publish button (you may need to scroll down the main window)
Figure 26. Publish Query
When it successfully publishes, you will see:
Run the Roxie Query in WsECL
Now that the query is deployed to a Roxie cluster, we can run it using the WS-ECL service Using the following URL:
http://nnn.nnn.nnn.nnn:pppp (where nnn.nnn.nnn.nnn is your ESP Server’s IP address and pppp is the port. The default port is 8002)
1. Click on the + sign next to myroxie to expand the tree. 2. Click on the fetchpeoplebyzipservice.1 hyperlink.
The form for the service displays.
Figure 28. RoxieECL
3. Provide a zip code (e.g., 33024), select Output Tables from the droplist, and press the Submit button. The results display.
© 2012 HPCC Systems. All rights reserved
Summary
Now that you have successfully processed raw data, sprayed it onto a cluster, and deployed it to a RDDE cluster, what’s next?
Here is a short list of suggestions on the path you might take from here: • Create indexes on other fields and create queries using them.
• Write client applications to access your queries using JSON or SOAP interfaces. • Looks at the resources available on the Links tab
Figure 30. Links
The Links tab provides easy access to a form, a Sample Request, a Sample Response, the WSDL, the XML Schema (XSD) and more...