IBM Tivoli Workload Automation
Dynamic Workload Console User’s Guide
Version 9 Release 1
IBM Tivoli Workload Automation
Dynamic Workload Console User’s Guide
Version 9 Release 1
Note
Before using this information and the product it supports, read the information in “Notices” on page 219.
This edition applies to version 9, release 1, modification level 0 of Tivoli Workload Scheduler (program number 5698-WSH) and to all subsequent releases and modifications until otherwise indicated in new editions.
Contents
Figures
. . . vii
About this publication . . . ix
What is new in this release . . . ix
Who should read this publication . . . ix
Publications . . . ix
Accessibility . . . ix
Tivoli technical training. . . x
Support information . . . x
Chapter 1. Navigating the Dynamic
Workload Console . . . 1
Naming conventions for scheduling objects . . . . 4
Convention for specific platform information . . . 6
Chapter 2. Getting Started . . . 7
Creating and managing engine connections . . . . 8
Setting user preferences. . . 8
Event management configuration . . . 9
Chapter 3. Installing and configuring
the Dynamic Workload Console . . . . 11
Chapter 4. Using the Dynamic
Workload Console from mobile devices 13
Chapter 5. Configuring High Availability 15
Managing user settings . . . 15Changing settings repository . . . 16
Sharing a settings repository. . . 17
Changing the Dynamic Workload Console user of DB repository . . . 18
Chapter 6. Customizing your console
21
Customizing your portfolio . . . 21Customizing your startup page . . . 22
Customizing your tasks . . . 22
Adding tasks to your favorite bookmarks . . . . 23
Using the news notification beacon . . . 24
Disabling news notification . . . 24
Customizing the list of notification recipients . . 25
Sending internal communications . . . 26
Customizing your global settings . . . 27
Chapter 7. Tivoli Workload Scheduler
Concepts. . . 29
Scheduling environment . . . 29 Workstation . . . 29 Domain. . . 32 Scheduling objects . . . 35 Job . . . 36 Job stream . . . 36 Workload application . . . 37 Period . . . 37 Calendar . . . 39 Run cycle . . . 39Run cycle group . . . 40
Operator instructions . . . 45 Parameter . . . 45 Dependencies. . . 46 User . . . 55 Workstation class . . . 55 Variable table . . . 56
Workload Broker job definition . . . 56
Production process . . . 57 Database . . . 57 Plans . . . 58 Preproduction plan . . . 60 Engine connections . . . 61 Event management . . . 62 Reports . . . 64
Workload service assurance . . . 65
Processing and monitoring critical jobs . . . . 67
Planning critical jobs . . . 69
Tivoli Workload Scheduler for SAP . . . 71
Chapter 8. Creating and Editing
Objects in the Database . . . 73
Designing your Scheduling Environment . . . . 73
Creating a workstation . . . 73
Editing workstation definitions . . . 75
Creating a domain . . . 76
Creating a pool of agents . . . 76
Designing your Workload . . . 77
Editing objects from the Working List View. . . 78
Editing objects from the Quick Open View . . . 79
Editing objects from the Details View . . . 80
Editing objects from the Graphical View . . . . 80
Editing object properties . . . 81
Creating job stream definitions . . . 81
Creating job definitions . . . 82
Adding a job to a job stream . . . 91
Adding and removing dependencies . . . 93
Creating cross dependencies . . . 95
Creating and managing run cycle groups and their run cycles . . . 96
Creating Workload Broker objects . . . 103
Creating an event rule . . . 104
Editing event rules . . . 109
Listing object definitions in the database . . . 109
Creating a workload application template . . . . 112 | || || || || || || || || || | || || ||
Chapter 9. Changing user password in
the plan . . . 115
Chapter 10. Monitoring your Objects
in the Plan. . . 117
Monitoring the progress of your plan . . . 117
Monitor tasks . . . 119
Monitoring your Scheduling Environment . . . . 119
Creating a task to Monitor Workstations . . . 120
Creating a task to Monitor Domains . . . 121
Monitoring your Workload . . . 122
Event management tasks . . . 124
Plan view tasks. . . 124
Creating a task to Monitor Jobs . . . 125
Creating a task to Monitor Critical Jobs. . . . 126
Creating a task to Monitor Tasks on Multiple Engines . . . 129
Creating a task to Monitor Job Streams . . . . 130
Creating a task to Monitor Job Streams on Multiple Engines . . . 132
Creating a task to Monitor Files . . . 133
Creating a task to Monitor Prompts . . . 134
Creating a task to Monitor Resources . . . . 136
Creating a task to Monitor Event Rules . . . . 137
Creating a task to Monitor Triggered Actions 138 Creating a task to Monitor Operator Messages 139 Controlling Jobs and Job Streams Processing . . . 140
Using dependencies to control job and job stream processing . . . 140
Using time restrictions to control job and job stream processing . . . 141
Using job priority and workstation fence to control distributed job processing. . . 142
Using limits to control job and job stream processing . . . 143
Using job confirmation to control job processing 143 Using job recovery actions to control job processing . . . 144
Chapter 11. Working with Plans
. . . 145
Selecting the working plan . . . 145
Generating Trial and Forecast Plans . . . 147
Creating a task to Show Plan View . . . 147
View preproduction plan . . . 149
Chapter 12. Submitting Workload on
Request in Production . . . 151
Submitting ad hoc jobs . . . 151
Submitting predefined jobs . . . 151
Submitting predefined job streams . . . 152
Setting properties for ad hoc jobs and predefined jobs and job streams . . . 152
Chapter 13. Reporting. . . 155
Creating a task to generate a Job Run Statistics report . . . 155
Creating a task to generate a Job Run History report . . . 156
Creating a task to generate a Workstation Workload Summary report . . . 157
Creating a task to generate a Workstation Workload Runtimes report . . . 158
Creating a task to Create Plan Reports . . . 159
Creating a task to Create Custom SQL Reports . . 160
Chapter 14. Scenarios. . . 161
Customizing your job stream . . . 161
Using workload service assurance to monitor z/OS critical jobs . . . 163
Monitoring jobs running on multiple engines. . . 165
Chapter 15. Troubleshooting the
Dynamic Workload Console . . . 169
Chapter 16. Reference
. . . 171
Accessing online publications . . . 171
Dynamic Workload Console global settings . . . 171
Override graphical view limits . . . 172
Plan View in new window . . . 172
Disable and customize NewsFeed function . . 173
Disable and customize the creation of predefined tasks . . . 174
Add customized URL to job and job streams 175 User registry . . . 177
z/OS http connections . . . 178
Limit the number of objects retrieved by queries 178 Limit task and engine sharing . . . 179
Entries in Workload Designer search windows 179 TdwcGlobalSettings.xml sample . . . 180
Users and groups . . . 182
Type of communication based on SSL communication options . . . 183
Status description and mapping for distributed jobs 184 Status description and mapping for z/OS jobs . . 186
Status description and mapping for distributed job streams . . . 188
Status description and mapping for z/OS job streams . . . 189
Workstation types . . . 191
Graphical Views in the plan . . . 195
Workload Designer . . . 199
Working List . . . 199
Quick Open . . . 199
Details view . . . 201
Graphical View . . . 203
Run Cycle Preview . . . 206
Message History . . . 207
Using recovery options in job definitions . . . 207
Reports . . . 209 Regular Expressions . . . 210 SQL report examples . . . 214 Event rule . . . 216 Action properties . . . 216 Event properties . . . 217
Activation statuses of the event rules . . . . 218
Schemas for generic events . . . 218 ||
Notices . . . 219
Trademarks . . . 220Figures
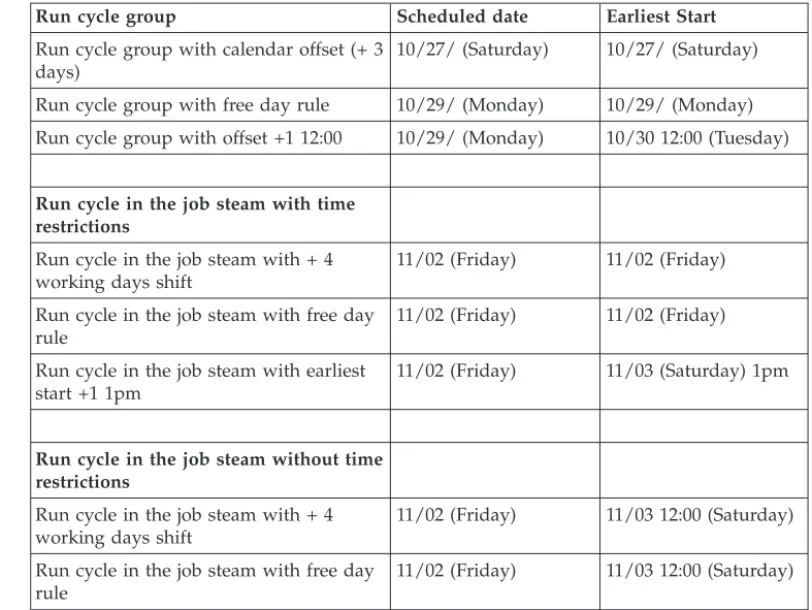
1. Single-domain network . . . 33 2. Multiple-domain network . . . 34 3. Example of a condition dependency definition 51 4. Example of a condition dependency at run
time . . . 51 5. Auto-recovery job stream with step level
dependency . . . 52
6. Example of recovery job with condition
dependencies . . . 53 7. Cross dependencies . . . 55 8. Critical path . . . 68
About this publication
IBM®Tivoli®Workload Scheduler simplifies systems management across distributed environments by integrating systems management functions. Tivoli Workload Scheduler plans, automates, and controls the processing of your enterprise's entire production workload. TheTivoli Workload Scheduler Dynamic Workload Console User's Guideprovides detailed information about how to configure and use the Dynamic Workload Console to manage your Tivoli Workload
Scheduler environment.
What is new in this release
For information about the new or changed functions in this release, see the IBM Tivoli Workload Automation Overview, sectionSummary of enhancements.
For information about the APARs that this release addresses, the Dynamic Workload Console Release Notes at http://www-01.ibm.com/support/ docview.wss?rs=672&uid=swg27038328.
Who should read this publication
This publication is intended for the following audience:
v Tivoli Workload Scheduler operators v Tivoli Workload Scheduler administrators
Publications
Full details of Tivoli Workload Scheduler publications can be found inTivoli Workload Automation: Publications. This document also contains information about the conventions used in the publications.
A glossary of terms used in the product can be found inTivoli Workload Automation: Glossary.
Both of these are in the Information Center as separate publications.
Accessibility
Accessibility features help users with a physical disability, such as restricted mobility or limited vision, to use software products successfully. With this product, you can use assistive technologies to hear and navigate the interface. You can also use the keyboard instead of the mouse to operate all features of the graphical user interface.
For full information with respect to the Dynamic Workload Console, see the Accessibility Appendix in theIBM Tivoli Workload Scheduler User’s Guide and Reference.
Tivoli technical training
For Tivoli technical training information, refer to the following IBM Tivoli Education website:
http://www.ibm.com/software/tivoli/education
Support information
If you have a problem with your IBM software, you want to resolve it quickly. IBM provides the following ways for you to obtain the support you need:
v Searching knowledge bases: You can search across a large collection of known
problems and workarounds, Technotes, and other information.
v Obtaining fixes: You can locate the latest fixes that are already available for your
product.
v Contacting IBM Software Support: If you still cannot solve your problem, and
you need to work with someone from IBM, you can use a variety of ways to contact IBM Software Support.
For more information about these three ways of resolving problems, see the appendix on support information inTivoli Workload Scheduler: Troubleshooting Guide.
Chapter 1. Navigating the Dynamic Workload Console
For an interactive overview of the product and its features, you can view several demo scenarios, available (in English only) in the Tivoli Workload Scheduler Wiki Media Gallery.
Note: To optimize the viewing of the demos, ensure that you have the latest version of Adobe Flash Player installed.
To have a quick and rapid overview of the portal and of its use, after logging in to Dashboard Application Services Hub (DASH), click one of the hyperlinks
displayed in the welcome page to launch videos and a tutorial that helps you find the information you need.
Several products can be integrated in this portal and their related entries are listed together with those belonging to the Dynamic Workload Console in the toolbar displayed on the left side. Use these icons to perform your tasks.
In the following sections only pages and tasks relating to the Dynamic Workload Console are described.
Use the toolbar on the left side to work with the Dynamic Workload Console to perform the following tasks:
Click theSearchicon and enter whole or part of the name of the page you want to open. Search results are dynamically returned and filtered as you type.
Click theFavoriteicon to create your customized portfolio of pages. To add a task to Favorites, drag it to the Favorites icon. Entries previously displayed in the My Tasks list have been automatically added to Favorites. The icons displayed in the central part of the toolbar are product-specific and are described in detail in the following section.
The icons located in the bottom part of the toolbar relate to console tasks, for view management, console administration, and help:
Click theUsers icon to personalize the console, manage your security settings, or log out. Add, remove, and reorder your favorite tasks. Personalize which pages automatically open when you log in with the My Startup Pages task. Manage your credentials used to access other systems or data providers with the Credential Store task.
Click the Viewsicon to change the current view. Views control which product tasks or pages are displayed and which pages open automatically.
| | | | | | | | | | | | | | | | | | | | | | | | | | | | | | | | | | |
Administrators use theConsole Settingsicon to manage settings. The General section contains tasks to manage pages, create a connection to a data provider, create widgets, and export the console setting for migration and backup. Views and console preference profiles personalize the console for various roles making it more usable. The Role section contains tasks to create and assign roles to users and groups.
Click theHelpicon to access help contents for the console and to find the release level of the installed product. Click it to open Tivoli Workload Scheduler information center. You can also access the community through the Help icon, where you will find multimedia tutorials and information about upcoming releases.
Administration - Create and modify workload definitions in the
database
Click theAdministrationicon to perform tasks that are run typically by the product administrator.
Workload Design
You can manage your workload to design and edit objects in the database, to handle events and SAP jobs.
To create and edit the definitions of workload objects in the database, click
Manage Workload Definitionsand open the Workload Designer. From the Workload Designer, you can create and edit the following objects:
Table 1. Workload Designer objects
Distributed environment z/OS environment
Jobs Jobs
Job Streams Job Streams
Prompt Periods
Resources Calendars
Users Variable Tables
Calendars Operator Instructions
Workstation Classes Event Tracking Criteria
Variable Tables Run Cycle Groups
Workload Application templates Run Cycle Groups
Open the event related pages to create a new event rule or to manage the list of all the event rules associated to an engine, and modify their definitions.
Use this section also to manage jobs that run on SAP systems.
Submit jobs and job streams not included in the plan:
| | | | | | | | | | | | | | | | | | | | | || || || || || || || || || || || || | | | | | |
Workload Submission
Use this section to find and submit jobs and job streams that are already defined in the database, but are not included in the current plan.
Design and modify workstation and domain definitions in the database:
Use this section to design and control the topology of your scheduling environment, that is, your workstations and domains.
Workload Environment Design
Open the pages available under this section to create new workstation definitions, associate them to domains, list all existing workstations associated to an engine, and modify their definitions.
You can also temporarily (for current session only) modify the user password associated to the current plan.
Design and modify Broker jobs and resources: Broker Design
Use this section to create new jobs on Broker systems and to modify existing jobs. From this section, you can also create and manage Broker logical resources and resource groups.
Planning - View and manage plans
Click thePlanningicon to perform planning-related tasks.
Workload Forecast
Use this section to work with plans, creating and viewing trial and forecast plans and listing archived plans. From this section you can also view your preproduction plan.
Reporting - Define and run reports
Click theWorkload Reportingicon to define and run reports to gather historical data or details about your plans.
Workload Reporting
Use this section to create and run reports about your workload. You can also generate and run customized SQL reports.
System Configuration - Create and manage engines and
configuration settings
Click theSystem Configurationicon to create new engine connections and manage the existing ones. From this section you can also configure your preferences (time zone, lines per page, layout, dashboard) as well as your settings repository.
Workload Scheduling Settings
Use this section to create and edit your engine connections and your user preferences. Use it also to import and export settings like user preferences,
| | | | | | | | | | | | | | | | | | | | | | | | | | | | | | | | | | | | | |
configured tasks, and engine connections to a local file or external repository database. If you want to use a repository database (to share it with other Dynamic Workload Console instances in high availability configuration), you must specify it in this section.
Broker Settings
Use this section to manage Broker server connections and user preferences.
System Status and Health - Create and run tasks to monitor
workload and environment
Click theSystem Status and Healthicon to define and run customized tasks (reusable queries) and predefined tasks to monitor your workload processing. From this section you can open the Dashboard to view the workload processing in a graphical format on several engines at the same time. From the dashboard, you can browse to view more detailed job information.
Create and run monitor tasks to obtain a list of objects on which you can perform monitoring and control actions. Creating and running a monitor task means creating a filter and running a search on it. From this list, you can click an item to view its properties or to run actions against it. In this way you can easily change some settings and the processing of the plan.
Workload Monitoring
Use this section to create tasks to monitor jobs (on single or multiple engines), critical jobs, job streams, files, resources, prompts and to open a graphical plan view. The result of your queries on jobs and job streams can also be represented in a graphical view.
Environment Monitoring
Use this section to create tasks to monitor workstations and domains.
Event Monitoring
Use this section to create tasks to monitor event rules, operator messages, and the actions triggered by the event rules.
Broker Monitoring
Use this section to monitor jobs, computers, logical resources, and resource groups on Broker systems.
Related tasks:
“Accessing online publications” on page 171
Accessing the Tivoli products online publications in the Tivoli software information center website.
Related information:
Chapter 14, “Scenarios,” on page 161
Naming conventions for scheduling objects
The Dynamic Workload Console allows you to manage and control Tivoli Workload Scheduler production for z/OS and distributed environments.
| | | | | | | | | | | | | | | | | | | | | | | | | | | | | | | | | | | | | | | | |
There are some differences in the processing and behavior between the Tivoli Workload Scheduler products for z/OS and distributed environments. When there are differences, the descriptions and related actions of scheduling objects are explained for both environments.
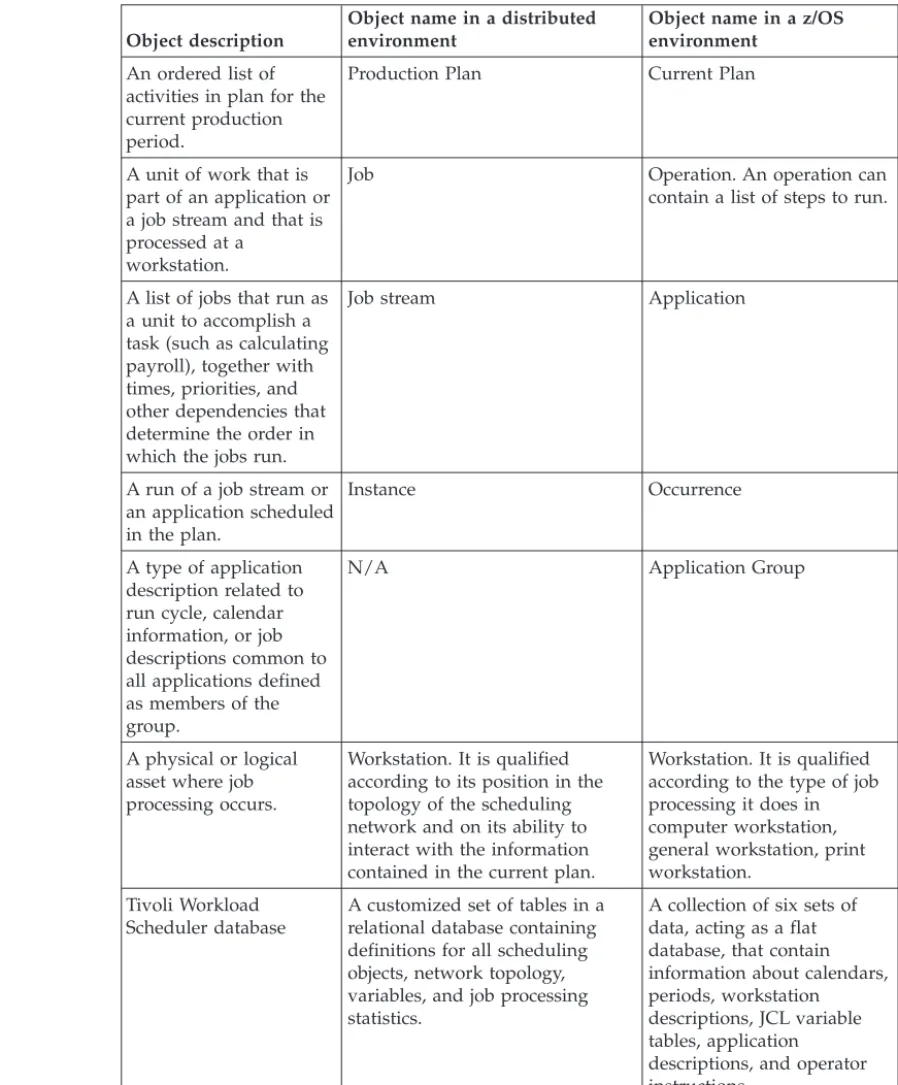
Table 2 lists the objects and object names typical of the Tivoli Workload Scheduler environment where they are defined.
Table 2. Naming convention for scheduling objects
Object description
Object name in a distributed environment
Object name in a z/OS environment
An ordered list of activities in plan for the current production period.
Production Plan Current Plan
A unit of work that is part of an application or a job stream and that is processed at a
workstation.
Job Operation. An operation can
contain a list of steps to run.
A list of jobs that run as a unit to accomplish a task (such as calculating payroll), together with times, priorities, and other dependencies that determine the order in which the jobs run.
Job stream Application
A run of a job stream or an application scheduled in the plan.
Instance Occurrence
A type of application description related to run cycle, calendar information, or job descriptions common to all applications defined as members of the group.
N/A Application Group
A physical or logical asset where job processing occurs.
Workstation. It is qualified according to its position in the topology of the scheduling network and on its ability to interact with the information contained in the current plan.
Workstation. It is qualified according to the type of job processing it does in computer workstation, general workstation, print workstation.
Tivoli Workload Scheduler database
A customized set of tables in a relational database containing definitions for all scheduling objects, network topology, variables, and job processing statistics.
A collection of six sets of data, acting as a flat database, that contain information about calendars, periods, workstation descriptions, JCL variable tables, application descriptions, and operator instructions. Related concepts: | | | | | | || | | | | | | | | | || | | | | | || | | | | | | | | | || | | | || | | | | | | | | || | | | | | | | | | | | | | | | | | | | | | | | | | | | | | | | | | |
“Workstation” on page 29 “Job” on page 36
“Job stream” on page 36
“Production process” on page 57
Convention for specific platform information
Icons to identify the information related only to specific platforms.
This publication uses the following icons to identify the information related only to specific platforms:
Distributed
The information applies only to Tivoli Workload Scheduler running in a distributed environment.
z/OS
The information applies only to Tivoli Workload Scheduler running in a z/OS environment.
All information that is not marked by an icon applies to all the supported environments. | | | | | | | | | | | | | | | | |
Chapter 2. Getting Started
Information about the Dynamic Workload Console installation and configuration For more information about this installation, see Planning and Installation or Planning and Installation
To configure the Dynamic Workload Console, see Configuring the Dynamic Workload Console to find information about:
v Launching in context with the Dynamic Workload Console v Configuring access to the Dynamic Workload Console
v Configuring Dynamic Workload Console to use Single Sign-On v Configuring the use of Lightweight Third-Party Authentication v Configuring Dynamic Workload Console to use SSL
v Customizing your global settings
v Configuring Dynamic Workload Console to view reports
You can access the Dynamic Workload Console from any computer in your environment using a web browser through either the secure HTTPS or HTTP protocol.
When you log in to the Dashboard Application Services Hub, you see a portfolio on the left containing an entry for each Tivoli product installed and integrated with it, for example, the Dynamic Workload Console. Expand the Tivoli Workload Scheduler entry in the portfolio to start to work with the console.
To access the Dynamic Workload Console online embedded documentation, click
Helpat the top right of the panel and select IBM Tivoli Workload Scheduler in the Contents section on the left of the panel that opens.
The first and main actions that you perform when you connect to the Dynamic Workload Console are:
Creating a connection to a Tivoli Workload Scheduler engine
You specify the details (such as IP address, user name, and password) to access a Tivoli Workload Scheduler engine, and, optionally, a database to operate with objects defined in plans or stored in the database.
From the Dynamic Workload Console, you can access the current plan, a trial plan, a forecast plan, or an archived plan for the distributed
environment or the current plan for the z/OS environment.
You might want to access the database to perform actions against objects stored in it or to generate reports showing historical or statistical data. In addition, working both on the database and on plans, you can create and runevent rulesto define and trigger actions that you want to run in response to events occurring on Tivoli Workload Scheduler nodes.
Defining a scheduling environment
You define your Tivoli Workload Scheduler network. You create
workstation definitions in the database to represent the physical machines or computer systems on which your workload is scheduled to run. A Tivoli Workload Scheduler network is made up of the workstations where job
and job stream processing occurs. When you design your network, you assign roles to these workstations to suit your specific business
requirements. You can design your network with multiple domains, to divide control of a large network into smaller manageable groups. A typical Tivoli Workload Scheduler network consists of a workstation acting as the master domain manager and at least one domain.
Defining scheduling objects in the database
You define your workload, which consists of jobs that are concatenated in job streams. Then, you specify the calendars and run cycles according to which job streams must run. You can also define dependencies to condition the workload processing. All these definitions can be done within the Workload Designer.
Creating tasks to manage Tivoli Workload Scheduler objects in the plan
You specify some filtering criteria to query a list of scheduling objects whose attributes satisfy the criteria you specified. Starting from this list, you can navigate and modify the content of the plan, switching between objects, opening more lists, and accessing other plans or other Tivoli Workload Scheduler environments.
Related concepts:
“Designing your Scheduling Environment” on page 73 “Monitoring your Scheduling Environment” on page 119 “Monitoring your Workload” on page 122
Related tasks:
“Creating and managing engine connections” “Designing your Workload” on page 77
Creating and managing engine connections
To create, modify, or delete an engine connection, perform the following steps.
Note: You can modify or delete only engine connections that you have created.
1. From the navigation toolbar, click System Configuration >Manage Engines.
2. From the displayed panel you can create, edit, delete, or share an engine connection, and test the connection to the remote server where Tivoli Workload Scheduler is installed. You can order the list of engine connections displayed in this panel by using sorting criteria that you select with the buttons at the top left corner of the table.
Related concepts:
“Scheduling objects” on page 35 “Engine connections” on page 61
Setting user preferences
To set the preferences to use in the output of tasks and reports, perform the following steps.
Note: The preferences that you set in this panel are not used in the output of plan reports. Those reports follow the preferences set on the workstation where the query is run.
1. From the navigation toolbar, click System Configuration> Set User Preferences. The Set User Preferences panel opens, containing the current settings.
2. To modify the current settings clickEdit. In this panel you can specify the:
v Number of rows that are displayed in the table of results of all your tasks as
the default setting
v Options to display dates, times, and time zones v Layout and the refresh rate for the dashboard
3. ClickSave changes to save the changes you made orDiscard changesto exit the page without saving.
In the Manage User Preferences panel, you can also enable again the news notification. For details, see “Disabling news notification” on page 24.
Event management configuration
You can use the event management feature both from the Tivoli Workload Scheduler command line interface and from the Dynamic Workload Console. You need the following authorizations to perform event management operations from the Dynamic Workload Console:
On Dashboard Application Services Hub
The user ID you use to log in to Dynamic Workload Console must be defined as user on Dashboard Application Services Hub and must be defined within one of the following groups:
Table 3. Event Management Authorizations
Groups Event management operations you can perform
TWSWEBUIOperator List and manage Event Rule Instances, Log Messages, and Triggered Actions.
TWSWEBUIDeveloper Create, list, and manage Event Rules.
Note: Dynamic Workload Console users belonging to the
TWSWEBUIAdministratorgroup can perform all operations available in the web-based user interface.
On Tivoli Workload Scheduler
The Tivoli Workload Scheduler user credentials defined in the engine connection must belong to a Tivoli Workload Scheduler user authorized to perform event management operations in the Tivoli Workload Scheduler security file.
You need thecreatepermission set for theruleobject. You also need theuse permission on the objects (job, job stream, and so on) that you want to use as events.
For more information about how to define and manage user authorizations in the security file, see Administration Guide.
Related concepts:
Chapter 3. Installing and configuring the Dynamic Workload
Console
For more information about this installation, see Planning and Installation or Planning and Installation
To configure the Dynamic Workload Console, see Configuring the Dynamic Workload Console to find information about:
v Launching in context with the Dynamic Workload Console v Configuring access to the Dynamic Workload Console
v Configuring Dynamic Workload Console to use Single Sign-On v Configuring Dynamic Workload Console to use SSL
v Customizing your global settings
v Configuring High Availability for Dynamic Workload Console v Configuring Dynamic Workload Console to view reports
For more information about z/OS connector instances configuration by using WebSphere Application Server tools, see Tivoli Workload Scheduler for z/OS Planning and Installation> Tivoli Workload Scheduler for z/OS connector > Installing, Upgrading and Uninstalling Tivoli Workload Scheduler for z/OS connector on distributed systems.
Chapter 4. Using the Dynamic Workload Console from mobile
devices
Use your mobile device to easily and quickly interact with the Dynamic Workload Console. You can monitor and run your workload from your mobile device by simply logging in to a URL and starting an app.
The IT market is moving towards mobile devices, which help you perform a large number of tasks, such as manage your sales workforce, read your email, check your accounting system, or attend a web conference. Applications designed for mobile devices must be intuitive and user-friendly while remaining robust and reliable, and providing instant access to business and client data wherever they are. You can interact with Tivoli Workload Scheduler by using the following
applications:
To open this home page on your mobile device, access the following URL: https://host_name:port_number/ibm/TWSWebUI/mobile
where host_nameand port_numberare the host name and port number of the Dynamic Workload Console you are connecting to.
Dashboard
To monitor your workload in plan, see the job details, and send this information via email. Launch the Dashboard from your mobile device by connecting to the following URL:
https://host_name:port_number/ibm/TWSWebUI/dash.jsp
wherehost_nameand port_numberare the host name and port number of the Dynamic Workload Console you are connecting to.
To launch and use the Dashboard, you must have one of the following roles:
TWSWEBUIAdministrator
Users with this role can view and edit objects.
TWSWEBUIOperator
Users with this role can only view objects.
Self-Service Catalog
To submit job streams from your mobile, even if you do not have any experience with Tivoli Workload Scheduler. Launch the Self-Service Catalog from your mobile device by connecting to the following URL:
https://host_name:port_number/ibm/TWSWebUI/sscatalog.jsp
wherehost_nameand port_numberare the host name and port number of the Dynamic Workload Console you are connecting to.
To launch and use this application, you must have one of the following roles:
TWSWEBUIAnalyst
This is the minimum role required to access Self-Service Catalog. Users with this role can view catalogs and services to which they are authorized and submit service requests. They cannot modify services or catalogs.
TWSWEBUIAdministrator
Users with this role can create, edit, and delete catalogs and services. They can also associate roles to services and catalogs to authorize other users to work with them.
Related concepts:
“Monitoring the progress of your plan” on page 117
Chapter 5. Configuring High Availability
How to configure, change, and share your settings repository.
Performance can be highly improved by migrating the Dynamic Workload Console to High Availability Configuration, so as to have multiple console instances
working at the same time as one console.
If you use a Dynamic Workload Console in High Availability configuration, when you connect to a Dynamic Workload Console you are not actually connecting to a specific console but to a load balancer that dispatches and redirects the connections among the nodes in the configuration. Therefore, for example, if a node fails, new user sessions are directed to other active nodes in the configuration and this change is completely transparent to users.
For more information about High Availability configuration, see Configuring High Availability for Dynamic Workload Console in theTivoli Workload Scheduler
Administration
To implement this kind of configuration, you must change your settings repository. The user settings such as user preferences, saved tasks, and engine connections, which by default are stored in a settings repository that is a local XML file, must be exported and stored in a settings repository on a DB2 database. Using a database as your repository, all your existing user settings relating to current Dynamic Workload Console are saved in the database, and all the operations involving user settings are run using the settings in this repository.
Managing user settings
How to export the user settings and import them into a new Dynamic Workload Console
To perform this task you need to have the TWSWEBUIAdministrator role. User settings such as user preferences, saved tasks, and engine connections are stored in the settings repository, which by default is a local file. However, you can decide to have your settings repository on a database for all Dynamic Workload Console operations that involve user settings.
You can export the content of your settings repository as an XML file, optionally modify it, and then import it into the same or another instance of Dynamic Workload Console.
This is particularly useful for migration purposes or if you want to modify the same settings in multiple Dynamic Workload Console instances.
To export the settings and import them into a new Dynamic Workload Console, perform the following procedure.
Note: Import and export operations are performed from and to the currently-selected repository.
1. From the navigation toolbar, click System Configuration >Manage Settings.
2. In the Manage Settings panel, clickExport Settingsand save the XML file in a directory of your choice.
3. Optionally, edit the file using an XML editor and save it.
4. Log in to the Dynamic Workload Console where you want to import the settings and open the Manage Settings panel.
5. ClickImport Settings and browse to the XML file containing the settings you want to import. During the import operation, you choose to update or to overwrite the existing settings with the new settings.
6. If you are using a local file as repository, restart the Dynamic Workload Console to make the change effective or click Undobefore restarting it to restore previous settings. This is not required if you are using a database as your repository, but in this case you must ensure that during the import operation there are no other users connected to the Dynamic Workload Console while the repository content is being updated.
Changing settings repository
Changing the settings repository.
v To perform this task you need to have the TWSWEBUIAdministrator role. v You need to have access to an installed DB2 where a database has already been
created. If you need information about how to create a DB2 database, see IBM DB2 Database for Linux, UNIX, and Windows Information Center.
v You must have Administrator rights on that database.
User settings such as user preferences, saved tasks, and engine connections are stored in the settings repository, which by default is a local file. However, you can decide to have your settings repository on a database for all Dynamic Workload Console operations that involve user settings.
This can be useful, for example, for scalability purposes or to have multiple Dynamic Workload Console instances sharing the same user settings.
To use a database for your settings repository, you must configure the database settings, as described in the following procedure:
1. Run the wastool:
a. From the Tivoli Workload Scheduler installation path, open the
install_dir\wastools directory and runinstallTDWCDatasourcewastool to
create the data source.
b. Specify the connection details of the DB2 database in
TDWCDatasource.propertiesfile, located ininstall_dir\wastoolsdirectory.
2. Restart the Dynamic Workload Console.
3. Export your settings:
a. From the navigation toolbar, click System Configuration>Manage Settings.
b. Optionally, in the Manage Settings panel, clickExport Settingsand save the XML file in a directory of your choice. In this way you save your user settings in a local file to load them on the database, when it becomes your settings repository.
4. Switch repository to DB2.
a. In the same panel, clickConfigure settings repository>Use database as settings repositoryto specify that settings must be saved in the database instead of a local file.
b. In theDatabase connection propertiessection, specify the credentials required to connect to the database.
Note: For all the details about options and fields displayed in the panels, see the online help by clicking the question mark located at the top-right corner of each panel.
c. Optionally, you can test the connection.
d. Save the new configuration.
5. Import your settings or initialize the database:
a. Optionally, clickImport settingsto import your user settings from the XML file to the database repository. During the import operation, keep the default choice, which overwrites the existing settings with the new settings. Performing this step, the database is automatically initialized.
b. If you have not performed previous step, clickConfigure settings repository>Initialize database.
As a result, all your existing user settings relating to current Dynamic Workload Console are saved in the database, and all the operations involving user settings are run using the settings in this repository.
Sharing a settings repository
How to share a settings repository on multiple Dynamic Workload Console instances.
To perform this task you need to have the TWSWEBUIAdministrator role. User settings such as user preferences, saved tasks, and engine connections are stored in the settings repository, which by default is a local file. However, you can decide to have your settings repository on a database for all Dynamic Workload Console operations that involve user settings.
This can be useful, for example, for scalability purposes or to have multiple Dynamic Workload Console instances sharing the same user settings.
To use a database for your settings repository, you must configure the database settings, as described in the following procedure:
1. Ensure that all the Dynamic Workload Console instances that will share the same settings repository, also use the same user registry.
2. Ensure that one Dynamic Workload Console settings repository has been switched to database, as described in Switch repository to DB2.
3. Specify this repository as the default one for all the other Dynamic Workload Console instances that must share it:
a. From the Tivoli Workload Scheduler installation path, open the
install_dir\wastools directory and runinstallTDWCDatasourcewastool to
create the data source, specifying the same database settings as in the first Dynamic Workload Console instance.
b. Restart the Dynamic Workload Console.
c. From the navigation toolbar, click System Configuration>Manage Settings.
d. In the same panel, clickConfigure settings repository>Use database as settings repositoryto specify that settings must be saved in the database instead of a local file.
e. In theDatabase connection propertiessection, specify the credentials required to connect to the database.
f. Optionally, you can test the connection.
g. Save the new configuration.
As a result, all user settings are saved in the database, shared by all the Dynamic Workload Console instances, and all the operations involving user settings are run using the settings in this repository.
Changing the Dynamic Workload Console user of DB repository
How to change the Dynamic Workload Console user that updates the settings repository on DB2.
To perform this task you need to have the TWSWEBUIAdministrator role.
You must have switched the Dynamic Workload Console settings repository from a local file to a database repository, as described in Changing settings repository. Only users with database administrator rights are authorized to initialize the Dynamic Workload Console related tables on the database.
If you want the Dynamic Workload Console to access the database repository with a user without database administrator privileges you must follow these steps:
1. Create a new DB2 user and grant this user with SELECT, INSERT, UPDATE, DELETE rights on all the following tables, belonging toTDWCschema: TDWC_EngineConnection TDWC_QueryTask TDWC_ReportTask TDWC_MEQueryTask TDWC_Credential TDWC_ConfigurationProperty TDWC_Preferenceable
The above are the default permissions. However, if you need to restrict your policy, you can give the following permissions to the new DB2user:
revoke connect,bindadd, createtab, implicit_schema on database from public; revoke use of tablespace USERSPACE1 from public;
grant use of tablespace userspace1 to user twsdb2; grant createtab on database to user twsdb2; grant implicit_schema on database to user twsdb2;
a. From the navigation toolbar, click System Configuration>Manage Settings.
b. In theDatabase Settingssection, specify the credentials of the newly created user that must to connect to the database.
Note: As a result of this user switch, theDynamic Workload Console without database administrator privileges will no longer be authorized to the following actions in the Manage Settings panel:
v Initialize database
Chapter 6. Customizing your console
How to customize your Console.
When you log in to the Dashboard Application Services Hub, you see a navigation bar on the left side with an entry for each Tivoli product installed inside it, such as, for example, the Dynamic Workload Console.
By clicking the hyperlinks displayed in the Dashboard Application Services Hub welcome page, you can learn how to customize your pages, manage roles and perform the most common console administrative tasks.
With respect to the Dynamic Workload Console, in the following sections you can see how to customize the list of your tasks and the startup page to include only the entries and the pages that you really need to access. In addition to this, you can see how to customize the tasks that you need to run and how to enable or disable the notification about product updates.
Customizing your portfolio
How to customize your portfolio.
Several products might be integrated in this portal and their related entries are listed together with the ones belonging to the Dynamic Workload Console in the toolbar displayed on the left side.
You can create a list of your favorite pages, including only the tasks you use most often.
The Favoritesicon in the welcome page, lets you access your daily tasks.
Entries previously displayed in the My Taskslist have been automatically added toFavorites.
To add a task to Favorites, simply drag it to the Favorites icon. To remove an item from your list of favorites, click and drag the item that you want to remove away from the list.
Alternatively, to add new tasks or manage existing tasks contained in your Favorites list, perform the following procedure:
1. From the welcome page, click the User>Favorites.
2. Select only the pages that you want to include among your favorites and click
Apply.
Your customized list is displayed in the list.
| | | | | | | | | | | | | | | | | | |
You can also define which pages must be automatically launched when logging into the Dashboard Application Services Hub by adding them to your startup pages.
For additional information about the Dashboard Application Services Hub console customization, refer Dashboard Application Services HubHelpsection
Customizing the console.
Customizing your startup page
How to customize the startup page
In the Dashboard Application Services Hub, you can define the list of pages that are launched every time you log in to the console. UseMy Startup Pagesto add or remove dashboards from the list of dashboards or pages that are launched every time you log into the console. Only single task and multiple task dashboards can be added to the startup list. You can set which dashboard is to be opened as the default tab (in focus). To open one of your startup dashboards, click the link for that page in the Page name column.
To add a page to your startup pages, perform the following steps.
1. Open the page you want to be launched when you log in to the console.
2. Click the Page Actions icon at the top right of the panel and select
Add to My Startup Pages.
3. To remove a page, click User>My Startup Pages, select the page in the list and clickRemove. To specify the page that will be displayed at login time, selectDefault.
The page that you added is launched every time you log in to the console.
To manage the pages you added, click User>My Startup Pagesin the toolbar on the left. From this page you can remove the pages from the list or define the default page to be displayed when you log in.
For additional information about the Dashboard Application Services Hub, click
Help at the top right hand corner of the panel.
Customizing your tasks
To customize a task, you must be the task owner.
Configured tasks are provided with default values. However, you can customize their properties and save the newly-modified tasks. You can modify the properties, such as filters and columns, of all the tasks that you own. Starting from a task, you can also customize the properties of secondary queries that are launched starting from the objects resulting from the task.
| | | | | | | | | | | | | | | | | | | | | | | | | | | |
If you have administrator's rights, you can configure a global setting so as to limit the number of results retrieved by monitor tasks. You can specify the maximum number of items that must be retrieved by the queries, and this configuration will apply to allmonitor tasks run by current Dynamic Workload Console, except for Monitor Critical jobs. For more information, see “Limit the number of objects retrieved by queries” on page 178.
To customize your tasks, perform the following steps:
1. Click System Status and Health>All Configured Tasks.
2. In the All Configured Tasks panel, select a task and clickTask Properties. The task opens displaying some tabs on the left.
Note: You can access the same task window by running the task and clicking the task properties icon from the navigation bar, above the table of results.
3. Click the tabs that refer to the properties you want to customize.
4. Modify the values as required and clickSaveto save the modified task. You have personalized your task. Consider that any customization only applies to the single task you edited. For example, if you change the columns to be displayed in a task named All Jobs in plan, this change does not affect any other task to monitor jobs.
Customizing secondary queries
While editing or creating a task, you can also choose the columns to display in secondary queries. Secondary queries are those that are run from the table of results of a task. For example, from the list of jobs resulting from a task namedMy Jobs, you can run a secondary query to list all job streams and workstations associated to one of the listed jobs.
You can also customize these secondary queries from the Columns Definition panel of any task. In the Columns Definition panel of My Jobstask, you can also choose the columns to display in job stream and workstation tasks. However, this column selection only applies to the lists of job streams and workstations obtained by drilling down from the results of the My Jobstask; it does not apply to any other generic monitoring task about job streams or workstations.
Adding tasks to your favorite bookmarks
How to save a task to the favorite bookmarks of your browser.
When you run a task, you can save it as one of the favorite bookmarks of your browser so that you can launch it directly from the browser.
To add a task to your favorite bookmarks, from the panel displaying your task results, click the add link icon .
Related concepts:
“Monitoring your Scheduling Environment” on page 119 “Monitoring your Workload” on page 122
Using the news notification beacon
How to be always up to date with the latest news and information about the product and receive internal communications from the environment administrator. A beacon appears on your screen when an update for the product or an internal communication from the administrator is made available. Click the beacon to open a pop-up that describes the update and gives you a direct link to it.
Update and news notifications relate to different topics, belonging to categories, such as:
v APARs
v Fixes and utilities v News
v Technotes
v Product documentation and publications v Internal communications
By default, the news notification is enabled for all users to all the categories, however, optionally, the TWSWEBUIAdministrator can customize this behavior specifying which user roles must receive all the notifications or only some of them or even none. For more information, see: “Disable and customize NewsFeed function” on page 173.
The news notification is enabled by default, however, to unsubscribe from all the news, or only form the displayed news category, you can select the related check-box in the news pop-up.
In th pop-up window that displays the latest news, you can also navigate through past news and notifications and provide your feedback on a piece of news trough an IBM feedback form.
If you have TWSWEBUIAdministrator role or writing rights on the system where Dynamic Workload Console, is installed, you can add multiple NewsFeedsections in theTdwcGlobalSettings.xmlfile to transmit different notifications to different user roles. For more information, see “Sending internal communications” on page 26.
Disabling news notification
How to enable and disable news notification preventing the beacon from appearing on your screen when an update for the product is made available. By default, all users receive all the news notifications. However, optionally, you can customize this behavior by preventing all or only some specific news from being notified to you.
When the beacon appears on your screen and you click it, the first notification displays in a pop-up. If you do not want to receive any notifications at all, or if you want to unsubscribe from some specific categories of notifications, select the related checkbox in the news pop-up.
1. From the navigation toolbar, click System Configuration> Set User Preferences. The Set User Preferences panel containing the current settings is displayed.
2. ClickRestore beacon defaults.
Related reference:
“Disable and customize NewsFeed function” on page 173
Customizing the list of notification recipients
How to customize the list of recipients of the news notification beacon, by specifying who must receive what kind of notification or communication. You must have TWSWEBUIAdministrator role or writing rights on the system where Dynamic Workload Console is installed.
By default, the news notification is enabled for all users to all the categories, however, optionally, the TWSWEBUIAdministrator can customize this behavior specifying which user roles must receive all the notifications and internal
communications, or only some of them or even none. You can send multiple feeds, containing different communications, addressed to different recipients by
customizing the TdwcGlobalSettings.xmlfile and providing multiple feeds, as explained in “Sending internal communications” on page 26.
For example, often operators do not need to have information about new patches and fix packs to be installed or about product events. Analysts are only interested in information and updates about reporting. Whereas, Administrators want to receive all notifications (and, optionally, force the default settings and send a notification to those who are normally excluded from a category).
Customize theTdwcGlobalSettings.xmlfile to specify the news categories that must be notified to users, based on their roles.
A template of this file is located on the installation DVD under
/utilities/TdwcGlobalSettings.xml. You can modify it, replacing default values with customized ones and enabling commented sections. After customizing, you must copy it under the following path: Installation_dir/profile_dir//registry
directory, where:
TheTdwcGlobalSettings.xmlfile is organized into several sections that can be repeated multiple times in the same file and applied differently to different user roles. Therefore, to customize a behavior based on the user role, uncomment the section corresponding to the user role and include the sections that must apply to this role.
TheDisable and customize NewsFeed functionsection contains the configuration details regarding the notification beacon. Therefore, for example, to enable the notifications of specific categories only to a specific user role, you can insert a section like the following:
<settings role="TWSWEBUIAdministrator"> <NewsFeed>
<property name="NewsFeed" type="RSS" value="http://www.my.company.com/ RSS_administrators.xml" />
<property name="NewsFeedCategory" value="Administrators" icon="http://www.my.company.com/
administrator.png" /> </NewsFeed>
</settings>
<NewsFeed>
<property name="NewsFeed" type="RSS" value="http://www.my.company.com /RSS_operators.xml" />
<property name="NewsFeedCategory" value="Operators" icon="http://www.my.company.com/operators.png" /> </NewsFeed>
</settings>
If no customized feed is specified, the default feed is used, which retrieves the latest product information from official support sites. To disable any notification, comment the entire section. To disable only external notifications about product information updates, assign an empty string as value to theFeedURLproperty of
JSONP feed like:
<property name="FeedURL" type="JSONP" value="" />
Related reference:
“Disable and customize NewsFeed function” on page 173
Sending internal communications
How to use the news feed beacon to transmit internal communications to all or some Dynamic Workload Console users.
You must have TWSWEBUIAdministrator role or writing rights on the system where Dynamic Workload Console, is installed.
You can use the news notification beacon to send specific communications to internal Dynamic Workload Console users, simply by storing these
communications on the Dynamic Workload Console server. For example,
administrators can use this feature to broadcast maintenance notices or company related announcements.
Note:
If no customized feed is specified, the default feed is used, which retrieves the latest product information from official support sites. To disable any notification, comment the entire section. To disable only external notifications about product information updates, assign an empty string as value to theFeedURLproperty of
JSONP feed like:
<property name="FeedURL" type="JSONP" value="" />
To add customized feeds, specify a list of sections named NewsFeedin the
TdwcGlobalSettings.xmlfile by performing the following procedure:
1. Edit theTdwcGlobalSettings.xmlfile by adding the properties specifying the name and format of the file in theNewsFeed section.Example:
<property name="NewsFeed" type="RSS"
value="http://www.DWC_hostname:portnumber.com/news_rss.xml"/>
For more details, see the “Customizing your global settings” on page 27.
2. Optionally, specify a polling interval for the feed reading and an image associated to the notification.Example:
<property name="PollInterval" value="600" /> <property name="PollInitialDelay" value="1" />
<property name="NewsFeedCategory" value="my company info" icon="http://www.my.company.com/info.png" />
<property name="NewsFeedCategory" value="my company alert" icon="http://www.my.company.com/alert.png" />
Note: To specify multiple feeds, you must specify multipleNewsFeed
properties.
3. Optionally, specify a list of feeds that must be taken into consideration by the notification feature. The browser detects new items from all the specified feeds and merge them sorting them by date in a single list.
4. Write the communication in ATOM 1.0 or RSS 2.0 format and store this file in the an HTTP server complying with thesame origin policy. For browser security reasons, this policy permits to access information only on server using the same protocol, hostname and port number as the one to which you are connected.
5. Optionally, if you want to store your customized feed on an external server, you must configure an HTTP reverse proxy server mapping the external server address.
The notification beacon function reads all the feeds specified in theNewsFeed
section, detects new information and aggregates all in a single file ordering it by date. Then, it transmits notifications and internal communications to the recipients based on the roles specified in theTdwcGlobalSettings.xmlfile.
Related reference:
“Disable and customize NewsFeed function” on page 173
Customizing your global settings
Some general settings of Dynamic Workload Console can be included in a
customizable file namedTdwcGlobalSettings.xml. You can find a copy of this file, in template form, on the installation DVD in the directory/utilities/
TdwcGlobalSettings.xml. Modify the file replacing default values with customized ones and enabling commented sections, and then save the file to the
<JazzSM_profile_dir>/registrydirectory. The complete path of the file is as
follows:
For Windows:
C:\Program Files\IBM\JazzSM\profile\registry\TdwcGlobalSettings.xml
For UNIX/Linux:
/opt/ibm/JazzSM/profile/registry/TdwcGlobalSettings.xml
Users with Administrator privileges can use a configuration file, named
TdwcGlobalSettings.xml, to add and modify some customizable information, such as:
v The maximum number of objects shown in the graphical views.
v The configuration details to enable the news notification beacon and be
constantly up-to-date with product information. See Disabling news notification.
v The URLs where you can store customized documentation about your jobs or
job streams to associate customized documentation to them.
v The timeout to read and write information on a Tivoli Workload Scheduler for
z/OS engine.
v The maximum number of objects retrieved with a query.
A template of this file is located on the installation DVD under
/utilities/TdwcGlobalSettings.xml. You can modify it, replacing default values with customized ones and enabling commented sections. After customizing, you must copy it under the following path: Installation_dir/profile_dir//registry
directory, where: | | | | |
profile_dir
is the directory you have defined as your profile directory. By default it is
JazzSM/profile.
For example, the complete path to this file is as follows:
For Windows:
C:\Program Files\IBM\JazzSM\profile\registry\TdwcGlobalSettings.xml
For UNIX/Linux:
/opt/ibm/JazzSM/profile/registry/TdwcGlobalSettings.xml
This file is accessed at each login, and all configurations specified in the file are immediately applied, except forprecannedTaskCreationproperty. This property is read only when a user logs in for the first time and then is used whenever this user logs in again.
You can use any text or XML editor to edit this file, but ensure that you save it is as a valid XML file.
The file is organized into the following sections that group similar properties: Sections can also be repeated multiple times in the same file and applied
differently to different user roles. To apply a section only to the users belonging to a role, the section must be included within the following setting:
settings role
The user for which the following configuration must be applied. Default value: all users, unless otherwise specified.
Only one settingssection can be specified for each role. If a user has more than one role, the settings associated to the higher role are taken into consideration.
Example: <?xml version"1.0"?> <tdwc> . . <settings> <graphViews>
<property name="planViewNewWindow" value="true"/> </graphViews>
</settings>
<settings role="TWSWEBUIOperator"> <graphViews>
<property name="planViewNewWindow" value="false"/> </graphViews>
</settings> .
. </tdwc>
See “TdwcGlobalSettings.xml sample” on page 180 to view the complete syntax for the file.
| | |
Chapter 7. Tivoli Workload Scheduler Concepts
Conceptual information about Tivoli Workload Scheduler
This section provides conceptual information about Tivoli Workload Scheduler and the Dynamic Workload Console.
Scheduling environment
This section contains the main concepts that help you to understand what a scheduling environment is and what it comprises.
Workstation
Note: This section provides information relating to the use of workstations for scheduling jobs and job streams.
If, instead, you want to learn about workstations because you are planning your network, see Planning and Installation or Planning and Installation
The computer system where you run your jobs and job streams is called a workstation. Workstations can be grouped logically intoworkstation classesand organized hierarchically intodomains, managed bydomain managers.
When you create a workstation definition for a system in your network you define a set of characteristics that uniquely identify the system and that control how jobs run on it. For example, the IP address of the workstation, if it is behind a firewall, if communications with it must be secure, what time zone it is in, and the identity of its domain manager.
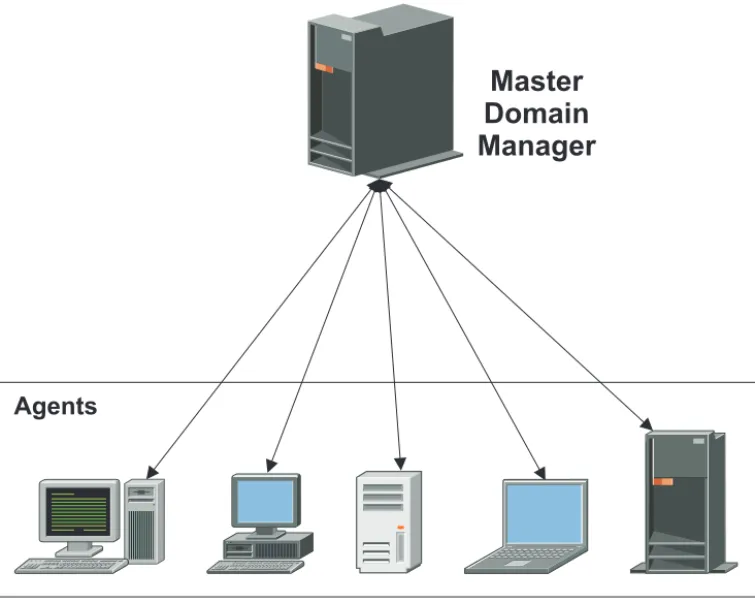
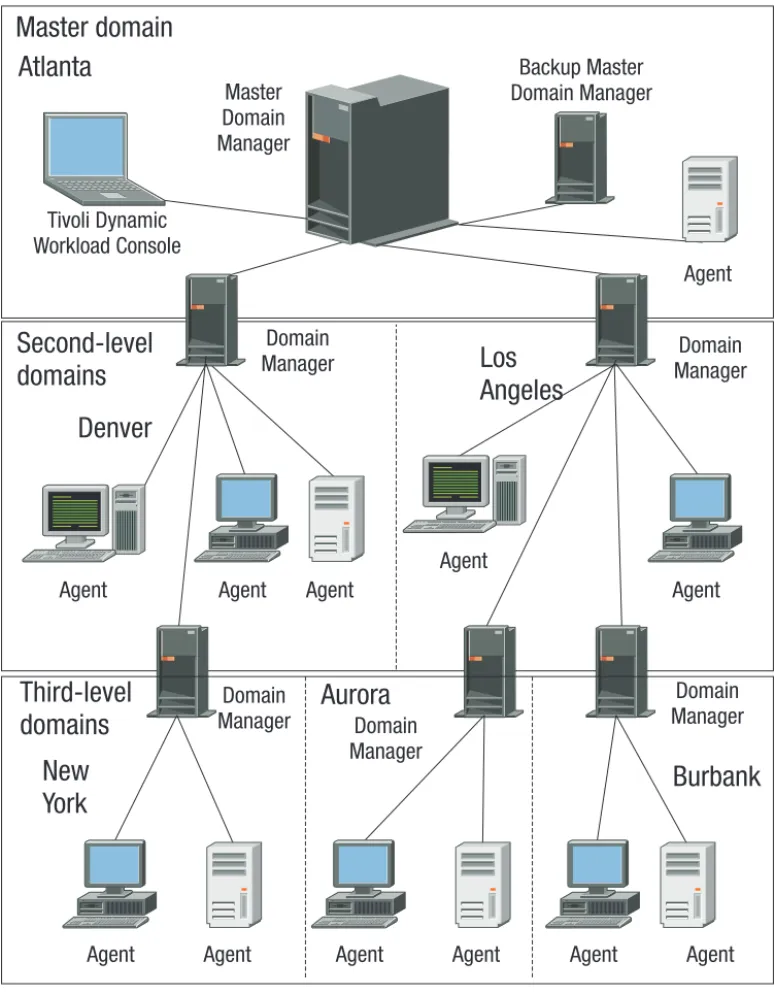
Workstations in the Tivoli Workload Scheduler scheduling network perform job and job stream processing, but can also have other roles. When your network is designed, these roles are assigned to these workstations to suit the specific needs of your business. The following types of workstation are available:
Distributed Master domain manager
A workstation acting as the management hub for the network. It manages all your scheduling objects. The master domain manager workstation must be installed with this role.
Distributed Backup master domain manager
A workstation that can act as a backup for the master domain manager when problems occur. It is a master domain manager, waiting to be activated. Its use is optional. This workstation must be installed as a master domain manager workstation.
Learn more about switching to a backup master domain manager in Administration Guide.
Distributed Domain manager
A workstation that controls a domain and that shares management responsibilities for part of the Tivoli Workload Scheduler network. It is installed as an agent, and then configured as a domain manager workstation when you define the workstation in the database.