Instruction Manual
6" LS-6 ACF / 6" LS-6 SC and
8" LS-8 ACF / 8" LS-8 SC Telescopes
with AutoStar III Hand Controller
Firmware version 1.3 and higher
WARNING!
Never use a Meade
®LS
™Telescope to look at the Sun!
Looking at or near the Sun will cause
instant and irreversible damage to your
eye. Eye damage is often painless,
so there is no warning to the observer
that damage has occurred until it is
too late. Do not point the telescope at
or near the Sun. Do not look through
the telescope or Red-Dot Finder as
it is moving. Children should always
have adult supervision while observing.
CONTENTS
Introduction
The most sophisticated and easiest
to use telescope ever . . . 3
Getting Started
Assembling the Telescope and using LightSwitch Assembling the tripod . . . 5Mounting the tripod . . . 6
Installing the batteries . . . 6
Using an AC Adapter or DC Power Cord . . . 6
Attaching Accessories . . . 7
Telescope is now Fully Assembled . . . 7
Powering up the Telescope - LightSwitch Technology™ . . . 8
AutoStar III Handbox – Basic Usage Basics . . . 9
Navigating the Menus . . . 9
Changing Modes . . . 10
Menu Mode . . . 10
Scope Info Mode . . . 10
Sky Map Mode . . . 10
Shortcuts . . . 10
LS Key Features
Telescope Key Features identifi ed on the Telescope . . . 11Key Features Explained . . . 13
Using the Red-Dot Finder . . . 15
Adjusting the Red-Dot Finder . . . 15
Optional MEADE® Accessories Choosing Eyepieces . . . 16
Meade Series 4000 Super Plössl Eyepieces . . . 16
Meade Series 5000 Premium Eyepieces . . . 17
Power Supplies . . . 18
Imagers and related Accessories . . . 18
AutoStar III Handbox Buttons, Display and their functions . . . 19
Menu Tree . . . 23
Guided Tour Menu. . . 24
Object Menu . . . 24
Event Menu . . . 25
Take Picture Menu . . . 25
Utilities Menu. . . 26
Setup Menu. . . 27
Advanced LS Features Two Star Alt Az Alignment . . . 29
One Star Alt Az Alignment . . . 30
Finding objects not in the database . . . 30
Landmarks . . . 30 Observing Satellites . . . 31 Terrestrial Observing . . . 32 Maintenance Basic Maintenance . . . 33 Collimation . . . 33
Inspecting the Optics. . . 35
Gauging the Movement of the Telescope . . . 35
Updating Your LS Firmware . . . 35
SD Card for Updates and Image Storage . . . 36
Meade Customer Service How to get in contact. . . 36
Appendix A:
Training the Drive . . . 37Appendix B:
Creating User Objects. . . 38Appendix C:
Basic Astronomy . . . 39Specifi cations
LS-6 ACF: . . . 41 LS-6 SC: . . . 42 LS-8 ACF. . . 43 LS-8 SC. . . 44Declarations
FCC: . . . 45 WEEE:. . . 46Meade Warranty
One Year Limited Warranty . . . Back Cover
® The name “Meade,” “AutoStar”, “LightSwitch” and the Meade logo are trademarks registered with the U.S. Patent and Trademark Offi ce and in principal countries throughout the world.
“SmartFinder”, “Deep Sky Imager”, “LS”, and “Tonight’s Best” are trademarks of Meade Instruments Corporation.
Patents:
US 7,277,223, US 7,079,317, US 7,092,156 US 6,304,376, US 7,221,527, US 6,922,283 US 6,392,799
© 2009 Meade Instruments Corporation.
BATTERY SAFETY INSTRUCTIONS:
• Always purchase the correct size and grade of battery: 8 x “C-type” Alkaline batteries (ANSI 14A, 14AC/ IEC LR14).
• Always replace the whole set of batteries at one time, taking care not to mix old and new ones, or batteries of different types.
• Clean the battery contacts and also those of the device prior to battery installation.
• Ensure the batteries are installed correctly with regard to polarity (+ and -).
• Remove batteries from equipment which is not to be used for an extended period of time.
• Remove used batteries promptly.
• Never attempt to recharge primary batteries as this may cause leakage, fi re, or explosion.
• Never short-circuit batteries as this may lead to high temperatures, leakage, or explosion.
• Never heat batteries in order to revive them. • Remember to switch off devices after use. • Keep batteries out of the reach of children; small
batteries may be ingested.
• Seek medical advice immediately if a battery has been swallowed.
Caution: If batteries or parts are swallowed, see a doctor immediately.
INTRODUCTION
The LS-6 and LS-8 LightSwitch
®Telescopes
The most sophisticated and easiest to use telescopes ever
Congratulations on receiving your new LS telescope. You’ll fi nd that this telescope system has all you need to explore the Universe we live in. Meade’s concept was to create a telescope that would be simple enough for anyone to use, yet capable enough for the experienced amateur to stretch their knowledge and skills. With the most advanced and complete list of features of any telescope, you will have plenty of room to learn and expand your interest in astronomy and not out grow your telescope. Here are a few of the features that set the Meade LS
telescope system apart from all others.
Ease of Use: LightSwitch Technology is the ultimate in easy setup. Using a combination of optical, mechanical and electronic sensors, LightSwitch delivers a telescope ready to start observations without any input from the user.
Optics: Your choice of optical systems to meet your needs. Meade’s Schmidt-Cassegrain (SC) optics give you high performance for the best possible price. Water-white glass, Ultra-High Transmission Coatings (UHTC) and oversized, thermally-stable Pyrex® primary mirrors provide spectacular viewing experience not available on comparable competitors’ telescopes. Advanced Coma-Free takes all of the features of our SC models and then ups the ante. ACF gives a fl atter, coma-free fi eld of view with pinpoint images all the way to the edge of the fi eld, equaling Ritchey-Crétien performance. ACF is the perfect solution for the serious astroimager or visual astronomer looking for observatory-class optics.
Mechanics: Strong and stable aluminum castings with large precision worm-gear drives in both axes for smooth tracking with low periodic error.
Computer: AutoStar III handbox gives you complete control of your LS system from the palm of your hand. With a database of nearly 100,000 objects, you will never run out of things to explore.
Multimedia: The Astronomer Inside™ provides audio and video descriptions of the objects you are viewing with a wealth of information along with guided tours of the best objects in your sky.
Imaging: The built-in ECLIPS™ CCD Module enables you to take wide-fi eld digital images of the sky, view them real time with an attached video monitor and save them to an SD card without using and external computer.
If you are like us, you can’t wait to get outside under a dark sky to try out your new LS telescope. We have provided a Getting Started Guide that will get you up and running in the shortest amount of time possible. After your fi rst experience, please sit down with this manual and read about all the advanced features that are available to you with this telescope system. We are confi dent that the LS will keep you fascinated with the Universe and entertained for many years to come.
Clear Skies,
GETTING STARTED
You may want to perform the LS assembly indoors in the light so that you become familiar with the parts and operation before moving the telescope outside into the dark for observing. This Getting Started Guide assumes you are too impatient to read the entire manual fi rst and want to use your new telescope as quickly as possible. Just follow the simple steps below and you will be up and running before you know it.
It is best to set up the telescope in twilight or before sunset the fi rst time you use it. Take the telescope and tripod outside. Set the telescope in a large open area where you can see lots of sky. Don’t setup right next to a building or a wall. Also try to stay away from large metal objects like a car or a metal fence. Make sure the ground is stable and is approximately level. It is best to set up the scope away from bright nighttime lighting. Bright lights will spoil your night vision and impede your ability to see the sky. Additionally, it will take the telescope longer to align itself if there are too many bright lights around.Assembling the Tripod
Remove the fi eld tripod from the shipping carton. Stand the tripod vertically with the tripod feet down and with the tripod still fully collapsed. Grasp two of the tripod legs and, with the full weight of the tripod on the third leg, gently pull the legs apart to a fully open position. Thread in two lock-knobs on each leg (six total) near the foot of each tripod leg. Use the lock-knobs to vary the height of the inner, extendible tripod leg sections. Tighten the locks to a fi rm feel only; do not overtighten. Remove the end nut from the spreader shaft and slide the spreader in between the telescope legs. Attach the end nut and hand tighten until the telescope legs are held snuggly in the most spread position. Position the tripod where you want the telescope to be and check that the top of the tripod is approximately level.GETTING ST
AR
TED
Spreader Bar End Nut Lock-Knob Spreader Shaft5
Mounting the Telescope
Take the LS Telescope from its packaging and place the entire telescope onto the top of the tripod head. Rotate the telescope head slowly until you feel the scope register on the center hub of the tripod head. Carefully screw the three attachment thumb-screws on the bottom of the plate to the base of the tripod. Hand tighten the screws so the telescope cannot spin or wobble on the tripod head.Installing the Batteries
Remove the end cover from the battery compartment exposing the battery tray. Carefully slide the battery tray out until it reaches its end stop. Insert 8 (user supplied) Alkaline “C” batteries into the battery compartment. Take care that the batteries + and - ends are as indicated in the battery holder.Slide the battery compartment back into the telescope and re-attach the battery compartment cover.
CAUTION: Use care to install batteries as indicated by the battery compartment. Follow battery manufacturer’s precautions. Do not install batteries backwards or mix new and used batteries. Do not mix battery types. If these precautions are not followed, batteries may explode, catch fi re, or leak. Improperly installed batteries void your Meade warranty. Always remove the batteries if they will not be used for a long period of time.
Using an AC Adapter or
DC Power Cord
Use only the optional Meade Universal AC Power Adapter (part number 07584 for North America or 07584F for 220v foreign) with your LS telescope when connecting to AC power. It is specifi cally selected to provide the quality voltage and current required to power and protect the electronics in the telescope. Power adapters from other manufactures may cause damage and void your warranty.Plug the AC plug into a household AC socket and the DC plug into the 12v DC jack on the telescope panel.
For external DC power use the optional #607 DC Power Cord (part number 07043) to connect to an automotive 12v DC accessory socket. Power Port
GETTING ST
AR
TED
Thumb-Screw Center Hub6
Follow the battery polarity (orientation) as indicated by molded icons
Attaching Accessories
Be sure the telescope master power switch is in the off position. Remove the AutoStar III handbox and the coiled interface cable from the packing materials. Plug one end into the HNDBX port of the control panel and plug the other end into the Handbox port on the AutoStar III handbox.Remove the dust cap from the rear cell of the telescope. Thread the 1.25" eyepiece holder onto the rear cell thread. Slide the diagonal prism into the eyepiece holder and lock in place by turning the thumbscrew to a fi rm feel. Place the Super Plössl 26mm eyepiece into the diagonal prism and tighten the diagonal prism thumbscrew to a fi rm feel only.
Your Telescope is now Fully Assembled
Now remove the dust cover from the front of the telescope tube. Be careful not to touch the glass lens. Next remove the dust cap from the ECLIPS CCD Module and put it in a safe place.Powering Up The Telescope
When night has fallen, approximately 1 hour after sunset, turn on your telescope. Flip the LightSwitch on the telescope fork arm to the ON (1) position. The copyright message lights on LS’s LCD display.GETTING ST
AR
TED
Rear Cell Thread Eyepiece Holder
Dust Cap Diagonal Prism
If you have attached a video cable from the Video Out connection on the telescope to the composite video input of a NTSC TV monitor, you will also see graphics accompanying the telescope introduction.
At the end of this message, the telescope will immediately start its LightSwitch Automatic Alignment procedure. It will take about fi ve to ten minutes for the telescope to orient and align itself. Once it has completed the alignment the handbox screen will display “Alignment Successful”.Slew Speeds: Speed 9: Fast ' ' Speed 5: Medium ' ' Speed 1: Slow Arrow Keys Number Keys
At this point look through the eyepiece of the telescope. You should see some light from the fi nal alignment star but it is probably out of focus. Adjust the focus using the knob on the back of the telescope until you get a sharply focused star image. Press the “Tours/8” key on the AutoStar and select the “Tonight’s Best” tour by pressing the Scroll Down arrow key at the bottom of the AutoStar. Press “ENTER”to start the tour of the best objects visible in your sky right now. You will hear a brief introduction to the tour and then the fi rst object will be shown on the second line of the AutoStar display. If you press “ENTER” to select this object, you will hear a description of the object. If you press the GoTo key, the telescope will move (slew) to put the object in the eyepiece so you can view it directly. To move to the next object, press the “BACK”
key and then the Scroll Down key to move through the available objects in the tour. Press “ENTER” to select the displayed object. To exit the tour, press the “Mode” key.
When you are fi nished observing for the night, replace the dust cover over the end of the telescope and the dust cap on the lens of the ECLIPS Module. Select “Shutdown” from the main top level menu. After the telescope has moved to its storage position and the AutoStar displays “Turn Off Telescope”, fl ip the LightSwitch to the OFF (0) position.GETTING ST
AR
TED
Focus KnobLS TIPS
“MODE” KeyThe “MODE” Key cycles the telescope through its three different modes; Menu Mode, Info Mode and Skymap Mode.
During most telescope operations, pressing the “MODE” key will stop the current operation.
Key Functions
“BACK” - return to previous menu.
“ENTER” - select or confi rm entry.
“GO TO” - Slew to currently selected object.
“SPEED” - Adjust Slew Speed.
“FOCUS” - Optional Electronic focuser. Motion pad controls focuser.
Up/Down scrolls focus speed.
“VOL”. - Up/Dn adjusts media volume.
“DISP” - Control Display contrast, brightness.
“MODE” - Cycles thru Menu -> Scope info -> SkyMap -> Menu and aborts
current operation.
“MEDIA” - Toggles media on and off.
“CALD” - Lookup Caldwell Objects
“MES” - Look up Messier Objects
“PLANETS” - Look up planets in our
solar system
“STAR” - Look up bright stars
AUTOSTAR III HANDBOX –
BASIC USAGE
Now that you have successfully setup and used your LS telescope, it’s time for more information about all the capabilities of this amazing optical system.
The fi rst step is to familiarize yourself with the AutoStar III handbox operation. The largest keys on the keypad are the motion control keys. Most of the time, these keys allow you to move, or slew, your telescope both up and down and right and left. Press them now and see how the telescope moves in response to the keys. When the telescope initially starts up the scope is set to move at its fastest speed. While this is great for getting close to the area you want to see, it is really too fast to get anything positioned into the eyepiece. For that reason, the LS has 9 distinct speeds.
To change the telescope’s speed, press the 1/SPEED
key. You can now select a speed with the scroll up and down small arrow keys on the bottom of the hand control. When you have the desired speed selected, press the “ENTER” key. Alternatively, when the speed selection screen is showing, you can just press a number 1-9 to select a speed quickly, where 1 is the slowest and 9 is the fastest.
Take a moment and try move the scope around at some different speeds.
Navigating the Menus
Now that you are starting to get comfortable with the basics, lets learn some new keys. The most important keys for navigating the menus on you telescope are the keys along the top and bottom rows of your AutoStar. The two small arrows on the bottom of the key pad, allow you to scroll through the possible menu selections. The menu line is at the top of the handbox display and the top of the video monitor if connected. The second line of the hand control display has the current active menu item. If you are looking at a connected video display, you will see more menu choices and the active selection will be highlighted.
AUTOST
AR III BASIC USAGE
The “ENTER” and “BACK” buttons on the top of the display let you move up and down the menu tree. When you press “ENTER” you will select the current active menu choice. Pressing “BACK” will move you up the menu tree. To get us to the top of the menu tree, press “BACK” until “Select Item” is displayed on line 1 of the display. This is the top level menu. Use the scroll keys to navigate through the choices until you fi nd “Objects”. Press “ENTER”. Now you should be able to navigate to “Constellations”. Once you are there press “ENTER” again. Now press “ENTER” to select “Andromeda”.
The telescope will now start to tell you the story of Andromeda. You can listen to the whole story, or press the “MEDIA” key to skip the story and more menu choices will appear. If you want to go from the menu,
“BACK” to the story, just press the “MEDIA” key again to restart the story.
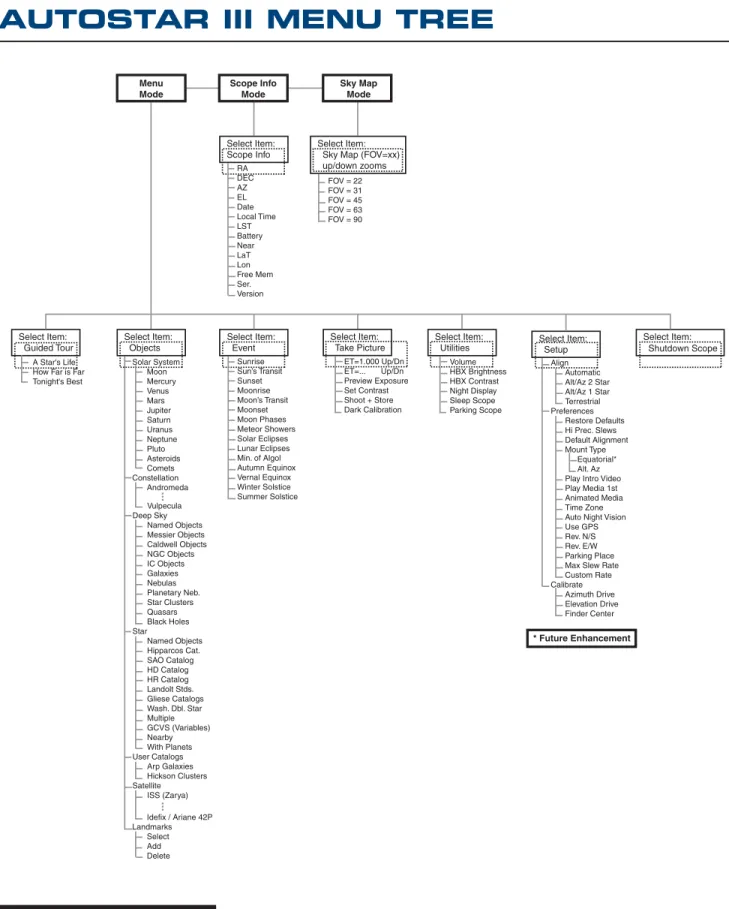
A complete tree of the available menu choice is contained in fi gure 6 on page 23 of the manual.
CHANGING MODES
Menu Mode
Up till now we have been exploring the Menu Mode. The handbox has several other modes in addition to simple menu navigation. You will notice the “0” key is also labelled “MODE”. Pressing “MODE” allows you to cycle through the telescopes three modes.
Scope Info Mode
Press “MODE” now. In Scope Info Mode the scroll keys allow you to look at the current time, date, and location where the telescope is pointing along with other key values about the status of your telescope.
Sky Map Mode
Press “MODE” again. The hand control display will show “Sky Map FOV=45”. In sky map mode an attached video monitor shows a planetarium-like map of the sky in the area where your telescope is pointed. Use the motion keys to move the scope and notice how the sky display changes as you move the scope. You can zoom the display in or out by pressing the scroll up and scroll down buttons.
Shortcuts!
Now lets look at the numeric keypad. Each of the number keys does two things. If the telescope is requesting input, the number keys allow you to enter digits into the telescope. When you are navigating the menus they act as shortcuts. Their assignments are as follows:
1. “SPEED”: We have already used this key. It allows you to change the slew speed of the telescope.
2. “CALDWELL”: Let’s you look up members of a popular group of bright deep sky objects that make up the Caldwell Catalog.
3. “MESSIER”: Let’s you look up some of the most famous bright deep sky objects that make up the Messier Catalog
4. “FOCUS”: If you have the optional electric focuser on you your telescope you can press this key to go to focus mode. Now the arrow keys will move the focus in or out.
5. “PLANETS”: Lets you directly lookup a planet.
6. “STARS”: Lets you directly lookup a bright stars.
7. “VOLUME”: Gives you quick access to the telescope audio volume control
8. “TOURS”: Lets you directly select a guided tour. (note: to exit a tour at any time hit the “MODE” Key.)
Now spend a little quality time with the telescope to get comfortable navigating its features. When you a comfortable, it is time to go out and explore the night sky.
AUTOST
AR III BASIC USAGE
LS KEY FEATURES
LS KEY FEA
TURES
Figure 1: LS TelescopeTelescope Input/Output Panel
ON/OFF LightSwitch
ECLIPS CCD Module
Red Dot Finder Alignment Screws
Handbox Storage Cradle
Diagonal Eyepiece Holder
Diagonal Prism
1.25” Eyepiece Holder
Eyepiece Holder Thumb Screw
Eyepiece
Single Fork Arm Mount
11
Figure 2: LS Right Side
LS KEY FEA
TURES
Figure 3: LS Front Figure 4: LS Connectors2!
2@
2#
2$
2%
2^
Diagonal ThumbscrewOptical Tube Assembly (OTA) Focus Knob
Integrated Sensor Module
Dust Cover
Battery Compartment
Red Dot Finder
Mini SD Card Slot
USB-A for Future Expansion
2!
2!
USB-B connector to PC2@
2@
Video Output2#
2#
Audio Output2$
2$
Electronic Focuser Jack2%
2%
Handbox (HNDBX) Port2^
2^
12v Power InputTightens the eyepiece in place. Tighten to a fi rm feel only.
Optical Tube Assembly (OTA): The main optical component that gathers the light from distant objects and brings this light to a focus for examination through the eyepiece. Single Fork Arm Mount: Holds the optical tube in place and moves it to fi nd and track objects.Focus Knob: Moves the telescope’s primary mirror in a fi nely-controlled motion to achieve precise image focus. The LS telescope can be focused on objects from a distance of about 25 ft. to infi nity. Rotate the focus knob counterclockwise to focus on distant objects, and clockwise to focus on nearby objects.
Integrated Sensor Module: Receives location and time information transmitted from Global Positioning System (GPS) satellites. Determines north and level positions. Telescope Input/Output Panel Dust Cover: Gently lift out the dust cover from the front lens of the telescope. The dust cover should be replaced after each observing session and the power turned off to the telescope. Verify that any dew that might have collected during the observing session has evaporated prior to replacing the dust cover. ON/OFF LightSwitch: Turns the LS system ON or OFF. The red LED power indicator light illuminates when power is on. Battery Compartment: Insert eight ANSI 14A (IEC LR14) Alkaline “C-Cell” (user-supplied) batteries in compartment. Be sure batteries are aligned correctly as shown in the battery compartment. ECLIPS CCD Module: The integrated camera is part of the system that allows the telescope to align itself, and provides you with a wide fi eld imager when a video monitor is attached to your telescope. Red Dot Finder: Provides an easy way to sight on objects and put them in the telescope’s eyepiece. Red Dot Finder Alignment Screws: Adjust these screws to align the Red Dot Finder with the telescope’s main optics. See page 15 for more information. Handbox Storage Cradle: Holds the AutoStar handbox in a convenient position on the telescope. Mini SD Card Slot: Allows standard Mini-SD™ cards to be used to store images taken with the telescope. Can also be used to update the application fi rmware in the telescope. USB-A Connector for future expansion2!
USB-B Connector to PC: Connects your telescope to a PC computer, so that the telescope can be remotely controlled from AutoStar Suite software, or other computer planetarium programs. This port can also be used to update the software in your telescope, manage custom catalogs, keep data on satellites, comets and asteroids current, and to download new tours to your telescope.2@
Video Output: This connector allows you to connect the telescope to a NTSC television monitor (not supplied). This monitor will display:a. Multiple line menus.
LS KEY FEA
TURES
b. Images from the ECLIPS camera.
c. Sky maps of the region where your telescope is pointed
d. Astronomer Inside videos and images of the moon, planets, and deep sky objects
e. The Video Output can be toggled on/off with the 9/DISP key.
2#
Audio Output: This connection will allow you to pass the telescope’s stereo sound to external speakers, headphones or and external television monitor.2$
Electronic Focuser Jack: Plug in the optional Meade Zero Image Shift Micro-Focuser (P/N 07080) for precision focusing control.2%
Handbox (HNDBX) Port: Plug the AutoStar III coil cord (Page 12, Fig. 4, 23) into this port.2^
12v Power Connector: Provides connection so that the telescope system may be powered from either a 12v DC auto cigarette light plug or from a standard 115v AC home outlet using the optional Meade Universal Power Adaptor. It is important that only the Meade Universal Power Adaptor be used to power the telescope.2&
AutoStar Suite Software: Contains the LS Instruction Manual and a collection of useful software including a planetarium program, the AutoStar Updater for downloading and upgrading the fi rmware in the telescope, software to control the telescope from a computer and other programs all designed to enhance your use of the LS system.LS KEY FEA
TURES
Using the Red-Dot Finder
Because your telescope has so much magnifi cation, its fi eld of view is very small. This can make it hard to know exactly where your telescope is pointing by simply looking at it. To help you point the telescope quickly and accurately, for terrestrial targets or when not using Auto Alignment and GO TO pointing, the LS has a 1X Red-Dot Viewfi nder.
The Red-Dot Finder will aid you in pointing your telescope easily. It works much like a fi ghter pilot’s heads-up display. To turn on the Red Dot Finder, carefully rotate the power switch until you feel it click on. Turning further clockwise will increase the dot brightness. Adjust the dot to the minimum brightness where it can be easily seen. This will extend its battery life and make it easier to see faint stars in the background. Look through the fi nder’s glass window. You will see a red dot superimposed on your view. Using the direction keys on the handbox, move the telescope until the red dot is on the target you want to view in the eyepiece. As you get close to your target, select a moderately low speed, like speed 5, and move the scope to center your target as you look through the eyepiece. This a great way to get used to fi nding the movement keys without removing your eye from the eyepiece.
On/Off & Brightness Adjustment
Adjusting the Red-Dot Finder
The Red-Dot Finder has been aligned at the factory, but you may need to touch-up the alignment from time to time. To do this, look through the eyepiece of your scope and using the hand controller center a distant object. Now turn on the Red-Dot Viewfi nder and adjust the brightness so you can see the red dot. Look through the sight as pictured above.
Now, without moving the telescope, adjust the indicated thumb screws until you have put the red dot on the object at which you were looking. It’s that simple. Now use the hand controller to put the laser dot on a new target. Check to see that the desired target is in the eyepiece. A d j u s t m e n t Screws
LS KEY FEA
TURES
15
Meade makes a complete line of accessories to enable you to get the most fun and performance from your LS telescope. No matter what you want to accomplish, we have the equipment to help you get there.
Choosing Eyepieces
A telescope’s eyepiece magnifi es the image formed by the telescope’s main optics. Each eyepiece has a focal length, expressed in millimeters, or “mm.” The smaller the focal length, the higher the magnifi cation. For example, an eyepiece with a focal length of 9mm has a higher magnifi cation than an eyepiece with a focal length of 26mm. Experienced users know that higher powers are, in general, not as useful as lower powers. Many of the objects in the night sky are relatively large and faint and look best at low magnifi cations.
The power or magnifi cation of a telescope is determined by the focal length of the telescope and the focal length of the eyepiece being used. To calculate magnifi cation, divide the telescope’s focal length by the eyepiece’s focal length. For example, a 26mm eyepiece is supplied with the LS. The focal length of the 6" LS is 1524mm (see SPECIFICATIONS, page 40).
Telescope Focal Length 1524mm Eyepiece Focal Length 26mm 1524 ÷ 26 = 58.6x
The magnifi cation is therefore 58.6x.
Low power eyepieces offer a wider fi eld of view, bright, high-contrast images, and long eye relief. To fi nd an object with a telescope, always start with a lower power eyepiece such as the Super Plössl 26mm or longer focal length. When the object is located and centered in the eyepiece, you may wish to switch to a higher power eyepiece to enlarge the image as much as practical for prevailing seeing conditions or, for many objects, the view is best with a high quality low-power wide-fi eld eyepiece.
NOTE: Seeing conditions vary widely from night-to-night and site-to-site. Turbulence in the air, even on an apparently clear night, can distort images. If an image appears fuzzy and ill-defi ned, reduce to a lower power eyepiece.
Your telescope comes supplied with a Super Plössl 26mm eyepiece, which gives a wide 53 ARC Minute
Series 4000 Super Plössl Eyepieces
56.0mm SP 2" 52º 27x 1º 55' 40.0mm SP 44º 38x 1º 9' 32.0mm SP 52º 48x 1º 6' 26.0mm SP 52º 59x 53' 20.0mm SP 52º 76x 41' 15.0mm SP 52º 102x 31' 12.4mm SP 52º 123x 25' 9.7mm SP 52º 157x 20' 6.4mm SP 52º 238x 13'
Focal Apparent Actual
Length Type Field Power Field
OPTIONAL ACCESSORIES
(just a little less than 1 degree) fi eld of view with 59x magnifi cation. This is a very good all purpose eyepiece for your telescope, but you should consider buying additional eyepieces in longer and shorter focal lengths to fully realize the potential of the excellent 6" optical system in your LS telescope.
The Series 4000 Super Plössl Eyepieces are excellent
well corrected 4 element optics at popular prices. They come in a wide range of focal lengths to give you the right magnifi cation for any type of celestial object you are viewing. You can also use one of the Series 4000 Barlows to double or triple the magnifi cation of a Super Plössl eyepiece. These eyepieces have been the standard for over 30 years.
OPTIONAL ACCESSORIES
The Series 5000 Premium Eyepieces represent the highest level of eyepiece technology. Featuring advanced lens designs with 5, 6 and 7 elements, super fully multi-coated lenses and some of the widest fi elds of view available, they provide the user with the highest-contrast, pinpoint-sharp images and spectacular wide fi eld views of the heavens. They are made to the same high quality standards as the primary optics in your LS 6" telescope and allow you to get all the performance that the Advanced Coma-Free and Schmidt-Cassegrain optical systems were designed to deliver. Use a Series 5000 Telextender for 2, 3 or 5 times the magnifi cation of the eyepiece alone. There is even a 2x 2 inch Telextender for the large 2 inch eyepieces.
NOTE: 2 inch eyepieces require the optional Series 5000 2” Enhanced Diagonal with 99% Refl ectivity (product number 07677) and the SC Thread to 2" Accessory Adapter (product number 07085).
Series 5000 Eyepieces 40.0mm 5 EP 2" 60º 38x 1º 34' 32.0mm 5 EP 2" 60º 48x 1º 16' 26.0mm 5 EP 60º 59x 1º 1' 20.0mm 5 EP 60º 76x 47' 14.0mm 5 EP 60º 109x 33' 9.0mm 5 EP 60º 169x 21' 5.5mm 5 EP 60º 277x 13'
Focal Apparent Actual
Length Type Field Power Field
40.0mm SWA 2" 68º 38x 1º 47' 32.0mm SWA 2" 68º 45x 1º 31' 26.0mm SWA 2" 68º 54x 1º 15' 20.0mm SP 68º 64x 4' 15.0mm SP 68º 76x 54' 12.4mm SP 68º 95x 43' 30.0mm UWA 2" 82º 51x 1º 37' 24.0mm UWA 2" 82º 64x 1º 17' 18.0mm UWA 82º 85x 58' 14.0mm UWA 82º 109x 45' 8.8mm UWA 82º 173x 28' 6.7mm UWA 82º 227x 22' 4.7mm UWA 82º 324x 15'
Series 5000 Super Wide Angle Series 5000 Super Plössl Series 5000 Ultra Wide Angle
OPTIONAL ACCESSORIES
17
Series 5000 2” Enhanced DiagonalUniversal AC Adapter (07584): This adapter supplies a constant regulated 12 volt DC at up to 5 Amps from either a standard 115 volt AC or 220 volt AC household supply. It is the only tested and recommended AC power supply for the LS system.
Power Supplies
While the LS telescope will operate with 8 “C” cell batteries, you should consider several other power options that might work better for your situation and save you money.
Deep Sky Imagers (DSI)
Accessories at Meade.com. Now you can order all these and more accessories or any Meade products right from the Meade Web Site www.meade.com and it will be shipped right to your door.
#607 DC Power Cord w/ Cigarette Lighter Adapter (07043): This adapter allows you to plug into a standard automobile 12v DC power socket. It comes with a 25 foot cord so you can setup far from the car.
Imagers and Accessories
Camera Adapters
Off Axis Guiders
Focal Reducers
OPTIONAL ACCESSORIES
18
The Meade 3.5 inch LCD monitor integrates fullywith the LS telescope. Includes all connectors, dedicated battery pack (up to 20 hours of usage) and integral mounting bracket.
AUTOSTAR III HANDBOX
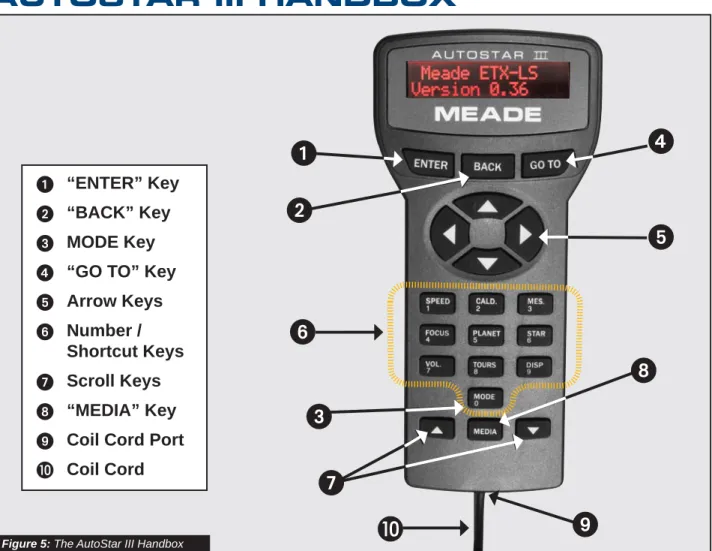
Figure 5: The AutoStar III Handbox
Tour the Cosmos with Just the
Push of a Button
The AutoStar III hand controller operates the LS telescope with just a few pushes of AutoStar’s buttons. Some of the major features of AutoStar III are:
• Automatically move the telescope to any of over 90,000 objects stored in the database or manually enter the astronomical coordinates of any celestial object.
• Take a guided tour of the best celestial objects to view on any given night of the year.
• Download the latest satellite data and software revisions directly from the Meade website
(www.meade.com) and share software with other LS enthusiasts.
The AutoStar Computer handbox provides control of virtually every telescope function. AutoStar III has soft-touch keys designed to have a positive feel. The LCD (Liquid Crystal Display) is backlit with a red LED (Light Emitting Diode) for easy viewing in the dark. The backlit display, key arrangement, and sequential database make AutoStar extremely user friendly.
2-Line LCD Display: Provides an interface between LS and the user.
• Top line: Lists the primary category or menu item.
• Bottom line: Contains a menu option or additional information about an object or subject, depending on which function is being performed.
“ENTER”
Key
“BACK”
Key
MODE
Key
“GO TO” Key
Arrow
Keys
Number
/
Shortcut
Keys
Scroll
Keys
“MEDIA”
Key
Coil Cord Port
Coil
Cord
AUTOST
AR III HANDBOX
19
NOTE: Pressing “BACK” while in the “Select Item” level moves LS to the topmost screen: “Select Item: Object.”
“MODE” KEY: Cycles the telescope through its different modes.NOTE: During any telescope operation, pressing and holding the “MODE” key will stop the current operation
From a mode other than the Menu Mode, pressing the “BACK” key will return the telescope to Menu Mode.
Scope Info: When in Menu Mode, pressing
“MODE” changes the telescope into Scope Information Mode. Information about the telescope’s status displays on the handbox and any attached video monitor. When the status displays, press one of the Scroll keys (Pg. 19, Fig. 5, 7) to display the following information:
• Right Ascension and Declination (astronomical) coordinates.
• Altitude (vertical) and Azimuth (horizontal) coordinates .
• Local Time and Local Sidereal Time (LST)
• Timer and Alarm Status
• Date
• Site coordinates
• Battery status
• Telescope Serial Number
• Free Memory remaining in the telescope
Sky Map: Press “MODE” again and the scope changes to SkyMap Mode. In this mode, an attached video monitor will display a tracking sky map, showing the stars and constellations in the area to which the telescope is pointed. Pressing the scroll-up and scroll-down keys will zoom the map in and out.
Menu: Press “MODE” again to return to the Menu Mode.
“GO TO” Key: Slews (moves) the telescope to the coordinates of the last selected object. While the telescope is slewing, the operation may be aborted at any time by pressing any key except“GO TO”. Pressing “GO TO” again resumes the slew to the object.
AUTOST
AR III HANDBOX
• Moves the telescope – Use the Up and Down Arrow keys to move the telescope vertically up and down. The Left Arrow key rotates the telescope horizontally counterclockwise, while the Right Arrow key rotates it clockwise.
• Data entry – When the scope is prompting for user entered data, use the Up and Down Arrow keys to scroll through the letters of the alphabet and numerical digits. The Down
Arrow key starts with the letter “A” and the Up Arrow key starts with the digit “9.” The Left and Right Arrow keys are used to
move the blinking cursor left and right across the LCD display.
• Catalog Paging – When the scope is presenting long catalogs of information, cities, celestial objects, stars, etc…, you can move through the list a page (8 items) at a time using the up and down arrow keys.
Number Keys: Each number key on the handbox serves a dual function. When you prompted to enter numerical information, the keys allow you to directly enter digits into the handbox. At all other times, the numeric keys act as shortcuts to frequently accessed places in the menu tree. The keys have the follow effec:t“1/Speed”– instantly brings up the scope slew speed menu so you can change the slew rate of the telescope
Slew Speeds
LS has nine slew speeds that are directly proportional to the sidereal rate (the rate at which stars appear to drift across the sky) and have been calculated to accomplish specifi c functions. Pressing a Number key changes the slew speed, which is shown for about two seconds on AutoStar’s display. To change the speed, press the 1/Speed.
Nine available speeds are:
Number Key “1” = 1x Number Key “2” = 2x Number Key “3” = 8x Number Key “4” = 16x Number Key “5” = 0.25°/sec Number Key “6” = 0.50°/sec Number Key “7” = 1.0°/sec Number Key “8” = 2.0°/sec Number Key “9” = 4.0°/sec
Speeds “1”,“3”, or “3” Best used for fi ne centering of an object in the fi eld of view of a higher power eyepiece, such as a 12mm or a 9mm eyepiece.
Speeds “4”, “5”, or “6”: Enables centering an object in the fi eld of a low-to-moderate power eyepiece, such as the standard Super Plössl 26mm.
Speeds “7” or “8”: Best used for rough centering of an object in the Red-Dot Viewfi nder.
Speed “9”: Moves the telescope quickly from one point in the sky to another.
“2/Caldwell” – instantly brings up the Caldwell catalog entry menu, so you can access any Caldwell object by its catalog number.
“3/Messier” – instantly brings up the Messier catalog entry menus, so you can access any Messier object by its catalog number.
“4/Focus” – If you have a optional electric focuser attached to your telescope, this key will change the function of the Arrow keys, to move the focuser in and out, rather than to move the telescope.
“5/Planet” – instantly brings up the solar system object selection menu. So you can quickly locate the moon, planets, comets and asteroids.
“6/Stars” – instantly brings up the star catalog selection menu, so you can quickly locate bright stars by name, or select stars by their catalog index numbers.
“7/Volume” – brings up the volume control for the built in speaker in your telescope.
“8/Tours” – instantly brings up the guided tours
AUTOST
AR III HANDBOX
“9/Display” – Toggles video output between on/off.
“0/Mode” – This key lets you cycle through the telescope’s modes, (See the entry above).
Scroll Keys: Accesses options within a selected menu. The menu is displayed on the fi rst line of the screen. Options within the menu are displayed, one at a time, on the second line. Press the Scroll keys to move through the options. Press and hold a Scroll key to move quickly through the options. When entering data, the Scroll Down key and the Down Arrow key move forward through the alphabet & digits (A to Z, 0 to 9). The Scroll Up key and the Up Arrow key move backward (Z to A, 9 to 0). Common symbols are also available in the list. “MEDIA” Key: The media key lets you toggle help and audio/video descriptions on and off. At any time you are navigating the menus, pressing the Media Key will start an explanation of the menu’s function. If you have selected an object, pressing the media key, will tell you more about the object. If a media clip is playing, pressing “MEDIA” stops the media clip and moves you back to the menu or object display.Coil Cord Port: Plug one end of the AutoStar coil cord into this port (Pg. 19. Fig. 5, 9) located at the bottom of the AutoStar handbox.
Coil Cord: Plug one end of the AutoStar coil cord into the HNDBX port (Pg. 12, Fig. 4, 23) of the input/output panel of the telescope and the other end into the coil cord port (Fig. 5, 9).AUTOST
AR III HANDBOX
LS TIPS
Observing Considerations
• Try to pick an observing site away from street and house lights and car headlights. While this is not always possible, the darker the site, the better.
• Try not to use a standard fl ashlight. Experienced observers use red LED fl ashlights, the red utility light on the AutoStar III handbox, or tape red cellophane over their fl ashlights to use for setup and map reading so they don’t have to continually readjust their eyes to the darkness. Be careful not to shine bright lights if there are other observers in the area. Do not shine a fl ashlight into the telescope while someone is observing! • Dress warmly. It gets chilly when you’re sitting
for prolonged periods.
• Practice setting up your equipment during the day or in a lighted area to become familiar with it before going to a dark site.
• Use your 26mm eyepiece to view terrestrial objects and wider areas of space, such as open star clusters. Use optional higher power eyepieces, such as a 9mm eyepiece, when you wish to view something up close, such as craters on the Moon or the rings of Saturn.
22
Orion Nebula (M42)Solar System Moon Mercury Venus Mars Jupiter Saturn Uranus Neptune Pluto Asteroids Comets Constellation Andromeda Volume HBX Brightness HBX Contrast Night Display Sleep Scope Parking Scope Align Automatic Alt/Az 2 Star Alt/Az 1 Star Terrestrial Preferences Restore Defaults Hi Prec. Slews Default Alignment Mount Type Equatorial* Alt. Az Play Intro Video Play Media 1st Animated Media Time Zone Auto Night Vision Use GPS Rev. N/S Rev. E/W Parking Place
Max Slew Rate Custom Rate Calibrate Azimuth Drive Elevation Drive Finder Center Select Item: Objects Select Item: Event Select Item: Utilities Select Item: Setup A Star's Life How Far is Far Tonight's Best ... ... Select Item: Guided Tour Select Item: Shutdown Scope Sunrise Sun’s Transit Sunset Moonrise Moon’s Transit Moonset Moon Phases Meteor Showers Solar Eclipses Lunar Eclipses Min. of Algol Autumn Equinox Vernal Equinox Winter Solstice Summer Solstice ET=1.000 Up/Dn ET=... Up/Dn Preview Exposure Set Contrast Shoot + Store Dark Calibration Select Item: Take Picture Select Item: Sky Map (FOV=xx) up/down zooms FOV = 22 FOV = 31 FOV = 45 FOV = 63 FOV = 90 Select Item: Scope Info RA DEC AZ EL Date Local Time LST Battery Near LaT Lon Free Mem Ser. Version * Future Enhancement Sky Map Mode Scope Info Mode Menu Mode Vulpecula Deep Sky Named Objects Messier Objects Caldwell Objects NGC Objects IC Objects Galaxies Nebulas Planetary Neb. Star Clusters Quasars Black Holes Star Named Objects Hipparcos Cat. SAO Catalog HD Catalog HR Catalog Landolt Stds. Gliese Catalogs Wash. Dbl. Star Multiple GCVS (Variables) Nearby With Planets User Catalogs Arp Galaxies Hickson Clusters Satellite ISS (Zarya) Idefix / Ariane 42P Landmarks Select Add Delete
AUTOSTAR III MENU TREE
Figure 6: The AutoStar III Menu Tree
AUTOST
AR III MENU TREE
Guided Tour Menu
When Guided Tours is selected, AutoStar III shows you a list of theme tours that will help you explore the night sky. These tours are pre programmed presentations of objects that are visible for the user’s particular location, time and date.
The most popular tour is “Tonight’s Best” that guides the user to the best objects that are currently up in the night sky. This tour is the easiest way to get started exploring the cosmos with your new LS telescope. Each tour will select the objects, present multi-media clips about the object and, if you press “GoTo”, put that object in the eyepiece of the telescope for you to view. To exit a tour, press “Mode”.
The telescope comes pre-loaded with:
• “Tonight’s Best”, a selection of the most interesting objects visible on any night.
• “A Star’s Life”, explains how stars are formed, created, changes through their lives and fi nally die using examples that are visible tonight.
• “How Far is Far”, an explanation of the phenomenal distances you can see with your LS.
AutoStar Suite also allows you to create your own guided tours of the skies, including your own objects, titles, images and sound fi les (for complete instructions on how to use the authoring tools please refer to the reference manual included on the AutoStar Suite DVD).
Object Menu
Almost all observing with LS is performed using the Object menu category. (NOTE: Exceptions include Guided Tour and Landmarks).
Many LS menu categories contain databases. An LS database is a list of objects, such as stars, planets, comets, nebulae and so forth. When one of these objects is selected from a database by pressing “ENTER”
and then “GO TO”, LS moves your telescope (when properly aligned) and points it at the selected object. The Object Menu options include:
Solar System is a database of the eight planets (Earth is not included) in ascending orbits from the Sun, followed by the Moon, asteroids, and comets.
Constellation is a database of all 88 Northern and Southern Hemisphere constellations. When this menu option is chosen and a constellation name appears on the fi rst line of the screen, the multimedia description of the constellation is played. When the media presentation completes, or you press the “MEDIA”
key to halt the presentation, a menu gives you three choices:
• Show Summary – presents the key data about the constellation.
• Walk the Stars – presents a catalog of the brightest stars in the constellation so that you can walk the constellation fi gure.
• Show Objects – presents a list of the best deep sky objects in this constellation for you to explore.
Deep Sky is a database of objects outside our Solar System such as nebulae, star clusters, galaxies, and quasars grouped in various catalogs like Messier, Caldwell and NGC.
Star is a database of stars listed in different categories such as named, double, variable, or nearby.
Important Note: When you are looking at descriptive object text, pressing “ENTER” will synchronize the telescope’s coordinates with the object. This is most useful when synching on bright stars to achieve better pointing in the vicinity of the star.
User Catalogs allows the user to defi ne and store in memory deep-sky objects of specifi c interest that are not currently in the LS database. See Appendix B, page 37 for more information (for complete instructions on how to use the authoring tools please refer to the reference manual included on the AutoStar Suite DVD).
Satellite is a database of Earth-orbiting objects such as the International Space Station (ISS), the Hubble Space Telescope (HST), Global Positioning System (GPS) satellites, and geosynchronous orbit satellites. In order to fi nd and track satellites, you must download recent orbital data into the telescope.
Landmarks stores the location of terrestrial points of interest that you create in the permanent LS database.
IMPORTANT NOTE: To use the Landmark function, the telescope must be located and aligned exactly as
AUTOST
AR III MENU OPTIONS
when the landmark was added to the database.
• Select – To select a Landmark already in the database (see ADD below), choose the “Select” option and scroll through the list. Press “ENTER”
to select a Landmark, then press “GO TO” and the telescope slews to the object.
• Add – To add a Landmark, choose the “Add” option. Enter a name for the Landmark. Locate and center the Landmark in the eyepiece, then press “ENTER”.
Event Menu
The Event menu provides access to dates and times of astronomical events. The Event database includes:
Sunrise and Sunset calculates the time that the Sun rises or sets on the current date.
Moonrise and Moonset calculates the time that the Moon rises or sets on the current date.
Moon Phases displays the date and time of the next New, 1st Quarter, Full and 3rd Quarter Moon.
Meteor Showers provides information on upcoming meteor showers, such as the Perseids, the Leonids, etc. Also lists the dates of the showers and when they reach maximum.
NOTE: Meteors are fast moving objects that cover large areas of the sky and are usually best observed with the naked eye.
Solar Eclipse lists upcoming Solar Eclipses, including the date and type (total, annular, or partial) of eclipse, and the location and time of the fi rst and last contacts of the Moon’s shadow. Use the Scroll Up and Down keys to display the available data. Remember, never use a telescope to look at the Sun!
Lunar Eclipse lists upcoming Lunar Eclipses, including the date and type (total, partial, penumbral) of eclipse. Use the Scroll Up and Down keys to display the available data.
Min. (Minimum) of Algol is the minimum brightness of the dramatic eclipsing binary star system, Algol. It is relatively close at a distance of 100 light years. Every 2.8 days during a 10 hour period, Algol undergoes a major change in apparent magnitude as one of the two stars passes behind the other. The combined magnitude of the two stars thus dips from +2.1 to a minimum of
+3.4 halfway through the eclipse as the second star is hidden. LS calculates minimum magnitude time at mid-eclipse.
Autumn and Vernal Equinox calculates the time and date of the fall or spring equinox of the current year.
Winter and Summer Solstice calculates the time and date of the winter or summer solstice of the current year.
Take Picture Menu
You can take wide-fi eld images of the night sky with the ECLIPS CCD Module that is part of the LightSwitch alignment system. It’s great for constellation shots and you can see some large bright deep sky objects as well.
Note that while you take and store images on to a user supplied Mini SD Card for download to your PC, to fully use many of the options below and to preview your
image you need to connect the LS to a user supplied external video monitor.
Start by selecting “Take Picture” from the top menu: “Take Picture” > “ENTER”
Then you will see the following options:
• Preview Exposure: Displays “Finder Image; Exposing...”. UP/DOWN adjusts Exposure Time (ET). A longer exposure records fainter stars. A shorter exposure records fainter stars. A shorter exposure is better for very bright subjects.
• Set Contrast: UP/DOWN selects scrolls through the thirteen pre-set Contrast curves available, “Cont. Day”, “Cont. Moon”, “Cont. Planet”, “Cont.
AUTOST
AR III MENU OPTIONS
25
The Pleiades Star Cluster (M45 )Stars”, and “Cont. Deep1” thru “Cont. Deep9”. The setting after “Cont. Deep9” is Cust.Cont.
(Custom Contrast). This setting allows you adjust the Contrast AND Brightness to create your own setting. Contrast is controlled using the LEFT/ RIGHT Arrow Keys. Brightness is controlled using the UP/DOWN Arrow Keys. NOTE: to fully utilize these the Custom Contrast setting you will need the use of an external monitor. Otherwise chose one of the thirteen pre-set Contrast curves.
• Shoot & Store: Allows you to take the image and save it to the SD once you have adjusted the settings and are happy with the preview. You must have an Mini SD Card formatted with the FAT32 fi le system inserted in the telescope to use this function. Press the “BACK” key to save the image.
• Dark Calibration: Allows you to take a dark frame of the same exposure as your image but with the camera lens covered to combine and subtract out noise from your image. You must cover the camera lens with the lens cap before you take the dark calibration frame.
Deep Sky Imager (DSI) Series: these high-performance, easy-to-use and affordable color and
black and white CCD camera suppresses electronic noise and by not compressing data from the sensor to increase picture quality. The Deep Sky Imager uses a full 16-bit analog-to-digital converter to enhance picture depth, contrast and dynamic range.
The DSI series are USB compatible to easily interface with most Windows-based laptop computers. It includes AutoStar Suite which automatically sorts, aligns and combines the best images, resulting in a
highly detailed color image.
The following Deep Sky Imagers models and accessories are available:
Deep Sky Imager III (DSI III)
Deep Sky Imager Pro III (DSI PRO III) Deep Sky Imager II (DSI II)
Deep Sky Imager Pro II (DSI PRO II)
Deep Sky Imager Pro II (DSI PRO II), w/RGB Color Filter Set
Utilities Menu
The Utilities menu provides access to several extra features within LS:
Volume: Adjusts audio volume of the telescope using the Scroll keys. When complete, press “ENTER”.
HBX Brightness: Adjusts the brightness of the display using the Scroll keys. When complete, press
“ENTER”.
HBX Contrast: Adjusts the contrast of the display using the Scroll keys. When complete, press “ENTER”.
Night Vision: When you have an external video monitor attached to your telescope, you will fi nd the bright colorful displays may affect your night vision and make it diffi cult to see dim objects in the eyepiece of your telescope. The human eye’s sensitivity actually increases for about the fi rst half hour you are in the dark. You have noticed this when you walk out of a dark theater into the daytime sun, how over bright the day seems. This dark adaptation of your eye can be reduced by white light. Red light does not have this effect on dark adapted vision. The night vision option on your telescope will change the display from color, to shades of red. There are three settings:
Auto – The video will automatically switch to red at night.
On – Selects full-time red video.
Off – Selects full-time color video.
AUTOST
AR III MENU OPTIONS
Sleep Scope is a power and time saving option that shuts down the LS telescope without forgetting its alignment. With “Sleep Scope” selected, press
“ENTER” to activate the Sleep function. LS goes dark, but the internal clock keeps running. Press any key, except “ENTER”, to re-activate LS.
Park Scope is designed for a telescope that has not moved between observing sessions. Align the telescope one time, then use this function to park the telescope. Next time it is powered up, no alignment is required. Pressing “ENTER” causes the telescope to move to its pre-determined Park position. Once parked, the screen prompts to turn off power.
IMPORTANT NOTE: When the “Park Scope” option is chosen and the display prompts you to turn off the telescope’s power, LS is unable to be returned to operation without turning the power off and then back on.
Setup Menu
The Setup menu’s primary function is to align the telescope. However, there are numerous other features available within the Setup menu, including:
Align prepares your telescope to automatically locate and track objects. There are four different alignment methods available. Unless you specifi cally disable LightSwitch as the default alignment, the scope will use this method immediately upon powering up. If you desire to use an alternate method below, be sure to disable automatic alignment in the preferences.
• Automatic Align will use the LightSwitch® alignment method to align your telescope.
• Alt. Az. 2 Star will begin the interactive two star alignment process. Complete details are described in the Advanced LS features section of this manual.
• Alt. Az. 1 Star will begin the interactive one star alignment process. Complete details are described in the Advanced LS features section of this manual.
• Terrestrial will set up the telescope to use on land objects.
Preferences allows you to confi gure the telescope’s behaviors to suit your own viewing tastes. Confi gurable options include:
• Restore Defaults sets all the settings back to the factory original values.
• Hi Precision Slews allows you to turn high precision slews on and off. When this feature is enabled and you command the telescope to
GoTo and object, it will fi rst slew to a nearby star and ask you to center the star and then press “ENTER” to proceed. This feature insures the target will be in the precise center of the eyepiece. With faint objects at the limit of your scope, or when making astro-images, enabling Hi Precision assures you are right on target.
• Default Alignment allows you to enable or disable LightSwitch alignment when the scope powers up. When you disable default alignment, the telescope will require you to select and perform one of the alignment procedures under the Setup menu before your telescope will automatically locate and track objects.
• Play Intro Video allows you to disable the introductory media message that plays when the telescope is fi rst powered up.
• Play Media 1st allows you to select when
multimedia object descriptions are played. As shipped from the factory, the telescope is confi gured to play the descriptive media before
showing you the object data. Disabling the Media 1st option, will cause the object’s data to be displayed immediately upon object selection. If you wish to hear the descriptions, you must explicitly press the “MEDIA” key.
• Animated Media allows you to bypass the animated portion of the media. As shipped from the factory, most objects have two media clips. The fi rst is an animated overview narrated by a male voice. This is followed by a second, more detailed description given by a female narrator. Disabling “Animated Media” will skip playing the audio/video media clip and go to the audio only presentation.
• Time Zone allows you to select an international time zone, or to manually confi gure a time zone to any fraction of an hour you need.
• Use GPS allows you to disable use of the GPS to determine the time and your telescope’s location. If your scope is mounted in an
AUTOST
AR III MENU OPTIONS
AUTOST
AR III MENU OPTIONS
28
observatory, or on a permanent mount, disabling the GPS can speed your startup. When the GPS is disabled, you are presented a menu that offers you the choice of using the previous locations, and the internal clock time, entering the date, time and location manually, taking a GPS fi x, or starting in a Demo/Terrestrial mode.
• Rev. N/S allows you to reverse the function of the up and down arrow keys. This can be handy when using diagonals.
• Rev. E/W allows you to reverse the function of the left and right arrow keys. This can be handy when using diagonals.
• Parking Place allows you to set a custom park position. This is convenient for permanently
mounted scopes that will be restarted and parked after every use.
• Custom Rate allows you to make minor adjustments to the telescopes tracking rate.
Tip: If you are having diffi culties with the telescope, the fi rst step to getting back on track is to use the Preferences – Restore Factory Defaults command rate.
Calibrate allows you to precisely tune several aspects of your telescope for peak performance. Calibration options include:
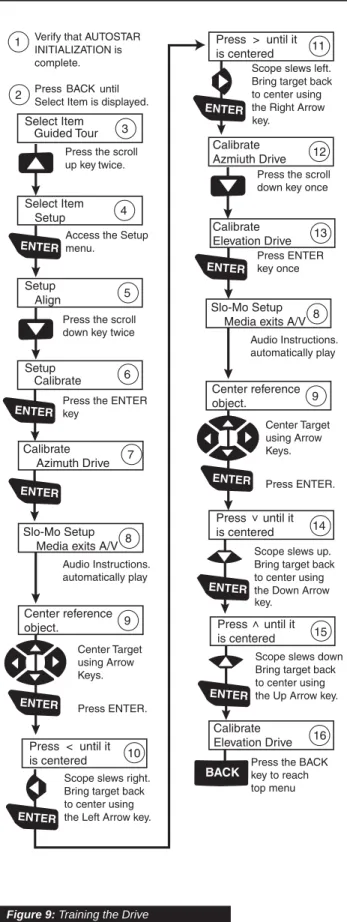
• Azimuth Drive allows you train your azimuth drive for peak pointing accuracy.
• Elevation Drive allows you train your elevation drive for peak pointing accuracy.
• Finder Center recomputes the center of the ECLIPS camera. When you change diagonals or other equipment the alignment of the equipment with the ECLIPS camera can change. If you are getting good alignments, but objects are consistently off center by the same amount, you should use the option to improve centering.