HPE
FlexNetwork
5130 HI Switch Series
Fundamentals
Command Reference
Part number: 5998-8427 Software version: Release 11xx Document version: 6W100-20151201
© Copyright 2015 Hewlett Packard Enterprise Development LP
The information contained herein is subject to change without notice. The only warranties for Hewlett Packard Enterprise products and services are set forth in the express warranty statements accompanying such products and services. Nothing herein should be construed as constituting an additional warranty. Hewlett Packard Enterprise shall not be liable for technical or editorial errors or omissions contained herein.
Confidential computer software. Valid license from Hewlett Packard Enterprise required for possession, use, or copying. Consistent with FAR 12.211 and 12.212, Commercial Computer Software, Computer Software Documentation, and Technical Data for Commercial Items are licensed to the U.S. Government under vendor’s standard commercial license.
Links to third-party websites take you outside the Hewlett Packard Enterprise website. Hewlett Packard Enterprise has no control over and is not responsible for information outside the Hewlett Packard Enterprise website.
Acknowledgments
Intel®, Itanium®, Pentium®, Intel Inside®, and the Intel Inside logo are trademarks of Intel Corporation in the United States and other countries.
Microsoft® and Windows® are trademarks of the Microsoft group of companies. Adobe® and Acrobat® are trademarks of Adobe Systems Incorporated.
Java and Oracle are registered trademarks of Oracle and/or its affiliates. UNIX® is a registered trademark of The Open Group.
Contents
Basic CLI commands ··· 1
alias ··· 1
command-alias enable ··· 2
display | { begin | exclude | include } ··· 3
display | by-linenum ··· 3
display > ··· 4
display >> ··· 5
display alias ··· 6
display history-command ··· 6
display history-command all ··· 7
display hotkey ··· 8 hotkey ··· 9 quit ··· 10 repeat ··· 10 return ··· 11 screen-length disable ··· 12 system-view ··· 12
Login management commands ··· 14
activation-key ··· 14 authentication-mode ··· 15 auto-execute command ··· 16 command accounting ··· 17 command authorization ··· 18 databits ··· 19 display line ··· 20
display telnet client ··· 21
display user-interface ··· 21 display users ··· 23 escape-key ··· 24 flow-control ··· 25 free line ··· 26 free user-interface ··· 27 history-command max-size ··· 28 idle-timeout ··· 28 line ··· 29 line class ··· 30 lock ··· 31 parity ··· 32 protocol inbound ··· 33 screen-length ··· 34 send ··· 35
set authentication password ··· 36
shell ··· 37
speed ··· 37
stopbits ··· 38
telnet ··· 39
telnet client source ··· 40
telnet ipv6 ··· 41
telnet server acl ··· 41
telnet server dscp ··· 42
telnet server enable ··· 43
telnet server ipv6 acl ··· 43
telnet server ipv6 dscp ··· 44
terminal type ··· 45
user-interface ··· 45
user-role ··· 47
RBAC commands ··· 49
description ··· 49
display role ··· 49
display role feature ··· 51
display role feature-group ··· 53
feature ··· 56
interface policy deny ··· 56
permit interface ··· 57
permit vlan ··· 59
role ··· 60
role default-role enable ··· 61
role feature-group ··· 62
rule ··· 63
super ··· 66
super authentication-mode ··· 67
super default role ··· 68
super password ··· 69
vlan policy deny ··· 70
FTP commands ··· 72
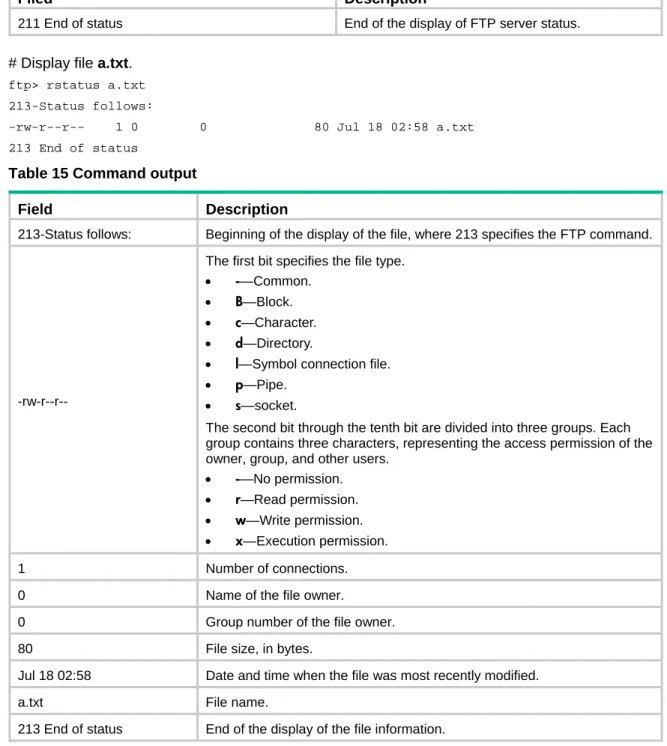
FTP server commands ··· 72 display ftp-server ··· 72 display ftp-user ··· 72 free ftp user ··· 73 free ftp user-ip ··· 74free ftp user-ip ipv6 ··· 74
ftp server acl ··· 75 ftp server dscp ··· 75 ftp server enable ··· 76 ftp server ipv6 dscp ··· 76 ftp server ssl-server-policy ··· 77 ftp timeout ··· 78 FTP client commands ··· 78 append ··· 78 ascii ··· 79 binary ··· 80 bye ··· 80 cd ··· 81 cdup ··· 82 close ··· 82 debug ··· 83 delete ··· 84 dir ··· 84 disconnect ··· 85
display ftp client source ··· 86
ftp ··· 86
ftp client ipv6 source ··· 87
ftp client source ··· 88 ftp ipv6 ··· 89 get ··· 90 help ··· 91 lcd ··· 91 ls ··· 92 mkdir ··· 93 newer ··· 94 open ··· 94 passive ··· 95 put ··· 96 pwd ··· 96 quit ··· 97
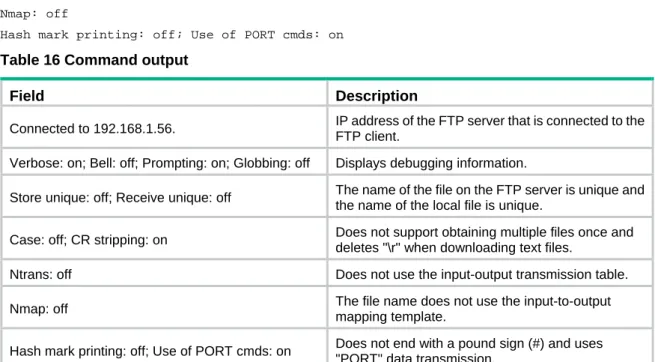
reget ··· 97 rename ··· 98 reset ··· 98 restart ··· 99 rhelp ··· 99 rmdir ··· 101 rstatus ··· 102 status ··· 103 system ··· 104 user ··· 105 verbose ··· 105 ? ··· 106
TFTP commands ··· 108
tftp ··· 108tftp client ipv6 source ··· 109
tftp client source ··· 110
tftp ipv6 ··· 111
tftp-server acl ··· 112
tftp-server ipv6 acl ··· 113
File system management commands ··· 114
cd ··· 114 copy ··· 115 delete ··· 117 dir ··· 118 fdisk ··· 119 file prompt ··· 121 fixdisk ··· 122 format ··· 122 gunzip ··· 123 gzip ··· 124 md5sum ··· 124 mkdir ··· 125 more ··· 125 mount ··· 126 move ··· 127 pwd ··· 128 rename ··· 128 reset recycle-bin ··· 128 rmdir ··· 129 sha256sum ··· 130 tar create ··· 130 tar extract ··· 131 tar list ··· 132 umount ··· 132 undelete ··· 133
Configuration file management commands ··· 135
archive configuration ··· 135
archive configuration interval ··· 135
archive configuration location ··· 136
archive configuration max ··· 137
backup startup-configuration ··· 138
configuration encrypt ··· 139
configuration replace file ··· 140
display archive configuration ··· 141
display current-configuration ··· 142
display current-configuration diff ··· 143
display default-configuration ··· 144
display diff ··· 145
display startup ··· 148 display this ··· 149 reset saved-configuration ··· 150 restore startup-configuration ··· 151 save ··· 152 startup saved-configuration ··· 153
Software upgrade commands ··· 155
boot-loader file ··· 155
boot-loader update ··· 156
bootrom update ··· 157
display boot-loader ··· 158
display install active ··· 159
display install committed ··· 160
install activate ··· 162
install commit ··· 163
install deactivate ··· 163
Device management commands ··· 165
clock datetime ··· 165 clock protocol ··· 166 clock summer-time ··· 166 clock timezone ··· 168 command ··· 169 copyright-info enable ··· 169 display clock ··· 171 display copyright ··· 171 display cpu-usage ··· 172
display cpu-usage configuration ··· 172
display cpu-usage history ··· 173
display device ··· 175
display device manuinfo ··· 176
display device manuinfo power ··· 177
display diagnostic-information ··· 178 display environment ··· 179 display fan ··· 179 display memory ··· 180 display memory-threshold ··· 182 display power ··· 183
display scheduler job ··· 183
display scheduler logfile ··· 184
display scheduler reboot ··· 185
display scheduler schedule ··· 185
display transceiver alarm ··· 186
display transceiver diagnosis ··· 188
display transceiver interface ··· 189
display transceiver manuinfo ··· 190
display version ··· 191 display version-update-record ··· 191 fan prefer-direction ··· 192 header ··· 193 job ··· 194 memory-threshold ··· 195 memory-threshold usage ··· 196
monitor cpu-usage enable ··· 197
monitor cpu-usage interval ··· 197
monitor cpu-usage threshold ··· 198
password-recovery enable ··· 199
reboot ··· 200
reset scheduler logfile ··· 201
reset version-update-record ··· 201
scheduler job ··· 203
scheduler logfile size ··· 203
scheduler reboot at ··· 204
scheduler reboot delay ··· 205
scheduler schedule ··· 205 shutdown-interval ··· 206 sysname ··· 207 temperature-limit ··· 208 time at ··· 209 time once ··· 209 time repeating ··· 211 usb disable ··· 212 user-role ··· 213
Tcl commands ··· 215
cli ··· 215 tclsh ··· 215 tclquit ··· 216Python commands ··· 217
python ··· 217 python filename ··· 217Document conventions and icons ··· 219
Conventions ··· 219
Network topology icons ··· 220
Support and other resources ··· 221
Accessing Hewlett Packard Enterprise Support ··· 221
Accessing updates ··· 221
Websites ··· 222
Customer self repair ··· 222
Remote support ··· 222
Documentation feedback ··· 222
Basic CLI commands
alias
Use alias to configure an alias for a command. Use undo alias to remove a command alias.
Syntax
alias alias command undo aliasalias
Default
The system defines a set of command aliases, as listed in Table 1.
Table 1 System-defined command aliases
Alias Command access-list acl end return erase delete exit quit hostname sysname logging info-center no undo show display write save Views System view
Predefined user roles
network-admin
Parameters
alias: Specifies an alias, a case-sensitive string of 1 to 20 characters. An alias cannot be alias or contain spaces.
command: Specifies a command string.
Usage guidelines
After you configure an alias for a command, you can enter the alias to execute the command. For example, you can configure the alias shrun for the display current-configuration command. Then, to execute the command, you only need to enter shrun.
The command string represented by an alias can include up to nine parameters. Each parameter starts with the dollar sign ($) and a sequence number in the range of 1 to 9. For example, you can configure the alias shinc for the command display ip $1 | include $2. Then, to execute the display ip routing-table | include Static command, you can enter shinc routing-table Static. To execute
the display ip interface | include GigabitEthernet0/0/1 command, you can enter shinc interface
GigabitEthernet0/0/1.
Examples
# Configure the alias shiprt for the display ip routing-table command.
<Sysname> system-view
[Sysname] alias shiprt display ip routing-table [Sysname] shiprt
Destinations : 12 Routes : 12
Destination/Mask Proto Pre Cost NextHop Interface 0.0.0.0/32 Direct 0 0 127.0.0.1 InLoop0 3.3.3.3/32 Static 60 0 192.168.1.62 GE0/0 127.0.0.0/8 Direct 0 0 127.0.0.1 InLoop0 127.0.0.0/32 Direct 0 0 127.0.0.1 InLoop0 127.0.0.1/32 Direct 0 0 127.0.0.1 InLoop0 127.255.255.255/32 Direct 0 0 127.0.0.1 InLoop0 169.254.0.0/24 Direct 0 0 169.254.0.188 GE0/0 169.254.0.0/32 Direct 0 0 169.254.0.188 GE0/0 169.254.0.188/32 Direct 0 0 127.0.0.1 InLoop0 169.254.0.255/32 Direct 0 0 169.254.0.188 GE0/0 192.168.57.0/24 RIP 100 1 192.168.1.62 GE0/0 224.0.0.0/4 Direct 0 0 0.0.0.0 NULL0 224.0.0.0/24 Direct 0 0 0.0.0.0 NULL0 255.255.255.255/32 Direct 0 0 127.0.0.1 InLoop0
# Configure the alias shinc for the display $1 | include $2 command.
[Sysname] alias shinc display ip $1 | include $2 [Sysname] shinc routing-table Static
3.3.3.3/32 Static 60 0 192.168.1.62 GE0/0
# Use the alias shinc to display RIP route information.
[Sysname] shinc routing-table RIP
192.168.57.0/24 RIP 100 1 192.168.1.62 GE0/0
Related commands
display alias
command-alias enable
Use command-alias enable to enable the command keyword alias feature. Use undo command-alias enable to disable the command keyword alias feature.
Syntax
command-alias enable undo command-alias enable
Default
The command keyword alias feature is disabled.
Views
Predefined user roles
network-admin
Usage guidelines
Configured command keyword aliases take effect only when the command keyword alias feature is enabled.
Disabling the command keyword alias feature does not delete configured aliases.
Examples
# Enable the command keyword alias feature.
<Sysname> system-view
[Sysname] command-alias enable
display | { begin | exclude | include }
Use display | { begin | exclude | include } to filter the output from a display command with a regular expression.
Syntax
display command| { begin | exclude | include } regular-expression
Views
Any view
Predefined user roles
network-admin network-operator
Parameters
command: Specifies the keywords and arguments of a display command. To display available keywords and arguments, enter display ?.
begin: Displays the first line matching the specified regular expression and all subsequent lines.
exclude: Displays all lines not matching the specified regular expression.
include: Displays all lines matching the specified regular expression.
regular-expression: Specifies a regular expression, a case-sensitive string of 1 to 256 characters.
Usage guidelines
Use the | { begin | exclude | include } regular-expression option with a display command to filter the command output. For more information about regular expressions, see Fundamentals Configuration Guide.
Examples
# Display the lines that contain vlan in the running configuration.
<Sysname> display current-configuration | include vlan vlan 1
vlan 999
port access vlan 999
display | by-linenum
Syntax
display command|by-linenum
Views
Any view
Predefined user roles
network-admin
Parameters
command: Specifies the keywords and arguments of a display command. To display available keywords and arguments, enter display ?.
Usage guidelines
By numbering each output line from a display command, you can easily identify the lines of interest. Each line number is displayed as a 5-character string and might be followed by a colon (:) or hyphen (-). If you specify both | by-linenum and | begin regular-expression for a display command, a hyphen is displayed for all lines that do not match the regular expression.
Examples
# Display CPU usage information, with each output line identified by a number.
<Sysname> display cpu-usage | by-linenum
1: Slot 1 CPU 0 CPU usage:
2: 14% in last 5 seconds
3: 14% in last 1 minute 4: 13% in last 5 minutes
# Display the first line that begins with user-group in the running configuration and all of the following lines.
<Sysname> display current-configuration | by-linenum begin user-group 114: user-group system
115- # 116- return
display >
Use display> to save the output from a display command to a separate file.
Syntax
displaycommand> filename
Views
Any view
Predefined user roles
network-admin network-operator
Parameters
command: Specifies the keywords and arguments of a display command. To display available keywords and arguments, enter display ?.
Usage guidelines
The display commands show the configuration, statistics, and states of the device. You can use the
display> command to save the output to a file.
If the specified file does not exist, the system creates the file and saves the output to the file. If the file already exists, the system overwrites the file.
Examples
# Save CPU usage information to a separate file named cpu.txt.
<Sysname> display cpu-usage > cpu.txt
# Verify the content of the cpu.txt file.
<Sysname> more cpu.txt
Slot 1 CPU 0 CPU usage:
13% in last 5 seconds
13% in last 1 minute 13% in last 5 minutes
display >>
Use display>> to append the output from a display command to the end of a file.
Syntax
displaycommand>> filename
Views
Any view
Predefined user roles
network-admin network-operator
Parameters
command: Specifies the keywords and arguments of a display command. To display available keywords and arguments, enter display ?.
filename: Specifies the name of the file that is used to save the output, a string of 1 to 63 characters.
Usage guidelines
The display commands show the configuration, statistics, and states of the device. You can use
display>> to save the output to a file.
If the specified file does not exist, the system creates the file and saves the output to the file. If the file already exists, the system appends the output to the end of the file.
Examples
# Append system time information to the end of the cpu.txt file.
<Sysname> display clock >> cpu.txt
# Check the content of the cpu.txt file.
<Sysname> more cpu.txt Slot 1 CPU 0 CPU usage: 13% in last 5 seconds 13% in last 1 minute
13% in last 5 minutes
02:03:27 UTC Tue 01/01/2013
display alias
Use display alias to display command aliases.
Syntax
display alias [ alias ]
Views
Any view
Predefined user roles
network-admin network-operator
Parameters
alias: Specifies a command alias. If you do not specify this argument, the command displays all command aliases.
Examples
# Display all command aliases.
<Sysname> display alias
Index Alias Command key 1 access-list acl 2 end return 3 erase delete 4 exit quit 5 hostname sysname 6 logging info-center 7 no undo
8 shinc display $1 | include $2 9 show display
10 sirt display ip routing-table 11 write save
# Display the command alias shinc.
<Sysname> display alias shinc Alias Command key
shinc display $1 | include $2
Related commands
alias
display history-command
Use display history-command to display all commands that are saved in the command history buffer for the current CLI session.
Syntax
display history-command
Views
Any view
Predefined user roles
network-admin network-operator
Usage guidelines
The system automatically saves commands you have successfully executed to the command history buffer for the current CLI session. You can view them and execute them again.
By default, the system can save up to 10 commands in the buffer. You can use the
history-command max-size command to change the buffer size.
Examples
# Display all commands saved in the command history buffer for the current CLI session.
<Sysname> display history-command system-view
vlan 2 quit
Related commands
history-command max-size
display history-command all
Use display history-command all to display all commands saved in the command history buffer for all CLI sessions.
Syntax
display history-command all
Views
Any view
Predefined user roles
network-admin network-operator
Usage guidelines
The system automatically saves commands successfully executed by users to the command history buffer for all CLI sessions. Users can view them and execute them again.
Up to 1024 commands can be saved in the command history buffer. When this number is reached, the system deletes the earliest commands to make room for newly executed commands.
Examples
# Display all commands saved in the command history buffer for all CLI sessions.
<Sysname> display history-command all
Date Time Terminal Ip User 03/16/2012 20:03:33 vty0 192.168.1.26 **
03/16/2012 20:03:29 vty0 192.168.1.26 ** Cmd:sys
Related commands
display history-command
display hotkey
Use display hotkey to display hotkey information.
Syntax
display hotkey
Views
Any view
Predefined user roles
network-admin network-operator
Examples
# Display hotkey information.
<Sysname> display hotkey
--- Hotkeys --- -Defined command hotkeys-
CTRL_G display current-configuration CTRL_L display ip routing-table CTRL_O undo debugging all
-Undefined command hotkeys- CTRL_T NULL
CTRL_U NULL
-System-reserved hotkeys-
CTRL_A Move the cursor to the beginning of the line. CTRL_B Move the cursor one character to the left. CTRL_C Stop the current command.
CTRL_D Erase the character at the cursor. CTRL_E Move the cursor to the end of the line. CTRL_F Move the cursor one character to the right. CTRL_H Erase the character to the left of the cursor. CTRL_K Abort the connection request.
CTRL_N Display the next command in the history buffer. CTRL_P Display the previous command in the history buffer. CTRL_R Redisplay the current line.
CTRL_V Paste text from the clipboard.
CTRL_W Delete the word to the left of the cursor.
CTRL_X Delete all characters from the beginning of the line to the cursor. CTRL_Y Delete all characters from the cursor to the end of the line.
CTRL_] Kill incoming connection or redirect connection. ESC_B Move the cursor back one word.
ESC_D Delete all characters from the cursor to the end of the word. ESC_F Move the cursor forward one word.
Related commands
hotkey
hotkey
Use hotkey to assign a command to a configurable hotkey. Use undo hotkey to restore the default.
Syntax
hotkey { CTRL_G | CTRL_L | CTRL_O | CTRL_T | CTRL_U } command undo hotkey { CTRL_G | CTRL_L | CTRL_O | CTRL_T | CTRL_U }
Default
• Ctrl_G: display current-configuration (display the running configuration).
• Ctrl_L: display ip routing-table (display the IPv4 routing table information).
• Ctrl_O: undo debugging all (disable all debugging features).
• Ctrl_T: No command is assigned to this hotkey.
• Ctrl_U: No command is assigned to this hotkey.
Views
System view
Predefined user roles
network-admin
Parameters
CTRL_G: Assigns a command to Ctrl+G.
CTRL_L: Assigns a command to Ctrl+L.
CTRL_O: Assigns a command to Ctrl+O.
CTRL_T: Assigns a command to Ctrl+T.
CTRL_U: Assigns a command to Ctrl+U.
command: Specifies the command to be assigned to the hotkey.
Usage guidelines
The system defines some hotkeys and provides five configurable command hotkeys. Pressing a hotkey executes the command assigned to the hotkey.
To display system-defined and configurable hotkeys, use the display hotkey command.
Examples
# Assign the display tcp status command to the hotkey Ctrl+T.
<Sysname> system-view
[Sysname] hotkey ctrl_t display tcp status
Related commands
quit
Use quit to return to the upper-level view.
Syntax
quit
Views
Any view
Predefined user roles
network-admin network-operator
Usage guidelines
Executing this command in user view disconnects you from the device.
Examples
# Return from the view of VLAN-interface 1 to system view and then to user view.
[Sysname-vlan1] quit [Sysname] quit <Sysname>
repeat
Use repeat to repeat commands in the command history buffer for the current user line.
Syntax
repeat [ number ] [ count times ] [ delay seconds ]
Views
Any view
Predefined user roles
network-admin
Parameters
number: Specifies the number of most recently executed commands in the history buffer for the current user line. The value range for this argument is 1 to 10. The default is 1.
count times: Specifies the number of times that you want to execute the commands. The value range is 0 to 4294967295. The default is 0. If you do not specify this option, the system keeps executing the commands until you terminate the execution.
delay seconds: Specifies the time (in seconds) that the system waits before executing the commands again. The value range is 0 to 4294967295. The default is 1.
Usage guidelines
To terminate the execution of commands, press the shortcut key defined by using the escape-key
command.
To repeat a command, first enter the view for the command. To repeat multiple commands, first enter the view for the first command.
The repeat command executes commands in the order they were executed. The system waits for your interaction when it repeats an interactive command.
Examples
# Configure the system to execute the two most recently executed commands (display cpu and
display clock) three times at an interval of 10 seconds.
<Sysname> repeat 2 count 3 delay 10 <Sysname> display cpu
Unit CPU usage:
33% in last 5 seconds 32% in last 1 minute 33% in last 5 minutes
<Sysname> display clock
12:20:08 UTC Thu 06/19/2014 <Sysname> display cpu Unit CPU usage:
33% in last 5 seconds 32% in last 1 minute 33% in last 5 minutes
<Sysname> display clock
12:20:18 UTC Thu 06/19/2014 <Sysname> display cpu Unit CPU usage:
33% in last 5 seconds 32% in last 1 minute 33% in last 5 minutes
<Sysname> display clock
12:20:28 UTC Thu 06/19/2014
Related commands
• display history
• history-command max-size
return
Use return to return to user view from any other view.
Syntax
return
Views
Any view except user view
Predefined user roles
network-admin network-operator
Usage guidelines
Examples
# Return to user view from the view of VLAN-interface 1.
[Sysname-vlan1] return <Sysname>
screen-length disable
Use screen-length disable to disable pausing between screens of output for the current session. Use undo screen-length disable to enable pausing between screens of output for the current session.
Syntax
screen-length disable undo screen-length disable
Default
The default varies by settings of the screen-length command in user line view. The following are the default settings for the screen-length command:
• Pausing between screens of output.
• Displaying up to 24 lines on a screen.
Views
User view
Predefined user roles
network-admin
Usage guidelines
If you disable pausing between screens of output, all output is displayed. The screen is refreshed continuously until the final screen is displayed.
This command takes effect only for the current session. When you are logged out, the default is restored.
Examples
# Disable pausing between screens of output for the current session.
<Sysname> screen-length disable
Related commands
screen-length
system-view
Use system-view to enter system view from user view.
Syntax
system-view
Views
User view
Predefined user roles
network-operator
Examples
# Enter system view from user view.
<Sysname> system-view
System View: return to User View with Ctrl+Z. [Sysname]
Login management commands
The device supports the FIPS mode that complies with NIST FIPS 140-2 requirements. Support for features, commands, and parameters might differ in FIPS mode and non-FIPS mode. For more information about FIPS mode, see Security Configuration Guide.
Some login management commands are available in both user line view and user line class view. For these commands, the device uses the following rules to determine the settings to be activated:
• A setting in user line view is applied only to the user line. A setting in user line class view is applied to all user lines of the class.
• A non-default setting in either view takes precedence over a default setting in the other view. A non-default setting in user line view takes precedence over a non-default setting in user line class view.
• A setting in user line view takes effect immediately and affects the online user. A setting in user line class view does not affect online users. It takes effect only for new login users.
activation-key
Use activation-key to define a shortcut key for starting a terminal session. Use undo activation-key to restore the default.
Syntax
activation-keykey-string undo activation-key
Default
Pressing Enter starts a terminal session.
Views
User line view, user line class view
Predefined user roles
network-admin
Parameters
key-string: Specifies a shortcut key. It can be a character (case sensitive), or an ASCII code value in the range of 0 to 127. For example, if you configure activation-key 65, the shortcut key is A. If you configure activation-key a, the shortcut key is a.
Usage guidelines
This command is not supported in VTY line view or VTY line class view.
This command is available in both user line view and user line class view. A non-default setting in either view takes precedence over a default setting in the other view. A non-default setting in user line view takes precedence over a non-default setting in user line class view.
To display the shortcut key you have defined, use the display current-configuration | include activation-key command.
Examples
# Configure character s as the shortcut key for starting a terminal session on the AUX line.
<Sysname> system-view [Sysname] line aux 0
[Sysname-line-aux0] activation-key s
To verify the configuration:
1. Exit the console session.
[Sysname-line-aux0] return <Sysname> quit
2. Log in again through the AUX line. The following message appears:
Press ENTER to get started. 3. Press Enter.
Pressing Enter does not start a session.
4. Enter s.
A terminal session is started.
<Sysname>
authentication-mode
Use authentication-mode to set the authentication mode for a user line. Use undo authentication-mode to restore the default.
Syntax
In non-FIPS mode:
authentication-mode { none | password | scheme }
undo authentication-mode
In FIPS mode:
authentication-modescheme undo authentication-mode
Default
In non-FIPS mode, the authentication mode is password for VTY lines, and none for the AUX lines. In FIPS mode, the authentication mode is scheme.
Views
User line view, user line class view
Predefined user roles
network-admin
Parameters
none: Disables authentication.
password: Performs local password authentication.
scheme: Performs AAA authentication. For more information about AAA, see Security Configuration Guide.
Usage guidelines
When the authentication mode is none, a user can log in without authentication. To improve device security, use the password or scheme authentication mode.
In VTY line view, this command is associated with the protocol inbound command. If you specify a non-default value for only one of the two commands in VTY line view, the other command uses the default setting, regardless of the setting in VTY line class view.
Examples
# Enable the none authentication mode for user line VTY 0.
<Sysname> system-view
[Sysname] line vty 0
[Sysname-line-vty0] authentication-mode none
# Enable password authentication for user line VTY 0 and set the password to 321.
<Sysname> system-view [Sysname] line vty 0
[Sysname-line-vty0] authentication-mode password
[Sysname-line-vty0] set authentication password simple 321
# Enable scheme authentication for user line VTY 0. Configure local user 123 and set the password to 321. Assign the Telnet service and the user role network-admin to the user.
<Sysname> system-view [Sysname] line vty 0
[Sysname-line-vty0] authentication-mode scheme [Sysname-line-vty0] quit
[Sysname] local-user 123
[Sysname-luser-manage-123] password simple 321 [Sysname-luser-manage-123] service-type telnet
[Sysname-luser-manage-123] authorization-attribute user-role network-admin
Related commands
set authentication password
auto-execute command
CAUTION:After configuring this command for a user line, you might be unable to access the CLI through the user line. Make sure you can access the CLI through a different user line before you configure this command and save the configuration.
Use auto-execute command to specify a command that is automatically executed when a user logs in through the current user line.
Use undo auto-execute command to remove the configuration.
Syntax
auto-execute command command undo auto-execute command
Default
Command auto-execution is disabled.
Views
User line view, user line class view
Predefined user roles
Parameters
command: Specifies the command to be automatically executed.
Usage guidelines
This command is not supported in AUX line view or AUX line class view.
This command is available in both user line view and user line class view. A non-default setting in either view takes precedence over a default setting in the other view. A non-default setting in user line view takes precedence over a non-default setting in user line class view.
The device automatically executes the specified command when a user logs in through the user line, and closes the user connection after the command is executed. If the command triggers another task, the device does not close the user connection until the task is completed.
Typically, you configure the auto-execute command telnet X.X.X.X command on the device so the device redirects a Telnet user to the host at X.X.X.X. In this case, the connection to the current device is closed when the user terminates the Telnet connection to X.X.X.X.
Examples
# Configure the device to automatically Telnet to 192.168.1.41after a user logs in through user line VTY 0.
<Sysname> system-view [Sysname] line vty 0
[Sysname-line-vty0] auto-execute command telnet 192.168.1.41
% This action will lead to configuration failure through line-vty0. Are you sure? [Y/N]:y
[Sysname-line-vty0]
# To verify the configuration, Telnet to 192.168.1.40.
The device automatically Telnets to 192.168.1.41, and the following output is displayed:
C:\> telnet 192.168.1.40
****************************************************************************** * Copyright (c) 2010-2015 Hewlett-Packard Development Company, L.P. * * Without the owner's prior written consent, * * no decompiling or reverse-engineering shall be allowed. * ****************************************************************************** Trying 192.168.1.41 ... Press CTRL+K to abort Connected to 192.168.1.41 ... ****************************************************************************** * Copyright (c) 2010-2015 Hewlett-Packard Development Company, L.P. * * Without the owner's prior written consent, * * no decompiling or reverse-engineering shall be allowed. * ****************************************************************************** <Sysname.41>
This operation is the same as directly logging in to the device at 192.168.1.41 through Telnet. When you break the Telnet connection to 192.168.1.41, the Telnet connection to 192.168.1.40 is broken at the same time.
command accounting
Use undo command accounting to restore the default.
Syntax
command accounting undo command accounting
Default
Command accounting is disabled, and the accounting server does not record executed commands.
Views
User line view, user line class view
Predefined user roles
network-admin
Usage guidelines
When command accounting is enabled but command authorization is not, every executed command is recorded on the HWTACACS server.
When both command accounting and command authorization are enabled, only authorized commands that are executed are recorded on the HWTACACS server.
Invalid commands issued by users are not recorded.
If the command accounting command is configured in user line class view, command accounting is enabled on all user lines in the class. You cannot configure the undo command accounting
command in the view of a user line in the class.
Examples
# Enable command accounting for user line VTY 0.
<Sysname> system-view [Sysname] line vty 0
[Sysname-line-vty0] command accounting
Related commands
• accounting command (Security Command Reference)
• command authorization
command authorization
Use command authorization to enable command authorization. Use undo command authorization to restore the default.
Syntax
command authorization undo command authorization
Default
Command authorization is disabled. Logged-in users can execute commands without authorization.
Views
User line view, user line class view
Predefined user roles
Usage guidelines
When command authorization is enabled, a command is available only if the following requirements are met:
• The user has the commensurate user role.
• The user is authorized to use the command by the AAA scheme.
If the command authorization command is configured in user line class view, command authorization is enabled on all user lines in the class. You cannot configure the undo command authorization command in the view of a user line in the class.
Examples
# Enable command accounting for VTY 0 so the VTY 0 user can execute only authorized commands that are permitted by the user role.
<Sysname> system-view [Sysname] line vty 0
[Sysname-line-vty0] command authorization
Related commands
• authorization command (Security Command Reference)
• command accounting
databits
Use databits to specify the number of data bits for each character. Use undo databits to restore the default.
Syntax
databits { 5 | 6 | 7 | 8 }
undo databits
Default
Eight data bits are used for each character.
Views
User line view
Predefined user roles
network-admin
Parameters
5: Uses five data bits for each character.
6: Uses six data bits for each character.
7: Uses seven data bits for each character.
8: Uses eight data bits for each character.
Usage guidelines
This command is not supported in VTY line class view.
This setting must be the same as that on the configuration terminal.
Examples
[Sysname] line aux 0
[Sysname-line-aux0] databits 5
display line
Use display line to display user line information.
Syntax
display line [ number1 | { aux | vty } number2 ] [ summary ]
Views
Any view
Predefined user roles
network-admin network-operator
Parameters
number1: Specifies the absolute number of a user line, in the range of 0 to 73.
aux: Specifies the AUX line.
vty: Specifies the VTY line.
number2: Specifies the relative number of a user line. The value range is 0 to 9 for the AUX line and 0 to 63 for the VTY line.
summary: Displays summary information about user lines. If you do not specify this keyword, the detailed information is displayed.
Examples
# Display user line information.
<Sysname> display line 0
Idx Type Tx/Rx Modem Auth Int 0 AUX 0 9600 - N - + : Line is active.
F : Line is active and in async mode. Idx : Absolute index of line.
Type : Type and relative index of line. Auth : Login authentication mode. Int : Physical port of the line. A : Authentication use AAA.
N : No authentication is required. P : Password authentication.
Table 2 Command output
Field Description
Modem Whether the modem allows calling in or out. By default, this attribute is not configured and a hyphen (-) is displayed.
# Display summary information about all user lines.
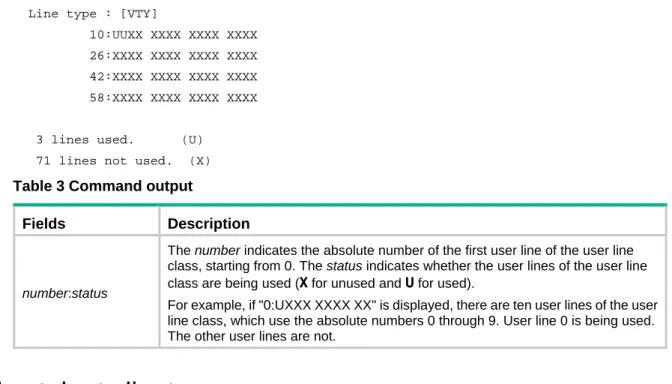
<Sysname> display line summary Line type : [AUX]
Line type : [VTY]
10:UUXX XXXX XXXX XXXX 26:XXXX XXXX XXXX XXXX 42:XXXX XXXX XXXX XXXX 58:XXXX XXXX XXXX XXXX
3 lines used. (U) 71 lines not used. (X)
Table 3 Command output
Fields Description
number:status
The number indicates the absolute number of the first user line of the user line class, starting from 0. The status indicates whether the user lines of the user line class are being used (X for unused and U for used).
For example, if "0:UXXX XXXX XX" is displayed, there are ten user lines of the user line class, which use the absolute numbers 0 through 9. User line 0 is being used. The other user lines are not.
display telnet client
Use display telnet client to display the source address or interface for outgoing Telnet packets when the device acts as a Telnet client.
Syntax
display telnet client
Views
Any view
Predefined user roles
network-admin network-operator
Examples
# Display the Telnet client configuration of the device when it acts as a Telnet client.
<Sysname> display telnet client The source IP address is 1.1.1.1.
The output shows that the device uses the source IPv4 address 1.1.1.1 for outgoing Telnet packets when it acts as a Telnet client.
Related commands
telnet client source
display user-interface
Use display user-interface to display user line information.
Syntax
Views
Any view
Predefined user roles
network-admin network-operator
Parameters
number1: Specifies the absolute number of a user line, in the range of 0 to 73.
aux: Specifies the AUX line.
vty: Specifies the VTY line.
number2: Specifies the relative number of a user line. The value range is 0 to 9 for the AUX line and 0 to 63 for the VTY line.
summary: Displays summary information about user lines. If you do not specify this keyword, the detailed information is displayed.
Usage guidelines
This command is an older version reserved for backward compatibility purposes. As a best practice, use the display line command.
Examples
# Display user line information.
<Sysname> display user-interface 0
Idx Type Tx/Rx Modem Auth Int 0 AUX 0 9600 - N - + : Line is active.
F : Line is active and in async mode. Idx : Absolute index of line.
Type : Type and relative index of line. Auth : Login authentication mode. Int : Physical port of the line. A : Authentication use AAA.
N : No authentication is required. P : Password authentication.
Table 4 Command output
Field Description
Modem Whether the modem allows calling in or out. By default, this attribute is not configured and a hyphen (-) is displayed.
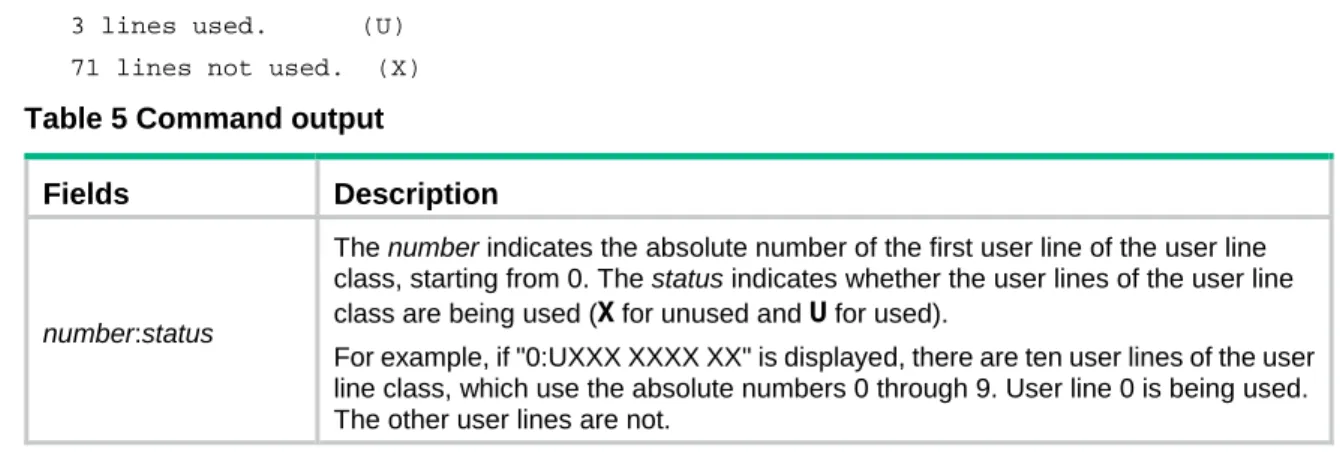
# Display summary information about all user lines.
<Sysname> display user-interface summary Line type : [AUX]
0:UXXX XXXX XX Line type : [VTY]
10:UUXX XXXX XXXX XXXX 26:XXXX XXXX XXXX XXXX 42:XXXX XXXX XXXX XXXX 58:XXXX XXXX XXXX XXXX
3 lines used. (U) 71 lines not used. (X)
Table 5 Command output
Fields Description
number:status
The number indicates the absolute number of the first user line of the user line class, starting from 0. The status indicates whether the user lines of the user line class are being used (X for unused and U for used).
For example, if "0:UXXX XXXX XX" is displayed, there are ten user lines of the user line class, which use the absolute numbers 0 through 9. User line 0 is being used. The other user lines are not.
display users
Use display users to display online CLI user information.
Syntax
display users [ all ]
Views
Any view
Predefined user roles
network-admin network-operator
Parameters
all: Displays all user lines supported by the device.
Examples
# Display online user information.
<Sysname> display users
Idx Line Idle Time Pid Type 10 VTY 0 00:10:49 Jun 11 11:27:32 320 TEL + 11 VTY 1 00:00:00 Jun 11 11:39:40 334 TEL Following are more details.
VTY 0 :
Location: 192.168.1.12 VTY 1 :
Location: 192.168.1.26 + : Current operation user.
F : Current operation user works in async mode.
The output shows that two users have logged in to the device: one is using user line VTY 0 and the other (yourself) is using VTY 1. Your IP address is 192.168.1.26.
Table 6 Command output
Field Description Idx Absolute number of the user line.
Field Description
Line Type and relative number of the user line.
Idle Time elapsed after the user's most recent input, in the hh:mm:ss format. Time Login time of the user.
Pid Process ID of the user session. Type User type, such as Telnet, SSH. + Indicates the user line you are using. Location IP address of the user.
escape-key
Use escape-key to define a shortcut key for terminating a task.
Use undo escape-key to disable the shortcut key for terminating a task.
Syntax
escape-key { key-string| default }
undo escape-key
Default
Pressing Ctrl+C terminates a task.
Views
User line view, user line class view
Predefined user roles
network-admin
Parameters
key-string: Specifies a shortcut key. It can be a character (case sensitive), or an ASCII code value in the range of 0 to 127. For example, if you configure escape-key 65, the shortcut key is A. If you configure escape-key a, the shortcut key is a.
default: Restores the default escape key sequence Ctrl+C.
Usage guidelines
Some commands might take a long time to complete in certain situations. Examples include:
• A ping command that has 1000 packets to send.
• A tracert command that is used for an unreachable destination. To stop a command, press the shortcut key for terminating tasks.
Whether a command can be terminated by Ctrl+C by default depends on the software implementation of the command. For more information, see the description of the command.
As a best practice, use a key sequence as the shortcut key. If you define a single character as the shortcut key, pressing the key while a command is being executed stops the command. If no command is being executed, the result depends on the following situations:
• If you are managing the local device, pressing the key enters the character as a common character.
You can execute this command multiple times, but only the most recent configuration takes effect. To view the current shortcut key definition, use the display current-configuration command.
This command is available in both user line view and user line class view. A non-default setting in either view takes precedence over a default setting in the other view. A non-default setting in user line view takes precedence over a non-default setting in user line class view.
Examples
# Define character a as the shortcut key for terminating a task.
<Sysname> system-view [Sysname] line aux 0
[Sysname-line-aux0] escape-key a
To verify the configuration:
1. Ping IP address 192.168.1.49, specifying the -c keyword to set the number of ICMP echo request packets to 20.
<Sysname> ping -c 20 192.168.1.49
PING 192.168.1.49: 56 data bytes, press a to break
Reply from 192.168.1.49: bytes=56 Sequence=1 ttl=255 time=3 ms Reply from 192.168.1.49: bytes=56 Sequence=2 ttl=255 time=3 ms 2. Press a.
The task is terminated, and the system returns to user view.
--- 192.168.1.49 ping statistics --- 2 packet(s) transmitted 2 packet(s) received 0.00% packet loss round-trip min/avg/max = 3/3/3 ms <Sysname>
flow-control
Use flow-control to configure the flow control mode. Use undo flow-control to restore the default.
Syntax
flow-control { hardware | none | software }
undo flow-control
Default
The flow control mode is none.
Views
User line view
Predefined user roles
network-admin
Parameters
hardware: Performs hardware flow control.
none: Disables flow control.
Usage guidelines
This command is not supported in VTY line view.
The device supports flow control in both the inbound and outbound directions.
• For flow control in the inbound direction, the local device listens to flow control information from the remote device.
• For flow control in the outbound direction, the local device sends flow control information to the remote device.
The flow control setting takes effect in both directions.
To communicate, two devices must be configured with the same flow control mode.
Examples
# Configure software flow control in the inbound and outbound directions for user line AUX 0.
<Sysname> system-view [Sysname] line aux 0
[Sysname-line-aux0] flow-control software
free line
Use free line to release a user line.
Syntax
free line { number1 | { aux | vty } number2 }
Views
User view
Predefined user roles
network-admin
Parameters
number1: Specifies the absolute number of a user line, in the range of 0 to 73.
aux: Specifies the AUX line.
vty: Specifies the VTY line.
number2: Specifies the relative number of a user line. The value range is 0 to 9 for the AUX line and 0 to 63 for the VTY line.
Usage guidelines
This command does not release the line you are using.
Examples
# Release user line VTY 1:
1. Display online users.
<Sysname> display users
Idx Line Idle Time Pid Type 10 VTY 0 00:10:49 Jun 11 11:27:32 320 TEL + 11 VTY 1 00:00:00 Jun 11 11:39:40 334 TEL
Following are more details. VTY 0 :
VTY 1 :
Location: 192.168.1.26 + : Current operation user.
F : Current operation user works in async mode.
2. If the operations of the user on VTY 1 impact your operations, log out the user.
<Sysname> free line vty 1
Are you sure to free line vty1? [Y/N]:y [OK]
free user-interface
Use free user-interface to release a user line.
Syntax
free user-interface { number1 | { aux | vty } number2 }
Views
User view
Predefined user roles
network-admin
Parameters
number1: Specifies the absolute number of a user line, in the range of 0 to 73.
aux: Specifies the AUX line.
vty: Specifies the VTY line.
number2: Specifies the relative number of a user line. The value range is 0 to 9 for the AUX line and 0 to 63 for the VTY line.
Usage guidelines
This command does not release the line you are using.
This command is an older version reserved for backward compatibility purposes. As a best practice, use the free line command.
Examples
# Release user line VTY 1:
1. Display online users.
<Sysname> display users
Idx LINE Idle Time Pid Type 10 VTY 0 00:10:49 Jun 11 11:27:32 320 TEL + 11 VTY 1 00:00:00 Jun 11 11:39:40 334 TEL Following are more details.
VTY 0 :
Location: 192.168.1.12 VTY 1 :
Location: 192.168.1.26 + : Current operation user.
F : Current operation user works in async mode.
2. If the operations of the user on VTY 1 impact your operations, log out the user.
Are you sure to free line vty1? [Y/N]:y [OK]
history-command max-size
Use history-command max-size to set the size of the command history buffer for a user line. Use undo history-command max-size to restore the default.
Syntax
history-command max-size size-value undo history-command max-size
Default
The buffer of a user line saves up to 10 history commands.
Views
User line view, user line class view
Predefined user roles
network-admin
Parameters
size-value: Specifies the maximum number of history commands the buffer can store, in the range of 0 to 256.
Usage guidelines
Each user line uses a separate command history buffer to save commands successfully executed by its user. The size of the buffer determines how many history commands the buffer can store. To view stored history commands on your user line, press the up or down arrow key, or execute the
display history-command command.
Terminating a CLI session clears the commands in the history buffer.
This command is available in both user line view and user line class view. A non-default setting in either view takes precedence over a default setting in the other view. A non-default setting in user line view takes precedence over a non-default setting in user line class view.
Examples
# Set the size of the command history buffer to 20 for user line AUX 0.
<Sysname> system-view [Sysname] line aux 0
[Sysname-line-aux0] history-command max-size 20
idle-timeout
Use idle-timeout to set the CLI connection idle-timeout timer. Use undo idle-timeout to restore the default.
Syntax
idle-timeout minutes [ seconds ]
undo idle-timeout
Default
Views
User line view, user line class view
Predefined user roles
network-admin
Parameters
minutes: Specifies the number of minutes for the timer, in the range of 0 to 35791. The default is 10 minutes.
seconds: Specifies the number of seconds for the timer, in the range of 0 to 59. The default is 0 seconds.
Usage guidelines
The system automatically terminates a user connection if no information interaction occurs on the connection within the idle-timeout interval.
Setting the idle-timeout timer to 0 disables the idle-timeout feature.
This command is available in both user line view and user line class view. A non-default setting in either view takes precedence over a default setting in the other view. A non-default setting in user line view takes precedence over a non-default setting in user line class view.
Examples
# Set the CLI connection idle-timeout timer to 1 minute and 30 seconds for user line AUX 0.
<Sysname> system-view [Sysname] line aux 0
[Sysname-line-aux0] idle-timeout 1 30
line
Use line to enter one or multiple user line views.
Syntax
line { first-number1 [ last-number1 ] | { aux | vty } first-number2 [ last-number2 ] }
Views
System view
Predefined user roles
network-admin
Parameters
first-number1: Specifies the absolute number of the first user line, in the range of 0 to 73.
last-number1: Specifies the absolute number of the last user line. This number cannot be smaller than first-number1.
aux: Specifies the AUX line.
vty: Specifies the VTY line.
first-number2: Specifies the relative number of the first user line. The value range is 0 to 9 for the AUX line and 0 to 63 for the VTY line.
last-number2: Specifies the relative number of the last user line. This number cannot be smaller than
first-number2.
Usage guidelines
To configure the same settings for multiple user lines, use this command to enter multiple user line views.
Examples
# Enter the view of user line AUX 0.
<Sysname> system-view [Sysname] line aux 0 [Sysname-line-aux0]
# Enter the views of user lines VTY 0 to VTY 4.
<Sysname> system-view [Sysname] line vty 0 4 [Sysname-line-vty0-4]
Related commands
line class
line class
Use line class to enter user line class view.
Syntax
line class { aux | vty }
Views
System view
Predefined user roles
network-admin
Parameters
aux: Specifies the AUX line class view.
vty: Specifies the VTY line class view.
Usage guidelines
To configure the same settings for all user lines of a line class, use this command to enter the user line class view.
Some login management commands are available in both user line view and user line class view. For these commands, the device uses the following rules to determine the settings to be activated:
• A setting in user line view is applied only to the user line. A setting in user line class view is applied to all user lines of the class.
• A non-default setting in either view takes precedence over a default setting in the other view. A non-default setting in user line view takes precedence over a non-default setting in user line class view.
• A setting in user line view takes effect immediately and affects the online user. A setting in user line class view takes effect only for new login users. It does not affect online users.
Examples
# Set the CLI connection idle-timeout timer to 15 minutes in VTY line class view.
<Sysname> system-view [Sysname] line class vty
# In AUX line class view, configure character s as the shortcut key for starting a terminal session.
<Sysname> system-view [Sysname] line class aux
[Sysname-line-class-aux] activation-key s [Sysname-line-class-aux] quit
# In AUX line view, restore the default shortcut key for starting a terminal session.
[Sysname] line aux 0
[Sysname-line-aux0] undo activation-key
Alternatively:
[Sysname-line-aux0] activation-key 13
To verify the configuration:
1. Exit the console session.
[Sysname-line-aux0] return <Sysname> quit
2. Log in again through the AUX line. The following message appears:
Press ENTER to get started. 3. Press Enter.
Pressing Enter does not start a session.
4. Enter s.
A terminal session is started.
<Sysname>
Related commands
line
lock
Use lock to lock the current user line. This method prevents unauthorized users from using the user line.
Syntax
lock
Default
By default, the system does not lock any user lines.
Views
User view
Predefined user roles
network-admin
Usage guidelines
This command is not supported in FIPS mode.
After executing the lock command, enter the password for unlocking the user line and confirm the password by entering it again.
Examples
# Lock the current user line and then unlock it.
<Sysname> lock
Please input password<1 to 16> to lock current line: Password:
Again:
locked !
// The user line is locked. To unlock it, press Enter and enter the password:
Password: <Sysname>
parity
Use parity to specify a parity check mode. Use undo parity to restore the default.
Syntax
parity { even | mark | none | odd | space }
undo parity
Default
The setting is none, and no parity check is performed.
Views
User line view
Predefined user roles
network-admin
Parameters
even: Performs even parity check.
mark: Performs mark parity check.
none: Disables parity check.
odd: Performs odd parity check.
space: Performs space parity check.
Usage guidelines
This command is not supported in VTY line view.
The configuration terminal and the device must be configured with the same parity check mode to communicate.
Examples
# Configure user line AUX 0 to perform odd parity check.
<Sysname> system-view [Sysname] line aux 0
protocol inbound
Use protocol inbound to enable a user line to support Telnet, SSH, or both protocols. Use undoprotocol inbound to restore the default.
Syntax
In non-FIPS mode:
protocol inbound { all |ssh | telnet }
undoprotocol inbound
In FIPS mode:
protocol inboundssh undoprotocol inbound
Default
In non-FIPS mode, both protocols are supported. In FIPS mode, SSH is supported.
Views
VTY line view, VTY line class view
Predefined user roles
network-admin
Parameters
all: Supports both protocols.
ssh: Supports SSH only.
telnet: Supports Telnet only.
Usage guidelines
A protocol change does not take effect for current online users. It takes effect only for new login users.
Before configuring a user line to support SSH, set the authentication mode to scheme for the user line. For more information, see authentication-mode.
This command is available in both VTY line view and VTY line class view. In VTY line view, this command is associated with the authentication-mode command. If you specify a non-default value for only one of the two commands in VTY line view, the other command uses the default setting, regardless of the setting in VTY line class view.
Examples
# Enable user lines VTY 0 through VTY 4 to support only SSH.
<Sysname> system-view [Sysname] line vty 0 4
[Sysname-line-vty0-4] authentication-mode scheme [Sysname-line-vty0-4] protocol inbound ssh
# Enable SSH support and set the authentication mode to scheme in VTY line class view. Enable user lines VTY 0 through VTY 4 to support all protocols and disable authentication for the user lines.
<Sysname> system-view [Sysname] line class vty
[Sysname-line-class-vty] protocol inbound ssh [Sysname-line-class-vty] line vty 0 4
[Sysname-line-vty0-4] authentication-mode none
To verify the configuration:
1. Telnet to the device.
<Client> telnet 192.168.1.241 Trying 192.168.1.241 ... Press CTRL+K to abort
Connected to 192.168.1.241 ...
****************************************************************************** * Copyright (c) 2010-2015 Hewlett-Packard Development Company, L.P. * * Without the owner's prior written consent, * * no decompiling or reverse-engineering shall be allowed. * ******************************************************************************
<Server>
You are logged in without authentication.
2. Display online CLI user information.
<Server> display users
Idx Line Idle Time Pid Type + 50 VTY 0 00:00:00 Jan 17 15:29:27 189 TEL
Following are more details. VTY 0 :
Location: 192.168.1.186 + : Current operation user.
F : Current operation user works in async mode.
The output shows that you are using VTY 0. The configuration in user line view is effective.
screen-length
Use screen-length to set the maximum number of lines to be displayed on a screen. Use undo screen-length to restore the default.
Syntax
screen-lengthscreen-length undo screen-length
Default
Up to 24 lines are displayed on a screen.
Views
User line view, user line class view
Predefined user roles