P/N 22130-M10-01 Rev. B
3D Systems Inc.
3D Lightyear
SLA File Preparation Software
User's Guide
Software Version 1.0
This User's Guide (the Guide) is licensed to the User for an indefinite period, subject to recall by 3D Systems, (3D) at any time upon return of any fees paid by the User at the time of receipt of this Guide. The Guide at all times remains the property of 3D. The information contained in this Guide is confidential to 3D and may not be given to anyone outside the recipients (Users) company. Furthermore, this Guide may not be copied or repro-duced in any form whatever.
3D makes no warranties which extend beyond the descriptions contained in this Guide, and NO warranty of merchantability in respect to the equipment, machinery, systems and products derived or resulting hereunder. The User assumes all risks and liability for results obtained by the use or implementa-tion of the software described herein, whether used singly or in combinaimplementa-tion with other designs or products. 3D makes no warranty that the equipment, machinery, systems and products derived or resulting from the software licensed to the user by 3D hereunder will not infringe the claims of domestic or foreign patents. Except for the negligence of 3D, its agents, representa-tives or employees, user shall protect, indemnify and save harmless 3D of and from any loss, cost, damage or expense arising from any claim that is in any way associated with the software described in this guide. 3D shall not be liable for any special or consequential damages.
Data presented in examples do not necessarily reflect actual test results and should not be used as design criteria.
By acceptance of this Guide, the User agrees to the above conditions and further agrees to comply with the Export Control Regulations of the United States of America.
The following are trademarks of 3D Systems: SLA 190, SLA 250, SLA 350, SLA 500, SLA 3500 SLA 5000, SLA 7000, and 3D.
Windows, Windows NT and MS-DOS are registered trademarks of Microsoft Corporation.
Copyright © 1999 3D Systems All Rights Reserved.
Table of Contents i
3D Lightyear SLA File Preparation Software User's Guide
Table of Contents
What is Stereolithography?...xiii
Introducing 3D Lightyear SLA File Preparation Software... ... 1
What is 3D Lightyear Software? ... 1
Whats New in this Version of 3D Lightyear Software? ... 6
Standard and Advanced Licenses ... 7
The Standard License ... 8
The Advanced License ... 8
Getting Started... 9
Symbols and Conventions Used in this Guide ... 10
Notes, Cautions, and Warnings ... 10
Procedures ... 10
User Input and Program Texts ... 10
Control Functions ... 11
Getting Help While Using 3D Lightyear Software... 11
Installing the Software ... 12
Before You InstallSpecifying Your Workstation(s) ... 12
Memory and Performance ... 15
A Note Regarding your Network ... 16
The Installation Procedure ... 16
Obtaining and Installing Your 3D Lightyear Software License... 25
Testing the InstallationRunning the 3D Lightyear Program for the First Time .... 30
Getting Help ... 34
Getting Help Directly from 3D Systems ... 35
Turn to 3D Systems Education Department for even more help... ... 36
3D Lightyear Software Workspace Overview ... 37
The Main Workspace ... 37
Program Title Bar ... 38
Pull-Down Menus ... 39
The File Menu ... 39
The Edit Menu ... 40
The View Menu ... 41
The Tools Menu ... 42
The Build Menu... 42
The Help Menu ... 43
ii Table of Contents
3D Lightyear SLA File Preparation Software User's Guide
Toolbars and Dialog Bars ... 43
Main Toolbar ... 44
Edit Toolbar ... 45
Tools Toolbar ... 46
Build Toolbar ... 47
Selection Dialog Bar ... 48
View Dialog Bar ... 48
Display Dialog Bar ... 49
Status Bar ... 49
Platform/Part Display Area ... 50
Quick Start: Step-by-Step ... 51
Loading and Viewing an STL File ... 51
Setting Up a New Platform ... 58
Machine Name ... 59
Machine Type... 60
Blade Type ... 61
Resin ... 61
Build Extents ... 61
Shrink Compensation (only for 190/250 users) ... 61
Laser Line Width/Beam Width ... 62
Units ... 62
Build Style ... 63
Layer Thickness... 64
Orienting Parts on the Platform: Translation and Rotation... 66
Why Orient Parts? ... 66
Selecting Parts ... 67
Translating Parts ... 68
Rotating a Part ... 70
The Undo Function ... 72
Verifying the Integrity of STL Files ... 73
Creating Supports ... 76
What are Supports? ... 76
What are Support-Generating Styles? ... 79
Generating the Supports ... 79
Saving Your Work ... 82
Preparing the Build File(s) ... 83
The Prepare Function ... 83
Stop, Pause, Resume Prepare ... 86
Completing the Prepare Process ... 87
Table of Contents iii
3D Lightyear SLA File Preparation Software User's Guide
Advanced Preparation Concepts and Techniques ... 89
Modifying the Build Parameters ... 89
Why Change Parameters? ... 89
Modifying Build Styles ... 90
Add... 90
Delete ... 93
Edit... 94
Copy ... 94
Paste ... 94
Paste on all selected parts ... 94
Save As ... 94
Linewidth Compensation ... 94
Auto Calculate Z Correction... 95
Layers ... 95
SFP comp ... 95
High Resolution Spatial Tolerance ... 95
Additional Borders ... 95
Multiple Border Offset ... 95
Minimum Width for Fills ... 96
SLA 7000 and SLA 190/250: Differences in the Modify Build Styles Dialog ... 96
Edit Parameters ... 98
Modifying Recoat Styles ... 108
Add... 108
Delete ...110
Edit... 111
Copy ... 113
Paste ... 113
Save As ...113
Creating Custom Build Styles ...114
Using the Styles Wizard to Select Style Files ... 114
Editing Supports ...116
Why Should I Edit Supports? ...116
Anatomy of a Support...116
Regions ... 116
Sierras and Separators ...116
Braces ... 118
Scaffolds ... 120
Gussets ... 121
Flag Supports ... 122
Deciphering SRG file names ... 123
Determining Whether Supports Need Editing ... 124
Getting a Better Look at the Supports While Editing... 125
Changing and Saving the Construction of "Supports" ... 128
What is Meant by the "Default Build Styles will be Assigned" Warning? ... 139
iv Table of Contents
3D Lightyear SLA File Preparation Software User's Guide
Adding and Deleting SupportsCustom Draw ... 140
The Main Custom Draw Workspace ... 141
Using the Custom Draw Interface... 142
Loading Regions into the Custom Draw Workspace ... 143
Using the Region List in Custom Draw ... 144
Changing the View of the Workspace in Custom Draw ... 145
Drawing Functions ... 146
Selection Functions ... 149
Editing Functions ... 150
Saving Changes and Restoring Original Values ... 152
Techniques for Quicker Editing of Supports. ... 153
Customizing the User Interface ... 153
Why Translating Parts Makes Their Supports "Invalid" for Editing ... 153
Importance of the Minimum Support Angle Setting ... 154
The Regions List box ... 155
Using the Orienting Tools to Optimize Build Speed ... 156
How Does Part Orientation in the Z Axis Affect a Build? ... 158
Build Time and Part Orientation in the X and Y Axes ... 158
Tools for Increasing Part Accuracy ... 161
Shrink Compensation ... 161
Determining the Correct "Beam Width" Setting ... 161
What are "Laser Beam Width" and "Line Width Compensation"? ... 161
High Resolution Spatial Tolerance Check Box ... 162
Minimum Z Height ... 162
What is Correct Minimum Z Height? ... 162
The Safe Sweep Zone... 164
Changing the Minimum Z Height Setting ... 164
Viewing and Getting Information on Layers of a Sliced Object ... 164
Viewing and Getting Information on Triangles in an STL File ... 166
Viewing and Getting Information on Part Properties ... 167
Part Loading Options ... 168
Using the Reference Plane ... 169
Using Other 3D Lightyear Software Tools and Functions ... 171
Using the Trackball and Mouse to Change the Views in the Workspace ... 171
The "Print" Function ... 172
Copy Selected Parts ... 172
Delete Selected Parts ... 174
Translate Selected Parts ... 174
Rotate Selected Parts ... 175
Scale Selected Parts ... 175
Mirror Selected Parts ... 176
The "Change Units" Function ... 177
Make Downfacing or Upfacing Plane ... 178
Table of Contents v
3D Lightyear SLA File Preparation Software User's Guide
Pick and Point ... 178
Working with the View Parameters ... 179
Changing the Color of Your Workspace Display ... 179
Light Intensity and Position ... 180
Setting Your View Preferences ... 181
Setting the Display Parameters for Parts ... 182
Setting the Display Parameters for Supports ... 184
Keeping Track of the Axes Orientation ... 185
Saving Current View Settings ... 186
Zooming the View of Your Workspace In and Out ... 187
Using Other Tools to Change the View of Your Workspace ... 188
Using QuickCast ... 191
What is QuickCast, and How Do I Use It?... 191
QuickCast-Specific Parameters ... 191
What are Vents and Drains, and How are they implemented in QuickCast? ... 193
Modifying the Default Vents and Drains ... 197
How the QuickCast Pattern is Used in a Foundry ... 200
Other QuickCast Considerations ... 201
The Importance of Surface Finish ... 201
The Significance of Holes... 202
Testing for Surface Leaks ... 202
Reference Topics ... 203
Block Mnemonics and Vectors ... 203
Vector or .v Files ... 205
Layer Hatches ... 206
Fills ... 206
Anatomy of an STL File ... 206
STL Format ... 206
Normals ... 207
How Verify Fixes Problem STL Files... 210
Problem STLs - What if Verify is Unable to Repair Them? ... 212
3D Lightyear Software Files... 213
Files that Can Be Opened and Viewed with 3D Lightyear Software ... 213
Files that Are Created by 3D Lightyear Software ... 213
More About the Platform File ... 215
Keyboard Shortcut Mnemonics ... 217
Restricted Areas of the Build Platform ... 218
Glossary ... 219
Build Style Tables ... 222
Index... 229
vi Table of Contents
3D Lightyear SLA File Preparation Software User's Guide
List of Figures vii
3D Lightyear SLA File Preparation Software User's Guide
List of Figures
Figure 1. Stereolithography in the Product Development Process ... 2
Figure 2. Stereolithography Process Flow ... 3
Figure 3. Accessing Windows Facility for Installing New Software. ... 18
Figure 4. Click “Install”, then “Next”, then “Browse” (if necessary) to find the installation program for 3D Lightyear ... 19
Figure 5. The 3D Lightyear software Setup Program automatically installs the program on your PC’s hard disk drive. ... 20
Figure 6. Read the last-minute, release-specific notes on screen during the installation process. ... 20
Figure 7. The Setup Program prompts you for the directory in which you would like the 3D Lightyear program sub-directory to reside. ... 21
Figure 8. Choose between the Typical (default), the Compact, or the Custom program installation. ... 21
Figure 9. The 3D Lightyear software setup displays progress messages as it installs. ... 23
Figure 10. When the 3D Lightyear program has “installed itself” successfully, you see this message. ... 24
Figure 11. Open a DOS window to start the process of obtaining a license for 3D Lightyear software. ... 26
Figure 12. Using the “cd” command to change directories to “bin”. ... 27
Figure 13. The “lmutil lmhostid” command queries your PC for an identification code. ... 28
Figure 14. You obtain your software license on line via 3D Systems’ Corporate Website. ... 29
Figure 15. Starting the 3D Lightyear program. ... 31
Figure 16. The 3D Lightyear License Manager prompts you to locate the License file for your workstation. ... 31
Figure 17. Use your system’s browser to locate your license file. ... 32
Figure 18. Save the location of your License File. ... 33
Figure 19. Following a momentary display of the program’s “Splash Screen”, the software opens into the main program workspace. ... 34
Figure 20. An example of 3D Lightyear’s Main Workspace upon launching the Program .... 37
Figure 21. The 3D Lightyear Software Graphical Overview ... 38
Figure 22. Program Title Bar ... 38
Figure 23. Pull-Down Menus ... 39
Figure 24. The File Menu ... 39
Figure 25. The Edit Menu ... 40
Figure 26. The View Menu ... 41
Figure 27. The Tools Menu ... 42
Figure 28. The Build Menu ... 42
Figure 29. The Help Menu ... 43
viii List of Figures
3D Lightyear SLA File Preparation Software User's Guide
Figure 30. Main Toolbar ... 44
Figure 31. Edit Toolbar ... 45
Figure 32. Tools Toolbar ... 46
Figure 33. Build Toolbar ... 47
Figure 34. Selection Dialog Bar ... 48
Figure 35. View Dialog Bar ... 48
Figure 36. Display Dialog Bar ... 49
Figure 37. Status Bar ... 49
Figure 38. 3D Lightyear Software Part Viewing and Display Area ... 50
Figure 39. 3D Lightyear 1.00 Menu ... 52
Figure 40. Open File Dialog ... 53
Figure 41. 3D Lightyear Workspace with Turbine Part ... 54
Figure 42. Options Menu, Show Points ... 57
Figure 43. Part Properties Dialog ... 58
Figure 44. Step 1: Machine Setup Wizard Dialog ... 59
Figure 45. Machine Setup Wizard, Units ... 62
Figure 46. Step 3: Machine Setup Wizard, Build Styles ... 63
Figure 47. Step 4: Machine Setup Wizard, Layer Thickness ... 64
Figure 48. New Platform Configuration Dialog ... 64
Figure 49. 3D Lightyear Workspace with Platform ... 65
Figure 50. Select Parts Dialog ... 67
Figure 51. Translate Selected Parts dialog ... 69
Figure 52. Rotate Selected Parts dialog ... 71
Figure 53. Part Rotated Off Platform, rendered in Red ... 72
Figure 54. Verify STL Dialog ... 74
Figure 55. Example of Verification ... 75
Figure 56. Supports ... 76
Figure 57. Supports and Anchoring ... 77
Figure 58. Overhangs ... 78
Figure 59. Create Supports Dialog ... 79
Figure 60. Build Platform (one part with Supports, and one without) ... 81
Figure 61. All modifications done to parts will be saved ... 84
Figure 62. Save As (Platform Files) Dialog ... 85
Figure 63. Information Dialog Bar (Prepare Completed Successfully) ... 87
Figure 64. Prepare has been completed successfully ... 87
Figure 65. Modify Build Styles Dialog (SLA 5000) ... 91
Figure 66. Add Build Style Dialog. ... 91
Figure 67. Select Part Build Style Window ... 92
Figure 68. Add Build Style Dialog Box With Added Build Style ... 92
Figure 69. “Start Z:” / “Stop Z:” Range ... 92
Figure 70. Modify Build Styles Dialog with Added Build Style ... 93
Figure 71. Modify Build Styles Dialog, SLA 7000 only ... 97
List of Figures ix
3D Lightyear SLA File Preparation Software User's Guide
Figure 72. Modify Build Styles Dialog, SLA 190/250 only ... 98
Figure 73. Build Style Parameters Dialog, Standard SLA 7000 users only) ... 99
Figure 74. Build Style Parameters Dialog, Standard SLA 350, 500, 3500, and 5000 users 100 Figure 75. Build Style Parameters Dialog, Standard SLA 190 and 250 users ... 100
Figure 76. Build Style Parameters Dialog, Advanced SLA 7000 users ... 101
Figure 77. Build Style Parameters Dialog, Advanced SLA 190, 250, 350, 500, 3500, and 5000 users ... 101
Figure 78. Hatch Parameters, Standard SLA 7000 users ... 102
Figure 79. Fill Spacing Parameters, Standard SLA 7000 users ... 102
Figure 80. Hatch Parameters, Standard SLA 190, 250, 350, 500, 3500, and 5000 users ... 102
Figure 81. Fill Spacing Parameters, Standard SLA 190, 250, 350, 500, 3500, and 5000 users ... 103
Figure 82. Hatch Parameters, all Advanced users ... 104
Figure 83. Fill Spacing Parameters, all Advanced users ... 106
Figure 84. Border Overcure Parameters, all Advanced users ... 107
Figure 85. Modify Recoat Styles Dialog ... 108
Figure 86. Add Recoat Style Dialog Box ... 109
Figure 87. Select Part Recoat Style Window ... 109
Figure 88. Add Recoat Style Dialog with Added Recoat Style ... 110
Figure 89. “Start Z:” / “Stop Z:” Recoat Range ... 110
Figure 90. Modify Recoat Styles Dialog with Added Recoat Style ... 110
Figure 91. Recoat Style Parameters Dialog, SLA 350, 500, 3500, 5000, and 7000 users .... 111
Figure 92. Recoat Style Parameters Dialog, SLA 250 users ... 112
Figure 93. New Platform Configuration Dialog ... 115
Figure 94. Sierras and Separators ... 117
Figure 95. Support Braces ... 119
Figure 96. Cube Part, with and without Scaffold Supports ... 121
Figure 97. Gusset Supports ... 122
Figure 98. Deciphering SRG File Names ... 123
Figure 99. Getting a Better Look at Supports ... 126
Figure 100 Regions, Supports, and Part Display Settings ... 127
Figure 101. Options Dialog (Viewing Tab) ... 127
Figure 102. Build Style Warning ... 128
Figure 103. Edit Supports Dialog ... 129
Figure 104. Edit Support Parameters Dialog Box (Attachment Tab) ... 131
Figure 105. Edit Support Top Parameters ... 132
Figure 106. Edit Support Bottom Parameters ... 133
Figure 107. Edit Support Parameters Dialog (Basic Tab) ... 133
Figure 108. Edit Support Parameters Dialog Box (Gusset Tab) ... 135
Figure 109. Edit Support Parameters Dialog Box (Other Tab) ... 137
Figure 110. 3D Lightyear software (Warning) ... 139
Figure 111. Custom Draw Interface and Workspace ... 141
Figure 112. Boundary Lines ... 142
x List of Figures
3D Lightyear SLA File Preparation Software User's Guide
Figure 113. Support Points ... 143
Figure 114. Region List Box in Custom Draw ... 144
Figure 115. The supports may become invalid (Warning Box) ... 154
Figure 116. Create Supports Dialog with Minimum Support Angle ... 154
Figure 117. Regions List Box ... 156
Figure 118. Options Dialog Box ... 160
Figure 119. Options Dialog Box (Other tab) ... 160
Figure 120. Line Width Compensation ... 162
Figure 121. Layer Display Box ... 165
Figure 122. Selected Triangle Properties Display Box ... 166
Figure 123. Part Properties Display Box ... 167
Figure 124. Options Dialog Box (Parts Loading Tab) ... 169
Figure 125. Trackball Cursor ... 171
Figure 126. Copy Selected Parts Dialog ... 173
Figure 127. Original and two copies of the Turbine Blade ... 173
Figure 128. Confirmation/Unload Selected Parts? ... 174
Figure 129. Translate Selected Parts Dialog ... 174
Figure 130. Rotate Selected Parts Dialog ... 175
Figure 131. Scale Selected Parts Dialog ... 176
Figure 132. Mirror Selected Parts Dialog ... 176
Figure 133. Mirrored Copy of Turbine Blade on Right ... 177
Figure 134. Proceed? Box ... 178
Figure 135. Options/Color Dialog ... 179
Figure 136. Color Dialog ... 180
Figure 137. Light Properties Dialog ... 181
Figure 138. View Pull-down Menu (Preferences) ... 181
Figure 139. View Pull-down Menu (Part Display) ... 183
Figure 140. Part Display Preference dialog bar ... 184
Figure 141. View Pull-down Menu (Supports Display) ... 185
Figure 142. Platform Orientation Indicator ... 186
Figure 143. Save View As Dialog ... 186
Figure 144. Select Saved Views ... 187
Figure 145. Other Tools to Change the View ... 188
Figure 146. The Options Button is Here ... 189
Figure 147. Options Dialog (Viewing Tab) ... 189
Figure 148. QuickCast Parameters Dialog, Advanced Users ... 192
Figure 149. QuickCast Parameters Dialog, Standard Users ... 192
Figure 150. Vents and Drains Dialog ... 195
Figure 151. Vents and Drains Check Boxes ... 195
Figure 152. Vents and Drains Dialog ... 198
Figure 153. Vents and Drains Check Boxes ... 198
Figure 154. QuickCast Radius Dialog ... 199
Figure 155. Layer Display Dialog ... 203
Figure 156. Normals ... 208
List of Figures xi
3D Lightyear SLA File Preparation Software User's Guide
Figure 157. Example of the Right-Hand Rule ... 209
Figure 158. Example of the Vertex-to-Vertex Rule ... 210
Figure 159. Status Bar ... 215
Figure 160. Workspace Displaying Build Extents ... 220
Figure 161. Showing a Parts Extents ... 221
Table 1. Specifying your PC Workstation for Using the 3D Lightyear Program ... 14
Table 2. Minimum Z Height ... 163
Table 3. SLA system 190 Build Styles ... 222
Table 4. SLA system 250 Build Styles ... 223
Table 5. SLA system 350/3500 Build Styles. ... 224
Table 6. SLA system 500 Build Styles. ... 225
Table 7. SLA system 5000 Build Styles. ... 226
Table 8. SLA system 7000 Build Styles. ... 227
xii List of Figures
3D Lightyear SLA File Preparation Software User's Guide
This page has been left blank intentionally.
Preface: Stereolithography Defined xiii
3D Lightyear SLA File Preparation Software Users Guide
What is Stereolithography?
From stereo, for three-dimensional, and lithography, for printing, stereolithog-raphy is literally three-dimensional printing. It is the term used to describe 3D Systems patented fabrication process that prints three-dimensional, solid objects by solidifying liquid plastic using a computer-directed, ultraviolet (UV) laser beam to cure successive layers of photo-sensitive polymer resin in a vat.
The process builds three-dimensional solids from the bottom up, layer by layer. As each layer is created and super-imposed on the layer underneath, a solid object in the shape of a three-dimensional part is created, the origina-tion of which typically occurs in a separate, computer-based modelling application such as CAD, CAM, or CAE.
Developed in 1987 by the founder of 3D Systems, stereolithography was the first commercially available layer-additive process to enable rapid fabrication of objects culled directly from Computer-Aided Design databases.
Today, 3D Systems offers an extensive line of stereolithography machines called SLAsas well as ThermoJet thermopolymer-based Solid Object Printers. Our products and services are used by marketing professionals, purchasing departments, engineering groups, research and development efforts, and design and testing teams all over the world...to turn their CAD, CAM, CAE designstheir IDEASinto solid, tangible, plastic objects.
xiv Preface: Stereolithography Defined
3D Lightyear SLA File Preparation Software Users Guide This page has been left blank intentionally.
Introduction 1
3D Lightyear SLA File Preparation Software User’s Guide
Introducing 3D Lightyear SLA File Preparation
Software...
a quantum leap forward in the ease, efficiency, and reliability of
preparing solid models for fabrication on 3D Systems SLA series of
stereolithographic solid imaging systems.
What is 3D Lightyear Software?
3D Lightyear is a software application for preparing specially-formatted computer image files for export to, and fabrication on stereolithographic, or SLA machines. In its most elementary characterization, 3D Lightyear
software is used to prepare STL and SLC three-dimensional model repre-sentations into build files that can be built on a SLA solid imaging system. It comprises the requisite second phase of the three-phase process for turning ideas on your computer workstation into tangible, three-dimensional, plastic parts.
The 3D Lightyear software application for stereolithography file preparation runs on workstations operating under the Microsoft Windows NT operating system. Working with all of our stereolithography machines (SLA solid imaging systems), as well as our newest, flagship, the SLA 7000,
3D Lightyear software builds on the powerful functionality of its predecessor, 3D Systems Maestro, by adding many convenient features such as:
A unified, graphical user interface
Drag and Drop object positioning in the workspace Significantly faster STL file verification
Improved overall performance (greater throughput) Many times smaller BFF build files
3D Lightyear software is an integral part of the 3D Systems solution for turning your ideas into solid, three-dimensional objects using our patented stereolithography systems. Figure 1 illustrates the position of
stereolithography in the product development process.
2 Introduction
3D Lightyear SLA File Preparation Software User’s Guide
Figure 1. Stereolithography in the Product Development Process
It Begins with an Idea...
...Your idea. Perhaps it is an idea for a part, or the model for something that your company could manufacture; some small piece of a housing or tubing that fits into some other part of a larger machine. Perhaps you envision some new design for a housing, or a fan blade, or a fitting, a bushing, an armature, a wheel or cog, or even blister-type packagingit could be almost anything. It starts, however, as an idea and the flat, two-dimensional phosphors representing that idea on your design workstation.
Wouldnt it be nice if you could actually install your idea in the place where you think it should go? What if you could test it in its final assembly, hold it up to the light, pass it around to your colleaguesturn it over in your hand?
Introduction 3
3D Lightyear SLA File Preparation Software User’s Guide
It Continues with 3D Lightyear software...
which turns STL files into SLA build files. It comprises the preparatory phase of the process for building your ideas as solid, physical objects using stere-olithography. Once you have taken your design to the point where you are ready to fabricate it on your stereolithography machine you must pre-process it using 3D Lightyear software. Figure 2 illustrates that process.
Figure 2. Stereolithography Process Flow
4 Introduction
3D Lightyear SLA File Preparation Software User’s Guide
NOTE!
Build files produced by 3D Lightyear software, in their BFF form, are used by 3D Systems larger platform SLA
machines, the SLA 350, SLA 500, SLA 3500, SLA 5000, and the SLA 7000. Build file output for the smaller, SLA 190 and SLA 250 machines, takes the form of a suite of files consisting of filename.v, filename.r, filename.l, and
filename.prm.
BFFs created with 3D Lightyear software are compatible with 3D Systems Buildstation 5.0SLA Control software
ONLY. The .v, .r, .l, and .prm output file suite is compatible with version 3.8.3 (or later) of the SLA 190 and SLA 250 SLA Control software.
Beyond its most simple characterization, 3D Lightyear software offers several tools, and performs several prerequisite functions to optimize your part(s) to, in turn, make building them on your SLA system as efficient as possible.
Use it to:
Verify that your STL file (your model) is properly formatted, and to automatically perform rudimentary repairs to the format
Orient your part for optimum building resolution
Scale, rotate, and/or move your part around on 3D Lightyear
softwares virtual build platform; generate multiple and/or mirror-image copies of it, if desired
Create and edit support structures for your part to help preserve its geometry during the build process (these will be removed during the finishing process, after building on an SLA system.)
Create and edit the position of vents and drains on your part, an optional task, to facilitate the removal of liquid resin that would otherwise be trapped in the interior during a build with the
QuickCast build style. (For more information, refer to the section on QuickCast, later in this guide.)
Introduction 5
3D Lightyear SLA File Preparation Software User’s Guide
Once on the SLA machine, the filesthe prepared and style-embellished data that constitutes the stereolithographic facsimile of your original, three-dimensional imagesare ready for 3D printing.
Then, the SLA Solid Imaging System Fabricates Your Idea
We make an extensive line of stereolithographic, three-dimensional fabrica-tion machines as well as solid object printers. Depending upon their frame size, our SLA systems use either BFFs (for large-frame machines) or the four-file suite (for the smaller frame SLA 190 and SLA 250-series) output by
3D Lightyear software to create highly accurate, three-dimensional parts from your three-dimensional image files.
We also offer a wide variety of resin polymers for use in our SLA machines, each with unique capabilities and characteristics that allow you to use your finished parts in applications like our own 3D Keltool® and other intermediate
tooling processes, investment casting, and room-temperature vulcanization (RTV), Direct-AIM, etc.
Talk with your 3D Systems Sales representative, log on to the 3D Systems site on the World-Wide Web, or call 3D Systems directly for information on our techniques, products, and expertise in:
Assign style parameters to your part; these are the receptacles for the build parameters that will be associated with your part while it is being fabricated on the SLA system
And finally, slice your part, creating the actual build file (or, as appropriate, the .v, .r, .l, .prm file suite) that is used by 3D Systems SLA solid imaging systems to print your part in three dimensions
File Formatsof STLs, and BFFs
Most commercial CAD, CAM, CAE and/or surface- or solid-rendering appli-cations output files in STL format. 3D Lightyearsoftware reads STL files and, after performing a series of pre-processing functions, generates 3D Systems proprietary Build-Files (BFFs).
These BFFs are then ported to 3D Systems Windows-based SLA machines (SLA 7000, 5000, 3500, 500, and 350.)
6 Introduction
3D Lightyear SLA File Preparation Software User’s Guide
Specialty Resins from Ciba-Geigy (a 3D Systems partner) 3D Keltool®
Direct AIM
Advanced Building and Part Finishing
Whats New in this Version of 3D Lightyear
Software?
Version 1.0 marks the first iteration of 3D Systems SLA file preparation applications to accommodate the Windows NT operating system and Intel Pentium platform. Users of our older products migrating to the new platform will notice significant departures from the way the softwares predecessors worked.
Among the changes, each of which is covered in detail in this guide there is: A completely new, customizable interface (say good-bye to spread
sheets)
A Machine Set Up Wizard that guides you interactively through the process of setting up a 3D Lightyear software work session for the particular type of SLA machine upon which you intend to build parts A Styles interface to help you edit Build, Recoat, and Support Styles
while minimizing chances of jeopardizing your builds success A host of automated features including:
Part Placement
Align with Up- or Down-facing Plane Reload Part(s) after Verify
Convert from inches to mm and vice-versa
Real-time Pick and Point and Drag and Drop part translation and orienting capability
Print your workspace to any connected Windows-compatible 2D paper printer
Introduction 7
3D Lightyear SLA File Preparation Software User’s Guide
Save specific views of your workspace for subsequent quick access Display reference planes in the workspace to show the starting and
stopping places for Build and/or Recoating Styles Correct work mistakes with multiple levels of Undo Fully-integrated Support Generation and Editing tool suite STL and SLC thumbnail preview before opening
Pause/Resume Slice Keyboard Shortcuts
NOTE!
Refer to the 3D Lightyear Software Release Notes accom-panying your software package for a complete and detailed description of the all the new features and functions.
Standard and Advanced Licenses
We are trying to make your life easier. History has taught us that when a user encounters a problem with a part build on an SLA system, more often than not there has been implementation of some standard, non-approved technique, or some on-site modification to the 3D Systems-tested parameters and tools in the preparatory software. In earlier versions of our software, users couldand often didunknowingly institute practices and procedures in preparing their files that produced undesirable results includ-ing, in some cases, outright crashes of the build process. These problems, in turn, resulted in the customers loss of significant time and, accordingly, revenues.
Starting with this version, we have incorporated into the design of our user interface a new operational scheme designed to prevent inadvertent and ill-advised tweaking of SLA system build parameters by novice users.
8 Introduction
3D Lightyear SLA File Preparation Software User’s Guide
The Standard License
...is for users that are relatively new to, and inexperienced with stereo-lithography. The Standard User License is designed to make it more difficult to make a mistake when modifying Support Generation, Build, and/or Recoating Styles.
At the Standard level, users will find all of the tools and access to machine and preparation parameters they need to enable them to prepare and build the majority of their part(s).
Our team of highly skilled and experienced Software Development and Process Engineers have created, and continue to improve upon the param-eters in the default Support-Generation Styles, Build Styles, and Recoat Styles for both our existing line of SL Resins, and for new products offering enhanced performance capabilities. The Standard license level provides guidance that helps users to avoid venturing into uncharted waters that can lead to problems and frustrations on the SLA Buildstation.
The Standard User License is available as part of the default installation of
3D Lightyear software.
The Advanced License
...is for those users who have adequate experience and/or knowledge of the stereolithographic process to understand the requirements for preparing parts for healthy, successful builds on their SLA machines.
At the Advanced level, the degree of access to parameters allows signifi-cantly greater latitude in the creation of custom styles. This is to accommo-date site- and/or part-specific circumstances that cannot otherwise be addressed without intimate knowledge of what goes on in the vat of their SLA machine.
To qualify for an Advanced User License at your site, there must be at least one user who has attended 3D Systems Advanced Training class, or has three years of part building experience on 3D Systems SLA machines.
Getting Started 9
3D Lightyear SLA File Preparation Software User’s Guide
Getting Started
The purpose of this guide is to provide you with the information you need to:
Prepare your work environment for the installation of 3D Lightyear software. This section consists of a list of the specifications necessary for your workstations to comfortably load your three-dimensional model files and run the programs preparatory functions to produce BFFs (and/or .v, .r, .l, and .prm file suites).
Install3D Lightyear SLA File Preparationsoftware on your Windows NT workstations, and obtain the necessary license(s) from 3D Systems
Use the program in a Quick Start mode that will have you preparing parts in as little time as possible
With the preceding goals in mind, we have organized this booklet as follows:
Using this GuideThis section describes the methods we use to convey instructions and information in printed texts and illustrations in this guide. Also included is an overview of our technical support, online help, and online context-sensitive help systems.
Preparing Your Work Environmentand Installing the Software This list of workstation specifications describes the type of
Windows NT workstation and network you will need in order to run
3D Lightyear software efficiently. Once certain that you have
configured the optimum hardware and operating environment, turn to this section for instructions on running the program that installs
3D Lightyear software on that workstations hard disk, and what you need to do to license your installation with 3D Systems.
Obtaining and Installing Your 3D Lightyear Software License
This section guides you through a series of steps to obtain the HostID from your workstation which you will use to obtain your license file(s) from 3D Systems internet website.
10 Getting Started
3D Lightyear SLA File Preparation Software User’s Guide
Symbols and Conventions Used in this Guide
Notes, Cautions, and Warnings
This symbol calls attention to a NOTE, CAUTION, or WARNING.
When it appears with a NOTE, the texts or illustrations call attention to a practice or condition that can save time or prevent inconvenience to the user.
When it appears with a CAUTION, the texts or illustra-tions call attention to a practice or condition that risks damage to equipment (or in the case of software, malfunc-tion).
Finally, when the symbol appears with a WARNING, the accompanying condition or practice risks injury to person-nel.
Procedures
Instructions, i.e. the tasks or steps that constitute formalized procedures, are numbered, and appear in a distinct type face.
Here is an example:
1. Click the Windows NT Start button, and choose Programs, then 3D Lightyear 1.00 to start the
program.
2. Pull down the File menu in the menu bar at the top of
the screen, and select Open.
User Input and Program Texts
All references to texts that appear on your computer screen, either within the
3D Lightyear software, within Windows NT, or within a Command Prompt window, appear in a distinct typeface and are set off by quotation marks. Refer to the preceding passage for examples.
Getting Started 11
3D Lightyear SLA File Preparation Software User’s Guide
When you, the user, have to enter specific texts (alphabetic or numeric), the area and instructions for it are enclosed in brackets.
Here is an example:
1. At the c:\ prompt, type: [ping], a space, and the
TCP/IP address of your SLA machine. For example:
“c:\ping 206.65.88.228”
Control Functions
Specific keystrokes (as opposed to specific texts)i.e., instructions to hold down combinations of keyboard keys to execute commands or functions appear in a distinct typeface and are enclosed by the symbols: < and >
Here is an example:
1. Hold down <Ctrl> and <Alt>, and press <Enter>.
Getting Help While Using 3D Lightyear Software
The 3D Lightyear Online Users Guide is another name for the programs online help systema kind of virtual users guide from which you can call for help and information at any time, from anywhere while using the program.
Mouse Power!
There are four ways to get information and help on the use of 3D Lightyear software from within the program itself:
1. Move the cursor over any graphical element on the screen and hold it there. After a brief pause, an encapsulized definition of the element over which you are hovering will pop up in a small window next to the on-screen cursor.
In some dialogs, this action will display the applicable range of input values for the field for which you are seek-ing help.
2. Press the <F1> function key at any time. The opening page of the online guide will appear in a separate window. 3. If you are working in the 3D Lightyear softwares main
workspace (as opposed to the Custom Draw workspace), you can also access Help by clicking the Help...
12 Getting Started
3D Lightyear SLA File Preparation Software User’s Guide
icon located in the toolbar at the top of the screen. 4. Pull down the Help menu at the top of the main
workspace and select Help Topics....
NOTE!
In addition to running concurrently with the program itself, the 3D Lightyear Online Users Guide also functions as a stand-alone application. This allows you to launch and run the guide by itself, separate from the 3D Lightyear program. You may find this useful when allocating disk space on your workstation.
We hope that you will come to view this feature of the 3D Lightyear program as a comprehensive complement to the products printed documentation. Together with its built-in, context-sensitive features it should significantly shorten your learning curve.
Installing the Software
The 3D Lightyear software installation CD includes an automated setup routine that you can run from within Windows Add/Remove Software facility. During installation, this setup routine performs automatic checks on your system, asks a series of questions about how you want to configure the 3D Lightyear program, and, based on your answers to these questions, copies several files to your hard disk. It then decompresses the files, writes data to areas of your systems registry, and creates Windows shortcuts to the program for your Windows system Start menu.
Before You InstallSpecifying Your Workstation(s)
The following section of this guide describes the PC workstation and net-working environment you will need to be able to run 3D Lightyear SLA File Preparation software.
Getting Started 13
3D Lightyear SLA File Preparation Software User’s Guide
NOTE!
The 3D Lightyear program runs exclusively on Intel
Pentium workstations configured with Microsofts Windows NT operating system. Depending upon the physical size and geometric complexity of the part(s) you intend to prepare with this software, processing on the 3D Lightyear software workstation can tax memory and storage configu-rations that might be adequate for other purposes.
Keep in mind that SLA file preparation is but one, requisite step in the process of turning your three-dimensional designs into physical solids. The less time you have to spend at the preparatory workstation, the more cost effectively your Rapid Manufacturing or Rapid Prototyping system will be to operate.
With the preceding tenet in mind, it behooves you to set up a system consid-ering the following specifications as medianthat is, a system that will function adequately when preparing most files of the size (kilobytes or megabytes) with which you work routinely. It should be noted that, to arrive at these specifications, our team of Product Assurance Engineers tested the preparation of a variety of parts of arbitrarily-determined average file size and varying degrees of part geometry.
While it is known to be possible to prepare files on PCs with less memory and less powerful (slower) processors, we recommend investing a little more in your working environment to save time and aggravation later on. In fact, adding more system memory (RAM), video memory (VRAM), upgrading to an even more powerful processor, and increasing the size and available free space on your systems hard disk drive has been shown, in our tests, to have significant positive affects on performance and throughput.
14 Getting Started
3D Lightyear SLA File Preparation Software User’s Guide
NOTE!
While 3D Lightyear software is known to function minimally on workstations running Windows 95 and Windows 98, it should be noted that functions such as Verify and Prepare call Windows routines that are not supported by these operating systems. Running 3D Lightyear software with these operating systems and attempting to execute these functions will likely cause unpredictable results.
The following system has been tested, and is recommended by 3D Systems technicians as a good, mid-level platform for running the 3D Lightyear
program.
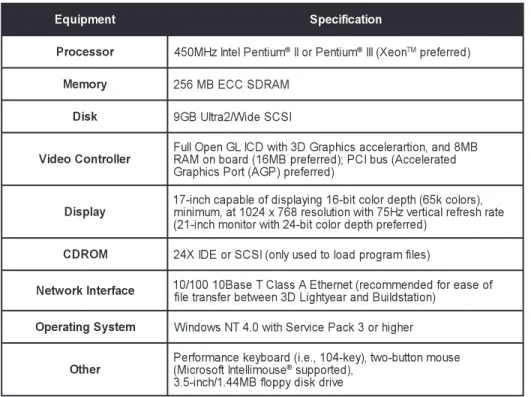
Table 1. Specifying your PC Workstation for Using the 3D Lightyear Program
t n e m p i u q
E Speciifcaiton
r o s s e c o r
P 450MHzIntelPenitum® IIorPenitum® III(XeonTMpreferred) y
r o m e
M 256MBECCSDRAM k
s i
D 9GBUlrta2/WideSCSI r e ll o r t n o C o e d i
V FRuAllMOponenboGaLrdIC(D16wMBtihp3rDefGerrraepdh;)icPsCaIcbcuesle(rAarccitoenle,raantedd8MB ) d e rr e f e r p ) P G A ( tr o P s c i h p a r G y a l p s i
D 1m7ini-inmcuhmca,apatb10le2o4fxd7is6p8lareiynsgol1u6ito-bntiwctiohlo7r5dHezptvher(6itc5aklcreolrfoerssh,)rate ) d e rr e f e r p h t p e d r o l o c ti b -4 2 h ti w r o ti n o m h c n i-1 2 ( M O R D
C 24XIDEorSCSI(onlyusedtoloadprogramflies) e c a f r e t n I k r o w t e
N 1f0lie/1rt0a0ns1f0eBrabesetwTeeCnla3sDsLAigEhtthyeeranertanr(decBoumlidmsetanditoend)foreaseof m e t s y S g n it a r e p
O WindowsNT4.0wtihSerivcePack3orhigher r
e h t
O (PMeicfrroormsoatfnIcnetekeillmyboousaerd®(s.iuep,.p1o0tr4e-dke,)y,)two-buttonmouse e v ir d k s i d y p p o lf B M 4 4 . 1 / h c n i-5 . 3
Getting Started 15
3D Lightyear SLA File Preparation Software User’s Guide
NOTE!
The following graphics accelerator cards have been tested by 3D Systems' engineering staff during development of the 3D Lightyear program:
Evans & Sutherland AGP Galaxy AGP Eclipse II
AGP Star II Tornado 3000.
While this information does not constitute an endorsement of these products, they were found to perform well with 3D Lightyear software, and to meet or exceed the requirements for Full Open GL compatibility. For more information on Evans and Sutherland products, consult their website at www.es.com. Note that during our beta testing of 3D Lightyear software, boards offered by other, third party manufacturers were successfully employed. In fact, we did not find any boards meeting the minimum requirements that did not work properly. When there were issues with a particular board, downloading the latest drivers from the manufacturers website resolved the issues. Consult the documentation that came with your video graphics accelerator card for information and support.
Memory and Performance
Most CAD applications require significantly more RAM, VRAM, and free disk space than the 3D Lightyear program. If, however, you are not using a CAD workstation, and are relying upon the specifications in this document to configure your 3D Lightyear software workstation, there a several aspects of the specified configuration to which you should pay particular attention.
16 Getting Started
3D Lightyear SLA File Preparation Software User’s Guide
The amount of virtual memory on your workstation under Windows NT is typically controlled by the operating system itself. Regardless of how much free RAM you may have at any time, Windows NT will often begin to make memory swaps to the free space on your hard disk drive. Usually, the default system settings for virtual memory levels are adequate for running 3D Lightyear software. If, however, you find that the performance of the program is less than acceptable, make sure that you have at least
300Mbytes total virtual memory configured on the non-boot hard disk of your workstation.
Refer to the online Help system or the documentation for Windows NT for instructions on accessing and adjusting virtual memory settings.
A Note Regarding your Network
Once you have used the 3D Lightyear program to successfully prepare parts for building on an SLA Buildstation, you will have to physically transport the data filethe BFF or the .v, .r, .l, and .prm file suiteto the computer on the SLA system. 3D Systems requires its SLA systems to be installed on a network for several reasons, not the least of which is the fact that most BFFs are far too large to move from PC workstation to the SLA Buildstation
controller via floppy diskette. The simplest method of porting files from the SLA file preparation workstation to the SLA Buildstation controller is over a network. Make sure to specify a Class A Ethernet.
The Installation Procedure
NOTE!
If you normally use a virus protection program on your PC, we recommend that you turn it off, or override its monitor-ing of the system before installmonitor-ing 3D Lightyear software. Since the programs setup program writes information to the system registry, it may not install properly if your virus protection is set to monitor and/or control this type of activity. After 3D Lightyear software installation is com-plete, you can restart your virus protection program.
Getting Started 17
3D Lightyear SLA File Preparation Software User’s Guide
To install 3D Lightyear software:
1. Insert the CD labeled 3D Lightyear SLA File Preparation Software into your PCs CD-ROM drive.
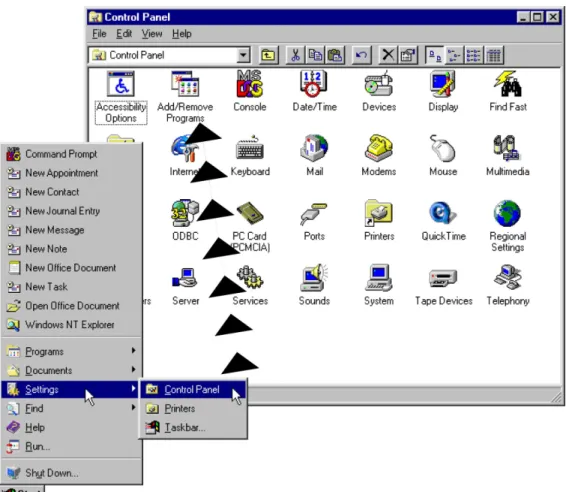
2. Click on the Windows Start button, in the lower-left corner of the Windows NT desktop.
3. Choose Settings, then Control Panel on the menu (see Figure 3).
4. From the Control Panel, open the Add/Remove Programs facility of Windows. You will see the dialog shown in the upper area of Figure 4.
5. Click on the Install button as shown in Figure 4. The next dialog will prompt you to begin the Windows func-tion that scans your drives for installafunc-tion programs or routines (see the middle dialog shown in Figure 4). 6. Click on the Next button. If the process is successful,
Windows will find the installation routine, Setup.exe on your CD-ROM drive. If it is unable to find the correct program, click on the Browse button to open an Ex-plorer-type dialog that will allow you to locate setup. 7. Click Finish. Following the preceding steps launches
the 3D Lightyear software setup program (see Figure 5), in which you will be prompted to:
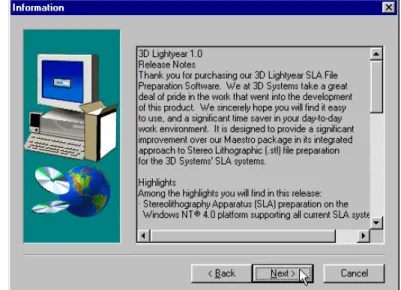
Agree to the tenets of 3D Systems software license View release-specific information (see Figure 6)
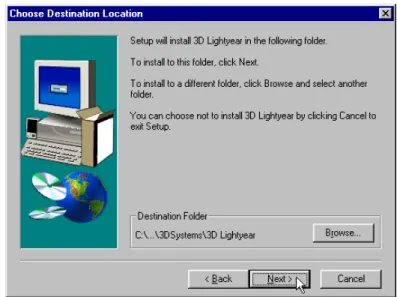
Create a directory structure in which the program will reside on your system (see Figure 7), and
Choose which type of installation you wish to perform, Typical, Compact, or Custom. (See Figure 8.)
18 Getting Started
3D Lightyear SLA File Preparation Software User’s Guide
Figure 3. Accessing Windows Facility for Installing New Software.
Getting Started 19
3D Lightyear SLA File Preparation Software User’s Guide Figure 4. Click “Install”, then “Next”, then “Browse” (if necessary) to
find the installation program for 3D Lightyear
20 Getting Started
3D Lightyear SLA File Preparation Software User’s Guide
Figure 5. The 3D Lightyear software Setup Program automatically installs the program on your PC’s hard disk drive.
Figure 6. Read the last-minute, release-specific notes on screen during the installation process.
Getting Started 21
3D Lightyear SLA File Preparation Software User’s Guide Figure 7. The Setup Program prompts you for the directory in which you would
like the 3D Lightyear program sub-directory to reside.
Figure 8. Choose between the Typical (default), the Compact, or the Custom program installation.
22 Getting Started
3D Lightyear SLA File Preparation Software User’s Guide
The Typical installation copies all the files needed to run 3D Lightyear software, including the Online Users Guide, and basic Styles for Support Generation, Build, and Recoating processes. You should be able to prepare most STL files using the components installed with the Typical selection checked at this stage of the installation.
The Compact installation does not copy the Online Users Guide to the designated directory on your workstation. This will save you approximately 92Mbytes of disk space. Note that you can run the Online Users Guide directly from the CD as a stand-alone application at any time. Simply double-click on the program 3DLightyear.hlp.
NOTE!
If you perform a Compact installation, the Online Users Guide (help system) for 3D Lightyear software will not be accessible from within the program.
The Custom installation allows you to pick the program components that you wish to install from the CD.
8. Follow the instructions given by the setup program on each prompt screen to complete the installation of the 3D Lightyear program. As the program installs, you will see various messages from the setup routine as files are transferred to their appropriate directories and expanded (see Figure 9).
Getting Started 23
3D Lightyear SLA File Preparation Software User’s Guide Figure 9. The 3D Lightyear software setup displays progress messages as it
installs.
NOTE!
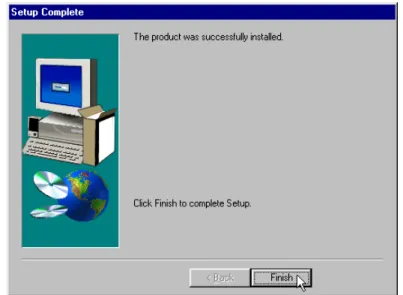
When the installation process is complete, you will see a screen similar to the one shown in Figure 10.
24 Getting Started
3D Lightyear SLA File Preparation Software User’s Guide
Figure 10. When the 3D Lightyear program has “installed itself” successfully, you see this message.
9. Click Finish to complete the installation and return to your workstations desktop.
NOTE!
Your software is now installed and you are ready to obtain a license.
Getting Started 25
3D Lightyear SLA File Preparation Software User’s Guide
Obtaining and Installing Your 3D Lightyear Software
License
NOTE!
YOU WILL NOT BE ABLE TO LAUNCH the 3D Lightyear program until you have obtained a license from
3D Systems.
Before you can begin to use 3D Lightyear software to prepare your files for building on an SLA system, you will have to get a license file from
3D Systems for each workstation on which you have installed the 3D Lightyear program.
Obtaining a license is a multi-step process. Before starting, make sure you have successfully completed the steps to install the software (earlier in this guide).
To get your license:.
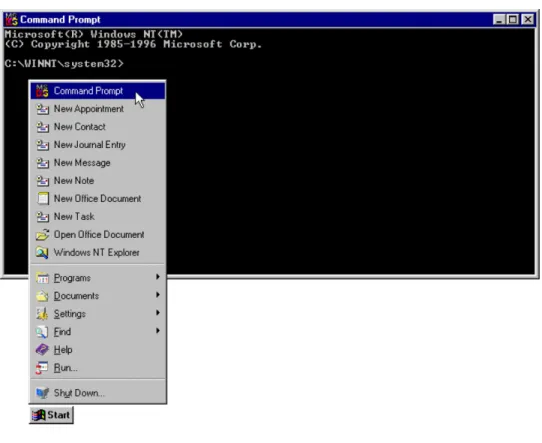
1. Open a Command Prompt (DOS window) from the Win-dows Start menu (See Figure 11).
2. Use the cd (change directory) DOS command to switch to the bin sub-directory (folder) in the 3D Lightyear directory where the Setup program created it (See Fig-ure 12).
26 Getting Started
3D Lightyear SLA File Preparation Software User’s Guide
Figure 11. Open a DOS window to start the process of obtaining a license for 3D Lightyear software.
Getting Started 27
3D Lightyear SLA File Preparation Software User’s Guide Figure 12. Using the “cd” command to change directories to “bin”.
3. Once in the bin sub-directory, at the prompt, type: lmutil lmhostid
(See Figure 13). The utility will prompt your system for its unique host identification code.
4. RECORD THE CODE. Make a note of the code somewhere so that you will be able to find it later.
NOTE!
License files are machine-specific. You should take steps to be able to identify your machine later on by its unique host identification code.
28 Getting Started
3D Lightyear SLA File Preparation Software User’s Guide Figure 13. The “lmutil lmhostid” command queries your PC
for an identification code.
5. REPEAT Steps 1 through 4 of this procedure for each machine that will be running the 3D Lightyear program (make a list of all the host identification codes and which machine they refer to).
6. LOG ON to 3D Systems website on the World-Wide Web. You can find us at:
www.3dsystems.com
7. Follow the instructions for licensing your software under Customer Services, Software Licenses. See Figure 14. The first step is to enter the License Authorization Code to gain access to the web-based license generator. This code is imprinted on the License Authorization Card that came with your 3D Lightyear software.
Once you gain access to the license generator, you input the HostID you obtained from Step 3 earlier, and the license generator displays the text for your license file. 8. Cut and paste the license file text from the web display into a text file using Notepad, and save it with the name License.dat.
Getting Started 29
3D Lightyear SLA File Preparation Software User’s Guide Figure 14. You obtain your software license on line via 3D Systems’ Corporate
Website.
30 Getting Started
3D Lightyear SLA File Preparation Software User’s Guide
NOTE!
ALTERNATIVELY (if you do not have access to the web) you can telephone:
3D Systems Contracts Administration Offices at 1-661-295-5600, extension 2369, Monday through Friday, be-tween the hours of 8:00 a.m. and 5:00 p.m., Pacific Standard Time. You will need to provide the Licensing Specialist with the Licensing Authorization Code shipped with the software package, and the host IDs you gener-ated in Step 3 of this procedure for each of the worksta-tions upon which you wish to run the 3D Lightyear program.
9. Once you have your license file(s), carefully match them to the correct machine by the HostID code.
Remember, licenses are machine-specific and will only enable the 3D Lightyear software to run on the machine whose identification code (HostID) matches a specific parameter in the license file.
10. Copy the appropriate license file into the bin sub-direc-tory where you installed the 3D Lightyear program on your machine and name the file license.dat.
NOTE!
Your software is now licensed and ready to run.
Testing the InstallationRunning the 3D Lightyear
Program for the First Time
When you first launch 3D Lightyear software, the programs license man-ager will prompt you for the location of the license file for your workstation. Once you have located it, you can save its location so that you will not be asked to locate it again.
To Launch the Program:
Getting Started 31
3D Lightyear SLA File Preparation Software User’s Guide
1. Click on Windows Start bar, and locate the 3D Lightyear
program shortcut.
Figure 15. Starting the 3D Lightyear program.
You are prompted to locate the license file manually by the screen illustrated in Figure 16.
Figure 16. The 3D Lightyear License Manager prompts you to locate the License file for your workstation.
32 Getting Started
3D Lightyear SLA File Preparation Software User’s Guide
2. Click the Specify the License File radio button.
3. Click the Next button to begin the process of locating your license file.
You are presented with the dialog illustrated in Figure 17.
Figure 17. Use your system’s browser to locate your license file.
4. Use the Browse function to open a Windows Explorer-type dialog with which you can locate your file. Double-click the filename of the license file.
With the License.dat filename displayed in the Browse
box, click the... button to continue.
The next dialog prompts you to save its location. Click the Save Setting radio button as illustrated in Figure 18.
Getting Started 33
3D Lightyear SLA File Preparation Software User’s Guide Figure 18. Save the location of your License File.
Saving the setting allows you to subsequently launch the program without having to specify its license location.
NOTE!
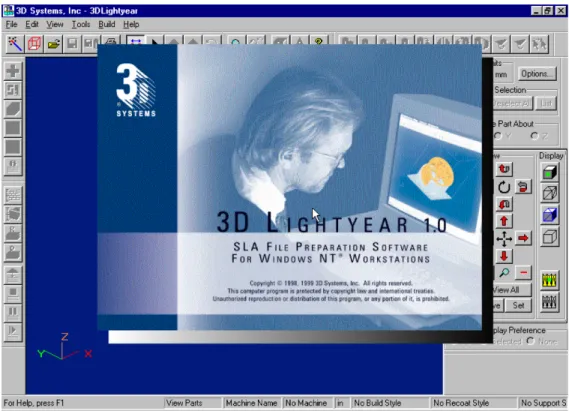
When you see the 3D Lightyear programs splash screen, followed by entrance to the programs Main workspace, you will know that you have successfully identified the correct license file for you workstation. (See Figure 19.)
34 Getting Started
3D Lightyear SLA File Preparation Software User’s Guide
Figure 19. Following a momentary display of the program’s “Splash Screen”, the software opens into the main program workspace.
Getting Help
The user interface of 3D Lightyear software is designed to allow you to learn by doing. We have tried, where we can, to provide answers to any questions you may have about the use of the program while you are actually using it.
The 3D Lightyear Online Users Guide, installed as part of the Typical
3D Lightyear software setup routine, allows you to get instructions and information on many aspects of the products use from within the program itself.