WatchGuard Certified Training
Fireware XTM
Advanced Active Directory Authentication
Courseware: Fireware XTM and WatchGuard System Manager v11.7
Revised: January 2013
TRAINING
www.watchguard.com/training [email protected]
SUPPORT
www.watchguard.com/support [email protected] U.S. and Canada +877.232.3531 All Other Countries +1.206.613.0456
Disclaimer
Information in this guide is subject to change without notice. Companies, names, and data used in examples herein are fictitious unless otherwise noted. No part of this guide may be reproduced or transmitted in any form or by any means, electronic or mechanical, for any purpose, without the express written permission of WatchGuard Technologies, Inc.
Copyright and Patent Information
Copyright© 2013 WatchGuard Technologies, Inc. All rights reserved.
WatchGuard, Firebox, Fireware, LiveSecurity, and spamBlocker are either registered trademarks or trademarks of WatchGuard Technologies, Inc. in the United States and other countries. This product is covered by one or more pending patent applications.
All other trademarks and tradenames are the property of their respective owners. Printed in the United States.
Table of Contents
Active Directory Authentication ... 1
Introduction ... 1
What You Will Learn ... 1
Exercises ... 1
What Active Directory Authentication Can Do For You ... 2
Related Information ... 2
What You Should Know ... 2
How Authentication Works in Fireware XTM ... 2
How Authorization Works in Fireware XTM ... 5
Authorization by Clientless Single Sign-On (SSO) ... 15
Active Directory Authentication Process Details ... 15
Understanding the LDAP Framework of Active Directory ... 16
How Fireware XTM Authenticates Users with Active Directory ... 20
Detailed Steps in the Authentication Process ... 20
Optional Data that Active Directory Can Give Fireware XTM ... 26
Before You Begin ... 29
Necessary Equipment and Services ... 29
Management Computer Configuration ... 29
Firewall Configuration ... 30
Physically Connect the Devices ... 30
Exercise 1: Allow Authenticated Users on the External Network to Manage the XTM Device 31 When to Use Authentication for Access to the XTM Device ... 31
Network Topology ... 31
Configure the Active Directory Server ... 32
Configure the XTM Device ... 32
Demonstrate It: Authenticate to Your Partner’s XTM Device to Manage It ... 41
Exercise 2: Use Active Directory to Authenticate Mobile VPN with SSL Clients ... 43
When to Use Active Directory for Mobile VPN Authentication ... 43
Network Topology ... 43
Configure the XTM Device ... 44
Download the Mobile VPN with SSL Client Software ... 52
Install the SSLVPN Client Software ... 52
Make an SSLVPN Connection to Your Partner’s XTM Device ... 52
Exercise 3: Use Clientless Single Sign-On to Authorize Domain Users ... 54
Active Directory for Clientless SSO ... 54
Default Domain Policy ... 55
Install the SSO Agent ... 55
Configure the XTM Device ... 58
Demonstrate Clientless SSO ... 60
Frequently Asked Questions ... 63
Fireware XTM Training
Active Directory Authentication
Restrict Access with Active Directory Users or Groups
This training is for:Introduction
What You Will Learn
About Side Notes
Side notes are extra information that is not necessary to understand the training. They might be configuration or troubleshooting tips, or extra technical details.
Authentication is an effective way to limit access to your network resources. This training course shows you how authentication works, and how to configure your Fireware XTM to use your existing Active Directory users and groups to give your users access network resources.
Exercises
This course demonstrates two examples of Active Directory authentication. Each step-by-step exercise illustrates a use case that might apply in your network. The exercises are:
• Allow AD authenticated users on the external network to manage the XTM device • Use Active Directory to authenticate Mobile VPN clients
• (Optional) Use Clientless Single Sign-On to authorize domain users
Before you begin the exercises, make sure to read the section “Before You Begin,” on page 29. This section includes a list of the equipment and software you must have for the exercises, and basic information about how to prepare your XTM device and your Active Directory server.
Note
This module includes exercises related to firewall authentication (over port 4100), Mobile VPN, and Clientless Single Sign-On (SSO) in a single domain environment. Clientless SSO on a multi-domain environment is not included in this training.
Device WatchGuard XTM Devices with Fireware XTM OS v11.7 and later
Device OS versions Fireware XTM v11.7 with a Pro Upgrade Management Software versions WatchGuard System Manager v11.7
What Active Directory Authentication Can Do For You
Because of the dynamic nature of the IP addresses of today’s highly mobile workforce, you can no longer rely only on IP addresses to control access to your network resources. If you select an access control method that forces your users to authenticate before they can connect to resources, you can use your firewall polices to have better control over resource access when you don’t know the IP addresses of your users’ IP addresses.
Active Directory authentication provides these benefits:
• Restricts access to network resources by user name or group name • Enforces user accountability based on user name
• Centralizes maintenance of user accounts
Related Information
For more information about Active Directory and LDAP, see these additional resources: • How Active Directory Searches Work from Microsoft:
http://technet2.microsoft.com/WindowsServer/en/library/ 8196d68e-776a-4bbc-99a6-d8c19f36ded41033.mspx • LDAP RFCs:
- RFC 1777 defines what is now called version 2 of the Lightweight Directory Access Protocol (or LDAP v2):
ftp://ftp.rfc-editor.org/in-notes/rfc1777.txt
- The core specifications of LDAP v3 are defined in RFC 2251: ftp://ftp.rfc-editor.org/in-notes/rfc2251.txt
What You Should Know
When you want to restrict access to resources by user name or group name, consider these two distinct concepts: Authentication and Authorization.
• Authentication proves the identity of the user.
The XTM device can authenticate users against your Active Directory server for Firewall Authentication and for Mobile VPN connections.
• Authorization grants the user permission to do something.
You enable access to networks by adding user names or group names in the source field (the From
list) of a policy in Policy Manager.
How Authentication Works in Fireware XTM
The XTM device can authenticate a user with your Active Directory server in three ways: Firewall Authentication, Mobile VPN with IPSec, and Mobile VPN with SSL.
In this training module, we discuss how to use Active Directory to authenticate your users with Firewall Authentication and Mobile VPN with SSL.
You can also use Active Directory to authenticate Mobile VPN with IPSec clients (iOS, the WatchGuard Mobile VPN with IPSec client, and the Shrew Soft VPN client), but we do not discuss these methods in this module. For more information, see the WatchGuard System Manager Help.
What You Should Know
Firewall Authentication
The session between the user’s computer and the XTM device is protected by SSL encryption.
A user with an Active Directory account must establish an HTTPS connection to the XTM device over TCP port 4100. To do this, the user opens a web browser and types the DNS name or IP address of the XTM device interface that protects network resources in the address list.
For example:
https://my.xtm_device.net:4100 https://10.0.1.1:4100
After the user is authenticated, the XTM device knows the user name and the groups of which the user is a member. Traffic from that user is allowed through a firewall policy if the policy's From list has a user name or group name that matches the user's identity or group membership.
The XTM device configuration must include a firewall policy that allows traffic to pass to the XTM device over port 4100. Policy Manager automatically adds the WatchGuard Authentication policy, which allows port 4100 connections to the XTM device from only trusted and optional networks. If you want users to authenticate from external networks, you must edit this policy (or add another policy) to also allow connections to the XTM device over port 4100 from external networks. For more
information, see the subsequent exercises in this module.
To service the connection requests, a web server in the XTM device listens on TCP port 4100. To authenticate, users type a user name and a password, and select a domain.
Figure 1: The Firewall Authentication web page
The Firewall Authentication web page refreshes every 15 seconds to update the current status and prevent an idle timeout.
If the authentication is successful, the success message appears.
Figure 2: Firewall Authentication success message
If authentication fails, a failure message appears. The content of the failure message depends on where in the authentication process the failure occurred.
Mobile VPN with SSL Authentication
To use Mobile VPN with SSL to authenticate:
1. Launch the Mobile VPN with SSL client.
Figure 3: Mobile VPN with SSL connection dialog box
2. Type the IP address of the XTM device, your user name, and password.
3. Click Connect.
When the connection is successful, a connection message appears, and the WatchGuard SSL icon in the system tray changes from black to green.
Figure 4: Mobile VPN with SSL successful connection
Information the XTM Device Gets From the Authentication Process
When a user authenticates to an XTM device, the device collects information to match traffic flows to users. To track the authenticated user’s session, the XTM device keeps these items in memory:
• The type of authentication server that authenticated the user.
For this training, we use Active Directory.
• The user name the user typed to authenticate.
• The IP address for the XTM device that is the source of the authentication (the user’s IP address). • The groups to which the user belongs.
The XTM device gets this information from a query it sends to the Active Directory server.
Group information must come from the authentication server. If group information is not in the server’s authentication response message, you can add a firewall policy to restrict the user’s access only by user name.
• The session timeout and idle timeout values for this user or group.
• The virtual IP address assigned to the Mobile VPN user. (This applies only to Mobile VPN with IPSec connections and Mobile VPN with SSL connections.)
What You Should Know
How Authorization Works in Fireware XTM
To authorize users to connect to resources, you add their user names, or the names of their groups, to a policy in Policy Manager. Users are authorized to pass traffic through a policy if their user names appear in the policy’s From list, or if they are members of a group that appears in the policy’s From list. To make sure that your policies do not allow traffic you did not intend, do not configure your policies with aliases that include a wide range of addresses. Such aliases can include Any, Any-Trusted,
Any-Optional, Any-External, or an alias that is the name of an XTM device interface. Before you use one of these aliases in a policy, carefully consider the purpose of the policy. These aliases can allow access to users that do not authenticate.
Make a List of Authorized Users and Groups
Policy Manager keeps a list of user and group objects so that you can easily get access to them when you manage your firewall policies. Before you can add an Active Directory user or group to a policy, you must add it to the Authorized Users and Groups list in Policy Manager.
To add users or groups to this list:
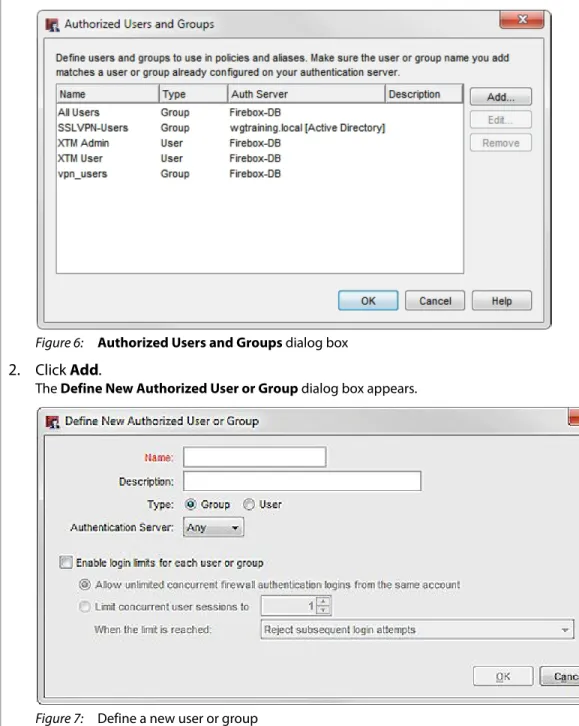
1. Select Setup > Authentication > Authorized Users/Groups.
The Authorized Users and Groups dialog box appears.
Figure 6: Authorized Users and Groups dialog box
2. Click Add.
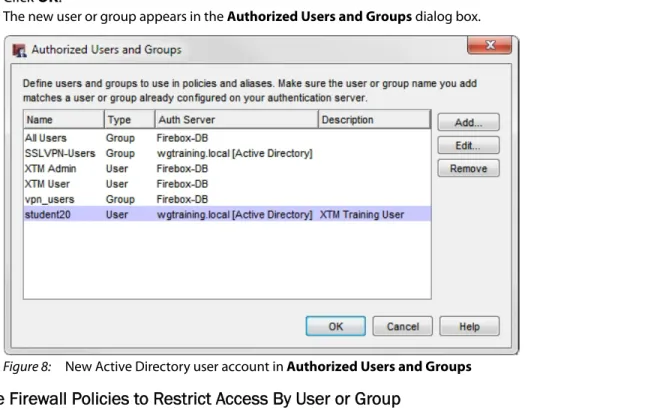
The Define New Authorized User or Group dialog box appears.
Figure 7: Define a new user or group
3. Type the Name for this user, or the name of an Active Directory group.
4. (Optional) Type a Description of the user or group.
5. Select Group or User.
6. From the Auth Server drop-down list, select Active Directory.
7. Select the Enable login limits for each user or group check box.
8. To limit the number of times the user, or users in the group, can log in with the same credentials to no more than three concurrent user sessions, select Limit concurrent users sessions to and type or select 3 in the adjacent text box.
9. From the When the limit is reached drop-down list, select an option: - Reject subsequent login attempts
What You Should Know
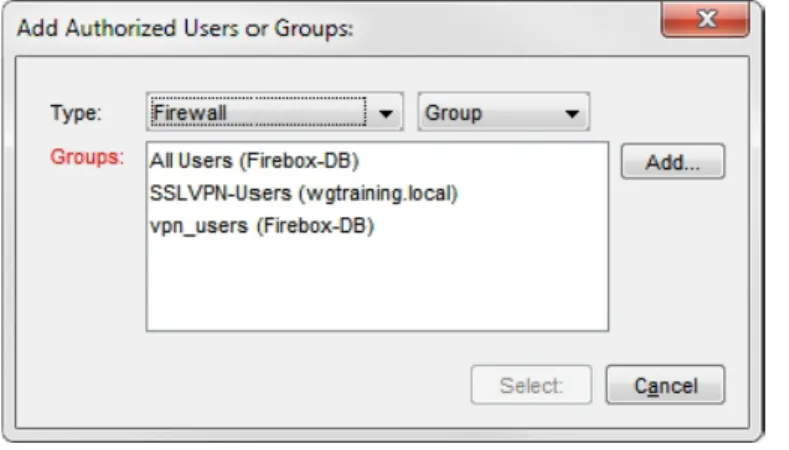
10. Click OK.
The new user or group appears in the Authorized Users and Groups dialog box.
Figure 8: New Active Directory user account in Authorized Users and Groups
Use Firewall Policies to Restrict Access By User or Group
To limit access to firewall policies, you add a policy on the Firewall tab of Policy Manager. To get access, users authenticate to the firewall, which is also known as Firewall Authentication.
Note the difference between the User and Group icons:
— The User icon has one person.
— The Group icon has two people.
This policy allows a user and a group.
Figure 10: A policy that allows access only for a user and a group
To limit access to a Firewall policy by user or group:
1. On the Firewall tab, double-click a policy to edit it.
2. In the From list, select the Any-Trusted and Any-Optional aliases, and any other addresses or aliases that could allow access to a user who has not authenticated, and click Remove.
3. In the From section, click Add.
Figure 11: Add to the From list of a policy The Add Address dialog box appears.
What You Should Know
4. Click Add User.
Figure 12: Add Address dialog box
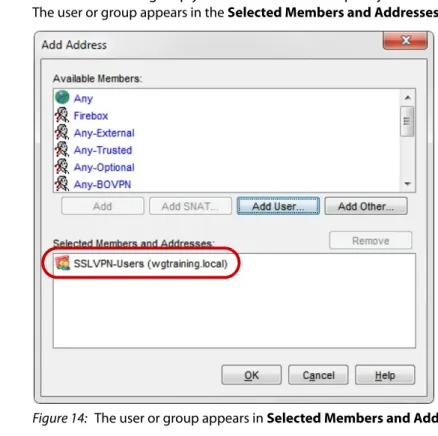
The Add Authorized Users or Groups dialog box appears with the users and groups you added to the Authorized Users and Groups list.
Figure 13: Select a user or group to add to the policy
If you use PPTP to authenticate your mobile users, select
PPTP from the Type
drop-down list. You cannot use Active Directory to
authenticate PPTP users.
5. From the left Type drop-down list, select Firewall.
6. From the right Type drop-down list, select Group to see the available groups, or select User to see the available users.
7. Select the user or group you want to add to the policy and click Select.
The user or group appears in the Selected Members and Addresses list.
Figure 14: The user or group appears in Selected Members and Addresses list
8. Click OK.
The user or group appears in the From list.
What You Should Know
Custom Addresses and Tunnel Addresses
To restrict whether traffic is allowed from an authenticated user, you can add a custom address or a
tunnel address. These address types let you specify the user or group, and set two other conditions that traffic must meet in order to match the address.
Note
Custom addresses and tunnel addresses apply only to firewall policies. They do not apply to Mobile VPN with IPSec policies.
With a custom address, you can specify these conditions for traffic: • A user or a group member
• An IP address.
This can be a host IP address, a network IP address, or an IP address range.
• The interface where the traffic passes through the XTM device.
- If the custom address is in the From list, this is the interface where the traffic enters the XTM device.
- If the custom address is in the To list, this is the interface where the traffic exits the XTM device.
With a tunnel address, you can specify these conditions for traffic: • User or member of a group.
• IP address.
This can be a host IP address, a network IP address, or an IP address range.
• Branch Office VPN tunnel that the traffic goes through.
If you use one of these address types in a firewall policy, traffic must match all three conditions of either address type.
For example, suppose you want to grant FTP access to an Active Directory user. You want users to authenticate first, but you do not want users to get access to FTP sites when they are authenticated from the optional or external network, only from the trusted network. Also, you want the user to have access only if the user’s traffic comes from a small segment of the trusted network, the 10.0.1.64/28 subnet.
To do this, add a custom address:
1. Double-click the policy to edit it.
The Edit Policy Properties dialog box appears, with the Policy tab selected.
2. In the Fromlist, select the Any-Trusted and Any-Optional aliases, along with any other addresses or aliases that could match this user’s IP address, and click Remove.
3. In the From section, click Add.
You cannot add users or groups to the
Authorized Users and Groups list from the Add Member
dialog box. You must add objects to the
Authorized Users and Groups list before you can use them in a custom address or a tunnel address.
You cannot use a Mobile VPN Group name in a custom address or tunnel address.
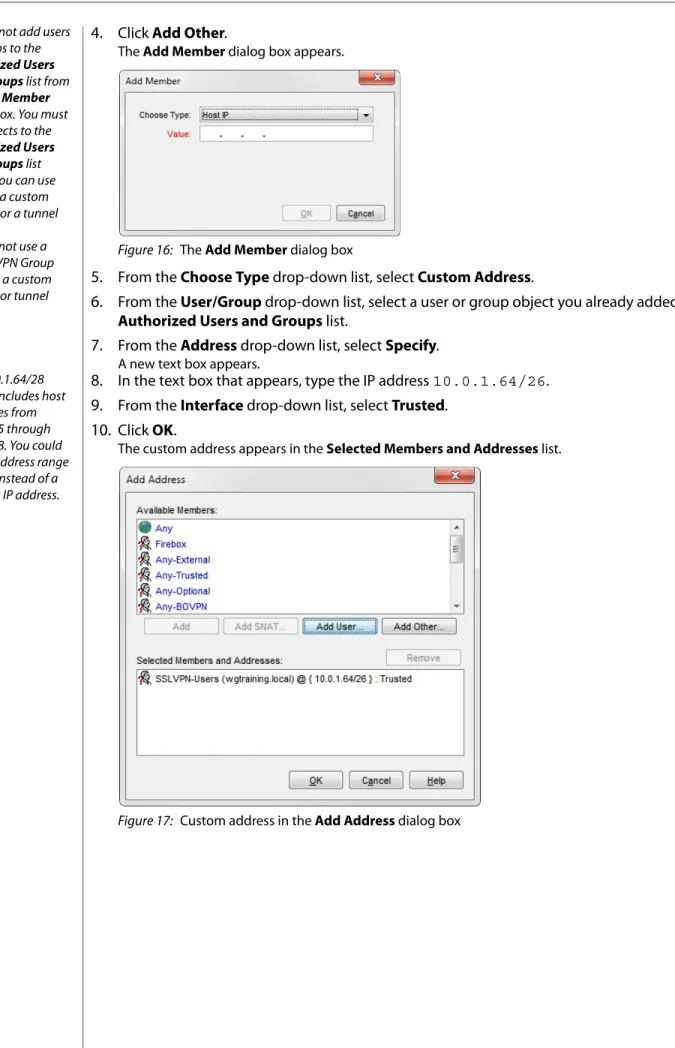
4. Click Add Other.
The Add Member dialog box appears.
Figure 16: The Add Member dialog box
5. From the Choose Type drop-down list, select Custom Address.
6. From the User/Group drop-down list, select a user or group object you already added to the
Authorized Users and Groups list.
7. From the Address drop-down list, select Specify.
A new text box appears. The 10.0.1.64/28
subnet includes host addresses from 10.0.1.65 through 10.0.1.78. You could use an address range for this instead of a network IP address.
8. In the text box that appears, type the IP address 10.0.1.64/26.
9. From the Interface drop-down list, select Trusted.
10. Click OK.
The custom address appears in the Selected Members and Addresses list.
What You Should Know
11. To see the details of this address, place your cursor over it.
A tool tip appears.
Use Mobile VPN with SSL Policies to Restrict Access by User or Group
For Mobile VPN with SSL users, you control access with policies on the Firewall tab of Policy Manager. When you create a Mobile VPN with SSL group, Policy Manager automatically adds policies that allow access to the resources you specify, over any port or protocol. These Mobile VPN with SSL policies allow traffic only from users that are members of the SSLVPN-Users group.
Figure 19: The Firewall tab with the automatically generated Mobile VPN with SSL policies
At the top of the Edit Policy Properties dialog box, in the From list, you can see the name of the Mobile VPN with SSL group from which the policy allows traffic.
Figure 20: The Edit Policy Properties dialog box for the Allow SSLVPN-Users policy that enables users in the SSLVPN-Users group to get network access through this policy
The To list includes the host IP addresses or network IP addresses that the Mobile VPN with SSL user can use to connect to the VPN.
Active Directory Authentication Process Details
Authorization by Clientless Single Sign-On (SSO)
Another method of authorization in a domain-controlled environment is to use the same credentials used to log in to the user’s computer. For this method, users do not need to authenticate manually to the firewall to submit their user credentials. This method is called Single Sign-On (SSO).
Clientless SSO Components
• XTM device — Where the authorization takes place
• Active Directory — Where user credentials such as the user name and groups are stored • SSO Agent — Queries the Event Log Monitor on the domain controller
• Event Log Monitor — Polls the logon and logoff events from the domain client computer and retrieves group membership information from the domain controller
Traffic Driven In Passive Mode
When a client computer on your domain connects to the Internet with a web browser, the XTM device captures the traffic and notes the source IP address used for that session. If the device does not find an existing authenticated session for the IP address, it contacts the SSO Agent for the user credentials on the client computer. The SSO Agent forwards the request to the Event Log Monitor, which contacts the domain client IP address for the logon event details. It tries to get the user name and domain
information that the user logged on with, which should be the same user credentials that are stored in your Active Directory server. The Event Log Monitor also gets the name of each group the user belongs to from the domain controller. Once it has collected all the available information, the Event Log Monitor sends it back to the SSO Agent. The SSO Agent then sends the user credentials to the XTM device. The XTM checks the user information to determine if the traffic can be allowed, or if it must be denied, based on the configured policy rules.
Active Directory Authentication Process Details
Terms and Definitions
The items in this list appear throughout the remainder of this training course.
Active Directory
Microsoft’s directory service. It stores information about objects on a network and makes this information available to users through an LDAP interface.
Attribute
A characteristic of an object in the directory. The schema defines whether the attribute can have only one value (single-valued) or multiple values (multi-valued).
Base DN
The start of the directory tree. The Base DN holds all objects in the domain.
Organizational Units are container objects. Active Directory provides other containers in the default installation, such as the Users container, the Builtin container, and the Computers container. Container
An object in the directory that can contain other objects. This is similar to a folder on your computer that can contain other folders or files.
Directory
A store of information. This is similar to an address book, which stores names and phone numbers.
Directory Object
An entry in the directory. An object has a list of attributes that describes it.
Directory Server
Directory Service
A service that runs on a directory server to give access to the directory.
Directory Tree
The hierarchical organization of information that starts from a single point (the root, or Base DN) and branches out. It is analogous to a tree and similar in structure to a computer file system. The structure of the tree is determined by the schema.
Distinguished Name (DN)
The globally-unique name of an object in the directory. It defines the object’s location in the directory tree.
The DN starts with the friendly name for the object, followed by the name of the container that holds the object, and continues with the name of the container that holds that container, and so on, all the way to the Base DN
Firewall Authentication
One method of authentication. Users make an HTTPS connection with a web browser to the XTM device over port 4100, and supply their user names and passwords.
LDAP
LDAP (Lightweight Directory Access Protocol) is a protocol used to get access to an information directory.
Leaf
An object in the directory that cannot contain other objects. Similar to a file on your computer, a leaf represents the end of the branch for that object in the directory tree. User objects and group objects are leaf objects.
Mobile VPN Authentication
An authentication method that uses the WatchGuard Mobile VPN with IPSec software. For this method, users type their credentials to log in.
Schema
The set of rules that controls all aspects of what can be stored in the directory.
User Principal Name (UPN)
A naming convention used by Active Directory to identify a user and the domain to which the user belongs. The UPN is almost always identical to the user’s email address: it includes the user’s logon name, followed by @ and the name of the domain. For example, the UPN for the user student20 in the training.net domain is [email protected].
Understanding the LDAP Framework of Active Directory
Active Directory includes Microsoft’s implementation of the Lightweight Directory Access Protocol (LDAP). When you understand the LDAP framework of Active Directory, you can confidently configure Active Directory authentication in Policy Manager and more easily diagnose Active Directory search and authentication failures.
What Active Directory Has In Common with LDAP
LDAP is a protocol. It defines methods to access information in a directory. A directory is simply a store of information, like an address book that stores names and phone numbers. A directory server runs a directory service to provide the access for clients. In your Active Directory domain, a domain controller runs the directory service.
Active Directory uses an LDAP-compliant directory for storing information about every object and resource in your domain: users, computers, file shares, applications, organizational units, groups, security policies, and so on. Because Active Directory implements LDAP, you can use standard LDAP operations to get information about the directory’s objects.
Active Directory Authentication Process Details
Structure of the LDAP Directory
Information in an LDAP directory is stored in a tree-like hierarchy. It begins with one container that holds everything, and branches out in a way that is similar to how files and folders are organized on your computer. The start of the tree, the container that holds everything, is called the Base DN. It represents your Active Directory domain.
The Base DN can hold container objects, leaf objects, or both. Container objects can hold other objects including other container objects, leaf objects, or both. You can have many containers within
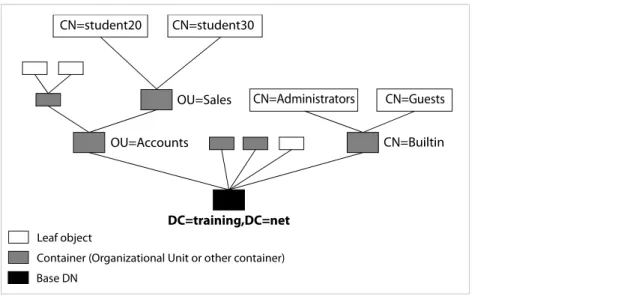
containers. Leaf objects are different from container objects in one major respect: leaf objects cannot contain other objects. Leaf objects can exist anywhere in the directory tree. The diagram in Figure 21 shows a simple representation of a directory tree.
Do not confuse a container object with an Active Directory group. A group in Active Directory is a leaf object; it cannot hold other objects. Members of an Active Directory group are not contained within the group, they are only members of the group.
Figure 21: Simple view of LDAP structure
Microsoft provides an interface into the directory with a tool called ADSI Edit. This GUI tool is a Microsoft Management Console (MMC) snap-in that acts as a low-level editor for Active Directory and illustrates the tree structure of the directory. It is included when you install Windows Server 2000 or 2003 Support Tools from the product CD. The subsequent image of the ADSI Edit tool shows the training.net domain with two user objects (circled).
Figure 22: ADSI Edit tool for the training.net domain with two user objects in the Sales OU
OU=Accounts OU=Sales CN=student20
DC=training,DC=net
CN=student30
CN=Builtin CN=Administrators CN=Guests
Leaf object
Container (Organizational Unit or other container) Base DN
Objects and Attributes
Every object in an LDAP directory is described by a list of attributes. Some attributes, such as
sAMAccountName, must be assigned a value, while others can be null. These requirements are defined in the schema. An attribute can be either single-valued (there can be only one value assigned to the attribute) or multi-valued (the attribute can have more than one value).
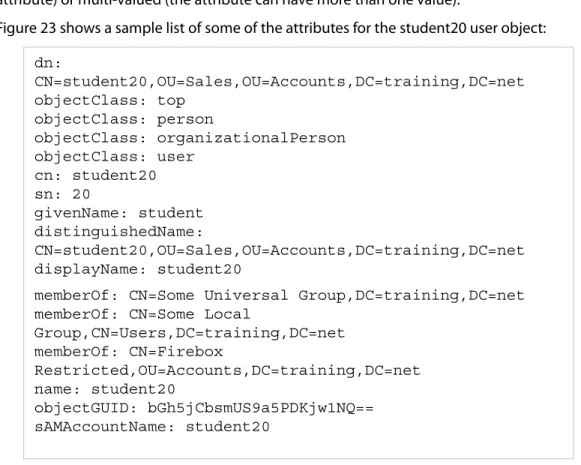
Figure 23 shows a sample list of some of the attributes for the student20 user object:
Figure 23: Some of the attributes for the student20 user object
When you add a user to a group, Active Directory automatically adds another value to the user object’s
memberOf attribute to indicate the user’s membership in the group. Because the Fireware XTM LDAP query finds the user object and all of its attributes, Fireware XTM can tell what groups the user belongs to by reading the user object’s memberOf attribute.
Identifying Objects in the Directory
Base DNThe name of the Base DN uses the DNS components of your domain name, called Domain Components (DC). Active Directory domains must have at least two DNS domain components: a friendly name such as mycompany, and a top-level domain suffix such as .net or .com. In our examples, we use the domain name training.net. The DNS domain components of this name are
training and net. (The domain name can also have a local component, as in classroom.training.net.) If the training.net domain had a child domain called “classroom”, the DN would be:
DC=classroom, DC=training,DC=net
To construct the Base DN name, you write DC=<domain component>,DC=<domain
component> with one such entry for each domain component. You start with the first part of your domain name and end with the top-level domain suffix. Separate each part with a comma and no space. There are no dots between each part of the name or at the end. Thus, the name of the Base DN for the training.net domain is: DC=training,DC=net
dn: CN=student20,OU=Sales,OU=Accounts,DC=training,DC=net objectClass: top objectClass: person objectClass: organizationalPerson objectClass: user cn: student20 sn: 20 givenName: student distinguishedName: CN=student20,OU=Sales,OU=Accounts,DC=training,DC=net displayName: student20
memberOf: CN=Some Universal Group,DC=training,DC=net memberOf: CN=Some Local
Group,CN=Users,DC=training,DC=net memberOf: CN=Firebox Restricted,OU=Accounts,DC=training,DC=net name: student20 objectGUID: bGh5jCbsmUS9a5PDKjw1NQ== sAMAccountName: student20
Active Directory Authentication Process Details Object’s Friendly Name
Every object in the directory has a simple name, or friendly name. It starts with an abbreviation for the type of attribute used for the friendly name, followed by =, followed by the object’s name. The objects you most often work with use well-defined attributes for the friendly name:
CN stands for “Common Name”, NOT “container” or “canonical name”.
- For a user object or group object, the friendly name starts with CN= - For an organizational unit, the friendly name starts with OU= Here are some examples:
- A user object’s friendly name is usually the user’s first and last name, and possibly a middle initial.
For example, CN=student30 or CN=student20. - A group object’s friendly name is the name of the group.
For example, CN=XTM device Restricted or CN=MUVPN Group. - An organizational unit’s friendly name is the name you give the OU.
For example, OU=Sales or OU=Accounting
The technical term for the object’s friendly name is the Relative Distinguished Name or RDN. An objects’ RDN must be unique within the branch of the tree where the object is; no other object in that branch, all the way to the root, can use that RDN. This ensures that the DN for any object is globally unique even if two objects have the same RDN. The DNS for objects with identical RDNs remain globally unique because an object’s Distinguished Name specifies not only the object’s RDN, but also its location in the directory.
Object’s Distinguished Name
Every object in the directory is uniquely identified by its Distinguished Name (DN). The DN for an object starts with its friendly name, followed by a list of each container above the object. Each part of the DN is separated by only a comma. Thus, the DN shows how the object relates to its parent objects, all the way to the Base DN.
The friendly name for the student20 object in Figure 23 is CN=student20, so the DN is:
CN=student20,OU=Sales,OU=Accounts,DC=training,DC=net
The DN for the OU called Accounts, just within the root of the tree, is:
OU=Accounts,DC=training,DC=net
The DN for the Administrators group in the Builtin container is:
CN=Administrators,CN=Builtin,DC=training,DC=net Active Directory Groups and LDAP
Some people confuse a group with a container. This is natural, because we often think of groups containing things. However it is important to keep these two concepts separate. The confusion can be an obstacle to understanding how groups fit into the LDAP structure of Active Directory.
A user’s group membership in Active Directory is not determined by the container the user is in. Instead, group membership is based on the values of an object's group membership attribute,
memberOf.
An administrator can use any attribute to define group membership, even a custom attribute added by extending the schema. The value of the attribute is what the XTM device considers to be the group the user belongs to. Use the attribute's name in the Group String text box when you configure Active Directory authentication in Policy Manager. Use the attribute's value as the group name in XTM device policies.
An Active Directory group can have members, but membership in a group is not the same thing as being contained in a parent object of the directory tree. A user object can be contained only in an Organizational Unit or other container. Do not confuse membership in a group with the container that holds the user.
Remember that Fireware XTM tells what groups a user is a member of by looking at the user object’s attributes, not by where in the directory the user is located.
How Fireware XTM Authenticates Users with Active Directory
To successfully authenticate a user, the XTM device must do these things:
To identify itself to a directory, the entity that requests a bind operation normally sends its full Distinguished Name (DN).
Active Directory also allows a different form of identification for a bind: the User Principal Name (UPN).
• Bind to the LDAP database
Fireware XTM does this using the LDAP bind operation. The XTM device sends credentials to the directory server to establish permissions to search the directory. These can be the credentials of the user trying to authenticate, or credentials that you specify.
• Search for the user object to verify it exists in the directory
Fireware XTM does this using the LDAP search operation. For a search, the only permission required is read access. Active Directory domains grant this permission to all domain user accounts by default.
• Get the user’s information from the search results
The search operation finds the user object in the directory and gets all the object’s attributes. The object’s attributes tell Fireware XTM the user’s distinguished name, the groups of which the user is a member, and possibly other optional information.
• Authenticate the user
Fireware XTM completes one final bind operation with the user’s credentials to verify the user’s password.
Detailed Steps in the Authentication Process
The events that make up the Active Directory authentication process include:
FAILUREMESSAGE: If the XTM device fails to complete a TCP session with the server, the user attempting Firewall Authentication sees this error in the browser: Authentication Failed: 'LDAP initial binding failed, please try again later'
Step 1 — User Attempts to Authenticate
This can be an attempt to use Firewall Authentication or an attempt to make a Mobile VPN connection. The following steps are the same for either type of authentication.
When the XTM device gets the user credentials, it starts a TCP session with the directory server to start the process.
Step 2 — Fireware XTM Attempts to Bind to Active Directory
This first bind request tells the directory server which account Fireware XTM wants to use for the Search operation. For this bind request, Fireware XTM uses one of two different accounts:
• The credentials of the user attempting to authenticate. • The credentials of an account that you specify.
Active Directory Authentication Process Details
The account the XTM device uses for this bind is determined by whether you specify a Searching User.
Figure 24: The items that determine the credentials used for the first bind
The simplest way to complete the selected area in Figure 24 is as shown: • DN of Searching User and Password of Searching User are empty • Login Attribute is set to the default value sAMAccountName
It is not necessary to provide a Searching User if you keep the default value of sAMAccountname for the Login Attribute. However, you must specify a Searching User if you use any other value for the Login Attribute. The Login Attribute is used as a search filter to find the user in the directory.
When you configure the highlighted area as suggested, Fireware XTM constructs the User Principal Name (UPN) from the user name that the user typed into the authentication dialog box, the @ character, and the domain components in DNS form. The XTM device sends this as identification for this first bind request.
When you use these default settings, the user attempting to authenticate enters the Windows logon name (without domain information) for the Username. Thus, if a user with logon name student20
attempts to authenticate, the user types student20 in the Username text box when prompted. The XTM device sends [email protected] as identification for this bind. (In our examples, the domain components are DC=training,DC=net.)
Active Directory does not require that the
User logon name (pre-Windows 2000)
value match the User logon name at the top of the Account
tab in Figure 25. In most cases the network
administrator keeps them the same, but you should make sure you do not confuse the two. Active Directory uses only the User logon name (pre-Windows 2000)
value for the sAMAccountName attribute. It uses the
User logon name
value only for the userPrincipalName attribute.
Figure 25 shows the student20 user account in Active Directory Users and Computers. The circled area shows what Active Directory uses for the sAMAccountName attribute.
Figure 25: User logon name (pre-Windows 2000) for the student20 account in Active Directory Users and Computers
If this first bind request in Step 2 fails, this error message appears in the browser:
Authentication Failed: 'LDAP binding failed, credentials are not correct, please try again'
How to Use a Different Login Attribute
If you want the user to type something else in the authentication dialog box instead of the standard Windows logon name, select (or manually type) a different value in the Login Attribute drop-down list in Figure 24.
For example, if you want users to type their Common Name in the Username text box, select cn for the Login Attribute in Figure 24. In this case student20 types student20 or student20 in the Username text box when he authenticates (Windows user names are not case-sensitive).
If you select an attribute that is not sAMAccountName, you must specify a Searching User in Figure 24. This is because Fireware XTM cannot construct the user’s UPN if the user types something other than the simple logon name in the Username text box.
For an account that has permission to read the directory, type the full Distinguished Name in the DN of Searching User text box and type the account password in the Password of Searching User text box.
Active Directory Authentication Process Details
Step 3 — Fireware XTM Searches the Directory for the Login Attribute
When the bind is successful, Fireware XTM sends a search request. An LDAP search request can include many different parameters and filters. The Fireware XTM search request includes these parameters and search filter:
• Search Base
A search request must indicate where in the database hierarchy the directory service should start the search.
The Search Base you specify indicates where in this container (the Search Base) Active Directory begins the search. The search will include the container you specify, and possibly the
subcontainers, but not the parent container of this container. • Scope
The scope of the search indicates whether the directory service searches only in the Search Base but not inside any containers in the Search Base, only one container within this container (one level lower in the search base), or in all containers inside other containers (in all containers to the end of the tree).
Fireware XTM uses the scope: subtree parameter to specify that Active Directory searches in the selected Search Base container, and every container and subcontainer in it, to the end of this branch of the directory tree.
To see all the attributes in Traffic Monitor, increase the Diagnostic Logging level for the Authentication module. From Policy Manager, select
Setup > Logging and click Diagnostic Log Level. Set the
Authentication
category to at least the Information
level.
This is not necessary to see only the user’s group membership in Traffic Monitor. When a user authenticates, a messages like this should appear: ADM auth get user group FBusers
• Attributes Only
This parameter specifies whether the directory server should return only the names of attributes tied to the object, or if it should send the attribute names and the value of each attribute. The search parameter takes a boolean value of true or false.
Fireware XTM uses a value of false for the parameter to specify that Active Directory returns all the attributes for the object, and the value of each attribute.
• Search Filter
The search filter specifies that the directory server returns only objects that match certain
conditions. If a filter is not specified, the search returns every object and attribute in the database. Fireware XTM uses an equality match filter to specify that the server:
- Search only for objects that have the specified attribute (this is the Login Attribute value in Figure 24 on page 21).
- Return an object as a match only if the value for that attribute matches the Username that was specified when the user authenticated.
For example, if you use the default settings in the Active Directory setup area of Policy Manager (Figure 24), and student20 tries to authenticate, the filter reads: sAMAccountName=student20
For the search result, the server looks only for an object with the sAMAccountName attribute AND the student20 attribute value.
Step 4 — The Server Sends the Search Result to the XTM Device
The server searches its database using the parameters and filter described above. If no such object exists with an attribute that matches the filter, Active Directory still returns a search result, but the result is <null>, meaning that the search did not find any matches. The authentication fails if this happens because the server cannot find the user.
If the server finds an object that matches the filter, it sends Fireware XTM all the attributes and their values for that object.
If the search result is null, this error appears in the browser for the user attempting Firewall Authentication:
Authentication Failed: 'Specified username or password is not correct, please try again'
Step 5 — Fireware XTM Extracts the Information It Needs From the Search Result
Fireware XTM reads all of the attribute/value pairs for the user object and searches for the DN
(distinguishedName) attribute. Fireware XTM then searches again to find the groups of which the user is a member.
If you specify additional attributes for the Optional Settings in the Active Directory setup in Policy Manager, Fireware XTM also extracts the values for those attributes.
Step 6 — Fireware XTM Unbinds and Binds Again to the Database
To run a new search, the XTM device unbinds and completes a new bind operation. The XTM device uses the full distinguished name of the user attempting to authenticate for this new bind and all subsequent bind operations.
Step 7 — Fireware XTM Searches the
tokenGroups
Attribute For the User Object
Now, Fireware XTM searches to find a special attribute called tokenGroups. This is a calculated attribute, so it does not appear in the list of attributes that Active Directory returned in the previous search.
Active Directory Authentication Process Details
Step 8 — The Server Sends the Search Result to the XTM Device
This is a better attribute to examine than the memberOf
attribute that Fireware uses in 10.x and previous versions. The benefits of using the tokenGroups
attribute are: (1) its values represent all groups, including Primary Groups and (2) its values also represent transitive group memberships. Transitive group membership means that when a user is a member of a group, that use is also a member of any subgroups of that group. For example, when groupB is a member of groupA, and a user is a member of groupA, that user is also a member of groupB.
The tokenGroups attribute is a multi-valued attribute. The attribute’s values represent the SIDs (security identifiers) for each group of which the user is a member.
The values for this attribute are in a binary format that does not directly represent group names. However, Fireware XTM can convert the binary values to values that it can use in a subsequent search.
Step 9 — Fireware XTM Calculates SID Values
Based on well-known algorithms, the XTM device calculates the SIDs associated with each value of the
tokenGroups attribute. After it determines which SIDs to find, it does a new search against the Active Directory LDAP database.
Step 10 — Fireware XTM Completes a Final Search to Find the Groups
This last search asks the Active Directory server to find the group object associated with each of the SIDs. The search looks for any object in Active Directory that has an attributed called objectSid, where the attribute’s value matches one of the SIDs the XTM device obtained from the calculation it did in the previous step.
The search asks Active Directory to tell the XTM device the Common Name of each object it finds from this search.
Step 11 — Active Directory Sends the Search Result
The Common Names for all groups that the user is a member of appear in the search result.
Step 12 — Fireware XTM Attempts a Bind with the User’s Distinguished Name
Finally, the XTM device can authenticate the user. To verify that the user is who he or she claims to be, Fireware XTM sends a bind request with the user’s credentials. It uses the Distinguished Name it got from the previous step for the bind name, and it sends the password that the user typed into the authentication dialog box. If this succeeds, the user is authenticated.
If the password the user typed for Firewall Authentication is incorrect, the user sees this error:
Authentication Failed: 'Specified username or password is not correct, please try again'
For all Mobile VPN with IPSec authentication failures, the remote client sees this in the client-side Log Viewer:
Optional Data that Active Directory Can Give Fireware XTM
Fireware XTM can get additional information from Active Directory when it reads the list of attributes in the server’s search response. This lets you use Active Directory to assign extra parameters to the authenticated user’s session, such as timeouts and Mobile VPN address assignments. Because the data comes from LDAP attributes tied to individual user objects, you can set these parameters for each individual user instead of being limited to global settings in Policy Manager.
However, Microsoft does not provide ready-made attributes you can use for these items, and you cannot assign values to these attributes with Active Directory Users and Computers.
To use these optional settings, you must:
• Extend the Active Directory schema to add new attributes for these items. • Make the new attributes available to the user object class.
• Give values to the attributes for the user objects that should use them.
Before you extend your Active Directory schema, you should thoroughly test and plan. Additions to the schema are generally permanent and cannot be undone. To find resources to help you plan, test, and implement changes to the schema, go to the Microsoft web site.
Microsoft provides two main methods to extend the schema. Both of these tools enable you to add attributes to the schema and make them available to an object class:
• The Active Directory Schema MMC snap-in
This is a GUI (graphical user interface) you can add as a snap-in to the Microsoft Management Console. It enables you to access and edit the schema.
• The ldifde (LDIF Data Exchange) command-line tool
This is a scriptable command-line interface to import or export LDIF files. LDIF is the LDAP Data Interchange Format. It specifies the format used to represent LDAP entries in a text file, to import and export directory data between directory servers.
After you add attributes to the schema, you must give them values. You cannot do this with Active Directory Users and Computers. Microsoft provides several different tools to assign values to the new attributes. Two commonly used tools are:
• The ldifde tool
Use this to import an LDIF file that specifies a value for the new attributes of each user object that should use them.
• The ADSI Edit snap-in to Microsoft Management Console
Use this tool to edit raw LDAP attributes. It enables you to access individual directory objects and edit the value of each object attribute.
Active Directory Authentication Process Details
Optional Attributes
To specify additional attributes for Fireware XTM to find in the Active Directory search response, in the
Add Active Directory Domain dialog box click Optional Settings. (See Figure 24.) The Active Directory Server Optional Settings dialog box appears.
Figure 26: Optional settings for Active Directory authentication
You can type the name of an LDAP attribute in each text box in Figure 26. Fireware XTM searches for these attributes in the list of attributes it gets from the search result, and uses the value of the attributes as follows:
• IP Attribute String
Type the name of the attribute Fireware XTM should use to assign the Mobile VPN client a virtual IP address. This should be a single-valued attribute. The value of the attribute should be a normal dotted-decimal IP address. The IP address must be within the pool of virtual IP addresses you specify when you create the Mobile VPN group.
This applies only to Mobile VPN clients.
If the XTM device does not find the IP attribute in the search response, or if you do not specify an attribute in Policy Manager, it assigns the Mobile VPN client a virtual IP address from the virtual IP address pool you create when you make the Mobile VPN Group.
• Netmask Attribute String
Type the name of the attribute Fireware XTM should use to assign a subnet mask to the Mobile VPN client’s virtual IP address. This should be a single-valued attribute. The value of the attribute should be a normal dotted-decimal subnet mask.
This applies only to Mobile VPN clients.
The Mobile VPN software automatically assigns a netmask if the XTM device does not see the netmask attribute in the search response, or if you do not specify one in Policy Manager. • DNS Attribute String
Type the name of the attribute Fireware XTM should use to assign the Mobile VPN client one or more DNS addresses for the duration of the Mobile VPN session. This can be a multi-valued attribute. Each value for the attribute should be a normal dotted-decimal IP address. This applies only to Mobile VPN clients.
If the XTM device does not see the DNS attribute in the search response, or if you do not specify an attribute in Policy Manager, it uses the DNS addresses you specify in Policy Manager in the
• WINS Attribute String
Type the name of the attribute Fireware XTM should use to assign the Mobile VPN client one or more WINS addresses for the duration of the Mobile VPN session. This can be a multi-valued attribute. Each value for the attribute should be a normal dotted-decimal IP address.
This applies only to Mobile VPN clients.
If the XTM device does not see the WINS attribute in the search response or if you do not specify an attribute in Policy Manager, it uses the WINS addresses you specify in Policy Manager in the
Network Configuration dialog box on the WINS/DNS tab. • Lease Time Attribute String
Type the name of the attribute Fireware XTM should use to control the absolute amount of time a user can stay authenticated (session timeout). After this amount of time, Fireware XTM removes the user from the list of authenticated users. This should be a single-valued attribute. Fireware XTM interprets the value of the attribute as a decimal number of seconds. It interprets zero as never time out.
This can apply to Mobile VPN clients and to clients that use Firewall Authentication.
- For Mobile VPN clients, when the timeout is reached, Fireware XTM sends an SA Delete
message to tell the client to delete its IKE and IPSec security associations.
- For Firewall Authenticated users, this message appears on the web authentication page when the session timeout is reached:
Authentication Failed: ‘Session timed out by session limit’
If the XTM device does not find session timeout attributes in the search response, or if you do not specify session timeout attributes for session timeout in Policy Manager, it uses these values:
- For Mobile VPN clients, select VPN > Mobile VPN > IPSec, select a Mobile VPN group to edit, and set the session timeout values on the General tab.
- For Firewall Authentication, select Setup > Global Settings and set the session timeouts. • Idle Timeout Attribute String
Type the name of the attribute Fireware XTM should use to control the amount of time a user can stay authenticated, when traffic does not pass from the user to the XTM device. If traffic does not pass to the XTM device for the specified amount of time, Fireware XTM removes the user from the list of authenticated users. This should be a single-valued attribute. Fireware XTM interprets the value of the attribute as a decimal number of seconds. It interprets zero as never time out. This applies to Mobile VPN clients and to clients that use Firewall Authentication.
- For Mobile VPN clients, when the timeout is reached Fireware XTM sends an SA Delete
message to tell the client to delete IKE and IPSec security associations.
- For Firewall Authenticated users, this message appears on the web authentication page when the idle timeout is reached:
Authentication Failed: ‘Session timed out by idle limit’
If the XTM device does not find idle timeout attributes in the search response, or if you do not specify attributes for idle timeout in Policy Manager, it uses these values:
- For Mobile VPN clients, select VPN > Mobile VPN > IPSec, select a Mobile VPN group to edit, and set the idle timeout values on the General tab
Before You Begin
Before You Begin
Necessary Equipment and Services
To complete these exercises you must have: • Windows 2003 or Windows 2008 Server
This must be a domain controller for an Active Directory domain.
The instructor should provide an Active Directory domain controller for the classroom domain. This is the authentication server for all students.
The domain for the exercises in this module is training.net. • Management computer
See the subsequent section for configuration information
• WSM version 11.7 software / Fireware XTM OS version 11.7 software
Your instructor provides this software, or you can download it from the WatchGuard web site with a valid LiveSecurity login.
• WatchGuard XTM device — 2 Series, 3 Series, 5 Series, 8 Series, 1050, or 2050
• Feature key
Your instructor will provide a feature key to enable the features the XTM device must have for these exercises. You use the feature key toward the end of the Quick Setup Wizard when you configure the XTM device.
• Ethernet cables
At a minimum, to complete these exercises you must have:
- One crossover Ethernet cable to connect your computer to the trusted interface on your student XTM device.
- One straight-through Ethernet cable to connect the external interface from your XTM device to a hub or switch that connects all student XTM devices to the central XTM device or Internet gateway.
• Optional Windows 2008 Server Virtual Machine
This must be a domain controller for an Active Directory domain.
The instructor should provide an Active Directory domain controller for the classroom domain. This is the authentication server for all students.
The domain for the optional Clientless SSO exercise is apac.wgtraining.net. • Optional Windows XP Virtual Machine for Domain Client Computer
This will be used for the optional Clientless SSO as a domain client in an Active Directory domain environment. Your Instructor provides this Virtual Machine (VM) as an optional training item.
Management Computer Configuration
Before you begin these exercises, make sure your management computer is configured correctly. • Install the WSM v11.7 client software and the Fireware XTM OS v11.7. You do not have to install the
WSM server components.
• Connect the management computer directly to the trusted Interface 1 on the XTM device with a crossover Ethernet cable.
• Make sure your management computer has an IP address in the same subnet as the trusted interface with the correct subnet mask. Use the XTM device trusted interface IP address as the
Firewall Configuration
If your XTM device is not yet configured, run the Quick Setup Wizard, and select routed mode. Routed mode has these defaults:
• The external Interface 0 is configured and enabled with a static IP address. Your instructor will tell you what IP address to assign to the external interface. • The trusted Interface 1 is configured and enabled with IP address 10.0.1.1/24.
Your instructor will give you an IP address to use for the trusted interface and for your management computer.
The exercises are designed so that all students can use the same IP address range for their trusted networks.
• None of the other interfaces are configured (they are all set to Disabled).
• The configuration file you open in Policy Manager includes these five policies: FTP, Ping, DNS, WatchGuard, and Outgoing.
Physically Connect the Devices
Because these exercises are designed for a classroom environment, the external interfaces of all student XTM devices should be connected to the same network segment that terminates at the instructor’s XTM device. Your management computer should be connected directly to Interface 1 on your XTM device.
Before You Begin
Exercise 1:
Allow Authenticated Users on the External Network to
Manage the XTM Device
When to Use Authentication for Access to the XTM Device
There are many situations where it is useful to be able manage the XTM device from external locations. When you force users to authenticate before they can manage the XTM device, you can use WSM tools to track who can access the XTM device. You can also restrict access to any resource protected by the XTM device.
Network Topology
In a typical installation, you connect the Active Directory server to a trusted or optional interface so the XTM device can protect it from the external network. For these exercises, we put the server on the external network so it is available to every XTM device in the classroom, and only one Active Directory server is necessary.
This exercise shows how to configure the XTM device for Active Directory authentication to a Windows server on the external network.
This diagram shows how your equipment is connected.
Configure the Active Directory Server
Your instructor has the Active Directory domain information for your classroom. For this exercise, we use these details:
• The training.net domain contains the organizational unit Accounts that is not in another container. • The user account student is included somewhere in this organizational unit.
• The user is a member of the Firebox Admins Active Directory group.
Configure the XTM Device
Specify an Active Directory Authentication Server
Use Policy Manager to configure the XTM device to use an Active Directory server for authentication.
1. Click .
Or, select Setup > Authentication > Authentication Servers.
The Authentication Servers dialog box appears. In this training
configuration, the Active Directory server is on the external network. In a typical installation the server would be on a trusted or optional network, protected by the XTM device.
2. Select the Active Directory tab.
3. Select the Enable Active Directory server check box.
4. In the IP Address text box, type 50.50.50.2.
5. In the Search Base text box, type OU=accounts,DC=training,DC=net.
6. For all other options, keep the default settings
Figure 28: The Active Directory configuration for this exercise
Before You Begin
Add a Group to the Authorized Users and Groups List
1. Select Setup > Authentication > Authorized Users/Groups.
The Authorized Users and Groups dialog box appears.
2. Click Add.
The Define New Authorized User or Group dialog box appears.
3. In the Name text box, type the name of the Active Directory group your instructor gives you. For this exercise, type Firebox Admins.
4. For the Type, select Group.
5. From the Auth Server drop-down list, select Active Directory.
Figure 29: Define the Active Directory group Firebox Admins
6. Click OK.
The new group appears in the Authorized Users and Groups dialog box.
Figure 30: The new Active Directory group appears in the Authorized Users and Groups list.
Edit the WatchGuard Policy to Allow Access for the Active Directory Group
1. Double-click the WatchGuard policy to edit it.
Figure 31: Edit the WatchGuard policy
Before You Begin Do not remove the other aliases from the
From list. The
Any-Trusted alias allows you to manage your XTM device from the trusted network.
2. In the From section, click Add.
Figure 32: The Edit Policy Properties dialog box. The Add Address dialog box appears.
3. Click Add User.
Figure 33: The Add Address dialog box
The Add Authorized Users or Groups dialog box appears.
4. From the right Type drop-down list, select Group.
The new group you added appears in the Groups list.
Before You Begin
5. Double-click the group.
The group appears in the Selected Members and Addresses list.
6. Click OK.
The Edit Policy Properties dialog box appears, with the changes to the WatchGuard policy
Figure 36: The finished WatchGuard policy
Before You Begin The automatically generated
WatchGuard-Authent ication policy allows TCP port 4100 connections to the XTM device only from trusted and optional networks. You must edit the policy to allow users on external networks to authenticate to the XTM device. Policy Manager automatically adds a new policy, the WatchGuard-Authentication policy, when you first add
a user or group to a policy.
Figure 37: The WatchGuard-Authentication policy is added automatically
8. Double-click the WatchGuard-Authentication policy to edit it.
A warning message appears.
9. Click Yes.
10. In the From section, click Add.
Though this policy limits port 4100 connections
To: Firebox, you can still get to external locations over port 4100 from trusted and optional networks. The Outgoing policy in Policy Manager allows port 4100 connections to external locations.
12. Click OK.
The Edit Policy Properties dialog box appears with the changes to the WatchGuard-Authentication policy. It allows external users to connect to the XTM device over port 4100 for Firewall Authentication.
Figure 38: The updated WatchGuard-Authentication policy
13. Click and save this configuration to the XTM device. Or, select File > Save > To Firebox.
Before You Begin
Demonstrate It: Authenticate to Your Partner’s XTM Device to Manage It
Before you begin:
You will not make any changes to your partner’s XTM device in this exercise. You need the
configuration password because you will make a configuration change to your partner’s XTM device in the next exercise.
• Give your partner your XTM device external IP address, the status (read-only) password, and the configuration (read-write) password.
• Get the same information about your partner’s XTM device from your partner.
Try to Connect to Your Partner’s XTM Device Without Authenticating First
1. From WatchGuard System Manager, select File > Connect to Device.
2. Type the external IP address and status passphrase for your partner’s XTM device and click Login. Because you did not authenticate first, you cannot connect. An error message appears.
Figure 39: Unable to connect
Authenticate to Your Partner’s XTM Device and Try to Connect Again
1. Use a browser to make an HTTPS connection to your partner’s XTM device over port 4100. Type https://<IP address of your partner’s XTM device>:4100. For this example, type https://100.100.100.10:4100
A browser warning message appears because the XTM device’s web server uses a self-signed certificate. The browser warning message you receive will be different depending on the browser you use. Some browsers have multiple warning pages.
2. In the browser warning message, select to continue to the web site.
If your browser has multiple warning message pages, click through the messages to import and accept the XTM device certificate, and proceed to the web site.
3. In the Username and Password text boxes, type the user credentials your instructor gives you. For this exercise, type student.
4. From the Domain drop-down list, select Active Directory.
Figure 40: Firewall Authentication screen