Creating Games in C++: A Step-by-Step Guide
By David Conger, Ron Little
... Publisher: New Riders
Pub Date: February 21, 2006
Print ISBN-10: 0-7357-1434-7
Print ISBN-13: 978-0-7357-1434-2
Pages: 464
Table of Contents | Index
Do you love video games? Ever wondered if you could create one of your own, with all the bells and whistles? It's not as complicated as you'd think, and you don't need to be a math whiz or a programming genius to do it. In fact, everything you need to create your first game, "Invasion of the Slugwroths," is included in this book and CD-ROM. Author David Conger starts at square one, introducing the tools of the trade and all the basic
Creating Games in C++: A Step-by-Step Guide
By David Conger, Ron Little
... Publisher: New Riders
Pub Date: February 21, 2006
Print ISBN-10: 0-7357-1434-7
Print ISBN-13: 978-0-7357-1434-2
Pages: 464
Table of Contents | Index
Copyright
Acknowledgments
Introduction
What's Different About This Book
What's in This Book?
System Requirements
Free Stuff on the CD
Who Am I?
Part 1: The Really Basic Stuff
Chapter 1. What it Takes to be a Game Programmer
Programming Skills
Computer Graphics Skills
Game Design Skills
Art Skills
Sound and Music Skills
Summary
Chapter 2. Writing C++ Programs
Introducing the Dev-C++ Compiler
Programming in C++
Essential Math Operators
Loops
While Loops
Do-while loops
Windows Programming
Game Programming
Summary
Part 2: ObjectOriented Programming in Games
Chapter 3. Introducing Object-Oriented Programming
Software Objects
Logical Operators
The If-Else Statement
Namespaces and Scope Resolution
A Brief Word About Structures
Summary
Chapter 4. Introducing the LlamaWorks2D Game Engine
A Step-by-Step Overview
How Does Llamaworks2D Work?
A Stationary Ball
A Bouncing Ball
Getting Good Results
Summary
Chapter 5. Function and Operator Overloading
What Is Overloading?
Implementing a Vector Class with Overloading
Summary
Chapter 6. Inheritance: Getting a Lot for a Little
What Is Inheritance?
Deriving Classes
Protected Members
Overriding Base Class Functions
Customizing Your Game with Inheritance
Summary
Part 3: The Essentials of Game Development
Chapter 7. Program Structure
Program Structure
File Structure
A Game Called Ping
Summary
Chapter 8. Sound Effects and Music
Sound Effects and Music Are Emotion
Storing Sound Data
Sound Effects in LlamaWorks2D
Noise, Sweet Noise
Play That Funky Music, Geek Boy
Summary
Part 4: Graduating to Better C++
Chapter 9. Floating-Point Math in C++
Getting into the Guts of Floating-Point Numbers
Case Study: Floating-Point Numbers and Gamespaces
Summary
Chapter 10. Arrays
What Are Arrays?
Declaring and Using Arrays
Problems with Array Boundaries
Summary
Chapter 11. Pointers
Why Are Pointers Important to Games?
Declaring and Using Pointers
Pointers and Dynamic Memory Allocation
Pointers and Inheritance
Arrays Are Pointers in Disguise
Summary
Chapter 12. File Input and Output
Games and File I/O
Types of Files
Summary
Chapter 13. Moving into Real Game Development
Sprites that Come Alive
High-Speed Input
Summary
Part 5: The Big Payoff
Chapter 14. No Slime Allowed: Invasion of the Slugwroths
What It Takes to Make a Real Game
Essential Game Design
Designing Invasion of the Slugwroths
Summary
Chapter 15. Captain Chloride Gets Going
Introducing Captain Chloride
Pulling It Together In The Game Class
Summary
Chapter 16. The World of Captain Chloride
The New Captain Chloride
Levels in LlamaWorks2D
Summary
Chapter 17. Captain Chloride Encounters Solid Objects
Bumping into a Solid Door
Picking Up a Key
Making the Door Open and Close
Summary
Chapter 18. That's a Wrap!
Time for Consolidation
Enter villains, Stage Left
Additions to the Game
Epilogue: Not the End
Glossary
Copyright
Creating Games in C++: A Step-by-Step Guide
David Conger with Ron Little
New Riders
1249 Eighth Street Berkeley, CA 94710 510/524-2178
800/283-9444
510/524-2221 (fax)
Find us on the Web at: www.newriders.com
To report errors, please send a note to [email protected]
New Riders is an imprint of Peachpit, a division of Pearson Education Copyright © 2006 by David Conger
Project Editors: Davina Baum, Kristin Kalning
Development Editors: Davina Baum, Denise Santoro Lincoln Production Editor: Myrna Vladic
Copyeditor: Liz Welch Tech Editor: Ron Little
Compositor: WolfsonDesign Indexer: Karin Arrigoni Cover design: Aren Howell Interior design: WolfsonDesign
Notice of Rights
All rights reserved. No part of this book may be reproduced or transmitted in any form by any means, electronic, mechanical, photocopying, recording, or otherwise, without the prior written permission of the publisher. For
information on getting permission for reprints and excerpts, contact
The information in this book is distributed on an "As Is" basis without
warranty. While every precaution has been taken in the preparation of the book, neither the author nor Peachpit shall have any liability to any person or entity with respect to any loss or damage caused or alleged to be caused
directly or indirectly by the instructions contained in this book or by the computer software and hardware products described in it.
Trademarks
Many of the designations used by manufacturers and sellers to distinguish their products are claimed as trademarks. Where those designations appear in this book, and Peachpit was aware of a trademark claim, the designations
appear as requested by the owner of the trademark. All other product names and services identified throughout this book are used in editorial fashion only and for the benefit of such companies with no intention of infringement of the trademark. No such use, or the use of any trade name, is intended to convey endorsement or other affiliation with this book.
9 8 7 6 5 4 3 2 1
Printed and bound in the United States of America
Dedication
This book is dedicated to my mother, Jan Conger, for all the good that she has done and still does.
Acknowledgments
This book has been one of the hardest projects I've ever worked on. Not because the book itself was hard to write, but because of three major
computer crashes (and two replacement motherboards), two serious illnesses, two surgeries, having to change compilers after the third chapter, and having to entirely rewrite the game engine after the fourth. I can honestly say that I could not have got through this book without the support of all those who
Introduction
The first video game I ever played (at age 13) was Pong. It was a very simple ping-pong simulation. During my teenage years, a few, more advanced games appeared on the market. Most notable were the Atari games such as Missile Command, a nuclear warfare simulator. When I was 19, I went to live for a couple of years in Japan. There I discovered a whole new worldseveral, in fact. Around the time I arrived in Japan, the game Space Invaders had just crested its phenomenal wave of popularity. I had never seen anything so cool. By the time I returned to the United States, video games were everywhere.
In the fall of 1981, I started college. Keith, a longtime friend and roommate, pointed to a class in the university's catalog and told me, "You have to take this programming class. I know you'll love it." He was right. By the time two weeks had passed, I knew I would be working with computers for the rest of my life.
And what did I specialize in? Graphics and games, of course.
When I started writing games in college, it was a long and difficult task. The only people who had a prayer of writing decent games were complete geeks (like me).
What's Different About This Book
There are lots of beginning game programming books. In the end, the question everyone asks is, "What's special about this book in particular?"
I'm glad you asked.
The short answer to your question is that this book is unlike 99 percent of all beginning game programming books in several respects.
It Doesn't Assume You Know How to Program Computers
Most people who want to get started in game programming don't know how to program at all. They are bright, creative, and innovativeand they like games. But they can't yet write computer programs.
Virtually every beginning game programming book I've ever seen assumes you know a programming language like C or C++. That means that most beginning game programmers have to spend months or years learning to program before they can even start a game.
What a waste.
If you want to be a game programmer, but you have little or no programming experience, this book is for you. As I mentioned earlier, the tools available for writing games make the whole experience much easier than when I started in the industry more than 25 years ago. There's no reason that a bright and creative person like you should have to jump through a lot of silly hoops learning to program before you learn to write games. You can learn to program computers and write games at the same time. Unfortunately, that thought hasn't occurred to most authors of beginning game programming books.
It Teaches You Real Game Programming Skills
There are a few, very rare, beginning game programming books that are written for nonprogrammers. To try and make things easy, they teach you to write games in a programming language called Basic. Unfortunately, no games are written in Basic. It's far too slow for real games. Instead, game
read one of these books, you'll have to start from scratch in a new programming language if you want to write a real game.
Unlike any other book on the market, this book teaches nonprogrammers how to write games in C++. When you finish reading this book, you'll be
reasonably proficient with the programming language that real game programmers use.
Also, I explain and demonstrate the techniques used by professional game programmers for animation and sound. In addition, I demonstrate that it is surprisingly easy to add essential physics to your games.
It Teaches You How to Build A Real Game
Many beginning programming books give you lots of nifty little sample
programs that demonstrate the concepts they're teaching. However, very few show you how to pull all of those concepts into a complete game. That's a skill in itself. And the process of building a complete game often stumps people who clearly understand how to write the individual pieces.
By the end of this book, you'll see how to write a complete game. The game we'll be building is called "Invasion of the Slugwroths." It's a simple side-scroller (I'll explain that term later) similar to many games that were popular in the 1980s and '90s.
Aren't most games today written in 3D?
Well, yes. But writing 3D games is much harder. If you start with a side-scroller like Invasion of the Slugwroths, you'll learn fundamentals of game programming before you have to deal with 3D concepts. It makes the learning process much easier and much more fun.
It Provides Everything You Need to Write Games
Not only does this book teach you everything you need to get started in game programming, it provides you with all of the tools as well. To write computer programs, you need a compiler, linker, and debugger. These can easily cost $500. Have no fear. You don't need to cough up your hard-earned cash. You'll find them all on the CD that comes with this book, at no extra cost.
uses, many game programmers use a game engine. A game engine supplies program code that performs the most common tasks in games. Professional game engines typically start at about $100. But don't go out and buy one. I've supplied one for you for free on the CD.
In addition, I've provided programs for making music, creating a game's graphics, and testing your animations. With the development tools and the game engine you get on the CD, the CD alone is well worth the cost of the book.
Both Teens and Adults Can Use This Book
I have been asked for years by parents what book they should buy to get their teenaged son or daughter started in game programming. Adults in their
twenties and thirties also often ask me how they can get started. I have difficulty recommending most books because they are really too technical. They're often too hard to understand for people who don't have a college degree in math, engineering, or computers.
Although this book is not written specifically for teens, it is usable by
everyone. If you're 15 or over, you can use this book. Both teens and adults will find everything they need right here. This book explains the terms and ideas it uses. It provides you with a lot of the essential program code
What's in This Book?
This book is divided into five main parts.
Part 1 gives an overview of the tools and skills you'll need to write games.
It also covers the most basic programming concepts.
Part 2 dives into object-oriented programming, which is a style of
programming used by all professional game programmers.
Part 3 shows how game programs are constructed. Here, you'll write your
first gamePing, a clone of the ancient Pong game. You'll also learn to add sounds to your games.
Part 4 raises your C++ skills to a level that enables you to write real
games.
Part 5 enables you to pull everything you've learned together to write the
game Invasion of the Slugwroths, and leaves you fully equipped to go on and write your own games.
System Requirements
To use the tools included with this book and to run the sample programs you compile as you read the chapters, you'll need a computer with at least the following:
500 MHz Pentium III computer.
Minimum 128 MB of system RAM.
Windows 98 Second Edition or later operating system.
OpenGL-compatible video adapter card. Virtually all video cards today are compatible with OpenGL.
Free Stuff on the CD
Note
If the HTML page is not displayed when you insert the CD, click the Windows Start button in your Taskbar and select Run. In the dialog box that appears, type <d>:\AutorunPro.exe, where <d> is the letter of
your CD/DVD-ROM drive.
On the CD, you'll find an assortment of essential tools for game programmers. Although I list them here, you can get more information on them by inserting the CD into your CD- or DVD-ROM drive. When you do, an HTML page will automatically display. That page contains a list of everything on the CD. In that list is an item called Tools, Tools, Tools. That item provides a link to a page in the CD that explains what the tools are and how to install them.
LlamaWorks2D This is the game engine you'll use to write your games. I wrote this version of LlamaWorks2D especially for this book. Building games with LlamaWorks2D will save you many hours of programming. In addition, it handles many of the repetitive and tedious tasks you have to do in order to get a game up and running. Using LlamaWorks2D, you'll spend less time with the mechanics of Windows programs and more time on games.
Dev-CPP The free Dev-C++ compiler is a combination of a compiler, linker, debugger, and program editor. You need all of these tools in order to write games. Therefore, you must install this program first.
Audacity Audacity is an excellent sound editor that is available for free. With Audacity, you'll be able to record sound effects and edit them for your games.
GIMP You'll need a program for drawing the images and animations your games use. Windows Paint, which is a free program that comes with
Windows, just doesn't have enough features for you to produce
your game runs.
And Much More In addition to the tools mentioned here, you'll find documentation for important graphics and sound technologies, an
outstanding music production program, a graphics file format conversion tool, a 3D image production program, and an animation tester. Please see the CD for more details.
Installation Instructions
I've made installing the programs in the CD extremely straightforward. On the main page that is displayed when you insert the CD, there is an entry called Tools, Tools, Tools. In that item is a link. When you click the link, you'll see a page called Installing the Free Tools. Find the tool you want to install on that page. For most of the tools, there is an installation link. Clicking this link runs the install program automatically. A few of the tools must be copied to your hard drive. The Installation section for that tool contains instructions on how to do that.
Compiling The Sample Programs
This book contains numerous sample programs that demonstrate the concepts it teaches. In order to view the programs, you must first compile them. The instructions for compiling them are slightly different for each program. To make things more convenient for you, I've written instructions for how to compile every program. You'll find the compilation instructions on the CD. To see them, insert the CD into your CD/DVD-ROM drive. On the HTML page that appears, you'll find a list item called Compilation Instructions. Click that link. At this point, an HTML page appears called Compiling the Sample Programs. This page contains a list of all of the sample programs grouped by chapter. To see how to compile a particular program, click on its link in the list. The
compilation instructions for that program will appear.
Who Am I?
Hi, I'm David Conger. I've been in the computer industry since 1981, when I took my first professional programming contract shortly after entering college. Most of my career has been focused on graphics, games, and network
programming. After graduating from college, I wrote firmware for graphics display controllers used on military aircraft. After that, I taught college-level programming classes for several years. My next career change enabled me to attain my long-standing goal of becoming a professional game programmer. I wrote games for American Laser Games, For Her Interactive Inc., and
Microsoft Corporation.
I started writing books in 1987. My first book was a collection of folktales from the Far East and India retold for Western children. Since then, I've written a fairly steady stream of computer books.
I play way too many games. If it wasn't for my wife and kids, I would hardly ever visit reality.
I have a lot of experience in computer graphics, games, writing, and teaching. I want to help you to get into game programming as fast and painlessly as possible. Game programming lets you get paid for being a programmer, designer, artist, composer, and general nutcase.
Part 1: The Really Basic Stuff
Chapter 1. What it Takes to be a Game Programmer
Chapter 1. What it Takes to be a Game Programmer
You're reading this book because you want to be a game programmer. You may not have any programming experience at all. That doesn't matter. This book shows you everything you need to know to get started. Before you finish reading this book, you'll see how to develop your own innovative games.
So what does it take to be a game programmer?
Game programming can include a wide range of skills. To be a game
programmer, you must, of course, know a bit about programming. You should also know the basics of computer graphics. In addition, it helps to know how to design games. You'll learn all of these skills right here.
It also helps to be a musician and an artist. That's not really required.
However, you do have to know how art and music are handled on a computer. If you've ever drawn something using the paint program that comes with
Windows, you know the basics of creating art on a computer. If you know how to rip MP3s, you know how to prepare music for games. But if you've never done either of these, don't worry. I'll teach you how to handle both art and music for your games.
Programming Skills
People are often fearful of learning to program computers. Programming can get pretty hairy at times, but learning to program proficiently is not as difficult as it may seem. In fact, if you like to tinker with things and find out how they work, programming often seems like play.
The first step in learning to program is to understand what a program is.
What is a Computer Program?
Note
Computer programs are just complex sets of instructions. The instructions tell the computer how to perform a task, such as playing a game.
Imagine you want to bake a cake. If you're like me, you don't know how to do that. In that case, you'd probably go to a cookbook and find a recipe. The
recipe is a set of instructions. If you follow the instructions exactly, you get a cake. If not, you may wind up with a foul-tasting mess.
A computer program is like a recipe. It's a set of instructions. The instructions in a program tell the computer how to be a game machine. If you write the instructions properly, you get a game. If not, you get a mess.
Each instruction in a computer program is made up of one or more statements in a programming language.
A what?
Computers don't understand human languages like English or Japanese. In fact, they don't really "understand" anything at all. But the computer's
microprocessor, which is also called its central processing unit (CPU) can
execute commands.
Every computer has a microprocessor. You can think of the microprocessor as the computer's "brain."
To be executable, the commands in a program must be in binary. If they're not, the microprocessor won't be able to execute them.
So what's binary?
Binary is a number system. It's also called the base 2 number system. People normally use the decimal, or base 10, number system. In other words, we count 0, 1, 2, 3, 4, 5, 6, 7, 8, 9, 10, and so on. Binary is base 2, so you count 0, 1, 10, 11, 100, 101, 110, 111, 1000, and so forth. You really don't have to know the details of using binary in order to program computers. All you have to know is that a binary number is a group of 0s and 1s. All instructions you give to a microprocessor must be 0s and 1s, or the microprocessor won't be able to execute them.
When a program is running, all of its binary instructions are stored as bits in your computer's memory. A bit is simply a binary 0 or 1. Therefore, the binary number 10 is 2 bits long. In computers, the bits in memory or on a disk are grouped together. A group of 8 bits is a byte. The binary number 10011100 is 8 bits long so it fits in 1 byte. A group of 1024 bytes is a kilobyte; 1024
kilobytes is a megabyte; 1024 megabytes is a gigabyte; 1024 gigabytes is a
terabyte. This is illustrated in Table 1.1.
Table 1.1. Groupings of Bits and Bytes in a Computer
A Group of... Equals
8 bits 1 byte
1024 bytes 1 kilobyte
1024 kilobytes 1 megabyte
1024 megabytes 1 gigabyte
The C++ Programming Language
When I started in computer programming, you had to understand binary to be able to write programs. There wasn't really any way to avoid it. These days, that's not necessary. Consider yourself lucky. Programming in binary isn't much fun. Instead, you can now write programs in languages that are similar to the languages people speak. Most games are written in a language called C++ (pronounced see-plus-plus).
The C++ programming language enables you to write statements that let you control all parts of a computer, such as the display, sound card, or joystick. With C++ statements, you can display aliens on the screen, let the player
control a space fighter, and shoot the aliens into space dust. C++ also lets you play music and add sound effects. It is a fast, efficient language that you must know to be a professional game programmer.
C++ programs start as C++ instructions that we store in text files. A text file is just what it sounds like: It's a file on the disk that contains textletters and numbers. C++ text files are also called source files. The entire collection of C++ instructions is called the source code of the program.
Tools of the Trade
Recall that microprocessors only execute commands that are binary numbers. C++ is not binary; it's more like English. How do you translate C++
statements into binary commands? Figure 1.1 gives the answer.
Figure 1.1. Translating a C++ source file into binary.
Figure 1.1 shows that there's a fair amount of work involved in getting source code translated into an executable binary program. In the next few sections, I'll explain each step.
Compilers
Figure 1.1 shows that you need a special program called a compiler to
translate your C++ source code into binary. Therefore, you'll need a compiler to write your games. I've provided you one for free. It's called Dev-C++ and you'll find it on the CD that comes with this book. The instructions for
installing it are in the Introduction.
Linkers
Compilers translate source code into an intermediate form called object code. Object code is binary, but it is not executable. Object code must be converted to executable code, which is an actual program that you can run on your
Whenever you compile your program with Dev-C++, the linker runs automatically, so your program is both compiled and linked in one step.
Note
To access the Dev-C++ compiler, just open the DVD and go to the \Tools\DevCPP folder. If you have not installed Dev-C++ on your computer, please turn to the Introduction and do that now.
Warning
All of the C++ source code you will encounter in this book is designed to work with Dev-C++. It may or may not compile with other compilers, such as Microsoft's Visual C++. Ideally, C++ source code should work with all compilers, but in reality, subtle differences exist between compilers produced by different
companies. Therefore, I strongly recommend that you use Dev-C++ for all the programs in this book. After you become an experienced C++ programmer, you should have no problem compiling this
What Is Dev-C++?
Although you'll often see me refer to Dev-C++ as a compiler, it is really an integrated development environment (IDE). An IDE contains everything you need to compile a program. This includes a program to edit your C++ source files, a compiler, a linker, and a debugger (linkers and debuggers will be explained shortly). The compiler, linker, and debugger that the Dev-C++ IDE uses are
Windows versions of the GNU Compiler Collection (GCC). The GCC is an open source project that is written by a large and vibrant developer community. You can find the GCC at http://gcc.gnu.org. The Windows version of the GCC is also an open source project whose home page is
www.mingw.org.
Debuggers
It's not possible for us to write perfect games in just one trywe'll make a lot of mistakes. In programming, mistakes are called bugs. It's normal for
programmers to accidentally create thousands of bugs in each game they write. Yes, I did say thousands.
As a result of the mistakes we make, you and I need a tool to help us find and fix bugs. Appropriately enough, that tool is called a debugger. You get a
debugger for free with Dev-C++. Like the linker, it's installed automatically.
Graphics Libraries
Many of the tasks involved in games are universal in game programming. For example, several times a second, every type of game gets user input, reacts to it, and updates the contents of the screen. No matter what type of game
you're writing, your game follows this design.
people I mentioned in the preceding paragraph. As a result, you already have code for the basic tasks you'll do when you write games. You don't have to write it yourself.
By the way, the graphics library you'll use is called OpenGL. OpenGL is used in high-powered games such as Quake and Doom from id Software. There is a version of the OpenGL graphics library for Dev-C++. The instructions for installing it are in the Introduction.
Microsoft also provides a graphics library called DirectX Graphics (more commonly called Direct3D). Like OpenGL, Direct3D is used for professional games. Direct3D is part of DirectX, which contains libraries for adding sound, music, and networking to games.
Whether you use OpenGL or Direct3D is largely a matter of preference. They both will get you where you need to go. Although this book primarily uses OpenGL, I've also provided the Microsoft DirectX Software Development Kit (SDK) on the DVD that comes with this book. It's in the folder\Tools\Microsoft DirectX SDK.
Tip
If you're planning on becoming a professional game programmer, it's best to be familiar with both OpenGL and DirectX.
If you have not installed Dev-C++ and OpenGL on your computer, please turn to the Introduction and do that now.
Game Engines
Games that are of the same type pretty much all work the same way. For example, all first-person shooters like Doom need code that does essentially the same set of tasks. All side-scrolling games, such as the old Super Mario Brothers or Sonic the Hedgehog, also use code that does basically the same things.
To make game programmers' lives easier, other programmers often develop
game engines. A game engine performs the most common tasks that a
shooters handles all of the tasks associated with displaying scenery, drawing bad guys, and so forth. You have to insert your own scenery, code for your weapons, and any other code that is specific to your game. The game engine handles displaying buildings, trees, and things like that. Figure 1.2 shows how game engines are used.
Figure 1.2. Games are built in layers of code.
As Figure 1.2 shows, games use game engines to get their work done. Game
engines, in turn, use graphics libraries to do all of their drawing. If you have a game engine and a graphics library, it saves you from writing a tremendous amount of code. All you have to do is add your game code on top of the game engine. That's the only part of the game that you have to write. Take my word for it; that's all you want to worry about. You'll find writing your game code challenging enough.
Note
The LlamaWorks2D game engine is on the CD in the folder \Tools\LlamaWorks2D, and you'll find instructions for installing LlamaWorks2D in the Introduction.
As mentioned earlier, different types of games each need their own game engine. So you may run across game engines that are for first-person shooters, others that are for flight simulators, and so on. The best game
them usually require you to buy the engine or pay a royalty when you sell your game. Some require both.
Games in 2D?
From the name LlamaWorks2D, you've probably figured out that this game engine does 2D rather than 3D games. You may also be wondering why I don't teach you how to do 3D games. The answer is simple: It's hard.
This book teaches the essential skills every professional game programmer must have. It does so by teaching you to write games in 2D, which is considerably simpler than doing 3D. However, don't think that your game programming skills will be anything less than professional when you get done. Many games today are written in 2D. Command and Conquer by Westwood Studios and SimCity by Maxis are two examples. They are both top-selling games that are written with 2D graphics.
Also, many 3D game programming techniques require that you first understand 2D game
Computer Graphics Skills
In addition to programming skills, you'll need to understand how computer graphics work. If you want to become a guru in computer graphics, be
prepared to do almost nothing but that for the rest of your career. However, you don't have to be a guru to start writing games. You just need to know a few fundamental concepts.
The Basics of Computer Graphics
The tool you'll use for displaying graphics in your games is a monitor, which is also commonly called a screen, or display. An understanding of monitors is the starting point for developing computer graphics skills.
How Computer Monitors Work
The internals of monitors aren't as complex as you might think. Figure 1.3
illustrates how they work.
Figure 1.3. How computer monitors work.
These days, many computer screens that do not use electron guns. Instead, they use an electrical current to make small cells of plasma glow different colors. These gas plasma displays are nice because they can be made quite flat. For this reason, they have long been used in laptop computers. Increasingly, they are also being used for desktop displays. Gas plasma displays are arranged just like
monitors that use electron guns. Specifically, they contain rows of pixels and each pixel is composed of a red, a green, and a blue dot.
A monitor, also called a screen or display, is coated on its front with a chemical called phosphorus. When electrons hit the phosphorus coating, the phosphorus glows. The color that the phosphorus emits depends on what chemicals you add to it. The phosphorus coating on the front of your screen is made up of groups of red, green, and blue dots. One group of dots is called a pixel. Every pixel has a red, green, and blue dot in it. To make a pixel turn a particular color on your screen, you mix different amounts of red, green, and blue.
Tip
When you write a game, you can assume that everyone who plays it will have a computer that supports the 800x600x24 graphics mode. That's a resolution of 800 pixels across and 600 rows of pixels with a color depth of 24 bits per pixel. If you want to write a cutting-edge game (not recommended when you're just starting out), you can assume that players' computers support the
1024x768x24 graphics mode.
The electrons that make pixels glow come from electron guns inside your
computer monitor. That's why the darn thing is so deep. The bigger the screen, the farther back the electron gun has to be so it can hit all the pixels. As
Figure 1.3 shows, color screens actually have three electron guns, one each
for red, green, and blue.
bottom. When they reach the end of the last scan line, they start again at the top of the screen. The time that it takes for the electron guns to hit every pixel on the screen is called the screen's refresh rate.
Selecting Graphics Modes
Computer monitors display better pictures if they have a high number of scan lines as well as a high number of pixels per scan line. In other words, if there are lots of pixels per row and lots of rows of pixels on the screen, your game looks better. It has a high resolution.
You specify a monitor's resolution by stating the number of pixels per row followed by the number of rows on the screen. So, for instance, a common resolution used by games is 800x600. That's 800 pixels per row and 600 rows on the screen.
All monitors are capable of displaying more than one resolution. Each
resolution is called a video mode. You'll often hear game programmers talk about 800x600 mode or 1024x768 mode. Obviously, the higher the resolution, the better your graphics look. The problem with that? Higher-resolution modes require more memory because drawing those graphics requires more
processing power. In addition, not every monitor has support for all high-resolution modes. The monitor itself is connected to a video adapter. The capabilities of the computer's video adapter also affect which modes a computer can set its monitor to. Table 1.2 shows some common modes.
Table 1.2. Common Video Modes
Mode Description
640x480 Supported on all monitors and adapters. Low resolution. Poor graphics.
800x600 Supported on all monitors and adapters. Decent resolution with decent graphics.
1024x768 Supported on most (but not all) monitors and adapters. High resolution with very good graphics.
everyone's computer, and that doesn't require too much memory and
processing power. Typically, that ends up being either 800x600 or 1024x768. The graphics mode also determines color depth. Color depth determines the number of colors a monitor can display. Every color is specified by a unique number. The number contains pixel values for the colors red, green, and blue. Every other color a monitor displays is created by mixing red, green, and blue.
Tip
With a color depth of 24 bits, you can get a good range of colors. Almost all video adapters support that color depth.
Suppose a graphics mode on a monitor has a color depth of 8 bits each for red, green, and blue, for a total color depth of 24 bits. Each set of 8 bits specifies an intensity of its respective color. Eight bits enables you to specify 256
individual numbers, 0255. A value of 255 for red means that the pixel's red is set to full intensity; 128 is half intensity; 0 is off, no red. With a 24-bit color depth, you can, for instance, set the 8 bits for red to 128, the 8 bits for green to 0, and the 8 bits for blue to 255 to get a color that contains some red, no green, and lots of blue all mixed together. The result is a nice shade of purple. The vast majority of video adapters actually support a color depth of 32 bits. They still use 24 bits for color. The extra 8 bits are used for special effects.
Displaying Pictures on a Computer Monitor
The images games display on screens are called bitmaps, pixel maps, or
pixmaps. A bitmap contains one item of data for each pixel you want to color
on the screen. As a result, we often end up calling the data items pixels. That's not strictly correct, since they're not really pixels. They contain data for pixels, so we tend to apply the name to them.
Figure 1.4 shows a Krelnorian who's not at all happy you showed up on his planet (Krelnor, which is just a hop, skip, and a hyperjump away from the popular tourist destination planet of Jaglon Beta).
If this picture is stored in a computer, it's stored in a bitmap. Notice that the bitmap is rectangularall bitmaps are. But the likelihood is that you just want to display the Krelnorian. Your game probably doesn't display the bitmap's
background. What your game needs to do is combine the image of the
Krelnorian with whatever's on the screen without displaying the background pixels in this bitmap. To get just the Krelnorian and not the background pixels, your game must make the background pixels transparent. The graphics library (OpenGL) and game engine (LlamaWorks2D) take care of that for you. When you add your bitmaps to a game, you'll need to tell the game engine which color is the background color. The library and the engine display the
Krelnorian but not the background color. As we get into animation in later chapters, I'll show you how this is done.
Animating Your Game
Tip
To get good animation, you need to display 30 frames per second or more.
Games aren't much fun if nothing moves. If you want to make the Krelnorian
in Figure 1.4 (or anything else) move, you use the same techniques that have
been used in movies and cartoons for over a century.
This technique is exactly how animation works in computer graphics. Your game draws a frame onto the screen, displays it for a portion of a second, and then draws the next frame.
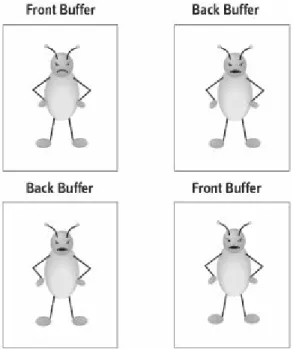
In reality, what games do is draw each frame into a chunk of the computer's memory. The chunk of memory is called a buffer. The image that is displayed on the screen is in the front buffer. While the player is looking at the frame in the front buffer, the game draws the next frame into another buffer called the
back buffer. When it's done, it switches the front buffer and the back buffer.
Because the back buffer is now the front buffer, the image in it is displayed on the screen. This process is illustrated in Figure 1.5.
Figure 1.5. Front and back buffers switch for each frame of
animation.
Figure 1.5 shows two rows of pictures. Each row represents what's going on in
a frame of animation. The picture marked as the front buffer is what's
currently displayed on the screen. In the top row, the picture on the left is the front buffer showing the unhappy Krelnorian. While that's being displayed, the game draws the next picture into the back buffer. When it is drawn, the game switches the buffers. The result is shown in the next frame, which is depicted in row two.
will be switched again. With each buffer switch, the Krelnorian appears to move slightly.
Game Design Skills
The term "game design skills" means different things to different people. If you're a programmer, it usually means that you design your code well. On the other hand, if you're someone playing a game, it means designing a game that is playable and fun. Let's take a quick look at both of those viewpoints.
Structuring Game Code
From a programming point of view, you must learn to design your game program code in such a way that the program is robust (in other words, it doesn't crash) and operates the way that games should. No matter what the game is, the program code performs the same essential set of tasks as every other game. Game programmers have found by experience that there are
certain ways of putting game program code together that work well. There are other ways that don't work well. This book not only shows you how to write games, it also explains and demonstrates how to build your programs in ways that work well. As we go through the rest of the book, I'll point out ways to structure your game code properly.
Note
You'll find a list of books on game design in the list of suggested reading on the CD.
Making Games Good
If you want to write your own games, you must spend time and effort (and probably money) finding out what makes a good game good. Also, you need to know what types of games there are and what sells.
their game was like, they said, "It's like Doom, only better." For the most part, they were wrong. The games were like Doom but not better.
At that time, the market was saturated with first-person shooters. Some of the games I saw that year at Comdex actually were better than Doom. However, because the market was so flooded with first-person shooters that year, not many of them were selling well (except Doom). As a result, even some very good games had mediocre sales.
To top it off, I saw some games that were very mediocre but were selling well. Why? Because they were different than most of what was on the market.
Make it Unique
When you approach game design, you have to come up with something unique. Just rehashing what's already out there is a waste of time. That
doesn't mean you have to think up an entirely new type of game. Your game can still fit into a well-established category. However, it has to be significantly different and better than the other games in that same category. And when I say "better," I don't mean that it just has better graphics. Players will often settle for graphics that are like everything else out there if the game itself is significantly better.
An example of what I mean is Halo, from Microsoft. Shooters like Halo were on the market for about 10 years before it came out. But Halo did quite well,
especially on Microsoft's Xbox. Why?
First, Halo had a unique story line that was well integrated into the gameplay. It also had a wider array of vehicles to drive and fly than most games. The vehicles added a lot of fun to the experience of playing the game. Halo also lets you move seamlessly between indoor and outdoor battles. At the time it was released, there weren't a lot of games that let you do that so easily and the outside areas of most games weren't nearly as large as those in Halo. Lastly, Halo had excellent music and sound that stood head and shoulders above most of the competition.
Tip
Because of these unique elements, Halo did quite well even though there was a decade of similar shooters on the market. Of course, Halo's excellent
graphics did help, but other games with similar graphics have not done as well. Upon its release, Halo's unique features set a new standard for all 3D shooters.
Make it Plausible
If aliens were to invade the earth, the Powers That Be wouldn't send just me to take care of the problem by myself. They'd send a whole bunch of people. I don't know how many games I've played in which one person was sent to save the entire planet (or galaxy or universe). It's completely implausible.
If I am the only person who can save the world, there has to be a reason. For example, I sometimes play a game called Gun Metal, from Yeti Studios. In this game, the player is the pilot of a prototype vehicle that can transform from being a battle robot to being a jet fighter. The idea works because the vehicle is a prototype, making it the only one of its kind. The player goes up against an army that is much better equipped and rather formidable. You have to be clever about how you approach each situation. Just diving in and shooting anything that moves isn't usually the best approach.
The nice thing about the setting of Gun Metal is that you have others helping you. Ground troops provide protection for your energy recharge unit. Drop ships move troops into position after you've cleared out the enemies. Battle cruisers take on enemy ships, with you providing support. You get the feeling that you're part of a much larger force, which is plausible in an invasion.
I've also played games that began with some kind of accident. The player in that case is usually the only survivor in a hostile environment. That's another plausible reason to be alone.
Make it Playable
I once played a game for the now-defunct 3DO game console in which I was the pilot of a vehicle that was to save the world from invasion. No reason was given as to why I was the only one sent (implausible). In any case, as I played, I quickly discovered that it was next to impossible to fly the vehicle well with the 3DO controller. Also, this game placed some of the power-ups I needed to continue out in areas that were constantly being bombarded from orbit. You could only get the power-ups and return to the safe area if your health was 100%. It was next to impossible to fight your way through to the correct
position with your health at 100%; there weren't enough recharges along the way for that. Because of this situation and the difficulty in controlling the
vehicle, the game was too hard to play after the fifth level. I just quit. It
probably wouldn't surprise you to know that, although the game had excellent graphics integrated with outstanding video, very good music, and killer sound effects, it sold quite poorly. It was so unplayable that word spread rapidly among 3DO owners, and they avoided it like the plague.
Make the Player Think
Let's face it: Anyone who's played games has played games in which you just go around and shoot everything that moves. That's been done to death. You've got to have a wider range of activities, and the player has to figure out what activities to use and when to use them. Let's go back to Halo for a good
example of this.
If you play Halo, you can play it much like the thousands of shooters that
came before it. That is, you can just shoot everything up. However, you can be cleverer about it, if you want to.
For example, instead of just stomping into an area and shooting up all the
aliens, Halo lets you sneak up on them while they sleep. Using your weapon as a club, you can kill the aliens by hitting them. It's possible to clear an entire large room of aliens by silently whopping them each on the back of the head. Another interesting thing about Halo is that you have constantly shifting
alliances during the game. Sometimes, it's best to let your enemies fight their enemies and just sneak on by without firing a shot.
It always increases the player's interest level if you provide multiple
banshee and fly over to the pyramid. But in order to do that, you have to get the invisibility cloak, which is quite a way back from the bridge.
Another approach to the bridge is to fight your way to the middle (or sneak there with the invisibility cloak), and then jump down onto one of the struts that hold up the pyramid structure. But to do so, you have to have good health and you have to have a weapon called a needler. The reason you want the
needler is that, as you're running down the strut to ground level, aliens are shooting at you. Because you need to concentrate on running down the narrow strut, you can't aim well. The needler is a heat-seeking weapon that doesn't require much aiming.
If you run down the strut fast enough, you can jump into a pit at the bottom. There you'll find a sniper rifle and a rocket launcher. You can grab those two weapons and go back up the strut. With the sniper rifle, you can kill all the aliens that shoot at you. With the rocket launcher, you can blow up the tank at the base of the pyramid. You can then run back down the strut and steal a
vehicle to take you up the pyramid.
The result of all of these game features is that you have the option of just blindly shooting your way through the game or thinking up better strategies. Games that allow the possibility of flexible thinking on the part of the player are much more fun.
One caution here: Making players think is not the same thing as making them guess your clever plot trick. An example will help clarify what I mean.
I once played a game in which the main character was a janitor on a starship. Of course, the starship was invaded by evil aliens and the rest of the crew killed (the janitor was sleeping in the broom closet). The aliens set the ship to blow itself up, so the hapless janitor needed to get off fast. To get him off the ship, you had to get him to open doors to the shuttle bay.
Tip
At that time, it was normal to type text commands into games (mice weren't common yet). So to get the janitor to open the doors, you had to walk him into the proper control room and type a command that would make him push a button. Unfortunately, the designers of the game decided to be clever here and make the player guess the exact command that was required to get the janitor to push the button. I tried "Push button." No luck. Next I tried "Push door button," "Press button," "Press door button," and so on. It wasn't all that long before I was typing "Press that @#!$% button you stupid *%^$#!"
The people who made this game didn't understand that making players guess the designer's cute trick is not the same as making the player think. The
Art Skills
You don't have to be an artist to write games. However, it does help. If you're not an artist, perhaps you have a friend who is. Either way, you have to know a bit about how computers draw pictures. As mentioned earlier, computers
display images on their screens as bitmaps. They can also store bitmaps in files on disks. You produce bitmap files with a paint program, like the one that
comes with Windows. The Windows Paint program is OK for starting out with. However, if you're serious about writing games, I encourage you to eventually invest in a professional paint program.
Note
Paint programs produce files that are in a variety of bitmap format. These include formats such as Windows bitmap (BMP), Tagged
Image File format (TIF), Windows Metafile (WMF), JPEG (JPG), GIF, and many others. The LlamaWords2D game engine supports BMP, JPG, and GIF.
At game companies, game programmers use what they call "placeholder art" to indicate what artwork they need in a game and where it goes. Usually, the
placeholder art that programmers create must be the same size as the final art. Other than that, it doesn't have to look much like the final art at all. An artist replaces the placeholder art with something that looks more
professional.
If you're writing games on your own, you have to draw all the artwork
yourself. This includes all the characters, monsters, guns, balls, hockey sticks, or whatever else you want players to see. The skills you need are the same skills needed by all artists. You can acquire them by taking classes at your local community college or high school. Many art supply stores also have listings of art classes. It's wise to focus specifically on classes that involve producing art on computers.
essentially take a 2D picture of it. If you want to get into 3D art, I suggest you take a look at a free program called Persistence of Vision (POV) Raytracer. You'll find it on the Web at www.povray.org.
Note
Sound and Music Skills
Tip
Many people have excellent recording programs and don't even know it. They often come free with your sound card in your
computer. If you got a CD with your sound card, take a look at the programs it contains. You might find a feature-rich sound recording program there. For example, many computers have sound cards from Creative Labs. If yours does, check the CD for a program
called Creative WaveStudio. It's a great free program for recording sound.
Great games have great music and sound effects. You don't have to be a
musician to write games if you can find one to work with you. If you do have a musician for a partner, or you are able to hire one, all you really have to know how to do is play their music during the game. However, the more musical skills you have, the better your game will be. Even just being a hobbyist musician can help you develop a better ear for music. You'll need it when
you're selecting music for the different portions of your game. Good music can tremendously intensify the experience of a game. If you doubt this, try playing your favorite game with the sound off. The experience is usually rather lifeless and sterile.
Computers store music in one of two ways. One way is to store a digitized version of the music itself. You usually do this with sound recording programs like Windows Recorder, which comes with Windows. That program will help you get started, but you'll eventually need a more professional program for
recording and mixing music.
Digitized recordings of music are generally stored in WAV or MP3 files. WAV files give better sound, but MP3 files are a lot smaller. You need to decide which is more important for your game: sound quality or disk space.
You can use the same technique for digitizing music you play on your electric guitar. Most guitar amplifiers have a headphone jack. Like the headphone output from a musical keyboard, an amplifier's headphone output can be plugged into the line-in jack of your computer's sound card.
The other way that computers store music is in MIDI files. A MIDI file doesn't store the music itself. Instead, it stores a set of commands that tell how to make the music. The computer then acts as a synthesizer and produces the music from the commands.
Warning
The technique of recording music by routing your instrument's headphone output into the line-in jack of your computer's sound card is the penny-pincher's approach. It may not give you the high-quality sound recordings that are common in professional games. If it doesn't, you need to explore other options, such as buying a
better sound card or external audio-to-digital conversion hardware.
MIDI files are much smaller than digitized music files. However, not all
computers have the same ability to synthesize music that your computer does. Some are better at it than your computer. Others are not as good at it. Either way, you cannot guarantee that the music will sound the same across all
computers. For that reason, most game developers use digitized music files rather than MIDI music files. Many will use MIDI instruments, such as
electronic keyboards, to produce their music. However, they'll record the MIDI music into an MP3 file so that they know the final product sounds the same on all computers.
Most electronic musical keyboards have a MIDI output jack. That means you can hook your musical keyboard into your computer to record your MIDI music. Virtually all computers have a jack on their sound cards that can be used either for a MIDI instrument or a joystick. You can plug your MIDI
keyboard into that. If you want to then digitize the resulting MIDI song, you use a music player like Windows Media Player or Winamp to play the song. At the same time, use Windows Recorder (or something similar) to digitally
Cheating Your Way to Great Music and Sound Effects
If you're not a musician, and you're not likely to become one soon, you can still get good music for your games. Many little-known musicians can be found on the Web on sites such as
GarageBand.com. They will often donate a song or two to your game to get the free advertising. Some of them sell royalty-free music that is designed for use in games.
Another way to get good music is to use a music generation program. There are several around, but the one I recommend is Band-in-a-Box. It enables you to quickly create great music by doing little more than clicking your mouse a few times.
For sound effects, you can get sound effect generator programs. However, I haven't been
particularly impressed by any of the low-cost programs. Instead, you might consider using sound effect collections, which you can purchase on CDs. There are also free collections you can download from the Web.
As with learning art skills, you can take music classes at your local community college or high school. Because the easiest way to get music into a computer is with an electronic musical keyboard, you should probably concentrate on
learning to play piano. However, it also helps to know how to play guitar and drums as well.
Whether or not you're a musician, you must deal with music and sound effects for all games. Without them, the experience of playing a game becomes
Summary
As you can see, it takes some skill to be a game programmer. You must know how to program computers, usually in C++. I'll begin showing how to program in C++ in the next chapter.
You also need to know the basics of computer graphics and animation. Computer animation works just like movie animation. That is, you show a series of pictures that differ slightly to produce the illusion of movement.
You're probably reading this book because you want to write your own games and not just work for a game company where someone else designs the
games. If that's the case, you need to know something about game design. Specifically, you need to make your games unique, plausible, and playable. Also, players will enjoy your game much more if you make them think.
You'll also need to know a bit about art and music. If you are not an artist or musician, it's a good idea to find friends or relatives who can help you with your game or buy collections of art and music that you can use in your game. It really is possible for two people, a programmer and an artist/musician, to develop a game that takes the industry by storm. To begin learning the programming skills you need to develop the next killer game, read on to
Chapter 2. Writing C++ Programs
chapter 1 discussed how C++ programs, such as games, are built. Specifically,
Introducing the Dev-C++ Compiler
Compilers today are more than just programs that translate source code into object code. They are complete integrated development environments (IDEs). With compilers like Dev-C++, you can write, compile, link, and debug your programs all in one development environment. So before we get into how to write C++ programs, let's take a brief look at Dev-C++.
At this point, I assume that you've installed Dev-C++ on your computer. If you haven't, please do it now. I'll wait.
Okay, now that you've installed Dev-C++, start it up. When you do, the program's main window resembles Figure 2.1.
Figure 2.1. The Dev-C++ program's main window.
[View full size image]
Warning
I think it's worthwhile to take a moment to repeat a warning that I gave in chapter 1. All of the C++ source code you will encounter in this book is designed to work with Dev-C++. It may or may not compile with other compilers, such as Visual C++. Ideally, C++ source code should work with all compilers, but in reality, subtle differences exist between compilers produced by different
companies. Therefore, I strongly recommend that you use Dev-C++ for all the programs in this book. After you become an experienced C++ programmer, you should have no problem compiling this
Can I Use Other Compilers?
You do not have to use the Dev-C++ compiler if you already have another one. For example, many programmers today use Microsoft's Visual Studio.
Commercial compilers such as Visual Studio are great, but they also cost a lot of money. Dev-C++ gives you the tools you need to get started, but it doesn't have all of the fancy Web programming tools, database access tools, and so on that you get with Visual C++. Most of these tools are not needed for game development. By itself, Dev-C++ does pretty much everything you need for game development in one IDE.
I recommend you start with Dev-C++. If you find that you need a bigger, more powerful tool set, you can always spend the money for a commercial compiler later.
Creating a Project
The first step in using Dev-C++ to write a C++ program is to create a new project. Here's how it's done.
Creating a Project File
1.
Start by choosing File from the main menu. Now select New and then Project. The dialog box in Figure 2.2 appears.
Figure 2.2. The New Project dialog box.
There are several options in the dialog box shown in Figure 2.2. Let's keep things simple and ignore most of them for now.
2. Click on the Console Application icon.
3. In the Name box, type hello and then click the Ok button.
4.
In the dialog box that appears, choose a directory to save your project file into. The main window now resembles Figure 2.3
Figure 2.3. The Dev-C++ main window after creating a new
project.
The tabbed box down the left side of the Dev-C++ window in Figure 2.3
contains information about the current project. If you click the + sign next to the folder icon by the word hello, Dev-C++ shows a list of all files in your project. Right now, the only file in the project is called main.cpp.
The larger pane on the right side of the window has a tab with the filename in it. This is the file editing pane. In this pane, you'll see your first C++
programDev-C++ generated it for you. This program doesn't actually do
anything. However, it contains all of the fundamental parts of a C++ program. We'll look at each one of them shortly.
Writing Programs
Let's go through the program in Figure 2.3 line by line. It's presented here in
Listing 2.1 for your convenience.
Listing 2.1. A very basic C++ program
1 #include <cstdlib> 2 #include <iostream> 3
4 using namespace std; 5
6 int main(int argc, char *argv[]) 7 {
8 system("PAUSE"); 9 return EXIT_SUCCESS; 10 }
The first two lines in the file main.cpp contain the following text:
#include <cstdlib> #include <iostream>
tasks that almost all C++ programs do. The main job of your linker is to link your program to the C++ Standard Libraries. You can also use it to link to other libraries. When you use other libraries, you will need to put special include statements in your program, similar to the ones shown in Figure 2.3. On line 4 of the file main.cpp, you'll find this statement:
using namespace std;
At this point, I'm not going to explain what this does. However, I will say that you need to put it at the beginning of most of your .cpp files. We'll revisit this statement, and others like it, in later chapters.
Lines 610 of main.cpp contain a block of code called the main() function. The main() function is the heart of every C++ program. I'll explain it in detail soon.
Right now, we'll take a look at how to add C++ statements to the main()
function.
Warning
I added line numbers to Listing 2.1 to make it easy to discuss the code. These line numbers are not allowed in C++ programs. Do not type them into your program. It will not compile. They're just
shown in the listing for convenience.
Modifying the Main() Function
1.
Delete the text on line 8 of main.cpp. Do this by using your mouse cursor to highlight both lines and then pressing the Delete key on your keyboard.
2.
Change the main() function so that it matches the code in Listing 2.2. The
Listing 2.2. The new version of main()
1 #include <cstdlib> 2 #include <iostream> 3
4 using namespace std; 5
6 int main(int argc, char *argv[]) 7 {
8 string yourName;
9
10 cout << "Please type your name and press Enter: "
11 cin >> yourName;
12
13 cout << endl << "Hello, " << yourName << endl << endl;
14
15 cout << "Press c and then Enter to continue...";
16
17 char justWait;
18 cin >> justWait;
19
20 return (EXIT_SUCCESS);
21 }
3.
Save main.cpp by selecting File and then Save from the main menu. The dialog box that appears enables you to enter a filename. In this case, you can just accept the name main.cpp by clicking the Save button.
Note
I've compiled all of the code listings in this chapter into executable programs. You'll find them on the CD in the
folder\Source\Chapter02\Bin.
Note
Compiling and Linking Programs
After you make the changes in Listing 2.2, press the F9 key on your keyboard to compile, link, and run the program. If you typed it correctly, you'll see a window that looks like Figure 2.4
Figure 2.4. The output from your first program.
[View full size image]
Congratulations! You've compiled, linked, and run your first C++ program. This is a console program. If you've been using computers a while, you know that it is essentially no different than old DOS programs. Figure 2.4 shows that this program is waiting for you to type your name and press Enter. After you do, it greets you with a friendly hello. It then asks you to press the C key followed by Enter. When you do, the program ends.
Tip
Programming in C++
Let's analyze the program we wrote in Listing 2.2. We're going to ignore the first five lines of the listing. For now, we'll just jump down to line 6, which is the beginning of the main() function.
The
main()
Thing
The main() function includes everything from line 6 through line 21. main() is the
program entry point. That's a fancy way of saying that the main() function is the
place where your C++ programs start executing. The program starts at main()
and executes one statement after another.
Actually, I should be more specific. When a C++ program executes, it starts with the first statement inside the main() function. The statements inside the main() function are all contained within the opening and closing braces, which
are the symbols { and }.
Note
Notice that every statement in the main() function in Listing 2.2
ends with a semicolon. Almost all statements in C++ must end with semicolon. I'll point out the exceptions as we go along.
The left brace appears on line 7. Programmers often call it the opening brace
of the function. The closing brace, which of course is the right brace, appears on line 21. All statements in the main() function must appear between the
opening and closing braces. The first statement in main() is the declaration of a