Intelligent
Application
Gateway
User Guide
December 2006
Version 3.7
© 2006 Whale Communications, a Microsoft subsidiary. All rights reserved.
This manual and the information contained herein are confidential and proprietary to Whale Communications, a Microsoft subsidiary, its affiliates and subsidiaries (hereinafter, the “Company”). All intellectual property rights (including, without limitation, copyrights, trade secrets, trademarks, etc.) evidenced by or embodied in and/or attached/connected/related to this manual, information contained herein and the Product, is and shall be owned solely by the Company. The Company does not convey to you an interest in or to this manual, information contained herein and the Product, but only a limited right of use. Any unauthorized use, disclosure or reproduction is a violation of the licenses and/or the Company’s proprietary rights and will be prosecuted to the full extent of the Law.
TRADEMARKS
Application Aware, and Attachment Wiper are service marks, trademarks or registered trademarks of Whale Communications or its subsidiaries in the United States and other countries, or both.
Netscape, and Netscape Navigator are service marks, trademarks or registered trademarks of America Online, Inc. or its subsidiaries in the United States and other countries, or both.
Carbon, Macintosh, Mac OS, and Safari are service marks, trademarks or registered trademarks of Apple Computer, Inc. or its subsidiaries in the United States and other countries, or both.
Citrix , Citrix NFuse, Citrix Presentation Server, Citrix MetaFrame, Citrix SecureGateway, and ICA, are service marks, trademarks or registered trademarks of Citrix Systems, Inc. or its subsidiaries in the United States and other countries, or both.
Debian is a service mark, trademark or registered trademark of Software in the Public Interest, Inc. or its subsidiaries in the United States and other countries, or both.
GNU, and GZip are service marks, trademarks or registered trademarks of Free Software Foundation, Inc. or its subsidiaries in the United States and other countries, or both.
Domino, Lotus, IBM Lotus, iNotes, Lotus iNotes, Lotus Domino, Notes, Sametime, and WebSphere are service marks, trademarks or registered trademarks of IBM Corporation or its subsidiaries in the United States and other countries, or both.
Linux is a service mark, trademark or registered trademark of Linus Torvalds or its subsidiaries in the United States and other countries, or both.
Active Directory, ActiveSync, ActiveX, Excel, Microsoft, Outlook, SharePoint, Visual Basic, Windows Mobile, Windows NT, Windows Server are service marks, trademarks or registered trademarks of Microsoft Corporation or its subsidiaries in the United States and other countries, or both.
Camino, Firefox and Mozilla are service marks, trademarks or registered trademarks of Mozilla Foundation or its subsidiaries in the United States and other countries, or both.
Novell, Novell Directory Services, Novell NetWare, and SUSE are service marks, trademarks or registered trademarks of Novell, Inc. or its subsidiaries in the United States and other countries, or both.
PGP is a service mark, trademark or registered trademark of PGP Corporation or its subsidiaries in the United States and other countries, or both.
Red Hat is a service mark, trademark or registered trademark of Red Hat, Inc. or its subsidiaries in the United States and other countries, or both.
Resonate is a registered trademark of Resonate, Inc. The Resonate logo and Resonate Central Dispatch are trademarks of Resonate, Inc. Resonate Central Dispatch contains technology protected under U.S. Patent 5,774,660.
ACE SecurID, RC4, and RSA SecurID, are service marks, trademarks or registered trademarks of RSA Security Inc. or its subsidiaries in the United States and other countries, or both.
All other trademarks, copyrights, product and or service marks mentioned in this manual, whether claimed or registered, are the exclusive property of their respective owners.
DISCLAIMER
The Company has reviewed this manual thoroughly. All statements, technical information, and recommendations in this manual and in any guides or related documents are believed reliable, but the accuracy and completeness thereof are not guaranteed or warranted, and they are not intended to be, nor should they be understood to be, representations or warranties concerning the products described. Further, the Company reserves the right to make changes to the information described in this manual at any time without notice and without obligation to notify any person of such changes.
LIMITATION OF LIABILITY
Neither the Company nor any of its worldwide subsidiaries or distributors or management or employees grants any warranties in respect to any damages or deficiencies resulting from accident, alteration, modification, foreign attachments, misuse, tampering, negligence, improper maintenance, abuse or failure to implement any updates furnished. The Products must be used and maintained in strict compliance with the instructions and safety precautions of the Company contained herein in all supplements thereto or in any other written documents of the Company. The products must not be altered without prior written consent of the Company.
The Company grants no warranties with respect to the Products, either express or implied, including any implied warranties of merchantability or fitness for a particular purpose. The Company will have no liability for any damages whatsoever arising out of or in connection with the delivery, installation, use or performance of the product. In no event shall the Company be liable under any legal theory (including but not limited to contract, negligence, misrepresentation, strict liability in tort or warranty of any kind) for any indirect, special, incidental or consequential damages (including but not limited to loss of profits), even if the Company has notice of the possibility of damages.
Without limiting the effect of the preceding clauses, the Company's maximum liability, if any, for damages (including but not limited to liability arising out of contract, negligence, misrepresentation, strict liability in tort or
SAP is a service mark, trademark or registered trademark of SAP AG or its subsidiaries in the United States and other countries, or both.
Java, JavaScript, JRE, and Sun are service marks, trademarks or registered trademarks of Sun Microsystems, Inc. or its subsidiaries in the United States and other countries, or both. Enhanced HAT owned by Sun Microsystems, Inc.
Norton and Symantec are service marks, trademarks or registered trademarks of Symantec Corporation or its subsidiaries in the United States and other countries, or both.
Apache is a service mark, trademark or registered trademark of The Apache Software Foundation or its subsidiaries in the United States and other countries, or both.
Terminal Services is a service mark, trademark or registered trademark of The Regents of the University of California or its subsidiaries in the United States and other countries, or both.
Unix is a service mark, trademark or registered trademark of The Open Group or its subsidiaries in the United States and other countries, or both.
XCompress is a service mark, trademark or registered trademark of XCache Technologies, Inc. or its subsidiaries in the United States and other countries, or both.
Document Name Intelligent Application Gateway User Guide Document Revision 3.7
Date December 2006
Contents
Chapter 1: Introduction... 15
Overview ...15
Control Access ...15
Protect Assets ...16
Safeguard Information ...16
Intelligent Application Gateway Architecture ...16
Broad Set of Connectivity Options ...17
Integrated Application Firewall ...18
Application Aware™ ...18
Supported Applications ... 18
Trunks: the IAG Transfer Channels ...19
Supported Browsers ...19
Security Management Tools ...20
Monitoring and Control Tools and Interfaces ...21
Encryption ...21
Encryption Passphrase ...22
High Availability Array ...23
About This Guide ...23
Conventions Used in This Guide ...25
Chapter 2: SSL VPN Portals ... 27
Creating an SSL VPN Portal ...28
6 Contents
Defining Authorization for Portal Applications ...38
Selecting Users and Groups ...43
Optional Configuration ...46
Configuring Global Host Address Translation ...46
Configuring Application Subnets ...48
Changing the Application Access Portal Port Number ...49
Where To Go From Here ...49
Chapter 3: Single Application Sites... 51
Optional Pre-configuration of the Services ...52
Creating a Webmail or a Basic Trunk ...54
Where To Go From Here ...57
Creating a Redirect Trunk ...58
Editing Trunks ...59
Editing in the Configuration Pane ...59
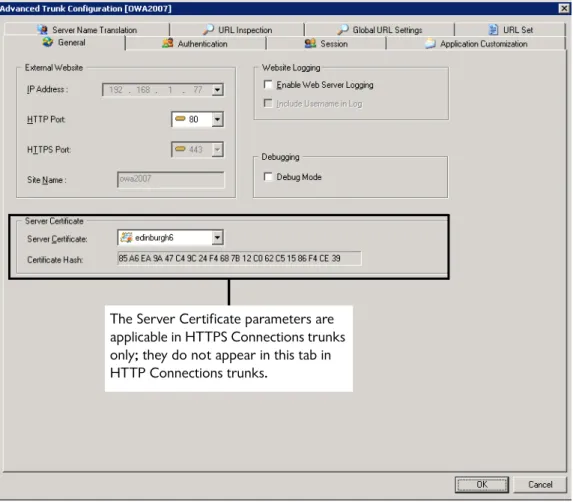
Editing in the General Tab ...61
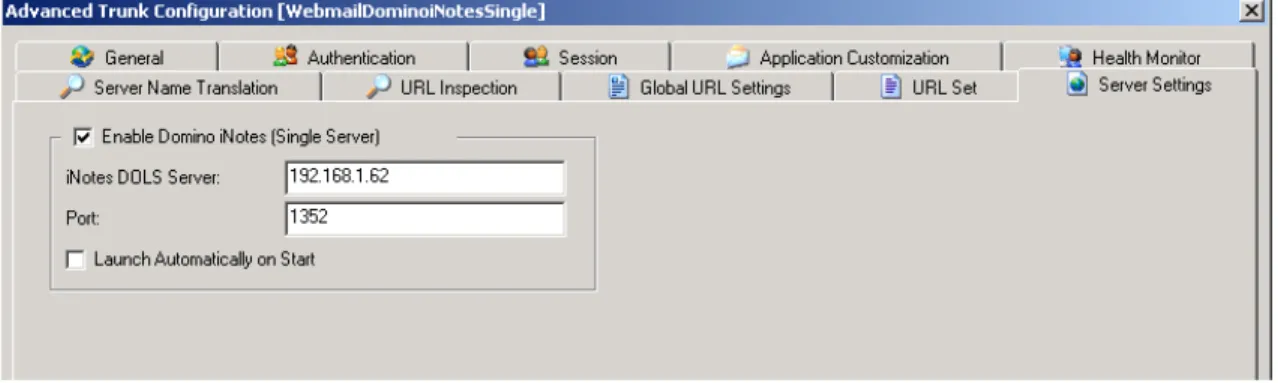
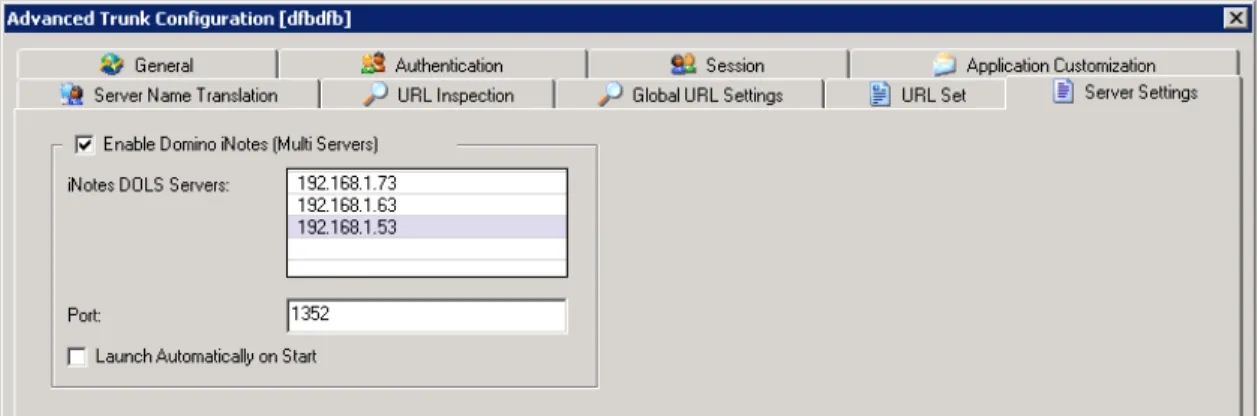
Editing Webmail Trunk Server Settings ...64
Domino iNotes (Single Server) ...65
Domino iNotes (Multiple Servers) ...66
Chapter 4: Application Settings... 67
Editing Application Properties ...67
Accessing the Application Properties Dialog Box ...68
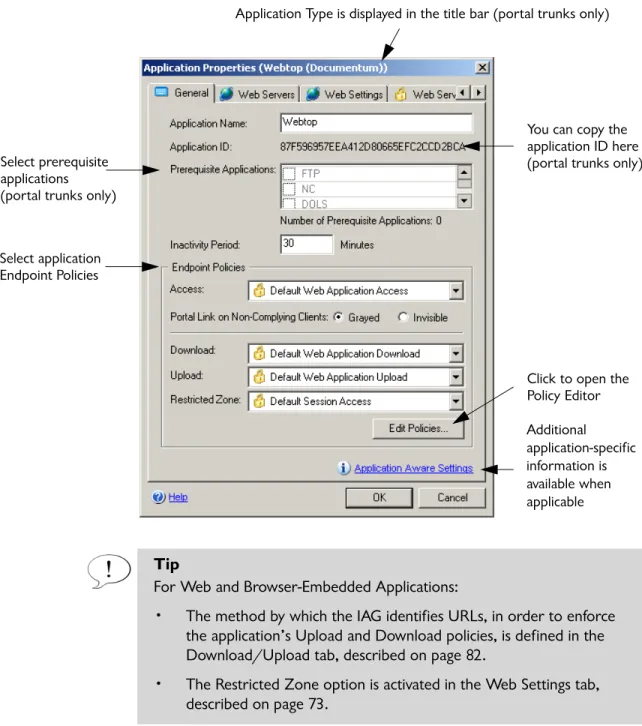
General Tab ...68
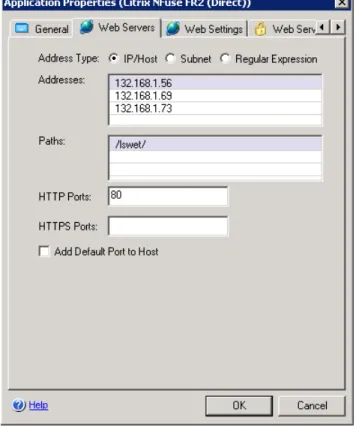
Web Servers Tab ...71
Web Settings Tab ...73
Application Authentication ... 74
General Web Settings ... 75
User Authorization Data ... 77
Cookie Encryption Tab ...80
Global Exclude List ... 82
Download/Upload Tab ...82
Server Settings Tab ...85
Client Settings Tab ...86
Portal Link Tab ...87
Authorization Tab ...91
Duplicating an Application ...91
Chapter 5: Endpoint Security ... 93
Endpoint Policies ...93
Endpoint Detection ...95
Session Endpoint Policies ...95
What Information is Collected from the End User’s Computer? ... 97
Application Endpoint Policies ...99
Defining Application Endpoint Policies ... 99
Editing Application Policies ... 100
Default Policies ...101
Basic Policy Configuration ...103
Advanced Policy Configuration ...104
Advanced Configuration Overview ... 105
Configuration in the Advanced Policy Editor... 106
Variable Formats ... 107
Endpoint Settings ...108
Attachment Wiper ...110
Configuring the Attachment Wiper ...112
Cleanup of Items That Are Saved Outside the Cache ...113
8 Contents
Certified Endpoints ...118
Certified Endpoint Configuration Overview ...118
Enabling Certified Endpoint Using Microsoft CA Locally ... 119
Enabling Certified Endpoints Using a Remote CA ... 122
Certified Endpoint Configuration Steps ...123
Installing a Microsoft Certificate Authority (Local CA Only) ... 124
Defining a Certification Authority Policy (Local CA Only) ... 128
Editing the Default Configuration (Local CA Only) ... 131
Preparing Endpoint Computers that Use Internet Explorer (Local CA Only)... 134
Adding Certified Endpoint Enrollment to the Trunk (Local CA Only) ... 135
Adding the CA to the Certificate Trust List (All CAs)... 136
Backing Up the Certificate Settings (All CAs)... 140
End-User Interaction (Local CA Only) ...140
Requesting Certified Endpoint Status ... 142
Checking the Certified Endpoint Request Status ... 144
Installing the Certificate and Logging In as a Certified Endpoint User ... 144
Viewing and Processing Certificate Requests (Local CA Only) ...146
Whale Client Components ...147
Installing and Running the Components on Endpoint Computers ...150
Prerequisites for Installing the Whale Client Components... 151
Online Whale Client Components Installation ... 152
Whale Client Components Installer ... 154
Offline Whale Client Components Installation ... 157
Prerequisites for Running the Whale Client Components ... 159
IAG Trusted Sites ...160
Remote Configuration of Users’ Trusted Sites Lists... 162
Restoring the Whale Client Components Defaults ...165
Chapter 6: SSL Wrapper... 171
Technology Overview ...172
Socket Forwarding Activation Modes... 174
Enabling Access to SSL Wrapper Applications ...175
SSL Wrapper Java Applet Prerequisites ...176
Uninstalling the SSL Wrapper Java Applet ... 178
Socket Forwarding Component Installation ...178
LSP Conflict Detection ... 179
Supported Applications ...181
Generic Applications ...182
Configuration Overview ...183
Remote User Interaction with the SSL Wrapper ...183
Portal Activity Window ...184
Connections Area... 186
Applications Area ... 187
Portal Activity Window Buttons ... 188
Chapter 7: Network Connector ... 189
Network Connector Technology Highlights ...189
Configuring the Network Connector ...190
Configuring the Network Connector Server ...190
Network Segment Tab ... 192
IP Provisioning Tab... 193
Access Control Tab ... 196
Additional Networks Tab... 197
Advanced Tab ... 199
10 Contents
Network Connector Troubleshooting ...203
Troubleshooting the Network Connector Server ...203
Server Logs... 204
Server Resources... 205
Network Traffic Logs ... 205
Troubleshooting the Network Connector Client ...206
Chapter 8: Providing Access to Internal File Systems ... 209
Local Drive Mapping ...209
Mapping Shares ...210
Windows 2003/XP Support ...210
File Access ...211
How File Access Works ...212
Enabling Remote Access to the File Access Application ...212
Windows Domain Settings ... 212
Novell NetWare Settings ... 220
Configuring File Access in the Configuration Program: Overview ...220
File Access Administration Settings ...221
Accessing the File Access Window ... 222
Configuring Home Directory, Mapped Drives, and Share Permissions... 223
Novell Logon Settings... 227
Configuring Access to Domains, Servers, and Shares... 229
Configuring Authentication with the Novell Directory Service ...231
Changing the Date Format of Files and Folders ...234
Hiding the Folder Tree in the End-User Interface ...234
Chapter 9: Monitoring and Control ... 237
Event Logging ...237
Overview ...238
Event Categories ... 238
Event Logging Reporters ... 238
Optional Event Logging Configuration Steps ...239
Configuring General Settings ...240
Configuring the Built-In Reporter ...242
Configuring the RADIUS Reporter ...243
Configuring the Syslog Reporter ...244
Configuring the Mail Reporter ...245
Enabling the Mail Reporter to Send Messages ... 246
Configuring which Messages are Sent by the Mail Reporter... 247
Message Configuration ...249
Configuring Event Messages in the Message Definitions File... 249
Event Logging Message Definitions File... 250
Event Messages Application Interface ... 257
Disabling Event Logging and Reporting ...258
Web Monitor ...258
Accessing the Web Monitor ...260
Enabling Web Monitor Access from Computers Other Than the IAG ... 261
Web Monitor Browser Support ... 264
Web Monitor Layout ...264
Tips for Using the Web Monitor ...265
Session Monitor - Current Status ...266
Session Monitor Over Time... 267
Session Monitor - Active Sessions ...268
Session Details ... 270
Session Monitor - Statistics ...271
Session Monitor - Statistics Window: Query Form ... 272
Session Monitor - Statistics Window: Query Results... 273
Application Monitor - Current Status ...275
12 Contents
Application Monitor - Statistics ...279
Application Monitor - Statistics Window: Query Form ... 279
Application Monitor - Statistics Window: Query Results View ... 281
Application Access Details ... 283
User Monitor - Current Status ...285
User Monitor Over Time ... 286
User Monitor - Active Sessions ...287
User Monitor - Statistics ...288
User Monitor - Statistics Window: Query Form ... 289
User Monitor - Statistics Window: Query Results View... 290
User’s Application Access Statistics ... 291
Event Viewer ...293
Event Query ...295
Event Report ... 297
Web Monitor High Availability Support ...298
Accessing IAG Servers in the Array ... 299
Analyzing History Reports Once an IAG Server is Removed from the Array ... 300
SSL Event Monitoring ...301
Chapter 10: Troubleshooting... 303
Backup & Restore Utility ...303
Backing up the Configuration ...304
Backing up the Configuration in the Configuration Program ... 304
Running the Backup Utility as a Console Application ... 305
Restoring the Configuration ...305
Restoring the Configuration in the Configuration Program ... 306
Running the Restore Utility as a Console Application ... 306
Error Logging and Process Tracing ...307
Error Server and Trace Configuration File ...307
Individual Trace Sections ... 308
General Trace Configuration Section ... 310
Error Server Trace and Log Files ...311
File Location and Naming ... 311
Size and Quantity of Files ... 312
Log File Cleanup ...313
Log File Cleanup Parameters ...314
How the Log File Cleanup Process Works ...314
Configuring Log File Cleanup Parameters ...317
Excluding IIS Log Files from the Log File Cleanup Process ...318
Support Utilities ...319
Running Support Utilities Tests ...320
Running the Data Collection Utility ...321
Restarting the Web Service in the IIS ...321
Chapter 1
Introduction
Overview
The Whale Communications Intelligent Application Gateway (IAG) is a Secure Socket Layer Virtual Private Network (SSL VPN) that provides employees and partners with policy-based secure access to applications and data from any PC or device and any location.
The IAG secure access solution enables remote access from diverse endpoints through a single point of entry to almost any business application and file share, while enforcing user authentication and authorization over a policy-defined application-layer connection. Endpoint security management enables granular access control and deep content inspection and application protection.
Running over Microsoft® Internet Security and Acceleration (ISA) Server 2006, the IAG enables users to access line-of-business, intranet, and client/server resources from a broad range of devices and locations, while providing infrastructure protection and information safeguards for corporate applications and data.
Control Access
Secure, web-based access to business critical applications and data: • Differentiated and policy-driven access to network, server, and data
resources.
• Flexible application-intelligent SSL VPN from any device or location. • Highly granular access and security policy enforced at the session,
application, and functionality levels.
• Comprehensive basic and form-based authentication through Active Directory®, RADIUS, LDAP, and SecurID®.
• Customizable, identity-based web portal with single-sign-on (SSO). • Handles embedded browser applications.
16 Chapter 1: Introduction
Intelligent Application Gateway Architecture
Protect Assets
Integrated application protection helps ensure the integrity and safety of network and application infrastructure by blocking malicious traffic and attacks:
• Application-layer firewall blocks non-conformant requests, such as buffer overflow or SQL injection, on application protocols.
• Comprehensive protocol validation and deep content inspection with both positive and negative logic rulesets.
• URL cloaking and full functionality for remote users through dynamic URL rewrite and HTTP parameter filtering.
• Application Optimizers provide out-of-the-box protection for high-value applications such as SharePoint® Server, Microsoft® Outlook® Web Access, SAP®, and WebSphere®.
• Comprehensive monitoring and reporting; integrates with third-party risk and policy management platforms.
• Extensible infrastructure and tools for custom application publishing and scripting.
Safeguard Information
Comprehensive policy enforcement helps drive compliance with legal and business guidelines that require information usage criteria to limit exposure and liability when accessing sensitive corporate data: • Ensures network integrity by restricting client access based on
endpoint security profile.
• Strong endpoint security management and verification helps ensure endpoint health compliance and session control.
• Enforces policy controls over actions within an application.
• Cache-cleanup tailored to specific applications removes downloaded files and pages, URLs, custom caches, cookies, history, and user credentials.
• Detects endpoint security state.
Intelligent Application Gateway Architecture
The IAG consists of four elements: • SSL VPN platform
• Endpoint security • Application security
The IAG integrated approach rests on an architecture that functions across the client, proxy, and appliance tiers, and is managed through a single policy engine. The gateway functions at the application layer, terminating both inbound and outbound communications and parsing traffic through full inspection at the application layer.
The ability to understand traffic flows within the context of specific applications is the foundation for the IAG application-specific optimizers, and underpins the gateway’s ability to enforce endpoint policy at the browser. This application intelligence allows the gateway to extend access to enterprise applications to unmanaged endpoints without creating risks to network integrity; it avoids having to resort to tunneling at the
network layer and jeopardizing back-end resources. In addition, the gateway’s underlying application intelligence provides the ability for administrators to create granular access control policies, to cordon off even parts of an application or network files, based on user profile. The gateway incorporates a native host-checker engine that can be customized to detect third-party anti-virus software or personal firewalls, and supports integration with third-party inspection tools. This engine can also extend far further into the client-side and detect virtually any metric or watermark used by an organization to tag an asset.
Broad Set of Connectivity Options
In order to support a wide variety of applications, the gateway supports the following connectivity options:
• Web proxy, for the support of web applications. The gateway’s content translation engine removes the need for a client component, enabling pure browser access.
• The SSL Wrapper and the inherent Socket Forwarding component enable access to non-web applications, such as Native Outlook, Citrix®, and Telnet, based on specific application knowledge. It utilizes ActiveX® and Java™ applet controls for SSL tunneling. • The Network Connector turns remote clients into part of the
corporate network, supporting full connectivity over a virtual and secure transparent connection. It enables the gateway to support split tunneling configurations and afford greater network reliability and performance.
18 Chapter 1: Introduction
Intelligent Application Gateway Architecture
Integrated Application Firewall
The gateway’s deep application-level filtering, assessed through
application behavior knowledge, prevents exploits that cause unexpected application responses. It blocks potentially malicious traffic using
positive- and negative-logic rules that identify errant commands and syntax and reduces the immediacy of server software patches by providing protection from zero-day attacks.
Application Aware™
Because the IAG is application aware, it can address application-specific issues, including security concerns and functionality requirements. This ability enables organizations to customize the behavior of specific
applications when accessed remotely. The IAG provides out-of-the-box support for key applications, to allow for rapid optimization of most popular applications in use today. Out-of-the-box application support is optimized for each application-type, including features such as URL Inspection rulesets and character definitions, wiping out sensitive information possibly recorded by a web browser during an SSL VPN session, and more.
In addition, the application aware approach provides administrators with tools and interfaces that enable them to define features which are not supported out-of-the-box for each application individually.
Supported Applications
The SSL VPN portal supports the following groups of applications:
• Built-in Services are services that are supplied with the IAG, such
as File Access or Web Monitor.
• Web Applications are applications that use HTTP/HTTPS and a
web interface, such as Microsoft Office SharePoint Server 2007 and Outlook Web Access.
• Client/Server and Legacy Applications are applications that use
non-HTTP/HTTPS protocols and are handled by the SSL Wrapper. Examples of client/server and legacy applications include: Telnet; Citrix® MetaFrame® Program Neighborhood applications,
Microsoft® Windows® Terminal Services Clients, Microsoft Outlook, and more.
• Browser-Embedded Applications are web initiated applications
that use a web-based interface to create a non HTTP/HTTPS connection, and are handled by the SSL Wrapper. These include Citrix NFuse®, IBM WebSphere Host-on-Demand, Lotus® SameTime®, Terminal Services Web Client, and others.
In addition to the applications that are supported out-of-the-box, you can define your own generic applications, such as a generic web application, where you define all the application settings, rulesets, and definitions according to the application’s requirements.
Trunks: the IAG Transfer Channels
Data is transferred through the gateway via transfer channels, or trunks, where each trunk is related to the type of data being transferred: HTTP or HTTPS. Each trunk is divided into two channels, one incoming and one outgoing, allowing for bi-directional data flow.
You can configure three types of trunks:
• Portal trunk: a forked one-to-many connection, where the same IP address is used to access multiple applications. Use it to enable access to any number of web and non-web applications, for both out-of-the-box and generic applications.
• Webmail trunk: a one-to-one connection, enabling access to a single Webmail application. A Webmail trunk is automatically created with authentication, application customization, and URL inspection rules that are optimized for the Webmail application you are running. • Basic trunk: a one-to-one straight line, where one IP address routes
to a single web server, enabling access to any generic web application.
Supported Browsers
On endpoint computers, the following browsers are supported:
Table 1. Supported Browsers
Operating System Supported Browsers
Windows 2000 • Internet Explorer 6.0
• Mozilla® family: Netscape® Navigator® 7.1.x, 7.2.x; Mozilla 1.7.x; Firefox® 1.0.x and higher
Windows XP/2003 • Internet Explorer 6.0, 7.0
• Mozilla® family: Netscape Navigator 7.1.x, 7.2.x; Mozilla 1.7.x; Firefox® 1.0.x and higher
20 Chapter 1: Introduction Security Management Tools
* Supports mobile Internet connectivity.
Although other browsers might also be functional, for optimal performance, Whale Communications extends support to these versions only.
For those users running other operating systems or other browser-versions, our portal homepage has been reworked to present a stripped-down page for browsers that do not support the rich environment
necessary to support the entire range of IAG features, such as scheduled logoffs and session timeouts. The limited portal presents users with a page containing links to all applications; when a user clicks a link, the application opens in a new window. The limited portal does not, however, include the Whale toolbar, which enables additional IAG features such as credentials management and system information.
Security Management Tools
The IAG provides you with security management tools that ensure strict security administration and enforcement:
• The Service Policy Manager is where you can optionally
pre-configure security policies to which the configuration settings are enforced to conform.
• The Configuration program enables robust, granular configuration
of all aspects of the gateway, including network management, content management, and application control. From within the Configuration Mac® OS X • Safari™ 1.2.4, 1.3 & 2.0
• Mozilla family: Netscape Navigator 7.1.x, 7.2.x; Mozilla 1.7.x; Firefox 1.0.x and higher; Camino® 0.83 and higher
Linux® (Red Hat®, SUSE®, Debian®)
Mozilla family: Netscape Navigator 7.1.x, 7.2.x; Mozilla 1.7.x; Firefox 1.0.x and higher
Note
Some of the Whale Client Components are supported only on Windows operating systems running Internet Explorer. For details, refer to “Whale Client Components” on page 147.
Table 1. Supported Browsers (Cont’d)
program, the Create New Trunk Wizard streamlines trunk
creation and configuration. Application-sensitive predefined rulesets and out-of-the-box dangerous-character definitions are automatically applied to the filtering mechanism as part of the configuration process.
• The Editor enables you to easily edit, sort and convert any text file,
including encrypted files and base64-encoded text.
All the tools are described in detail in the Intelligent Application Gateway Advanced Configuration guide, in Chapter 2: “Security Management Tools”.
Monitoring and Control Tools and Interfaces
The IAG monitoring and control tools enable network management and auditing at both the network and application levels:
• The Event Logging mechanism logs IAG-related events to a variety
of tools and output formats, including information about usage, user activities, and potential security risks.
• The Web Monitor is a monitoring and reporting web application
that enables anywhere, anytime snapshot viewing of events, as well as event filtering and analyzing.
Encryption
In order to prevent unauthorized access to the IAG, the IAG’s
configuration files are encrypted. You generate an encryption key when you first access the IAG, and this key is used to encrypt and decrypt the IAG configuration data. This process is described in the Intelligent Application Gateway Advanced Configuration guide, in the section “Creating Encryption Keys” on page 20.
In setups where more than one IAG server is used, the IAG servers have to be configured with an identical encryption key in order to:
• Export and import configuration files between IAG servers. • Export and import URL inspection and File Access rulesets. • Use High Availability arrays.
22 Chapter 1: Introduction Encryption
Encryption Passphrase
Once the encryption key is generated, every time you carry out operations that write to the disk, such as saving or activating configuration files, or when you import a configuration file or a set of rules into the IAG, the IAG prompts you to enter the encryption passphrase. You must always enter a valid passphrase; this ensures that only authorized users can access the IAG’s configuration files.
The Passphrase prompt is shown below:
When prompted, enter the passphrase and click [OK]. You can then securely carry on the operation you have started.
In sites where a number of IAG servers use the same encryption keys— such as a High Availability array—the same encryption passphrase is used for all the IAG servers at the site.
Tip
In order to change the passphrase any time after the initial installation, run the following command in a Command prompt:
changepassphrase
Tip
When using the Configuration program, the encryption passphrase you enter is valid for 10 minutes. That is, during the 10 minutes following an operation that requires access to the configuration files, you can access the files again without having to re-enter the passphrase.
High Availability Array
For high-traffic sites, with applications supporting a large number of simultaneous connections, the IAG provides a powerful performance enhancement and traffic control solution—the High Availability array. Implementing central management and supporting a variety of load balancing tools, the High Availability array enables you to run a server array, consisting of two or more IAG servers, while controlling high traffic volumes through the system. The High Availability array is configured to route traffic so that it maximizes resource utilization and supports uptime.
For a detailed description of the High Availability array, including step-by-step instructions on how to configure it, refer to the Intelligent Application Gateway Advanced Configuration guide, to Chapter 9: “Configuring the High Availability Array”.
About This Guide
This Guide is intended for the system administrator of the IAG. It
provides you with in-depth information about the IAG’s functionality and how you can best use its various components and options. It includes step-by-step instructions on how to configure, maintain, monitor and control any number of IAG servers, either locally or over the network.
This Guide provides information on the following topics:
• Chapter 2: “SSL VPN Portals” explains how you use the Create New Trunk and Add Application Wizards to create SSL VPN portals, to secure access to multiple applications from remote locations, anywhere, anytime.
• Chapter 3: “Single Application Sites” describes how you can use the Service Policy Manager to pre-configure the HTTP and HTTPS Connections services, how you create Webmail and Basic trunks, and how you use the Configuration program to edit trunks once they are created.
• Chapter 4: “Application Settings” describes application-specific settings you can edit and control after you add the application to the trunk, or create a Webmail trunk, such as the application’s web and non-web servers, application authentication, and more.
• Chapter 5: “Endpoint Security” describes features that help to protect your internal network against access from non-secure
24 Chapter 1: Introduction About This Guide
• Chapter 6: “SSL Wrapper” describes how you can provide users with secured SSL connectivity, via the portal homepage, to various TCP/IP client/server applications, such as native messaging
applications, standard email applications, collaboration tools, connectivity products, and more. It also describes how you provide users with secured SSL connectivity to Domino® iNotes™ servers via a Webmail trunk.
• Chapter 7: “Network Connector” describes the Network Connector feature, which enables you to install, run, and manage remote
connections as if they were part of the corporate network, supporting full connectivity over a virtual and secure transparent connection. • Chapter 8: “Providing Access to Internal File Systems”
describes how you can provide remote users with access to the organization’s internal file systems, including:
• Local Drive Mapping, which provides access to Windows shared network folders.
• File Access, which provides web access to the internal Windows Network and Novell® NetWare® file servers.
• Chapter 9: “Monitoring and Control” familiarizes you with the IAG’s monitoring and control tools and interfaces and provides detailed instructions on how to access and use them.
• Chapter 10: “Troubleshooting” describes how you use the Backup & Restore utility, and how you use various diagnostics tools such as support utilities tests and error and trace logs. It also provides information on how log files are cleaned up, and how to restart the Web service in the Windows Server® IIS (Internet Information Server).
• Appendix A: “Troubleshooting Event Logging Messages”
provides troubleshooting guidelines and instructions for Warning and Error messages that are reported by the Event Logging mechanism.
Tip
For a description of additional, advanced features and configuration settings, refer to the Intelligent Application Gateway Advanced Conf iguration guide.
Conventions Used in This Guide
This section explains the conventions used throughout this Guide.
Menu Item Menu names and menu items.
[Button] Buttons that you select with the mouse.
Icons that you select with the mouse are represented graphically.
Procedure Title of an operating procedure.
Computer text System files and information that you type in.
Caution
A note advising you that failure to take or avoid a specific action could result in loss of data.
Note
Important information you should note.
Tip
26 Chapter 1: Introduction About This Guide
Chapter 2
SSL VPN Portals
An Intelligent Application Gateway (IAG) SSL VPN Portal enables you to provide employees and partners with browser-based remote access to multiple corporate applications and file systems. In order to create an SSL VPN Portal, you go through the following stages:• Portal session setup, which includes the lifecycle of a session, such as: access IP, authentication, access endpoint policies, and more.
• Application setup, where you set up the applications you enable through the trunk.
Once you set up the portal and applications, the SSL VPN Portal is operational; remote users can access the portal and the applications that are enabled through it. Portal session setup and initial application setup are described in “Creating an SSL VPN Portal” on page 28. • Users setup (optional), to determine which users are authorized to
view and access each of the applications enabled through the portal. By default, all authenticated users are allowed access to all
applications. You can, however, configure a more granular setup, and determine which users can view and access each of the applications you enable through the portal, as described in “Users Setup” on page 32.
• Additional portal configuration options you may require are described in “Optional Configuration” on page 46, including:
• “Configuring Global Host Address Translation” on page 46 • “Configuring Application Subnets” on page 48
• “Changing the Application Access Portal Port Number” on page 49
• If you need to make adjustments to the look-and-feel of the portal homepage, refer to the Intelligent Application Gateway Advanced Configuration guide, to “Portal Homepage Configuration” on page 54. • Some of the applications you can enable through the portal require
28 Chapter 2: SSL VPN Portals Creating an SSL VPN Portal
Creating an SSL VPN Portal
You create an SSL VPN Portal in these stages:
• You can optionally use the Service Policy Manager to pre-configure the IAG HTTP Connections and HTTPS Connections services, as described in “Optional Pre-configuration of the Services” on page 52. • In the Configuration program, set up the portal session using the
Create New Trunk Wizard. The wizard facilitates a quick auto-completion of the initial portal session setup, including basic portal settings, session authentication, setup of the website that is created on the IAG, and session endpoint policies that control access to the site. • In the trunk you defined, use the Add Application Wizard to set up
the applications that will be enabled to remote users through the portal, including basic application attributes such as application servers, application authentication, endpoint policies, portal page links, and more. The IAG Application Aware approach insures that, for the supported applications, out-of-the-box settings such as replying to application authentication requests, URL inspection rulesets, and more, are automatically applied.
To create an SSL VPN Portal:
1. In the Windows desktop of the IAG, click [Start], then point to
Programs > Whale Communications IAG and click Configuration. Enter your password, as required.
2. In the Configuration program, in the List pane, select and right-click HTTP Connections or HTTPS Connections, then select New Trunk. The Create New Trunk Wizard is displayed.
Note
• Before you start the configuration process, log on to Windows with full administrator privileges.
• The first time you access either the Configuration program or the Service Policy Manager, you are required to create an encryption key and passphrase for the IAG. The key and passphrase serve both IAG applications, so that this action is only required once; when you subsequently access either application, you use the same passphrase. Additional information is available as follows:
• For an overview of the encryption mechanism, see “Encryption” on page 21.
• For details on how to create the encryption keys and
passphrase, refer to the Intelligent Application Gateway Advanced Conf iguration guide, to “Creating Encryption Keys” on page 20.
3. Follow the instructions on the screen to complete the wizard; for details, click .
When you complete the wizard, click [Finish].
The wizard closes. The new Portal trunk you created now appears in the List pane, and the Configuration pane displays the trunk’s parameters.
4. In the List pane, right-click the trunk and select Add; Or,
In the “Applications” area of the Configuration pane, under the Application List, click [Add...], or double-click an empty line.
The Add Application Wizard is displayed.
5. Follow the instructions on the screen to complete the wizard; for details, click .
When you complete the wizard, click [Finish].
The Add Application Wizard closes, and the application you defined appears in the Applications list. Once you activate the configuration,
Note
By default, the Initial Internal Application is the Whale Portal application, used in conjunction with the Whale toolbar. If you wish to use a different portal homepage, refer to the Intelligent Application Gateway Advanced Conf iguration guide, to “Using a Custom Portal Homepage” on page 61.
30 Chapter 2: SSL VPN Portals Creating an SSL VPN Portal
6. Repeat steps 4–5 to add more applications to the SSL VPN Portal. You can also quickly add a new application to the trunk, based on the definitions of an existing application, as described in “Duplicating an Application” on page 91.
7. Determine in what order you wish the applications to be displayed on the portal page, as follows:
• If you want the applications to be displayed in alphabetical order, activate the option “Sort alphabetically”.
• If you want to arrange the applications in any other order, leave the “Sort alphabetically” option unchecked, and use the up/down arrows to arrange the order of the applications in the list. They will be displayed on the portal page in the order by which they are arranged in the list of applications.
Note
Some applications require additional setup. For those applications, when you finish adding the application to the trunk, a help screen pops up, informing you of the application-specific requirements, and providing step-by-step setup instructions where applicable. The help is also available to you any time thereafter, in the General tab of the Application Properties dialog box, via the following link:
You can find a description of all the IAG application-specific requirements in the Intelligent Application Gateway Application Aware Settings guide.
8. In the main window of the Configuration program, click to save and activate the configuration.
The following is displayed:
9. Click [Activate>].
Once the configuration is activated, the following message is displayed:
IAG configuration activated successfully.
The trunk is operational. All authenticated users will be able to access the applications enabled through the portal. If you wish to configure authorization for any of the applications you enable through the trunk, proceed to “Users Setup” on page 32.
Note
We recommend that you activate the option “Back up configuration after activation”, so that the configuration settings are backed up. For more details refer to “Backup & Restore Utility” on page 303.
Note
• You can duplicate a trunk, including all application definitions, changing only the name, and the external website’s IP address and port numbers. Right-click the trunk you wish to duplicate, and select
32 Chapter 2: SSL VPN Portals Users Setup
Users Setup
Users setup determines which users are authorized to view and access each of the applications enabled through the portal. When you set an application up, by default, all authenticated users are allowed to view and access the application. If required, you can change the default settings, and determine which users can view and access the application.
Users setup affects the following:
• Authorization: the process by which authenticated users are given
access to the portal applications.
• Personalization: the process by which different users view different
application links on the same portal homepage, depending on their authorization permissions.
When you add an application to a Portal trunk using the Add Application Wizard, the option “All Users Are Authorized”, in the “Application Setup” step, is enabled by default. You can disable this option while adding the application to the trunk, or at any time after the initial application configuration, in the Application Properties dialog box, in the Authorization tab.
If you disable the “All Users Are Authorized” option for an application, you must configure authorization in order to enable access to the
application through the portal. Using authorization, you can grant access permissions to an application to selected users and user groups, while blocking access from users that should not be accessing the application. In order to configure authorization, you take the following steps:
• Define the users and groups of users to which you can grant
authorization permissions, as described in “Defining Authorization Repositories” on page 33.
• Define authorization and personalization per application, as described in “Defining Authorization for Portal Applications” on page 38.
Note
Personalization only works when you use the default portal homepage supplied with the IAG. However, even if you are using a custom portal homepage, authorization works, enabling users to access only those applications for which they have access permissions.
Defining Authorization Repositories
Repositories are databases containing user and group information; a user can be defined as an individual unit or associated with a group. This section describes how you define repositories of users and user groups, which you can then use in order to define authorization for portal applications, including:
• “User/Group Servers” on page 33.
• Optional configuration of local groups, described in “Local Groups” on page 35.
User/Group Servers
This section describes how you define a third-party user/group server. The servers are used as user/group repositories for application authorization, and can also be used to define local groups.
To define a user/group server:
1. In the Configuration program, on the Admin menu, click Authentication and User/Group Servers…
The Authentication and User/Group Servers dialog box is displayed.
2. In the Authentication and User/Group Servers dialog box, click [Add...].
Note
User/group servers are also used for session authentication, as described in the Intelligent Application Gateway Advanced Conf iguration guide, in “Authentication” on page 81.
34 Chapter 2: SSL VPN Portals Users Setup
3. Use the Add Server dialog box to define the server. For details regarding each server-type, click [Help].
4. Repeat steps 2–3 to define all the required servers.
You can now use the servers you defined in order to:
• Define local groups, as described in “Local Groups” on page 35. • Define application authorization, as described in “Defining
Authorization for Portal Applications” on page 38.
Tip
For a description of the types of authentication and user/group servers you can use with the IAG, refer to the Intelligent Application Gateway Advanced Conf iguration guide, to “Authentication Schemes” on page 104.
Local Groups
A local group is a repository of users that you define once, and can then reuse as many times as required when defining authorization for portal applications. A local group can contain users and groups from various user/group servers; it can also contain other local groups. An include/ exclude mechanism enables you to select individual users and groups that will be included in or excluded from the local group.
For example: you can create a local group that includes selected users
from three different user/group servers, then use this group repeatedly, to define authorization for all the portal’s non-web applications.
You can use the Configuration program to define local groups in one of two ways:
• Via the Local Groups menu item, as described in this section.
• Via the Authorization tab of the Application Properties dialog box, as described in “Defining Authorization for Portal Applications” on page 38.
To define a local group via the menu bar:
1. In the Configuration program, on the Admin menu, click Local Groups… The Local Groups dialog box is displayed.
2. In the Local Groups dialog box, click [Add...].
The Name Local Group dialog box is displayed.
3. Name the group, then click [OK].
The Add Local Group dialog box is displayed. The name you assigned to the group is displayed in the title bar and in the left pane of the
36 Chapter 2: SSL VPN Portals Users Setup
4. In the Add Local Group dialog box, click [Add...].
The Select Users or Groups dialog box is displayed.
5. Use the Select Users or Groups dialog box to select the users and groups that will be included in the local group. If other local groups are already defined, they can also be selected as part of the current group. For a description of how you use the Select Users or Groups dialog box, refer to “Selecting Users and Groups” on page 43.
6. Once you select the users and groups you wish to assign to the local group, close the Select Users or Groups dialog box.
The selected users and groups are added in the Add Local Group dialog box.
7. If required, use the “Include/Exclude” column to refine the definition. By default, when you add a user or group to the local group, their status is “Include”; double-clicking an entry in the “Include/Exclude” column toggles the status of the user or group.
For example: if you wish to include most of the users of an Active
Directory user/group server in the local group, but exclude three individual users from that group, take the following steps:
a) Use the Select Users or Groups dialog box to select from the Active Directory repository both the “Authenticated Users” group, and the three users you wish to exclude from the local group.
b) Use the Add Local Group dialog box to exclude the three users from the local group.
8. Click [OK] to close the Add Local Group dialog box.
9. Repeat steps 2–8 to define additional groups, as required.
Tip
If the local group you created includes other local groups, the nested local groups are displayed in the left pane of the Add Local Group dialog box:
Tip
You can use the [SaveAs...] button in the Local Groups dialog box to duplicate an existing local group.
“AppGroup” local group is nested under “SW_R&D”
38 Chapter 2: SSL VPN Portals Users Setup
Defining Authorization for Portal Applications
You can define authorization for any of the applications enabled through an SSL VPN Portal. To define authorization for an application, take the following steps:
• Assign users and groups to the application. In this step, you
select the users and user groups from any of the defined
authorization repositories, and assign them to the application. By default, the users and groups you select here have Allow and View permissions for the application.
• Assign authorization permissions to the users and groups you
selected for the application. For each user or group, you can assign Allow, View, or Deny authorization permissions.
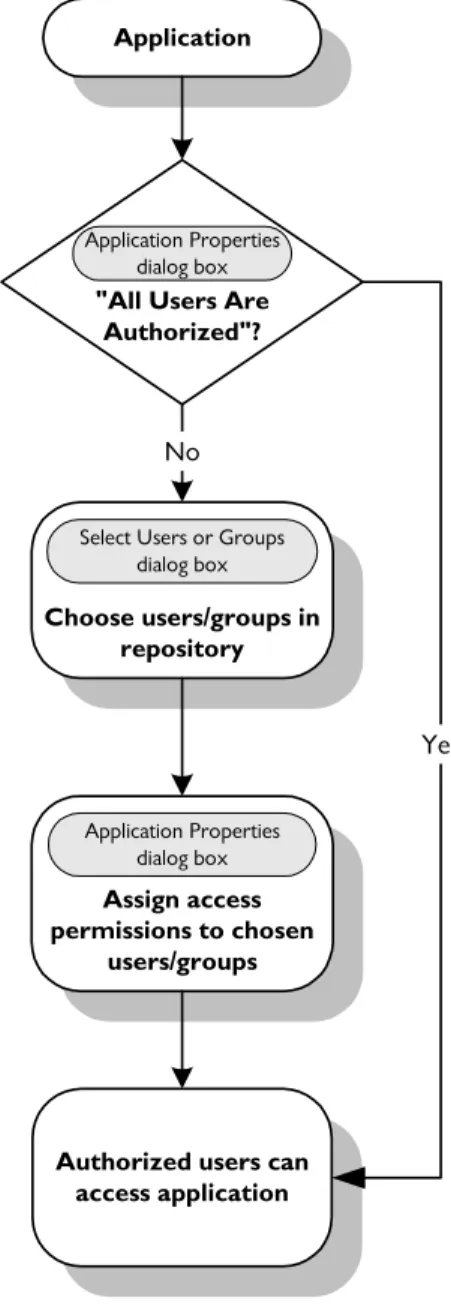
Figure 1 on page 39 illustrates the process of configuring users authorization permissions for an application.
Note
If, at any time after the initial configuration, there are changes in the authorization repository, such as a user is removed or added from the repository, or user permissions are changed, you need to change the permissions you assign to users and groups in this repository, correspondingly.
To assign authorization for an application:
1. In the Configuration program, from the List pane, select the trunk that enables the application you wish to edit.
2. In the Configuration pane, in the “Applications” area, select the application and click [Edit...], or double-click the application.
Figure 1. Flow of Configuring Application Authorization
Application
"All Users Are Authorized"? Application Properties dialog box No Choose users/groups in repository Select Users or Groups
dialog box
Authorized users can access application Assign access permissions to chosen users/groups Application Properties dialog box Yes
40 Chapter 2: SSL VPN Portals Users Setup
In the Authorization tab, the option “All Users Are Authorized” is checked.
4. Uncheck the option “All Users Are Authorized” and click [Add...].
The Select Users or Groups dialog box is displayed.
Note
If the option “All Users Are Authorized” is unchecked, and you do not define the users and groups that are authorized to access and view the application, as described in the steps that follow, all users are blocked from using the application.
5. Use the Select Users or Groups dialog box to select the users and groups to which you wish to define authorization permissions for the application. For a description of how you use the Select Users or Groups dialog box, refer to “Selecting Users and Groups” on page 43. 6. Once you select the users and groups you wish to assign to the
application, close the Select Users or Groups dialog box.
The users and groups you selected are added to the Users/Groups list in the Authorization tab of the Application Properties dialog box.
42 Chapter 2: SSL VPN Portals Users Setup
7. For each user or group, click the appropriate boxes to select one of the access permission levels:
• Allow: users can view and access the application via the portal homepage.
• View: the link is displayed on the portal homepage. However, when users click the link, they are prompted to enter additional credentials in order to access the application.
• Deny: the effect of this option depends on the type of portal homepage used with the site:
• In sites that use the default portal homepage supplied with the IAG, the link is not displayed on the portal homepage and users cannot access the application.
• In sites that use a custom portal homepage, the link is displayed on the portal homepage. However, when users click the link, access to the application is denied.
In both types of portal homepages, if users attempt to access the application, either directly or via a different link, they are denied access.
Tip
You can save your selection of users and groups as a local group, using the [SaveAsLocalGroup...] button. For details on local groups, refer to “Local Groups” on page 35.
8. Click [OK].
The Application Properties dialog box closes. Once the trunk is activated, the application is accessible to users according to the authorization permissions you defined in this procedure. If you use the default portal homepage, the portal is personalized according to each user’s access permissions.
Selecting Users and Groups
This section describes how you use the Select Users or Groups dialog box to select users and groups of users when you:
• Define local groups, as described in “Local Groups” on page 35. • Define authorization for an application, as described in “Defining
Authorization for Portal Applications” on page 38. The dialog box is divided into two main areas:
• The “Repository Users and Groups” area changes according to the type of item selected in the “Look in” drop-down list:
• If a users/groups server is selected in the “Look in” drop-down list, all the users and groups in the selected repository are listed in the “Repository Users and Groups” area.
• If “Local Groups” is selected in the “Look in” drop-down list, all the defined local groups are listed in the “Repository Users and Groups” area.
• The “Selected Users and Groups” area lists the users and groups that you selected in the “Repository Users and Groups” area. These are the users and groups that will be added to the local group or to the application’s Authorization tab, as applicable.
44 Chapter 2: SSL VPN Portals Users Setup
To use the Select Users or Groups dialog box:
1. In the Look in drop-down list, select the repository you wish to use. You can select from two types of user/group repositories:
• Repositories of users and user-groups, based on the definition of a third-party user/group server, described in “User/Group Servers” on page 33.
All the users and user groups in the selected repository are listed in the “Repository Users and Groups” list.
• Local groups, described in “Local Groups” on page 35.
All the defined local groups are listed in the “Local Groups” list.
2. To add users and groups to the “Selected Users and Groups” list, double-click a user or a group in the “Repository Users and Groups” list or the “Local Groups” list, respectively, or select one or more users and groups and click [Add].
For Active Directory and LDAP servers, the “Repository Users and Groups” list contains groups and individual users; groups are listed first, then users. If the option “Include Subfolders” is activated for this user/group server (when you configure the server in the Add Server dialog box), subfolders are listed as well; the path of the selected folder is shown above the “Users/Groups” list. In order to facilitate the search for a user or a group, use any of the buttons described in Table 2 on page 45.
The selected users and groups are moved to the “Selected Users and Groups” list.
3. Repeat steps 1–2 to add users and groups from other repositories, if required.
4. Click [OK] at the bottom of the Select Users or Groups dialog box.
The dialog box closes. The users and groups you selected are added to the local group or to the application’s Authorization tab, as applicable.
Tip
• To add all the users and groups in a users/groups server, select “Authenticated Users”.
• When you add a local group, all the users and groups that are part of the local group are selected.
Table 2. Select Users or Groups–User/Group Search Buttons
Button Description
Search Enter a string in the Search text-box then click the Search button. The search is affected by the selected View setting, described in “View Menu”, below.
Tip: You can also select an entry in the list, then start typing the user/group string. The display automatically moves to the relevant letter or string. Up One Level Moves the display one level up in the folder-tree.
46 Chapter 2: SSL VPN Portals Optional Configuration
Optional Configuration
In certain cases, you may want to configure additional parameters, such as: • Define the global Host Address Translation (HAT) parameters, which are applied to all the trunks configured in the IAG. For details, refer to “Configuring Global Host Address Translation” on page 46.
• Restrict the applications in the SSL VPN Portal so that only servers within the defined subnets are enabled, as described in “Configuring Application Subnets” on page 48.
Configuring Global Host Address Translation
This section describes the optional configuration of HAT parameters. The parameters you configure here are global, and are used during link manipulation for all the Portal trunks configured in the IAG.
View Menu Enables you to filter the view in the “Repository Users and Groups” list:
• Show all: displays all users and groups in the selected folder. If the option “Include
Subfolders” is activated for the selected server, subfolders are also displayed.
• Show users only: displays all users in the selected folder.
• Show groups only: displays all groups in the selected folder.
• Show users & groups: displays all users and groups in the selected folder. Subfolders are not displayed.
• Show users & groups, including subfolders: displays all users and groups in the selected folder. If the option “Include Subfolders” is activated for the selected server, subfolders are also displayed, as well all users and groups in all subfolders.
Table 2. Select Users or Groups–User/Group Search Buttons (Cont’d)
To configure global HAT parameters:
1. In the Configuration program, on the Admin menu, click Advanced Configuration…
The Advanced Configuration window is displayed.
2. In the Host Address Translation area, enter the following:
• Unique Identifier: a sign that will be added to manipulated links in responses, and by which the IAG will recognize the URL in the request.
Note
• Link manipulation is described in the Intelligent Application Gateway Advanced Conf iguration guide, in Chapter 8: “Optimizing Portal Performance”.
• If you do not configure HAT parameters here, the IAG automatically assigns the required parameters the first time you configure a Portal trunk. You can change the configuration settings any time after the initial configuration.
Note
• The unique identifier must contain only alphanumeric values.
• Make sure the identifier is not a string that is contained within one of the server names in your organization. For example, if one of the servers in your organization is named “appserver”, do not use the string “app” or “ser” as the unique identifier.
48 Chapter 2: SSL VPN Portals Optional Configuration
3. In the Configuration program, click to save and activate the configuration.
The IAG will use the unique identifier and encryption key you entered here during link manipulation, for all Portal trunks.
Configuring Application Subnets
You can restrict any of the applications in your SSL VPN Portal so that only servers within the defined subnets are enabled.
Once the trunk is operative, when a user requests a URL, the filter first checks the URL against the Application List; if the application is listed here, the filter goes on to check the URL against the Subnet List. Only URLs that pass both checks are enabled to the user.
You configure subnets in the main window of the Configuration program, in the “Applications” area, as described in this procedure.
To configure application subnets:
1. In the “Applications” area, under the Subnets list, click [Add...].
The Add subnet dialog box is displayed.
Note
For each application you add, make sure that the application is listed in the IAG’s DNS or Hosts file.
Application List
2. Enter the subnet address and mask, then click [OK].
The Add subnet dialog box closes. The subnet you configured is added to the Subnet list.
3. Repeat steps 1–2 to define additional subnets.
The applications will be restricted to the defined subnets.
Changing the Application Access Portal Port Number
The port number that is assigned to the Application Access Portal when you create the trunk in the Create New Trunk Wizard is the port number of the external website. In setups where remote users access a machine other than the IAG, such as a load balancer, enter the port number of the actual machine that is accessible to the users, at the top left side of the Configuration pane, in the Application Access Portal area:
Where To Go From Here
Once the SSL VPN Portal is created, you can edit it using the Configuration program. You can configure any of the following: • Options that are described in this Guide include:
50 Chapter 2: SSL VPN Portals Where To Go From Here
• For HTTPS Connections trunks: creating a Redirect trunk in order to redirect HTTP requests, as described in “Creating a Redirect Trunk” on page 58.
• Editing general trunk parameters, as described in “Editing in the General Tab” on page 61.
• Changing the event logging definitions, as described in “Event Logging” on page 237.
• Enabling access to the Web Monitor, as described in “Enabling Web Monitor Access from Computers Other Than the IAG” on page 261.
• Additional, advanced options, described in the Intelligent Application Gateway Advanced Configuration guide, including:
• Customizing the look-and-feel and other aspects of the HTML pages the user interacts with, for example changing the company logo and the color scheme, described in Chapter 3: “Customizing Web Pages”. This chapter also describes how you can use your own, custom portal homepage, if you do not wish to use the default page supplied with the IAG.
• Authentication, described in Chapter 4: “Access Control”.
• Session settings, such as the maximum number of sessions that can be concurrently open through the trunk, and how you define default and privileged sessions, described in Chapter 5: “Session Settings”.
• Content Inspection, described in Chapter 6: “Content Inspection”. • Application Customization, described in Chapter 7: “Application
Customizers”.
• Optimizing and troubleshooting portal performance, as described in Chapter 8: “Optimizing Portal Performance”.
• Configuring a High Availability array, as described in Chapter 9: “Configuring the High Availability Array”.
• Configure the Form Authentication engine. The engine handles HTML login and change password forms sent by the application, as described in Appendix C: “Form Authentication Engine”.
Tip
• For information on the Network Connector application, see Chapter 7: “Network Connector”.
• For information on the Local Drive Mapping and File Access applications, see Chapter 8: “Providing Access to Internal File Systems”.