Universal Camera Setup Software
MIC Camset
Table of Contents
1 Introduction 5
2 Using Quick Start Guides 6
2.1 Connecting MIC to Universal Camset Guide 6
2.1.1 Requirements 6
2.1.2 Physical Connections 6
2.1.3 Configuring Universal Camset 6
2.1.4 General Controls 7
2.2 Programming Guide 7
2.2.1 Requirements 7
2.2.2 File Selection 7
2.2.3 Programming 7
2.2.4 Commissioning the MIC 7
3 Configuring Camset 9
3.1 Preferences 9
3.2 Reset Camset 9
4 Controlling a MIC Camera 10
4.1 MIC Settings 10
4.2 Configure MIC Communications 10
4.3 Camset Settings 10
4.4 Boot Messages 11
4.5 Manual Settings 11
4.6 MIC Protocol Programming 12
4.6.1 Selecting a MOT File 12
4.6.2 Software Versions 13
4.6.3 Telemetry Programming 14
4.6.4 Direct Connection Programming 15
4.6.5 Programmer Controls 16
4.7 Presets and Tours 17
4.7.1 Preset Position 17
4.7.2 Introduction to MIC Series Tours 17
5 MIC Settings 23
5.1 Easy Setup 23
5.2 Control Settings 23
5.3 Camera Module Settings 24
5.4 IR / Lowlight Settings 25
5.5 Alarm Settings 25
5.6 Privacy Settings 26
5.7 Captions 27
5.8 Thermal Settings 28
5.9 SonySet 29
5.9.1 SonySet Controls 29
5.9.2 SonySet Options 30
5.10 Default Loader 34
5.10.1 Default Loader Controls 34
5.10.2 Upload Defaults to Multiple MICs 35
5.11 MIC Serial Number 35
5.12 Brushed Motor Settings 35
5.13 Re-map Pelco Auxiliary 36
6 Diagnostics 37
6.1 Communications Testing 37
6.2 Data Monitor 38
6.3 Motor Test 38
6.3.1 Motor Test Controls 39
6.3.2 Motor Test Results 40
6.4 Rotation Analyzer 41
6.5 MIC Statistics 42
7 Advanced Setup 43
7.1 Privacy Calibration 43
7.1.1 Calibrating a Privacy 3 Card 43
7.1.2 Calibrating a Privacy 4 Card 44
7.1.3 Privacy 4 Advanced 45
7.1.4 Direct Commands 46
7.2 Send Custom Command 46
7.3 Setup Menu Explorer 46
7.4 EEPROM Copier 46
1
Introduction
– This configuration tool can be used to perform any of the following tasks with your MIC Series camera:
– Change MIC address or baud rate
– Update the firmware or change the protocol
– Learn preset positions and define preset or pattern tours – Configure all MIC settings to optimize for your application – Load factory defaults
– Save and upload your own site-specific defaults – Capture controller and MIC communications – Run several different diagnostic tools
2
Using Quick Start Guides
This section contains a few quick start guides, aimed to help users to step through common functions of Camset and the MIC range without having in-depth knowledge of the application.
2.1
Connecting MIC to Universal Camset Guide
This section provides a step-by-step guide to getting the MIC to communicate with Universal Camset.
2.1.1
Requirements
– MIC and associated PSU – PC running Universal Camset
– MIC-USB485CVTR2, Third party RS232 to 485 adapter (configured for 4 wire, full duplex) or Bosch IP encoder
2.1.2
Physical Connections
To get the Camset to talk to the MIC, the unit must be powered up using a MIC PSU, and must have the Rx and Tx communication lines connected through a device into the PC. There are several different methods of creating this comm link: with RS485 to RS232 converters, with a MIC-USB485CVTR2, with a third party USB-to-RS485 converter, or through a Bosch IP device. For details on using any of these methods and making the physical connection, refer to the appropriate sub page in the Connecting To Camset section of this help file.
For one-way (simplex) communications (Universal Camset to MIC), only the Rx lines need to be connected.
2.1.3
Configuration
1. Open the latest version of Camset.
2. In the Camset Settings window, at the bottom left of the screen, select the model of the MIC connected, the MIC’s protocol and baud rate. The protocol (and baud rate in some units) is displayed in boot messages on the video of the unit approximately 10 seconds after powering up. To make sense of the software version, look at the Software Versions page in the Programmer section of this help file.
3. Select the communications method in the Comm Port drop-down list. For RS232 to RS485, or third part USB to RS232 converters, the physical or emulated serial port on the PC should be selected.
To determine a USB device’s emulated serial port number, on your PC go to Control Panel - System - Hardware tab - Device Manager, then locate the device under Ports (COM and LPT). The description should contain the port number (for example: USB Serial Port (COM5)).
For MIC-USB485CVTR2 devices, select the USB option. For any Bosch IP device, use IP and select the device from the list provided.
4. The Camset software automatically detects the last setting - the MIC address - from the MIC’s boot messages.
5. Power up the MIC. If the communication settings and physical connections are valid, the Boot Messages window will fill with several lines of information and the address of the unit will be loaded into the Current Address box. If the communications link is only one way or if the current protocol does not support boot messages, the address can be taken from the boot message on the video as the number following CAM, and entered manually into the Current Address box.
Camset will remember all of these settings for next time to simplify the process if you use the same connection method every time.
2.1.4
General Controls
With the communications link established and the MIC powered up, the unit should now be controllable using the Pan and Tilt controls.
2.2
Programming Guide
This section provides a step-by-step guide to changing the software in a MIC unit and re-commissioning it for your control system.
2.2.1
Requirements
– MIC and associated PSU – PC running Universal Camset
– MIC-USB485CVTR2, Third party RS232 to 485 adapter (configured for 4 wire, full duplex) or Bosch IP encoder
2.2.2
MIC File Selection
1. Open Camset and select the valid communications method from the Comm Port list on the bottom left of the window.
2. Select Standard Controls > MIC Protocol Programming. The programming page appears. 3. Load the MIC file by either of the following methods:
– Select the MIC File tab, and then select the required MIC Model and Protocol from the lists provided. If the MIC file is incorrect or out of date, try browsing for the correct version or updating the default MIC file using the Browse for MIC File and Update Default MIC File buttons, respectively.
– Select the MIC File tab, and then select the required MIC Model and Protocol from the lists provided. If the MIC file is incorrect or out of date, try browsing for the correct version or updating the default MIC file using the Browse for MIC File and Update Default MIC File buttons, respectively.
2.2.3
Programming
If your MIC supports the latest Fixed Security code programming method, select the Fixed Security Code tab, and then click the Upload File to MIC button. If you are unsure if your MIC supports this, contact your local Tech Support center.
If the unit does not support this feature, select the Based on Serial No. tab, and then enter the MIC serial number in the MIC Serial Number field. Click the Generate Security Code button to provide the code required to unlock the MIC. Click the Upload File to MIC button to initiate the process, which takes about 20 to 30 seconds and will indicate that the MIC has been disconnected when complete.
For pre-brushless MICs that do not support the telemetry programming functionality, refer to the Programmer - Direct Connection Programming help file.
2.2.4
Commissioning the MIC
Once re-programmed, the MIC may not work immediately with the new protocol, as the programming process can cause the internal settings to be set randomly. Therefore there are a few important steps required to get the MIC to the default state for the given protocol and enable direct connection with the new control system.
1. Set Camset to the appropriate MIC Model, Protocol and Address, on the bottom left of the Camset window.
2. Confirm that you have PTZ operation by using the controls on the Standard Controls > PTZ Controls + Auxiliaries window.
Easy Commission
1. On the Standard Controls > PTZ Controls + Auxiliaries window, click the Start Easy Setup Process button.
2. Answer all of the questions provided to set up the MIC to your requirements. At the end, the settings can be saved to a file for easy configuration of multiple cameras on one install. See Advanced commission or Default loader for instructions on how to use these files in other units.
3. Check that the Aux commands are working as expected (for example, Wiper, IR, etc.) using the associated controls on the Standard Controls - PTZ Controls + Auxiliaries window.
4. Modify the MIC address and baud rate as required using the MIC Settings sub window which can be opened by clicking the Configure MIC Communications button on the bottom left of the Camset window.
Advanced Commission
1. On the Settings > Default Loader window, click the Load Settings into Cam-set button and select the file MIC Production Defaults.xml (or other appropriate file if you require IR functionality, or a custom site setup). The controls in the software should populate with the default settings (Pan Reverse: Off, etc).
2. Click Set Settings to Single MIC. This process will take a few seconds and will finish with the MIC locating its mechanical limit stops in tilt.
3. Once complete, check that the MIC orientation is correct and adjust Pan Reverse, Tilt Reverse and Image Flip as required.
4. Check that the Aux functions are working as expected (for example, Wiper, IR, etc.) using the associated controls on the Standard Controls - PTZ Controls + Auxiliaries window. 5. Modify the MIC address and baud rate as required using the MIC Settings sub window
which can be opened by clicking the Configure MIC Communications button on the bottom left of the Camset window.
3
Configuring Camset
This section describes the settings that specifically affect Camset software rather than the MIC camera itself. Access these settings under File > Preferences.
3.1
Preferences
Comms Mode
There are 3 options for comms modes:
– Full Duplex: Full 2 way 4 wire communications connection. Messages are transmitted and received on separate comms pairs.
– Half Duplex: 2 way, 2 wire communications connection. Messages are transmitted and received on the same pair of wires. The 485 drivers deal with the switching of the line directions automatically.
– Simplex: 1 way 2 wire communications connection. Messages are only transmitted to the camera. This will work for most manual controls, but anything that requires a response, such as Pot Test, Exact Positioning, Programming, etc. will fail.
Video Window
Select the Always on top for the video preview window to appear above all other Universal Camset windows.
Serial Port Defines
Select RTS to define the state of the RTS line on the serial port which can be used to power in line RS232 to 485 adapters. See Connecting Through RS232 subsection in Connecting To Camset for more information.
Advanced Controls Access
Some of Universal Camsets more advanced controls are locked behind a password which can be entered here. This will only be provided to approved installers and repair centers.
Protocol Access
Some of Universal Camsets protocols are locked behind a password providing access only to licensed customers. These can be obtained from repair centers upon proof of the licensing agreement.
3.2
Reset Camset
This re-initializes all of the controls for the software to the state it would be on boot. All text boxes, check boxes and radio buttons are cleared and therefore will no longer represent the current settings in the MIC. This control is found under File > Reset Universal Cam-Set.
4
Standard Controls
This section describes some of the basic controls available in Universal Camset for controlling and programming your MIC Series unit. The majority of these controls are found under the Standard Controls menu in the tool bar.
4.1
MIC Settings
MIC Address
This box indicates the address to which commands are sent from Camset. This therefore needs to match the address of the MIC that needs to be controlled. When the MIC is booted the first line of the messages it sends is the address, which is read and put into this box automatically.
4.2
Configure MIC Communications
This button opens up a new window which provides the options to reconfigure the MIC communications settings. If the MIC Model is set to 500, then all of the options on the new window become available. No other model provides the multi protocol and therefore only the Address and Baud Rate options are available.
In order for any of these modifications to work, Camset must have full communications with the MIC. Ensure this by performing a simple manual control test (Up, Down, etc). To store the new settings, click Apply once the modifications have been made. To discard any changes, click Cancel.
New Address
This input box defines the new address to which the MIC should change after you click Apply. The value will also be copied into Current Address on the main form to provide continual control. This feature will not work on any brushed releases, or brushless releases prior to 131CN in Panasonic Protocol. Refer to Panasonic Menu Controls in Advanced Controls for instructions on another method for these releases.
New Protocol
This drop-down list provides a full list of the protocols available in Camset. These may not all be supported by the MIC, in which case Camset will change protocol and the MIC may not, causing a lack of control. To regain control should this happen, reset the Camset Protocol to the original settings.
New Baud Rate
This drop-down list provides the valid baud rates for the chosen protocol. In the case of a non-MIC 500 model, the baud rate options reflect the protocol as set on the main form for Camset itself. In FV protocol, the option is toggle, which switches the MIC between 4800 and 9600. If control is not present after the window is closed, try changing the Camset Baud Rate.
4.3
Camset Settings
Cam-set Protocol
This drop-down list provides access to the available protocols Camset can produce. When an option is selected, all the Camset controls are reset and then the availability of certain features is set dependent on their availability in the MIC itself. Any features that are not accessible for the chosen protocol will still be visible but will be shaded out. The
communication settings will be set to the default for the chosen protocol, indicating this on the Cam-set Baud Rate drop-down list.
Cam-set Baud Rate
This displays the current Baud Rate at which outgoing messages are sent, and the other options available for the given protocol above. Changing this without first changing the MIC baud rate will cause a loss of communications.
MIC Model
This provides a list of all the available MIC Models. This should be set to the type of camera being controlled as Camset is then set up accordingly to provide more or less options dependent upon the combination of this setting with the Cam-set Protocol above. Comm Port
This provides a list of the available Comm Ports detected by the software on the PC. If a comm port is in use when it is selected, the user will receive an error, and should either select another port or close the application currently using it. If an FV USB to 485 dongle is
connected, this will be indicated as USB at the end of the list. The final option is Close, which will close any open communications port meaning that other applications can then use the port for other purposes.
IP Address
This indicates the IP address of the Bosch encoder that is currently providing control.
4.4
Boot Messages
The large square text box in this area will display boot messages coming from the MIC. One of the first lines contains the MIC address which is decoded and entered into the Address input box. The rest of the lines indicate the MIC model number, control card serial number, MIC Software, etc. At the same time, a boot message is displayed on the video indicating similar information, which may be helpful if return comms are not set.
4.5
Manual Settings
Pan, Tilt and Zoom
The Up, Down, Left and Right buttons send commands to the MIC to move in the selected direction at the speed indicated by the Speed slider, which goes from 1% to 100%. Zoom In and Zoom Out control the zoom position of the camera lens at a fixed rate.
if the Latch PTZ option under PTZ Options is checked, Camset will not transmit a stop command when a PTZ control is released.
MIC Menu
The On Screen Menu button loads the MIC Menu, displayed on the video itself. This is then controlled using the pan and tilt controls above.
Iris Controls
Auto Iris lets the MIC automatically adjust to changing light levels, while Manual Iris gives the user control with Open and Close buttons.
Focus Controls
Auto Focus lets the MIC automatically focus on a changing scene, where Manual Focus gives the user control with Near and Far buttons.
Auxiliaries
Controls are provided for directly accessing the most commonly used auxiliaries such as wiper, IR, etc. These are all immediate controls meaning that they are not remembered by the MIC over a power cycle. On boot, the MIC wiper, IR, washer, etc. will all be turned off.
See the list below for a description of each auxiliaries function. – Slow Zoom: Reduces the speed at which the MIC zooms. – PTZ Scale: Scales the MIC speed dependent on zoom position. – Wiper: Turns on or off the MIC wiper if fitted.
– Washer: Activates the washer relay in the PSU (if purchased). Also moves MIC to the stored WashWipe position and turns on the wiper. Once de-activated, the MIC will return to its original position and turn off the wiper.
– IR / Thermal: Dependent on the MIC, this will do one of 3 things:
For a Non-IR Standard MIC, the IR cut filter will come in and the image will go black and white.
For a twin IR MIC, the cut filter will come in and the lamps will turn on.
Note: If the lamps do not turn on, ensure the power supply is an IR version and that Auto Alarm and Multi Alarms are both turned on.
For a thermal MIC, the video output will switch from the Sony module to the thermal module.
– Digital Zoom: This will enable the MIC to continue into the digital zoom once the optical limit has been reached. For this option to function, you must enable Digital Zoom under the MIC Setups tab.
– Auto Pan: This will start the MIC panning between left and right defined limits. – On Screen Data: This activates the Sony modules’ on-screen icons.
User Defined Auxiliaries
This section enables the user to transmit a specific On or Off Aux command to the MIC where the number is user defined.
4.6
MIC Protocol Programming
This section describes the controls found on the Programmer page of Camset. The
Programmer is designed to allow the user to update or change the software inside any MIC product, either remotely or with a direct connection. This software can also be used to generate and set the security code inside the MIC which is used for up the telemetry
programming, reliant upon a correct password being entered (these options are for user with Forward Vision protocol only).
4.6.1
Selecting a MOT File
Using a MIC FileThe MIC files provide an easier method of locating the correct MOT file for a required MIC model and protocol. Each individual MOT file is stored along with some basic information allowing for an easier interface.
Camset will automatically open the latest MIC file stored in the folder location - Install Directory\MIC Files\ - and load the contents into the drop-down boxes.
If a newer version of the MIC File is downloaded from the Bosch website, it can be loaded into this folder easily by using the Update Default MIC File. A browse window opens in which the user can select the new file. Click Open. The file will be copied into the correct directory. Alternatively, load an older or specific MIC file by clicking the Browse for MIC File and selecting the required file.
With either method of MIC file selection, the filename and location will be indicated in the text box and the Status window will indicate some attributes associated with the MIC file, including file type (indicating the data structure method), description and release. The combo boxes below will also populate with the options stored inside of the batch file. An individual
file can then be located by selecting the MIC Model and Protocol as required. Information on the chosen file is indicated in the Status window on the right, including the filename, model, protocol, compatible Camset, release date and release notes.
Using a Single MOT File
To find an MOT file to upload, click the Browse button at the bottom of the Single MOT File tab. A Microsoft Windows Open an MOT File dialog box opens. Browse to the MOT file, select it, and then click Open. The dialog box closes, and the filename and location will be indicated in the text box to the left.
4.6.2
Software Versions
Each MIC camera suses different software file types depending on the model, build state and protocol. Uploading incorrect software may cause your MIC to lock up, so ensure that you select the correct version. If you are unsure, please contact Tech Support for advice. MIC 500
The MIC 500 Range supports multiple protocols in one software bundle and therefore the titles are different from those for all other MIC products. The software code name is 8 characters long and formed as below.
500B C.DDE
where
MIC 300 / MIC 400 / MIC 410 / MIC 411 / MIC 412 / MIC 440
All non-MIC 500 cameras use the following 5 character method to identify the software.
AAABC
where CAUTION!
When reflashing or changing the protocol on a standard MIC 400 or 400 IR model, select 400 from the MIC Models drop-down list. Do not select 300,400,440 from the drop-down list; this option is reserved for older "brushed" models. In addition, you must reset the camera’s default settings. Refer to Section 4.9 Resetting Default Values After a Protocol Change, page 18.
500 Denotes the MIC model, this is the only 3 digit numeric code for MIC 500 Series. B Denotes the mechanical build state, which is changed only if the software for this
configuration would conflict with other builds. C Denotes the major release number.
DD denotes the minor release number.
E Denotes the protocol group with a single letter. The options are as follows: – P: Forward Vision / Bosch
– A: Forward Vision / American Dynamics – K: Forward Vision / Kalatel
– N: Forward Vision / Panasonic – D: Forward Vision / Pelco P / Pelco D – L: Forward Vision / VCL
Contract Reviews
There is a final type of software available known as a Contract Review which will have been written specifically for one customer or site. These may be simple changes or additions to an existing standard software, or a new protocol entirely. The title is 8 characters long as below: “CR”AABBCC
where
The title therefore contains no information as to the build state or function of the software, so please contact technical support with the software title for any further information as required.
4.6.3
Telemetry Programming
How to Program through TelemetrySelect the required MOT file as an individual file, or select your MIC and protocol combination from the MIC file. Click the Upload File to MIC button on the Fixed Security Code tab.
How to Program through Telemetry: MIC Series pre March 2010
Select the required MOT file as an individual file, or select your MIC and protocol combination from the MIC file. Click the Based on Serial No. tab, and enter your MIC’s Serial number in the input box. Click the Generate Security Code button and then click the Upload File to MIC button.
With what will this work?
This method of programming is only valid for MICs with a 6E control card or later, or older cards that have the telemetry programming upgrade card 400-213 or 400-214. This requires
AAA Denotes the build state of the MIC, this is a 3 digit numeric code. The options are as follows:
– 117: Early MIC 300, using potentiometers (pre 2001)
– 118: Early MIC 300, using first generation resolvers (pre April 2003) – 120: MIC 300 / 400 with brushed motors
– 131: MIC 400 with brushless motors – 410: MIC 410 Thermal
– 411: MIC 411 Thermal – 412: MIC 412 Thermal
B Denotes the software release version as a letter A through Z.
C Denotes the protocol with a single letter code. The options are as follows: – A: American Dynamics
– B: 360 Vision – D: Pelco P / Dl – K: Kalatel – L: VCL – M: Molynx – N: Panasonic – P: Bosch – V: Vicon
– W: Forward Vision
AA Denotes the release month. BB Denotes the release year.
the correct security code to be entered for the MIC. Any discrepancies on this will not allow the MIC to be re-programmed.
Telemetry programming is performed through a normal 2 way 4 wire 485 comms connection to the host PC. This process will not work over 2 wire connections.
The programming process 1. Open and Read MOT File
This takes the file selected and reads it into memory, indicating the file size and ID tag. A fail here would indicate an invalid or corrupted MOT file.
2. Connect to the MIC Through Telemetry
This verifies that the security code matches the serial number. If they match, the security code is sent to the MIC to put into program mode. If the control care is 6E or later, then a confirmation byte will be sent. Whether or not Camset waits for this is defined by the Old Control Card check box.
3. Setup MIC to Receive MOT File
The next few stages get the processor in the correct state to receive the MOT file. Initially a handshaking occurs to confirm the communications speed, and then several Kernel files are sent to first erase the memory and then provide an interface to store the MOT file data in the correct positions in memory. If any of these steps fail, then the process will jump out. Ensure that all files are located in the correct position, and that the header is seated correctly into the connector.
4. Send the MOT File
This stage is the longest and sends out the MOT file sequentially. The time this takes is dependent on the upload speed chosen and the size of the file. Typically this takes around 20 to 30 seconds. The progress bar underneath indicates the current stage in the process.
5. Error Check the MIC Flash
If Error Check is selected, this process will run and set up the MIC to send back the contents of its memory. Once 2 kernel files are sent, the program will sit receiving the data back storing all the data for comparison with the original file. An error count is then indicated in the status window.
6. Disconnect the MIC
At the end of the process, the programmer will disconnect and restart the MIC. This means the MIC doesn't require a power reboot to start the new software. The MIC can then be set up as required using the other controls in Camset.
4.6.4
Direct Connection Programming
How to Program with a 900-200To gain access to the programming socket, remove the bottom shell of the MIC. Connect the Programming Header 900-200 into the corresponding socket on the front of the board and remove the red jumper situated next to the connector. Then connect the other end to your computer’s RS232 port. If the camera is powered up and the connections made correctly, you should see that the LED on the programming header is illuminated. If at any point an error occurs, disconnect and reconnect the header on the MIC control card to get the LED illuminated again.
What will this work with?
This method of programming is only valid for older MICs with pre-6E control cards which have the programming socket built onto them. For all other MICs use the Telemetry Programming method.
The programming process – Open and Read MOT File
This takes the file selected and reads it into memory, indicating the file size and ID tag. A fail here would indicate an invalid or corrupted MOT file.
– Set up MIC to Receive MOT File
The next few stages get the processor in the correct state to receive the MOT file. Initially a handshaking occurs to confirm the communications speed, and then several Kernel files are sent to first erase the memory and then provide an interface to store the MOT file data in the correct positions in memory. If any of these steps fail, then the process will jump out. Ensure that all files are located in the correct position, and that the header is seated correctly into the connector.
– Send the MOT File
This stage is the longest and sends out the MOT file sequentially. The time this takes is dependent on the upload speed chosen and the size of the file. Typically this takes around 20 to 30 seconds. The progress bar underneath indicates the current stage in the process.
– Error Check the MIC Flash
if Error Check is selected, this process will run and set up the MIC to send back the contents of its memory. Once 2 kernel files are sent, the program will sit receiving the data back storing all the data for comparison with the original file. An error count is then indicated in the status window.
– Disconnect the MIC
Once the programming is complete, remove the 900-200 from the control card, and replace the red link next to the socket. The MIC should then boot running the new software. Replace the lower shell and set up as required using the other controls in Camset.
4.6.5
Programmer Controls
Fixed Security Code, or Based on Serial No.
These 2 tabs define the security code functionality. To simplify the programming process, the latest range of MIC models run from the same security code and as such this is entered automatically by selecting the Fixed option. When you select Based on Serial No., the MIC Serial Number and Security Code boxes are cleared and become available for editing. MIC Serial Number / Security Code
These 2 input boxes are where the MIC Serial Number and corresponding 12 character Security Code are entered. The serial number can be found in the paperwork that came with the MIC, on a label on the MIC, or by using the Get Serial feature on the Advanced Controls page.
The Security Code is unique and matches the Serial Number of the MIC to ensure security for the programming process.
Generate Security Code
This button enables the user to generate the security code from the provided Serial Number. The code is automatically entered into the Security Code input box.
Plug in telemetry programming header
If this option is checked, the programmer will not wait for a confirmation from the MIC that the telemetry programming connection has been made, which is only available on MIC cards 6e or later. If you try to program an older card with this unchecked, the software will report that no connection has been made and the process will stop.
High speed Upload
If checked, the software will send the MOT file to the MIC at 57600 baud rate compared to the standard 9600. This can be left on as standard and only turned off if you are experiencing continual communication issues during upload.
Programming Mode
These 2 options (Program through Telemetry and Program Directly using a 900-200)
determine the connection method used for reprogramming the MIC. Direct connection is used on pre-6E control cards without the telemetry programming upgrade board, and requires a Forward Vision Programming Header 900-200. Telemetry programming is performed through a 4 wire 485 communications link to a Comm port on the PC.
Clear Status
This button clears all the text in the status text box on the right of the page. This is automatically cleared every time a new file is sent anyway.
4.7
Presets and Tours
4.7.1
Preset Position
Preset positions are locations stored by the MIC in Pan, Tilt and Zoom, Focus etc, which can either be called back manually, or returned to as part of a preset position tour.
To learn a position, move the MIC to the desired location and then either enter in the preset number in the box available or click the Preset Number button until it displays the desired value. Then click the Learn button to store. Once stored, the value in the input box will be cleared.
Return to a position using the same number entry method and then click the Go To instead. The Learn All Presets button will set every preset position available for the given protocol to the current position. This may take a few seconds.
4.7.2
Introduction to MIC Series Tours
Tours provide a way of making a MIC continually move to points of interest within its visible range. There are 2 different methods for this: Preset Tours, which recalls preset positions in the set order waiting at each for a desired dwell time, and Pattern Tours, which mimics the user’s movements while recording so it can follow a specific path.
Access to these methods is entirely protocol-specific, meaning that if it is shaded out, the feature is not supported. In some cases there are up to 6 separate tours available. Preset Tours
To save a preset tour, enter the end preset number and a corresponding Dwell time into the input boxes and then click the Program Tour button. This sets up a simple tour, with each steps preset position fixed, and the dwell time constant across the tour, stored to the Tour Number. More comprehensive program methods are normally available through the control system.
The Tour Number selects the tour to which you save and from which you play the tour. The Start Tour button initiates the current programmed sequence for the given Tour Number. Pattern Tours
Depending on the protocol, the controls for these vary. Some fully implement the recording functionality, and in these cases the Start Recording and Stop Recording buttons are used, with user manual control in between. This is again stored to the Tour Number as set.
Other protocols use an add point method, where Start Recording and Stop Recording are used in the same way, but instead of manual control in the middle, Add Tour Point is used to insert a preset position with the options specified: Preset, Dwell and Speed.
4.8
Reset MIC
Accessed from File > Reset MIC, this sends out a command to reboot the software. This is not a hardware reboot. The only way to reboot the hardware is to remove the power supply to the MIC. The software reboot will take approximately 10 to 15 seconds, depending on the software loaded.
4.9
Resetting Default Values After a Protocol Change
After any protocol change or a firmware (FW) upgrade, MIC cameras MUST be reset to their default values. For Camset 4.0, follow these steps:
1. Open the Universal Camset software.
2. Set the appropriate values in the Cam-set Protocol, MIC Model, and IP Address fields (at the bottom left of the main window).
3. Test for control. If control is not possible, repower the unit and check the camera address on the Video Out or in the Boot Messages box. The address is sometimes changed during the protocol changes. For example, when changing protocols from Pelco to Bosch, the MIC address is changed to 54; the unit will not Pan left, and will only Tilt in one direction.
4. Select Settings > General Control.
5. Click the Clear button under both Soft Stops and Non-Dwell Zone sections of the window, and then click the Find End Stops button.
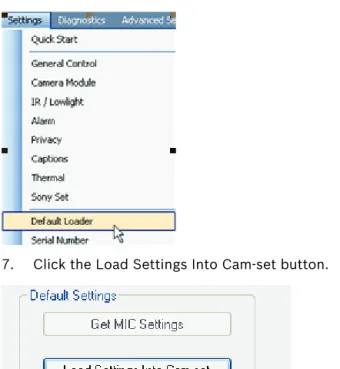
7. Click the Load Settings Into Cam-set button.
The Open a Default File window appears (in Microsoft Windows).
8. Select the appropriate Production Defaults file. (Select the IR file if your camera is an IR model.) Click Open.
9. Click the Set Current Options to MIC button.
Note: This process is NOT COMPLETED until after the MIC has finished locating its mechanical Tilt limit stops.
10. Select Settings > General Control.
11. Confirm that the following MIC Orientation settings are correct: Pan Reverse, Tilt Reverse, Image Flip.
Note: After changing the settings to Pelco settings, always toggle the Tilt Reverse and Image Flip so that the correct values are set.
12. Select Standard Controls > PTZ Controls + Auxiliaries.
13. Test the following Auxiliary functions (in the Auxiliaries section of the window): Wiper, IR/Thermal, Auto Pan, On Screen Data.
Note: Some protocols do not support all AUX functions. In this case, the option will be grayed out, as in the Pelco example below.
14. If the MIC is fitted with a Privacy Card, select Settings > Privacy, check for alignment, and adjust as necessary. If necessary, check for alignment for Captions. Select Settings > Captions, and adjust as necessary.
15. Click the Configure MIC Communications button (in the MIC Settings section of the window, under the Boot Messages box).
The MIC Communications Settings window appears.
16. Change the Address of the camera to the setting required for the installation. Click Apply. The window closes. The MIC camera should now have the correct settings.
4.10
Resetting Default Values for MIC 500 Series Cameras
Because the defaults for the 500 Series are slightly different than those for the 400 Series, the steps to reset the defaults for the 500 Series are also different. There are two methods of resetting the default values:
– Via the Default Loader in the Camset software. – Via the on-screen menu from a Bosch controller.
For either option, open the Universal Camset software, then proceed accordingly: Resetting default values via Default Loader in the Camset software
1. Select Settings > Default Loader.
2. Click the Load Factory Defaults button. The Info dialog box appears, displaying the message, “This will reset all information in the MIC, including Presets, Tours, Captions and SonySet information. Are you sure you want to continue?”
Click OK.
3. Note the values in the Transmit line at the bottom of the Camset software window. It should have these values:
4. Note the ::Loading Defaults:: text on your video monitor.
Resetting default values via the Camset PTZ Controls and your monitor’s on-screen menu 1. Select Settings > General Control.
CAUTION!
2. Click the down arrow of the PTZ Controls until the ‘Enter Password’ option appears on the monitor. You must enter the password in order to reset the defaults.
3. Click the right arrow until ‘Password’ appears.
4. Click the right arrow until you set the password at ‘1000.’ 5. Click the right arrow until the ‘Reset to Defaults’ appears. 6. Click the down arrow until ‘Confirm Reset’ appears. 7. Click the right arrow until ‘Yes’ appears.
8. Click the left arrow. The text ::Loading Defaults:: appears on the screen. CAUTION!
5
MIC Settings
This section describes most of the more basic settings available in Universal Camset for configuring your MIC Series unit. All of these can be found under the Settings menu in the tool bar.
5.1
Quick Start / Easy Setup Process
Menu Path: Settings > Quick Start
The Quick Start process Easy Setup Process can be used to configure your MIC series unit by answering a series of questions about the installation requirements, both physical and operational. Once completed, the optimum settings will be loaded in and the MIC will be ready to go. Follow these steps:
1. Ensure that you have selected the appropriate Comm Port, Protocol, Baud Rate and Address. Confirm the setting by trying the PTZ controls on the Camset window.
2. Click either the large Start Easy Setup Process button or the Start button. Both will lock away all of the MIC settings pages, meaning that once configured, the MIC cannot be modified without returning the Camset to manual mode by clicking the Return to Manual Setup button. At the same time, the MIC should start panning and display the question, “Is the MIC currently panning?” Select the appropriate answer and then click Next. 3. Follow the series of questions, answering each according to how you want the MIC to
operate. Each selected answer will be appended to the text box below with a short description. Correct any mistakes by clicking the Previous button to return to earlier questions.
4. Answer the last question: “Do you want to save your configuration?” Select No to load the current settings to the MIC; the process will reset.
Select Yes to upload the defaults and then load a save dialog that allows you to store the current settings as a file that can be loaded into other MICs via the Default Loader at a later date.
5.2
Control Settings
Menu Path: Settings> General Control Pan Reverse
This will invert the pan rotation of the MIC compared to the commands from the controller. This would be used to regain logical control if a MIC was inverted.
Tilt Reverse
This will invert the tilt rotation of the MIC compared to the commands from the controller. Image Flip
This manually inverts the image from the camera module, which may be used on an inverted camera where the head cannot be rotated through 180 degrees. Inverting the image would normally also require some modification of the control directions.
Wash Wipe
If Wash Wipe is On, then, when the Wash auxiliary is set, the MIC will return to a preset Wash Position (which is set by clicking Set Position), activate the washer relay in the PSU, and turn on the wiper. When the auxiliary is turned off again, the MIC will return to its prior position and turn off the wiper. If Wash Wipe is Off, then when the aux is activated, the MIC will close the washer relay and remain in its current position.
Auto Flip
With this enabled, the MIC will pan through 180 degrees as it reaches the vertical position so that the user can then tilt down the other side, meaning that the MIC video is never inverted. Once the rotation is complete, the controls are reversed until a stop command is received, at which point they are returned to normal.
E-Flip
With E-Flip turned on, the MIC will automatically invert the image and reverse or revert controls as required when the MIC tilts over the vertical point. The tilt reverses once the unit has stopped to remove any switch over issues. When switched off, the MIC pans and tilts as per normal.
Auto Home
After a programmable time with no manual control, the MIC can be configured either to move to the home position (Preset 1) or start tour / pattern 1. With Auto Home turned off, the MIC will remain stationary until the next user input. The amount of time before this takes place can be set using the input boxes and the Set Time button.
Soft Stops
This feature offers a method of restricting the MIC's movements to a certain area. A “box” is defined using the Top Left and Bottom Right buttons which provides the area within which the MIC is allowed to move. To clear the area, set both corners to the same location. Non-Dwell Zone
This provides the opposite of Soft Stops, in that an area can be defined within which the MIC cannot stop. The area is defined and cleared in the same way using the Top Left and Bottom Right buttons. Once the MIC enters the area, it passes straight through to the opposite edge. Clear Soft-Stops and Non-Dwell Zones
This button clears both the Soft Stops and the Non-Dwell Zone, which is required after a MIC is re-flashed.
Find End Stops
This will allow the MIC to rotate in the tilt axis first down then up to its mechanical limit stops. It will then store a “soft” limit a few units back from these for normal use. During this process, manual control is not available.
5.3
Camera Module Settings
Menu Path: Settings > Camera Module Camera Power
This can be used to turn the camera module inside the MIC off as required. Digital Zoom
This is an override for the Digital Zoom Auxiliary, meaning that if On, this will allow digital zoom to be controlled by the aux state. If it is Off, this will never allow digital zoom no matter what the state of the aux.
Lens Recalibration
This section defines when and how often the Sony block should perform a recalibration process. The first field Inactivity defines how long, in hours, it should be after the last manual control command before the first recalibration should take place, and the second is a time in days between each successive recalibration from then on.
To set these, enter the appropriate values in the text boxes provided, and then click Apply. Alternatively the Recal Now button will perform a manual recalibration.
5.4
IR / Lowlight Settings
Menu Path: IR / Lowlight Auto IR
In this mode, the camera module is monitored for its current IR state. As soon as the light drops sufficiently, the module will automatically put the cut filter in place and switch to black and white, at which point the MIC will turn on the IR lamps.
Photocell IR
This mode enables the user to attach an external photocell to the power supply to control the IR lamps. The device is connected to alarm input 4, meaning that when the light levels drop sufficiently alarm 4 is triggered, and instead of moving, the MIC detects this as an activation signal for the lamps. When the light levels pick up again, the alarm will deactivate and the lamps will be turned off. This mode can enable the user to hide the sensor away from any large external lighting which may cause the camera to flick in and out of IR mode under Auto conditions.
IR Illumination
This setting defines if the MIC image is illuminated with IR or visible light, to ensure that the back focus position is corrected accordingly on 36x imagers. Use On for IR MIC's or non-IR MIC's with other external IR lighting, and Off for all other MIC installs. The back focus only affects the output when in the camera is in night mode (IR cut filter in place).
Auto Lowlight
If this is turned on, the MIC will decrease its shutter speed as the light levels drop, rather than increasing the gain. Motion blur on the video can occur if the frame rate drops sufficiently low, which may not be ideal for a camera which is continually moving. If the images are still, however, they will not have the grain associated with low light conditions.
The controls below define the Max Gain and Min Shutter Speed parameters used by the MIC when in Auto Lowlight mode. The combo boxes provide the actual settings available in dB for gain and FPS for shutter speed. The On Screen Data auxiliary will indicate the current frame rate if required. The values are set by selecting the desired option from the drop-down lists.
5.5
Alarm Settings
Menu Path: Settings > Alarm Auto Alarm
This is used for both single or multi alarm functionality. With Auto Alarm on and Multi Alarm off, the MIC will monitor the tamper switch line, moving to the programmable Alarm Position (set by clicking the Set Position button) when the connection is grounded. If Auto Alarm is turned off the MIC will ignore any change in status of the tamper line.
Multi Alarm
With this, the user can set up a separate position for each of the 8 alarm inputs. Any given alarm input will trigger the MIC to move to the position with which it is associated. To activate this functionality, both Auto Alarm and Multi Alarm should be turned on.
Multi Alarm Settings
This section sets up how the MIC reacts to a given alarm input, when Multi Alarm is turned on. For these options to do anything, the PSU must be either fitted with a Multi Alarm card (8 alarm inputs) or be an IR PSU (4 alarm inputs).
The multi alarm card provides 2 output relays which can be configured to close or open on given alarm inputs. Relay 1 can be activated from either alarm inputs 1 to 4 or 1 to 8 and similarly relay 2 with 5 to 8 or 1 to 8. The re-arm time is a time in seconds before the MIC returns to its current position and returns the relay to its prior state. The options for this are 1, 5, 10 or 60 seconds. To send the settings to the MIC, select the desired options and then click Set Relays.
5.6
Privacy Settings
Menu Path: Settings > Privacy
This section deals with the most common controls of the privacy card, creating and clearing masks, and setting up mask colors, etc. These settings require the optional Privacy Card to be fitted into the head of the MIC. Privacy is not available on any of the thermal MICs.
Mask / Clear Screen
These functions will add or remove a privacy mask the size of the entire current view. Moving the MIC in Pan or Tilt should then indicate the zone clearly. This would most commonly be used in conjunction with zoom where a window can be made full frame and then the whole thing masked as opposed to the Mask / Clear Pixel method which may take significantly longer.
Mask / Clear Pixel
This is a more accurate way of creating privacy masks one pixel at a time. The Pixel is created at the center of the image, or where the crosshair points if it is visible.
Masks On / Off
This is an override setting to turn masks completely On or Off. This will not clear individual masks settings; when Off is sent, they will disappear and then re-appear in the same positions went On is sent.
Crosshair On / Off
Select On to display a crosshair in the middle of the video display. Use this crosshair to set individual mask pixels with the appropriate command from below.
Show / Clear Style
This setting provides a preview of the current mask style. For the Privacy 3 units, this will only work if the Crosshair is turned On, indicating the current style in a small privacy block to the right of the crosshair center. With Privacy 4, a bar will appear on the top left of the video indicating the available mask types, and a second bar below showing the currently-selected style. Use the Set Mask Style to step through the available styles. Once the required style has been selected, click Clear Mask Style (and Crosshair Off for Privacy 3) to return to the normal state.
Set Crosshair
This will create a pixel sized mask as with the function above, and will also bring up the crosshair. Click again to remove the crosshair or use Crosshair Off.
Set Mask Type
If Crosshair and Mask Style are both turned On, this function can be used to step through each of the available mask types one at a time. This will not update all the masks to the same type; it will only update the ones that are created subsequent to the change.
Save Current Settings
Once any calibration changes are made, click this button to save the new values permanently. Erase All Masks : Privacy 4 Only
This will remove all of the masks from memory. This takes about 8 seconds to complete. During this time, the privacy card will ignore any incoming commands.
MIC Configuration
These options define the MIC's orientation, which defines how the masks track. For Inverted MICs, the head would normally be rolled around through 180 degrees, with Pan Reverse On to regain sensible control. With inverted IR MICs, however, the head cannot be rotated around because of the IR Lamp arms; therefore, the video must be inverted, and both controls reversed.
Privacy 4 Mask Copier
The privacy mask copier provides the ability to download all mask data from one MIC Series camera and upload it into another via the Privacy 4 module. It is highly unlikely that the pan will be aligned between 2 units, so there is a Pan Offset parameter that can be used to bring the masks back to the same position for the new MIC.
– Use this control to download all of the privacy masks to an XML document at a user-specified location. The progress will be indicated on the status bar below.
– Use this button to select an XML file that has been downloaded previously, and upload it into another MIC. The progress will be indicated on the status bar below.
– Use the increment and decrement controls to shift the newly-uploaded masks to the correct position over the target. The larger buttons shift the masks in small increments, while the outer smaller buttons will make a large jump.
5.7
Captions
Menu Path: Settings > Captions
The MIC has 3 different caption options available. On the MIC 400 (and older) series, only one line of text is available and therefore a preset caption will overwrite a default caption. On the 500 series, they can run together on different lines. The Default Caption can be treated as the name of the camera. It will appear on the video whenever it can (always for 500; no preset or sector captions are visible for older MICs).
Preset Captions can be used to display a different title for each of the preset positions available. This will be loaded once the MIC has reached the position. As an alternative, the same 64 captions can be used, not for preset positions but for rotational sectors. The MIC’s pan is split into 64 segments and a different caption can be assigned to each or to a group. Using this option can result in an occasional slight control lag.
Whatever caption is being set, the writing must be entered into the Caption text box. The caption will be displayed in block capitals and only certain extra characters are recognized. Unknown characters will be displayed as “?”.
Location and Color
Set Default Caption
This programs the current caption (if valid), position and color settings to the default caption. If captions are turned on this should appear immediately on the video.
Toggle Captions On / Off
This setting is a global On / Off setting for captions. If Off, then no captions will be displayed, Default, Preset or Sector.
Toggle Sector / Preset
This toggles between the 2 caption modes of Preset or Sector. These options are mutually exclusive.
Preset Captions
This section provides 3 options, to either set one preset caption to the preset number specified in the input box. Set all 64 presets to the same caption, or clear all 64 preset captions to nothing.
Sector Captions
This section allows the definition of the sectors and what caption to use for each. First, enter the Caption Number, that corresponds to a preset caption, then enter the start and end of the group in terms of an individual sector. Click Set Sector Info to store the data.
Basic N, E, S, W Sector Setup
This button provides a simple one step setup to get the MIC to indicate “N”, “E”, “S”, or “W” on the display dependent upon the current 90 degree sector. North is defined as the 16 sectors centered at the zero point of the resolver. The MIC therefore needs to be orientated to point North physically if these are required for accurate positioning.
5.8
Thermal Settings
Menu Path: Settings > Thermal
Shutter and Image Flip
The Shutter option provides manual control over the physical shutter of the imager. Image Flip defines the orientation of the video output. As standard in the MIC 412, this is On as the imager is mounted inverted inside the MIC.
Gain and Auto Gain Modes
The thermal imager has a number of different gain modes available dependent upon the application. By default Gain will be on Auto and the Auto Gain Mode will be Histogram. Histogram, Linear and Logarithmic modes are all fully automatic modes which provide different scaling dependent upon the scene itself, where the others require some user intervention, in the form of Brightness and Contrast settings, under the Manual Gain Control section. This may be desired to get a perfectly exposed image in a fixed level environment. For outdoor use it would be extremely difficult to specify manual settings that would work well over the whole day, and changing conditions.
False Color
The thermal imager has 11 different false color options, which can highlight different temperatures on a scene in different colors. The color range's are not fixed, and are
dependent upon the gain settings of the imager, but for each specific setting the colors will always remain in order of temperature from coldest up to hottest over the scene.
5.9
Sony Set
Menu Path: Settings > Sony Set
This section describes the controls on the SonySet page of Camset, including the Creating, Loading, Saving, Uploading and Downloading SonySet tables.
A MIC can store 10 Sony Set tables, each containing 10 separate camera controls. This means that a complete setup for the camera module (shutter speed, gain level, effect, etc.) can be saved and loaded back at any time through an input from the user, rather than the user needing to modify each setting separately.
These tables can be used to define certain camera states for different positions or
requirements of a MIC (for example, one could be set up for normal operations, and another set up for ANPR, with a specified frame rate and gain, etc.). Users can then toggle between these by executing an Execute SonySet command.
5.9.1
SonySet Controls
SonySet Preset Number
This is where the SonySet Preset number is selected, there are 10 options available relating to 10 complete camera setups.
The SonySet Table
The table on the right of the form indicates the current state of one of the presets. The first column Sony Command indicates the command type for each of the 10 steps in each preset. The Option column indicates the current value for the chosen command, (e.g On or Off) or if the command is a direct set type, this will indicate the range available and the result is displayed in column 3, Value. Refer to the SonySet Options of the Help documents for the full list of available commands and values.
Changing any of the Sony Commands will invoke the corresponding Option to also change and take on the top value in the list of available options, therefore clearing the previous setting from memory. If the command type requires a numeric input, the corresponding Value box will indicate the lower bound of the range, which can then be changed to any valid value.
If only a few commands are utilized on the list then the rest should be set to “End” which will display “N/A” in the option column.
Get Preset from MIC
This process will query the MIC for the table number as specified in the SonySet Preset Number list. Each valid command and value will be shown in the table. If any data is incorrect or the command does not exist the Sony Command column will display “Invalid”. It is not advised to reprogram a MIC with any “Invalid” commands.
Send Preset to MIC
This will read through the entire table checking for valid commands and respective values indicating any discrepancies, and then form the commands to send the data to the MIC. The data is stored to the preset number as indicated in the SonySet Preset Number in list. Execute this Preset
This will send a command to the MIC to read the commands from the preset number in SonySet Preset Number list in memory and send them on to the Sony module. This will only send commands stored in the camera; it will not send the commands in Camset software. To test a Setup, first use Send Preset to MIC, then Execute this Preset.
Load Table from File to MIC
It is also possible to Load a complete table of all 10 presets directly into the MIC from a file. This will prompt the user to open an XML file containing all of the information required. The information will not be displayed in the table display. It will be sent straight to the MIC. Save Table from MIC to File
This creates the files that can be used by the feature above. First it will prompt for a file location to store. If the file is valid, it will then poll the MIC for the command of each preset and store all of the information to an XML file. Using the Save and Load file functions as above means it is possible to copy a complete SonySet table from one MIC to another to set up a site easily with the same configuration.
Clear Table
This clears the table in Camset and will not do anything to the data stored at the location in memory in the MIC itself. To clear a MIC table, use this function and then Send Preset to MIC.
5.9.2
SonySet Options
Full Command List
Below is a list of the available SonySet Commands and their corresponding Values or valid value ranges:
Command Value
Camera Power On / Off
Zoom Set 0 to 28672
Digital Zoom On / Off
Focus Set 4096 to 49152
Focus Mode Auto / Manual
Focus Control One Push Trigger / Force Infinity AF Sensitivity High / Low
Focus Near Limit 4096 to 49152
White Balance Mode Auto / Indoor / Outdoor / One Push / Auto Tracing / Manual White Balance Control One Push Trigger
Red Gain Control Reset / Plus 1 / Minus 1 Red Gain Set 0 to 255
Blue Gain Control Reset / Plus 1 / Minus 1 Blue Gain Set 0 to 255
Exposure Mode Auto / Manual / Shutter Priority / Iris Priority / Gain Priority / Bright / Shutter Auto / Iris Auto / Gain Auto
Slow Shutter Mode Auto / Manual
Shutter Control Reset / Plus 1 / Minus 1
Shutter Set 0 to 21
Iris Control Reset / Plus 1 / Minus 1
Iris Set 0 to 17
Gain Control Reset / Plus 1 / Minus 1
Gain Set 0 to 15
Bright Control Reset / Plus 1 / Minus 1
Bright Set 0 to 31
Exposure Comp Control Reset / Plus 1 / Minus 1 Exposure Comp Set 0 to 14
Exposure Comp Mode On / Off
Backlight On / Off
Aperture Control Reset / Plus 1 / Minus 1
Aperture Set 0 to 19
Low Lux On / Off
Individual Setting Details
For some settings in the Sony Set table, the values available are a range of integers that internally relate to specific lens or camera configurations. The following tables indicate how these values relate for each given setting.
Shutter Speed
Iris Set
Image Flip Horiz On / Off
Freeze Frame Off / Negative / Black & White On Screen Data On / Off
Caption Display On / Off
Auto IR On / Off
Camera Initialise Lens Recal / Bad Pixel Correction
Image Flip On / Off
End N/A
Invalid N/A
Command Value Shutter Speed
PAL NTSC
0 1 1
1 2 2
2 4 3
3 8 6
4 15 12
5 30 25
6 60 50
7 90 75
8 100 100
9 125 120
10 180 150
11 250 215
12 350 300
13 500 425
14 725 600
15 1000 1000
16 1500 1250
17 2000 1750
18 3000 2500
19 4000 3500
20 6000 6000
21 10000 10000
Command Value Iris Level
0 Close
1 F28
2 F22
3 F19
4 F16
5 F14
6 F11
7 F9.6
8 F8
9 F6.8
Gain Set Bright Set 10 F5.6 11 F4.8 12 F4 13 F3.4 14 F2.8 15 F2.4 16 F2 17 F1.6
Command Value Gain Level (dB)
0 -1 1 0 2 +1 3 +2 4 +3 5 +4 6 +5 7 +6 8 +7 9 +8 10 +9 11 +10 12 +11 13 +12 14 +13 15 +14
Command Value Iris Gain (dB)
0 Close 0
1 F28 0
2 F22 0
3 F19 0
4 F16 0
5 F14 0
6 F11 0
7 F9.6 0
8 F8 0
9 F6.8 0
10 F5.6 0
11 F4.8 0
12 F4 0
13 F3.4 0
14 F2.8 0
15 F2.4 0
16 F2 0
17 F1.6 0
18 F1.6 +1
19 F1.6 +2
20 F1.6 +3
21 F1.6 +4
22 F1.6 +5
Exposure Compensation Set
Zoom Set: Optical Range
Zoom Set: Digital Range
Focus Set
23 F1.6 +6
24 F1.6 +7
25 F1.6 +8
26 F1.6 +9
27 F1.6 +10
28 F1.6 +11
29 F1.6 +12
30 F1.6 +13
31 F1.6 +14
Command Value Step Ref Gain Level (dB)
0 -7 -10.5
1 -6 -9
2 -5 -7.5
3 -4 -6
4 -3 -4.5
5 -2 -3
6 -1 -1.5
7 0 0
8 +1 +1.5
9 +2 +3
10 +3 +4.5
11 +4 +6
12 +5 +7.5
13 +6 +9
14 +7 +10.5
Command Value Hex Command Value Actual Zoom Position
0000 0 1x
166F 5743 2x
2C02 11266 6x
34D9 13529 12x
39A0 14572 18x
3D06 15622 24x
3F00 16128 30x
4000 16384 36x
Command Value Hex Command Value Actual Zoom Position
4000 16384 1x
6000 24576 2x
7000 28672 4x
7540 30016 6x
7800 30720 8x
7980 31104 10x
7AC0 31424 12x
5.10
Default Loader
Menu Path: Settings > Default Loader
This section describes how default settings can be read from and set to your MIC Series unit in a single process. Settings can be loaded from or saved to files meaning that custom setups are available, and once the configuration is confirmed the options can be set to single or multiple MICs across 485 or IP networks. All of these can be found under the Settings - Default Loader option in the tool bar.
5.10.1
Default Loader Controls
The Default Settings section reads and sets settings from the following sections: – Manual Control Auxiliaries
– General Settings – Auto Home Controls – Multi Alarm Settings – Lens Recalibration
– Frame Integration Settings – All Thermal
All other settings will not be saved, loaded, downloaded or set through the following controls. Get MIC Settings
This downloads the current status of each of the settings from the MIC and loads it into the text boxes and radio buttons on Camset. This provides an easy way of viewing the current setup of each MIC and also a way of copying the settings from one into the next.
Save Camset Settings
This option will first prompt for a file location and then store the current state of all the options outlined above to an XML file which can then be loaded at a later date back into Camset as a standard for a specific site.
Load Settings into Camset
This will prompt to open an XML file as saved above. Only valid Camset Default XML files will work.
Set Settings to Single MIC
This will go through each of the settings above except for thermal, and send out the
commands to the MIC to set it up as Camset displays. This may take a few seconds as there are several commands involved in this process.
Command Value Hex Command Value Actual Focus Distance
1000 4096 Infinity
2000 8192 20m
3000 12288 10m
4000 16384 5m
5000 20480 3m
6000 24576 2m
7000 28672 1.5m
8000 32768 32cm
9000 36864 9.5cm
A000 40960 4.5cm
B000 45056 2cm
Upload Default Options
There are 2 extra options for defaults, Clear SS and NDZ will clear any saved Soft Stops and Non-Dwell Zones, and Find End Stops. These options may be used to completely set up a MIC after it has been reprogrammed to a new protocol.
Load Factory Defaults
This causes the MIC to take on its original factory default settings. This resets everything except the address, including preset positions and SonySet tables. If this feature is available you will note a “LOADING DEFAULTS” caption appear on the video. Otherwise default settings can be loaded through Camset in the Default Settings frame.
5.10.2
Upload Defaults to Multiple MICs
This sub window enables the upload of the currently set settings in Universal Camset to multiple MIC addresses, or even multiple addresses across a range of Bosch IP encoders. There are 2 modes Address Range and Multiple IP Devices, which are described in more detail below.
Address Range
The input box is used to define the addresses required in a comma-separated fashion. Ranges of addresses can also be defined using the “-” character. For example, “1,3,5-9” would upload to the following addresses: 1, 3, 5, 6, 7, 8 and 9. The length of this process is dependent on the number of addresses chosen, but will typically be 5 to 10 seconds per unit. Click the Apply button to upload the settings.
Multiple IP Devices
Click the List Connected IP Devices to populate the list below, the time this takes will depend on your network size. Each device will be indicated by its IP address and programmed device name.
The Set column indicates if settings are loaded to this device, and the Address Range works in the same fashion as described in the Address Range section above. The Select All check box will set or clear all of the devices Set field, and similarly, the Set Default Address Range can be used to configure the address range field for all encoders.
Once complete, click the Apply button to upload the settings. This will take approximately 10s per MIC, so may take a few minutes on large systems.
5.11
MIC Serial Number
Menu Path: Settings > Serial Number
This feature is used to set or read the actual MIC Serial Number. This may be required to reprogram the MIC through the telemetry. On MIC 500 models the Serial Number is also displayed on the on screen boot message. The Set function is locked out with the Advanced Password as this should only be performed at the manufacturing stage, however read is available to use as required.
5.12
Brushed Motor Settings
Menu Path: Settings > Brushed Motor Parameters
Earlier brushed motor MIC Series units used 4 configuration settings to define minimum and maximum speeds under different circumstances to maximize the lifetime of the motors brushes.