IBM Endpoint Manager
Version 9.2
Software Use Analysis
Managing Software Inventory Guide
IBM Endpoint Manager
Version 9.2
Software Use Analysis
Managing Software Inventory Guide
Managing the Software Inventory Guide
This edition applies to IBM Endpoint Manager for Software Use Analysis application update 9.0.1.1 (product number 5725-F57) and to all subsequent releases and modifications until otherwise indicated in new editions.
Contents
Managing software inventory
. . . 1
Software asset management dashboard . . . 1
Maintaining accurate software inventory . . . 4
Reviewing software inventory . . . 5
IBM Software Classification. . . 6
Automated bundling . . . 7
Part numbers . . . 8
Partition collocation . . . 10
Infrastructure collocation . . . 11
Stand-alone product discovery . . . 12
Confirming the assignment of a software instance 13 Reassigning software instances . . . 14
Excluding software instances from pricing calculations . . . 16
Including software instances in pricing calculations . . . 16
Sharing software instances . . . 17
Working with software catalogs . . . 17
Catalog customization process . . . 18
Step 1: Prioritize the work . . . 18
Step 2: Analyze your software . . . 18
Step 3: Review information about files and packages . . . 19
Step 4: Create component signatures . . . . 20
Downloading the software catalog . . . 21
Updating the software catalog . . . 22
Searching the catalog . . . 23
Creating catalog entries . . . 24
Editing catalog entries . . . 25
Deleting catalog entries . . . 26
Creating signatures from package data . . . . 26
Creating signatures from scanned file data . . . 28
Exporting and importing custom catalog content 29 Viewing catalog audits . . . 30
Managing the catalog content in Software Knowledge Base Toolkit . . . 31
Software model . . . 31
Software Knowledge Base Toolkit signatures supported in Software Use Analysis . . . . 34
Updating the software catalog in Software Knowledge Base Toolkit . . . 35
Customizing the catalog content . . . 40
Reports . . . 47
Viewing reports . . . 47
Available reports . . . 47
Viewing computers . . . 50
Viewing metering data . . . 51
Viewing contract usage reports . . . 51
Viewing software inventory and usage . . . 52
Exploring software inventory . . . 52
Viewing audit trail . . . 53
Managing reports . . . 53
Applying report filters. . . 54
Exporting reports to a file . . . 54
Saving customized report views . . . 55
Scheduling report emails . . . 57
Working with PVU and RVU reports . . . 57
PVU and RVU license usage reports . . . . 57
Viewing PVU and RVU consumption . . . . 59
Creating snapshots of PVU and RVU consumption . . . 60
Contracts . . . 62
Maintaining contracts . . . 62
Creating contract custom fields . . . 63
Creating contracts . . . 64
Viewing contract usage reports . . . 65
Contract usage report . . . 66
Notices
. . . 69
Trademarks . . . 70
Managing software inventory
The topics in this section provide information about how to discover software in your IT infrastructure. You can check how to generate and view reports, analyze the findings, and adjust all processes and functions for creating these reports.
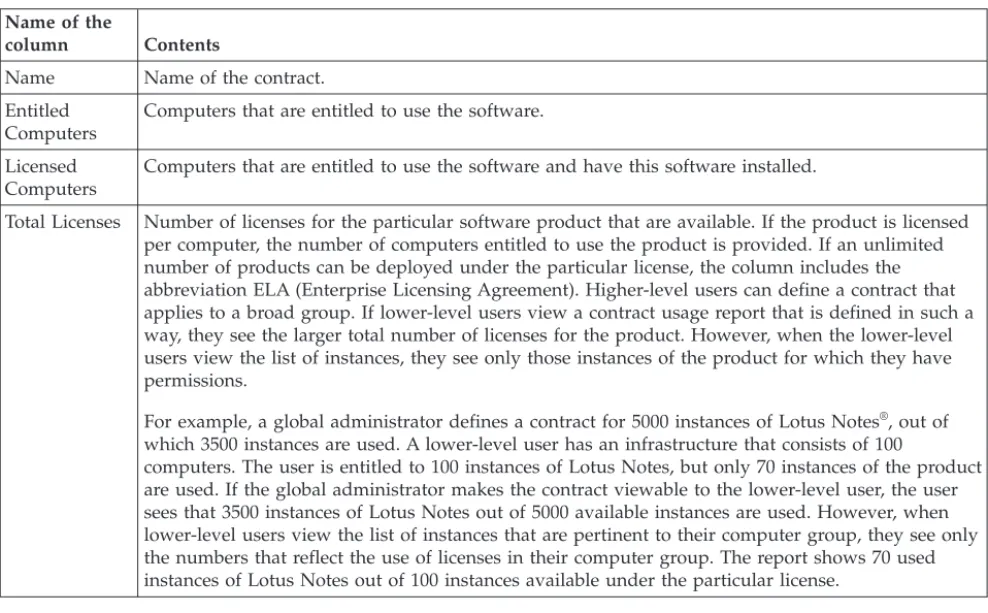
Software asset management dashboard
The software asset management dashboard provides you with a quick overview of the most important information about the software assets in your infrastructure. It includes information about the software catalog, part numbers, the status of software assignment confirmation, and completeness of the data that is used for capacity calculation.
IBM Capacity Data Completeness
The widget shows whether agents are correctly configured to collect all data for the hardware and software that is present in your infrastructure. A system can have an incomplete and inactive scan at the same time.
Elements of the widget
1 Links to the Inventory Data report with
results narrowed down to computers with the particular status.
2 The number of computers with a
particular status.
3
3 A link to the VM Managers panel.
IBM PVU Subcapacity
The widget presents products with the highest PVU consumption rate. It shows how many PVUs a product consumes but does not relate this information to your license entitlements. A maximum of five products are displayed by default. The accuracy of data that is displayed on the chart depends on when the scan data was imported, whether the PVU table is up-to-date, and whether software assignment was modified. If any of these factors was altered, an appropriate message is displayed on the widget.
No Data
scans was not uploaded, the upload of the data has not finished yet, or inventory scans do not work properly. The message is no longer displayed if data from at least one agent is successfully updated.
1 2 3 3 4 5
Elements of the widget
1 The PVU consumption rate of a product. 2 A link to the whole IBM PVU
Subcapacity report.
3
3 The current version of the PVU table.
4 A link to the website on which you can
check whether a new version of the PVU table is already available.
A link to the Metric Table Upload panel on which you can upload a new version of the PVU table.
IBM Software Classification
The widget presents the number of confirmed and unconfirmed software installations in your infrastructure. The accuracy of data that is displayed on the chart depends on when the scan data was imported and whether the part numbers file is up-to-date. If any of these factors were changed, an appropriate message is displayed on the widget.
No Data
Indicates that no data is available. It might occur when the data from the scans was not uploaded, the upload of the data has not finished yet, or inventory scans do not work properly. The message is no longer displayed if scan data from at least one agent is successfully updated.
1 2
3 4 5
Elements of the widget
1 A link to the IBM Software Classification
panel with results narrowed down to software installations whose assignment was confirmed.
2 A link to the IBM Software Classification
panel with results narrowed down to
software installations whose assignment is not confirmed yet. Go through these items and either confirm their default assignment or reassign them to different products so that all installations in your infrastructure are confirmed.
3
3 A link to the IBM Software Classification
panel.
4 The date when the last part numbers file
was imported.
A link to the Part Numbers Upload panel on which you can upload a new part
Inventory Data
The widget presents a summary of the IBM software that is installed in your infrastructure, computers, and computer groups in your infrastructure.
1
2 3 3
Elements of the widget
1 A link to the Software Installations report. 2 A link to the Computer Groups report.
3
3 A link to the Computers report.
Inventory Exploration
The widget presents top five publishers with the largest number of defined contracts defined. The publishers are ordered according to the number of computers on which their software is installed, regardless of the number of contracts.
1
2 3 3
Elements of the widget
1 The number of products from a particular
publisher.
2 A link to the Software Installations report.
3
3 A link to the Contracts panel.
Software Catalog
The widget presents links to the publishers, software products, versions, releases, components, and signatures in the current catalog.
1
2
3 4
5
Elements of the widget
1 Catalog overview links for all publishers,
software products, versions, releases, components, and signatures in the current catalog.
2 Name of the catalog provider.
3
3 Information about the current version of
the catalog.
4 The date when the software catalog was
last edited.
Catalog search field.
Maintaining accurate software inventory
When you know that a particular software item is installed in your infrastructure but is not displayed in Software Use Analysis, you must customize your software catalog so that your software inventory is accurate.
About this task
The following workflow presents one way of maintaining accurate software inventory and is intended as a starting point for new users. You can use your own method of ensuring that your software inventory is up-to-date and accurate.
NO
Start the process of verifying software detection and updating the catalog
View software inventory
Are any software items missing? Is software inventory
missing from any computers? YES
NO YES
Update the catalog (optional) Troubleshoot software
detection problems
COMPLEX
Create the software hierarchy and add a signature Create a signature in
Software Use Analysis
Import software scan data from IBM Endpoint Manager
You have accurate software inventory
Your software inventory should be accurate after the scan data import. What type of
a signature is required? SIMPLE
Is the software item in the catalog?
NO YES
Import the latest catalog to Software Knowledge Base Toolkit
(optional)
Add a signature to an existing hierarchy
Publish the customized catalog
1. View software inventory. If there are software detection problems, troubleshoot them. For more information, see the topicTroubleshooting software inventory problemsin the Troubleshooting guide.
2. Optional: If there is a newer version of the software catalog,update the catalog.
3. If a software item that is installed in your infrastructure is not displayed in Software Use Analysis, customize the software catalog. Analyze the Raw Usage Data or Scan Data report and identify a file, registry entry, or other type of information that can be used to identify the software item or its usage. If the software item can be detected with a simple signature, that is a file or an installation package, create a signature by using the simple catalog
management functionality that is available directly in Software Use Analysis.
If the software item cannot be detected with a simple signature, use Software Knowledge Base Toolkit to create a complex signature.
Important: A signature can be edited only in the application in which it was created.
4. Optional: Check the version of the software catalog in Software Knowledge Base Toolkit. If a newer version is available,import the catalog.
5. If the software item exists in the software catalog, add the signature to the existing hierarchy.
6. If the software item does not exist in the catalog, create the software hierarchy and then add the signature.
Important: After you start customizing your software catalog in Software Knowledge Base Toolkit, you can no longer import the latest IBM®
catalog directly to Software Use Analysis. You must use Software Knowledge Base Toolkit to keep your catalog customization.
7. Publish the catalog that you customized in Software Knowledge Base Toolkit to make it available for Software Use Analysis.
8. Importing software scan data. The inventory results are stored on your Endpoint Manager server. To import software scan data, the
software catalog, and other settings that changed since the last update, you must extract the data from the Endpoint Manager server and load it into Software Use Analysis.
Reviewing software inventory
After new components are discovered by software scans, the server associates those components with products based on their relationships in the software catalog. If the initial association does not reflect your actual environment, that is, the discovered components do not in fact belong to the automatically assigned products, you must change the assignment. You can reassign, confirm, and share
software product instances. You can also include them in and exclude them from the pricing calculations. Work with software instances to ensure that the software associations match your entitlements.
IBM Software Classification
Correct assignment of software components reduces the cost of software ownership and ensures audit readiness. Use theIBM Software Classificationpanel to ensure that software assignments reflect your entitlements.
1
2
3
3 4 5 6 7 8
1 Selection of products
After new components are discovered, the server associates them with products based on their relationships in the software catalog. If the relationships do not guarantee a 100% match, product instances are unconfirmed. To start working with your inventory, specify whether you want to display confirmed, unconfirmed or all classifications. Focus on the unconfirmed classification first as they require your action.
2 Actions
The actions menu is available from the list at the top of the table or when you right-click a release or a component. Use the following actions to ensure that software classifications reflect your entitlements:
v “Reassigning software instances” on page 14
v “Confirming the assignment of a software instance” on page 13 v “Including software instances in pricing calculations” on page 16 v “Excluding software instances from pricing calculations” on page 16 v “Sharing software instances” on page 17
Tip: To select more than one product or release at a time, hold down theCtrlkey. To select a range of products or releases, hold down theShiftkey.
3
3 Options
Tip: The columns that are available for selection depend on whether the product tree is expanded or collapsed. If a particular column is not available for selection, expand at least one product.
4 Refreshing
Updates the data that is displayed on the panel according to the selected time range.
Part numbers
Shows part numbers that you purchased and imported to the server. Make sure to systematically import a list of your part numbers because they facilitate software assignment. You can import the list from Passport Advantage®or create it yourself.
Update 9.0.1.1 License Type
Shows the type of license for each product. The possible values are PVU, RVU MAPC, and Other. You can use this information when you reassign or share software components to better understand the impact your actions might have on the PVU and RVU calculations.
Filter
Narrows down the number of products that are displayed on the panel according to the specified filter.
Update 9.0.1.1 Discovery start and end dates
Specify when the product or component was detected for the first time and when the detection finished (the product or component was uninstalled)
Automated bundling
Automated bundling is the process of automatically assigning component instances to products based on four rules: part numbers, partition collocation, infrastructure collocation, and stand-alone product discovery. The results of automated bundling are shown on the IBM Software Classificationpanel.
After a software scan, new component instances are automatically associated with products based on a combination of four product-component linking rules. 1. First, theautomated bundling process assigns points to product-component
connections.
2. Next, the connections that have the highest number of points are marked as the ones with the greatest internal score.
3. After that, assignments are selected when the final bundles are calculated. Each of the rules in the following table contributes to the internal score that is calculated when components are assigned to product bundles.
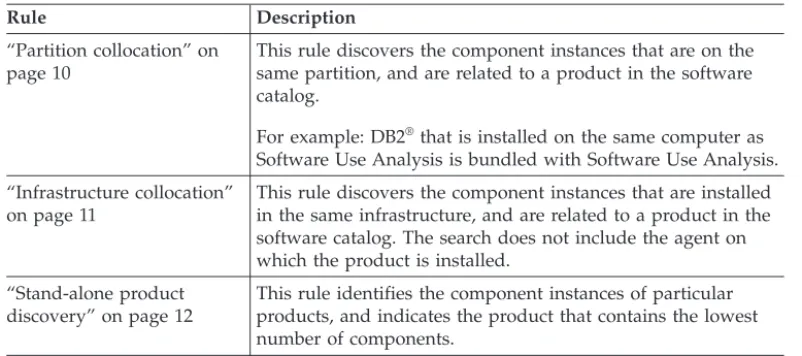
Table 1. Bundling rules
Rule Description
“Part numbers” on page 8 This rule uses the part numbers list to identify possible target products. Part numbers are the records of the software offerings that were purchased from IBM. They can be downloaded from Passport Advantage or obtained from your customer records.
Table 1. Bundling rules (continued)
Rule Description
“Partition collocation” on page 10
This rule discovers the component instances that are on the same partition, and are related to a product in the software catalog.
For example: DB2®
that is installed on the same computer as Software Use Analysis is bundled with Software Use Analysis. “Infrastructure collocation”
on page 11
This rule discovers the component instances that are installed in the same infrastructure, and are related to a product in the software catalog. The search does not include the agent on which the product is installed.
“Stand-alone product discovery” on page 12
This rule identifies the component instances of particular products, and indicates the product that contains the lowest number of components.
Important:
v If the internal score is low, more actions might be necessary, for example manual
bundling.
v Instances that are a part of an excluded product cannot be rebundled
automatically. Instances can be bundled with excluded products only if they are associated with the excluded products based on the software catalog or the stand-alone product discovery. Any new instance that is assigned to the excluded product is also excluded on the agent.
Part numbers
Part numbers represent software products that you purchased. They can be used to increase the accuracy of automated bundling by narrowing down the number of possible products to which a discovered component can be assigned.
Example
Automated bundling assigns a database component to one of the products that were discovered in your infrastructure. However, the database component can also be potentially assigned to another software product.
Product 1
Product 2 Database component
Before you confirm the assignment of the database component or change it manually, you can import the part numbers list into Software Use Analysis. Based on the list and the component-product relations that are defined in the software catalog, the initial assignment of the database component is more accurate.
Product 1
Product 2 Database component
Based on imported part number information
Types of the part numbers file
There are two types of the part numbers file:
v A file with part numbers that is provided by IBM together with the software
catalog
v A file with part numbers that represent the IBM software that you purchased
The first file is uploaded in the Catalog Upload panel. The second file is downloaded from the Passport Advantage website or created manually and uploaded in the Part Numbers Upload panel. Part numbers that represents your purchased products are matched against the part numbers that are provided with the software catalog to improve the results of the automated bundling.
Limitations
The extent to which part numbers can improve automated bundling is limited by the following factors:
v Part numbers influence the assignment of only those components whose
assignment is not confirmed yet
v Part numbers that were purchased before 2010 are not contained in the software
catalog
v Part numbers that represent products that have limited availability are not
contained in the software catalog
v Part numbers that represent products that are available only outside of the
United States are not included in the catalog
Preparing the part numbers file:
The part numbers file can be used to increase the accuracy of automated bundling by narrowing the number of possible products to which a discovered component can be assigned. You can download the file from Passport Advantage or create it manually.
Procedure
v To download the file from Passport Advantage:
1. Log in to Passport Advantage.
2. From the menu on the left, select Reporting>Order history. 3. If applicable, select the relevant site or sites.
4. In the Type of ordersection, selectAll.
5. Specify theSales order date and clickSubmit detail report. Your report is ready.
6. To save the file, clickDownload report, and then selectComma delimited.
v To create a CSV file on your own, create a file in which the column with part
numbers is calledPart number. Use a comma as a field separator and quotation marks (" ") as a text delimiter. For example:
"Part number", "Order type" "D07UMLL", "Licenses" "D08UMLL", "Licenses" "D09UMLL", "Licenses"
Tip: Only the column named Part numberis treated as the one that contains part numbers. Your part numbers file must also contain a column that is named
Order type, and only the rows that contain theLicenses element are imported.
Uploading part numbers:
Upload and import part numbers to increase the accuracy of automated bundling of software components.
Before you begin
You must have the Manage Uploads permission to perform this task.
Procedure
1. Prepare the part numbers file.
2. In the top navigation bar, clickManagement>Part Numbers Upload. 3. ClickBrowseand choose the part numbers file to upload. You can upload
either a csv or zip file.
4. Optional: If you want to overwrite the existing part numbers, select the Overwrite existing part numbers check box.
Note: The check box is enabled only if you have previously imported a part numbers file.
5. ClickUpload.
When you upload the file, a new entry is created in the Upload History table. The status is Pending until you run the import.
Important: If more than one entry is Pending in the table, only the latest one will be executed during the import.
6. In the top navigation bar, clickManagement>Data Imports, and then click
Import Now.
Results
The part numbers were imported to Software Use Analysis and saved in the
adm.current_part_numberstable in the database. If you want to remove the part numbers from the server, click Remove All Part Numbersand then run the import. You can remove the part numbers only if you have previously imported the part numbers file to the server.
Partition collocation
Partition collocation is a rule that discovers component instances that are on the same partition and are related to a product in the software catalog. If any of the
discovered component instances has a confirmed, one-to-one, or auto-bundled relation to the product, the other instances are automatically bundled with the same product.
Example
The assignment of the Server 2 component to Product 4 is simple, auto-bundled, or manually confirmed. The database component is assigned to Product 1. Both components are on the same partition.
Product 4 Product 1 Server 2 component Database component User defined, auto-bundled, or simple
Based on the software catalog data, the database component is automatically reassigned to Product 4.
Product 4
Product 1 Server 2 component
Database component Based on software catalog data
Infrastructure collocation
Infrastructure collocation is a rule that discovers component instances that are installed in the same infrastructure and that are related to a specific product in the software catalog. The search does not include the agent on which the product is installed. If any of the discovered component instances has a confirmed,
one-to-one, or auto-bundled relationship with the product, the other instances are automatically bundled with the same product.
Example
The assignment of the Server 2 component to Product 4 is simple, auto-bundled, or manually confirmed. The database component is assigned to Product 1. Both components are in the same infrastructure.
Product 4 Product 1 Server 2 component Database component User defined, auto-bundled, or simple
Based on the software catalog data, the database component is automatically reassigned to Product 4.
Product 4
Product 1 Server 2 component
Database component Based on software catalog data
Stand-alone product discovery
Stand-alone product discovery is a rule that identifies component instances of particular products, and indicates the product that contains the lowest number of components. If the possibility that the instances belong to a product is above a specific threshold, they are automatically bundled.
Example
The agent discovers the database component and the server checks which products contain this particular database component in the software catalog. The database component is assigned to the product with the lowest number of components, in this case, Product 2.
Confirming the assignment of a software instance
After new components are discovered, the server associates them with products based on their relationships in the software catalog. If the relationships do not guarantee a 100% match, the product instances are unconfirmed. If the default bundling matches your environment, you must manually confirm the instances in default products. If the default bundling does not match your environment, you must reassign instances to achieve a 100% match.
Before you begin
You must have the Manage IBM Software Classification permission to perform this task.
Procedure
1. In the top navigation bar, clickManagement>IBM Software Classification. 2. If the default bundling reflects your environment, right-click the instance whose
bundling you want to confirm, and clickConfirm the assignment of instances. 3. If the default bundling does not reflect your environment, reassign instances to
Reassigning software instances
Reassignment of software components to proper products lowers the total cost of ownership, reduces the risk of unplanned cost of license compliance payments, and the risk of not meeting the conditions of your contractual licensing. Two
approaches to managing software classification exist. In the first approach, you start from a software instance and identify a release to which it can be reassigned. In the second approach, you start from a software release. You can identify instances that can be reassigned to this release. You can also find a product to which instances of this release can be reassigned.
Before you begin
You must have the Manage IBM Software Classification permission to perform this task.
About this task
The two main reasons for reassigning instances are:
v Fixing mistakes - If a component is assigned to a wrong product, you can
identify the correct product, select the instances, and bundle them to the right product.
v Repurposing - If a component is assigned to a software product that you want
to uninstall, you can simply reassign the component to another legitimate product.
Procedure
1. In the top navigation bar, clickManagement>IBM Software Classification. 2. If you want to manage software classification from the level of software
instances, right-click an instance, and clickReassign instances to another product. Then, select the product to which you want to reassign this instance, and clickReassign.
Tip: 9.0.1.1 TheLicense Typecolumn contains information about the type
of license of products to which you can reassign this software instance.
3. If you want to manage software classification from the level of software releases, right-click a release and choose one of the following options:
v To reassign a software instance to this release, clickReassign instances to
this product. Then, select the instances that you want to reassign, and click
Reassign.
Tip: 9.0.1.1 TheLicense Type column contains information about the
type of license of product instances that you can reassign to this release.
v To reassign the instances of this software release to another product, click
Reassign instances to another product. Then, select the product to which you want to reassign, and clickReassign.
Tip: 9.0.1.1 TheLicense Type column contains information about the
type of license of products to which you can reassign instances of this release.
Example
According to the software catalog, Product 4is associated withDatabase component. If you know that Database componentis a part ofProduct 1, you have to reassign this component fromProduct 4toProduct 1. After you reassign it,Product 4 disappears from the inventory, andProduct 1replaces it. If eitherProduct 1or Product 4is PVU-based or CPU-based, during the next recalculation, the consumption of processor value units or central processing units will be recalculated according to the new association.
Product 1
Product 4
Database component
Example 2
BothProduct 1andProduct 4can containDatabase component. In your current infrastructure, the component is assigned toProduct 4. If you decide to uninstall
Product 4and installProduct 1, you only need to rebundleDatabase componentfrom Product 4toProduct 1.
Excluding software instances from pricing calculations
You can exclude one or more product instances from the PVU and systems software calculations if it is allowed by your license agreement.
Before you begin
You must have the Manage IBM Software Classification permission to perform this task.
Procedure
1. In the top navigation bar, clickManagement>IBM Software Classification. 2. Right-click an instance that you want to exclude from the pricing calculations,
and clickExclude instances from pricing calculation.
Tip: To select more than one product or release at a time, hold down theCtrl
key.
3. If the instances that are displayed in the table are correct, clickNext. 4. Choose the reason for excluding the instances. The possible reasons are:
v Backup, disaster recovery
v Alpha, beta, early support program
v Component of a non-licensed product: if the product has a different licensing
model than PVU or systems model, its component might be excluded from the calculations, depending on your license agreement.
v Evaluation, trial
v Not eligible for licensing: the PVU or systems license agreement was not
signed for a product.
v Component is not compatible with the server or agent system: the
component is installed on a server and cannot be initiated because of
differences, for example, in the architecture or operating system. An example might be a file server.
v Other: you must enter a comment to justify the exclusion.
5. ClickExclude.
Important: Instances that are assigned to the excluded product cannot be reassigned.
Including software instances in pricing calculations
You can include one or more instances in the PVU and system software pricing calculations to reduce the risk that you do not meet your contractual licensing conditions. You can include only those instances that were previously excluded.
Before you begin
You must have the Manage IBM Software Classification permission to perform this task.
Procedure
1. In the top navigation bar, clickManagement>IBM Software Classification. 2. Right-click an instance that you want to include in pricing calculations, and
clickInclude instances in pricing calculation.
Tip: To select more than one product or release at a time, hold down theCtrl
key.
Sharing software instances
You can share an instance of a component between more than one product. It contributes to the pricing of all products that are assigned to the particular instance.
Before you begin
You must have the Manage IBM Software Classification permission to perform this task.
Procedure
1. In the top navigation bar, clickManagement>IBM Software Classification. 2. Right-click the instance that you want to share, and clickShare instance.
Tip: 9.0.1.1 You can check the license type of the product with which you
want to share the instance in theLicense Typecolumn.
3. Choose products with which you want to associate the selected instance, and clickShare.
Example
The same instance ofDatabase componentcan be used by bothProduct 1and Product 2. After the association, both products appear in the inventory. If eitherProduct 1 orProduct 2is PVU-based or CPU-based, the consumption of processor value units or central processing units is recalculated according to the new associations.
Product 1
Product 2
Database component
Working with software catalogs
To correctly identify the components of various software products in your
infrastructure, ensure that your software catalog is always up-to-date. Periodically import a software catalog that contains the most recent software products. Also, manually add those products that are installed in your infrastructure but do not have corresponding entries in the catalog.
Catalog customization process
The process of adding custom signatures to the software catalog requires careful planning and consideration. It starts with identifying products that you expect to discover but are not reported or are missing from the software catalog. Next, you should organize your work to ensure that the most important products are given the highest priority. Then, you determine what files or packages can be used to detect the software and report its usage. Finally, you can create the signatures.
Note: Software Use Analysis is intended for software inventory and license management. It is suggested that you extend the software catalog for those purposes only.
Process input
The input to the catalog customization process is a list of software products that you want to be discovered. The list can be based on the general knowledge of your environment and the procurement data. As the discovery, monitoring, and license management of every software product require extra effort, target products on the basis of license expenses. Focus on a few selected products and adopt an iterative approach instead of trying to work on all products simultaneously.
Required skills
A set of skills that are helpful during the creation of the custom catalog content includes:
v General knowledge of the software products that are used in your company,
their architecture, and licensing models
v General knowledge of the operating systems on which the software is installed
Step 1: Prioritize the work
Before you start adding custom signatures to the software catalog, prioritize your work. Start with products that are critical from the business perspective. Then, iteratively continue with the remaining products until all software that is used in your company is discovered.
To optimize your work on the custom catalog content, adopt an iterative approach. Start by grouping all software products that are used in your company into
software families and focus on one software family per iteration. Analyze and create software signatures for all products that belong to the family on which you are working. If a software family is too extensive, split it into smaller groups, for example based on editions or distributions. The iterative approach allows for continuously extending the catalog content and verifying its correctness at the same time. Thus, you can gain more benefits in less time.
Step 2: Analyze your software
Extend the software catalog only with information that is related to products that are used in your company but are not reported or do not exist in the catalog. Consult the product administrators and available documentation to gather information that is related to the product architecture and licensing model.
To gather basic information about a software product, work with the administrator who is responsible for its installation and has the knowledge of its architecture and licensing model. Try to establish a reference installation. Investigate the architecture of the product to obtain the following details:
v Separately installable pieces (components) that constitute the product and are
important for discovery or licensing purposes
v Version number of each component
v Ways to check whether the component is installed v Platforms on which the component can be installed v Licensing model
If the product administrator is unable to provide the information necessary for creating the licensing model, consult the available documentation. It can be found on the installation media, in the product installation path, license agreements, installation instructions, or online resources.
Step 3: Review information about files and packages
To identify candidates for software signatures, review information about files and packages that exist on the computer where a particular software product is installed.
Candidates for file and package signatures
Most efficient signatures are file-based signatures with constant size that is different for each release or signatures that are based on package data where a wildcard (*) can be used. In both cases, the file and package data should be
removed during the product uninstallation or changed during the product upgrade or downgrade.
When you are looking for candidates for such signatures, always check:
v Whether any product documentation describes methods for determining the
product edition and release based on files or package data
v Whether the product name and version can be unambiguously determined, for
example, by the file name
v Whether there are any component-specific files:
– Executable files whose version, part of version, or size is specific to the particular release
– Files whose name or its part is specific to the particular release – Files whose content defines the product name and version
– Other files with constant size, for example, a graphic that contains the product release number
– Libraries with version or constant size
v Whether there are application-specific packages
Do not create signatures that are based on:
v Shared or external libraries
v Files that can be used by another product
v File names that are commonly used, for example,readme.txt
Available reports
Use one of the following reports to identify candidates for signatures.
Package Data
The report provides information about the packages that are installed on the computers in your infrastructure. To find a package that can be used as
a signature, filter the report to the data from the computer on which the particular software product is installed.
Scanned File Data
The report provides information about files that were detected on the computers in your infrastructure. To find a file that can be used as a signature, filter the report to the data from the computer on which the particular software product is installed. To further narrow down the results, specify the whole or part of the path to the directory where the software is installed. Then, look at the following columns:
v Recognized- the column shows whether the file was recognized as part
of an existing signature
v Caused Detection- the column shows whether the file contained
enough information to cause detection of the related software
Important: The columns are not displayed by default. To display the columns, clickConfigure Viewand select the appropriate check boxes. If the value in both columns is false, the file is not used for software detection and can be used to create a new signature.
Only files with the following extensions can be used to create software signatures:
*.A, *.APP, *.BAT, *.BIN, *.CMPTAG, *.EAR, *.EXE, *.FXTAG, *.ITLM, *.LIC, *.NLM, *.O, *.OCX, *.PL, *.PRODUCT, *.PTF, *.RPM, *.SGN, *.SH, *.SIG, *.SIGNATURE, *.SL, *.SPB, *.SWIDTAG, *.SWTAG, *.SY, *.SYS, *.SYS2, *.TCL, *.XPM, *.a, *.app, *.bat, *.bin, *.cmd, *.cmptag, *.com, *.ear, *.exe, *.fxtag, *.ink, *.itlm, *.lic, *.mdb, *.nlm, *.o, *.ocx, *.pl, *.product, *.ptf, *.rpm, *.sgn, *.sh, *.sig, *.signature, *.sl, *.so, *.spb, *.swidtag, *.swtag, *.sy, *.sys, *.sys2, *.tcl, *.xpm
Unrecognized Files
The report creates a ranking of files that are most commonly encountered in your computer infrastructure but do not produce matches for any signature. The ranking of 1000 file names is separate for each computer group. It is based on the number of computers on which the files were detected, the number of copies of a particular file, and the alphabetical order. The files are listed by name with no regard to their size or version metadata. To access such detailed information, click the file name.
Step 4: Create component signatures
Use the following guidelines to avoid common mistakes and to create the most accurate signatures that better recognize software.
To obtain the best results, try to create signatures that meet the following requirements:
v The signature is based on the main executable file of the software.
v The signature combines the main executable file of the software with package
data if it is available.
v The signature discovers only one release. If it discovers release 7.2, it cannot be
valid for releases 7.1 or 7.3.
v The signature is generic and discovers a particular release and all its
mod-releases and fix packs. To ensure that the signature is generic: – Use a wildcard (*) in the package version, for example: 7.2.*
If you use a dot (.) in the package version, the dot is also matched with a dash (-). For example, if you specify the package version as 4.9.3.1*, version 4.9.3-1.el1 is also matched.
If you specify a version without the wildcard, the signature also matches a package that contains a comma in the version number. For example, if the package version is11.10.1,REV=2005.01.21.15.53, signatures that have the following package version specified match it:
- 11.10.1
- 11.10.1,REV=2005.01.21.15.53
Signatures that have the following package version specified do not match it: - 11.10
- 11.10.1,REV=2005.02.14.12.32
– Specify the version of the file rather than its size
– If a signature combines a file and package data and neither of them has a version, accept a file with any size
Tip: If you are unable to cover all fix packs and mod-releases, combine separate conditions for each of them.
Version of the software that is provided in the package and in the file might sometimes be inaccurate and might not match the version that is displayed in Software Use Analysis. If such a discrepancy occurs, ensure that the proper version is defined in the software catalog. Consider creating more specific rules for
handling issues that are related to software versioning.
Downloading the software catalog
You can download the latest software catalog from the Endpoint Manager server.
Before you begin
If the computer where the Endpoint Manager server is installed does not have the Internet access, ensure that the content of the Software Use Analysis action site is up-to-date. For more information, see: Updating the action site.
Important: If you see any discrepancies between the fixlets in your site and the fixlets described in the documentation, check the version of your fixlet site and update it if necessary.
About this task
TheSoftware Catalog Updatetask allows you for downloading the software catalog, charge unit data, and the part numbers file. Charge unit data consists of information about charge unit definitions, their relations with products, and additional parameters. The part numbers file contains information about part numbers that are used for software licensing purposes. If you want to update all of the files, you can download a single compressed file with the software catalog, charge unit data, and the part numbers file. If you want to update only one of the files, you can download either the software catalog or a compressed file with charge unit data and part numbers.
If the task is not applicable on your endpoint, see Server operation problemsin the Troubleshooting section.
Procedure
1. Log in to the Endpoint Manager console.
2. In the navigation bar, clickSites>External Sites>IBM Endpoint Manager for Software Use Analysis v9>Fixlets and Tasks.
3. In the upper-right pane, clickSoftware Catalog Update, and then clickTake Action.
4. Choose which files you want to download:
v The software catalog, charge unit data, and the part numbers file compressed
into a single file
v Only the software catalog
v Charge unit data and part numbers compressed into a single file
5. Click the name of the computer on which you want to download the files, and clickOK.
Results
Depending on the option that you chose, the following file is downloaded:
v IBMSoftwareCatalog_canonical_2.0_form_date.zip- contains the software
catalog in the XML format and two CSV files with charge unit data and part numbers
v IBMSoftwareCatalog_canonical_2.0_form_date.zip- contains the software
catalog in the XML format
Important: The name of the file is the same as the name of the file that contains the software catalog, charge unit data, and the part numbers file.
v ChargeUnits_date_dataversion_version.zip- contains two CSV files with
charge unit data and part numbers
The file is downloaded to the sua_catalogdirectory that is in the Software Use Analysis installation directory, by default: /opt/IBM/SUA/sua_catalog.
What to do next
Copy the file to the computer from which you access the Software Use Analysis web user interface and update the catalog.
Updating the software catalog
Regularly update the software catalog and check for updates every month to keep your software inventory up-to-date. If you do not edit the content of the software catalog that is provided by IBM or use the built-in catalog management
functionality, update the catalog directly in Software Use Analysis.
Before you begin
You must have the Manage Uploads permission to perform this task.
About this task
This procedure describes how to update the software catalog directly to Software Use Analysis. Follow these steps if you do not edit the content of the software catalog or if you use the built-in catalog management functionality to create your customized catalog content. If you customize the catalog content in Software
Knowledge Base Toolkit, see: “Updating the software catalog in Software Knowledge Base Toolkit” on page 35.
Procedure
1. Download the catalog.
2. In the navigation bar, clickManagement>Catalog Upload. 3. ClickBrowseand select the appropriate compressed file.
v If you downloaded a compressed file that contains the software catalog,
charge unit data, and the part numbers file, search for the
IBMSoftwareCatalog_canonical_2.0_form_date.zipfile.
v If you downloaded a compressed file that contains only the software catalog
in the XML format, search for the
IBMSoftwareCatalog_canonical_2.0_form_date.zipfile.
v If you downloaded a compressed file that contains two CSV files with charge
unit data and part numbers, search for the
ChargeUnits_date_dataversion_version.zipfile.
The default location of the file is/opt/IBM/SUA/sua_catalog. 4. To upload the file, clickUplaod.
Results
The software catalog file and the charge unit data are listed in the table. Their status isPendinguntil you import the scan data to process the new data.
Searching the catalog
You use the search feature to quickly locate software items in which you are interested. Software items are structured into hierarchies that consist of the
software publisher, title, version, release, component, and signature. You can search for the software by any of these categories.
Before you begin
You must have the Manage Catalogs permission to perform this task.
Procedure
1. In the top navigation bar, clickHome.
2. In the Catalog Searcharea, enter a part or all of the publisher, title, version, release, component, or the signature name for which you want to search. For example, to search for software products that are published by IBM, you can enter IB, BM, or IBM.
3. ClickSearch.
Results
The search results are displayed in Catalog Search. You can drill down through the results to view more detailed information.
Creating catalog entries
You can use the built-in functionality to add software products that are installed in your infrastructure but are not present in the IBM catalog to your custom catalog.
Before you begin
You must have the Manage Catalogs permission to perform this task.
Procedure
1. In the top navigation bar, clickManagement>Catalog Customization, and then clickNew.
2. In the Create Catalog Entry window, provide the publisher name, product name, and release number.
3. Select a condition or conditions that must be fulfilled for the software item to be discovered.
v To create an installation package signature, select the first condition, and
specify the name of the package, its version, and vendor.
v To create a file signature, select the second condition, and specify the name
of the file and its size or version. If neither the file size nor the version are relevant, select Any size or version.
Tip: If you select one condition and specify multiple files or installation packages, detection of any of them causes that the software item is discovered. If you select both conditions, at least one file and one installation package must be detected for the software item to be discovered.
4. To save the catalog entry, clickSubmit.
Editing catalog entries
You can use the built-in catalog management functionality to edit publishers, software products, and releases that exist in your custom catalog.
Before you begin
You must have the Manage Catalogs permission to perform this task.
About this task
Restriction: When you edit the name of a publisher, product, version or release you cannot change it to a name that already exists in the custom catalog.
Procedure
1. To edit a publisher that exists in your custom catalog:
a. In the top navigation bar, clickManagement>Catalog Customization. b. In the left pane navigation tree, search for the name of the publisher and
click it.
c. Edit the name and add the website address of the publisher, and clickSave.
2. To edit a software product or release that exists in your custom catalog: a. In the top navigation bar, clickManagement>Catalog Customization. b. In the left pane navigation tree, search for the name of the software product,
its version, or release, and click it.
Deleting catalog entries
You can use the built-in catalog management functionality to delete entries from your custom catalog.
Before you begin
You must have the Manage Catalogs permission to perform this task.
Procedure
1. In the top navigation bar, clickManagement>Catalog Customization. 2. In the left pane navigation tree, search for the entry that you want to delete. 3. Click the entry that you want to remove from your custom catalog, and click
Delete.
Important: You can delete an entire hierarchy, that is a publisher, software product, version, release, component, and signature simultaneously. However, you cannot delete multiple entries, for example multiple publishers, at the same time.
Creating signatures from package data
You can use the scanned file data to amend your custom catalog. You can add signatures for software products that are installed in your infrastructure but are not present in the IBM catalog. You identify the product name, or another piece of information that can be used to identify the software and add the signature.
Before you begin
You must have the View Endpoints and Manage Catalogs permissions to perform this task.
Procedure
1. Log in to Software Use Analysis.
2. In the top navigation bar, clickReports>Package Data.
3. To filter the report data, clickConfigure Viewand specify the appropriate filtering options.
4. In the Namecolumn, look for the location where the missing software title is installed. Click the arrow on the right from theNameof the file that you want to use as a signature, and clickCreate Signature.
5. In the Create Catalog Entry window, provide the publisher name, product name, and release number.
Tip: The most efficient signatures are file-based signatures with a constant size that is different for each release, or signatures that are based on registry entries where a wildcard (*) can be used. You can use a wildcard in theName,
can be combined with other characters. For example, you might use IBM * SDK for Java™, 5.*, * for the name, version, and vendor.
6. To save the catalog entry, clickSubmit.
Important: If you create an entry that exists in the software catalog an informational message is displayed, and both signatures are saved in the catalog.
Results
You added a software signature to your custom catalog. The signature can now be used to detect software or its usage.
Creating signatures from scanned file data
You can use scanned file data to amend your custom catalog. You can add
signatures for software products that are installed in your infrastructure but are not present in the IBM catalog. You identify the file name, or another item of
information that can be used to identify the software and add the signature.
Before you begin
You must have the View Endpoints and Manage Catalogs permissions to perform this task.
Procedure
1. Log in to Software Use Analysis.
2. In the top navigation bar, clickReports>Scanned File Data.
3. To filter the report data, clickConfigure Viewand specify the appropriate filtering options.
a. Optional: Select theRecognizedand theCaused Detectioncheck boxes to add two columns to the view of scan data.
v TheRecognizedcolumn shows whether the file was recognized as part of
an existing signature. If the value istrue, the file meets one or all conditions of the signature.
v TheCaused Detectioncolumn shows whether the file contained enough
information to cause detection of the related software.
4. Optional: In theFile Pathcolumn, look for the location where the missing software title is installed.
5. Click the arrow on the right from theFile Name that you want to use as a signature, and clickCreate Signature.
6. In the Create Catalog Entry window, provide the publisher name, product name, and release number.
7. To save the catalog entry, clickSubmit.
Important: If you create an entry that exists in the software catalog, an
information message is displayed, and both signatures are saved in the catalog. 8. To make the signatures available for software detection, clickReports>Import
Now, or wait for a scheduled import.
Results
You added a software signature to your custom catalog. The signature can now be used to detect software or its usage.
Exporting and importing custom catalog content
You can export your custom catalog content from one instance of Software Use Analysis and import it into another to merge your custom data. Merging the software catalogs is useful if you maintain separate Software Use Analysis
instances for test and production sites. In such case, you can reuse your custom catalog content instead of creating the new one.
Before you begin
Catalog with customizations can be exported into native format and uploaded into a new Software Use Analysis installation before the initial import.
Restriction:
v Native format overwrites the existing catalog. It can only be imported into a
fresh Software Use Analysis installation.
v You can only transfer custom catalog content between two instances of Software
Use Analysis if are the same version, for example application update 9.0.1.1.
v You must have the Manage Catalogs permission to perform this task. v The imported custom catalog overwrites all custom data that is already present
in Software Use Analysis.
About this task
When you export the custom catalog content from Software Use Analysis, an XML file that contains all catalog entries is saved to your computer. Then, you must log in to another Software Use Analysis instance to which you want to import the custom catalog content and upload the XML file.
Procedure
1. Log in to Software Use Analysis instance from which you want to export the custom catalog content.
2. In the top navigation bar, clickManagement>Catalog Upload.
3. In the Catalog Exportsection, clickExport. An XML file with your custom catalog content is saved to your computer.
4. Log in to Software Use Analysis instance to which you want to import the custom catalog content.
5. In the top navigation bar, clickManagement>Catalog Upload.
6. ClickBrowse, select the XML file with your custom catalog content, and click
Upload.
Results
The software catalog file is listed in the table. The status isPendinguntil you go to
Management>Imports, and click Import Nowto process new changes.
Viewing catalog audits
You can display a list of all changes that were made to the content of your customized catalog. The changes include creating an entry, modifying an existing entry, and deleting an entry. You can add, remove, and sort the report columns, and apply filters.
Procedure
1. To display a list of changes to customized catalog content, clickReports>
Catalog Audit. In this view, you can see information about customized catalog entries that were created, modified, and deleted.
2. Optional: You can resize and sort the report columns by clicking and dragging. You can also customize the type of information displayed. To add or remove columns, and to apply filters, use theConfigure Viewfeature.
3. To view a detailed report for an item, click one of the items in theActionlist.
Managing the catalog content in Software Knowledge Base
Toolkit
You can use the catalog management functionality that is available in Software Use Analysis to create your custom software catalog. However, this functionality cannot be used to create complex signatures. If you want to create such signatures, use Software Knowledge Base Toolkit.
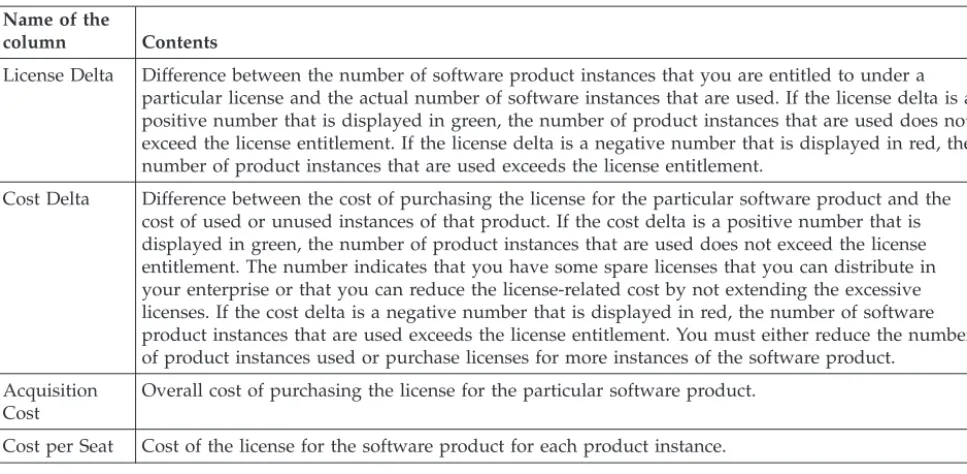
Software model
Software items can be classified into two software types: software products and components. In Software Knowledge Base Toolkit, for all those types, you can define software hierarchies, which consist of the parent product level, versions, and releases.
Software types
The software types into which you can classify software items that are stored in the knowledge base differ in terms of licensing attributes and the types of
dependencies that can be defined for them. The software type determines the role that the software item can play in relation to other items.
Software product
A logical unit of software packaging and sharing that has a managed development and maintenance lifecycle and customer visible attributes. It can be a collection of components and other products whose licensing may be dependent on the licensing of the product as a whole.
Component
A unit of software, which cannot be offered and licensed independently of other software items. It cannot be installed separately but it can be
detected as installed or running on computer systems by means of its own signatures. It can be assigned to products and shared between many different product definitions.
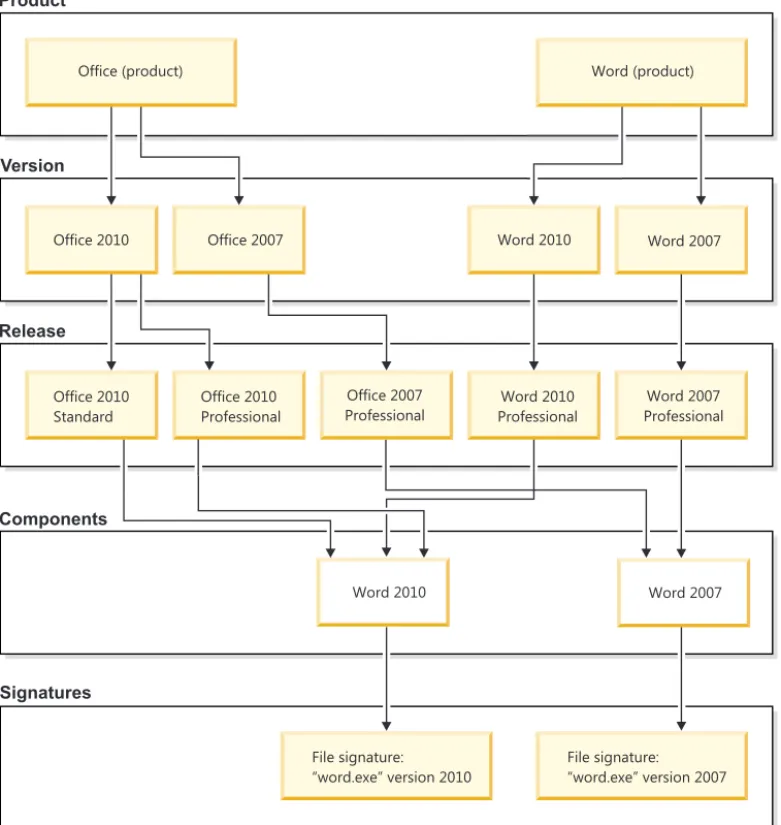
The structure of those items in the knowledge base is hierarchical - components can be assigned to software products and products can be bundled into more complex products. A graphic representation of the structure is shown in the figure below. Many components can be assigned to one product, and that the same component can be assigned to many products. Similarly, many products can be assigned to one product, and one product can be shared between many products. The software item to which one or more other items are assigned is referred to as the enclosing software item.
An example of a structure in which two products are bundled
Product
Version
Release
Office (product) Word (product)
Office 20 01 Office 2007 Word 2010 Word 2007
Office 20 01 Standard Office 20 01 Professional Office 2007 Professional Word 20 01 Professional Word 2007 Professional File signature: “word.exe” version 2010 File signature: “word.exe” version 2007 Components Word 20 01 Word 2007 Signatures
Software levels
The following tables present terminology differences between Software Knowledge Base Toolkit and Software Use Analysis.
Table 2. Differences in software hierarchy Software Knowledge
Base Toolkit Software Use Analysis Description
Product Software product It is the root of the hierarchy. It groups all the versions of a software item. Some of the attributes that are specified for the product are inherited by subordinate levels of the hierarchy. Every software hierarchy can contain only one parent product.
Version Software version It is a separately licensable software item immediately subordinate to the parent product. It can group one or more releases.
Release Software release It is a separately licensable software item immediately subordinate to an item at the version level. It can only be subordinate to one version.
Table 2. Differences in software hierarchy (continued) Software Knowledge
Base Toolkit Software Use Analysis Description
Variation Software release It is a modification of a release (for example, a patch or a fix pack) which can be separately identified during software scans and influences the discovery of the release to which it is subordinate. It cannot be licensed individually. Variations are converted into software releases during data import from Software Knowledge Base Toolkit to Software Use Analysis and some precision is lost at that stage.
Table 3. Differences in component-related information
Software Knowledge Base Toolkit Software Use Analysis
Product component x
Component version x
Component release Software component
Graphical representation of changes in the software model Product Product version Product release Component product Component version Component release Software relationship Software title Software title version Software title
release Software component
Software relationship
Product
Product version
Product release
Signature
IBM software model
Independent Software Vendor model
Signature
Software title
Software title version
Software title
release Software component
Software relationship Signature Signature
Software Knowledge Base Toolkit
Software Knowledge Base Toolkit Software Use Analysis
Software Use Analysis
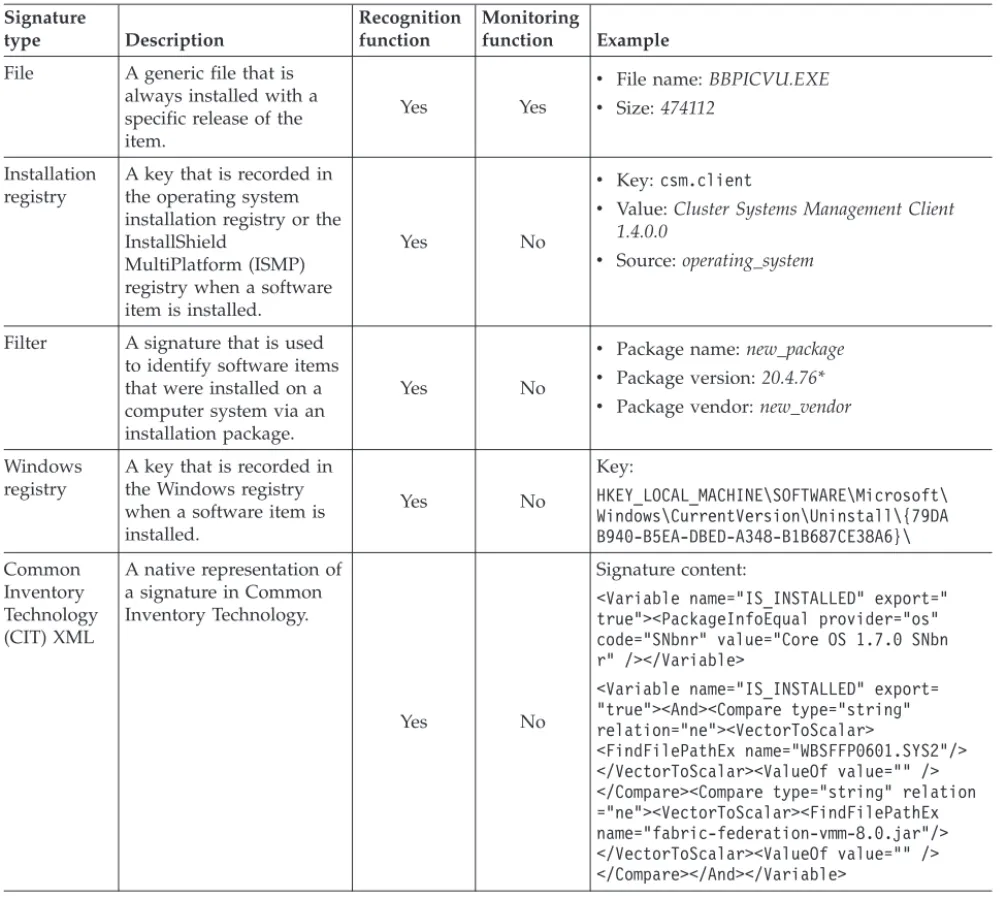
Software Knowledge Base Toolkit signatures supported in
Software Use Analysis
In Software Knowledge Base Toolkit, there are eight types of signatures that can be defined for software items and used to detect those items on computer systems. Five of them are supported in Software Use Analysis. Every signature depending, on its type and function, can be classified as a recognition signature, a monitoring signature, or a signature used both for recognition and monitoring.
For more information about Software Knowledge Base Toolkit signatures, see the section Managing software signatures in Software Knowledge Base Toolkit 1.2.2 information center.
Table 4. Types of signatures supported in Software Use Analysis Signature type Description Recognition function Monitoring function Example
File A generic file that is always installed with a specific release of the item.
Yes Yes
v File name:BBPICVU.EXE v Size:474112
Installation registry
A key that is recorded in the operating system installation registry or the InstallShield
MultiPlatform (ISMP) registry when a software item is installed.
Yes No
v Key:csm.client
v Value:Cluster Systems Management Client
1.4.0.0
v Source:operating_system
Filter A signature that is used to identify software items that were installed on a computer system via an installation package.
Yes No
v Package name:new_package v Package version:20.4.76* v Package vendor:new_vendor
Windows registry
A key that is recorded in the Windows registry when a software item is installed. Yes No Key: HKEY_LOCAL_MACHINE\SOFTWARE\Microsoft\ Windows\CurrentVersion\Uninstall\{79DA B940-B5EA-DBED-A348-B1B687CE38A6}\ Common Inventory Technology (CIT) XML A native representation of a signature in Common Inventory Technology. Yes No Signature content:
<Variable name="IS_INSTALLED" export=" true"><PackageInfoEqual provider="os" code="SNbnr" value="Core OS 1.7.0 SNbn r" /></Variable>
<Variable name="IS_INSTALLED" export= "true"><And><Compare type="string" relation="ne"><VectorToScalar>
<FindFilePathEx name="WBSFFP0601.SYS2"/> </VectorToScalar><ValueOf value="" /> </Compare><Compare type="string" relation ="ne"><VectorToScalar><FindFilePathEx name="fabric-federation-vmm-8.0.jar"/> </VectorToScalar><ValueOf value="" /> </Compare></And></Variable>
Updating the software catalog in Software Knowledge Base
Toolkit
To update the software catalog that is managed in Software Knowledge Base Toolkit, download the catalog and charge unit data from the Endpoint Manager server. Then, import the catalog file to Software Knowledge Base Toolkit. After you finish customizing the catalog, publish it in Software Knowledge Base Toolkit so that it becomes available for Software Use Analysis. Finally, upload the software catalog and the charge unit data to Software Use Analysis.
Checking the version of the software catalog:
Compare your software catalog version with the one that is stored in Software Knowledge Base Toolkit to ensure that you can detect the latest software releases.