LiCO 5.5.0
Sixth Edition (April 2020)
© Copyright Lenovo 2018, 2020.
LIMITED AND RESTRICTED RIGHTS NOTICE: If data or software is delivered pursuant to a General Services
Administration (GSA) contract, use, reproduction, or disclosure is subject to restrictions set forth in Contract No. GS-35F- 05925.
Reading instructions
• To ensure that you get correct command lines using the copy/paste function, open this Guide with Adobe Acrobat Reader, a free PDF viewer. You can download it from the official Web site https://get.adobe.com/ reader/.
• Replace values in angle brackets with the actual values. For example, when you see <*_USERNAME> and <*_PASSWORD>, enter your actual username and password.
Contents
Reading instructions . . . . ii
Chapter 1. Overview . . . . 1
Introduction to LiCO . . . 1
Typical cluster deployment . . . 1
Operating environment . . . 2
Supported servers and chassis models . . . 3
Prerequisites . . . 4
Chapter 2. Deploy the cluster
environment . . . . 5
Install an OS on the management node . . . 5
Deploy the OS on other nodes in the cluster . . . 5
Configure environment variables . . . 5
Create a local repository . . . 7
Install Lenovo xCAT . . . 8
Prepare OS mirrors for other nodes . . . 9
Set xCAT node information . . . 9
Add host resolution . . . 10
Configure DHCP and DNS services . . . 10
Install a node OS through the network . . . . 10
Create local repository for other nodes . . . . 11
Configure the memory for other nodes . . . . 11
Checkpoint A . . . 11
Install infrastructure software for nodes . . . 12
List of infrastructure software to be installed . . 12
Configure a local Zypper repository for the management node . . . 12
Configure a local Zypper repository for login and compute nodes . . . 12
Configure LiCO dependencies repositories . . 13
Install Slurm . . . 14
Configure NFS . . . 14
Configure NTP . . . 16
GPU driver installation . . . 16
Configure Slurm . . . 18
Install Ganglia. . . 19
Install MPI . . . 20
Install Singularity . . . 21
Checkpoint B . . . 21
Chapter 3. Install LiCO
dependencies . . . 23
Cluster check. . . 23
Check environment variables . . . 23
Check the LiCO dependencies repository . . . 23
Check the OS installation . . . 23
Check NFS . . . 23
Check Slurm . . . 24
Check Ganglia . . . 24
Check MPI and Singularity . . . 24
Check OpenHPC installation . . . 25
List of LiCO dependencies to be installed . . . 25
Install RabbitMQ . . . 25
Install PostgreSQL. . . 26
Install InfluxDB . . . 26
Install Confluent. . . 27
Configure user authentication . . . 28
Install OpenLDAP-server . . . 28
Install libuser . . . 28
Install OpenLDAP-client . . . 30
Install nss-pam-Idapd . . . 30
Install Gmond GPU plug-in . . . 31
Chapter 4. Install LiCO . . . 33
List of LiCO components to be installed . . . 33
Obtain the LiCO installation package . . . 34
Configure the local Zypper repository for LiCO. . . 34
Install LiCO on the management node . . . 34
Install LiCO on the login node . . . 35
Install LiCO on the compute nodes . . . 36
Chapter 5. Configure LiCO . . . 37
Configure the service account . . . 37
Configure cluster nodes . . . 37
Room information . . . 37
Logic group information . . . 37
Room row information . . . 38
Rack information . . . 38
Chassis information . . . 38
Node information . . . 39
Configure generic resources . . . 40
Gres information. . . 40
List of cluster services . . . 40
Infrastructure configuration . . . 42
Database configuration . . . 42
Login configuration . . . 42
Storage configuration . . . 42
Scheduler configuration . . . 43
Shared folders configuration . . . 43
Alert configuration . . . 43
Cluster configuration . . . 43
Billing configuration . . . 44
lico-vnc-mond . . . 44 lico-portal . . . 45 lico-ganglia-mond . . . 45 lico-icinga-mond . . . 46 lico-icinga-plugin . . . 46 lico-confluent-proxy . . . 47 lico-confluent-mond . . . 47 lico-wechat-agent . . . 48 lico-job-manager . . . 48 License configuration . . . 49
Initialize the system . . . 49
Initialize users . . . 49
Chapter 6. Start and log in to LiCO . . 51
Start LiCO . . . 51
Log in to LiCO . . . 51
Configure LiCO services . . . 52
Chapter 7. Appendix: Important
information . . . 53
Configure VNC . . . 53
Standalone VNC installation . . . 53
VNC batch installation . . . 53
Configure the Confluent Web console . . . 54
LiCO commands . . . 54
Set the LDAP administrator password . . . . 54
Change a user’s role . . . 54
Resume a user . . . 54
Delete a user . . . 55
Import a user . . . 55
Import AI images . . . 55
Generate nodes.csv in confluent . . . 55
Security improvement . . . 55
Binding settings . . . 55
Firewall settings . . . 60
SSHD settings . . . 61
Import system images . . . 61
Slurm issues troubleshooting . . . 61
Node status check . . . 61
Memory allocation error . . . 62
Status setting error. . . 62
InfiniBand issues troubleshooting . . . 62
Installation issues troubleshooting . . . 62
XCAT issues troubleshooting . . . 63
MPI issues troubleshooting . . . 63
Update OS packages . . . 64
Edit nodes.csv from xCAT dumping data . . . 64
Chapter 1. Overview
Introduction to LiCO
Lenovo Intelligent Computing Orchestration (LiCO) is an infrastructure management software for high- performance computing (HPC) and artificial intelligence (AI). It provides features like cluster management and monitoring, job scheduling and management, cluster user management, account management, and file system management.
With LiCO, users can centralize resource allocation in one supercomputing cluster and carry out HPC and AI jobs simultaneously. Users can perform operations by logging in to the management system interface with a browser, or by using command lines after logging in to a cluster login node with another Linux shell.
Typical cluster deployment
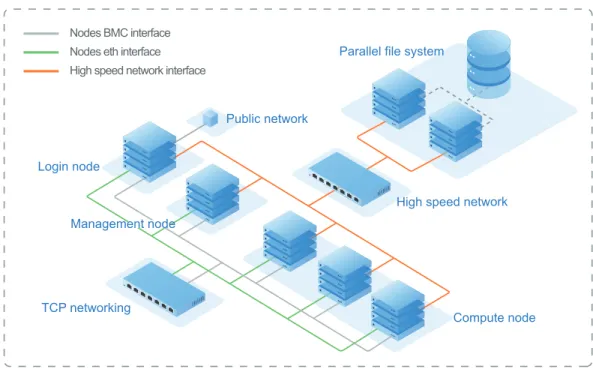
This Guide is based on the typical cluster deployment that contains management, login, and compute nodes.
Public network
Nodes BMC interface Nodes eth interface High speed network interface
TCP networking Login node
Compute node High speed network Parallel file system
Management node
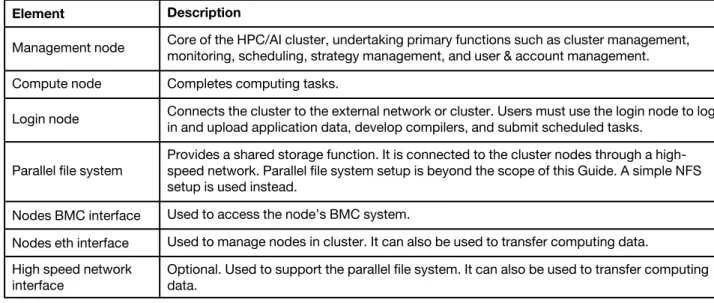
Elements in the cluster are described in the table below. Table 1. Description of elements in the typical cluster
Element Description
Management node Core of the HPC/AI cluster, undertaking primary functions such as cluster management, monitoring, scheduling, strategy management, and user & account management. Compute node Completes computing tasks.
Login node Connects the cluster to the external network or cluster. Users must use the login node to log in and upload application data, develop compilers, and submit scheduled tasks.
Parallel file system
Provides a shared storage function. It is connected to the cluster nodes through a high- speed network. Parallel file system setup is beyond the scope of this Guide. A simple NFS setup is used instead.
Nodes BMC interface Used to access the node’s BMC system.
Nodes eth interface Used to manage nodes in cluster. It can also be used to transfer computing data. High speed network
interface
Optional. Used to support the parallel file system. It can also be used to transfer computing data.
Note: LiCO also supports the cluster deployment that only contains the management and compute nodes. In this case, all LiCO modules installed on the login node need to be installed on the management node.
Operating environment
Cluster server:
Lenovo ThinkSystem servers
Operating system:
SUSE Linux Enterprise server (SLES) 12 SP4
Client requirements:
• Hardware: CPU of 2.0 GHz or above, memory of 8 GB or above
• Browser: Chrome (V 62.0 or higher) or Firefox (V 56.0 or higher) recommended • Display resolution: 1280 x 800 or above
Supported servers and chassis models
LiCO can be installed on certain servers, as listed in the table below. Table 2. Supported servers
Product code Machine type Product name Appearance
sd530 7X21 Lenovo ThinkSystem SD530 (0.5U)
sd650 7X58 Lenovo ThinkSystem SD650 (2 nodes per 1U tray) sr630 7X01, 7X02 Lenovo ThinkSystem SR630 (1U)
sr650 7X05, 7X06 Lenovo ThinkSystem SR650 (2U)
sr655 7Y00, 7Z01 Lenovo ThinkSystem
SR655 (2U) sr670 7Y36, 7Y37, 7Y38 Lenovo ThinkSystem SR670 (2U) sr950 7X11, 7X12, 7X13 Lenovo ThinkSystem SR950 (4U)
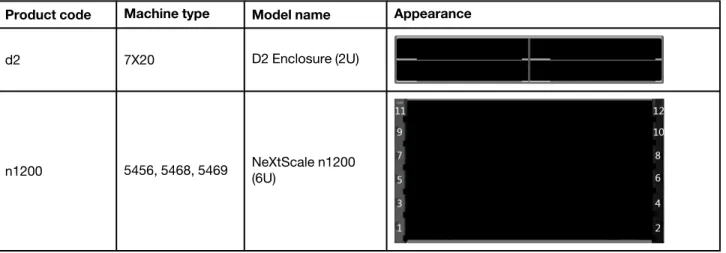
LiCO can be installed on certain chassis models, as listed in the table below. Table 3. Supported chassis models
Product code Machine type Model name Appearance
d2 7X20 D2 Enclosure (2U)
n1200 5456, 5468, 5469 NeXtScale n1200 (6U)
Prerequisites
• Refer to LiCO best recipe to ensure that the cluster hardware uses proper firmware levels, drivers, and settings: https://support.lenovo.com/us/en/solutions/ht507011.
• Refer to the OS part of LeSI 19C_SI best recipe to install the OS security patch: https:// support.lenovo.com/us/en/solutions/ht505184.
• The installation described in this Guide is based on SLES 12 SP4.
• A SLES-12-SP4-Server or SLES-12-SP4-SDK local repository should be added on management node. • Unless otherwise stated in this Guide, all commands are executed on the management node.
• To enable the firewall, modify the firewall rules according to “Firewall settings” on page 60.
• It is important to regularly patch and update components and the OS to prevent security vulnerabilities. For details about how to update OS packages, see “Update OS packages” on page 64. Additionally it is recommended that known updates at the time of installation be applied during or immediately after the OS deployment to the managed nodes and prior to the rest of the LiCO setup steps
Chapter 2. Deploy the cluster environment
If the cluster environment already exists, you can skip this chapter.
Install an OS on the management node
Install an official version of SLES 12 SP4 on the management node. You can select the minimum installation. Run the following commands to configure the memory and restart OS:
echo '* soft memlock unlimited' >> /etc/security/limits.conf
echo '* hard memlock unlimited' >> /etc/security/limits.conf
reboot
Deploy the OS on other nodes in the cluster
Configure environment variables
Step 1. Log in to the management node.
Step 2. Run the following commands to configure environment variables for the entire installation process: su root
cd ~
vi lico_env.local
Step 3. Run the following commands to edit the lico_env.local file: # Management node hostname
sms_name="head"
# Set the domain name
domain_name="hpc.com"
# Set OpenLDAP domain name
lico_ldap_domain_name="dc=hpc,dc=com"
# set OpenLDAP domain component
lico_ldap_domain_component="hpc"
# IP address of management node in the cluster intranet
sms_ip="192.168.0.1"
# The network adapter name corresponding to the management node IP address
sms_eth_internal="eth0"
# Subnet mask in the cluster intranet. If all nodes in the cluster already have
# OS installed, retain the default configurations.
# BMC username and password
bmc_username="<BMC_USERNAME>"
bmc_password="<BMC_PASSWORD>"
# OS mirror pathway for xCAT
iso_path="/isos"
# Local repository directory for OS
os_repo_dir="/install/custom/server"
sdk_repo_dir="/install/custom/sdk"
# Local repository directory for xCAT
xcat_repo_dir="/install/custom/xcat"
# link name of repository directory for Lenovo OpenHPC
link_ohpc_repo_dir="/install/custom/ohpc"
# link name of repository directory for LiCO
link_lico_repo_dir="/install/custom/lico"
# link name of repository directory for LiCO-dep
link_lico_dep_repo_dir="/install/custom/lico-dep"
# Local repository directory for Lenovo OpenHPC, please change it according to
# this version.
ohpc_repo_dir="/install/custom/ohpc-1.3.9"
# LiCO repository directory for LiCO, please change it according to this version.
lico_repo_dir="/install/custom/lico-5.5.0"
# LiCO repository directory for LiCO-dep, please change it according to this version.
lico_dep_repo_dir="/install/custom/lico-dep-5.5.0"
# Total compute nodes
num_computes="2"
# Prefix of compute node hostname. If OS has already been installed on all the nodes
# of the cluster, change the configuration according to actual conditions.
compute_prefix="c"
# Compute node hostname list. If OS has already been installed on all the nodes of the
# cluster, change the configuration according to actual conditions.
c_name[0]=c1
c_name[1]=c2
# Compute node IP list. If OS has already been installed on all the
c_ip[0]=192.168.0.6
c_ip[1]=192.168.0.16
# Network interface card MAC address corresponding to the compute node IP. If OS has
# already been installed on all the nodes of the cluster, change the configuration
# according to actual conditions.
c_mac[0]=fa:16:3e:73:ec:50
c_mac[1]=fa:16:3e:27:32:c6
# Compute node BMC address list.
c_bmc[0]=192.168.1.6
c_bmc[1]=192.168.1.16
# Total login nodes. If there is no login node in the cluster, the number of logins
# must be "0". And the 'l_name', 'l_ip', 'l_mac', and 'l_bmc' lines need to be removed.
num_logins="1"
# Login node hostname list. If OS has already been installed on all nodes in the cluster,
# change the configuration according to actual conditions.
l_name[0]=l1
# Login node IP list. If OS has already been installed on all the nodes of the cluster,
# change the configuration according to actual conditions.
l_ip[0]=192.168.0.15
# Network interface card MAC address corresponding to the login node IP.
# If OS has already been installed on all nodes in the cluster, change the configuration
# according to actual conditions.
l_mac[0]=fa:16:3e:2c:7a:47
# Login node BMC address list.
l_bmc[0]=192.168.1.15
Step 4. Save the changes to lico_env.local.This Guide assumes that the node's BMC username and password are consistent. If they are inconsistent, they need to be modified during the installation. Step 5. Run the following commands to make the configuration file take effect:
chmod 600 lico_env.local
source lico_env.local
After the cluster environment is set up, configure the IP address of the public network on the login or management node. In this way, you can log in to LiCO Web portal from external network.
Create a local repository
Step 1. Run the following command to create a directory for ISO storage: mkdir -p ${iso_path}
Step 2. Download SLE-12-SP4-Server-DVD-x86_64-GM-DVD1.iso and SLE-12-SP4-SDK-DVD-x86_64-GM-DVD1.
iso from the official Web site. Record MD5SUM result from your download Web site. Step 3. Copy the file to ${iso_path}.
Step 4. Run the following commands to compare md5sum result with original to check if ISO file is valid: cd ${iso_path}
md5sum SLE-12-SP4-Server-DVD-x86_64-GM-DVD1.iso
md5sum SLE-12-SP4-SDK-DVD-x86_64-GM-DVD1.iso
cd ~
Step 5. Run the following commands to mount image: mkdir -p ${os_repo_dir}
mkdir -p ${sdk_repo_dir}
mount -o loop ${iso_path}/SLE-12-SP4-Server-DVD-x86_64-GM-DVD1.iso ${os_repo_dir}
mount -o loop ${iso_path}/SLE-12-SP4-SDK-DVD-x86_64-GM-DVD1.iso ${sdk_repo_dir} Step 6. Run the following commands to configure local repository:
cat << eof > ${iso_path}/SLES12-SP4-12.4.repo
[SLES12-SP4-12.4-SERVER] name=sle12-server enabled=1 autorefresh=0 gpgcheck=0 baseurl=file://${os_repo_dir} [SLES12-SP4-12.4-SDK] name=sle12-sdk enabled=1 autorefresh=0 gpgcheck=0 baseurl=file://${sdk_repo_dir} eof cp ${iso_path}/SLES12-SP4-12.4.repo /etc/zypp/repos.d
Install Lenovo xCAT
Step 1. Download the package from https://hpc.lenovo.com/downloads/19c/xcat-2.14.6.lenovo5_confluent- 2.4.1-1-sles12.tar.bz2.
Step 2. Upload the package to the /root directory on the management node. Step 3. Run the following commands to create xcat local repository:
mkdir -p $xcat_repo_dir
tar -xvf xcat-2.14.6.lenovo5_confluent-2.4.1-1-sles12.tar.bz2 -C $xcat_repo_dir
cd $xcat_repo_dir/lenovo-hpc-sles12
./mklocalrepo.sh
cd ~
Step 4. Run the following commands to install xcat:
zypper --gpg-auto-import-keys install -y --force-resolution xCAT
source /etc/profile.d/xcat.sh
Prepare OS mirrors for other nodes
Step 1. Run the following command to prepare the OS image for the other nodes: copycds ${iso_path}/SLE-12-SP4-Server-DVD-x86_64-GM-DVD1.iso \
-a x86_64
Step 2. Run the following command to confirm that the OS image has been copied: lsdef -t osimage
Note: The output should be as follows: sles12.4-x86_64-install-compute (osimage)
sles12.4-x86_64-install-service (osimage)
sles12.4-x86_64-netboot-compute (osimage)
sles12.4-x86_64-statelite-compute (osimage)
Step 3. Run the following command to disable the Nouveau module: chdef -t osimage sles12.4-x86_64-install-compute addkcmdline=\
"rdblacklist=nouveau nouveau.modeset=0 R::modprobe.blacklist=nouveau"
Note: Nouveau module is an accelerated open-source driver for NVIDIA cards. This module should disabled before the installation of CUDA driver.
Set xCAT node information
Step 1. Run the following commands to import the compute node configuration in the lico_env.local file to xCAT:
for ((i=0; i<$num_computes; i++)); do
mkdef -t node ${c_name[$i]} groups=compute,all arch=x86_64 netboot=xnba mgt=ipmi \
bmcusername=${bmc_username} bmcpassword=${bmc_password} ip=${c_ip[$i]} \
mac=${c_mac[$i]} bmc=${c_bmc[$i]} serialport=0 serialspeed=115200;
done
Step 2. Run the following commands to import the login node configuration in the lico_env.local file to xCAT:
for ((i=0; i<$num_logins; i++)); do
bmcusername=${bmc_username} bmcpassword=${bmc_password} ip=${l_ip[$i]} \
mac=${l_mac[$i]} bmc=${l_bmc[$i]} serialport=0 serialspeed=115200;
done
Step 3. (Optional) If the BMC username and password of the node are inconsistent, run the following command to make them consistent:
tabedit ipmi
Step 4. Run the following command to configure the root account password for the node: chtab key=system passwd.username=root passwd.password=<ROOT_PASSWORD>
Add host resolution
Note: If the cluster already has the OS installed and can resolve the IP address through the hostname, skip this section.
Run the following commands to add host resolution: chdef -t site domain=${domain_name}
chdef -t site master=${sms_ip}
chdef -t site nameservers=${sms_ip}
sed -i "/^\s*${sms_ip}\s*.*$/d" /etc/hosts
sed -i "/\s*${sms_name}\s*/d" /etc/hosts
echo "${sms_ip} ${sms_name} ${sms_name}.${domain_name} " >> /etc/hosts
makehosts
Configure DHCP and DNS services
Note: If all nodes in the cluster have the OS installed, skip this step. Run the following commands to configure DHCP and DNS services: makenetworks
makedhcp -n
makedhcp -a
makedns -n
echo "search ${domain_name}" > /etc/resolv.conf
echo "nameserver ${sms_ip}" >> /etc/resolv.conf
Note: Please reference to the following two links to make sure that the management node is pointing at the same DNS as other nodes:
https://sourceforge.net/p/xcat/wiki/XCAT_iDataPlex_Cluster_Quick_Start/#install-xcat-on-the-management-node https://sourceforge.net/p/xcat/wiki/Cluster_Name_Resolution/
Install a node OS through the network
Note: If all nodes in the cluster have the OS installed, skip this section. Run the following commands to set and install the necessary OS mirror:
nodeset all osimage=sles12.4-x86_64-install-compute
rsetboot all net -u
rpower all reset
Note: It takes several minutes to complete the OS installation. You can use the following command to check the progress:
nodestat all
Create local repository for other nodes
Run the following commands:cp /etc/zypp/repos.d/SLES12-SP4-12.4.repo /var/tmp
sed -i '/^baseurl=/d' /var/tmp/SLES12-SP4-12.4.repo
sed -i "/name=sle12-server/a\baseurl=http://${sms_name}${os_repo_dir}" \
/var/tmp/SLES12-SP4-12.4.repo
sed -i "/name=sle12-sdk/a\baseurl=http://${sms_name}${sdk_repo_dir}" \
/var/tmp/SLES12-SP4-12.4.repo
xdcp all /var/tmp/SLES12-SP4-12.4.repo /etc/zypp/repos.d
Configure the memory for other nodes
Run the following commands:xdcp all /etc/security/limits.conf /etc/security/limits.conf
psh all reboot
Checkpoint A
Run the following commands to check and ensure that the installation is complete: psh all uptime
Notes:
• The output should be as follows:
c1: 05:03am up 0:02, 0 users, load average: 0.20, 0.13, 0.05
c2: 05:03am up 0:02, 0 users, load average: 0.20, 0.14, 0.06
l1: 05:03am up 0:02, 0 users, load average: 0.17, 0.13, 0.05
……
• If you cannot run these commands,check if the xCAT is successfully installed on the management node, and passwordless SSH is set between the management node and other nodes. You can copy the id_rsa file and the id_rsa.pub file from the management node to other nodes, and run these commands again.
Install infrastructure software for nodes
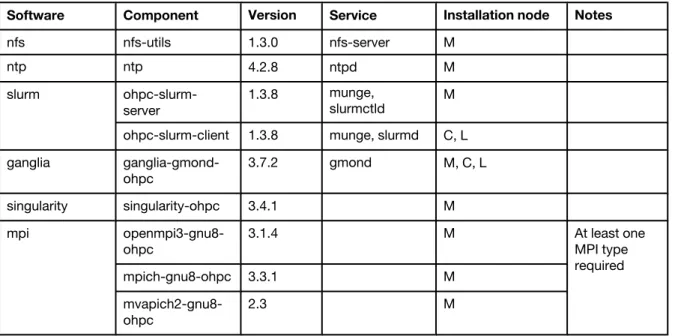
List of infrastructure software to be installed
Note: In the Installation node column, M stands for “Management node”, L stands for “Login node”, and C stands for “Compute node”.
Table 4. Infrastructure software to be installed
Software Component Version Service Installation node Notes
nfs nfs-utils 1.3.0 nfs-server M ntp ntp 4.2.8 ntpd M slurm ohpc-slurm- server 1.3.8 munge, slurmctld M ohpc-slurm-client 1.3.8 munge, slurmd C, L
ganglia ganglia-gmond- ohpc 3.7.2 gmond M, C, L singularity singularity-ohpc 3.4.1 M mpi openmpi3-gnu8- ohpc 3.1.4 M At least one MPI type required mpich-gnu8-ohpc 3.3.1 M mvapich2-gnu8- ohpc 2.3 M
Configure a local Zypper repository for the management node
Step 1. Download the package from https://hpc.lenovo.com/lico/downloads/5.5/Lenovo-OpenHPC-1.3.9.SLE_12.x86_64.tar.
Step 2. Upload the package to the /root directory on the management node.
Step 3. Run the following commands to configure the local Lenovo OpenHPC repository: mkdir -p $ohpc_repo_dir
cd /root
tar xvf Lenovo-OpenHPC-1.3.9.SLE_12.x86_64.tar -C $ohpc_repo_dir
rm -rf $link_ohpc_repo_dir
ln -s $ohpc_repo_dir $link_ohpc_repo_dir
$link_ohpc_repo_dir/make_repo.sh
rpm --import $link_ohpc_repo_dir/SLE_12/repodata/repomd.xml.key
Configure a local Zypper repository for login and compute nodes
Step 1. Run the following commands to configure a local repository for login and compute nodes:cp /etc/zypp/repos.d/Lenovo.OpenHPC.local.repo /var/tmp
sed -i '/^gpgkey=/d' /var/tmp/Lenovo.OpenHPC.local.repo
echo "baseurl=http://${sms_name}${link_ohpc_repo_dir}/SLE_12"\
>>/var/tmp/Lenovo.OpenHPC.local.repo
echo "gpgkey=http://${sms_name}${link_ohpc_repo_dir}/SLE_12/repodata/repomd.xml.key"\
>>/var/tmp/Lenovo.OpenHPC.local.repo
Step 2. Run the following commands to distribute repo file:
xdcp all /var/tmp/Lenovo.OpenHPC.local.repo /etc/zypp/repos.d/
psh all rpm --import http://${sms_name}${link_ohpc_repo_dir}\
/SLE_12/repodata/repomd.xml.key
psh all echo -e %_excludedocs 1 \>\> ~/.rpmmacros
Configure LiCO dependencies repositories
Step 1. Download the package from https://hpc.lenovo.com/lico/downloads/5.5/lico-dep-5.5.0.sle12.x86_ 64.tgz.
Step 2. Upload the package to the /root directory on the management node.
Step 3. Run the following commands to configure the Zypper repository for the management node: mkdir -p $lico_dep_repo_dir
cd /root
tar -xvf lico-dep-5.5.0.sle12.x86_64.tgz -C $lico_dep_repo_dir
rm -rf $link_lico_dep_repo_dir
ln -s $lico_dep_repo_dir $link_lico_dep_repo_dir
$link_lico_dep_repo_dir/mklocalrepo.sh
rpm --import $link_lico_dep_repo_dir/RPM-GPG-KEY-LICO-DEP-SLE12
Attention: Before running the commands, ensure that the management node has configured a local operating system Zypper repository for the above and subsequent actions.
Step 4. (Optional) If the cluster already exists, check to ensure that your version is consistent with “List of LiCO dependencies to be installed” on page 25.
Step 5. Run the following commands to configure the Zypper repository for other nodes: cp /etc/zypp/repos.d/lico-dep.repo /var/tmp
sed -i '/^baseurl=/d' /var/tmp/lico-dep.repo
sed -i '/^gpgkey=/d' /var/tmp/lico-dep.repo
echo "baseurl=http://${sms_name}${link_lico_dep_repo_dir}"\
>>/var/tmp/lico-dep.repo
echo "gpgkey=http://${sms_name}${link_lico_dep_repo_dir}/RPM-GPG-KEY\
-LICO-DEP-SLE12" >> /var/tmp/lico-dep.repo Step 6. Run the following commands to distribute repo file:
psh all rpm --import http://${sms_name}${link_lico_dep_repo_dir}/RPM-GPG\
-KEY-LICO-DEP-SLE12
Install Slurm
Step 1. Run the following commands to install the base package: zypper install lenovo-ohpc-base
Step 2. Run the following commands to install Slurm: zypper install ohpc-slurm-server
Step 3. Run the following command to install the Slurm client:
psh all zypper install -y --force-resolution ohpc-base-compute \
ohpc-slurm-client lmod-ohpc
Step 4. (Optional) Run the following commands to prevent non-root logins to the compute nodes: psh all echo "\""account required pam_slurm.so"\""\
\>\> /etc/pam.d/sshd
Note: Do not perform this step if you want to allow non-root logins to the compute nodes regardless of whether a Slurm job is running on those nodes. If this step is performed, non-root logins to the compute nodes will only be allowed if a Slurm job is already running on those nodes under a particular username. In this case, non-root ssh logins will work for that particular username for the duration that Slurm job is running on those nodes.
Step 5. (Optional) To save the previous job information and use memory accounting function, install and configure slurm accounting function based on the information on https://slurm.schedmd.com/ accounting.html.
Configure NFS
Step 1. Run the following commands to create the shared directory /opt/ohpc/pub: a. Manage node sharing /opt/ohpc/pub for OpehHPC:
zypper install nfs-kernel-server
echo "/opt/ohpc/pub *(ro,no_subtree_check,fsid=11)" >> /etc/exports
exportfs -a
b. Configure shared directory for cluster nodes:
psh all zypper install -y --force-resolution nfs-client
psh all mkdir -p /opt/ohpc/pub
psh all echo "\""${sms_ip}:/opt/ohpc/pub /opt/ohpc/pub nfs \
nfsvers=4.1,nodev,noatime 0 0"\"" \>\> /etc/fstab c. Mount shared directory:
psh all mount /opt/ohpc/pub
Note: This directory is mandatory. If you have already shared this directory from the management node and mounted it on all other nodes, you can skip this step.
echo "/home *(rw,async,no_subtree_check,fsid=10,no_root_squash)"\
>> /etc/exports
exportfs -a
b. Unmount the mounted /home:
psh all "sed -i '/ \/home /d' /etc/fstab"
psh all umount /home
c. Configure shared directory for cluster nodes:
psh all echo "\""${sms_ip}:/home /home nfs nfsvers=4.1,nodev,nosuid,noatime \
0 0"\"" \>\> /etc/fstab d. Mount shared directory:
psh all mount /home
Configure NTP
Note: If the NTP service has already been configured for nodes in the cluster, skip this section. Step 1. Run the following commands to configure NTP:
echo "server 127.127.1.0" >> /etc/ntp.conf
echo "fudge 127.127.1.0 stratum 10" >> /etc/ntp.conf
systemctl enable ntpd
systemctl restart ntpd
psh all zypper install -y --force-resolution ntp
psh all echo "\""server ${sms_ip}"\"" \>\> /etc/ntp.conf
psh all systemctl enable ntpd
psh all systemctl restart ntpd
Step 2. Run the following commands to check service: psh all "ntpq -p | tail -n 1"
GPU driver installation
You must install the GPU driver on all the GPU compute nodes. If only a subset of nodes have GPUs, replace the compute argument in ppsshh commands with the node range corresponding to GPU nodes.
Install the GPU driver
Step 1. Run the following commands to configure the operating system to start on the text console and then restart the system:
psh compute systemctl set-default multi-user.target
psh compute reboot
Note: This step is required only when the operating system is configured to start on a graphical desktop.
Step 2. Download the NVIDIA driver from https://us.download.nvidia.cn/tesla/418.87/nvidia-driver-local-repo- sles124-418.87.01-1.0-1.x86_64.rpmand copy it to the shared directory /home.
Step 3. Run the following commands:
psh compute rpm -ivh /home/nvidia-driver-local-repo-sles124-418.87.01-1.0-1.x86_64.rpm
psh compute zypper --gpg-auto-import-keys install -y --force-resolution cuda-drivers
psh compute "sed -i 's/660/666/g' /etc/modprobe.d/50-nvidia-default.conf"
psh compute "/sbin/mkinitrd"
Step 4. Run the following command to restart the compute nodes with GPU: psh compute reboot -h now
Step 5. Check to ensure that all nodes are restarted referring to “Checkpoint A” on page 11. Step 6. Run the following command on the GPU nodes to determine if the GPU can be identified:
psh compute nvidia-smi | xcoll
Configure automatic start for the GPU driver
Step 1. Run the following commands to configure automatic start for the GPU driver: psh compute zypper install -y pciutils
Step 2. Run the following commands to add configure file:
cat << eof > /usr/lib/systemd/system/nvidia-persistenced.service
[Unit]
Description=NVIDIA Persistence Daemon
Before=slurmd.service Wants=syslog.target [Service] Type=oneshot RemainAfterExit=yes ExecStart=/usr/bin/nvidia-modprobe -u -c=0 [Install] WantedBy=multi-user.target eof
Step 3. Run the following commands to distribute configure file:
xdcp compute /usr/lib/systemd/system/nvidia-persistenced.service /usr/lib/systemd/system/\
nvidia-persistenced.service
Step 4. Run the following commands to restart service: psh compute systemctl daemon-reload
psh compute systemctl enable nvidia-persistenced
Configure Slurm
Step 1. Download slurm.conf from https://hpc.lenovo.com/lico/downloads/5.5/examples/conf/to /etc/slurm on the management node, and modify this file according to the instructions in “slurm.conf” on page 18.
Step 2. Download cgroup.conf from https://hpc.lenovo.com/lico/downloads/5.5/examples/conf/to /etc/slurm on the management node.
Step 3. Run the following commands to distribute the configuration: xdcp all /etc/slurm/slurm.conf /etc/slurm/slurm.conf
xdcp all /etc/slurm/cgroup.conf /etc/slurm/cgroup.conf
xdcp all /etc/munge/munge.key /etc/munge/munge.key
Step 4. For GPU nodes only: Download gres.conf from https://hpc.lenovo.com/lico/downloads/5.5/examples/ conf/to /etc/slurm on the GPU node, and modify this file according to the instructions in “gres. conf” on page 19.
Step 5. Run the following commands to start management node service: systemctl enable munge
systemctl enable slurmctld
systemctl restart munge
systemctl restart slurmctld
Step 6. Run the following commands to start other node service: psh all systemctl enable munge
psh all systemctl restart munge
psh all systemctl enable slurmd
psh all systemctl restart slurmd
slurm.conf
The following typical fields need to be configured: • Cluster name:
ClusterName=mycluster • Management node name:
SlurmctldHost=c031 • GPU scheduling:
GresTypes=gpu
Note: In the cluster, this entry is used when a GPU node is included. If the cluster includes no GPU node, delete this entry.
• Cluster node definitions:
NodeName=c031 Gres=gpu:4 CPUs=28 RealMemory=200000 State=UNKNOWN
NodeName=c032 Gres=gpu:4 CPUs=28 RealMemory=200000 State=UNKNOWN
– Gres: Number of GPUs
– CPUs: Number of CPUs on a node.
• Partition definitions:
PartitionName=compute Nodes=c0[31-32] Default=YES MaxTime=INFINITE State=UP
PartitionName=compute1 Nodes=c0[31-32] Default=NO MaxTime=INFINITE State=UP
Notes:
– Default: identifies whether this partition is the default partition. When submitting a job, you can select a partition. If you do not select a partition, the default partition is used.
– Nodes: the NodeName list. If NodeName is irregular, Nodes=[nodename1,nodename2,...] is allowed. • Enforced part limit definitions:
EnforcePartLimits=ALL
Attention: Use this configuration if you want to submit a direct error response when a job requests resources that exceed the cluster resource amount. Otherwise, the job remains in the queue. For more details about how to configure slurm.conf, refer to the official Slurm site: https:// slurm.schedmd.com/slurm.conf.html.
gres.conf
This configuration file describes the GPUs installed on the GPU nodes and the GPU memory. The content of this file may vary based on the GPU node.
Modify the following content: Name=gpu File=/dev/nvidia[0-3]
Note: In /dev/nvidia[0-3] , [0–3] should be changed to your actual GPU configuration. For example, /dev/
nvidia0 means one GPU card, whereas /dev/nvidia[0-1] means two GPU cards.
Install Ganglia
Step 1. If the cluster monitoring is based on Ganglia, run the following commands on the management node to install Ganglia:
zypper install ganglia-gmond-ohpc
Step 2. Download gmond.conf from https://hpc.lenovo.com/lico/downloads/5.5/examples/conf/ganglia/ management/, copy it to the /etc/ganglia/ directory on the management node, and modify the hostname in the /etc/ganglia/gmond.conf file to the management node hostname for the udp_ send_channel setting:
echo net.core.rmem_max=10485760 > /usr/lib/sysctl.d/gmond.conf
echo net.core.rmem_max=10485760 > /etc/sysctl.d/90-gmond.conf
/usr/lib/systemd/systemd-sysctl gmond.conf
sysctl -w net.core.rmem_max=10485760
Step 3. Run the following command to install Ganglia on other nodes: psh all zypper install -y --force-resolution ganglia-gmond-ohpc
Step 4. Download gmond.conf from https://hpc.lenovo.com/lico/downloads/5.5/examples/conf/ganglia/, copy it to the /var/tmp/ directory of the management node, and modify the hostname in the /var/tmp/
gmond.conf file to the management node hostname for the udp_send_channel setting: xdcp all /var/tmp/gmond.conf /etc/ganglia/gmond.conf
systemctl enable gmond
systemctl start gmond
Step 6. Run the following commands to start other nodes service: psh all systemctl enable gmond
psh all systemctl start gmond
Step 7. Run the following command to see whether all nodes are listed: gstat -a
Install MPI
Step 1. Run the following commands to install three modules (OpenMPI, MPICH, and MVAPICH) to the system:
zypper install openmpi3-gnu8-ohpc mpich-gnu8-ohpc mvapich2-gnu8-ohpc Step 2. Set the default module.
Run the following command to set OpenMPI module as the default: zypper install lmod-defaults-gnu8-openmpi3-ohpc
Run the following command to set the MPICH module as the default: zypper install lmod-defaults-gnu8-mpich-ohpc
Run the following command to set the MVAPICH module as the default: zypper install lmod-defaults-gnu8-mvapich2-ohpc
Note: MVAPICH requires that Infiniband or OPA is present and working correctly. The following packages should be installed to support Infiniband or OPA:
zypper -n install libibmad5 librdmacm1 rdma infinipath-psm dapl-devel dapl-utils \
libibverbs-utils
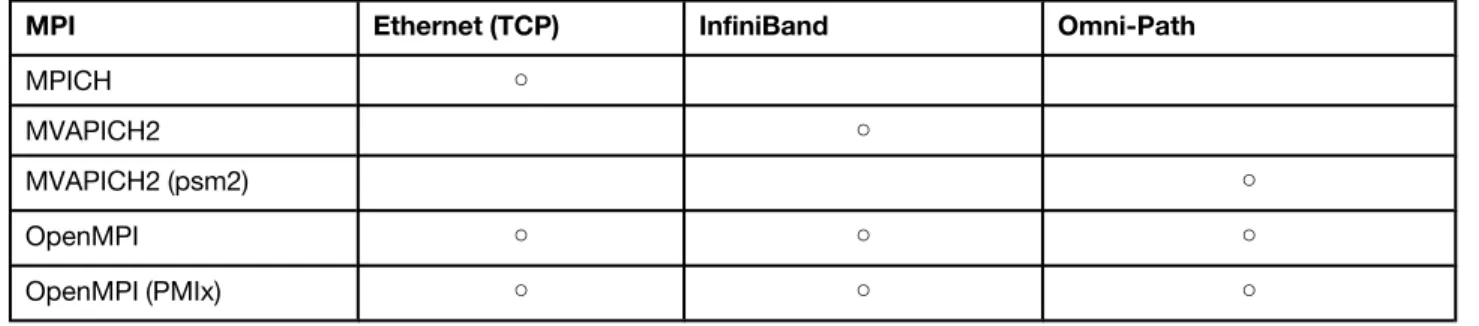
Interconnect support between MPI types
Table 5. Interconnect support between MPI typesMPI Ethernet (TCP) InfiniBand Omni-Path
MPICH ○
MVAPICH2 ○
MVAPICH2 (psm2) ○
OpenMPI ○ ○ ○
OpenMPI (PMIx) ○ ○ ○
Dependencies between MPI types
Observe the following dependencies for MPI installation: • To use MVAPICH2 (psm2), install mvapich2-psm2-gnu8-ohpc. • To use OpenMPI (PMIx), install openmpi3-pmix-slurm-gnu8-ohpc.
• mvapich2-psm2-gnu8-ohpc and mvapich2-gnu8-ohpc are incompatible.
Install Singularity
Singularity is an HPC-facing lightweight container framework. Step 1. Run the following command to install Singularity:
zypper install singularity-ohpc
Step 2. Edit the file /opt/ohpc/pub/modulefiles/ohpc by adding the following content to the end of the
module try-add block: module try-add singularity
Step 3. In the module del block, add the following content as the first line: module del singularity
Step 4. Run the following command: source /etc/profile.d/lmod.sh
Changes to /opt/ohpc/pub/modulefiles/ohpc may be lost when the default modules are changed with the installation of the lmod-defaults* package. In that case, either modify /opt/ohpc/pub/modulefiles/ohpc again, or add module try-add singularity to the end of /etc/profile.d/lmod.sh.
Checkpoint B
Step 1. Run the following command to test if Slurm is properly installed: sinfo
Notes:
• The output should be as follows:
PARTITION AVAIL TIMELIMIT NODES STATE NODELIST
normal* up 1-00:00:00 2 idle c[1-2]
……
• The status of all nodes should be idle; idle* is unacceptable. Step 2. Run the following command to add a test account:
psh all useradd test -m --uid 65530
Step 3. Log in a compute node by using the test account and the test program distrubuted by Slurm: su - test
mpicc -O3 /opt/ohpc/pub/examples/mpi/hello.c
srun -n 8 -N 1 -w <NODENAME> -p <PARTITIONNAME> --pty /bin/bash
prun ./a.out
Note: The output should be as follows: Master compute host = c1
Resource manager = slurm
Hello, world (8 procs total) --> Process # 0 of 8 is alive. -> c1 --> Process # 4 of 8 is alive. -> c2 --> Process # 1 of 8 is alive. -> c1 --> Process # 5 of 8 is alive. -> c2 --> Process # 2 of 8 is alive. -> c1 --> Process # 6 of 8 is alive. -> c2 --> Process # 3 of 8 is alive. -> c1 --> Process # 7 of 8 is alive. -> c2
Step 4. Run the following command to end the test: exit
Note: If you need to leave from “test” user session,type “exit” again. Step 5. Run the following command to remove test user:
psh all userdel test -r
Chapter 3. Install LiCO dependencies
Cluster check
If you skipped Chapter 2 “Deploy the cluster environment” on page 5, follow this section to make sure that the cluster environment is ready. Otherwise, proceed to “List of LiCO dependencies to be installed” on page 25.
Check environment variables
Run the following commands to check the environment variables ${sms_name}, ${lico_ldap_domain_name}, and ${lico_repo_dir}:
echo $sms_name;echo $lico_repo_dir;echo $lico_ldap_domain_name
Notes:
• The output should be as follows: head
/install/custom/lico-5.5.0
dc=hpc,dc=com
• If there is no output, see “Configure environment variables” on page 5.
Check the LiCO dependencies repository
Run the following commands to check the LiCO dependencies repository: zypper repos|grep lico-dep-local
Notes:
• The output should be as follows:
5 | lico-dep-local | lico-dep-local(sle12) | Yes | (r ) Yes | No
• If there is no output, see “Configure LiCO dependencies repositories” on page 13.
Check the OS installation
Go to “Checkpoint A” on page 11 to check the OS installation for the cluster. If the OS installation check fails, reconfigure the cluster OS referring to “Deploy the OS on other nodes in the cluster” on page 5.
Check NFS
Note: If the cluster does not use NFS as the distributed file system, skip this section. Run the following commands to check the NFS service on the management node: systemctl status nfs | grep Active && exportfs -v | grep -E '/home|/opt/ohpc/pub'
Notes:
• The output should be as follows:
Active: active (exited) since Sat 2019-10-12 16:04:21 CST; 2 days ago
/opt/ohpc/pub <world>(sync,wdelay,hide,no_subtree_check,sec=sys,ro,secure,root_squash,no_all_ squash)
/home <world>(async,wdelay,hide,no_subtree_check,sec=sys,rw,secure,no_root_squash,no_all_squash) • If the status is not 'active (exited)' or there is no output for eexxppoorrttffss, go to “Configure NFS” on page 14. Run the following commands to check the mounting points on all other nodes:
psh all df | grep -E '/home | /opt/ohpc/pub'
Notes:
• The output should be as follows:
c032: 10.1.1.31:/home 485642240 111060992 374581248 23% /home
c032: 10.1.1.31:/opt/ohpc/pub 485642240 111060992 374581248 23% /opt/ohpc/pub • If the status is no output, go to “Check NFS” on page 23.
Check Slurm
Run the following commands to check slurmctld on the management node: systemctl status slurmctld | grep Active
Notes:
• The output should be as follows:
Active: active (running) since Tue 2018-07-24 19:02:49 CST; 1 months 20 days ago
• If the status is not 'active (running)', go to “Install Slurm” on page 14 and “Configure Slurm” on page 18. Run the following commands to check slurmd on the compute nodes:
psh compute systemctl status slurmd | grep Active
Notes:
• The output should be as follows:
c031: Active: active (running) since Tue 2018-07-24 19:02:49 CST; 1 months 20 days ago
c032: Active: active (running) since Sat 2018-07-21 17:16:59 CST; 1 months 23 days ago
• If the output does not contain all compute nodes, go to “Install Slurm” on page 14 and “Configure Slurm” on page 18.
Check Ganglia
Run the following commands to check gmond on all nodes:
systemctl status gmond|grep Active && psh all systemctl status gmond|grep Active
Notes:
• The output should be as follows:
Active: active (running) since Tue 2018-07-24 19:03:21 CST; 1 months 21 days ago
c031: Active: active (running) since Tue 2018-07-24 19:03:21 CST; 1 months 21 days ago
c032: Active: active (running) since Sat 2018-07-21 17:17:31 CST; 1 months 24 days ago • If gmond is not running on all nodes, go to “Install Ganglia” on page 19.
Check MPI and Singularity
module list
Notes:
• The output should be as follows: Currently Loaded Modules:
1) prun/1.3 2) gnu8/8.3.0 3) mpich/3.3.1 4) singularity/3.4.1 5) ohpc
• If the outputs does not contain one of the following: openmpi3, mpich, or mvapich2, go to “Install MPI” on page 20.
• If the output does not contain “singularity”, go to “Install Singularity” on page 21.
Check OpenHPC installation
Go to “Checkpoint B” on page 21 to check the OpenHPC installation for the cluster. If the OpenHPC installation check fails, reconfigure OpenHPC referring to “Install infrastructure software for nodes” on page 12.
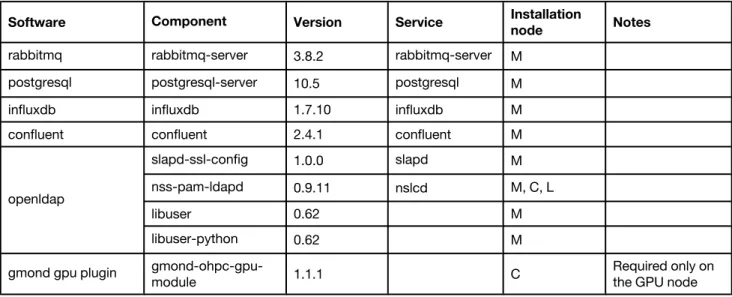
List of LiCO dependencies to be installed
Note: In the Installation node column, M stands for “Management node”, L stands for “Login node”, and C stands for “Compute node”.
Table 6. LiCO dependencies to be installed
Software Component Version Service Installation
node Notes
rabbitmq rabbitmq-server 3.8.2 rabbitmq-server M
postgresql postgresql-server 10.5 postgresql M
influxdb influxdb 1.7.10 influxdb M
confluent confluent 2.4.1 confluent M
openldap
slapd-ssl-config 1.0.0 slapd M
nss-pam-ldapd 0.9.11 nslcd M, C, L
libuser 0.62 M
libuser-python 0.62 M
gmond gpu plugin gmond-ohpc-gpu-
module 1.1.1 C
Required only on the GPU node
Install RabbitMQ
LiCO uses RabbitMQ as a message broker.
Step 1. Run the following command to install RabbitMQ on the management node: zypper install -y rabbitmq-server
Step 2. Run the following commands to start RabbitMQ service: systemctl enable rabbitmq-server
Install PostgreSQL
LiCO uses PostgreSQL as an object-related database for data storage.
Step 1. Run the following command to install PostgreSQL on the management node: zypper install -y postgresql-server
Step 2. Run the following commands to configure PostgreSQL:
Note: The value of the -U switch on the initdb command ("postgres") is the postgres username. The postgres username, and other usernames and passwords will be used in installing lico- passwd-tool. Therefore, keep a record of them when installing PostgreSQ.
su - postgres
echo <PG_PASSWORD> > /var/tmp/pwfile
initdb -U postgres --pwfile /var/tmp/pwfile /var/lib/pgsql/data
rm /var/tmp/pwfile
exit
Step 3. Run the following commands to start PostgreSQL: systemctl enable postgresql
systemctl start postgresql
Step 4. Run the following commands to create LiCO database: export PGPASSWORD=<PG_PASSWORD>
psql -U postgres -c "CREATE DATABASE lico;"
Install InfluxDB
LiCO uses InfluxDB as a time series database for storage monitoring. Step 1. Run the following commands to install InfluxDB:
zypper install influxdb
systemctl enable influxdb
systemctl start influxdb
Step 2. Run the following commands to create InfluxDB users: a. Enter the InfluxDB shell:
influx
b. Create database: create database lico c. Use database:
use lico
d. To create an administrator user, ensure that the password is a string:
create user <INFLUX_USERNAME> with password '<INFLUX_PASSWORD>' with all privileges e. Exit the influxDB shell:
exit
f. Do configuration:
sed -i '/# auth-enabled = false/a\ auth-enabled = true' /etc/influxdb/config.toml g. Restart InfluxDB:
systemctl restart influxdb
Install Confluent
Note: If you need to use the Web console, see “Configure the Confluent Web console” on page 54. Step 1. Run the following command to install Confluent:
zypper install --force-resolution confluent_server Step 2. Run the following commands to start confluent:
systemctl enable confluent
systemctl start confluent
Step 3. Run the following commands to create confluent count: source /etc/profile.d/confluent_env.sh
Configure user authentication
Install OpenLDAP-server
Note: If OpenLDAP is configured or other authentication services are used in the cluster, skip this section. OpenLDAP is the open-source version of the lightweight directory access protocol. It is recommended to use OpenLDAP to manage users. However, LiCO also supports other authentication services that compatible with Linux-PAM.
Step 1. Run the following command to install OpenLDAP: zypper install --force-resolution slapd-ssl-config
Step 2. Run the following commands to modify the configuration file:
sed -i "s/dc=hpc,dc=com/${lico_ldap_domain_name}/" /usr/share/openldap-servers/lico.ldif
sed -i "/dc:/s/hpc/${lico_ldap_domain_component}/" /usr/share/openldap-servers/lico.ldif
install -g ldap -o ldap /etc/openldap/slapd.conf.lico /etc/openldap/slapd.conf
sed -i "s/dc=hpc,dc=com/${lico_ldap_domain_name}/" /etc/openldap/slapd.conf
slapadd -v -l /usr/share/openldap-servers/lico.ldif -f /etc/openldap/slapd.conf \
-b ${lico_ldap_domain_name}
Step 3. Run the following command to get the key: slappasswd
Step 4. Edit the /etc/openldap/slapd.conf file to cover the contents of the rootpw with the key obtained. rootpw <ENCRYPT_LDAP_PASSWORD>
Step 5. Run the following commands to change the role for configuration file: chown -R ldap:ldap /var/lib/ldap
Step 6. Run the following commands to edit the /etc/sysconfig/openldap configuration files:
Note: Ensure the following commands are uncommented. OPENLDAP_START_LDAPS="yes"
OPENLDAP_CONFIG_BACKEND="files"
Step 7. Run the following commands to start OpenLDAP service: systemctl enable slapd
systemctl start slapd
Step 8. Run the following command to check service: systemctl status slapd
Install libuser
The libuser module is a recommended toolkit for OpenLDAP. The installation of this module is optional. Step 1. Run the following commands to install llibuser:
zypper install libuser libuser-python
Step 2. Run the following commands to configure libuser: vi /etc/libuser.conf [import] login_defs = /etc/login.defs default_useradd = /etc/default/useradd [defaults] crypt_style = sha512 modules = ldap create_modules = ldap [userdefaults] LU_USERNAME = %n LU_GIDNUMBER = %u LU_GECOS = %n
# Pay attention to modify option below
LU_HOMEDIRECTORY = /home/%n LU_SHADOWNAME = %n LU_SHADOWMIN = 0 LU_SHADOWMAX = 99999 [groupdefaults] LU_GROUPNAME = %n [files] [shadow] [ldap]
# Modify <LDAP_ADDRESS> to management node IP
server = ldap://<LDAP_ADDRESS>
# Pay attention to modify option below
# Make sure <DOMAIN> should be the same with ${lico_ldap_domain_name}defined in lico_
# env.local basedn = <DOMAIN> userBranch = ou=People groupBranch = ou=Group binddn = uid=admin,<DOMAIN> bindtype = simple [sasl]
Install OpenLDAP-client
Run the following commands to install OpenLDAP-client: echo "TLS_REQCERT never" >> /etc/openldap/ldap.conf
xdcp all /etc/openldap/ldap.conf /etc/openldap/ldap.conf
Install nss-pam-Idapd
nss-pam-ldapd is a name management tool that contains Name Service Switch(NSS) module and Pluggable Authentication Module(PAM). LiCO uses this tool for user authentication.
Step 1. Run the following commands to install YaST extension on management node: zypper install yast2-auth-client
Step 2. Run the following commands to install YaST extension on other nodes: psh all zypper install -y --force-resolution yast2-auth-client
Step 3. Change the IP address for the management node. a. Run the following commands to enter YaST2:
yast
b. Select Network Services ➙ LDAP and Kerberos Client on the management node. The LDAP and Kerberos page is displayed.
c. Highlight the Computer Name row, and click Change Settings on the lower right of the page. A page is displayed for you to change the IP address, as shown below.
d. Change the IP address for the management mode.
e. Click Test Connection and ensure that the IP address passes the test. f. Click OK.
Step 4. Run the following commands to install nss-pam-ldapd on management node: zypper install --force-resolution nss-pam-ldapd
Step 5. Run the following commands to install nss-pam-ldapd on other nodes: psh all zypper install -y --force-resolution nss-pam-ldapd
Step 6. Run the following commands to edit the /etc/nslcd.conf configuration file:
Note: Modify <LDAP_ADDRESS> to management node IP, and ensure that <DOMAIN> should be the same with ${lico_ldap_domain_name} defined in lico_env.local.
uri ldap://<LDAP_ADDRESS>
...
base <DOMAIN>
rootpwmoddn uid=admin,<DOMAIN>
Step 7. Run the following commands to edit configuration file: sed -i 's/pam_mkhomedir.so/pam_mkhomedir.so umask=0077/g' \
/etc/pam.d/common-session-pc
Step 8. Run the following commands to distribute OpenLDAP configuration: xdcp all /etc/nslcd.conf /etc/nslcd.conf
xdcp all /etc/nsswitch.conf /etc/nsswitch.conf
xdcp all /etc/krb5.conf /etc/krb5.conf
xdcp all /etc/pam.d/common-session-pc /etc/pam.d/common-session-pc
xdcp all /etc/pam.d/common-password-pc /etc/pam.d/common-password-pc
xdcp all /etc/pam.d/common-auth-pc /etc/pam.d/common-auth-pc
xdcp all /etc/pam.d/common-account-pc /etc/pam.d/common-account-pc Step 9. Run the following commands to start management node service:
systemctl start nslcd
systemctl enable nslcd
Step 10. Run the following commands to start other node services: psh all systemctl stop nscd
psh all systemctl disable nscd
psh all systemctl enable nslcd
psh all systemctl start nslcd
Install Gmond GPU plug-in
Step 1. On all GPU nodes, run the following commands to install Gmond GPU plug-in: psh compute zypper install -y --force-resolution gmond-ohpc-gpu-module
psh compute "ls /etc/ganglia/conf.d/*.pyconf|grep -v nvidia|xargs rm" Step 2. Run the following command to start Gmond:
psh compute systemctl restart gmond
Step 3. Run the following command to see whether all nodes are listed: gstat -a
Chapter 4. Install LiCO
List of LiCO components to be installed
Note: In the Installation node column, M stands for “Management node”, L stands for “Login node”, and C stands for “Compute node”.
Table 7. List of LiCO components to be installed
Software Component Version Service Installation node Notes
lico-core lico-core 5.5.0 lico M
lico-portal lico-portal 5.5.0 M, L lico-core-extend lico-confluent-proxy 1.1.3 M lico-vnc-proxy 1.1.3 M lico-ai-image 1.4.0 M lico-env lico-env 1.2.1 M, C, L
lico-ai-expert 1.2.4 C Only for AI
functions lico monitor lico-ganglia-mond 2.1.1 lico-ganglia- mond M Cannot install this software if you install lico- icinga-mond
lico-icinga-mond 1.0.1 lico-icinga-
mond M
Cannot install this software if you install lico- ganglia-mond lico-icinga-plugin 1.1.1 M, C, L Required if you need to install lico-icinga-mond lico-confluent-mond 1.3.0 lico-confluent- mond M
lico-vnc-mond 1.1.1 lico-vnc-mond C Required if you
need to run VNC lico-monitor-tool 1.1.1 M Required if you need to install icinga lico alarm notification lico-sms-agent 1.2.3 lico-sms-agent L Required if you need to send alerts via SMS lico-wechat-agent 1.2.3 lico-wechat- agent L
Required if you need to send alerts via WeChat
lico-mail-agent 1.3.4 lico-mail-agent L
Required if you need to send alerts via e-mails lico manager lico-job-manager 1.1.0 lico-job- manager M Essential components
Table 7. List of LiCO components to be installed (continued)
Software Component Version Service Installation node Notes
lico-file-manager 1.1.0 lico-file- manager M Essential components
Obtain the LiCO installation package
Step 1. Obtain the LiCO release package and LiCO license file from https://commercial.lenovo.com/cn/en/ signin.
The LiCO 5.5.0 release package for SLES12 is lico-release-5.5.0.sle12.tar.gz. Step 2. Upload the release package to the management node.
Configure the local Zypper repository for LiCO
Step 1. Run the following commands to configure a local Zypper repository for the management node: mkdir -p $lico_repo_dir
tar zxvf lico-release-5.5.0.sle12.tar.gz -C $lico_repo_dir --strip-components 1
rm -rf $link_lico_repo_dir
ln -s $lico_repo_dir $link_lico_repo_dir
cd $link_lico_repo_dir
./Makerepo
Step 2. Run the following commands to configure a local Zypper repository for other nodes: cp /etc/zypp/repos.d/lico-release.repo /var/tmp
sed -i '/baseurl=/d' /var/tmp/lico-release.repo
echo "baseurl=http://${sms_name}${link_lico_repo_dir}"\
>> /var/tmp/lico-release.repo
Step 3. Run the following commands to distribute repo files: xdcp all /var/tmp/lico-release.repo /etc/zypp/repos.d
Install LiCO on the management node
Step 1. Run the following command to install the LiCO module on the management node: zypper install --force-resolution lico-core lico-confluent-mond lico-confluent-proxy \
lico-ai-expert lico-env lico-ai-image lico-job-manager lico-file-manager
Note: If there is an error regarding processes using files that have been deleted, restart those processes at this point.
If you need to... Run the following commands: Use Ganglia for LiCO monitoring (provided that
Ganglia is installed on the management node)
Note: LiCO can be monitored by either Ganglia or Icinga2. Only one of Ganglia or Icinga2 can be installed.
zypper install --force-resolution \
lico-ganglia-mond
Use Icinga2 for LiCO monitoring (provided that
Icinga2 is installed on the management node) zypper install --force-resolution \ lico-icinga-mond lico-icinga-plugin
Provide Web service on the management node
zypper install --force-resolution lico-portal
Use the VNC component
zypper install --force-resolution \
lico-vnc-proxy
Step 3. Run the following command to restart services: systemctl restart confluent
Install LiCO on the login node
Step 1. Run the following command to install the LiCO module on the login node: psh login zypper install -y --force-resolution lico-env
Step 2. Perform the following steps as required:
If you need to... Run the following commands:
Provide Web service on the login node
psh login zypper install -y \
--force-resolution lico-portal
Use Icinga2 for LiCO monitoring (provided that
Icinga2 is installed on the login node) psh login zypper install -y \
If you need to... Run the following commands: Provide e-mail, SMS, and WeChat services on
the login node psh login zypper install -y \
--force-resolution lico-mail-agent
psh login zypper install -y \
--force-resolution lico-sms-agent
psh login zypper install -y \
--force-resolution lico-wechat-agent
Provide a basic compiling environment on the
login node psh login zypper install -y \
-t pattern SDK-C-C++
psh login zypper install -y glibc-devel
Note: This is an optional step. To install these packages successfully, you may need an internet-based repository. You can set up the repository according to your network
condition.
Install LiCO on the compute nodes
Run the following command to install the LiCO module on the compute nodes: psh compute zypper install -y --force-resolution lico-env lico-ai-expert
If Icinga2 is installed on the compute nodes, run the following commands: psh compute zypper install -y --force-resolution lico-icinga-plugin
Chapter 5. Configure LiCO
Configure the service account
Note: The username and password of PostgreSQL, InfluxDB, and Confluent are configured in this Guide. On the management node, use the tool lico-passwd-tool.
If Icinga2 is not installed, follow the prompt below to enter the username and password for PostgreSQL, InfluxDB, and Confluent:
lico-passwd-tool
If Icinga2 is installed, follow the prompt below to enter the username and password for PostgreSQL, InfluxDB, Confluent and Icinga2 API:
lico-passwd-tool --icinga
Configure cluster nodes
Step 1. Run the following command to import the cluster information to the system: cp /etc/lico/nodes.csv.example /etc/lico/nodes.csv
Step 2. Run the following command to edit the cluster information file: vi /etc/lico/nodes.csv
Notes:
• It is recommended that you download this file to your local PC and edit it using Excel or other table editing software. After that you can upload it to the management node and overwrite the original file.
• If you are facing a large cluster that is already been configured by xCAT, see “Edit nodes.csv from xCAT dumping data” on page 64
Room information
Below is an example of the room information table. Table 8. Room information table
room name location_description
Shanghai Solution Room Shanghai Zhangjiang
Enter one entry of information for the fields name and location_description.
Logic group information
Managers can use logic groups to divide nodes in the cluster into groups. The logic groups do not impact the use of computer resources or permissions configurations.
Table 9. Logic group information table
group name
login
You need to enter at least one logic group name in the name field.
Room row information
Room row refers to the rack order in the room. Enter the information about the rack row where the cluster node is located.
Below is an example of the room row information table. Table 10. Room row information table
row name index belonging_room
row1 1 Shanghai Solution Room
Enter at least one entry of row information in the fields below: • name: row name (must be unique in the same room)
• index: row order (must be a positive integer and be unique in the same room) • belonging_room: name of the room where the row belongs
Note: Add this information to the room information table.
Rack information
Below is an example of the rack information table. Table 11. Rack information table
rack name column belonging_row
rack1 1 row1
Enter at least one entry of rack information in the fields below: • name: rack name (must be unique in the same room)
• column: rack location column, also known as rack number (must be a positive integer and be unique in the same row)
• belonging_row: name of the row where the rack belongs
Note: Add this information to the row information table.
Chassis information
If there is a chassis in the cluster, enter the chassis information. Below is an example of the chassis information table.
Table 12. Chassis information table
chassis name belonging_rack location_u_in_rack machine_type
chassis1 rack1 7 7X20
The fields in this table are described as follows:
• name: chassis name (must be unique in the same room)
• belonging_rack: rack location name (must use the name configured in the rack information table) • location_u_in_rack: location of the chassis base in the rack (Unit: U). In a standard cabinet, the value
should be between 1 and 42. For example, a chassis base is located at 5U.
• machine_type: chassis type (see “Supported servers and chassis models” on page 3)
Node information
Enter the information about all nodes in the cluster into the node information table. Due to its width, the example node information table is displayed in two split parts.
Table 13. Node information table (Part 1)
node name nodetype immip hostip machine_
type
ipmi_user
head head 10.240.212.13 127.0.0.1 7X58 <BMC_
USERNAME> Table 14. Node information table (Part 2)
ipmi_pwd belonging_service_ node
belonging_rack belonging_ chassis
location_u groups
<BMC_PASSWORD> rack1 2 login
The fields are described as follows:
• name: node hostname (domain name not needed)
• nodetype: head means management node; login means login node; compute means compute node. • immip: IP address of the node’s BMC system
• hostip: IP address of the node on the host network
• machine_type: product name for the node (see “Supported servers and chassis models” on page 3) • ipmi_user: XCC (BMC) account for the node
• ipmi_pwd: XCC (BMC) password for the node
• belonging_service_node: large clusters require setting up a service node to which the node belongs. If there is no service node, leave the field blank.
• belonging_rack: name of the rack where the node is located (need to add the configured name to the rack information table). If the node belongs to a chassis, leave this field blank.
• belonging_chassis: name of the chassis where the node is located (need to add the configured name to the chassis information table). If the node belongs to a rack, leave this field blank.
• location_u: node location. If the node is located in the chassis, enter the slot in the chassis in which the node is located. If the node is located in a rack, enter the location of the node base in the rack (Unit: U). • groups: name of the node location logic group. One node can belong to multiple logic groups. Group
Configure generic resources
This module only executes when the scheduler is slurm. Do one of the following to configure generic resource:
• If no generic resources are configured by default, GPU resource is in cluster and accounting is required, run the following command:
cp /etc/lico/gres.csv.example /etc/lico/gres.csv
• If Slurm is configured with other generic resource, and accounting is required for these resources, run the following command:
vi /etc/lico/gres.csv
Note: To ensure the historical billing information accuracy, the generic resource removed from gres.csv
will still remain in the system database.
Gres information
Following is an example of the gres information table:
code display_name unit
gpu GPU card
Enter at least one entry of generic resource information in the fields below:
• code: Code should align with the generic resource type defined in your scheduler. If you have installed LiCO following this document, you can fill it according to your configuration of GresTypes in slurm.conf. • display_name: Name of generic resource displayed in the LiCO system. A meaningful display name is
recommended. • unit: Unit of resource.
List of cluster services
Note: In the Installation node column, M stands for “Management node”, L stands for “Login node”, and C stands for “Compute node”.
Table 15. List of cluster services
Software Component Service Default port Installation
node lico lico-core lico 18081/tcp M lico-ganglia-mond lico-ganglia-mond 8661/tcp,8662/tcp M lico-confluent-proxy 18081/tcp M lico-confluent- mond lico-confluent-mond M lico-vnc-proxy 18082/tcp,18083/tcp C lico-vnc-mond lico-vnc-mond C lico-sms-agent lico-sms-agent 18092/tcp L lico-wechat-agent lico-wechat-agent 18090/tcp L
Table 15. List of cluster services (continued)
Software Component Service Default port Installation
node lico-mail-agent lico-mail-agent 18091/tcp L lico-file-manager lico-file-manager 18085/tcp M lico-job-manager lico-job-manager 18086/tcp M lico dependencies ngnix ngnix 80/tcp,443/tcp L, M rabbitmq rabbitmq-server 5672/tcp M postgresql postgresql 5432/tcp M confluent confluent 4005/tcp,13001/tcp M influxdb influxdb 8086/tcp,8088/tcp M ldap slapd 389/tcp,636/tcp M nslcd M, C, L cluster nfs nfs 2049/tcp M ntp ntpd M slurm munge M, C slurmctld 6817/tcp M slurmd 6818/tcp C
ganglia gmond 8649/tcp,8649/udp M, C, L
dns named 53/udp M
Infrastructure configuration
The following part of the infrastructure configuration in the /etc/lico/lico.ini should be modified: # Cluster domain settings
domain = hpc.com
Database configuration
The following parts of the database configuration are modifiable: # PostgreSQL address
db_host = 127.0.0.1
# PostgreSQL port
db_port = 5432
# PostgreSQL database name
db_name = lico
# InfluxDB address
influx_host = 127.0.0.1
# InfluxDB port
influx_port = 8086
# InfluxDB database name
influx_database = lico
Login configuration
The following part of the login configuration should be modified: # Maximum number of login password error attempts
login_fail_max_chance = 3
Attention: If user login failures exceed login_fail_max_chance, the system will suspend this user for 45 minutes. Suspended users cannot log in to the system even with the valid authentication information. Administrators, however, can resume a suspended user with a command line or Web portal. See “Resume a user” on page 54, or refer to LiCO 5.5.0 Administrator Guide.
Storage configuration
To adhere to the shared directory configurations in this document, the following part of the storage configuration should be modified:
# Shared storage directory
Scheduler configuration
The following part of the scheduler configuration should be modified:
# The scheduler configuration currently supports Slurm, LSF, and Torque. Slurm is the default.
scheduler_software = slurm
Shared folders configuration
To make new users accessible to one or more custom shared directory, do the following:
Step 1. Create one or more shared folder, change the permission, and change Shared_Folder to the absolute path of the Shared directory.
mkdir -p <Shared_Folder>
chmod 777 <Shared_Folder>
Note: If you want to use the existing directories, remember to change the permission. Step 2. Open the file /etc/lico/