1
RESPIRATORY SELF CARE
A Manual For Patients And Their Families
© 1987, 2005 Deane Hillsman, MD
INTRODUCTION
I am Dr. Deane Hillsman, a physician who has practiced Internal Medicine and the specialty of Pulmonary Diseases. My particular interest is Pulmonary Rehabilitation, and breathing training to help people with COPD.
In the early 1960's during my residency training, quite by accident, I was privileged to see two British trained Physical Therapists work with a patient suffering from Emphysema, and achieve significant dyspnea (shortness of breath) relief. I was later told by many that "breathing exercises" were not of value. However, when you see such positive results it is difficult to ignore what you have seen. This lead to a lifelong interest in trying to understand, and improve the technology that is generally known as Chest Physical Therapy (or Chest Physiotherapy).
A major part of Chest Physiotherapy is "breathing pattern" training to more efficient patterns of how to breathe. To this end I invented a sophisticated computer program to define breathing patterns, and to see patients breathing and interacting with these breathing templates. The Breathing Trainer is a simple version of that original development, designed for home use.
It is quite astonishing, but true, the scientific pulmonary community has never defined, even to this day, in any comprehensive manner the most efficient way for a COPD / Emphysema patient to breathe. Because of this lack of scientific guidance as to how to program my breathing training system, I had to rely of the general guidelines provided by the Chest Physiotherapy community. And then I observed a few patients in my practice with very advanced Emphysema, but with only mild complaints of dyspnea. I collected their breathing patterns, and observed they correlated well with the Chest Physiotherapy techniques. Indeed, these few patients appeared to be a model of natural adaptation to the altered breathing mechanics of COPD. The lessons learned from these few very instructive patients have substantially guided my design of breathing patterns for others with COPD.
The first prototype of my breathing training invention was presented in 1978 before the California Thoracic Society. Since then there has been a great deal of experimental adjustment of the various parameters that go into characterizing a breathing pattern for individual patients, in trying to understand the optimal manner for the COPD patient to
breathe. I am impressed how small adjustments can make a significant difference in breathing comfort to these patients.
Chest Physiotherapy is substantially a creation of British Physical Therapists, beginning in the mid-1920's and quite mature by the mid-1930's. Also quite astonishing is the general lack of awareness of this technology in North America. Surveys of general Physical Therapy training programs have documented usually only minimal time devoted to the subject. In fact, today there are only about 100 credentialed Cardio-Pulmonary Physical Therapy specialists in the United States. If COPD patients seek Chest Physiotherapy training, they are not likely to find these services.
Please do not think that the techniques that I will be showing you are a substitute for proper instruction from a qualified therapist. However, if you do not have access to a qualified therapist, the modules of instruction I am providing may be of use to you. And if you are receiving instruction in "breathing exercises" or "diaphragmatic breathing" perhaps your therapist might be interested in a few of the techniques and tips in these instruction modules.
2 It is my hope this series will provide information to patients that will empower them, in a self-help manner, to use these lessons to gain dyspnea control and relief in their activities of daily living. And when you have mastered dyspnea control, that you will then be able to be even more active, and more comfortable.
Remember, I can't do dyspnea control for you. Only you can do dyspnea control for you.
THE FIRST STEP
At the end of the consultation with a new COPD / Emphysema patient I usually told them:
"I can't help you, but I can show you how to help yourself."
This was a rather harsh, but realistic technique to hopefully set the stage for the pulmonary rehabilitation program to follow. Patients are usually oriented to the belief that their doctor is simply going to provide them with some pills, and that by taking these medications their health problems will be resolved. True, taking medications in many disease conditions will resolve their problems. However, for the COPD / Emphysema patient nothing could be further from the truth. Effective therapy for these patients is critically dependent on patient understanding, cooperation, and various respiratory skills. It requires the patient to become a part of a team effort, with their doctor and therapists. I then told them the first crucial lesson to be learned is:
"Every breath of air first begins by getting the old stale air out, to make room for the fresh air."
This is a very counter-intuitive message to patients, as their natural focus is to get air IN, to relieve their dyspnea. To persuade patients as to the importance of properly exhaling their last breath, it is helpful to describe the residual last breath in derogatory terms such as "dead air" or "foul air" or "old bad air" and similar terms. The object is to change the patients focus from inspiration to expiration. Indeed, and as you will learn in greater detail in lessons to come, the expiration phase of breathing is the most crucial and difficult to learn.
And finally, I gave them some simple instructions for a much abbreviated breathing control program. Most of the time patients obtained at least some measure of dyspnea relief, and if they did it was an excellent beginning as I could then advise them this was a favorable sign for better things to come, when they had developed more advanced breathing control skills. The instructions are:
"Sit back in a comfortable easy chair (or if in bed, propped up on at least three pillows). Relax, you can't breathe properly if you are tense and anxious. Breathe gently, and rhythmically. Slow down your breathing. Concentrate on breathing OUT, and MAKE YOUR EXPIRATIONS LONGER. When you breathe in, take in a gentle larger breath, and try to place, and try to feel the air going down to your lowest lateral ribs, directly in line with the anterior portion of your arm pits."
Try it. It may not work the first few times, but keep trying. A friend or spouse coaching you with these instructions may help.
And if you do have some success with these primitive instructions this is indeed a sign of better things to come.
UNDERSTANDING BREATHING ATTACKS
There are several reasons why you might be haveing a "Breathing Attack" or "Acute Dyspnea Attack." Essentially this is an exacerbation of dyspnea on top of whatever background of chronic dyspnea you might have. The five commonest reasons for these dyspnea attacks are:
3
Exertion
Coughing up mucus
Bronchospasm ("Asthma") exacerbation
The Rescue Breathing Pattern
Dynamic Hyperinflation 1.) EXERTION
This is the commonest cause of a dyspnea attack. You have exerted yourself beyond the point where your lungs can provide the necessary increased ventilation to meet the increased metabolic needs (i.e. taking in more Oxygen and getting rid of more Carbon Dioxide) of increased activity. Essentially you must learn measured paceing of yourself at a slower and lower effort level of the particular activity you are doing. We will discuss this in detail in another
module.
2.) COUGHING UP MUCUS
Coughing is normal and necessary to clear mucus ("phlegm") from your lungs. However, should you cough up a larger blob of mucus from deep within the lung and it sticks in the larger airways, this can precipitate a more violent coughing and choking spell. This is particularly common in the hour or two after waking up, as mucus has been accumulating overnight, and tends to be thicker and stickier. We will discuss this in detail in another module, and show you the Huff Cough technique.
3.) BRONCHOSPASM ("ASTHMA") EXACERBATION
Bronchospasm refers to a spasm of contraction of the muscles in the bronchial tubes, thereby making them narrower and therefore more restrictive as to being able to move air freely. It is commonly called an "Asthma Attack," but technically Asthma is a separate entity from COPD, though indeed there is some overlap of the two conditions. It is better to use the term "bronchospasm" if you have COPD, because directions for treating true Asthma that you might hear of may not be appropriate for COPD. We will discuss this in detail in another module, and show you the
Metered Dose Inhaler (MDI) technique to inhale "Rescue Medications" into your lungs for fast relief. 4.) The RESCUE BREATHING PATTERN
This is a very common breathing pattern of rapid breathing when patients get upset or panicky, and is often seen if they develop further dyspnea. Rapid breathing is very detrimental to COPD breathing control. We will discuss this in detail in another module, and show you techniques to control this problem.
5.) DYNAMIC HYPERINFLATION
Dynamic Hyperinflation refers to overinflation of the lung, because the air you have inhaled does not have sufficient time to fully exhale, and therefore your lungs progressively inflates into a position where breathing becomes much more difficult. It is commonly seen with a bronchospasm attack, and with exertion. Dynamic Hyperinflation prevention and/or correction is the major reason why breathing control techniques work in COPD. It is therefore crucial you understand the concept. We will discuss this in detail in another module, and show you techniques to control this problem.
BREATHING CONTROL OVERVIEW
Breathing training with the Breathing Trainer for COPD must be put in perspective, and the following diagram briefly summarizes some of the major components.
The Breathing Trainer is only part of the equation in breathing control, though certainly a very important part. It can show you very effectively how to breathe, but no breathing is possible without an effective chest and diaphragm so-called "Bellows" mechanism to make the lungs actually move. All active lung movement is totally dependant on an
4 effective Bellows mechanism to enable breathing pattern training. In another module we will describe how the COPD chest becomes deformed into the so-called "Barrel Chest" deformity, and how to deal with that problem.
The Bellows mechanism is composed of the "Chest Wall" as noted in the center of the diagram. The Chest Wall in turn has two distinct components, the "Ribs" of the chest, and the "Diaphragm," which is a thin curved muscle between the chest and the abdomen, attached to the lower ribs. The diaphragm is the major driving force of breathing, and in COPD it's function is typically severely compromised. It is critically important that diaphragm function be restored, in order that you can then effectively use the Breathing Trainer to learn more efficient breathing patterns. The breathing pattern parameters are defined in the center of the diagram, by adjusting:
Tidal Volume (i.e. the breath volume of air)
Respiratory Rate (i.e. the number of breaths per minute)
Inspiration : Expiration Time Ratio (i.e. the relative time of the Inspiration and Expiration components)
End-Inspiration and End-Expiration Pauses (i.e. slight breath hold times at the end of inspiration and expiration)
Inspiration and Expiration Waveforms (i.e. the shape of the inspiration and expiration breathing pattern. NOTE: The complexity of waveform considerations has been omitted from the Breathing Trainer.)
As noted in the small diagram on the right, it is critical the breathing pattern achieve a minimal adequate degree of "Alveolar Ventilation," i.e. the ventilation breath that actually gets down to lung alveoli (air sacks) where gas exchange takes place.
However, as noted in the small diagram on the left, it is also critical that the breathing pattern produce the minimal degree of "Work of Breathing" i.e. a measure of the effort and energy to breathe, as dyspnea is most closely related to the Work of Breathing. It should be apparent that there are conflicting needs involved in developing an optimal breathing pattern, and that balancing these different breathing parameters is a delicate and often not an easy task. Considerable experimental adjustment may be needed to achieve the optimal compromise. I am impressed as to how small adjustments may make substantial differences in patient comfort. The Breathing Trainer is designed to permit very subtle adjustments to permit you to seek out the breathing pattern that is best for you. Another module will go into detail as to how to adjust your Breathing Trainer to make a "Breathing Prescription" individualized for your particular needs.
Be aware there are many therapists who strongly advocate for one or another type of breathing pattern. I would suggest that frequently a strong advocacy position does not take into account the fact that most every breathing
5 parameter adjustment has both positive benefits, and also undesirable negative factors. The trick is to find the optimal balance between these conflicting parameters.
Please do not skip directly to the module on Breathing Trainer adjustment. It is suggested you proceed to the Barrel Chest module, to better understand the underlying problems that must be corrected. The more you know, the better the results you will achieve.
THE BARREL CHEST DEFORMITY
COPD / Emphysema classically produces the "Barrel Chest Deformity" as noted in this diagram from Dr. Frank Netter.
Note the chest is generally overinflated. This is because the lungs are overinflated, and pushing the chest wall out.
Also note the humped back deformity, called Kyphosis, pushing the upper chest and neck forward. Poor general posture is a significant result, and it impacts unfavorably on your ability to breathe.
When pushed out in this manner the normal outward rib movement becomes limited, and with limited movement comes stiffness and further movement limitation. As a result the chest wall becomes "frozen," and the entire chest now is less capable of expanding and therefore permitting larger breaths. Also, the "frozen" state results in the chest moving as a single unit, so-called "unit movement," instead of the two distinct chest movements noted below.
The result is a shift to inefficient abnormal upper chest breathing, and a decrease in the normally dominant outward lower chest breathing. The diaphragm is attached to the lower ribs, and normally has a coordinated and synergistic movement with these ribs. Without this coordinated movement, diaphragm function is significantly impaired. It is therefore very important to restore proper outward lower chest movement in order to allow better diaphragm function.
Remember, the diaphragm is the major muscular organ that drives breathing, and therefore restoring that function is critically important.
To give you understanding of the two distinct chest movement, consider the anatomy of the ribs, as taken from Grant's Atlas of Anatomy.
Note the upper ribs are short and relatively straight. The muscles that move these ribs are centrally placed, and therefore pull the chest directly upward, in the so-called "Pump Handle" movement. With the "frozen" chest, this is what pulls the chest upward with the so-called "unit movement." The lower chest movement is more complex. Other than for the straight "short ribs" 12 and 11, the lower ribs are sharply curved. Between these ribs are the "External Intercostal Muscles" which that slant forward and downward to the ribs below. When these muscles contract, the ribs are
6 pulled in an upward and lateral direction, which expands the lower chest. This is the so-called "Bucket
Handle" movement.
This outward and lateral Bucket Handle movement is what stretches the attached diaphragm muscle into a more favorable position of movement, and what restores some of the important synergistic movement between ribs and diaphragm.
This diagram taken from Cherniack and Cherniack's text "Respiration in Health and Disease" brilliantly illustrates the complex rib movements of the "Pump Handle" and Bucket Handle" movements.
As the large majority of lung volume is in the lower chest, and considering this illustration of the Bucket Handle movement, can there be any doubt as to the importance of lower / lateral / outward chest movement in restoring diaphragm function?
We will now move on to the topic of chest mobilization, chest movement training and coordination, and chest strengthening. And then the all important topic of Dynamic Hyperinflation. We will then be in a better position to learn about effective breathing pattern training.
And in other modules we will elaborate on general posture improvement, including neck positioning, as well as some specific posture tricks that will assist your breathing.
CHEST PHYSICAL THERAPY
Mobilizing, Coordinating and Strengthening the Chest
Your chest must first be mobilized because, as you have learned, it is out of correct positioning and stiffened. Next it must have corrected and coordinated movement, because it is not moving properly. And finally the chest muscles must be strengthened, because the immobilized chest has permitted weakness to develop in your breathing muscles . This is a complex task, and ideally would require a skilled professional Physical Therapist to use "hands on"
techniques to augment chest movements and teach corrective and coordinated movements, and enhance joint
flexibility with local massage and supplemental heat or diathermy. However, as previously indicated, these services are difficult to find in North America, as indeed there are presently only about 100 credentialed Cardio-Pulmonary Physical Therapists in the United States. We will provide you with self-help instructions that will cover the major points of this technology, but regardless of these instructions, you are encouraged to use them in conjunction with your physician and other health care providers.
However, there is another option you might consider, and that is Yoga. Dr. Vijai Sharma, a practicing clinical psychologist and credentialed Yoga instructor with a particular interest in COPD, has developed a training DVD
7 video designed specifically for home use by people with COPD. Dr. Sharma is currently offering two DVDs and instruction manuals:
"Stretching Breathing Exercises adapted for people with severe COPD" and
"Stretching Breathing for COPD For all levels of fitness" for people who are weaker and frailer.
The various Yoga spine and neck exercises, coupled with Yoga breathing exercises, seem well suited to substituting for traditional Chest Physical Therapy. Dr. Sharma has a web site with many helpful COPD instructions, and the instruction videos may be purchased at Dr. Sharma's web site
Physical Therapy is much involved with so-called "trick movements," which basically is the use of different muscular groups to assist the function of impaired neuro-muscular groups. There are "good trick movements" which are
productive, and "bad trick movements" which are not productive, and any time one is doing neuro-muscular training it is important to watch out for bad trick movements, and to correct them. In diaphragmatic breathing training there is one common bad trick movement called the "Belly Puffing Artifact" that must not be allowed to happen.
The BELLY PUFFING ARTIFACT
Normally when one inhales the diaphragm descends toward the abdomen, and as a result the abdomen rises. However, it is important the abdomen rise naturally because of proper diaphragm movement. Belly Puffing, which is not due to diaphragm movement, can mimic normal abdominal protrusion due to correct diaphragm movement. And
unfortunately, Belly Puffing can be easily learned. Try this exercise in Belly Puffing on yourself.
While standing, breathe in deeply, and at the same time suck your abdomen IN. Then exhale fully, and while doing so, puff your abdomen OUT. Note this is 180 degrees out of phase with the normal abdominal movement due to diaphragm action. Now, lying flat on your back, do the same Belly Puffing maneuver, and note how easy it is to do. Belly Puffing is not simply a shifting of thoracic-abdominal contents by gravity.
There are two commonly practiced diaphragmatic breathing techniques that should not be done, because they are in fact teaching Belly Puffing, not true diaphragmatic breathing training. Note one hand placed on the upper chest, and the other on the abdomen, just below the ribs. Typically this exercise is done from the sitting or lying position.
The patient is instructed to not move the upper chest while breathing in (i.e. to correct the abnormal "Pump Handle" movement, and at the same time to have the abdomen come out with inhalation, to teach diaphragm movement.
Note however, these instructions are in fact teaching Belly Puffing, not true diaphragm breathing.
The proper instruction is to have the patient direct their inspiration breathing to the lowest rib margin, directly beneath the anterior margin of the arm pit. This will make the chest move outwards and upwards because of the "Bucket Handle" movement. There should be no abdominal movement for about one third to one half of inspiration, and at that point the abdomen will then begin to protrude outwards, but this time as a result of true diaphragm movement. All abdominal movement on inspiration should flow naturally from correct "Bucket Handle" chest movement.
8 Note in the supine position the weight on the upper abdomen will rise with inspiration. By focusing on making the weight rise, again, this is obvious Belly Puffing training.
However, this technique can be a useful one, provided the therapist uses two flat sand-bag type weights, each positioned along the lower-lateral rib margin, with no more than half the weight lying on the abdomen. If the patient watches the weights move in this position, they will now have a visual biofeedback prompt to perform the Bucket Handle chest movement.
The correct hand position for diaphragm breathing training is as noted.
Note the hands on the lower rib margins, directly below the anterior portion of the arm pits. The fingers, preferably only the distal half of the fingers, are over the lowest ribs and on the abdomen. The inspiration breath should be gently directed towards the palms of the hands, and you should try to feel the air moving into this region. Learn to recognize this feeling of correct breathing. As the ribs swing outward and upwards, with a little practice about half way through inspiration you should be able to feel the diaphragm gently rising against your finger tips. And about one third to half way through inspiration the abdomen should gently rise, but this time because of true diaphragm movement. The hand positioning is providing the signal to train you in correct diaphragm breathing. With only a month or two of diligent practice you should be able to do this type of breathing naturally, and without using the hand prompting signal.
Note that I have made no mention of inhibiting the abnormal upper-anterior "Pump Handle" chest movement causing the upward "unit movement" of the chest. This is seldom needed. If indeed you correctly focus on the correct "Bucket Handle" movement this upper chest movement will gradually disappear. Occasionally however, some directed
voluntary suppression of this upper chest movement is needed.
However, you should teach yourself to recognize this abnormal upper chest movement, and to voluntary suppress this upper chest movement. You will need this skill to help correct the Rescue Breathing Pattern. More on this subject in a later module.
BREATHING BELT EXERCISES
The Breathing Belt is a simple device used by Chest Physical
Therapists to apply directed pressure to the ribs for chest mobilization and breathing enhancement. And as you will see, it has other usefull purposes. But first you must know how to construct a Breathing Belt.
9 Take an old sheet and cut a piece 16 inches wide down the entire length. The eventual length will be approximately from floor to shoulder height, but you can correct that length later. Place the two edges together lengthwise, and sew them along the edge, to make an 8 inch wide piece. Then fold the edges together again, and sew them along the edge to make a 4 inch wide belt. You can make the belt a little fancier by inverting the entire piece after sewing the edges. To keep it from getting distorted during use, run two or three evenly spaced stitches down the middle. And a zigzag or wavy crosswise stitch will further prevent the material from distortion during use.
The Safety Belt
The Breathing Belt may also be used as a Safety Belt. This is an old technique used by Physical Therapists to help ambulate frail patients safely.
Tie the belt snugly around the lower waist of the patient, just above the brim of the pelvic bones, and secure it with a knot (no safety pins or insecure clasps). Then, the person assisting the patient should firmly grasp the belt with one hand in the mid portion of the back. The other hand may be used to otherwise assist the patient.
The Safety Belt may then be used to assist the patient in getting out of bed, getting up from a chair, or walking. Always maintain the belt hand, as this is the controlling hand should the patient lose their balance, or look in danger of falling due to weakness.
Most of the falling accidents happen because a frail patient loses their balance. However, with the controlling hand on the Safety Belt even a small helper can easily control most patient acts of incoordination and stumbling.
And should the patient actually fall, the controlling hand on the Breathing Belt can ease the patient to the floor without serious injury.
Positioning the Breathing Belt
The Breathing Belt is best used in the sitting position, though it could be used both standing and lying down.
Place the belt behind you, at the level of the lowest ribs. The lowest portion of the belt should be positioned about an inch below the anterior lowest rib, directly below the collar-bone (or Clavicle). It is important the belt not be lower than this, or you will only be compressing the abdomen, and therefore deriving no rib mobility benefit.
10 Now, take your right hand and grasp the left belt, just below the anterior portion of the arm pit. And cross your left hand over to the right belt at this same position below the arm pit. Many patients find it convenient to grasp the belt as though one is holding the reins of a horse.
You are now ready to do chest mobilization
. Relax. As with all breathing techniques it is important that you do them in a relaxed manner.Take in a slow, deep and gentle breath, and then totally relax your chest and let the air gently fall out of your chest.
Then, about half way through breathing out, apply chest pressure by pulling your hands towards each other, directly across your chest. As you are pulling, increase the pressure gradually and firmly. Do not pull suddenly or forcefully, as this type of pressure could crack or even fracture a frail rib. Try to get the sensation as though you are wringing water out of a wet bath towel. Make your exhalation time prolonged, at least two to three times your normal time of breathing out.
Then, simultaneously, release the belt pressure and breathe in gently and fully. Direct this inspiration breath down to the bottom of your lungs, and laterally, directly below the anterior portion of your arm pits. This is critically important, as this action is training your rib muscles to do the Bucket Handle movement. Try to feel the air moving into these lower regions of your lungs.
If you have done this correctly, release of the belt pressure should cause your compressed ribs to spring out, and you should feel a satisfying rush of air into your lungs. Repeat this compression cycle, and try to get a rhythm to your chest compressions.
Patients frequently get confused as to when to apply the belt pressure, as indeed the combination of breathing phase and belt pressure is somewhat counterintuitive. If you get these movements mixed-up, the application of the breathing belt pressure will work against your breathing, and your breathing then will immediately get worse.
11 Remember:
Pull and Squeeze to breathe out; Relax and let go to breathe in.
Done with skill, and without excessive compression force, this can be a useful trick to relieve an acute attack of dyspnea.
For rib mobilization exercises, three to five minutes, done twice or at most three times a day, should be sufficient. Done more than this the exercises can become unpleasant and boring, and you may lose interest. But during these brief practice times you should concentrate on technique perfection, and particularly where to place your inspired breath of air down in the lower-lateral lungs.
A warning. Stiffened ribs that are being mobilized often complain by producing a general aching type of pain, and this discomfort usually takes about five to six weeks to slowly resolve. Local low-level gentle heat and simple pain relievers such as Aspirin may help. However, a sharp localized pain may indicate a cracked or broken rib, and you should stop further belt exercises until you have been checked by your doctor. Be patient. You will find that this discomfort is well worth the trouble if you re-gain the capacity to take in deeper breaths, and being able to take in deeper breaths easily is what this is all about.
CHEST WALL COORDINATION
Muscular movement is seldom as a result of a single muscle moving in one direction. Muscles act together in groups, that support the activity of one another in a coordinated and synergistic manner. Much of that coordination and synergism of breathing has been lost in the development of the "Barrel Chest" deformity of COPD. As noted
previously, much of the abnormal COPD chest movement is the stiff upward "Unit Movement" involving the "Pump Handle" action. And because of the overinflated positioning and chest stiffening of the lower chest, the crucial "Bucket Handle" movement is now minimal, which results in a failure to provide synergistic support for the all important movement of the diaphragm. Remember, the diaphragm is the major muscle of breathing, and restoring its function as much as possible is the major objective of chest physiotherapy. This is why this type of therapy is
generaly known as "Diaphragm Breathing Exercises" or "Diaphragmatic Breathing Training" or just Diaphragmatic Breathing."
To provide the crucial synergistic support from the lower rib cage structures for optimal diaphragm movement the "Bucket Handle" movement must be restored. To achieve this, the focus of your inspiratory breath must be on the lowest-lateral ribs, at a point directly below the anterior portion of your arm pits. Placing your hands, or having an assistant place their hands in the correct position (as shown in the diagrams in the last module) is helpful in getting started. You should try to feel these lower ribs moving outward and upward, and also try to feel air moving into this region. After some initial practice you should be able to perform this chest movement naturally, and without needing to have hand placement to remind you. And as your ribs become more mobile with Belt Exercises you will find this easier to do and with improved rib excursions.
And what about teaching specific diaphragm movement? Most of the time this is not necessary. Remember, the diaphragm and the rib cage muscles performing the Bucket Handle movement act as a synergistic muscle group. By activating the Bucket Handle movement, the diaphragm movement will naturally follow. Note the synergistic progressive flow of group movement. First is the rib cage Bucket Handle movement, and then soon after the upper abdomen begins to rise due to diaphragm movement into the abdomen. At this juncture, do not attempt to puff your upper belly out to aid inspiration. Continue to focus on the Bucket Handle movement, and the abdomen will rise on it's own with further diaphragm movement.
12
UPPER CHEST MOVEMENT
And what about reducing the abnormal upper chest movement? Almost always that movement will gradually go away if you simply maintain focus on the lower rib, Bucket Handle movement. I do not advocate, and in fact discourage the popular "Two Hand Technique," with one hand on the upper chest (to encourage minimal movement) and the other hand on the central upper abdomen (to encourage maximal diaphragm movement) as this technique unfortunately tends to teach the abnormal trick movement of Belly Puffing.
However, with very large breaths you will note the upper chest now moving upward. This is normal, as you are now activating the so-called "Accessory Breathing Muscles" driving the "Pump Handle" movement. This is a normal emergency breathing movement to provide maximal breathing. It can be easily seen as the "heaving" upper chest of an athlete who has just finished an exhausting race. Think of this movement as an emergency breathing reserve, to be encouraged. However, it is important to maintain focus on the lower Bucket Handle movement as is the dominant movement. Let the upper chest movement flow from the lower Bucket Handle movement.
Note the synergist flow of muscle group activity. First the lower chest Bucket Handle movement, then the abdomen rises with diaphragm activity. Then, with larger breaths there is more Bucket Handle movement and more diaphragm activity and a further rise of the abdomen, and the upper chest now starts to rise with Pump Handle movement.
UPPER CHEST MOVEMENT MOVEMENT WITH ANXIETY
The "Pump Handle" upper chest movement is basically a defensive, emergency type of breathing. This is certainly how it became ingrained as part of the abnormal "Unit Movement" of the "Barrel Chest" deformity.
However, it is very interesting to note that anxiety will frequently trigger this type of upper chest movement, and it does so both in people with with COPD as well as those with perfectly normal lungs. Presumably this is because tension and anxiety is part of the overall defensive, emergency reaction.
In distressed patients with COPD having an acute dyspnea attack it may be impossible to tell if upper chest movement is at least partially due to this anxiety based type of breathing. Most likely most such upper chest movement in this situation is a part of a desirable muscular recruitment to assist breathing (i.e. due to deranged pulmonary mechanics resulting from Dynamic Hyperinflation). To resolve this problem it is best to focus on the lower chest "Bucket Handle" movement, and if in doubt about residual upper chest movement, try to voluntarily limit same.
Some people will immediately display upper chest breathing when starting the Rescue Breathing Pattern. These people should immediately try to limit upper chest breathing while calming themselves.
In people with normal lungs suffering an anxiety attack and an overbreathing condition known as the
"Hyperventilation Syndrome" very frequently exhibit a heaving upper chest manner of breathing. The link between acute anxiety and this type of breathing seems so compelling that many therapists make elimination of upper chest movement a priority in reducing anxiety and establishing breathing control.
EXPIRATION CONTROL
And what about expiration? Expiration is mainly about timing of the length of breathing out. Generally speaking, expiration should be entirely relaxed and passive, to permit rest of the respiratory muscles. However, if you do need to provide some muscular force to exhale, it is best done by tightening the upper abdominal muscles, and from there there will flow some activity to the lower ribs. Remember, if you do forcefully exhale, do it as gently as possible, in order to minimize any Dynamic Bronchial Compression.
13
RESPIRATORY MUSCLE STRENGTHENING
The rib muscles of breathing, having been encased in the stiffened Barrel Chest deformity, have undergone at least some measure of atrophy and weakness. And unfortunately, when liberated from the stiff Barrel Chest they initially may be so weak they tire very easily. Most patients will gradually improve this muscle strength with increased activity made possible by breathing control, and progress well with their rehabilitation process. However,
occasionally some initial post chest mobilization muscular strengthening is needed to speed the rehabilitation process. If so, a modification of the Breathing Belt technique can be used for this purpose.
To strengthen the rib muscles, perform the Belt Exercise as noted above. However, instead of suddenly releasing the belt and allowing the chest wall to spring out, gradually release the belt tension as you inhale. This requires a little practice to do properly, as maintaining a steady pressure as the chest moves out on inspiration is a subtle skill. Initially the pressure applied should be gentle, and as your strength improves, increase the inspiration belt tension until you are using a firm tension and working fairly hard to breathe in. These strengthening exercises should be done only two or three times a day, and never more than five minutes at a time. The amount of fatigue you feel at the end of this exercise will be your indicator as to whether or not you should increase of decrease the amount of belt tension. Another useful option are the commercial "Inspiratory Muscle Training (IMT)" devices. These simple devices are quite economical. Your doctor will need to prescribe one for you, and if so, be sure to get a so-called "threshold" training device. The inspiration pressure needs to be set, and start with about 10 to 15 cm water pressure, and
gradually work up to between 30 and preferably 40 cm water pressure. Some advocate using these devices for 15, 20 or even 30 minutes 3 or 4 times a day. I believe these are excessively prolonged, unpleasant, and unnecessary exercise sessions. Again, as with belt exercises I would suggest that your exercise sessions with these IMT devices be limited to five minutes, and only two or at most three times a day.
The RESPIRATORY SQUEEZE
The Respiratory Squeeze is basically an exaggerated Breathing Belt exercise. The object is to squeeze as much air out of your lungs as possible, in preparation for a better inspiration breath. The method can be used for rapid lung
decompression of an overinflated lung causing an acute attack of dyspnea. It may also be used to advantage in clearing retained bronchial mucus (phlegm) as part of the "Huff Cough" technique. More on this aspect in another module.
The Respiratory Squeeze is performed in the sitting position, with the knees touching. The Breathing Belt technique is then done as described above, but with a longer time spent on expiration, at least four or five or more times longer than your usual exhalation time.
However, instead of maintaining an upright posture, lean your body forward on expiration as you are applying belt pressure. As you near the end of expiration your hands should now be together in the center of your upper abdomen, and by leaning against your legs, your hands will assist in pushing your diaphragm upward for enhanced lung emptying. Then, on inspiration release the belt pressure and return your body to the upright position.
For correction of even severe lung overinflation, properly done, only one or two Respiratory Squeezes should be needed. For clearing stubborn sticky retained phlegm, repeating a Respiratory Squeeze before each Huff Cough maneuver can be very helpful.
Your chest should now be mechanically ready to learn how to breathe. We will now move on to bad breathing patterns, and why and how to correct them.
14
BREATHING CONTROL
Breathing control is regulated by many sensors in the body that feed information into the Respiratory Center in the brain, which in turn sends out feedback regulatory signals to the diaphragm and rib muscles to tell them how to move to make a Breathing Pattern in order to breathe in and out. The system is very complex, with mechanical sensors in the lung and chest wall that sense pressure and tissue stretch, and the position of the lung. There are also chemical sensors in the central blood vessels that sense Oxygen and Carbon Dioxide levels in the blood. The Respiratory Center must make a constant delicate balance of breathing to be certain enough Oxygen in breathed into the body, and that the waste Carbon Dioxide of body metabolism is removed. This system is very dynamically active and constantly changing to adapt to changing metabolic needs, for example when you go from a resting to exercising condition. However, the respiratory regulatory system is unique among all the major body systems in the ability of the individual to voluntarily control their breathing patterns. Higher centers in the brain can easily overide the normal automatic regulatory system of the Respiratory Center. Think of this as a manual override button, which allows you to take larger or smaller breaths, or vary your breathing rate and pattern in subtle ways. This ability to voluntarily control your breathing, and to train your breathing into a new pattern, is the marvelous tool that you can use to correct your COPD Breathing Pattern and minimize your breathing distress.
The COPD / Emphysema Breathing Pattern
The person with COPD typically breathes at a relatively rapid rate and with a small breath volume. This is due to abnormal mechanical factors within your lungs and chest wall. The lungs are stretched-out near their elastic limit and therefore more effort has to be expended to make the lungs move. The chest wall and chest muscles of breathing are also stretched-out near their elastic limit, and furthermore are involved in the stiffening problem related to the Barrel Chest deformity, thus making the chest wall even harder to move. The result is a small breath volume (the Tidal Volume), because taking in a larger breath is just too hard to do, and would require too much so-called Work of Breathing. Shortness of breath (Dyspnea) is related to a number of factors, but is most closely related to the Work of Breathing. And because of these smaller breaths, in order to provide enough air, the respiratory rate of breathing must speed up, hence the COPD breathing pattern of rapid and shallow breathing.
Unfortunately however, using smaller breaths to breathe more easily has a serious downside. Not all of the air you breathe in actually does you any good. Only the air that reaches the alveolar air sacks can participate in the Gas Exchange of Oxygen and Carbon Dioxide. This air, at the beginning of the breath, that penetrates down deepest to the alveoli is called the Alveolar Ventilation. The air at the end of a breath in does not penetrate the lungs deep enough to reach the alveoli and participate in Gas Exchange, and appropriately is called Dead Space Ventilation. The smaller your breath, the smaller will be your relative Alveolar Ventilation that is actually doing you some good. Yes indeed, smaller breaths are easier to do, but they carry a serious breathing penalty of having relatively more of your breath as Dead Space Ventilation. Being able to take a larger breath with relative ease is crucial to optimizing your breathing. You now know why we have spent so much time discussing the chest wall, and the mobilzation and strengthening of the chest wall, in order that you may take in a larger breath of air, and doing it more efficiently and easily.
This also introduces you to the concept of balancing, and trading-off various parts of your breathing, in order to best optimize your breathing pattern within the constraints imposed by the disordered mechanics of COPD and
Emphysema. Later you will learn more about other apparent contradictions that may be used in a balanced manner to optimize your breathing, and how the Breathing Trainer may help you in fine tuning these balancing factors to advantage.
But first you must understand the concept of lung overinflation, and in particular the all-important concept of
15
DYNAMIC HYPERINFLATION
Lung Overinflation or Hyperinflation is a critically important component of both COPD and Emphysema. In fact, recent evidence suggests that correction of Hyperinflation is apparently more important in the relief of dyspnea than is the correction of airway obstruction with broncodilator therapy. Said another way, if you use so-called Rescue Drugs
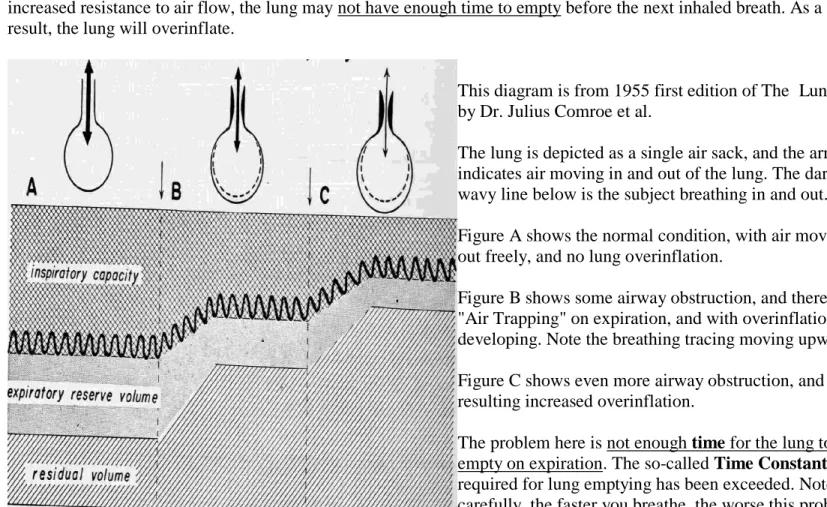
such as Metered Dose Inhalers to relieve airway bronchospasm, the majority of relief felt comes not come from bronchospasm relief, but rather as a result of relieved bronchospasm now permitting correction of hyperinflation. There are two general types of overinflation. The first is so-called "Anatomic Hyperinflation" seen in Emphysema, where there is actual destruction of alveolar lung tissue to create cystic overdistended spaces. The second general type of overinflation is so-called "Physiologic Hyperinflation" seen in both COPD and Emphysema. The underlying problem here is the airway obstruction common to both conditions. With increased airway obstruction causing increased resistance to air flow, the lung may not have enough time to empty before the next inhaled breath. As a result, the lung will overinflate.
This diagram is from 1955 first edition of The Lung, by Dr. Julius Comroe et al.
The lung is depicted as a single air sack, and the arrow indicates air moving in and out of the lung. The dark wavy line below is the subject breathing in and out. Figure A shows the normal condition, with air moving out freely, and no lung overinflation.
Figure B shows some airway obstruction, and therefore "Air Trapping" on expiration, and with overinflation developing. Note the breathing tracing moving upward. Figure C shows even more airway obstruction, and the resulting increased overinflation.
The problem here is not enough time for the lung to empty on expiration. The so-called Time Constant
required for lung emptying has been exceeded. Note carefully, the faster you breathe, the worse this problem will become.
The older term "Physiologic Hyperinflation" is now evolving into the name "Dynamic Hyperinflation," and more recently has generally been used as a phenomenon related to patient exertion. However, this is not entirely correct, as it is now clear that this type of hyperinflation is commonly present while patients are at rest. Dynamic Hyperinflation therefore is of two general types, "Resting Dynamic Hyperinflation" and "Active Dynamic Hyperinflation."
ACTIVE DYNAMIC HYPERINFLATION
Active Dynamic Hyperinflation in COPD occurs most commonly: With Exertion
After a Coughing spell
16
The Rescue Breathing Pattern
The Rescue Breathing Pattern ("RBP") may be briefly characterized as "....trying to pump air in and out of your lungs as fast and as hard as you can...." It is a basic cognitive reflex (i.e. controlled by a persons thoughts), generated by a persons conscious will to try and breathe in a manner to relieve acute dyspnea distress. It is not a part of the complex traditional mechanical feedback reflexes from the lung, or the blood chemical (Oxygen and Carbon Dioxide) feedback mechanisms that automatically control breathing via the Respiratory Center in the brain. This cognitive reaction to dyspnea distress is seen commonly, in both normal people and those with disease problems.
If you have an acute breathing attack, the more you struggle to catch your breath by breathing rapidly, the worse your problem will become. This is a so-called "Vicious Circle" phenomenon, and it is physiologic disaster because it makes Dynamic Hyperinflation worse. It is also a sad paradoxical reality that your natural instincts to help yourself should in fact be turned against you, to make your breathing attack worse.
It is very important you clearly understand, if you have a mild episode of increased dyspnea, and then become anxious and upset, you may trigger the Rescue Breathing Pattern and rapidly make your dyspnea attack much worse. This is because the increased breathing rate of the RBP produces Dynamic Hyperinflation. Remaining calm and not allowing yourself to become upset by your dyspnea is a critically important component of COPD breathing control to prevent or minimize acute dyspnea events.
Typically in this situation, patients use their Rescue Medications, usually a Metered Dose Inhaler, to relieve acute dyspnea exacerbations. This is desirable treatment, but rescue drugs are only the beginning of the process to obtain full dyspnea relief. This is because, even after complete, 100% maximal bronchospasm correction achieved by medications, the patient is still left with their original underlying problem of severe airway obstructive disease. It should therefore be obvious that it is imperative that you learn breathing control to prevent and/or correct this problem of Dynamic Hyperinflation.
In another module we will show you how to control Dynamic Hyperinflation in these various circumstances.
RESTING DYNAMIC HYPERINFLATION
A recent bronchodilator study involving some 20,000 patients revealed that 48% of these patients had Resting Dynamic Hyperinflation. Clearly, Resting Dynamic Hyperinflation is a major problem in the COPD population. What is not clear is, how many patients among those 48% had their Resting Dynamic Hyperinflation fully resolved by their bronchodilator therapy. Until this question is answered, it would seem prudent that all patients with symptomatic COPD have breathing control skills to determine whether or not these skills can enhance their overall resting
breathing comfort.
This study makes it very clear, that almost half of the COPD population, even while stable and at rest, are critically vulnerable to any increase in their breathing rate, and that any increase in their breathing rate may precipitate them into acute Active Dynamic Hyperinflation.
Well, since the emptying of the lung on expiration is generally by passive elastic recoil of the chest wall and lung, why not solve the problem of hyperinflation by simply exerting voluntary muscular force to expiration and force the air out? Sadly, the answer to that question varies somewhere between "Yes" and "No." To understand this problem we will explain the subtle and important problem of "Dynamic Bronchial Compression" in the next module.
As to Dynamic Hyperinflation therapy, always remember, it is mainly a TIME problem, that is, manipulating your breathing pattern to generate enough time to allow emptying of the lung on exhalation. We will show you later how to
17 adjust the breathing time constraints with the Breathing Trainer to balance some conflicting constraints and give you enough time to breathe out in an optimal manner.
DYNAMIC BRONCHIAL COMPRESSION
The lung has no muscles (other than the muscles surrounding the larger bronchial airways) to cause it to expand and contract to pump air in and out. The lung in fact is a totally passive elastic structure that for inspiration depends on the chest wall and diaphragm to literally suck it outwards, and therefore expand the lung to pull air into the alveoli. This is essentially what we have been discussing under diaphragmatic breathing.
The act of expiration under normal conditions simply involves the chest wall and diaphragm to relax, and the elastic forces within the the lung and chest wall that have been stretched out by inspiration now retract to their resting state, and the lung therefore collapses and pushes the stale air out.
There are muscles within the chest wall that can actively cause the rib cage to contract, and push air out. And if the muscles of the abdominal wall contract they cause the diaphragm to be pushed up into the chest cavity, and press on the lungs and thereby further cause active expiration. Normally however these expiratory muscles are not used, except during conditions of exercise where they are used to literally pump air in and out of the lungs.
So, if Dynamic Hyperinflation correction needs to get air out of the chest, why not use these expiratory muscles to easily get that stale air out? The answer is, they can assist in expiration, but in COPD and Emphysema there is a very special problem with so-called Dynamic Bronchial Compression.
This diagram simplifies the lung down to one alveolus and one bronchial tube within the chest wall, and the bronchial tube leading to the outside air.
When the lung exhales, the chest wall retracts and moves in and therefore applies pressure and everything within the chest gets smaller. The pressure applied to the alveoli is desirable, because that is what pushes the stale air out.
However, this same pressure applied to the bronchi also makes them smaller, and that is not desirable, because the bronchial tubes also become narrower, and therefore impose a greater degree of airway obstruction for the stale air trying to get out. In the normal lung this is not a problem, but in COPD, and particularly with Emphysema, the bronchial walls are diseased and narrowed, and they are less well outward supported by diseased and deficient elastic structures. These bronchial tubes therefore are much more succeptable to collapse, and collapse prematurely at particularly weak areas when the so-called Critical Closing Pressure is exceeded.
If you apply muscular pressure on expiration the internal chest pressure will be higher than normal, and the problem of Dynamic Bronchial Compression will be exacerbated, and the problem of getting stale air out of your chest made worse. And furthermore, forced exhalation increases the expiratory Work of Breathing and can be very exhausting. Once again you can see the problem of contradictory actions within the physiology of breathing, and the need to balance these conflicting forces.
18 However, as a "Rescue technique" to help correct Dynamic Hyperinflation, gently forced expiration, applied in a very controlled manner at approximately two thirds to three quarters of the way through expiration, can be a very helpful technique. The controlled force should be likened to gently wringing water out of a wet bath towel. With the
Breathing Trainer it is easy to see where to apply this controlled force.
So far you have spent a lot of time learning about the underlying complexities of breathing training. If you understand why various breathing recommendations are made, you will better be able to utilize, and work with these
recommendations, and to fine tune them yourself for increased comfort. The more you know, the better you will do in breathing training.
We will now show you some COPD breathing patterns, and what to do about them.
THE COPD BREATHING PATTERN
This series of pictures are patient breathing training records using the advanced Biofeedback Incentive System®; ("BIS"®) designed for research. The Breathing Trainer v1.0 is a simplified version of this system, designed for home use.
The pictures are "screen dumps" taken directly from the computer display. In the upper picture, the patient's computer screen is turned off, in order to obtain their native breathing pattern, and to follow these breathing patterns to see if the therapeutic breathing pattern was in fact being learned properly. The lower picture shows a patient training
session. Note there are two traces. One is a "Breathing Prescription," a visual template of how to breathe in and out, for the patient to follow. The other is the patient's real time breathing signal. The object of the training session was to have the patient superimpose their breathing signal on top of the prompting template. If the patient signal was above or below the Breathing Prescription, they then had a visual biofeedback signal to instruct them how to breathe correctly. This system permitted the operator to literally see the patient breathe, in both a quantitative and qualitative manner, in comparison to the prescription template. This ability to see patients breathe provided much insight in
working with patients to tailor a Breathing Prescription suitable to their needs.
The patient shown was lady with very severe Emphysema, and when she began the program in 1987 when she was 73 years old. She never smoked, but had an alpha-1 antitrypsin deficiency (alpha AT 7 micromoles). She was in Cor Pulmonale with evidence of right heart failure. Her FEV 1 was 0.5 lpm and her PCO2 in the mid 50's and she required oxygen supplementation at 2 lpm. Her Total Lung Capacity was 5.18 L (109% of predicted) with a Functional Residual Capacity of 3.99 L (146% of predicted) and an RV / TLC ratio of 59%. Her CO Diffusing Capacity was 3.8 (predicted 20.0).
In this upper screen of native breathing, obtained on her first lesson August 5, 1987 her inspired breath volume, i.e. the Tidal Volume is 500 cc (these documentation screens of native breathing are always calibrated full scale 1000 cc volume on the vertical axis).
After one full breath in and out, it may be seen that she is breathing at a rate of about 19 breaths per minute (these documentation screens are always calibrated full scale 10 breaths per minute on the horizontal axis, for comparison purposes).
19 Note carefully, her inspiration time and expiration time are almost identical.
This is a typical COPD and Emphysema breathing pattern, i.e. the Tidal Volume is relatively small (it should have been about 600-650 cc); the Respiratory Rate is rapid (it should have been about 10-12 per minute); and the expiratory time phase is shortened (in the normal person it should be about 60% of the breathing time, and even longer for the COPD patient).
Remember, rapid and shallow breathing, with a shortened expiration time is characteristic of COPD.
In the lower screen, the Breathing Prescription had been set with the full scale Tidal Volume increased to 800 cc, and with a Respiratory rate reduced to 11 breaths per minute. The Inspiration : Expiration Ratio is now set to 1:2.4 (in the normal it is 1:1.4), i.e. the Expiration time in now almost three times longer that the Inspiration time. Note how well the patient is following the Breathing Prescription, even though her native breathing pattern has been drastically altered.
Note that despite the significant 300 cc increase in her Tidal Volume breath, she is still able to easily achieve full exhalation volume, and not develop Air Trapping and Dynamic Hyperinflation, simply by breathing slower and with a longer exhalation time.
She was given a photocopy of her native breathing and breathing training prescription and told to practice only twice daily, for only five minutes each session. And she was to concentrate on her breathing and "put the breathing picture in your mind." She was also started on chest mobilization and diaphragm breathing training.
On her next office visit November 13, 1987 (about three months later) her native breathing pattern now shows her Tidal Volume at 750 cc (it was set at 800 cc), and her breathing rate now starting to slow, and expiration time now starting to get longer. This degree of improvement was somewhat longer than most patients.
Note carefully that her breathing pattern is smooth and regular, not hesitant or irregular. This indicates good breathing coordination, and is a hallmark of patients who do well with breathing training. This
qualitative aspect of breathing evaluation is very important.
As on her initial training session, she followed her Breathing Prescription training with a high degree of skill.
There was still no sign of Air Trapping, even though her Tidal Volume was increased to 950 cc. This was done as it was anticipated that her chest physiotherapy and improved chest mobilization would allow for a greater breath volume.
20 Her next office visit was on January 28, 1988 (almost six months after starting breathing training). She was doing well.
Her native breathing pattern had now settled into a comfortable 675 cc Tidal Volume, with her Expiration time phase now further prolonged to about two and a half times longer than the Inspiration time.
Her breathing training skills remained excellent. The Tidal Volume was lowered to 800 cc.
At this juncture she seemed well trained in breathing skills, and essentially had completed the training program. She was seen in routine follow-up about four times a year, and generally was doing well, though it was apparent her Emphysema was progressing. Her dyspnea became slowly worse, and she was having more dyspnea attacks, which she generally controlled fairly well with Dynamic Hyperinflation breathing tricks.
The last time her breathing skills were evaluated was on October 2, 1990 (about 39 months after starting breathing training and 33 months since last evaluated).
It seems clear that her Breathing Prescription has been well preserved as a native breathing pattern.
21 In March 1992 her condition was deteriorating, as is typical with patients with alpha-1 antitrypsin deficiency. She developed dyspnea with even slight effort, but did find relief with breathing control. Her Cor Pulmonale and heart failure became difficult to control, and she died in November 1992, some five years after starting her rehabiltation program.
Again, this was a very severe case of progressive Emphysema. Based on this example, we will show you in another module how to use the Breathing Trainer. If this patient can do it, you can do it, to optimize your breathing pattern and gain maximal breathing control and comfort.
THE DYNAMIC HYPERINFLATION BREATHING PATTERN
This is an example of a breathing pattern causing Air Trapping and resulting in Dynamic Hyperinflation. It is rather unusual example because the patient has only moderate airway obstructive disease, and her Respiratory Rate is slow, at about a normal 11 breaths per minute. This patient was a rather anxious lady, and at the time this record was obtained she was upset about her breathing comfort. This is probably the main reason for this breathing pattern. Patients with severe airway obstructive disease, who are breathing more rapidy (frequently about 15 to 20 breaths per minute) are much more susceptable to developing Dynamic Hyperinflation.22 This upper record is one where the patint's computer screen was turned off, to obtain a record of the unprompted, native breathing pattern.
Note that her inspired Tidal Volume breath is only about 425 cc, and that she does not properly exhale this breath back down to the zero level. The amount of Air Trapping in this case is about 250 cc. Two or three more breaths of this type and she would certainly have significant Dynamic Hyperinflation. Note my hand written notation "You are not getting the breath out."
This bottom picture shows the Breathing Prescription prompting the patient. The time record shows it was obtained only 8 minutes later, and during that interval she did not take any medications.
Note that she follows the Breathing Prescription very well, and has easily increased her Tidal volume breath from 425 cc to about 1150 cc. And that she is now fully exhaling back down to the zero level. Note the encouraging notations directly showing her with her own breathing record "You can breathe deeply" and "You can get the breath out." Her Breathing Prescription has a slightly prolonged expiratory time with an Inspiration : Expiration Ratio of 1:1.7, to insure lung deflation. This Breathing Prescription is essentially to PREVENT Dynamic Hyperinflation.
Using this patient example I have drawn some lines to indicate strategies to CORRECT Dynamic Hyperinflation.
23
Slow down your breathing.
Prolong the exhalation time
.The first technique is the most desirable one, the:
Gradual Deflation Technique
.This is simply a natural prolongation of your usual expiration breathing pattern, which should always be relaxed, or at most, with very minimal effort.
Note the line extending to the right of the diagram. A 25% prolongation is about correct, as it will cause your lung volume to go below the beginning zero point, the so-called Functional Residual Capacity (FRC) by about 100 to 150cc.
Then, on Inspiration, the trick is not to breathe in more deeply than what your Breathing Prescription indicates. It is very tempting when you are short of breath to breathe in deeply, but if you do you will re-inflate your lung and have to start all over again.
If you do this consistantly for about five to ten breaths you should be fully deflated, and then you can start to take in some larger breaths. And when you do, be sure that you are exhaling all the way out.
The second technique is a "Rescue technique" for urgent lung deflation, the:
Forced Expiration Deflation Technique
This should begin about two thirds to three quarters of the way through expiration, and at this juncture you apply breathing force with your chest muscles, and also by tightening your upper abdomen. As noted in the second line below the diagram, this should abruptly force air out of your chest. Then, as before, be sure not to take in a deeper inspiration breath to re-inflate your lungs.
Unfortunately this technique has a penalty, and that penalty is the aggravation of Dynamic Bronchial Compression, which makes it much harder to breathe out, and makes breathing very exhausting. When done, it should be done with the minimum force needed to do the job (Remember, like wringing water out of a wet towel). Save this technique for emergency use, such as acute dyspnea after a prolonged coughing attack.
24 The final deflation technique is the:
Inspiration Limitation Technique
.This technique can also be used in conjunction with the other deflation methods for rapid lumg deflation. After exhaling, breathe in only about 70 to 80% of you usual inhalation breath, anad then promptlydo the exhalation maneuver again. Do this no more than two or three times, as it is rather uncomfortable to do.
Changing Breathing Patterns
The breathing pattern you define initially will not be ideal as your condition changes, and re-definition of your breathing pattern may be needed. For example:
If you were initially ill and decompensated, your resting medically stable breathing pattern needs to be re-defined.
As your chest mobility improves with physical therapy, you may find you can take larger breaths.
If you develop a "Bronchitic Exacerbation" or an Asthmatic attack, you will need to re-define your program.
As you get older, or develop various medical problems, you may need to adjust your program.
You may want to define an exertion breathing pattern.
It should be apparent that breathing is a very dynamic function, and needs to be adjusted to your life style and various medical conditions.
What If Your Normal Breathing Pattern Changes
Lets assume that your medical condition is stable, and that you have defined a breathing pattern that is providing you with as much dyspnea relief as possible. That is, you anticipate a certain level of dyspnea comfort from that particular breathing pattern.
Now, over the course of a few days, perhaps one day, or as many as three or four days, your breathing comfort is now worse with the same breathing pattern. What does this mean? It means that some problem is developing in your lungs, and the usual reason is a so-called "Bronchitic Exacerbation." More later on this very important topic. Basically this is a low grade infection in your bronchial tubes causing excessive mucus ("phlegm") plugging-up your airways and also causing increased asthmatic bronchial spasm. If allowed to progress this condition can become very serious, and early detection and treatment is imperative.
If you detect any deterioration of your expected breathing comfort while using your usual breathing pattern, it is critically important that you closely monitor your health. Should you detect progressive deterioration over the next day or two of your expected breathing comfort with the same breathing pattern, it is critically important that you receive immediate medical attention. Bronchitic Exacerbations treated early are usually treated quite easily. Treated late they are often difficult to treat and may evolve into Pneumonia, and Respiratory Failure, and other life threatening problems.
Knowing your baseline breathing comfort with a defined breathing pattern is one of the most important uses of the Breathing Trainer. Used in this manner, the Breathing Trainer can be a sensitive diagnostic tool, and your early warning signal as to Bronchitic Exacerbations and other lung complications.
25
PURSED LIP BREATHING
Pursed Lip Breathing ("PLB") is a very popular and excellent "Rescue" technique for acute dyspnea. This dyspnea is usually related to COPD, Emphysema and Asthma. However, in some cases of severe COPD and Emphysema, and chronic severe Asthma, it may enhance breathing comfort if used in a chronic long term manner. Generally however, breathing control techniques are easier and more desirable for chronic, long term breathing comfort.
First, you need to understand some theory as to why this technique works. Refresh your memory on the concept of
Dynamic Bronchial Compression, and the collapsing of your airways on expiration, as your lungs are getting smaller as you breathe out. And recall that this is a particularly serious problem in people with Emphysema, as the elastic supporting lung structure helping to keep the airways open is deficient. Pursed Lip Breathing simply imposes a slight obstruction to air flow at the mouth, which generates a back pressure throughout the airways, and therefore a stenting effect to help prop open the airways and assist expiration and lung emptying. It must be emphasized, the amount of pressure supplied by you by pursing your lips together must be minimal, or gentle. Specifically this mouth back pressure must be in the range of only 5 to 10 cm water pressure, and that isn't very much. If you compress your lips too much and exceed this minimal pressure you will actually provide an airway obstructive situation and impair air flow and lung emptying.
As generally taught, breathe in through your nose (to warm and humidify the air, and remove particles and bacteria), and then on expiration pucker your lips together as though you are whistling, to provide the desired mouth back pressure, and breathe out through your pursed lips in a "prolonged" manner. The length of prolongation is often stated to be two or three times (and occasionally four times) longer than inspiration. To practice correct lip pursing people are instructed to place a candle about 4 to 6 inches away, and to make the flame gently bend or flicker, but never so hard as to blow out the flame.
Practicing in this manner is not very precise as to the all important length of expiration. A more realistic and precise way of practicing is by using the Breathing Trainer in conjunction with candle blowing. For normal breathing, use your regular Breathing Trainer prescription. For "Rescue" practice from acute overinflation dyspnea, set the
Respiratory Rate two or three breaths less than your usual, and also set the Inspiration Time 5 or up to 10% less than your usual (i.e. your desired expiration time prolongation will therefore be set 5 to 10% longer). Five or ten breaths of this Rescue pattern should get your lungs deflated, and you can then resume your normal breathing pattern. This Rescue pattern is also a good technique to be used temporarily during exertion such as hurrying to cross a street or climbing stairs.
There is a common and serious problem with Pursed Lip Breathing, and that is the frequent reaction for people distressed by shortness of breath to preform tight-lipped PLB and therefore excessively high PLB pressures. This will immediately make their breathing situation worse. This is a very tragic paradox, as it is a natural tendancy for people to believe that if PLB works beneficially, then harder PLB will work better. And unfortunately lip puckering in the whistling position makes it very easy to slip into tight, high pressure breathing.
A better solution to this problem is not to make the "whistling pucker," but instead to gently press the center of the lips together, and permit the air to escape through both sides of the lips. To do this more effectively, the cheeks should be relaxed. Doing PLB in this manner it is more difficult to switch into a tight, high pressure PLB situation.
And there is another major advantage to this modified PLB technique. By placing a straw through the central portion of the lips the mouth pressure can now be easily and directly measured with a suitable pressure guage. By watching the guage one is now able to do direct biofeedback training to achieve the desired 5 to 10 cm H2O back pressure, and to learn specifically what that pressure feels like, and therefore how to sense when they are pursing their lips too hard. A suitable pressure guage may be obtained at Dwyer Instruments, Inc