Tec hnic al Report
Clustered Data ONTAP
Security Guidance
Ron Demery, NetApp September 2011 | TR-3964
CLUSTERED DATA ONTAP 8.1
This document is a brief summary of the security features and settings within clustered Data ONTAP® 8.1.
TABLE OF CONTENTS:
1 INTRODUCTION...4
2 CLUSTER ADMINISTRATO R COMP ARED TO VS ERV ER ADMINISTRATOR ...4
2.1 DEFA ULT CLUSTER CONTEXT USER ACCOUNT ROL ES... 4
2.2 DEFA ULT VSERVER CONT EXT USER ACCOUNT ROLES... 4
3 HOW CLUSTERED DATA ONTAP ADMINISTRATIVE PATH IDENTIFICATION AND AUTHENTICATION WORK ...5
3.1 WHERE... 5
3.2 HOW ... 6
3.3 WHAT ... 6
3.4 CREATING THE LOGIN M ETHOD... 6
4 LOCAL ACCOUNT ATTRIBUTES ...6
4.1 DEFA ULT ADMINISTRATIVE ACCOUNTS ... 7
5 NETWORK SECURITY ... 11
5.1 ROL ES FOR NETWORK PORTS... 11
6 SNMP ... 12
7 TIMEOUTS ... 13
8 AUTOSUPPORT ... 13
9 AUDIT LOGGING AND EVENT MESSAGES ... 15
10 HARDWARE ... 16
10.1 REMOTE LAN MODUL E (RLM) ... 16
10.2 SERVICE PROC ESSOR (SP)... 16
10.3 BASEBOARD MANAGEMENT CONTROLLER ( BMC) ... 17
11 DATA ONTAP ... 18 11.1 SYSTEM MANAGER ... 18 11.2 SSH... 18 11.3 TELNET ... 18 11.4 SHELLS ... 19 12 SYSTEM SERVICES ... 19 12.1 FIREWALL SERVICE ... 19 12.2 NDMP SERVICE ... 20 12.3 WEB SERVICE ... 21 LIST OF TABLES Table 1) Cluster context default roles and capabilities. ... 4
Table 3) Password attributes... 7
Table 4) Remote LA N module summary, ...16
Table 5) Service processor summary. ...17
Table 6) BMC summary. ...18
1 INTRODUCTION
This document contains some of the highlights from the various manuals for the administration of clustered Data ONTAP.
We highly recommend that you also read the clustered Data ONTAP 8.1 System Administration, Network Administration, and Antivirus Protection Management guides.
2 CLUSTER ADMINISTRATOR COMPARED TO VSERVER
ADMINISTRATOR
Cluster administrators administer the entire cluster. Vserver administrat ors administer only their own data Vservers.
Cluster administrators can administer the entire cluster and its resources. They can also set up data Vservers and delegate Vserver administration to Vserver administrators. The specific capabilities that cluster administrators have depend on their access-control roles. By default, a cluster administrator with the ‘admin’ account name or role name has all capabilities for managing the cluster and Vservers. Vserver administrators, in contrast, can administer only their own data Vservers’ storage and network resources, such as volumes, protocols, LIFs, and services. The specific capabilities that Vserver
administrators have depend on the access-control roles that are assigned by cluster administrators. For more information about Vserver administrator capabilities, see the clustered Data ONTAP Vserver Administrator Capabilities Overview Guide.
2.1 DEFAULT CLUSTER CONTEXT USER ACCOUNT ROLES
The predefined roles for the cluster context are admin, readonly , and none.
Table 1) Cluster context default roles and capabilities.
Role Access Level to Command Directories Capabilities
admin All All
readonly Readonly read-only
none None none
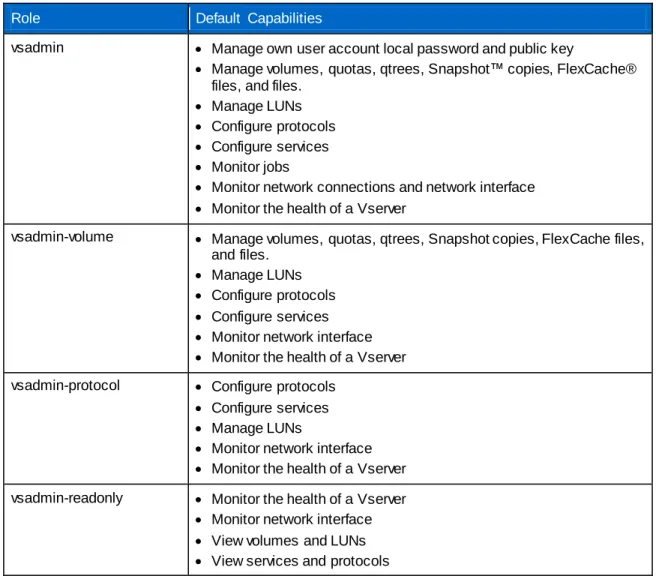
2.2 DEFAULT VSERVER CONTEXT USER ACCOUNT ROLES
A Vserver can have its own user and administration authentication domain. You can delegate the management of a Vserver to a Vserver administrator. There are four predefined roles for Vserver administrator.
Table 2) Vserver context default roles and capabilities.
Role Default Capabilities
vsadmin Manage own user account local password and public key
Manage volumes, quotas, qtrees, Snapshot™ copies, FlexCache® files, and files.
Manage LUNs
Configure protocols
Configure services
Monitor jobs
Monitor network connections and network interface
Monitor the health of a Vserver
vsadmin-volume Manage volumes, quotas, qtrees, Snapshot copies, FlexCache files,
and files.
Manage LUNs
Configure protocols
Configure services
Monitor network interface
Monitor the health of a Vserver
vsadmin-protocol Configure protocols
Configure services
Manage LUNs
Monitor network interface
Monitor the health of a Vserver
vsadmin-readonly Monitor the health of a Vserver
Monitor network interface
View volumes and LUNs
View services and protocols
3 HOW CLUSTERED DATA ONTAP ADMINISTRATIVE PATH
IDENTIFICATION AND AUTHENTICATION WORK
There are several factors that are taken into consideration when you are attempting to access administrative path for clustered Data ONTAP.
Where: This is determined by the logical interface (LIF) type or physical port.
How: The application or transport method being used (snmp, ssh, service-processor, and so on)
What: The method are you using to authenticate (domain, nsswitch, password, and so on)
3.1 WHERE
The LIFs and access connections for administration of clustered Data ONTAP are:
System console port
Cluster management LIF (only one per cluster)
Vserver management LIF (only one per Vserver)
Maintenance port (RLM/SP/BMC)
3.2 HOW
The application or method is determined by a property of the user account that is created using the
-application option; the possibilities are:
System console (console)
HTTP and HTTPS (http)
Data ONTAP API (ontapi)
SNMP (snmp)
SP or RLM (service-processor)
SSH (ssh)
Telnet (telnet)
Note: Vserver user accounts cannot use console, snmp, service-processor, or telnet as an access method.
While it is not possible to string methods together for a user (with multiple “–application option” pairs), it is possible by repeating the command; see the examples in section 4.1.
3.3 WHAT
The authentication method is determined by a property of the user account that is created using the
-authmethod option; the possibilities are:
User password (password)
Windows® Active Directory® authentication (domain): Vserver context only
LDAP or NIS authentication (nsswitch): Vserver context only
SSH public key authentication (publickey): ssh application only
SNMP community strings (community): snmpuser only
SNMP user-based security model (usm): snmpuser only
3.4 CREATING THE LOGIN METHOD
The security login create command creates a login method for the management utility. A login method consists of a user name, an application (access method), and an authentication method. It can optionally include an access-control role name.
security login create -username user_name -application application -authmethod authentication_method [-role role_name]
4 LOCAL ACCOUNT ATTRIBUTES
In clustered Data ONTAP the modifiable account name attributes are as follows:
Length: 3–16 (default 3)
Alphanumeric enforcement: enabled/disabled (default: disabled)
In clustered Data ONTAP the modifiable account password attributes are as follows:
Alphanumeric enforcement: enabled or disabled (default disabled)
Password history (default 6)
Minimum age (default 0)
Table 3) Password attributes.
Attribute Range Default Recommended
Length 3–64 8 Minimum 8
Alphanumeric Enabled/disabled Disabled Enabled
History 6 6
Minimum age 0 1
Example using the above recommendations:
security login role config modify -role admin -passwd-minsize 8 -passwd-alphanum enabled -disallowed-reuse 6 -change-delay 1
Cluster07::> security login role config show -instance Vserver: Cluster07 Role Name: admin Username Min Size: 3
Username Alpha-Numeric: disabled Password Min Size: 8
Password Alpha-Numeric: enabled Disallow Last 'N' Passwords: 6 Delay Between Password Changes (Days): 0
4.1 DEFAULT ADMINISTRATIVE ACCOUNTS
There are two default administrative accounts: 'admin' and 'diag'.
ADMIN ACCOUNT
The 'admin' account has the role of 'admin' and is allowed access using all applications.
Recommendation
Delete or lock the default 'admin' account.
To accomplish this task you should first create another account (security login create) with the admin role for each application that the new admin_account has permissions to use. Note that the authentication method should not be ‘off-box’ for the primary admin_account, so that a networking problem does not lock you out of all administrative access.
Cluster07::> security login show
Authentication Acct Vserver UserName Application Method Role Name Locked --- --- --- --- --- --- Cluster07 admin console password admin no Cluster07 admin http password admin no Cluster07 admin ontapi password admin no Cluster07 admin service - password admin no processor
Cluster07 public snmp community readonly - 6 entries were displayed.
Cluster07::> security login create stgAdmin -application http -auth password Cluster07::> security login create stgAdmin -application ontapi -auth password Cluster07::> security login create stgAdmin -application service-processor -auth password
Cluster07::> security login create stgAdmin -application console -auth password Cluster07::> security login create stgAdmin -application ssh -auth password
Once you have tested the ability for the new account to use the access the cluster using the application, you can either delete (security login delete) or lock (security login lock) the 'admin' account.
Note: The admin console entry cannot be deleted or locked if it is the only account with permissions to that application.
Cluster07::> security login show
Authentication Acct Vserver UserName Application Method Role Name Locked --- --- --- --- --- --- Cluster07 admin console password admin no Cluster07 admin http password admin no Cluster07 admin ontapi password admin no Cluster07 admin service - password admin no processor
Cluster07 admin ssh password admin no Cluster07 public snmp community readonly - Cluster07 stgAdmin console password admin no Cluster07 stgAdmin http password admin no Cluster07 stgAdmin ontapi password admin no Cluster07 stgAdmin service - password admin no processor
Cluster07 stgAdmin ssh password admin no 11 entries were displayed.
Cluster07::> security login delete ? Usage:
[ -vserver <vserver name> ] Vserver (default: Cluster07) [-username] <text> User Name
[-application] <text> Application
[-authmethod] <text> Authentication Method
Cluster07::> security login delete admin -application console -auth password Cluster07::> security login show
Authentication Acct Vserver UserName Application Method Role Name Locked --- --- --- --- --- --- Cluster07 admin http password admin no Cluster07 admin ontapi password admin no Cluster07 admin service - password admin no processor
Cluster07 admin ssh password admin no Cluster07 public snmp community readonly - Cluster07 stgAdmin console password admin no Cluster07 stgAdmin http password admin no Cluster07 stgAdmin ontapi password admin no Cluster07 stgAdmin service - password admin no processor
Cluster07 stgAdmin ssh password admin no 10 entries were displayed.
Cluster07::> security login lock ?
[ -vserver <vserver name> ] Vserver (default: Cluster07) [-username] <text> Username
Cluster07::> security login lock admin
Cluster07::> security login show
Authentication Acct Vserver UserName Application Method Role Name Locked --- --- --- --- --- --- Cluster07 admin http password admin yes Cluster07 admin ontapi password admin yes Cluster07 admin service - password admin yes processor
Cluster07 admin ssh password admin yes Cluster07 public snmp community readonly - Cluster07 stgAdmin console password admin no Cluster07 stgAdmin http password admin no Cluster07 stgAdmin ontapi password admin no Cluster07 stgAdmin service - password admin no processor
Cluster07 stgAdmin ssh password admin no 10 entries were displayed.
DIAG ACCOUNT
A diagnostic account, named “diag,” is provided with your storage system. You can use the diag account to perform troubleshooting tasks in the systemshell. The diag account and the systemshell are intended only for low-level diagnostic purposes and should be used only with guidance from technical support. The diag account is the only account that can be used to access the systemshell, through the advanced command system node systemshell. Before accessing the systemshell, you must set the diag account password by using the security login password command. Neither the diag account nor the
systemshell is intended for general administrative purposes.
Recommendation
Lock the 'diag' account and reset the password after every use.
Cluster07::> security login lock diag Lock diag User account
Cluster07::> security login password diag Reset the password
Please enter a new password: Please enter it again:
Error: New password must be different than old password. Cluster07::> security login password diag
Please enter a new password: Please enter it again:
Warning: These advanced commands are potentially dangerous; use them only when directed to do so by NetApp personnel.
Do you want to continue? {y|n}: y
Cluster07::*> system node systemshell -node Cluster07-01 Data ONTAP/amd64 (Cluster07-01) (ttyp2)
login: diag Password:
Login incorrect diag still locked
[Ctl+D to excape from the system shell}
Cluster07::*> security login unlock diag unlock diag
Cluster07::*> system node systemshell -node Cluster07-01 Data ONTAP/amd64 (Cluster07-01) (ttyp2)
login: diag Password:
Last login: Fri Aug 5 18:19:47 from localhost
Warning: The system shell provides access to low-level diagnostic tools that can cause irreparable damage to the system if not used properly. Us e this environment only when directed to do so by support personnel. Cluster07-01% ^D Ctl+D exits the systemshell
Cluster07::*> security login password diag change password after you are done
Please enter a new password: Please enter it again:
Error: New password must be different than last 6 passwords. Cluster07::*> security login password diag
Please enter a new password: Please enter it again:
Cluster07::*> security login lock diag lock diag
Note: To verify the state of the 'diag' account use the security login show username diag -instance command.
Cluster07::> security login show -username diag -instance Vserver: Cluster07
User Name: diag Application: console Authentication Method: password Role Name: admin Account Locked: no
5 NETWORK SECURITY
Ports are either physical ports (NICs) or virtualized ports, such as interface groups or VLANs. A logical interface (LIF) communicates over the network through the port to which it is currently bound. A LIF is essentially an IP address with the following associated characteristics:
Role Home node Home port Routing group Firewall policy Failover policy
5.1 ROLES FOR NETWORK PORTS
Network ports can have roles that define their purpose and their default behavior. Port roles limit the types of LIFs that can be bound to a port. Network ports can have four roles:
Node management
Cluster
Data
Intercluster
You can modify the roles for obtaining the best configuration.
NODE MANAGEMENT PORTS
These ports are used by administrators to connect to and manage a node. You can create VLANs and interface groups on node-management ports. Some platforms have a dedicated management port (e0M). The role of these ports cannot be changed, and these ports cannot be used for data traffic. The mgmt
policy is applied by default, and it allows dns, http, https, ndmp, ntp, snmp, and ssh traffic. It will block all telnet traffic.
CLUSTER PORTS
These ports are used for intracluster traffic only. By default, each node has two cluster ports. Cluster ports should be on 10-GbE ports and enabled for jumbo frames. You cannot create VLANs or interface groups on cluster ports. The cluster policy is applied by default and allows dns, http, https, ndmp, ntp, snmp, ssh, and telnet traffic. No traffic is blocked by default.
DATA PORTS
These ports are used for data traffic. These ports are accessed by NFS, CIFS, FC, and iSCSI clients for data requests. By default, each node has a minimum of one data port. You can create VLANs and interface groups on data ports. VLANs and interface groups have the data role by default , and the port role cannot be modified. The data policy is applied by default and allows dns and ndmp traffic. It blocks http, https, ntp, snmp, ssh, and telnet traffic.
INTERCLUSTER PORTS
These ports are used for cross-cluster communication. An intercluster port should be routable to another intercluster port or data port of another cluster. The intercluster policy is applied by default and allows ndmp traffic only. It blocks dns, http, https, ntp, snmp, ssh, and telnet traffic.
6 SNMP
Enabling SNMP provides a mechanism for monitoring your cluster to avoid issues before they occur and to respond to issues when they occur. Managing SNMP involves enabling SNMP, configuring SNMP users, and configuring SNMP trap hosts for specific events. If you enable SNMP in Data ONTAP, SNMP managers can query your storage system's SNMP agent for information. The SNMP agent gathers information and forwards it to the SNMP managers. The SNMP agent also generates trap notifications whenever specific events occur. The SNMP agent on the storage system has read-only privileges—that is, it cannot be used for any set operations or for taking a corrective action in response to a trap. In clustered Data ONTAP, SNMP is enabled cluster-wide.
For diagnostic and other network management services, Data ONTAP provides an SNMP agent
compatible with SNMP versions v1, v2c, and v3. SNMPv3 offers advanced security by using passphrases and encryption.
SNMPv3 is a secure protocol when compared to SNMPv1 and SNMPv2c. If you want to use SNMPv3, you must configure an SNMPv3 user to run the SNMP utilities from the SNMP manager.
Use the security login create command to create an SNMPv3 user. Security level can be Authentication, No Privacy; Authentication, Privacy; or no Authentication, no Privacy.
You are prompted to provide the following information:
Engine ID (default value is local EngineID)
Authentication protocol (none, md5, sha)
Authentication password (8 character minimum)
Privacy protocol (none, des)
Privacy protocol password (passphrase for encryption)
Recommendations
Change the snmpv2 community string.
Use snmpv3 with auth (sha) and priv (des).
Cluster07::> system snmp community show ro public
Cluster07::> system snmp community ? Notice there is not a modify command
add Add a new community with the specified access control type
delete Deletes community with the specified access control type
show Displays communities
Cluster07::> system snmp community add ? Add a new community name
[-type] <ctype> access type [-community-name] <text (size 1..64)> Community
Cluster07::> system snmp community add -type ? ro
rw all
Cluster07::> system snmp community add -type ro -community-name secret-name Cluster07::> system snmp community show
ro public ro secret-name
Cluster07::> system snmp community delete ?
[-type] <ctype> access type [[-community-name] <text (size 1..64)>] Community
Cluster07::> system snmp community delete ro -community-name public Delete public
Cluster07::> system snmp community show ro secret-name
7 TIMEOUTS
The timeout value specifies how long a CLI session remains idle before being automatically terminated. The CLI timeout value is cluster-wide. That is, every node in a cluster uses the same CLI timeout value. By default, the automatic timeout period of CLI sessions is 30 minutes.
Note: Commands that have not yet completed will continue to execute after the session times out.
Recommendations
Set the timeout to 10 minutes.
Cluster07::> system timeout modify -timeout 10
8 AUTOSUPPORT
AutoSupport™ is a mechanism that proactively monitors the health of your system and, if enabled, automatically sends e-mail messages to NetApp technical support, your internal support organization, and a support partner.
Note: AutoSupport is enabled by default and can be disabled at any time.
Cluster07::> system node autosupport modify -node {nodename} -state disabble Cluster07::> system node autosupport modify -node {nodename} -support disabble
The content of an AutoSupport transmission has changed from past releases clustered Data ONTAP. The content of the weekly and daily AutoSupport messages to NetApp Support will include all logs. This now includes the command-history.log as well as the mgwd.log. These logs as well as others contain very sensitive information about your storage environment and should not be shared outside of your corporate infrastructure without a complete understanding of the contents.
The downside of sending a minimal content AutoSupport, by setting the remove-private-data option to
true, to NetApp Support is that some of the logs that NetApp Support might need to assist you might need to be sent manually.
There are several commands that you will find useful; they are the manifest and history commands. The manifest command allows you to see the contents of one of the saved ASUPs that are from a particular node. The following is a manifest from one node of a two-node cluster. The remove-private-data option is set to true for this node (Cluster07-02).
Cluster07::> system node autosupport show -fields remove-private-data node remove-private-data
--- --- Cluster07-01 false Cluster07-02 true 2 entries were displayed.
Cluster07::> system node autosupport manifest show -node Cluster07-02 Manifest
AutoSupport Collected
Node Sequence Body Filename Size Status Error --- --- --- --- --- --- Cluster07-02 18 SYSCONFIG-A.txt 2.19KB completed OPTIONS.txt 5.04KB completed software_image.xml 7.66KB completed CLUSTER-INFO.xml 4.13KB completed effective-cluster-version.xml 4.55KB completed cluster-version-replicated.xml 5.32KB completed autosupport.xml 11.92KB completed autosupport_budget.xml 7.58KB completed autosupport_history.xml 6.58KB completed X-HEADER-DATA.TXT 916B completed SYSTEM-SERIAL-NUMBER.TXT 34B completed SOFTWARE-LICENSES.xml - content-not-collected-mode cluster_licenses.xml
Press <space> to page down, <return> for next line, or 'q' to quit...
3.37KB completed
AutoSupport Collected
Node Sequence Body Filename Size Status Error --- --- --- --- --- --- Cluster07-02 18 vserver-info.xml 9.21KB completed log_files.xml 13.35KB completed EMS-LOG-FILE.gz - content-not-collected-privacy EMS-LOG-FILE-PARTNER.gz - content-not-collected-privacy MESSAGES.gz 20B completed MESSAGES-PARTNER.gz - content-not-collected-precheck This content is only collected for partner AutoSupports
ucore_reports.tar - content-not-collected-privacy command-history.gz - content-not-collected-privacy command-history-partner.gz
- content-not-collected-privacy Press <space> to page down, <return> for next line, or 'q' to quit...
AutoSupport Collected
Node Sequence Body Filename Size Status Error --- --- --- --- --- --- Cluster07-02 18 debug.gz - content-not-collected-privacy debug-partner.gz - content-not-collected-privacy mgwd.gz - content-not-collected-privacy mgwd-partner.gz - content-not-collected-privacy sktlogd.gz - content-not-collected-privacy sktlogd-partner.gz - content-not-collected-privacy ndmpd.gz - content-not-collected-privacy ndmpd-partner.gz - content-not-collected-privacy notifyd.gz - content-not-collected-privacy Press <space> to page down, <return> for next line, or 'q' to quit...
AutoSupport Collected
Node Sequence Body Filename Size Status Error --- --- --- --- --- ---
Cluster07-02 18 notifyd-partner.gz - content-not-collected-privacy secd.gz - content-not-collected-privacy secd-partner.gz - content-not-collected-privacy spmd.gz - content-not-collected-privacy spmd-partner.gz - content-not-collected-privacy vifmgr.gz - content-not-collected-privacy vifmgr-partner.gz - content-not-collected-privacy vldb.gz - content-not-collected-privacy vldb-partner.gz - content-not-collected-privacy Press <space> to page down, <return> for next line, or 'q' to quit...
AutoSupport Collected
Node Sequence Body Filename Size Status Error --- --- --- --- --- --- Cluster07-02 18 messages.log.gz - content-not-collected-privacy messages-partner.gz - content-not-collected-privacy bcomd.gz - content-not-collected-privacy snapmirror.gz - content-not-collected-privacy snapmirror-partner.gz - content-not-collected-privacy dotsql.gz - content-not-collected-privacy dotsql-partner.gz - content-not-collected-privacy php.gz - content-not-collected-privacy php-partner.gz - content-not-collected-privacy Press <space> to page down, <return> for next line, or 'q' to quit...
AutoSupport Collected
Node Sequence Body Filename Size Status Error --- --- --- --- --- --- Cluster07-02 18 apache_access.gz - content-not-collected-privacy apache_access-partner.gz - content-not-collected-privacy apache_error.gz - content-not-collected-privacy apache_error-partner.gz - content-not-collected-privacy web-diag.gz - content-not-collected-privacy web-diag-partner.gz - content-not-collected-privacy
As can be seen in the output from the console, much of the content is not collected for sending to the AutoSupport recipients.
For further information on AutoSupport refer to the clustered Data ONTAP 8.1 Administration Guide. Refer to the NetApp Support site for futher infromation concerning MyAutosupport and the impact of sending a minimal content AutoSupport. http://now.netapp.com/NOW/knowledge/docs/olio/autosupport/
9 AUDIT LOGGING AND EVENT MESSAGES
Audit logging creates a chronological record of management activities. You can specify what types of activities in the management interface are audited.
Recommendations
Send minimum content AutoSupport messages to NetApp.
Cluster07::> system node autosupport modify -node Cluster07-01 -remove-private-data true
Always use the HTTPS transport when sending AutoSuport messages to NetApp Support .
Data ONTAP enables you to audit two types of requests—set requests and get requests. A set request typically applies to nondisplay commands, such as creating, modifying, or deleting an object. A get request occurs when information is retrieved and displayed to a management interface. This is the type of request that is issued when you run a show command, for instance.
You use the security audit commands to manage audit settings. Regardless of the settings for the security audit commands, set requests are always recorded in the command-history.log file, which is sent by AutoSupport to the specified recipients and NetApp, by default on a weekly basis.
10 HARDWARE
All NetApp® FAS storage systems provide an out-of-band (OOB) management port for the maintenance and management of the storage system hardware. These network- based ports provide communications using SSH to make sure of confidentiality of the interactive sessions.
10.1 REMOTE LAN MODULE (RLM)
The RLM command line interface (CLI) commands enable you to remotely access and administer the storage system and diagnose error conditions. Also, the RLM extends AutoSupport capabilities by sending alerts and notifications through an AutoSupport message.
In order to access the storage system through the RLM interface an account must have service-processor method. The storage system admin role has service-processor method by default. RLM firmware 4.0 and above utilizes SSHv2 only. The SSH protocol on the RLM is part of the RLM’s kernel operating system and therefore different from the implementation of SSH by the Data ONTAP operating system.
RLM firmware 4.0 will track failed SSH login attempts from an IP address. If more than 5 repeated login failures are detected from an IP address in any 10-minute period, the RLM will stop all communication with that IP address for the next 15 minutes. Normal communication will resume after 15 minutes, but if repeated login failures are detected again, communication will again be suspended for the next 15 minutes.
For detailed information on the RLM and its capabilities, please refer to the “Using the Remote LAN Module for remote system management” section of the “Data ONTAP 8.1 Cluster-Mode System Administration Guide.”
Table 4) Remote LAN module summary, Storage Systems Connection
Protocol Current Firmware (August 2011) Idle Connection Timeout Failed Login IP Lockout
FAS30xx SSHv2 4.0 None Yes
FAS31xx SSHv2 4.0 None Yes
FAS60xx SSHv2 4.0 None Yes
10.2 SERVICE PROCESSOR (SP)
More recent hardware is supplied with a service processor rather than an RLM. The SP CLI commands enable you to remotely access and administer the storage system and diagnose error conditions. Also,
the SP extends AutoSupport capabilities by sending alerts and notifications through an AutoSupport message.
In order to access the storage system through the SP interface an account must have login service-processor method. The storage system admin role has service-processor method by default. SP firmware 1.2 and later will track failed SSH login attempts from an IP address. If more than five repeated login failures are detected from an IP address in any 10-minute period, the RLM will stop all communication with that IP address for the next 15 minutes. Normal communication will resume after 15 minutes, but if repeated login failures are detected again, communication will again be suspended for the next 15 minutes.
For detailed information on the SP and its capabilities, please refer to the “Using the Service Processor for remote system management” section of the “Data ONTAP 8.1 Cluster-Mode System Administration Guide.”
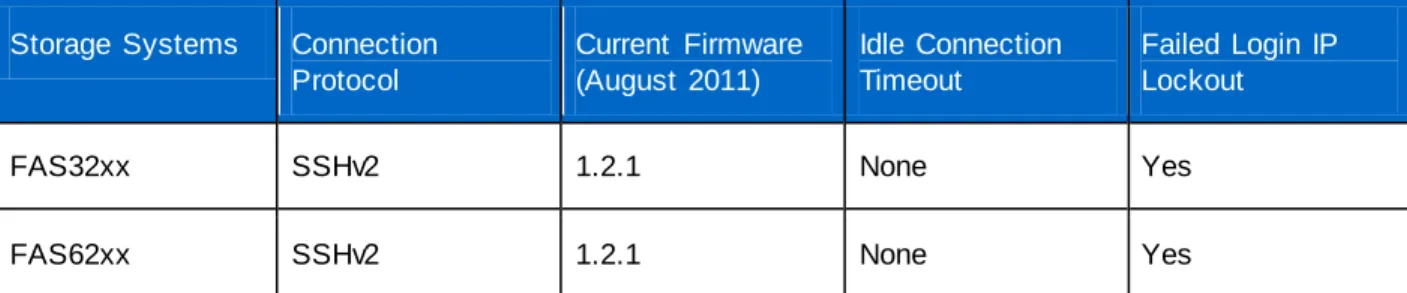
Table 5) Service processor summary. Storage Systems Connection
Protocol Current Firmware (August 2011) Idle Connection Timeout Failed Login IP Lockout
FAS32xx SSHv2 1.2.1 None Yes
FAS62xx SSHv2 1.2.1 None Yes
10.3 BASEBOARD MANAGEMENT CONTROLLER (BMC)
The baseboard management controller (BMC) is a remote management device that is built into the motherboard of FAS20xx storage systems. It provides remote platform management capabilities, including remote access, monitoring, troubleshooting, logging, and alerting features.
Available on the 2040 platform only (for Data ONTAP 8.1), BMC requires the use of an SSH client and uses the root password. It shares the active console session if one is active when t he system console
command is issued from the bmc shell prompt.
The BMC supports the SSH protocol for CLI access from UNIX® clients and PuTTY for CLI access from PC clients. Telnet and RSH are not supported on the BMC, and system options to enable or disabl e them have no effect on the BMC.
You can use naroot, root, or administrator to log into the BMC. This password is set in the
nodeshell of the storage controller.
For detailed information on the BMC and its capabilities, please refer to the “Using the Baseboard Management Controller for remote system management” section of the “Data ONTAP 8.1 Cluster-Mode System Administration Guide.”
Table 6) BMC summary.
Storage Systems Connection Protocol Current Firmware (August 2011) Idle Connection Timeout Failed Login IP Lockout FAS20xx SSHv2 1.3 None No
Setting the password for the BMC must be done at the nodeshell.
Cluster07::> system node run -node local Enter the nodeshell
Type 'exit' or 'Ctrl-D' to return to the CLI Cluster07-01> passwd
New password:
Retype new password:
11 DATA ONTAP
11.1 SYSTEM MANAGER
System Manager enables you to manage storage systems and storage objects such as disks, volumes, and aggregates. System Manager is a Web-based graphical management interface to manage common storage system functions from a Web browser.
System Manager enables you to perform many common tasks such as the following:
Configure and manage storage objects such as disks, aggregates, volumes, qtrees, and quotas.
Configure protocols such as CIFS and NFS and provision file sharing.
Configure protocols such as FC and iSCSI for block access.
Set up and manage SnapMirror® relationships.
Perform cluster management, storage node management, and Vserver management operations in a cluster environment.
Create and configure Vservers, manage storage objects associated with a Vserver, and manage Vserver services.
Monitor and manage your storage systems.
Note: System Manager requires that snmp is enabled and the community string is known.
Note: System Manager can only use the cluster context users for authentication.
11.2 SSH
Is the primary method to manage the Vserver using the Vserver users via the vserver LIF.
11.3 TELNET
The following conditions must be met before you can use telnet to access the cluster:
If firewall is enabled, telnet must also be added in the firewall policy to allow telnet requests to go through firewall. By default, telnet is disabled. You can use the system services firewall policy show command to display whether telnet has been enabled.
The -service and -action parameters of the system services firewall policy modify
command controls whether a specified protocol can be used to access the storage system. For more information, see the system services firewall policy man pages.
The -application parameter of the security login commands specifies the access method for a role. For more information, see the security login man pages.
11.4 SHELLS
SYSTEM SHELLNote: Commands typed at the FreeBSD shell (systemshell) are not logged.
The systemshell is a low-level shell used for diagnostic and troubleshooting purposes. The systemshell is not intended for general administrative purposes. You should access the systemshell only with guidance from technical support.
CLUSTER SHELL
The native shell in which you can execute commands is referred to as the clustershell. This is the shell that is started automatically when you log in to the cluster. It provides all commands you need to configure and manage the cluster.
VSERVER SHELL
The Vserver shell can be accessed through SSH on the Vserver management LIF by using a vserver account. Accounts that possess a cluster admin role can make modifications to all Vservers.
NODE SHELL
Note: Commands typed at the node shell are not logged.
In addition, a special shell exists that enables you to run a subset of Data ONTAP 7-Mode commands from within clustered Data ONTAP. This special shell is called the nodeshell. Nodeshell commands take effects only at the node level. You can run a single nodeshell command from the clustershell that returns immediately. Or, you can switch within the clustershell to a nodeshell session from which you can run multiple nodeshell commands interactively.
To access the nodeshell, enter the following command at the clustershell's system prompt:
system node run -node {nodename|local}
local is the node you used to access the cluster.
Cluster07::> system node run -node local Type 'exit' or 'Ctrl-D' to return to the CLI Cluster07-01>
Note: Notice the change of the prompt from ::> to >.
12 SYSTEM SERVICES
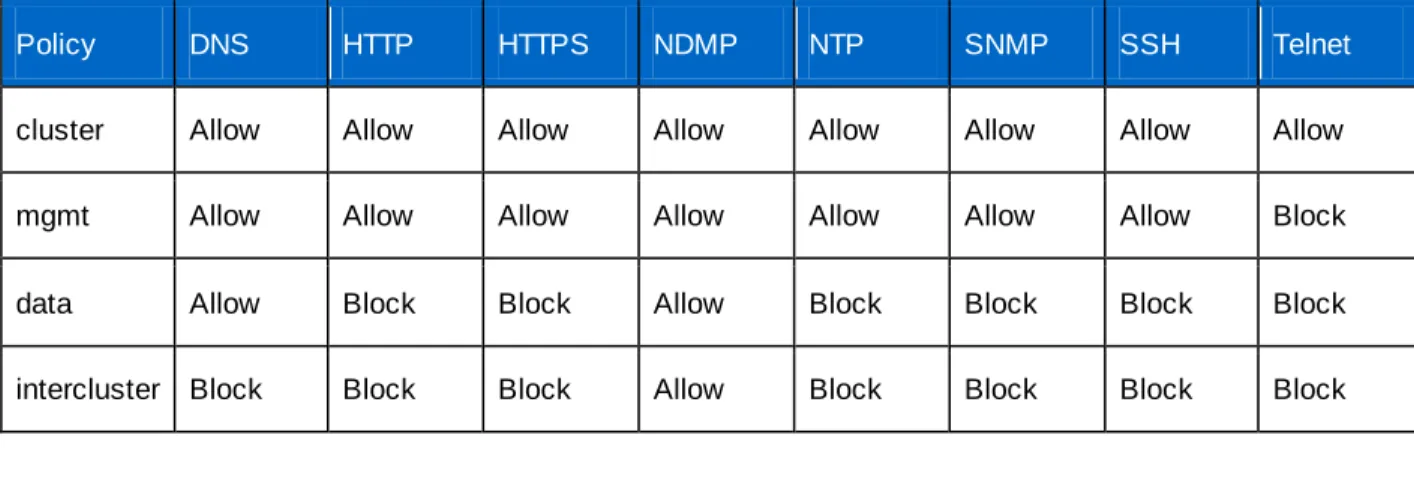
12.1 FIREWALL SERVICE
Table 7) Default firewall policies.
Policy DNS HTTP HTTPS NDMP NTP SNMP SSH Telnet
cluster Allow Allow Allow Allow Allow Allow Allow Allow
mgmt Allow Allow Allow Allow Allow Allow Allow Block
data Allow Block Block Allow Block Block Block Block
intercluster Block Block Block Allow Block Block Block Block
To view all the policies within the cluster:
system services firewall policy show To view the policy applied on a network interface:
network interface show -fields firewall-policy To create a new policy:
system services firewall policy create-policy policy_name -services service_name [-allowed-ipslist_of_IP_addresses_and_netmasks]
12.2 NDMP SERVICE
There are two default settings that need to be changed: the ndmp account and the clear text password setting.
Cluster07::system services ndmp> ?
kill Kill the specified NDMP session killall Kill all NDMP sessions
modify Modify NDMP service configuration off Disable NDMP service
on Enable NDMP service
password Change the NDMP password for the node probe Display list of NDMP sessions
show Display NDMP service configuration status Display list of NDMP sessions version Display default NDMP version Cluster07::system services ndmp> show
Node Enabled Clear text User Id --- --- --- ---
Cluster07-01 true true root Clear text passwords Cluster07-02 true true root Clear text passwords 2 entries were displayed.
Cluster07::system services ndmp> modify -node * -clear-text false use * for all
2 entries were modified.
Cluster07::system services ndmp> show
Node Enabled Clear text User Id --- --- --- ---
Cluster07-01 true false root encrypted passwords Cluster07-02 true false root
Cluster07::system services ndmp> modify -node Cluster07-02 -user-id garlic Please enter password:
Confirm password:
Cluster07::system services ndmp> show
Node Enabled Clear text User Id --- --- --- --- Cluster07-01 true false root
Cluster07-02 true false garlic User changed
2 entries were displayed.
Cluster07::system services ndmp> modify -node Cluster07-01 -user-id onion Please enter password:
Confirm password:
Cluster07::system services ndmp> show
Node Enabled Clear text User Id --- --- --- --- Cluster07-01 true false onion Cluster07-02 true false garlic 2 entries were displayed.
12.3 WEB SERVICE
The Web services allow you to generate certificates as well as modify the state of ssl.
SSL SERVICES
To check the state of the services:
Cluster07::> system services web show External Web Services: true
Status: online HTTP Protocol Port: 80 HTTPs Protocol Port: 443 TLSv1 Enabled: true SSLv3 Enabled: true SSLv2 Enabled: false
To turn off sslv3 and only have tls active:
Cluster07::> system services web modify ?
[[-external] {true|false}] External Web Services (default: true) [ -sslv3-enabled {true|false} ] SSLv3 Enabled
[ -sslv2-enabled {true|false} ] SSLv2 Enabled
Cluster07::> system services web modify -sslv3-enabled false
Warning: Modifying the cluster configuration will cause pending web service requests to be interrupted as the web servers are restarted. Do you want to continue? {y|n}: y
Cluster07::> system services web show External Web Services: true
Status: online HTTP Protocol Port: 80 HTTPs Protocol Port: 443 TLSv1 Enabled: true SSLv3 Enabled: false
SSLv2 Enabled: false
CERTIFICATE GENERATION
Use of a digital certificate makes sure that Web communications are transmitted in encrypted form. It also makes sure that information is sent privately and unaltered to only the specified server. Data ONTAP enables you to generate, install, and manage a self-signed or certificate authority (CA) signed digital certificate for server authentication.
A digital certificate (sometimes called a public key certificate) is an electronic document that verifies the owner of a public key. It can be either self-signed (by owner) or CA signed. Which way to have a digital certificate signed depends on your security requirements and budget. You can obtain a self-signed digital certificate for free, but a digital certificate signed by a trusted CA can incur a considerable expense. A self-signed digital certificate is not as secure as a digital certificate signed by a CA. Therefore, it is not recommended in a production environment. A CA-signed digital certificate helps prevent man-in-the-middle attacks and provides better security protection than a self-signed digital certificate.
In order to view, delete, generate, or install certificates you must be in the advanced mode.
Cluster07::> security ? Can't access the Certificate directory in the Admin mode
audit> Manage administrative audit logging settings login> Manage login methods, roles, and passwords snmpusers Show SNMP users
ssl> Manage the SSL configurations for a Vserver Cluster07::> set advanced
Warning: These advanced commands are potentially dangerous; use them only when directed to do so by NetApp personnel.
Do you want to continue? {y|n}: y Cluster07::*> security ?
audit> Manage administrative audit logging settings certificate> *Manage Digital Certificates
login> Manage login methods, roles, and passwords snmpusers Show SNMP users
ssl> Manage the SSL configurations for a Vserver Cluster07::*> security certificate Navigate to the certificate directory
Cluster07::security certificate*> ?
create *Create and install a self -signed digital certificate
delete *Delete an installed digital certificate file> *Show Digital Certificate files
generate-csr *Generate a digital certificate signing request install *Install a digital certificate
show *Display installed digital certificates
The generation of a self-signed certificate is performed with the create command, and most of the fields have defaults.
Cluster07::security certificate*> create Usage:
-vserver <vserver name> *Vserver
[-common-name] <Common Name> *FQDN or Custom Common Name
[[-size] {512|1024|1536|2048}] *Size of Requested Certificate in Bits (default: 2048)
[[-country] <text>] *Country Name (default: US)
[[-state] <text>] *State or Province Name (default: "") [[-locality] <text>] *Locality Name (default: "")
[[-organization] <text>] *Organization Name (default: "") [[-unit] <text>] *Organization Unit (default: "") [[-email-addr] <text>] *Contact Administrator's Email Address (default: "")
[[-expire-days] {1..36510}] *Number of Days until Expiration (default: 365)
[[-hash-function] {SHA1|SHA256|MD5}] *Hashing Function (default: SHA256)
Cluster07::security certificate*> create -vserver Cluster07 -common-name New.local Cluster07::security certificate*> show view the certificates in the cluster.
Certificate
Vserver Common Name Authority Protocol Service --- --- --- --- --- Cluster07 Cluster07.cert Self-Signed SSL server Expiration Date: Wed Aug 01 14:08:00 2012
Cluster07 New.local Self-Signed SSL server Expiration Date: Thu Aug 09 14:19:50 201 2
Cluster07-01
Cluster07-01.cert Self-Signed SSL server Expiration Date: Wed Aug 01 14:07:58 2012
Cluster07-02
Cluster07-02.cert Self-Signed SSL server Expiration Date: Wed Aug 01 14:20:18 2012
4 entries were displayed.
Note: Generating a certificate request for network solutions requires the use of the SHA1 hashing function.
Cluster07::security certificate*> generate-csr Usage:
[-common-name] <Common Name> *FQDN or Custom Common Name
[ -size {512|1024|1536|2048} ] *Size of Requested Certificate in Bits (default: 2048)
[-country] <text> *Country Name
[-state] <text> *State or Province Name [-locality] <text> *Locality Name
[-organization] <text> *Organization Name [-unit] <text> *Organization Unit
[-email-addr] <text> *Contact Administrator's Email Address [ -hash-function {SHA1|SHA256|MD5} ] *Hashing Function (default: SHA256)
Cluster07::security certificate*> generatecsr commonname test.local country US -state HI -locality name -organization yours -unit yes -email-addr none -hash-function sha1
For more information see the Generating and installing a CA-signed digital certificate in the Data ONTAP 8.1 Cluster-Mode System Administrator’s Guide.
© 2013 NetApp, Inc. All rights reserved. No portions of this document may be reproduced without prior written consent of NetApp, Inc. Specifications are subject to change without notice. NetApp, the NetApp logo, Go further, faster, AutoSupport, Data ONTA P, FlexCache, SnapMirror, and Snapshot are trademarks or registered trademarks of NetApp, Inc. in the United States and/or other