Image Concepts
Using Microsoft Paint
l a b
12
247
Objectives:
Upon successful completion of Lab 12, you will be able to
● Create a simple image using the drawing tools in Paint including pencil, brush, airbrush, and some filled shapes
● Select and move part of an image ● Select and copy part of an image
● Understand that images are stored in files that can be compressed or uncompressed
● Use the image in a Word document
Resources required:
● A computer running any version of Paint and Word
Starter file:
● mountain.jpg (required for Exercise 2)
Prerequisite skills:
● General keyboarding skills; familiarity with editing keys such as Delete, Backspace, Shift, Caps Lock, and Arrow keys
● Ability to find files using Windows Explorer or Windows search feature ● Ability to open and save a file in a Windows application
NRC’s Top Ten Skills, Concepts, and Capabilities:
● SkillsUse a graphics or artwork package to manipulate an image • Use Paint to edit an image
• Use Paint to create an image • Image compression
● Concepts
Structuring information Universality
● Capabilities
Lab Lesson
Pictures and other images can be stored digitally in files. There are examples of this around us every day. The pictures you see on a Web page are stored in separate files. Pictures taken with a digital camera are also stored in files. Documents and pictures can be scanned using a scanner and also stored in files. An image file often contains a picture but can also contain a scanned image of a document, banner advertising used for a Web page, or a company logo.
Let’s explore some of the techniques that can be used to create and edit an image. We will use Paint. This is a very simple image editing application and does not have some of the more sophisticated features such as selecting individual objects after they’ve been drawn, layers, or applying gradient and lighting effects. It accomplishes some very simple drawing and editing.
Open Paint. You will probably find it in the Windows menus, Start, All Programs, Accessories, Paint.
The Paint window is shown in Figure 12.1. The drawing area can be sized to accommodate images of different sizes.
Figure 12.1 Paint parts of the Window.
Adjusting the Canvas Size
Let’s experiment with some of the drawing tools. First, we’ll set the drawing canvas size.
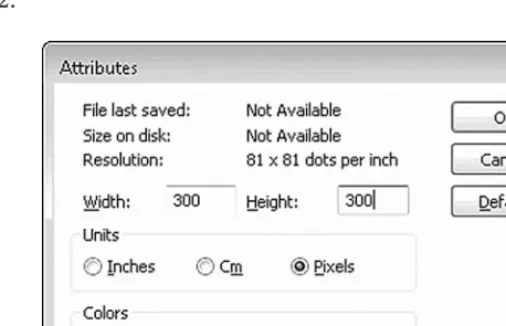
Click the Image, Attributesmenu commands.
248 Computer Skills Workbook for Fluency with Information Technology, Third Edition
Click the Widthbox and delete the number in the box. Type: 300, as shown in Figure 12.2.
Click the Heightbox and delete the number in the box. Type: 300, as shown in Figure 12.2.
Ensure that the Pixelsradio button is selected for Units, as shown in Figure 12.2.
Figure 12.2 Paint image attributes.
Click the OKbutton to set the canvas size.
Pencil, Brush, and Airbrush Tools
Let’s experiment with drawing some shapes. Do not worry about artistic talent. Keep it abstract and just have fun!
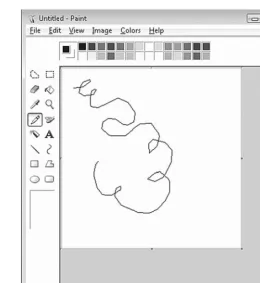
Click the Pencil tool, as shown in Figure 12.3.
Click one of the colors in the color palette to select a drawing color. Drag a path on the canvas with the mouse.
The pencil line will follow the path you draw, as shown in Figure 12.3.
Lab 12: Image Concepts Using Microsoft Paint 249
Figure 12.3 Paint drawing with the Pencil tool.
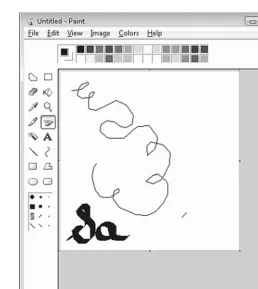
Click the Brushtool, as shown in Figure 12.4.
Notice that there are a variety of brush tips to choose from that have appeared below the Tool
buttons.
Click one of the brush tips. The slanted tips will provide a calligraphy effect. Click one of the colors in the color palette to choose a drawing color.
Again, drag a path on the canvas to draw with the Brushtool, as shown in Figure 12.4.
250 Computer Skills Workbook for Fluency with Information Technology, Third Edition
Figure 12.4 Paint adding the Brush tool drawing.
You will find that it is easier to draw a smooth curve if you move the mouse a bit quickly. You may also find that you have more control over drawing if you put more pressure on the left mouse button with your index finger and use that motion to move the mouse rather than using your whole hand to move the mouse.
Click the Airbrushtool, as shown in Figure 12.5. Notice that there are three spray sizes below the tool buttons.
Click the largest spray size.
Click one of the colors in the color palette to select the spray color. Drag a path on the canvas with the mouse. If you hover over a spot for a second or two, the spray will intensify just as if you were using a can of spray paint.
Notice that as you draw over other drawn items, the current item appears on top and may obstruct the other item entirely, as shown in Figure 12.5.
Notice that the spray is formed, following the path of your mouse, as shown in Figure 12.5.
Lab 12: Image Concepts Using Microsoft Paint 251
Figure 12.5 Paint drawing with the Airbrush tool.
Erasing
Paint does not allow us to select and delete a drawn object individually. This is a feature of most other image editing software packages. We can erase parts of the image using an eraser. Let’s erase part of the image.
Click the Erasertool, as shown in Figure 12.6.
Notice that a variety of eraser sizes appear below the Toolbuttons.
Click the largest eraser size.
Drag through parts of your drawn image. Notice that the eraser colors a white path through the image as you drag the mouse. Figure 12.6 shows an erased area in the middle of the image.
252 Computer Skills Workbook for Fluency with Information Technology, Third Edition
Figure 12.6 Paint with erased portion.
Selecting, Moving, and Copying Part of the Image
We can select part of the image to move or copy it as well. The selection tools allow us to define a rectangular shape or draw a custom shape. Let’s select part of the image and move it.
Click the Selecttool, as shown in Figure 12.7.
Drag through part of the image to draw a rectangle area, as shown in Figure 12.7.
Lab 12: Image Concepts Using Microsoft Paint 253
Figure 12.7 Paint showing selected part of the image.
Position the mouse pointer inside the selected area.
Drag the selected area to a new location on the canvas, as shown in Figure 12.8.
254 Computer Skills Workbook for Fluency with Information Technology, Third Edition
Figure 12.8 Paint showing selected portion of image moved.
We can also copy part of the image as well.
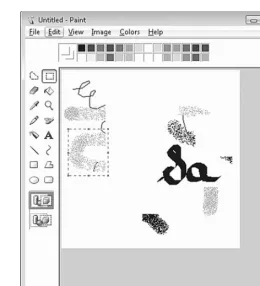
Move the mouse pointer to a new location in the image and drag to select a new portion of the image, as shown in Figure 12.9.
Lab 12: Image Concepts Using Microsoft Paint 255
Figure 12.9 Paint selected portion of the image.
Click the Edit, Copymenu commands. Click the Edit, Pastemenu commands.
Notice that a copy of the selection has been pasted in the upper left corner of the image, as shown in Figure 12.10.
256 Computer Skills Workbook for Fluency with Information Technology, Third Edition
Figure 12.10 Paint with copied selection.
Feel free to move the copied selection to a new location on the canvas.
Filled Objects
Let’s experiment with a few of the filled objects.
Click the Ellipsetool, as shown in Figure 12.11.
The three options shown below the toolbar include outline, outline and filled, and filled, as shown in Figure 12.11.
Click the Outline and Filloption below the Toolbuttons, as shown in Figure 12.11.
We can select the outline and fill colors separately. We will left-click a color swatch to select the outline color and right-click a color swatch to select the fill color.
Left-click one of the color swatches.
Notice that the color you have selected appears as indicated by the left-click location in Figure 12.11.
Right-click one of the color swatches.
Notice that the color you have selected appears as indicated by the right-click location in Figure 12.11.
Lab 12: Image Concepts Using Microsoft Paint 257
Move the mouse pointer to the canvas and drag to form an ellipse.
Notice that the left-click color is used as the outline and the right-click color is used as the fill color.
Figure 12.11 Excel Ellipse drawing options.
The method to draw the rectangle and rounded rectangle shapes is identical to drawing an ellipse. For something different, let’s draw a polygon. A polygon is a multi-sided shape. Again, we will use the Outline and Filloption.
Click the Polygon Shape Toolbutton, as shown in Figure 12.12. Click the Outline and Filloption, as shown in Figure 12.12.
Move the mouse pointer into the canvas area and drag to form a line, as shown in Figure 12.12, Step 1.
Move the mouse pointer to another spot on the canvas where the next “corner” for the polygon will be, and click the left mousebutton as shown in Figure 12.12, Step 2. Do not drag.
Move the mouse pointer again to another point on the canvas and click the
left mousebutton to form another “corner” as shown in Figure 12.12, Step 3.
258 Computer Skills Workbook for Fluency with Information Technology, Third Edition
Figure 12.12 Paint drawing a polygon.
Hover the mouse pointer over the starting point and double-click to close the polygon, as shown in Figure 12.13.
Lab 12: Image Concepts Using Microsoft Paint 259
Figure 12.13 Paint polygon drawing.
We can change or add fill color to the canvas or objects. The Fill with Colortool will fill a closed area with color. If the area chosen is a closed object, such as the ellipse, it will fill only the inside of the ellipse. If the area chosen is an object that is not closed, the color will spill into all of the open areas. Let’s fill the canvas with color to see this effect.
Click the Fill with Colorbutton, as shown in Figure 12.14.
Click one of the color swatches to select the fill color. Figure 12.14 shows a grey swatch selected.
Move the mouse pointer to the canvas but not inside a filled object. Click somewhere on the canvas to fill the canvas with the selected color.
The effect is shown in Figure 12.14.
260 Computer Skills Workbook for Fluency with Information Technology, Third Edition
Figure 12.14 Paint filling the canvas with color.
Notice that some of the filled shapes have not been filled with color. They will need to be filled separately. Let’s try another one.
Click one of the color swatches to select a different color.
Move the mouse pointer to the middle of the ellipse and click to fill the ellipse with the new color, as shown in Figure 12.15.
Lab 12: Image Concepts Using Microsoft Paint 261
Figure 12.15 Paint with fill color in the ellipse.
Image File Types
There are a variety of image file types used to store images. Let’s look at just a few of them.
Click the File, Savemenu commands.
Windows may automatically choose the Picturesfolder, as shown in Figure 12.16.
Click the File namebox and type: test, as shown in Figure 12.16.
Figure 12.16 Save As dialog box default as jpg.
The default file type for an image created in Paint is jpg. We will save this file again using different file types and compare.
Click the Savebutton to save the file.
262 Computer Skills Workbook for Fluency with Information Technology, Third Edition
There are a variety of compressed image formats that may consolidate pixels that have the same color in the internal storage, or limit the number of colors that are used. One of the most popular image formats for displaying an image in a Web page is jpg. A bitmap file type uses an
uncompressed format and stores a color number for each pixel. Let’s store our image as a bitmap image and look at the difference in file size.
Click the File, Save Asmenu commands.
Click the Save as typedrop-down menu, as shown in Figure 12.17. Select 24-bit Bitmap as shown in Figure 12.17.
Figure 12.17 Paint Save As 24-bit Bitmap.
Click the Savebutton to save the file.
Saving in some formats produces an alert message that there may be some color loss. You may find this to be the case with gif images. Let’s look at the difference in file size.
Click the Startbutton and click the Picturesmenu option to display the folder list for the folder containing the images, as shown in Figure 12.18.
Click the Viewsbutton and select the Detailsoption to see the listing shown in Figure 12.18.
Figure 12.18 Windows Explorer showing the list for the image files created.
Lab 12: Image Concepts Using Microsoft Paint 263
Hover the mouse pointer over each file name to see the detailed information including file type.
In the example shown in Figure 12.18, the test.bmp file is 264 KB and the test.jpg file is 12 KB. That’s quite a difference. The jpg image is more suitable for a Web page where download time is a concern and file sizes should be as small as possible.
Now that we have an image, we can use it in a document such as a Word, Excel or PowerPoint file. We can also include it in a Web page.
Let’s add our image to a document.
Open Word 2007.
Click the Insertmenu command.
In the Picturebutton, select the folder containing your image files and select the test.bmp image file from the list, as shown in Figure 12.19.
The file list in Figure 12.19 is shown using the medium icons view.
Figure 12.19 Insert Picture dialog box showing file list from Pictures.
Click the Insertbutton to insert the test.bmp picture into the Word document.
The image should appear in the Word document, as shown in Figure 12.20.
264 Computer Skills Workbook for Fluency with Information Technology, Third Edition
Figure 12.20 Word document with test.bmp.
Review
This has been a busy lab! We have covered the following topics:
● Creating a simple image using some of the drawing tools in Paint Pencil
Brush Airbrush Filled shapes
● Selecting and moving part of an image ● Selecting and copying part of an image ● Storing an image in a file
Bmp as a large uncompressed file Jpg as a smaller compressed file ● Using the image in a Word document
Lab 12: Image Concepts Using Microsoft Paint 265
Exercises
Use Paint to create the following effects:
1. Draw a picture of some people stick figures. Be creative! Figure 12.21 is a small example.
Figure 12.21 Paint with stick figure drawing.
2. We can open an image file in Paint and add enhancements to it or clip out parts. Open the mountain.jpg file in Paint, as shown in Figure 12.22.
a. Click the Texttool to add text.
b. Drag to form a rectangle in the upper left corner, as shown in Figure 12.22. c. From the Fonts toolbar choose the Arial font, size 12.
d. In the new text box, type: Climb the biggest mountain one step at a time! This is shown in Figure 12.22.
266 Computer Skills Workbook for Fluency with Information Technology, Third Edition
Figure 12.22 Paint with mountain picture and text.
Lab 12: Image Concepts Using Microsoft Paint 267