Chapter 7
Basic Concepts of I/O
• I/O devices are also called peripheral devices.
• I/O devices are pieces of equipment that
exchange data with a computer.
– Examples include switches, light-emitting diodes,
cathode-ray tube screens, printers, modems,
Interface (Peripheral) Chip
(1 of 2)
• A chip whose function is to synchronize data transfer
between the CPU and I/O devices
• Consists of control registers, status registers, data
direction latches, and control circuitry
• Has pins that are connected to the CPU and I/O port
pins that are connected to the I/O devices
• Each interface chip has a chip enable signal input or
inputs, when asserted, allow the interface chip to react to
the data transfer request.
Address Decoder
Microprocessor
Data Bus Interface
chip 1
Interface chip 1 from
input device
to output device I/O pins
CE CE
Interface (Peripheral) Chip
(2 of 2)
I/O Schemes
• Isolated I/O scheme
– The microprocessor has dedicated instructions for I/O
operations.
– The microprocessor has a separate address space for
I/O devices.
• Memory-mapped I/O scheme
– The microprocessor uses the same instruction set to
perform memory accesses and I/O operations.
Microprocessor
Control signals
(such as R/W or interrupt)
Interface chip
handshake or
strobe signal I/O device electronics
Data Bus
D
at
a
B
us
I/O Transfer Synchronization
• The role of an interface chip
– Synchronizing data transfer between the CPU and the interface
chip
Synchronizing the Microprocessor
and the Interface Chip
• The polling method
– For input -- The microprocessor checks a status bit of the
interface chip to find out if the interface chip has received new
data from the input device.
– For output -- The microprocessor checks a status bit of the
interface chip to find out if it can send new data to the interface
chip.
• The interrupt-driven method
– For input -- The interface chip interrupts the microprocessor
whenever it has received new data from the input device.
Synchronizing the Interface Chip
and the I/O Devices
•
Brute-force method -- useful when the data timing is unimportant
– For input -- Nothing special is done. The microprocessor reads the interface chip and the interface chip returns the voltage levels on the input port pins to the
microprocessor.
– For output -- Nothing special is done. The interface chip places the data that it received from the microprocessor directly on the output port pins.
•
The strobe method -- a strobe signal used to indicate that data are stable on
I/O port pins
– For input -- The interface chip latches the data into its data register using the strobe signal.
– For output -- The interface chip places the data on port pins that it received from the microprocessor and asserts the strobe signal. The output device latches the data using the strobe signal.
•
The handshake method -- used when timing is crucial
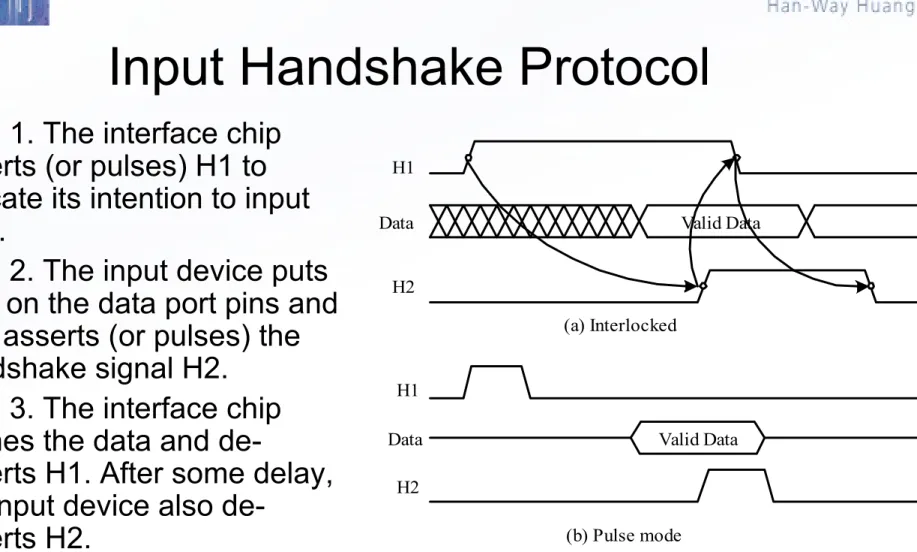
– Two handshake signals used to synchronize the data transfer. One signal, call it H1, is asserted by the interface chip. The other signal, call it H2, is asserted by the I/O device.
Valid Data H1
Data
H2
(a) Interlocked
H1
H2
Data Valid Data
(b) Pulse mode
Figure 7.3 Input Handshakes
Input Handshake Protocol
• Step 1. The interface chip
asserts (or pulses) H1 to
indicate its intention to input
data.
• Step 2. The input device puts
data on the data port pins and
also asserts (or pulses) the
handshake signal H2.
• Step 3. The interface chip
latches the data and
de-asserts H1. After some delay,
the input device also
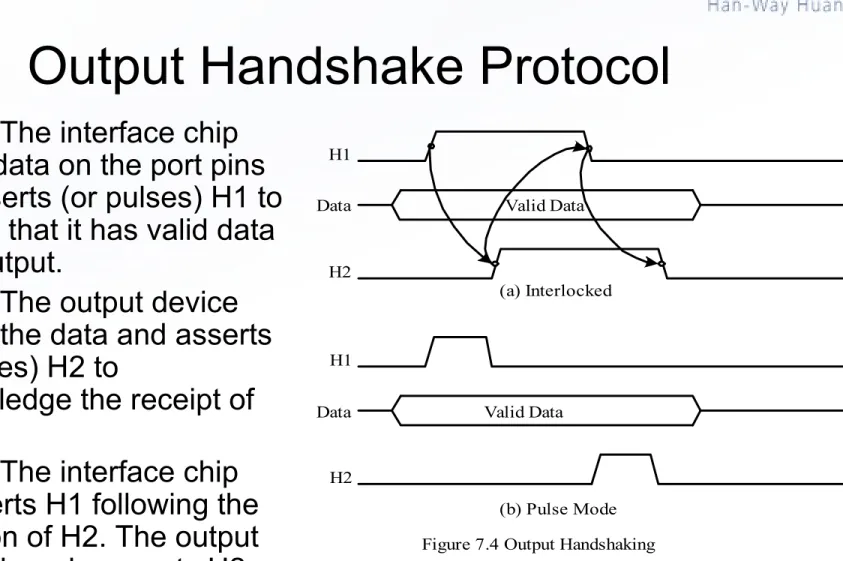
Valid Data
(a) Interlocked H1
H2 Data
Valid Data
(b) Pulse Mode H1
H2 Data
Figure 7.4 Output Handshaking
Output Handshake Protocol
• Step 1. The interface chip
places data on the port pins
and asserts (or pulses) H1 to
indicate that it has valid data
to be output.
• Step 2. The output device
latches the data and asserts
(or pulses) H2 to
acknowledge the receipt of
data.
Overview of HCS12 Parallel Ports
(1 of 3)
• The HCS12 members have from 48 to 144 I/O pins
arranged in 3 to 12 ports and packaged in a quad flat
pack (QFP) or low profile quad flat pack (LQFP).
• All I/O pins serve multiple functions.
• When a peripheral function is enabled, its associated
pins cannot be used as I/O pins.
• Each I/O port has several registers to support its
operation.
• Registers related to I/O ports have been assigned a
mnemonic name and the user can use these names to
refer to them:
Overview of HCS12 Parallel Ports
(2 of 3)
• All I/O ports (except PAD0 and PAD1) have an associated data
direction register and a data register.
• The name of the data direction register is formed by adding the
letters “DDR” as the prefix to the port name. For example, DDRA,
DDRB, and DDRT.
• To configure a pin for output, write a ‘1’ to the associated bit in the
data direction register.
• To configure a pin for input, write a ‘0’ to the associated bit in the
data direction register.
movb #$FF,DDRA ; configure port A for output
movb #0,DDRA
; configure port A for input
Overview of HCS12 Parallel Ports
(3 of 3)
• The name of port data register is formed by adding letters “PT” as
the prefix to the port name. For example, PTA, PTB, PTP, and PTT.
• We can also use “PORT” as the prefix to the port name for port A, B,
E, and K.
• Output a value to a port is done by storing that value to the port data
register.
movb #$FF,DDRH ; configure Port H for output
movb #$37,PTH; output the hex value 37 to port H
• Input a value from an input port is done by loading from the port
data register.
movb #0,DDRH ; configure Port H for input
ldaa PTH ; read data from port H into A
Port A and Port B
• In expanded mode, Port A carries the
time-multiplexed higher address/data signals
A15/D15…A8/D8
.
• In expanded mode, Port B carries the
time-multiplexed lower address/data signals
A7/D7…
A0/D0
.
PE0/ XIRQ PE1/ IRQ PE2/ R/ W
PE3/ LSTRB/ TAGLO PE4/ ECLK
PE5/ MODA/ IPIPE0 PE6/ MODB/ IPIPE1
Figure 7.5 Port E pins and their alternate functions PE7/ NOACC/ XCLKS
Port E
• Port E pins are used
for bus control and
interrupt service
request signals.
Port E Registers
•
Port E assignment register (PEAR)
– In expanded mode, the PEAR register assigns the function of each port E pin.
•
MODE register
– This register establishes the operation mode and other miscellaneous functions.
•
Pull-up control register (PUCR)
– This register selects the pull-up resistors for the pins associated with the core ports.
– Port A, B, E, and K are in the core part.
•
Reduced drive register (RDRIV)
– This register selects reduced drive for the pins associated with the core ports. – This gives reduced power consumption and reduced RFI with a slight increase in
transition time.
•
External bus interface control register (EBICTL)
– Only bit 0 is implemented (ESTR).NOACCE 0 PIPOE NECLK LSTRE RDWE 0 0
7 6 5 4 3 2 1 0
$000A
NOACCE: No Access output enable. Can be read/written any time. 0 = PE7 is used as general-purpose I/O pin
1 = PE7 is output and indicates whether the cycle is a CPU free cycle PIPOE: Pipe signal output enable.
In normal modes: write once. Special modes: write anytime except the first time. This bit has no effect in single chip modes.
0 = PE[6:5] are general-purpose I/O
1 = PE[6:5] are outputs and indicate the state of the instruction queue. NECLK: No external E clock. Can be read anytime.
In expanded modes, writes to this bit has no effect. E clock is required for de-multiplexing the external address. NECLK can be written once in normal single chip mode and can be written anytime in special single chip mode.
0 = PE4 is the external E-clock. 1 = PE4 is a general-purpose I/O pin.
LSTRE: Low strobe (LSTRB) enable. Can be read anytime.
In normal modes: write once; special modes: write anytime. This bit has no effect in single-chip modes or normal expanded narrow mode.
0 = PE3 is a general-purpose I/O pin.
1 = PE3 is configured as the LSTRB bus-control output, provided the HCS12 is not in single chip or normal expanded narrow modes. RDWE: Read/write enable. Can be read anytime.
In normal modes: write once; special modes: write anytime except the first time. This bit has no effect in single-chip modes.
0 = PE2 is a general-purpose I/O pin
1 = PE2 is configured as the R/W pin. In single-chip modes, RDWE has no effect and PE2 is a general-purpose I/O pin.
MODC MODB MODA 0 IVIS EMK EME
7 6 5 4 3 2 1
0
0
MODC, MODB, MODA: mode select bits 000 = special single chip mode
001 = emulation narrow mode 010 = special test mode
011 = emulation wide mode 100 = normal single chip mode
101 = normal expanded narrow mode (external memory data bus is 8-bit) 110 = special peripheral mode
111 = normal expanded wide mode (external memory data bus is 16-bit) IVIS: internal visibility
0 = No visibility of internal bus operations on external bus 1 = Internal bus operations are visible on external bus EMK: emulate Port K
0 = PTK and DDRK are in memory map and port K can be used in general I/ O 1 = If in any expanded mode, PTK and DDRK are removed from memory map EME: emulate Port E
0 = PTE and DDRE are in the memory map so Port E can be used for general I/ O 1 = If in any expanded mode or special peripheral mode, PORTE and DDRE are removed from memory map and hence allows the user to emulate the function of these registers externally.
PUPKE 0 0 PUPEE 0 PUPBE PUPAE
7 6 5 4 3 2 1
0
0
PUPKE: pull-up Port K enable
0 = Port K pull-up resistors are disabled 1 = Port K pull-up resistors are enabled PUPEE: pull-up Port E enable
0 = Port E input pins 7 and 4-0, pull-up resistors are disabled 1 = Port E input pins 7 and 4-0, pull-up resistors are enabled PUPBE: pull-up Port B enable
0 = Port B pull-up resistors are disabled 1 = Port B pull-up resistors are enabled PUPAE: pull-up Port A enable
0 = Port A pull-up resistors are disabled 1 = Port A pull-up resistors are enabled
reset: 1 0 0 1 0 0 0 0
RDPK 0 0 RDPE 0 RDPB RDPA
7 6 5 4 3 2 1
0
0
RDPK: reduced drive of Port K
0 = All Port K pins have full drive enabled 1 = All Port K pins have reduced drive enabled RDPE: reduced drive of Port E
0 = All Port E pins have full drive enabled 1 = All Port E pins have reduced drive enabled RDPB: reduced drive of Port B
0 = All Port B pins have full drive enabled 1 = All Port B pins have reduced drive enabled RDPA: reduced drive of Port A
0 = All Port A pins have full drive enabled 1 = All Port A pins have reduced drive enabled
reset: 1 0 0 1 0 0 0 0
Figure 7.10 Port K pins and their alternate functions
PK0/ X14 PK1/ X15 PK2/ X16 PK3/ X17 PK4/ X18 PK5/ X19 PK6/ XCS
PK7/ ECS/ ROMONE
(only available in H sub-family)
Port K
• Has PTK and DDRK
registers
• Carries expanded address
XADDR14…XADDR19 in
expanded mode
• On the rising edge of the
RESET signal, the value of
the PK7 pin is latched into
the ROMON bit of the MISC
register in expanded mode.
If it is 1, the on-chip flash
memory is enabled.
Figure 7.14 Port T pins and their alternate functions
PT0/ IOC0 PT1/ IOC1 PT2/ IOC2 PT3/ IOC3 PT4/ IOC4 PT5/ IOC5 PT6/ IOC6 PT7/ IOC7
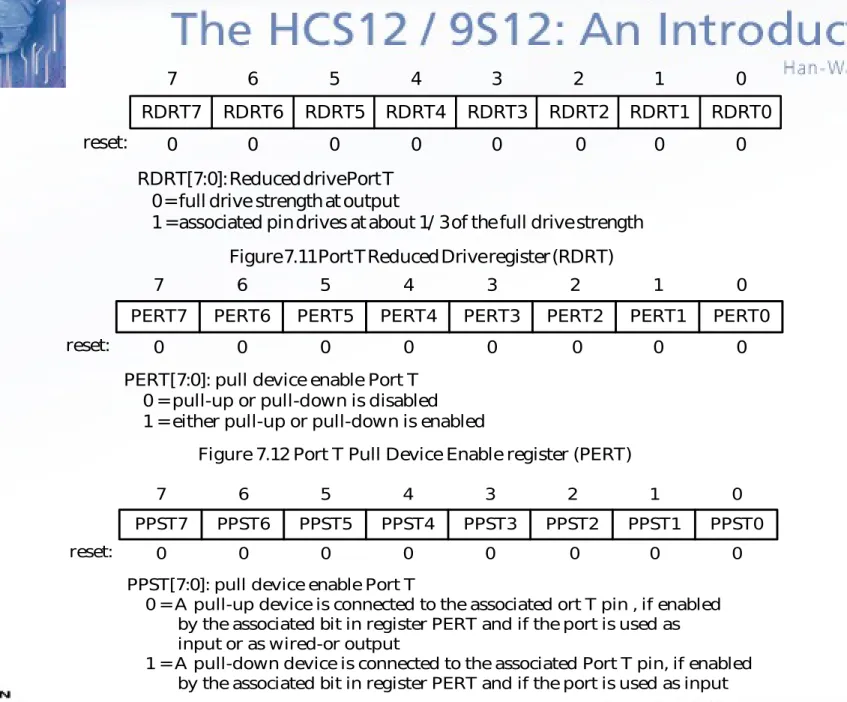
Port T
•
Has Port T data register (PTT), Port T
data direction register (DDRT), Port input
register (PTIT), reduced drive register
(RDRT), pull device enable register
(PERT), and port polarity select register
(PPST)
– The PTIT register allows the user to read back the status of Port T pins.
– The RDRT register can configure the drive strength (current output) of each port pin as either full or reduced load.
– The PERT register is used to enable an input Port T pin pull-up or pull-down device.
– The PPST register selects whether a pull-down or pull-pull-down device is connected to the pin.
RDRT7 RDRT6 RDRT5 RDRT4 RDRT3 RDRT1 RDRT0
7 6 5 4 3 2 1
RDRT2
0
RDRT[7:0]: Reduced drive Port T 0 = full drive strength at output
1 = associated pin drives at about 1/ 3 of the full drive strength
reset: 0 0 0 0 0 0 0 0
Figure 7.11 Port T Reduced Drive register (RDRT)
PERT7 PERT6 PERT5 PERT4 PERT3 PERT1 PERT0
7 6 5 4 3 2 1
PERT2
0
PERT[7:0]: pull device enable Port T 0 = pull-up or pull-down is disabled 1 = either pull-up or pull-down is enabled
reset: 0 0 0 0 0 0 0 0
Figure 7.12 Port T Pull Device Enable register (PERT)
PPST7 PPST6 PPST5 PPST4 PPST3 PPST1 PPST0
7 6 5 4 3 2 1
PPST2
0
PPST[7:0]: pull device enable Port T
0 = A pull-up device is connected to the associated ort T pin , if enabled by the associated bit in register PERT and if the port is used as input or as wired-or output
1 = A pull-down device is connected to the associated Port T pin, if enabled by the associated bit in register PERT and if the port is used as input
WOMS7 WOMS6 WOMS5 WOMS4 WOMS3 WOMS1 WOMS0
7 6 5 4 3 2 1
WOMS2
0
WOMS[7:0]: Wired-or mode Port S
0 = Output buffers operate as push-pull outputs 1 = Output buffers operate as open-drain outputs
reset: 0 0 0 0 0 0 0 0
Figure 7.15 Port S Wired-Or Mode register (WOMS)
PS0/ RXD0 PS1/ TXD0 PS2/ RXD1 PS3/ TXD1 PS4/ MISO0 PS5/ MOSI0 PS6/ SCK0 PS7/ SS0
Port S
• Port S pins are used as general I/O, serial communication interface,
and serial peripheral interface pins.
Figure 7.18 Port M pins and their alternate functions
PM0/ RXCAN0/ RXB PM1/ TXCAN0/ TXB
PM2/ RXCAN1/ RXCAN0/ MISO0 PM3/ TXCAN1/ TXCAN0/ SS0
PM4/ RXCAN2/ RXCAN0/ RXCAN4/ MOSI0 PM5/ TXCAN2/ TXCAN0/ TXCAN4/ SCK0 PM6/ RXCAN3/ RXCAN4
PM7/ TXCAN3/ TXCAN4
Port M
• Port M has all the
equivalent registers that
Port S has and also a
module routing register
(MODRR).
0 MODRR6 MODRR5 MODRR4 MODRR3 MODRR1 MODRR0
7 6 5 4 3 2 1
MODRR2
0
reset: 0 0 0 0 0 0 0 0
MODRR1 MODRR0 RXCAN0 TXCAN0 CAN0 routing 0 0 1 1 0 1 0 1 PM0 PM21 PM42 PM1 PM31 PM52 reserved MODRR3 MODRR2 RXCAN4 TXCAN4 CAN4 routing 0 0 1 1 0 1 0 1 PJ6 PM43 PM64 PJ7 PM53 PM74 reserved
MODRR4 MISO0 SS0 SPI0 routing
0 1
MOSI0 SCK0 PS4
PM25 PM4PS56 PM5PS66
PS7 PM35
MODRR5 MISO1 SS1 SPI1 routing
0 1
MOSI1 SCK1 PP0
PH0 PH1PP1 PH2PP2
PP3 PH3 MODRR6 MISO2 SS2
SPI2 routing 0
1
MOSI2 SCK2 PP4
PH4 PH5PP5 PH6PP7
PP6 PH7
Note: 1. Routing to this pin takes effect only if CAN1 is disabled. 2. Routing to this pin takes effect only if CAN2 is disabled.
3. Routing to this pin takes effect only if CAN2 disabled and CAN0 disabled if routed here.
4. Routing to this pin takes effect only if CAN3 is disabled.
5. Routing to this pin takes effect only if CAN1 disabled and CAN0 disabled if routed here.
•
Example 7.1
Give an instruction to configure the MODRR
register to achieve the following port routing:
1. CAN0: use pins PM1 and PM0 2. CAN1: use pins PM3 and PM2 3. CAN2: use pins PM5 and PM4 4. CAN3: use pins PM7 and PM6 5. I2C: use PJ7 and PJ6
6. SPI0: use pins PS7~PS4 7. SPI1: use pins PH3~PH0 8. SPI2: use pins PH7~PH4
•
Solution:
This routing requirement can be achieved by
preventing CAN4 from using any port pins and keep the default
routing after reset.
-The following instruction will satisfy the requirement:
•
Example 7.2
Give an instruction to configure the MODRR register to
achieve the following port routing:
1. CAN0: use pins PM1 and PM0 2. CAN1: use pins PM3 and PM2 3. CAN2: disabled
4. CAN3: disabled
5. I2C: use PJ7 and PJ6 6. SPI0: use pins PS7~PS4 7. SPI1: use pins PP3~PP0 8. SPI2: use pins PH7~PH4
•
Solution:
This routing requirement can be satisfied by the following
instruction:
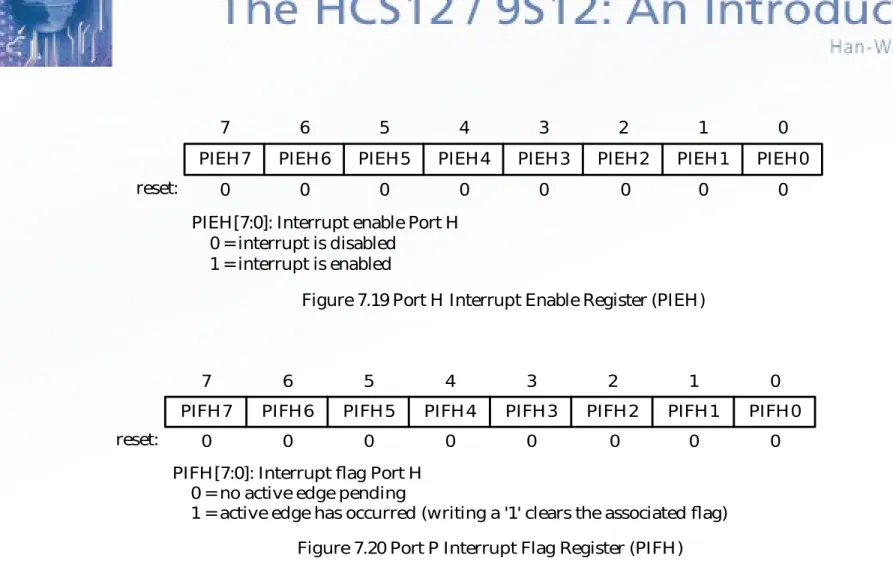
Port H, J, and P
•
These three I/O ports have the same set of registers:
– Port I/O register (PTH, PTJ, PTP)– Port Input Register (PTIH, PTIJ, PTIP)
– Port Data Direction Register (DDRH, DDRJ, DDRP) – Port Reduced Drive Register (RDRH, RDRJ, RDRP) – Port Pull Device Enable Register (PERH, PERJ, PERP) – Port Polarity Select Register (PPSH, PPSJ, PPSP)
– Port Interrupt Enable Register (PIEH, PIEJ, PIEP) – Port Interrupt Flag Register (PIFH, PIFJ, PIFP)
•
These ports have edge-triggered interrupt capability in the wired-OR
fashion.
•
The SPI function pins can be rerouted to Port H and P.
•
The interrupt edges can be rising or falling and are programmed through
Port Device Enable Register and Port Polarity Select Register.
PIEH7 PIEH6 PIEH5 PIEH4 PIEH3 PIEH1 PIEH0
7 6 5 4 3 2 1
PIEH2
0
PIEH[7:0]: Interrupt enable Port H 0 = interrupt is disabled
1 = interrupt is enabled
reset: 0 0 0 0 0 0 0 0
Figure 7.19 Port H Interrupt Enable Register (PIEH)
PIFH7 PIFH6 PIFH5 PIFH4 PIFH3 PIFH1 PIFH0
7 6 5 4 3 2 1
PIFH2
0
PIFH[7:0]: Interrupt flag Port H 0 = no active edge pending
1 = active edge has occurred (writing a '1' clears the associated flag)
reset: 0 0 0 0 0 0 0 0
Figure 7.21 Port H pins and their alternate functions
PH0/ MISO1/ KWH0 PH1/ MOSI1/ KWH1 PH2/ SCK1/ KWH2 PH3/ SS1/ KWH3 PH4/ MISO2/ KWH4 PH5/ MOSI2/ KWH5 PH6/ SCK2/ KWH6 PH7/ SS2/ KWH7
Figure 7.22 Port J pins and their alternate functions
PJ0/ KWJ0 PJ1/ KWJ1
PJ6/ KWJ6/ RXCAN4/ SDA/ RXCAN0 PJ7/ KWJ7/ TXCAN4/ SCL/ TXCAN0
Figure 7.23 Port P pins and their alternate functions
IEN7 IEN6 IEN5 IEN4 IEN3 IEN1 IEN0
7 6 5 4 3 2 1
IEN2
0
IENx: ATD digital input enable on channel x 0 = disable digital input buffer to PTADx pin 1 = enable digital input buffer to PTADx pin
reset: 0 0 0 0 0 0 0 0
Figure 7.24 ATD Input enable register (ATD0DIEN and ATD1DIEN)
Port AD0 and AD1
• Many HCS12 devices have two 8-channel A/D converters (AD0 and
AD1).
• Device that has only one 8-channel module is referred to as AD.
• When A/D functions are disabled, these two ports can be used as
general input port.
• These two ports do not have data direction registers.
Electrical Characteristic
Consideration for I/O Interfacing
• When interfacing I/O device to the MCU, one needs to
consider electrical compatibility issues.
– There are two electrical compatibility issues:
• Voltage level compatibility
• Current drive capability
• There are many IC technologies in use. Some are
bipolar, whereas others are unipolar (mainly CMOS and
BICMOS).
• Voltage parameters related to electrical compatibility
For Device X to Drive Device Y Correctly
• The output high voltage of device X (VOHX) must be
higher than the input high voltage of device Y (VIHY).
• The output low voltage of device X (VOLX) must be
lower than the input low voltage of device Y (VILY).
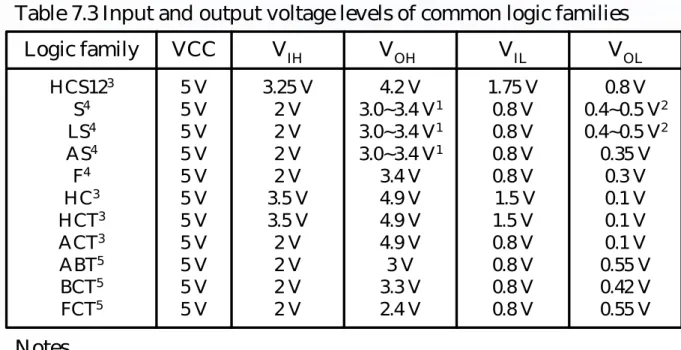
• The input and output voltage levels of several popular
logic families are shown in Table 7.3.
• At the same power supply level, the CMOS device has
no problem in driving the bipolar and CMOS devices.
• Bipolar devices have problem in driving CMOS devices.
• HCS12 cannot be driven by bipolar devices.
Logic family VCC VIH VOH VIL VOL HCS123 S4 LS4 AS4 F4 HC3 HCT3 ACT3 ABT5 BCT5 FCT5 5 V 5 V 5 V 5 V 5 V 5 V 5 V 5 V 5 V 5 V 5 V 3.25 V 2 V 2 V 2 V 2 V 3.5 V 3.5 V 2 V 2 V 2 V 2 V 4.2 V 3.0~3.4 V1
3.0~3.4 V1
3.0~3.4 V1
3.4 V 4.9 V 4.9 V 4.9 V 3 V 3.3 V 2.4 V 1.75 V 0.8 V 0.8 V 0.8 V 0.8 V 1.5 V 1.5 V 0.8 V 0.8 V 0.8 V 0.8 V 0.8 V 0.4~0.5 V2
0.4~0.5 V2
0.35 V 0.3 V 0.1 V 0.1 V 0.1 V 0.55 V 0.42 V 0.55 V Notes.
1. VOH value will get lower when output current is larger.
2. VOL value will get higher when output current is larger. The VOL values of different logic gates are slightly different.
3. HCS12, HC, HCT, ACT are based on the CMOS technology.
4. S, LS, AS and F logic families are based on the bipolar technology. 5. ABT, BCT, and FCT are using the Bi-CMOS technology.
Current Drive Capability
• The device that drives other devices must have enough sourcing
(supply current) and sinking (absorb current) capability.
• Current flows out from the driving device when the driving voltage is
high.
• Current flows into the driving device when the driving voltage is low.
• The driving device must be able to supply (or sink) enough current
needed by those devices being driven for proper operation.
• If a device cannot source or sink enough current, then using buffer
device is a common solution.
• The current capabilities of a logic device are determined by the
following currents:
– Input high current (I
IH)
– Input low current (I
IL)
– Output high current (I
OH)
– Output low current (I
OL)
Logic family VCC HCS1223 S LS AS F HC3 HCT3 ACT3 ABT3 BCT FCT3
IIH IIL IOH IOL
5 V 5 V 5 V 5 V 5 V 5 V 5 V 5 V 5 V 5 V 5 V
2.5 A 50 A 20 A 20 A 20 A 1 A 1 A 1 A 1 A 20 A
1 A
2.5 A 1.0 mA 0.2 mA 0.5 mA 0.5 mA 1 A 1 A 1 A 1 A 1 mA 1 A
25 mA 1 mA 15 mA 15 mA 1 mA 25 mA 25 mA 24 mA 32 mA 15 mA 15 mA 25 mA 20 mA 24 mA 64 mA 20 mA 25 mA 25 mA 24 mA 64 MA 64 mA 64 mA Notes.
1. Values are based on the 74xx244 of Texas Instrument (xx is the technology name) 2. The total HCS12 supply current is 65 mA.
3. The values for IIH and IIL are input leakage currents. Table 7.4 Current capabilities of common logic families1
1. The I
OHof an output pin must be equal to or larger than the total current
flowing into all the peripheral pins that are connected to this pin.
D
CLK
Q
Q
Figure 7.28 D flip-flop and its latching timing requirement (a)
D
CLK
tsu thd
(b)
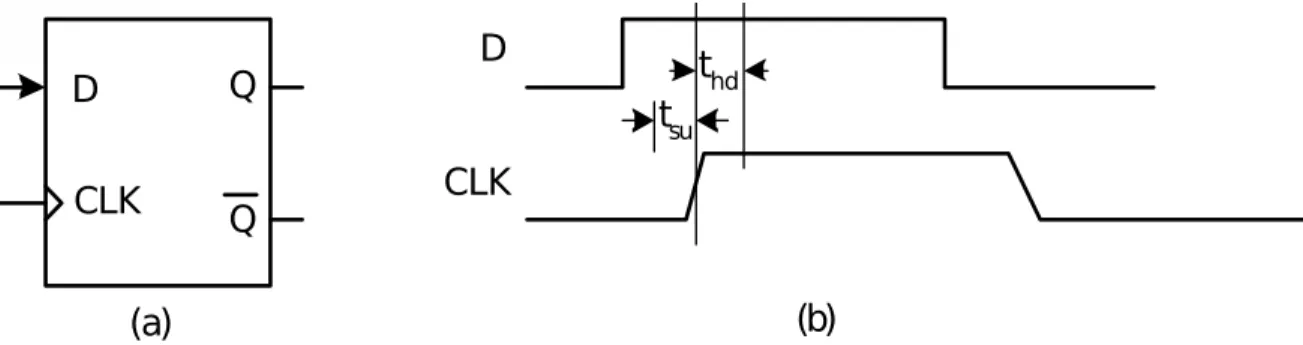
Timing Compatibility
• There is no timing problem when driving a peripheral pin that does
not contain latches or flip-flops.
• When driving a latch or flip-flop device, one needs to make sure that
the data set up time (t
SU) and data hold time (t
HD) are both satisfied.
74HC04 VCC
Figure 7.29 An LED connected to a CMOS inverter through a current- limiting resistor.
Port pin
(a) positive direct drive (c) buffered drive
R1
R2
R3
VCC
Port pin
Port pin
(b) inverse direct drive
Interfacing with LED Devices
• Figure 7.29 suggests three methods for interfacing with LEDs.
• Circuit (a) and (b) are recommended for LEDs that need only small
current to light.
•
Example 7.3
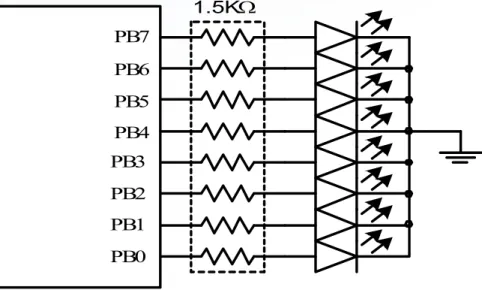
Use Port B to drive eight LEDs using the circuit
shown in Figure 7.30. Light each LED for half a second in turn
and repeat assuming the HCS12 has a 24-MHz E clock.
Figure 7.30 Circuit connection for example 7.3 PB3
PB2 PB1 PB0 HCS12
PB7 PB6 PB5 PB4
1.5K
The assembly program that performs the operation is as follows:
#include "C:\miniide\hcs12.inc"
org $1500
movb #$FF,DDRB ; configure port B for output
bset DDRJ,$02 ; configure PJ1 pin for output
bclr PTJ,$02 ; enable LEDs to light
forever ldaa #16 ; initialize loop count to 8
ldx #led_tab ; use X as the pointer to LED pattern table
led_lp movb 1,x+,PTB ; turn on one LED
ldy #5 ; wait for half a second
jsr delayby100ms ; "
dbne a,led_lp ; reach the end of the table yet?
bra forever ; start from beginning
led_tab dc.b $80,$40,$20,$10,$08,$04,$02,$01
dc.b $01,$02,$04,$08,$10,$20,$40,$80
The C language version of the program is as follows:
#include "c:\egnu091\include\hcs12.h" #include "c:\egnu091\include\delay.c" main (void)
{
char led_tab[8] = {0x80,0x40,0x20,0x10,0x08,0x04,0x02,0x01, 0x01,0x02,0x04,0x08,0x10,0x20,0x40,0x80}; char i;
DDRB = 0xFF; /* configure port B for output */
DDRJ |= 0x02; /* configure PJ1 pin for output (needed for DRAGON12 board only) */
PTJ &= 0xFD; /* enable LEDs to light (needed for DRAGON12 board only)*/
while (1){
for (i = 0; i < 16; i++) { PTB = led_tab[i]; delayby100ms(5); }
}
BCD
digit a b c d e f g
Segments Corresponding Hex Number 0 1 2 3 4 5 6 7 8 9 1 0 1 1 0 1 1 1 1 1 1 1 1 1 1 0 0 1 1 1 1 1 0 1 1 1 1 1 1 1 1 0 1 1 0 1 1 0 1 1 1 0 1 0 0 0 1 0 1 0 1 0 0 0 1 1 1 0 1 1 0 0 1 1 1 1 1 0 1 1 $7E $30 $6D $79 $33 $5B $5F $70 $7F $7B Table 7.5 BCD to seven-segment decoder
74 H C 24 4 PB6 PB5 PB4 PB3 PB2 PB1 PB0 a b c d e f g common cathode a b c d e f g HCS12
Figure 7.31 Driving a single seven-segment display 300 each
Driving a Single Seven-Segment Display
• A common cathode seven-segment display is driven by the
74HC244 via resistors.
• The output high voltage of the 74HC244 is close to 5V with a 5V
power supply.
. . . a b g
PB6 PB5 PB0
Figure 7.32 Port B and Port K together drive six seven-segment displays (MC9S12DP256) . . . . . . . . . 74HC244 HCS12 a b g . . . c ommon cathode c ommon cathode c ommon cathode a b g
IMA
X = 7 0 m A . . . R R R 2N2222 2N2222 2N2222
300
PK5
PK4
PK0
300
#5 #4 #0
Driving Multiple Seven-Segment Displays
• Time multiplexing
technique is often used
to drive multiple
displays in order to
save I/O pins.
• One parallel port is
used to drive the
segment pattern and
the other port turns on
one display at a time.
Each display is turned
on and then off many
times within a second.
The persistence of
#include <hcs12.inc>
four equ $33 ; seven-segment pattern of digit 4
movb #$3F,DDRK ; configure PORT K for output
movb #$FF,DDRB ; configure PORT B for output
bset PTK,$10 ; turn on seven-segment display #4
bclr PTK,$2F ; turn off seven-segment displays #5, #3…#0
movb #four,PTB ; output the seven-segment pattern to PORTP
In C language:
DDRK = 0x3F;
DDRB = 0xFF;
PTK = 0x10;
PTB = 0x33;
•
Example 7.4
Write a sequence of instructions to display
4
on the
seven-segment display
#4
in Figure 7.32.
•
Solution:
To display the digit 4 on the display #4, we need to:
– Output the hex value $33 to port B
– Set the PK4 pin to 1
- The program logic is shown in Figure 7.33. seven-segment
display displayedBCD digit Port B Port K #5
#4 #3 #2 #1 #0
1 2 3 4 5 6
$30 $6D $79 $33 $5B $5F
$20 $10 $08 $04 $02 $01 Table 7.6 Table of display patterns for Example 7.5
•
Example 7.5
Write a program to display 123456 on the
six seven-segment displays shown in Figure 7.32.
•
Solution:
Display 123456 on display #5, #4, #3, #2, #1,
and #0, respectively.
Start
X address of display table
Output the byte at [X] to port B Output the byte at [X]+1 to Port K
Increment X by 2 Wait for 1 ms
X = display + 12? no
yes
#include "c:\miniide\hcs12.inc"
pat_port equ PTB ; Port that drives the segment pattern
pat_dir equ DDRB ; direction register of the segment pattern
sel_port equ PTK ; Port that selects the digit
sel_dir equ DDRK ; data direction register of the digit select port
org $1500
movb #$FF,pat_dir ; configure pattern port for output movb #$3F,sel_dir ; configure digit select port for output
forever ldx #disp_tab ; use X as the pointer
loop movb 1,x+,pat_port ; output digit pattern and move the pointer
movb 1,x+,sel_port ; output digit select value and move the pointer
ldy #1 ; wait for 1 ms
jsr delayby1ms ; “
cpx #disp_tab+12 ; reach the end of the table
bne loop
bra forever
#include "c:\miniide\delay.asm"
disp_tab dc.b $30,$20 ; seven-segment display table
dc.b $6D,$10
dc.b $79,$08
dc.b $33,$04
dc.b $5B,$02
#include “c:\egnu091\include\hcs12.h” #include “c:\egnu091\include\delay.c”
#define pat_port PTB /* segment pattern port */
#define pat_dir DDRB /* pattern port data direction register */ #define sel_port PTK /* digit select port */
#define sel_dir DDRK /* digit select port direction register */ main (void)
{
char disp_tab[6][2] = {{0x30,0x20},{0x6D,0x10},{0x79,0x08}, {0x33,0x04},{0x5B,0x02},{0x5F,0x01}}; char i;
pat_dir = 0xFF; /* configure pat_port for output */ sel_dir = 0x3F; /* configure sel_port for output */ while (1) {
for (i = 0; i < 6; i++) {
pat_port = disp_tab[i][0]; /* output the segment pattern */ sel_port = disp_tab[i][1]; /* turn on the display */
delaybyms(1); /* wait for 1 ms */ }
}
Liquid Crystal Display (LCD)
(1 of 2)
• The basic construction of an LCD is illustrated in Figure
7.34.
• The most common type of LCD allows the light to pass
through when activated.
• An LCD segment is activated when a low frequency
bipolar signal in the range of 30 Hz to 1KHz is applied to
it.
• LCD can display characters and graphics.
• LCDs are often sold in a module with LCDs and
controller unit built in.
Segment Frontplane
Backplane Black cardboard backing
Liquid crystal Glass
Figure 7.34 A liquid crystal display (LCD)
DB7
DB0
E R/W RS VEE VCC VSS
COM 16
LCDP (FRD7069)
SEG 160 SEG 40
4 SEGMENT DRIVER x 4 CONTROLLER
LSI HD44780
A HD44780-Based LCD Kit
(1 of 3)
• Display capability: 4 x 20
• Uses the HD44780 as the controller as shown in Figure 7.35. • Pins DB7~DB0 are used to exchange data with the CPU.
• E input should be connected to one of the address decoder output or I/O pin. • The RS signal selects instruction register (0) or data register (1).
• The VEE signal allows the user to adjust the LCD contrast.
• The HD44780 can be configured to display 1-line, 2-line, and 4-line information.
Table 7.7 Pin assignment for displays with less than 80 characters Pin No. symbol I/ O Function
1 2 3 4 5 6 7 8 9 10 11 12 13 14 VSS VCC VEE RS R/ W E DB0 DB1 DB2 DB3 DB4 DB5 DB6 DB7 -I I I I/ O I/ O I/ O I/ O I/ O I/ O I/ O I/ O
Power supply (GND) Power supply (+5V) Contrast adjust
0 = instruction input, 1 = data input 0 = write to LCD, 1 = read from LCD enable signal
data bus line 0 data bus line 1 data bus line 2 data bus line 3 data bus line 4 data bus line 5 data bus line 6 data bus line 7
Table 7.8 Pin assignment for displays with more than 80 characters
Pin No. symbol I/ O Function
1 2 3 4 5 6 7 8 9 10 11 12 13 14 15 16 DB7 DB6 DB5 DB4 DB3 DB2 DB1 DB0 E1 R/ W RS VEE VSS VCC E2 N.C I/ O I/ O I/ O I/ O I/ O I/ O I/ O I/ O I I I -I
-data bus line 7 data bus line 6 data bus line 5 data bus line 4 data bus line 3 data bus line 2 data bus line 1 data bus line 0
enable signal row 0 & 1
0 = write to LCD, 1 = read from LCD 0 = instruction input, 1 = data input Contrast adjust
Power supply (GND) Power supply (+5V) Enable signal row 2 & 3
Table 7.9 HD44780U instruction set
Instruction Code
RS R/ W B7 B6 B5 B4 B3 B2 B1B0 Description
Execution time
Clear display
Cursor home
Entry mode set
Display on/ off control
Cursor / display shift Function set Set CGRAM address Set DDRAM address Read busy flag and address counter Write CGRAM or DDRAM Read from CGRAM or DDRAM
Clears display and returns cursor to the home position (address 0).
Returns cursor to home position (address 0). Also returns display being shifted to the original position. DDRAM contents remain unchanged.
Set cursor move direction (I/ D), specifies to shift the display (S). These operations are performed during data read/ write. Sets on/ off of all display (D), cursor on/ off (C) and blink of cursor position character (B).
Sets cursor-move or display-(S/ C), shift direction (R/ L). DDRAM contents remains unchanged.
Sets interface data length (DL), number of display line (N) and character font (F). Sets the CGRAM address. CGRAM data is sent and received after this setting. Sets the DDRAM address. DDRAM data is sent and received after this setting. Reads busy flag (BF) indicating internal operation is being performed and reads CGRAM or DDRAM address counter contents (depending on previous instruction).
Writes data to CGRAM or DDRAM.
Reads data from CGRAM or DDRAM.
1.64 ms
1.64 ms
40 s
40 s
40 s
40 s
40 s
40 s
0 s
40 s
40 s 0 0 0 0 0 0 0 0 0 1 1 0 0 0 0 0 0 0 0 1 0 1 0 0 0 0 0 0 0 1 BF 0 0 0 0 0 0 1 0 0 0 0 0 1 0 0 0 0 1 DL 0 0 0 1 S/ C N 0 0 1 D R/ L F 0 1 I/ D C * * 1 * S B * * CGRAM address DDRAM address CGRAM/ DDRAM address write data read data
Bit name Settings I/ D
S D C B S/ C R/ L DL
N F BF
0 = decrement cursor position. 0 = no display shift.
0 = display off 0 = cursor off 0 = cursor blink off 0 = move cursor 0 = shift left 0 = 4-bit interface
0 = 1/ 8 or 1/ 11 duty (1 line) 0 = 5x8 dots
0 = can accept instruction
1 = increment cursor position 1 = display shift
1 = display on 1 = cursor on 1 = cursor blink on 1 = shift display 1 = shift right 1 = 8-bit interface 1 = 1/ 16 duty (2 lines) 1 = 5 x 10 dots
1 = internal operation in progress Table 7.10 LCD instruction bit names
Table 7.11a DDRAM address usage for a 1-line LCD
Display size character positionsVisibleDDRAM addresses 1 * 8
1 * 16 1 * 20 1 * 24 1 * 32
00..07 00..15 00..19 00..23 00..31
0x00..0x07 0x00..0x0F 0x00..0x13 0x00..0x17 0x00..0x1F
• The HD44780 has a display data RAM (DDRAM) to store data to be
displayed on the LCD.
• The address range of DDRAM for 1-line, 2-line, and 4-line LCDs are
shown in Table 7.11a, 7.11b, and 7.11c.
• The HD44780 has a character generator ROM that can generates 5
8 or 5
10 character patterns from a 8-bit code.
• The user can rewrite character patterns into the character generator
RAM (CGRAM).
• Up to eight 5
8 patterns or four 5
10 patterns can be
programmed.
Table 7.11b DDRAM address usage for a 2-line LCD
Display size character positionsVisibleDDRAM addresses 2 * 16
2 * 20 2 * 24 2 * 32 2 * 40
00..15 00..19 00..23 00..31 00..39
0x00..0x0F + 0x40..0x4F 0x00..0x13 + 0x40..0x53 0x00..0x17 + 0x40..0x57 0x00..0x1F + 0x40..0x5F 0x00..0x27 + 0x40..0x67
Table 7.11c DDRAM address usage for a 4-line LCD
Display size character positionsVisible DDRAM addresses
4 * 16 4 * 20 4 * 40
00..15 00..19
00..39 on 1st controller and 00..39 on 2nd
controller
0x00..0x0F + 0x40..0x4F + 0x14..0x23 + 0x54..0x63 0x00..0x13 + 0x40..0x53 + 0x14..0x27 + 0x54..0x67 0x00..0x27 + 0x40..0x67 on 1st controller and 0x00..0x27 + 0x40..0x67 on 2nd controller
Table 7.12 Register selection
RS R/ W Operation
0 0 1 1
0 1 0 1
IR write as an internal operation (display clear, etc) Read busy flag (DB7) and address counter (DB0 to DB6)
DR write as an internal operation (DR to DDRAM or CGRAM) DR read as an internal operation (DDRAM or CGRAM to DR)
Registers of HD44780
•
The HD44780 has two 8-bit user accessible registers: instruction register
(IR) and data register (DR).
•
To write data into display data RAM or character generator RAM, the MCU
writes into the DR register.
•
The address of the data RAM should be set up with a previous instruction.
•
The DR register is also used for data storage when reading data from
DDRAM or CGRAM.
•
The register selection is shown in Table 7.12.
•
The HD44780 has a busy flag that is output from the DB7 pin.
HD44780 Instructions
(1 of 3)
• Clear display
– Writes 0x20 (space character) to all DDRAM locations
– Sets 0 to the address counter (return cursor to upper left corner of the
LCD)
– Sets increment mode
• Return home
– Sets address counter to 0
– DDRAM contents not changed
• Entry mode set
– Sets incrementing or decrementing of the DDRAM address
– Controls the shifting (shifts if S bit = 1) of the display
• Display on/off control
– Turns on/off display
– Turns on/off cursor
Table 7.13 LCD Shift function S/ C R/ L Operation
0 0 1 1
0 1 0 1
Shifts the cursor position to the left. (AC is decremented by 1) Shifts the cursor position to the right. (AC is incremented by 1)
Shifts the entire display to the left. The cursor follows the display shift. Shifts the entire display to the right. The cursor follows the display shift.
HD44780 Instructions
(2 of 3)
• Cursor or display shift
– This function shifts the cursor position to the right or left without writing
or reading display data.
– The shifting is controlled by two bits as shown in Table 7.13.
• Function set
– Sets the interface length (DL bit) to be 4- or 8-bit
HD44780 Instructions
(3 of 3)
• Set CGRAM address
– This command contains the address to be written into the
address counter.
• Set DDRAM address
– This command allows the user to set the starting address to
display information.
• Read busy flag and address
– This command reads the busy flag and the address counter.
– User can use this command to determine the LCD controller is
ready to accept another command.
PK4 PK6 PK5
PH7...PH0 DB7..DB0 E
RS R/ W
HD44780U-based LCD Module HCS12 MCU
Figure 7.36a LCD interface example (8-bit bus, used in SSE256) 5V VCC
VEE GND
5V
PK0 PK1
PK5...PK2 DB7..DB4 RS E R/ W
HD44780U-based LCD Module HCS12 MCU
Figure 7.36b LCD interface example (4-bit bus, used in Dragon12) 5V VCC
VEE
GND
5V
Interfacing the HD44780 with the HCS12
• One can treat the LCD kit as an I/O device and use an I/O port and
several other I/O pins as control signals.
• The interface can be 4 bits or 8 bits.
tA S R/W
RS
E
DB0-DB7 Valid data tEr
PWEH
tAH
tDDR
tCYCLE
tDHR tEf
Figure 7.37 HD44780U LCD controller read timing diagram
tA S R/W
RS
E
DB0-DB7 Valid data tEr
PWEH
tAH
tD SW
tCYCLE
Table 7.15 HD44780U bus timing parameters (2 MHz operation) Meaning
Symbol
Enable cycle time
Enable pulse width (high level) Enable rise and decay time Address setup time, RS, R/W, E Data delay time
Data setup time Data hold time (write) Data hold time (read) Address hold time tCYCLE
PWEH tEr, tEf tAS tDDR tDSW tH tDHR tAH
Min Typ Max. Unit
500 230 -40 -80 10 5 10 -20 -160 -ns ns ns ns ns ns ns ns ns
•
Procedure to send a command to the IR register
– Step 1
• Pull the RS and the E signals to low.
– Step 2
• Pull the R/W signal to low.
– Step 3
• Pull the E signal to high.
– Step 4
• Output data to the output port attached to the LCD data bus. One needs to configure the I/O Port for output before writing data to the LCD kit.
– Step 5
• The procedure for writing a byte to the LCD data register
– Step 1
• Pull the RS signal to high.
– Step 2
• Pull the R/W signal to low.
– Step 3
• Pull the E signal to high.
– Step 4
• Output data to the I/O port attached to the LCD data bus.
– Step 5
• Pull the E signal to low and make sure that the internal operation is
complete.
lcdPort equ PTH ; LCD data port
lcdCtl equ PTK ; LCD control port
lcdE equ $80 ; E signal pin (PK7)
lcdRW equ $20 ; R/W signal pin (PK5)
lcdRS equ $10 ; RS signal pin (PK4)
; the command is contained in A
cmd2lcd bclr lcdCtl,lcdRS+lcdRW ; select instruction register and Write
bset lcdCtl,lcdE ; pull the E signal high
staa lcdPort ; send the command, along with RS, E signals nop
nop
bclr lcdCtl,lcdE ; pull the E signal low bset lcdCtl,lcdRW ; pull R/W to high
ldy #1 ; adding this delay will complete the internal
jsr delayby50us ; operation for most instructions rts
• Write a function to send a command to the LCD kit
– Most LCD commands are completed in 40 ms.
– If the function waits for 40 ms after performing the specified operation,
then most commands will be completed when the function returns.
lcdDIR equ DDRH
lcdCtlDIR equ DDRK
openlcd movb #$FF,lcdDIR ; configure port H for output
bset lcdCtlDir,$B0 ; configure control pins for output
ldy #5 ; wait for LCD to complete internal
jsr delayby100ms ; configuration
ldaa #$38 ; set 8-bit data, 2-line display, 5x8 font jsr cmd2lcd ; "
ldaa #$0F ; turn on display, cursor, and blinking jsr cmd2lcd ; "
ldaa #$06 ; move cursor right (entry mode set instruction) jsr cmd2lcd ; "
ldaa #$01 ; clear LCD screen and return to home position jsr cmd2lcd ; "
ldy #2 ; wait until "clear display" command is complete jsr delayby1ms ; "
• The function to configure LCD sends four commands to the LCD kit
putc2lcd bset lcdCtl,lcdRS ; select LCD Data register bclr lcdCtl,lcdRW ; enable write to LCD
bset lcdCtl,lcdE ; pull E to high staa lcdPort ; send data to LCD
nop ; provide enough length to E signal nop ; "
bclr lcdCtl,lcdE ; pull the E signal low
bset lcdCtl,lcdRW ; pull R/W high to complete the write cycle
ldy #1 ; wait until the write operation is
jsr delayby50us ; complete
rts
• Function to output a character to the LCD
• Function to output a string terminated by a NULL
character
– The string to be output is pointed to by index register X.
• Example 7.7 Write an assembly program to test the
previous four subroutines by displaying the following
messages on two lines:
hello world!
I am ready!
puts2lcd ldaa 1,x+ ; get one character from the string beq done_puts ; reach NULL character?
#include "hcs12.inc"
lcdPort equ PTH ; LCD data pins (PH7~PH0)
lcdDIR equ DDRH ; LCD data direction port
lcdCtl equ PTK ; LCD control port
lcdCtlDir equ DDRK ; LCD control port direction
lcdE equ $80 ; E signal pin
lcdRW equ $20 ; R/W signal pin
lcdRS equ $10 ; RS signal pin org $1500
lds #$1500 ; set up stack pointer jsr openlcd ; initialize the LCD ldx #msg1lcd
jsr puts2lcd
ldaa #$C0 ; move to the second row
jsr cmd2lcd ; "
ldx #msg2lcd jsr puts2lcd swi
msg1lcd fcc "hello world!"
dc.b 0
msg2lcd fcc "I am ready!"
dc.b 0
#define lcdPort PTH /* Port H drives LCD data pins */
#define lcdDIR DDRH /* Direction of LCD port */
#define lcdE 0x80 /* E signal (PK7) */
#define lcdRW 0x20 /* R/W signal (PK5) */
#define lcdRS 0x10 /* RS signal (PK4) */
#define lcdCtlDIR DDRK /* LCD control port direction */
void cmd2lcd (char cmd);
void openlcd (void);
void putc2lcd (char cx);
void puts2lcd (char *ptr);
void cmd2lcd (char cmd)
{
char temp;
char xa, xb;
lcdCtl &= ~(lcdRS+lcdRW); /* select instruction register & pull R/W low */
lcdCtl |= lcdE; /* pull E signal to high */
lcdPort = cmd ; /* output command */
xa = 1; /* dummy statements to lengthen E */
xb = 2; /* " */
lcdCtl &= ~lcdE; /* pull E signal to low */
lcdCtl |= lcdRW; /* pull R/W to high */
void openlcd(void) {
lcdDIR = 0xFF; /* configure lcdPort port for output */
lcdCtlDIR = 0xB0; /* configure LCD control pins for output */ delayby100ms(5); /* wait for LCD to become ready */
cmd2lcd (0x38); /* set 8-bit data, 2-line display, 5x8 font */ cmd2lcd (0x0F); /* turn on display, cursor, blinking */
cmd2lcd (0x06); /* move cursor right */
cmd2lcd (0x01); /* clear screen, move cursor to home */
void putc2lcd(char cx) {
char temp; char xa, xb;
lcdCtl |= lcdRS; /* select LCD data register and pull R/W high*/ lcdCtl &= ~lcdRW; /* pull R/W to low */
lcdCtl |= lcdE; /* pull E signal to high */ lcdPort = cx; /* output data byte */
xa = 1; /* create enough width for E */ xb = 2; /* create enough width for E */
lcdCtl &= ~lcdE; /* pull E to low */
lcdCtl |= lcdRW; /* pull R/W signal to high */
delayby50us(1); }
void puts2lcd (char *ptr) {
while (*ptr) {
putc2lcd(*ptr); ptr++;
• Write a C program to test the SSE256 LCD functions.
#include "c:\egnu091\include\hcs12.h" #include "c:\egnu091\include\delay.c"
#include “c:\egnu091\include\lcd_util_SSE256.c” main (void)
{
char *msg1 = "hello world!"; char *msg2 = "I am ready!"; openlcd();
cmd2lcd(0x80); /* move cursor to the 1st column of row 1 */ puts2lcd(msg1);
cmd2lcd(0xC0); /* move cursor to 2nd row, 1st column */ puts2lcd(msg2);
VCC
10K
PA0 PA1 PA2 PA3 PA4 PA5 PA6 PA7
HCS12 SW DIP-8
Interfacing with DIP Switches
(1 of 2)
• Switches are often grouped together. It is most common
to have four or eight switches in a DIP package.
• DIP switches are often used to provide setup information
to the microcontroller. After power is turned on, the
#include “c:\miniide\hcs12.inc”
movb #0,DDRA ; configure Port A for input
ldaa PTA ; read Port A
In C language:
#include “c:\egnu091\include\hcs12.h” void main ()
{
char xx; DDRA = 0; xx = PTA; }
Interfacing with DIP Switches
(2 of 2)
• Example 7.9 Write a sequence of instructions to read the
value from an eight-switch DIP connected to PORTA of
the HCS12 into accumulator A.
Interfacing to a Keyboard
• A keyboard is arranged as an array of switches, which can be
mechanical, membrane, capacitors, or Hall-effect in construction.
• Mechanical switches are most popular for keyboards.
– Mechanical switches have a problem called contact bounce. Closing a
mechanical switch generates a series of pulses because the switch
contacts do not come to rest immediately.
– In addition, a human cannot type more than 50 keys in a second.
Reading the keyboard more than 50 times a second will read the same
key stroke too many times.
• A keyboard input is divided into three steps:
– Scan the keyboard to discover which key has been pressed.
VDD
Set
Reset R
R
Q
Reset Set Q
(a) Set-reset latch
4050 R
Vout VDD
(b) CMOS gate debouncer
VDD
Vout H
L
Threshold level
Switch closed
(c) Integrating RC circuit debouncer
Figure 7.42 Hardware debouncing techniques R
C
Hardware
Debouncing Techniques
• SR latches
• Non-inverting CMOS
gates
Software Debouncing Technique
• The most popular and simple one has been the
wait and see
method.
ASCII Code Table Lookup
A B C D E F 0 1 2 3 4 5 6 7 8 9 10K VCC PA7 PA6 PA5 PA4 PA3 PA2 PA1 PA0 HCS12 MCU
PA7 PA6 PA5 PA4 Selected keys 1 1 1 0 1 1 0 1 1 0 1 1 0 1 1 1 0, 4, 8, C, 1, 5, 9, D, 2, 6, A, E, and 3 and 7 and B and F Table 7.16 Sixteen-key keypad row selections
Interfacing the HCS12 to a Keypad
•
A keypad usually consists of 12 to 24 keys and is adequate for many
applications.
•
Like a keyboard, a keypad also needs debouncing.
•
A 16-key keypad can be easily interfaced to one of the HCS12 parallel ports.
•
A circuit that interfaces a 16-key keypad is shown in Figure 7.41. In this
#include “c:\miniide\hcs12.inc"
keyboard equ PTA
get_char movb #$F0,DDRA ; set PA7~PA4 for output, PA3~PA0 for input
scan_r0 movb #$EF,keyboard ; scan the row containing keys 0123
scan_k0 brclr keyboard,$01,key0 ; is key 0 pressed? scan_k1 brclr keyboard,$02,key1 ; is key 1 pressed? scan_k2 brclr keyboard,$04,key2 ; is key 2 pressed? scan_k3 brclr keyboard,$08,key3 ; is key 3 pressed?
bra scan_r1
key0 jmp db_key0
key1 jmp db_key1
• Example 7.10 Write a program to perform keypad scanning,
debouncing, and returns the ASCII code in accumulator A to the
caller.
• Solution
– Pins PA4..PA7 each control one row of four keys.
key2 jmp db_key2
key3 jmp db_key3
scan_r1 movb #$DF,keyboard ; scan the row containing keys 4567
scan_k4 brclr keyboard,$01,key4 ; is key 4 pressed? scan_k5 brclr keyboard,$02,key5 ; is key 5 pressed? scan_k6 brclr keyboard,$04,key6 ; is key 6 pressed? scan_k7 brclr keyboard,$08,key7 ; is key 7 pressed?
bra scan_r2
key4 jmp db_key4
key5 jmp db_key5
key6 jmp db_key6
key7 jmp db_key7
scan_r2 movb #$BF,keyboard ; scan the row containing keys 89AB
bclr keyboard,$40 ; “
scan_k8 brclr keyboard,$01,key8 ; is key 8 pressed? scan_k9 brclr keyboard,$02,key9 ; is key 9 pressed? scan_kA brclr keyboard,$04,keyA ; is key A pressed? scan_kB brclr keyboard,$08,keyB ; is key B pressed?
bra scan_r3
keyA jmp db_keyA
keyB jmp db_keyB
scan_r3 movb #$7F,keyboard ; scan the row containing keys CDEF
scan_kC brclr keyboard,$01,keyC ; is key C pressed? scan_kD brclr keyboard,$02,keyD ; is key D pressed? scan_kE brclr keyboard,$04,keyE ; is key E pressed? scan_kF brclr keyboard,$08,keyF ; is key F pressed?
jmp scan_r0
keyC jmp db_keyC
keyD jmp db_keyD
keyE jmp db_keyE
keyF jmp db_keyF
; debounce key 0
db_key0 jsr delay10ms
brclr keyboard,$01,getc0
jmp scan_k1
getc0 ldaa #$30 ; return the ASCII code of 0
db_key1 jsr delay10ms
brclr keyboard,$02,getc1
jmp scan_k2
getc1 ldaa #$31 ; return the ASCII code of 1
rts
db_key2 jsr delay10ms
brclr keyboard,$04,getc2
jmp scan_k3
getc2 ldaa #$32 ; return the ASCII code of 2
rts
db_key3 jsr delay10ms
brclr keyboard,$08,getc3
jmp scan_r1
getc3 ldaa #$33 ; return the ASCII code of 3
rts
db_key4 jsr delay10ms
jmp scan_k5
getc4 ldaa #$34 ; return the ASCII code of 4
rts
db_key5 jsr delay10ms
brclr keyboard,$02,getc5
jmp scan_k6
getc5 ldaa #$35 ; return the ASCII code of 5
rts
db_key6 jsr delay10ms
brclr keyboard,$04,getc6
jmp scan_k7
getc6 ldaa #$36 ; return the ASCII code of 6
rts
db_key7 jsr delay10ms
brclr keyboard,$08,getc7
getc7 ldaa #$37 ; return the ASCII code of 7 rts
db_key8 jsr delay10ms
brclr keyboard,$01,getc8
jmp scan_k9
getc8 ldaa #$38 ; return the ASCII code of 8
rts
db_key9 jsr delay10ms
brclr keyboard,$02,getc9
jmp scan_kA
getc9 ldaa #$39 ; return the ASCII code of 9
rts
db_keyA jsr delay10ms
brclr keyboard,$04,getcA
jmp scan_kB
getcA ldaa #$41 ; get the ASCII code of A
rts
db_keyB jsr delay10ms
brclr keyboard,$08,getcB
jmp scan_r3
db_keyC jsr delay10ms
brclr keyboard,$01,getcC
jmp scan_kD
getcC ldaa #$43 ; get the ASCII code of C
rts
db_keyD jsr delay10ms
brclr keyboard,$02,getcD
jmp scan_kE
getcD ldaa #$44 ; get the ASCII code of D
rts
db_keyE jsr delay10ms
brclr keyboard,$04,getcE
jmp scan_kF
getcE ldaa #$45 ; get the ASCII code of E
rts
db_keyF jsr delay10ms
brclr keyboard,$08,getcF
jmp scan_r0
getcF ldaa #$46 ; get the ASCII code of F
delay10ms movb #$90,TSCR1 ; enable TCNT & fast flags clear
movb #$06,TSCR2 ; configure prescale factor to 64
movb #$01,TIOS ; enable OC0
ldd TCNT
addd #3750 ; start an output compare operation
std TC0 ; with 10 ms time delay
wait_lp2 brclr TFLG1,$01,wait_lp2
The AD7302 D/A Converter
(1 of 2)
• A dual-channel 8-bit D/A converter made by Analog
Devices
• The AD7302 converts an 8-bit digital value into an
analog voltage.
• The block diagram is shown in Figure 7.43. The AD7302
is designed to be a memory-mapped device. The CS
signal must be low for this chip to work.
• The AD7302 needs a reference voltage to operate. The
reference voltage could be external one (from the REFIN
pin) or the internal VDD.
Input Register
DAC
Register I DAC A I/V
Input
Register RegisterDAC I DAC B I/V
D7 D0
A/B WR CS
PD CLR LDAC REFIN VDD DGND
AGND
VOUTA
VOUTB AD7302
Figure 7.24 Functional block diagram of the AD7302 Control
Logic MUX
÷2
Power On Reset
- The output from either DAC is given by
V
OUTA/B = 2 × V
REF× (N/256)
HCS12
PB7~PB0 D7..D0
WR PD CLR VDD
AD7302
CS LDAC
AGND DGND VDD REFIN
5V
A/B
VOUTA VOUTB PJ0
PJ1
Figure 7.44 Circuit connection between the AD7302 and the HCS12
Using the AD7302 to
Generate Sawtooth Waveform
• Configure PB7…PB0, PJ0…PJ1 for output.
• Output the digital value from 0 to 255 and repeat. For each value,
pull the PJ0 to low and then to high so that the value on pins
Example 7.10 Write a program to generate a sawtooth waveform from VOUTA pin. The assembly program is as follows:
#include "c:\miniide\hcs12.inc"
org $1500
movb #$FF,DDRB ; configure PORTB for output
bset DDRJ,$03 ; configure PJ1~PJ0 for output
bclr PTJ,$02 ; select VOUTA output
loop inc PORTB ; increase the output by one step
bclr PTJ,$01 ; generate a rising edge on PJ0 pin
bset PTJ,$01 ; "
bset PTJ,$01 ; add 9 more “bset” instructions to provide 2 ms
bset PTJ,$01 ; for D/A conversion to complete
bset PTJ,$01 ; "
bset PTJ,$01 ; “
bset PTJ,$01 ; “
bset PTJ,$01 ; "
bset PTJ,$01 ; “
bset PTJ,$01 ; “
bset PTJ,$01 ; “
bra loop ; to complete the D/A conversion
#include “c:\egnu091\include\hcs12.h” void main(void)
{
DDRB = 0xFF; /* configure PORTB for output */
DDRJ |= 0x03; /* configure pins PJ1~PJ0 for output */
PTJ &= 0xFD; /* pull the signal A/B to low too select channel A */ while (1) {
PTB += 1;
PTJ &= 0xFE; /* generate a rising edge */
PTJ |= 0x01; /* “ */
PTJ |= 0x01; /* use dummy statements to provide 2 ms */ PTJ |= 0x01; /* time for D/A conversion to complete */ PTJ |= 0x01;
PTJ |= 0x01; PTJ |= 0x01; PTJ |= 0x01; PTJ |= 0x01; PTJ |= 0x01; PTJ |= 0x01; }
Stepper Motor Control
(1 of 7)
• It is digital in nature and provides high degree of control.
• In its simplest form, a stepper motor has a permanent
magnet rotor and a stator consisting of two coils. The
rotor aligns with the stator coil that is energized.
• By changing the coil that is energized, the rotor is turned.
• Figure 7.45a to 7.45d illustrate how the rotor rotates
clockwise in full step.
1st
2nd
C1 C2
C3 C4
N S N S
N S
Figure 7.45a Stepper motor full step 1
current flow
1st
2nd
C1 C2
C3 C4 S N
N
S
Figure 7.45b Stepper motor full step 2
current flow
N
S
1st
2nd
C1 C2
C3 C4
N
S S N
N S
Figure 7.45c Stepper motor full step 3
current flow
1st
2nd
C1 C2
C3 C4 S
N
Figure 7.44d Stepper motor full step 4
current flow
N S N S
N
S
rotor
Step 1 Step 2
Figure 7.46 Full-step counterclockwise operation of step motor C1 C2 C3 S N C4 S N rotor C1 C2 C3 S N C4 S N N S N S rotor Step 3 C1 C2 C3 S N C4 S
N Step 4
rotor C1 C2 C3 S N C4 S N N S
Stepper Motor Control
(5 of 7)
• In a four-pole stepper motor shown in Figure 7.45 & 7.46, a full step
is 90 degrees.
• The stepper motor may also operate with half step. A
half step
occurs when the rotor (in a four-pole step) is moved to eight discrete
positions (45º).
• To operate the stepper motor in half steps, sometimes both coils
may have to be on at the same time. When two coils in close
proximity are energized, there is a resultant magnetic field whose
center will depend on the relative strengths of the two magnetic
fields.
• Figure 7.47 illustrates the half-stepping sequence.
• The step sizes of the stepper motors may vary from approximately
0.72º to 90º. The most common step sizes are 1.8º, 7.5º, and 15º.
• The actual stator of a real motor has more segments than previously
N S ro to r S te p 1 ro to r S te p 2 ro to r S te p 3 ro to r S te p 4 F ig ur e 7. 47 H al f-st ep o pe ra tio n of th e st ep pe r m ot or N S ro to r S te p 5 ro to r St ep 6 ro to r St ep 7 ro to r S te p 8 S N N S N S C 1 C 2 C 3 C 4
S N S N
S N
C
4 C3
S N S N C 1 C 2 S N C
4 C3
S C 2 N S C 1 N N S C 1 C 3 N S S C 2 N C 4 S N C 2 C 1 C 3 N S S N C 4 S N C 1 C 3 N S N C 4 S C 2 C 3 C 1 S N C 2 N S C 4 C 3 S N N S S N C 1 C 2 C 4 N S N S
N
S
N N
S S
C1
C3
C4
C5 C6
C7 C8
S
S
N N
Figure 7.48 Actual internal construction of step motor
rotor C2
Stepper Motor Drivers
(1 of 6)
•
Driving a step motor involves applying a series of voltages to the coils of the
motor.
•
A subset of coils is energized at a time to cause the motor to rotate one
step. The pattern of coils energized must be followed exactly for the motor
to work correctly.
•
A microcontroller can easily time the duration that the coil is energized, and
control the speed of the stepper motor in a precise manner.
•
The circuit in Figure 7.49 shows how the transistors are used to switch the
current to each of the four coils of the stepper motor.
•
The diodes in Figure 7.49 are called
fly back diodes
and are used to
protect the transistors from reverse bias.
•
The transistor loads are the windings in the stepper motor. The windings are
inductors, storing energy in a magnetic field.
•
When the current is cut off, the inductor dispenses its stored energy in the
form of an electric current.
VCC VCC
VCC
VCC V
CC
VCC
Step Motor PP3
PP2
PP1
PP0
Q1 Q2 Q3 Q4
R R
R R
R R R
R
Stepper Motor Drivers
(3 of 6)
• The normal full-step sequence shown in Table 7.17
should be used for high-torque
applications.
• For lower-torque applications the half-step mode is used
and its sequence is shown in Table 7.18.
• The microcontroller outputs the voltage pattern in the
sequence shown in Table 7.17 or 7.18.
• Table 7.17 & 7.18 are circular. The values may be output
in the order as shown in the table, which will rotate the
motor clockwise; or in the reverse order, which will rotate
the motor
counterclockwise.
Table 7.17 Full-step sequence for clockwise rotation Step 1 2 3 4 1 Q1 PP0 Q2 PP1 Q3 PP2 Q4 PP3 value on on off off on off off on on off on off off on on off on on off off 1010 1001 0101 0110 1010
Table 7.18 Half-step seque