AT&T
DEFINITY
®
Communications System
Generic 1 and Generic 3
and System 75
NOTICE
While reasonable efforts were made to ensure that the information in this document was complete and accurate at the time of printing, AT&T can assume no responsibility for any errors. Changes or corrections to the information contained in this document may be incorporated into future issues.
TO ORDER COPIES OF THIS DOCUMENT Contact: AT&T Customer Information Center
2855 North Franklin Road P.O. Box 19901
Indianapolis, IN 46219
1 800 432-6600 In Canada: 1 800 255-1242
Order: Document No. AT&T 555-230-741
Issue 1, June 1992
For more information about AT&T documents, see Business Communications
Contents
Your 7406 Plus Voice Terminal
1
What the Features Do
4
Voice Features
4
Display Features
7
How to Use the Features
8
Special Instructions
8
Conventions
9
Troubleshooting
9
Quick Reference Lists
10
Voice Features
11
Handset and Speaker
11
Abbreviated Dialing (AD)
11
Automatic Callback
13
Bridging
14
Call Coverage
14
Call Forwarding All Calls
15
Call Park
15
Call Pickup
16
Conference
16
Drop
17
Hold
18
Intercom (Automatic/Dial)
18
Last Number Dialed
19
Leave Word Calling (LWC)
19
Message
20
Mute
20
Priority Calling
21
Reset Speakerphone
21
Select Button
22
Select Ring (and Ringer Volume)
23
Self-Test
24
Send All Calls
24
Speaker
25
Display Features
2 9
Inspect
2 9
Integrated Directory
3 0
Message Retrieval
3 0
Normal
3 1
Stored Number
3 1
Time/Date
3 2
Timer
3 2
Tones and Their Meanings
3 3
Ringing Tones
3 3
Handset Tones
3 3
Troubleshooting
3 4
System 75 Version Notes
3 6
Key Words to Know
3 7
Your 7406 Plus Voice Terminal
The 7406 Plus voice terminal is available in two models: one with a display and one without. The display offers some added functionality, but both models are
comprehensively equipped so that you can make the best use of the many features
System 75.
of the AT&T DEFINITY® Communications System Generic 1 or Generic 3 and
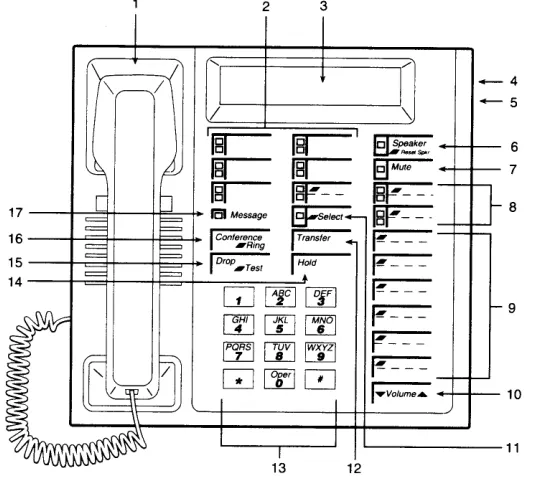
Figure 1. 7406 Plus Voice Terminal (With Display)
Starting with the upper left corner of Figure 1 and continuing clockwise:
1) Handset
2) Call appearances/ feature buttons
3) Display
4) Speakerphone/ headset jack (on back of terminal)
5) Line jack
(on back of terminal) 6) Speaker/Reset Speakerphone
button
7) Mute button
8) Two-level feature
For placing and answering calls (also known as the
receiver).
These 5 buttons are devoted to handling incoming and outgoing calls (call appearances) and are labeled with an extension number. Each has a red in-use light to tell you that this is the line you are using or that this is the line you will get when you lift your handset. The green status light next to each call appearance and feature button tells you the line or feature is being used. A built-in 2-line by 24-character display.
Used for connecting an external speakerphone or a headset adapter to your voice terminal. The jack is labeled
Used for connecting a line cord to your voice terminal. The jack is labeled “LINE.”
For accessing the speaker or the built-in speakerphone and microphone combination. When you touch [ Select ] and then [ Speaker Reset Spkr ] (if your voice terminal is set for the
Speakerphone feature), you hear a set of tones as the speakerphone performs an acoustic test of the
environment. When the tones stop, your speakerphone has finished adjusting itself for optimal performance and is ready for use.
Note: Your voice terminal can be set for either the
Speaker (listen-only) feature or the Speakerphone (listen and talk) feature. Check with your System Manager to see how your Speaker button is to be used. For turning off the microphone of the built-in
speakerphone or the handset so the other person cannot hear you.
Note: If your voice terminal is set for the Speaker
(listen-only) feature, pressing [ Mute ] while on a call using the handset will affect only the microphone
associated with the handset. When you use the Speaker (listen-only) feature, the Mute feature is also activated and the light next to [ Mute ] is always on.
9) Two-level feature buttons
10) Volume control button
11) Select button
1)
2)
3)
4)
12) Transfer button
13) Dial pad
14) Hold button 15) Drop/Test
button
16) Conference/Ring button
17) Message light
Each of these 6 buttons accesses 2 features, one printed on the top half of the label and one printed on the bottom half of the label. You can access the top feature by pressing [ Select ] and then the feature button. For adjusting the volume of the built-in speakerphone when you are using the speakerphone and a call is in progress, or for adjusting the volume of the tone ringer when you are not using the speakerphone.
Can be used in 4 different ways: Used with a 2-level feature
-button to access the top-labeled feature;
Used with [ Drop Test ] , to initiate a self-test of your
voice terminal;
Used with [ Conference Ring ] , to select your own
personalized ring from among 8 available patterns; Used with [ Speaker Reset Spkr ] , to perform an
acoustic test of the environment and adjust the speakerphone to the surrounding acoustic environment for optimal performance.
For transferring a call to another voice terminal.
The standard 12-button pad for dialing phone numbers and accessing features. The letters, "Q" and "Z," have been added to the appropriate dial pad keys for
directory access, and the "5" button on your dial pad has raised bars for visually-impaired users.
For putting a call on hold.
For disconnecting from a call or dropping the last party added to a conference call. When used with [ Select ] ,
you can perform a self-test of your voice terminal button lights and tone ringer.
For setting up conference calls. When used with [ Select ] , you can select a personalized ringing pattern for your voice terminal.
What the Features Do
Here are brief descriptions of 31 features, including what each one does and how you might want to use it. The first 24 are voice features and the final 7 are display features. Note: You will automatically have the following features on your voice terminal: Conference, Drop, Hold, Message, Mute, the Select Button, Select Ring, Self-Test, and Transfer voice features and Normal mode among the display features. You may also be able to use the Speakerphone (and Reset Speakerphone) or the Speaker feature. Check with your System Manager to see what other features you can use with the DEFINITY Generic 1 or Generic 3 or the System 75 switch.
Voice Features
Abbreviated Dialing (AD) Allows you to store selected phone numbers for quick and easy dialing. Each of these numbers can be a complete or partial phone number, an extension number, or a trunk or feature code. There are 4 possible types of lists—personal, group, system, and enhanced—and you can have a total of 3 out of the 4 lists. Numbers on a personal list are programmable by you; numbers on all other lists are programmable only by the System Manager. Use as a timesaver for dialing frequently called, lengthy, or emergency numbers.
Automatic Callback Sends you a special 3-burst ring indicating that a previously busy or unanswered extension is now available. Use to avoid constant redialing when you wish to speak to someone who is frequently busy on the telephone or in and out of the office. Note: Can be used only for extensions, not outside numbers.
Bridging Permits you to answer or join in calls to someone else’s extension by pressing a bridged appearance button on your voice terminal. This button can be any call appearance button labeled with another user’s primary extension number, as assigned to you by your System Manager. Use to assist in handling calls for a designated co-worker.
Call Coverage Provides automatic redirection of certain calls to your voice
terminal for answering. (Your System Manager determines which calls will be sent to you.) Use to answer calls for other extensions for whom you provide coverage.
Note: If you have Go to Cover, you (the calling party) can send internal calls
directly to coverage any time during the call attempt (the person you call must be in a call coverage group).
Call Forwarding All Calls Temporarily forwards all your calls to another extension or to an outside number, depending on your system. Use when you will be away from your voice terminal and you want your calls to be forwarded to a phone number of your choice.
Conference Allows you to add parties to a call, so that you can conduct up to a 6-way conversation. (If you wish to conference more than 6 parties, call your
attendant for assistance.) Use to set up time-saving conferences, or to spontaneously include a party important to a discussion.
Drop Disconnects from a call without requiring you to hang up the handset or press the switchhook. Can also be used with the Conference feature to disconnect the last party added. Use whenever you are using the built-in speaker instead of the handset, or whenever you are using the handset and want to continue using it for another action after ending a call.
Hold Puts a call on hold until you can return to it. While a call is on hold, you can place another call, activate another feature, answer a waiting call, or leave your voice terminal to perform another task. Use when you have a call that you don’t wish to drop, but which you have to interrupt briefly to do something else.
Intercom (Automatic/Dial) Gives you quick access to specified extensions. With Automatic Intercom, you can call a predetermined partner by pressing a single feature button. With Dial Intercom, you can call any member of a predetermined group of users by pressing a feature button and then dialing the group member’s 2- or 3-digit code. Use to rapidly dial frequently called numbers.
Last Number Dialed Automatically redials the last number you dialed, either an extension or an outside number. Use to save time in redialing a busy or unanswered number.
Leave Word Calling (LWC) Leaves a message for another extension to call you back. The called party will be able to dial message service (for example, attendant, AUDIX, covering user, etc.) to retrieve a short, standard message which gives your name and extension, the date and time you called, and the number of times you
called. Use any time you wish to have someone call you back; it will help cut down on repeated call attempts.
Message Your Message light goes on when a caller has left a message for you. You can then follow your System Manager’s local message retrieval procedures to get your message. Note: If you have a display, see Message Retrieval under the
Display Features heading that follows.
Mute Turns off the microphone of the built-in speakerphone or the handset. Use when you want to confer with someone in the room with you, but you do not want the other party on the call to hear your conversation.
Priority Calling Allows you to call another extension with a distinctive 3-burst ring to indicate that your call requires immediate attention. Use when you have
important or timely information for someone.
move your voice terminal to a different location (even in the same room), or whenever the light next to [ Speaker Reset Spkr ] is fluttering. (For best results, use the
Reset Speakerphone feature when the handset is on-hook.)
Select Button Used in any of 4 ways:
1) When used with a feature button, you can access the top-labeled feature on 2-level buttons. Use whenever you need to access one of these top-labeled features.
2) When used with [ Drop Test ] , you can perform a self-test of your voice terminal’s
lights, ringer, and display.
3) When used with [ Conference Ring ] , you can select your own personalized ring from among
8 available patterns. Use to distinguish your ring from that of other nearby voice terminals.
4) When used with [ Speaker Reset Spkr ] , the built-in speakerphone performs an acoustic test
of the surrounding acoustic environment to provide optimal speakerphone performance. Use whenever you move your voice terminal to a different location (even in the same room).
Self-Test Initiates a test of the lights, ringer, and display on your voice terminal.
Send All Calls Temporarily sends all your calls to the extension of a person designated to answer them when you cannot (perhaps a secretary or receptionist). Use when you will be away from your desk for awhile, or when you do not wish to be interrupted by phone calls.
Speaker Allows you to place calls or access other voice features without lifting the handset. However, in order to speak to the other party, you must use the handset (the speaker must be off). Use with feature activities that require listening only, such as on-hook dialing, monitoring calls on hold, and group listening situations.
Note: Your voice terminal has either the Speaker (listen-only) or the Speakerphone
function. Check with the System Manager to see how your voice terminal is set.
Speakerphone Allows you to place and answer calls or access other voice features without lifting the handset. When [ Speaker Reset Spkr ] is used with [ Select ] , the built-in speakerphone performs a test of the surrounding acoustic environment and adjusts itself for optimal performance. (See Reset Speakerphone.) Use the built-in
speakerphone any time you prefer hands-free communication, both speaking and listening, or for group conference situations. Note: Your voice terminal may be set for the Speaker (listen-only) rather than the Speakerphone (listen and speak) feature. Check with your System Manager.
Transfer Transfers a call from your voice terminal to another extension or outside number. Use when your caller needs to speak further with someone else. Note: Calls from an outside number to your voice terminal can be transferred only to an extension, not to another outside number.
Display Features
Inspect Shows you call-related information for an incoming call when you are already active on a call. Use to identify and screen new calls.
Integrated Directory Searches for the extension of another user by allowing you to key in the user’s name with the dial pad. Use as a handy quick reference source for extension number information.
Message Retrieval Allows you to retrieve messages left for you that have turned on your Message light. Will also let you retrieve messages for other voice terminals not equipped with a display (if you are authorized as a systemwide message retriever by your System Manager). Use to quickly and conveniently check messages, even when you are already on a call.
Normal Identifies current call appearance, calling/called party, and calling/called number. Use to see who is calling you and, when placing a call, to verify the number you have dialed.
Stored Number Allows you to check the number stored on an Abbreviated Dialing button or as an item on an Abbreviated Dialing list. Also lets you see what number you last dialed (via Last Number Dialed feature). Use to verify Abbreviated Dialing list items before placing a call or reprogramming a number, and to make sure that Last Number Dialed is appropriate to use.
Time/Date Shows you the date and time. Use as a handy calendar and clock.
How to Use the Features
The procedures which follow give short, step-by-step instructions for using each of the voice features and display features. For your convenience, features in both categories are listed alphabetically.
Special Instructions
The first time you use these procedures, you will need to customize them for yourself by following the directions below. Your System Manager can supply the information required.
To the right of each feature name is a box. For each feature that you have, mark a [ ✔ ] in the blank box as a reminder. (Voice features Conference, Drop, Hold, Mute, Message, the Select Button, Select Ring, Self-Test, and Transfer and display feature Normal are already marked for you.) Ask your System Manager if your voice terminal is set for the Speaker (listen-only) or the Speakerphone (speak and listen) feature, and then place a check in the box beside that feature also. Note: If your voice terminal is set for the
Speakerphone feature, you can also put a check in the box beside the Reset Speakerphone feature.
Most of the voice features can be activated or canceled by dialing 2- or 3-digit codes (if they are not already assigned to a button). In the blanks provided within the procedures, write in the feature code numbers.
As you operate the features assigned to your voice terminal, keep in mind the following general rules.
●
●
●
●
●
●
Follow carefully all the steps listed in the procedure for the particular feature you are using.
Remember to press [ Select ] before attempting to use any of the top-labeled
features on 2-level feature buttons.
If you receive an intercept tone (high-pitched, alternating high and low tone) while attempting to operate any feature, you have taken too much time to complete a procedural step or have made a dialing error. Hang up, get dial tone, and begin again at Step 1.
Conventions
The following conventions are used in the procedures:
Gray Type Procedural steps in gray type are steps you should follow if you do not have a button assigned for the feature.
[ xxxxx ] This box represents a call appearance button, which is used exclusively for placing or receiving calls. The button has a red in-use light and a green status light and is labeled with an extension number (shown as
xxxxx).
[ Feature ] and Each of these boxes represents a button that has a feature assigned to it. The button is labeled with a [ Feature xxxxx ] feature name, sometimes followed by an extension
number or a person’s name (shown as xxxxx).
[handset tone] The tone that appears in brackets after a step indicates what you should hear from your handset after
successfully performing that step. For a list of tones and their meanings, see the section titled Tones and
Their Meanings.
[ DISPLAY INFORMATION ] A white box containing fully capitalized words
represents information shown on the display.
For a list of glossary terms, see the section titled Key Words to Know.
Troubleshooting
Later in this guide you will find a short section on troubleshooting. Use the
Quick Reference Lists
Handset and Speaker
When placing calls or using the voice features, you have the option of doing so
off-hook (by lifting the handset) or on-off-hook (by pressing [ Speaker Reset Spkr ] ) . If your voice
terminal is set for the Speakerphone feature, pressing [ Speaker Reset Spkr ] simultaneously
activates the built-in microphone so that you can place and answer calls without lifting the handset.
Abbreviated Dialing (AD)
To program/reprogram an AD button
Note: AD buttons must
first be assigned by System Manager.
1
2
On a separate sheet of paper, jot down the outside numbers, extensions, and/or feature codes you want to program.
Note: Each AD button will hold one complete phone
number or feature code.
Pick up handset [dial tone]
Note: If you are using the speakerphone, you must
press a call appearance button before you begin Step 3.
Voice Features
3
4
5
6
7
Press [ Program ]
or Dial AD Program code
[dial tone]
Press [ AD xxxxx ] to be programmed [dial tone] Press [ Select ] first if the [ AD xxxxx ] is top-labeled
on a 2-level button
Dial outside number, extension, or feature code you want to store (up to 24 digits)
Note: If you are programming an outside number,
be sure to include a trunk code, if applicable.
Press [ # ] [confirmation tone]
●
●
●
Number is stored
To place an AD call Press selected [ AD xxxxx ] [ringback tone] Press [ Select ] first if the [ AD xxxxx ] is top-labeled
on a 2-level button Call is dialed (silently)
● ●
To program/reprogram an outside number, extension, or feature code into a personal list
1
2
1
2
3
4
5
6
7
8
On a separate sheet of paper, jot down the outside numbers, extensions, and/or feature codes you want to program as items on your personal lists(s) (see example to the left)
Note: Each phone number or feature code is stored
as a separate item.
Pick up handset [dial tone]
Note: If you are using the speakerphone, you must
press a call appearance button before you begin Step 3.
Press [ Program ]
or Dial AD Program code [dial tone] Dial Personal List number (1, 2, or 3)
[dial tone]
Dial list item (1, 2, 3...) [dial tone] Dial number you want to store (up to 24 digits)
Note: If you are programming an outside number,
be sure to include a trunk code, if applicable.
Press [ # ] [confirmation tone] Repeat Steps 5–7 if you want to program
additional items on the same list; press [ Drop Test ]
and begin again at Step 1 if you want to program items on another list.
Hang up or press [ Drop Test ] to end programming
Note: Record your personal list items on the
To place a call using an 1 Press [ Pers List ] or [ Grp List ] or [ Sys List ]
2
AD list button or code or Dial appropriate AD List code:
●
●
●
●
List 1
List 2 [dial tone]
List 3
Note: An [ Enhcd List ] may also be available; see your
System Manager.
Dial desired list item (1, 2, 3...)
Call is dialed
Automatic Callback
To automatically place Press [ AutoCallBk ] during call attempt
another call to an [confirmation tone] extension that was busy,
did not answer, or Green light goes on steadily until callback is returned a call waiting completed or canceled
1
2 ●
●
ringback tone Note: If you send your calls to coverage after
activating Automatic Callback, your callback calls will still ring at your extension and will not be redirected to coverage.
Hang up
You will get a 3-burst priority ring when both you and the called extension are idle; when you answer, regular ringing is sent to the called party
Note: Automatic Callback is automatically canceled
after 30 minutes.
To cancel Automatic Press [ AutoCallBk ] again [dial tone]
Callback
Green light goes off
1
Bridging
To answer a bridged call Press [ xxxxx ] of bridged call
Note: If your terminal has Ringing Appearance
Preference, this step is not necessary; you will automatically be connected to the call when you lift the handset.
To use Manual Exclusion Press [ Excl xxxxx ] while connected to the call
to prevent other bridged
terminals from entering a Note: Pressing [ Excl xxxxx ] again reactivates bridging.
call (on a per call basis)
Call Coverage
To answer a call for a Press [ xxxxx ] of incoming call when ring begins or co-worker for whom you green light flashes
are a coverage point Note: The call is not at your terminal until the green light is flashing.
1
1
1
To leave a message for a Press [ Cvr Callbk ] while connected to the call
co-worker to call the [confirmation tone] original caller’s extension Note: To leave a message for a co-worker to call you,
activate Leave Word Calling instead.
1
Note: You can privately discuss call; if co-worker is
not available, press the fluttering [ xxxxx ] to reconnect to call.
3
1
2
3
Press [ Transfer ] again to send call to co-worker or press [ Conference Ring ] to make it a 3-party call
Call Forwarding All Calls
To temporarily redirect all calls to an extension or outside number of your choice
Press [ Call Fwd ] (while on-hook or off-hook)
or Dial Call Forward code
[dial tone]
Note: If you have console permission, next, dial the
extension number whose calls are to be forwarded; receive dial tone.
Dial extension or number where calls will be sent [confirmation tone]
Note: Some voice terminals have restrictions on
where calls can be forwarded (see your System Manager).
Hang up
Note: You may hear a ring-ping tone from your
voice terminal as each call is forwarded.
To cancel Call Press [ Call Fwd ] again (while on-hook) Forwarding or Dial Call Forward Cancel code
[confirmation tone]
Your calls will now ring at your own voice terminal
1
●
Call Park
To park a call at your extension (for retrieval at any extension)
Note: If a [ Call Park ] button has been assigned to your voice terminal, simply press [ Call Park ] and
3
4 ●
Press [ Transfer ] again Call is parked Hang up
To retrieve a parked call Dial Answer Back code [dial tone] from any extension
Dial extension where call is parked
[confirmation tone] If returning to call parked at your voice terminal, dial your own extension
Note: If you receive intercept tone, parked call has
been disconnected or retrieved by someone else.
1
2
●
Call Pickup
To answer a call placed to Press [ CallPickup ]
a member of your pickup or Dial Call Pickup code
group when your voice
terminal is idle You are connected to ringing call
1
1
2 ●
Conference
✔
To add another party to a call (for a total of up to 6 parties)
Press [ Conference Ring ] [dial tone]
Present call put on hold, and you are given a new call appearance; all other parties remain
connected to each other
●
3
1
2
3
Press [ Conference Ring ] again
●
●
All parties now connected
Repeat Steps 1–3 for additional conference connections
To add a call you’ve put on hold to another call you’re connected to
Press [ Conference Ring ] [dial tone]
Held call light continues to flutter; current call light also flutters
●
●
●
You are given a new call appearance Press [ xxxxx ] of call on hold (first call) Press [ Conference Ring ] again
All parties are now connected
To drop the last party Press [ Drop Test ]
added to a conference call
Last party you added is dropped
1
●
● You remain connected to other parties Note: Parties other than the last one must
disconnect to be released from the conference call.
D r o p
✔
To disconnect from a Press [ Drop Test ]
normal call and obtain
dial tone without hanging Note: If you press [ Drop Test ] during a conference call, the last party added will be dropped, and you will up the handset
remain connected to the other parties.
Hold
✔
To put a call on hold while you answer another call, make a call, or perform some other task
1 Press [ Hold ]
Green light flutters
Note: If you put a conference call on hold, the other
parties remain connected.
●
To answer a new call Press [ Hold ] while active on another
Green light flutters
1
2
1 ●
●
Press [ xxxxx ] of incoming call
You are connected to incoming call
To return to held call Press [ xxxxx ] of held call
You are connected to held call
Note: If you are active on a call and you press the
[ xxxxx ] of the held call, the active call will be
dropped.
●
Intercom (Automatic/Dial)
To make a call to your Press [ IcomAutoxx ] [ringback tone] predetermined Automatic
Intercom partner Special intercom ring is sent
Note: If call is unanswered, press [ Go to Cvr ] while
1
●
●
●
call is ringing if you want to redirect it to coverage.
To dial a call to a 1 Press [ IcomDialxx ] [dial tone]
2
member of your Dial
Intercom group Green light goes on steadily Dial group member’s 1- or 2-digit code
[ringback tone]
To answer any intercom Pick up handset call
You are connected to call
1
●
Note: If you are active on another call, first press
[ Hold ] , then press flashing [ xxxxx ]
Last Number Dialed
To automatically redial Press [ LastDialed ]
the last number you or Dial Last Number Dialed code
1
dialed (up to 24 digits) (extension, outside number, or trunk/feature code)
Leave Word Calling (LWC)
To leave a message after Press [ LWC ] before hanging up your handset
dialing an extension [confirmation tone] (when your call is not
Message light goes on at called voice terminal answered, you hear a
coverage or busy tone, or Note: If reorder tone is heard, message is not
you have been put on stored; try again. hold)
1
●
Note: To do this, you
must have a [ LWC ]
button.
To cancel a Leave Word Press [ CanceI LWC ]
Calling message or Dial Leave Word Calling Cancel code
Note: You cannot cancel 1
[dial tone]
a message left for an 2 Dial extension [confirmation tone] AUDIX subscriber.
Note: If reorder tone is heard, message is not
canceled; try again.
Message
✔
To retrieve a message If your set has a display, see the Message Retrieval when your Message light procedures under the Display Features heading. is on Otherwise, see your System Manager for instructions
regarding your local message retrieval procedures.
1
Mute
✔
Note: When you are talking on the handset, the Mute feature affects the
microphone associated with the handset rather than the speakerphone. This feature has no effect on an external speakerphone attached to the voice terminal.
To prevent the other 1 Press [ Mute ]
party from hearing you
(To mute the Red light goes on and other party cannot hear speakerphone you
microphone) When you are ready to resume conversation with the other party, press [ Mute ] again
2 ●
● Red light goes off and other party can hear you
again
Priority Calling
To place a priority call Press [ Priority ]
(3-burst ring) or Dial Priority Calling code
[dial tone]
1
2 Dial the extension
Note: If your call is not answered and you wish to
redirect it to coverage, press [ Go to Cvr ] while call is ringing.
To change a regular call Press [ Priority ] into a priority call (when
Wait for called party to answer you hear a call waiting
ringback tone) Note: If you still receive a call waiting
ringback tone, wait a few minutes and try again.
1
2
Reset Speakerphone
You can adjust the speakerphone to the surrounding room acoustics to provide optimal performance. Use the Reset Speakerphone feature in the following ways:
●
●
Whenever you move your voice terminal to another place (even in the same room) Whenever the green light next to [ Speaker Reset Spkr ] is fluttering
Note: You may also use this feature when you are on a call in the unlikely event
that your speakerphone makes a squealing noise during the call. When you press [ Select ] and [ Speaker Reset Spkr ] , your speakerphone will adjust itself to normal for that
call. (No tones will be heard.)
Important: If there has been a interruption in power (such as, the system has
just been powered up again, or you have plugged in the voice terminal at another location), the light next to [ Speaker Reset Spkr ] flutters until you reset the built-in
1 2 1 2 ● ● ● ●
Select Button
To adjust the speakerphone to the surrounding room acoustics
Press [ Select ]
Green light next to [ Select ] goes on steadily Press [ Speaker Reset Spkr ]
Green light next to [ Select ] goes off
Green light next to [ Speaker Reset Spkr ] flutters
intermittently
You hear a series of tones as the speakerphone performs an acoustic test of the environment. When the tones stop, your built-in speakerphone is ready for use.
✔
You can use any of the following features by, first, pressing the Select Button ( [ Select ] ).
Then press one of these buttons:
1
2
3
4
Press [ Drop Test ] to initiate a self-test of your voice terminal lights, ringer, and
display. For procedures, see “Self-Test” in this section.
Press [ Conference Ring ] to select one of 8 personalized ringing patterns for your voice
terminal. For procedures, refer to “Select Ring” in this section.
Press [ Speaker Reset Spkr ] perform an acoustic test of the surrounding environment and
adjust the speakerphone for optimal performance. For procedures, refer to “Reset Speakerphone” in this section.
Press a 2-level feature button to access the top-labeled feature. Use the procedure below.
To use the Select Button to access the top-labeled feature on 2-level buttons
Press [ Select ] to access any of the top-labeled features on buttons with split labels
Green light goes on
Press the split-labeled button whose top feature you wish to use
Note: When you press the chosen feature button,
the green light for [ Select ] automatically goes off;
begin again at Step 1 to use another top-labeled feature.
Select Ring (and Ringer Volume)
✔
To select a personalized Press [ Select ]
ring
Green light goes steadily
1
2
3
4
Press [ Conference Ring ]
●
●
●
●
●
Green light next to [ Select ] winks
Current ring pattern plays and repeats every 4 seconds
If you have a display, it shows
[ PERSONAL RING #x ] (x will be a number from 1 to 8)
Continue to press [ Conference Ring ] to cycle through all 8
ring patterns
When you hear the desired ring pattern, press [ Select ] again
Your new ring is set; light next to [ Select ] goes off
Note: If you receive a call, go off-hook, or lose power
during selection, the process is interrupted and you must start again.
To adjust ringer volume To raise the volume, press the right half of the if necessary (speaker is Volume control button labeled [ ∧ ] ;
not active) to lower the volume, press the left half of the Volume control button labeled [ ∨ ]
1
● If you have a display, it shows
Self-Test
✔
To test the lights and ringer of your voice terminal
1
2
3
While on-hook, press [ Select ]
Green light goes on Press and hold [ Drop Test ]
All lights next to buttons go on steadily
Ringer sounds Display is activated Release [ Drop Test ] to end test
Ringer and lights return to pretest state; light next to [ Select ] goes off
Note: If ringer or lights do not respond during test,
notify your System Manager.
●
●
●
●
●
Send All Calls
To send all calls (except Press [ Send Calls ] (while on-hook) priority calls) or Dial Send All Calls code
immediately to coverage [confirmation tone]
Note: You may hear a ring-ping tone from your
voice terminal as each call is forwarded.
1
1
To cancel Send All Calls Press [ Send Calls ] again (while on-hook)
or Dial Send All Calls Cancel code
Speaker
Note: Your voice terminal is set for either the Speaker (listen-only) or the
Speakerphone (listen and talk) function. Check with your System Manager to see which of these two features you can use.
You can use the Reset Speakerphone feature only if your voice terminal is set for Speakerphone (listen and talk).
Use the following procedures if your voice terminal is set for the Speaker (listen-only) feature.
To place a call without lifting the handset, or to use speaker with any listening-only feature activity (such as, monitoring a call on which you have been put on hold or for group listening)
Note: In order for the
other party to hear you, you must speak through the handset.
1
2
3
Press [ Speaker Reset Spkr ]
Green light next to [ Speaker Reset Spkr ] goes on; red light
next to [ Mute ] goes on
Place call or access selected feature Adjust speaker volume if necessary
To raise the volume, press the right half of the Speaker Volume control button labeled [ ∧ ] ; to lower the volume, press the left half of the Speaker Volume control button labeled [ ∨ ] If you have a display, it shows
[ SPEAKER L > > > > H ]
●
●
●
(There are 8 possible volume settings. On the display, 1 arrow is the lowest setting, and 8 arrows is the highest setting)
To mute the microphone Press [ Mute ] associated with the
handset so the other Red light goes on and other party cannot hear party cannot hear you you
Press [ Mute ] again to resume talking to other party through handset
To activate the speaker Press [ Speaker Reset Spkr ]
while using the handset
Green light next to [ Speaker ] and the red light
next to [ Mute ] go on steadily
1 2 1 ● ● ●
To turn off the speaker and return to handset
1
1
1
2
3
Pick up handset
Green light next to [ Speaker Reset Spkr ] and red light next
to [ Mute ] go off Speaker goes off
To end a call
(while handset is on-hook and only speaker is active)
Press [ Speaker Reset Spkr ]
Green light next to [ Speaker Reset Spkr ] and red light next
to [ Mute ] go off
Speakerphone
Note: If you are uncertain whether your voice terminal is set for the Speaker
(listen-only) feature or the Speakerphone (listen and talk) feature, check with your System Manager.
Use the following procedures if your voice terminal is set for the Speakerphone (speak and listen) feature.
For directions on using the Reset Speakerphone feature, see "Reset Speakerphone" in this section.
To place/answer a call without lifting the handset,
or to use speakerphone with any feature
Press [ Speaker Reset Spkr ]
Green light goes on steadily
Place or answer call, or access selected feature Adjust speakerphone volume if necessary
● ● ● ● ● ●
To raise the volume, press the right half of the Volume control button labeled [ ∧ ] ; to lower the volume, press the left half of the Volume control button labeled [ ∨ ] If you have a display, it shows
[ SPEAKER L > > > > H ]
(There are 8 possible volume settings. On the display, 1 arrow is the lowest setting, and 8 arrows is the highest setting)
To prevent the other Note: If the Speakerphone feature is not active, the
party from hearing you Mute feature turns off the microphone associated with the handset (not the speakerphone).
1
2
Press [ Mute ]
Red light goes on and other party cannot hear you
Press [ Mute ] again to resume talking to party
Red light goes off and other party can hear you again
●
●
To change from Pick up handset and talk speakerphone to handset
Green light goes off next to [ Speaker Reset Spkr ]
1
●
To change from handset Press [ Speaker Reset Spkr ]
to speakerphone
Green light goes on next to [ Speaker Reset Spkr ]
Hang up handset
1
2 ●
To end a call
✔
To send present call to Press [ Transfer ] [dial tone] another extension or
Present call is put on hold outside number
Dial number that call is to be transferred to
[ringback tone]
1
1
2
3
Press [ Speaker Reset Spkr ] again to hang up
Green light next to [ Speaker Reset Spkr ] goes off
Transfer
●
●
● Remain on line and announce call; if no answer or
busy, return to held call by pressing its [ xxxxx ]
Voice Message Retrieval
To retrieve your voice messages when your Message light is on
1
2
3
[ # ] [ 3 ] [ 4 ] [ 5 ]
[ 8 ]
4
Dial the Voice Message Retrieval code
(while on-hook or off-hook) [dial tone] Press [ # ] [voice prompting]
Note: Do not press [ # ] if calling from someone else’s extension; instead, dial your own extension number and your security code, if required. Move through the messages with these dial pad buttons: (Press [ # ] to retrieve first message)
NEXT (read next message) DELETE (erase from storage) HELP (request assistance) REPEAT (read message again) CALL (call back named extension)
Note: When you call back an extension with [ 8 ] be sure to also delete the message by pressing [ 3 ]
before you press [ 8 ] ; otherwise the message will remain in storage.
Hang up or press [ Drop Test ] to end Voice Message
Retrieval
To retrieve voice
messages for a co-worker
1
2
3
4
Dial Voice Message Retrieval Coverage code
(while on-hook or off-hook) [dial tone] Dial co-worker’s extension [voice prompting]
Note: If you receive an intercept tone, see your
System Manager for further instructions.
Move through the messages with dial pad buttons previously listed
Hang up or press [ Drop Test ] to end Voice Message
Display Features
In normal mode, the display shows call information for the current active call appearance button:
●
●
●
●
You may have as many as 5 call appearance buttons. Beginning with the first button in the upper left hand corner of your faceplate and going down, the display identifies the first 3 buttons as a, b, and c; the 2 buttons in the second column are identified as d and e. When the display shows [ a= ] it represents call
information for the first call appearance button. The next button down would be shown as [ b= ] , and so on, continuing through [ e= ] if all 5 of these
buttons are used for call appearances.
When you dial an extension, that number is shown then replaced by the called party’s name and extension.
When a call is received from another extension, the caller’s name is shown; when a call is received from outside, [ OUTSIDE CALL ] or a trunk identifier is shown.
The display remains in normal mode until you activate one of the other display features. After using any of these features, return to normal mode by pressing [ Normal ] .
Inspect
To see who’s calling Press [ Inspect ] while on a call
Name and number of caller shown if from extension; [ OUTSIDE CALL ] or other trunk source shown if from outside
Note: New caller information is shown for 30
seconds when call is received; then display returns to normal mode.
To see who’s on hold Press [ Inspect ]
while on a call
Press [ xxxxx ] of held call
1
1
2 ●
Integrated Directory
1
2
3
1
2
1
2
1
2
To search directory for a name
Press [ Directory ]
Key in selected name with dial pad:
last name, comma (use [ * ] ), first name or
initial
Press [ Next Msg ] for each successive directory name
you wish to see
● To search for a new name, begin again at Step 1
To place call to name Lift handset shown
Press [ ReturnCall ] while name is shown
Note: You can also leave your handset on-hook. The
speakerphone will turn on automatically when you press [ ReturnCall ] .
Message Retrieval
To see your messages Press [ Msg Rtrv ] when your Message light
Press [ Next Msg ] to see first message (and then for is on (while on-hook,
each following message) off-hook, or on a call)
To return a call to message sender
Lift handset
Press [ ReturnCall ] while any part of message is shown
Note: You can also leave your handset on-hook. The
To see co-worker’s Press [ CvrMsgRtrv ] messages
(can be during call with Dial co-worker’s extension
co-worker) Press [ Next Msg ] to see first message (and then for
Note: You must first be each following message) 1
2
3
1
2
3
1
designated as a systemwide message retriever by your System Manager.
To return call for a co-worker to displayed extension (while on call with co-worker)
Press [ Transfer ]
● Co-worker is put on hold
Press [ ReturnCall ] while any part of message is shown
Press [ Transfer ]
● Co-worker is connected to call attempt
To erase a message Press [ Delete ] while any part of message is shown
Normal
✔
To return to normal Press [ Normal ] display after using any
display feature Display will show call information for active call appearance
Stored Number
1●
●
To see number stored on Press [ Stored ] an AD button
Press selected [ AD xxxxx ]
1
2
3
Stored number shown
Press [ Normal ] to return to normal display
To see number stored as a list item
1
2
3
4
Press [ Stored ]
Press selected [ Pers List ] or [ Grp List ] or [ Sys List ]
or Dial appropriate AD List code:
●
●
●
●
List 1 List 2 List 3
Note: An [ Enhcd List ] may also be available; see your System Manager.
Dial selected list item (1, 2, 3...) Stored number shown
Press [ Normal ] to return to normal display or begin again at Step 2 to see another stored number
To see the number you Press [ Stored ]
last dialed Press [
LastDialed ]
or Dial Last Number Dialed code
1
2
Time/Date
To see date and time Press [ Date/Time ]
Display returns to normal mode after a few seconds
1
●
T i m e r
To see elapsed time Press [ Timer ] (hours, minutes, seconds)
Green light goes on
Press [ Timer ] again to stop timer and clear display Green light goes off
1
2 ●
Tones and Their Meanings
Ringing tones are produced by an incoming call. Handset tones are those which
you hear through the handset (receiver).
Ringing Tones
1 ring— A call from another extension.
2 rings— A call from outside or from the attendant.
3 rings— A priority call from another extension, or from an Automatic Callback
call you placed.
ring-ping (half ring, not repeated)— A call redirected from your voice
terminal to another because Send All Calls or Call Forwarding All Calls is active.
Handset Tones
busy tone— A low-pitched tone repeated 60 times a minute; indicates the
number dialed is in use.
call waiting ringback tone— A ringback tone with a lower-pitched signal at the
end; indicates that the extension called is busy, but the called party has been given a call waiting tone.
●
●
●
●
●
●
●
●
●
●
●
●
●
call waiting tone— One, two, or three beeps of high-pitched tone, not repeated;
indicates an incoming call is waiting to be answered. Number of beeps designates the source: 1 for an internal call, 2 for an outside or attendant call, 3 for a
priority call.
confirmation tone— Three short bursts of tone; indicates a feature activation or
cancellation has been accepted.
coverage tone— One short burst of tone; indicates your call will be sent to
another extension to be answered by a covering user.
dial tone— A continuous tone; indicates dialing can begin.
intercept/time-out tone— An alternating high and low tone; indicates a dialing
error, a denial of the service requested, or a failure to dial within a preset interval (usually 10 seconds) after lifting the handset or dialing the previous digit.
recall dial tone— Three short bursts of tone followed by a steady dial tone;
indicates the feature request has been accepted and dialing can begin.
Troubleshooting
Problem
A feature doesn’t work as noted in the book.
Solution
1
2
3
4
Reread the procedure and try again.
For many features you must lift the handset before you can use the feature.
Check with your System Manager to be sure this feature is administered on your voice terminal.
You may have an older version of the System 75 software so that some features may have slight differences from the procedures described in this guide. Check the section below on “Version Notes” for ways in which these features work differently.
Problem
There are no Feature Codes (such as Call Forward code or Send All Calls code) written in the appropriate blanks in this guide.
Solution
Problem
There’s no dial tone.
Problem
The telephone doesn’t ring.
Solution
1
2
3
4
1
2
3
4
1
2
Check with your System Manager to be sure your voice terminal is administered correctly.
Make sure that the handset and line cords at your voice terminal are securely connected at both ends.
Find a working voice terminal of the same type as your own. Unplug this voice terminal from its modular wall jack. Plug your voice terminal into that jack and check if it gets dial tone.
If your voice terminal still does not work, plug the working voice terminal (of the same type) into your modular wall jack. If the working voice terminal has dial tone, your own voice terminal is faulty. See your System Manager.
The lights do not go on next to the buttons.
Solution
Set the ringer volume to a higher level. Place a test call from another extension to your extension.
Check the line cord to make certain that it is securely connected at both ends.
If there is still a problem, see your System Manager.
Check the line cord to make certain that it is securely connected at both ends.
System 75 Version Notes
If you have Version 1 or 2 of System 75, some features may work a little differently than noted in this guide. The following list explains the slight differences in these features.
Note: If you are uncertain what version of the System 75 software your business is
using, check with your System Manager.
Feature System 75 Version Changes in Feature Operation
Abbreviated If you are using You can store up to 16 digits Dialing Version 1 rather than 24 digits.
If you are using You cannot use an Version 1 or 2 Enhanced List.
Call Forwarding If you are using You cannot forward someone All Calls Version 1 or 2 else’s calls.
Last Number If you are using You can store up to 16 digits Dialed Version 1 rather than 24 digits.
Key Words to Know
activate To begin or turn on the operation of a feature.
attendant The person who handles incoming and outgoing calls at the main console.
AUDIX Audio Information Exchange, an optional voice mail and message
service which provides coverage for calls to you by recording callers’ messages and reporting Leave Word Calling messages.
call appearance A button used exclusively to place or receive calls. It has an assigned extension number and is equipped with a red in-use light and a green status light.
console permission The authorization (from your System Manager) to initiate Call Forwarding All Calls for an extension other than your own.
coverage Automatic redirection of calls from an unanswered voice terminal to another voice terminal. Redirection could be to the extension of a receptionist, secretary, co-worker, AUDIX, or message center. A person who provides coverage is a covering user.
DEFINITY Communications System Generic 1 or Generic 3 The AT&T switch to which you may be connected. (Your voice terminal may be connected to System 75 instead.) DEFINITY Generic 1 and Generic 3 and System 75 are communications systems which transmit and receive voice and data signals for all communications equipment in your network.
dial pad The 12 pushbuttons you use to dial a number and access features.
enhanced list One of the 4 types of Abbreviated Dialing lists; programmable only by the System Manager. Contains phone numbers useful to all system members, and stores each of those numbers as a 3-digit list item.
extension A dialing number of 1 to 5 digits assigned to each voice terminal connected to your DEFINITY Generic 1 or Generic 3 or your System 75.
feature A special function or service, such as Conference, Hold, Send All Calls, etc.
feature code A dial code of 1, 2, or 3 digits that you use to activate or cancel the operation of a feature.
group list One of the 4 types of Abbreviated Dialing lists; programmable only by the System Manager. Contains phone numbers useful to members of a specific group, and stores each of those numbers as a 2-digit list item.
handset The handheld part of the voice terminal which you pick up, talk into, and listen from. Also known as the receiver.
party A person who places or answers a call.
personal list One of the 4 types of Abbreviated Dialing lists; programmable by the System Manager or by you, the user. Contains phone numbers of your choice, and stores each of them as a single-digit list item.
personal list item One of the 10 available slots on an Abbreviated Dialing personal list. The first nine personal list items are given digits 1 to 9, with 0 for the tenth item.
pickup group A group of telephone users who can answer calls for each other through the Call Pickup feature. Group members are determined by the System Manager and are usually located in the same work area or perform similar job functions.
priority call An important or urgent call which sends a special 3-burst ring.
program/reprogram To use your dial pad to assign a phone number to a personal list item or an [ AD xxxxx ] for Abbreviated Dialing.
reset the speakerphone To use [ Speaker Reset Spkr ] to perform an acoustic test of the
surrounding environment and adjust the speakerphone for optimal performance.
retrieve To collect phone messages with the Message Retrieval or Voice Message
terminal.
Retrieval features. (Also, with Call Park, to resume a call from an extension other than the one where the call was first placed or received.)
ringer The device that produces the electronic ringing sound in your voice
stored number A telephone number which has been programmed and stored as a 1-, 2-, or 3-digit list item for use with Abbreviated Dialing. It can be a complete or partial phone number, an extension number, or a trunk or feature code. Once programmed, a number can be accessed by first dialing the list, then the list item digit(s) under which it is stored; if the number is stored on an [ AD xxxxx ] , the number can be accessed by simply pressing that button.
switch The device which makes connections for all voice and data calls for a network, and also contains software for features. Also known as a system,
switching system, or PBX (private branch exchange). (Your switch is either an AT&T DEFINITY Communications System Generic 1 or Generic 3 or System 75.)
system list One of the 4 types of Abbreviated Dialing lists; programmable only by the System Manager. Contains phone numbers helpful to all system users, and stores each of those numbers as a 2-digit list item.
System Manager The person responsible for specifying and managing the operation of features for all the voice and data equipment in your network.
trunk A telecommunications channel between your switch and the local or long distance calling network. Trunks of the same kind connecting to the same end points are assigned to the same trunk group.
trunk code A dial code of 1, 2, or 3 digits that you dial to access a trunk group to place an outside call.
Quick Reference Lists
Feature Codes
F e a t u r e C o d e Feature C o d e
ABBREVIATED DIALING
List 1
List 2
List 3
Program
CALL PICKUP
LAST NUMBER DIALED
LEAVE WORD CALLING
Trunk Codes
Abbreviated Dialing*
Description C o d e
Miscellaneous
Description E x t e n s i o n
Attendant
Personal List 1 Personal List 2 Personal List 3 Item
No.
Name Name Name
1
2
3
4
5
6
7
8
9
0
AT&T 555-230-741