AT&T
PARTNER MAIL VS™
Voice Messaging System
Release 3
Copyright © 1995 AT&T
All Rights Reserved
Printed in U.S.A.
AT&T 518-322-105
Issue 1
July 1995
Notice
Every effort was made to ensure that the information in this book was complete and accurate at the time of printing. However, information is subject to change.
Federal Communications Commission (FCC) Interference Notice
This equipment has been tested and found to comply with the limits of a Class A digital device, pursuant to Part 15 of FCC rules. For additional FCC information, see Appendix B of this book.
Canadian Emissions Requirements
This digital apparatus does not exceed the Class A limits for radio noise emissions from digital apparatus set out in the Radio Interference Regulations of the Industry Canada (lC). For additional IC information, see Appendix B of this book.
Le present appareil numerique n’emet pas de bruits radioelectriques depassant Ies Iimites
applicable aux appareils numeriques de la classe A prescribes clans Ie Reglement sur Ie brouillage radioelectrique edicte par Ie ministere de Industrie du Canada. Vous trouverez des renseignements complémitaires à la annexe B de ce manuel.
Security
Toll fraud, the unauthorized use of your telecommunications system by an unauthorized party (for example, persons other than your company’s employees, agents, subcontractors, or persons working on your company’s behalf) can result in substantial additional charges for your
telecommunications services. You are responsible for the security of your system. There may be a risk of toll fraud associated with your telecommunications system. You are responsible for
programming and configuring your equipment to prevent unauthorized use. Your system manager should read all documents provided with this product to fully understand the features that can introduce the risk of toll fraud and the steps that can be taken to reduce that risk. AT&T does not warrant that this product is immune from or will prevent unauthorized use of common-carrier telecommunication services or facilities accessed through or connected to it. AT&T will not be responsible for any charges that result from such unauthorized use.
Trademarks
PARTNER MAIL VS and PARTNER MAIL are trademarks of AT&T. MLS-34D, MLS-18D, MLS-12D, MLS-12, MLS-6, and PARTNER are registered trademarks of AT&T.
Ordering Information
The order number for this book is 518-322-105. To order additional books, call 1800457-1235 in the continental U.S. or 1317361-5353 outside the continental U.S.
Support Telephone Number
In the continental U. S., AT&T provides a toll-free customer helpline 24 hours a day. Call the AT&T Helpline at 1 800 628-2868 if you need assistance when programming or using your system.
Contents
About This Guide
v
1
Overview
1-i■
Important Safety Instructions
1-ii■
Tutor Feature
1-2■
Languages
1-2■
Voice Messaging Services
1-32
Installation
2-i■ Important Safety Instructions 2-ii
■
Before You Start
2-1■
Installing the Voice Messaging System Module
2-13
Understanding Programming
3-i■
Communications System Programming
3-1 ■Voice Messaging System Programming
3-44
■
■
■
■
■
■
■
Initial Programming
Overview
Initial System Setup
Voice Messaging System Programming
Communications System Programming
Verifying System Operation
Initial Programming Flowchart
Programming Quick Reference
Contents
5
System Management
5-i■
General Information
5-2■
Language
5-6■
Automated Attendant Service
5-14■
Modifying Mailboxes
5-28■
Line Coverage
5-39■
Telephone Button Programming
5-466
Troubleshooting
6-i■
When You Need Help
6-1■
Automated Attendant Service
6-2■
Call Answer Service
6-5■
Voice Mail Service
6-6■
Language
6-8A
Specifications
A-1B
FCC Information
B-1C
Maintenance
C-1D
Planning Forms
D-1E
Case Studies
E-1Contents
GL
Glossary
GL-1IN
Index
IN-1About This Guide
Purpose
This guide provides instructions for installing, programming, and managing the PARTNER MAIL VS™ Voice Messaging System on the PARTNER®
Plus, PARTNER II, or PARTNER 48 Communications System. It is intended for the
technician who installs the hardware and programs the initial system settings
and for the System Manager, the person who is responsible for managing the system on an on-going basis.
Terminology
This guide uses the following terms:
■
■
■
■
Voice messaging system: the PARTNER MAIL VS Voice Messaging
System.
Subscriber: a user who has a mailbox on the voice messaging system.
Communications system: the PARTNER Plus, PARTNER II, or PARTNER
48 Communications System.
System phones: the AT&T telephones specifically designed to work with
Key Sequences
This guide instructs you to press key sequences on the telephone’s dialpad to perform tasks. Each sequence includes a number. If the keys on your dialpad also have letters, the number in the sequence is equivalent to a letter associated with the task in English. For example, to delete a message from your mailbox, you press [∗] [3] , which is equivalent to [∗] [D] on the dial pad, The numerical key sequences and their associated letter sequences are listed below for your reference:
Delete [∗] [3] [∗] [D] Help [∗] [4] [∗] [H] Restart [∗] [7] [∗] [R] Transfer [∗] [8] [∗] [T] Exit [∗] [∗] [9] [∗] [∗] [X]
How to Use This Guide
If you
■
■
■
■
If you
■
■
■
■
are the technician, refer to the appropriate chapters to help you:
Install the voice messaging system hardware. Chapter 2 provides
instructions for installing the voice messaging system module in the communication system’s control unit. It also provides instructions for installing the Mailbox Expansion Card.
Refresh your memory about programming. Chapter 3 offers general
programming information for both the communications system and the voice messaging system.
Perform initial programming. Chapter 4 provides step-by-step
programming instructions for integrating the voice messaging system with the communications system, It also provides test procedures that you should use after installation to ensure that the system is working properly.
Solve problems. Chapter 6 provides information to help you identify and
correct problems you may have with the voice messaging system.
are the System Manager, refer to the appropriate chapters to help you:
Learn about the voice messaging system. Chapter 1 describes the
voice messaging system’s features and services.
Learn about programming. Chapter 3 offers general programming
information for both the communications system and the voice messaging system.
Manage the voice messaging system. Chapter 5 provides instructions
for changing system settings to accommodate the changing needs of the business. It also offers guidelines for setting up and using the
receptionist’s extension.
Once you are experienced with the system, use the Table of Contents or Index to locate the information you need.
This guide contains some information about communications system features as well as voice messaging system features. For detailed information about a specific communications system feature, refer to the Programming and Use guide for the communications system.
Product Safety Statements
Product safety statements are identified in this guide by a
CAUTION:
Indicates the presence of a hazard that will or can cause minor personal injury or property damage if the hazard is not avoided.
WARNING:
Indicates the presence of a hazard that can cause severe or fatal personal injury if the hazard is not avoided.
How to Comment on This Guide
A feedback form is located at the end of this guide, after the appendixes. If the form is missing, send your comments and recommendations for changes to Publications Manager, AT&T, 211 Mount Airy Road (Room 2W-226), Basking Ridge, NJ 07920 (FAX 1 908 953-6912).
Reference Materials
In addition to this guide, the following materials are available (the order numbers are in parentheses) for the voice messaging system:
■ Using the PARTNER MAIL VS Voice Messaging System (518-322-106)
■ Tutor Labels (585-322-510)
To order these materials, call the AT&T GBCS Publications Fulfillment Center at 1 800 457-1235 in the continental U.S. or at 1 317 361-5353.
Some of these materials also are available in other languages. For more information about these materials or about communications system materials, contact the AT&T GBCS Publications Fulfillment Center or your AT&T
Important Safety Instructions
WARNING:
The following list provides basic safety precautions that should always be followed when using the system:
1.
2.
3.
4.
5.
6.
7.
8.
9.
10.
Read and understand all instructions.
Follow all warnings and instructions marked on the product.
Unplug all telephone connections before cleaning. DO NOT use liquid cleaners or aerosol cleaners. Use a damp cloth for cleaning.
This product should be serviced by (or taken to) a qualified repair center when service or repair work is required.
DO NOT use this product near water, for example, in a wet basement location
DO NOT place this product on an unstable cart, stand, or table.
Never push objects of any kind into slots or openings as they may touch dangerous voltage points or short out parts that could result in a risk of fire or electric shock. Never spill liquid of any kind on the product.
Avoid using this product during an electrical storm. There maybe a remote risk of electric shock from lightning.
DO NOT use the telephone to report a gas leak in the vicinity of the leak.
The product is provided with a three-wire grounding type plug. This is a safety feature. DO NOT defeat the safety purpose of the grounding type plug. DO NOT staple or otherwise attach the AC power supply cord to buiIding surfaces.
CAUTION:
DO NOT block or cover the ventilation slots and openings. They prevent the product from overheating. DO NOT place the product in a separate enclosure unless proper ventilation is provided.
Overview
1
The PARTNER MAIL VS Voice Messaging System is designed to work with the communications system to automate the call handling needs of the business. The voice messaging system:
■
■
■
■
■
■
■
Handles up to two calls simultaneously and provides service for a predetermined number of subscribers, An optional Mailbox Expansion Card may be installed to double the number of subscribers.
Answers outside calls, plays a customized message prompting the caller to press digits for the party with whom the caller wants to speak, and efficiently routes the call to the appropriate party-all without the aid of a receptionist.
Allows outside callers to hear all voice prompts and customized messages in the language selected for the system; or the caller can choose between two available languages.
Allows callers to leave a private message if the called party does not answer or is busy on another call, or to transfer to another system extension or the receptionist’s extension for assistance.
Allows subscribers to retrieve messages from any touch-tone phone on the premises or from a remote location.
Allows subscribers to choose a language for their own mailbox use.
Provides after-hours service in addition to daytime service.
Tutor Feature
Tutor is an “on-line help” feature that allows users to easily access and listen to information about commonly-used communications system features. Any user can access the Tutor-users do not have to be voice messaging system subscribers.
Tutor provides information about the following subjects:
■
■
■
System phone features such as ringing patterns, volume control, speakerphone, display, buttons, and lights.
Various types of internal calls including group paging calls, voice interrupt on busy calls, and hands-free answer on intercom calls,
System features such as Conference, Transfer, Auto Dialing, Personal Speed Dialing, Last Number Redial, and Save Number Redial.
To access the Tutor menu, users simply make a call to the voice messaging system. The system plays:
Welcome to PARTNER MAIL VS. Please enter extension and #. Otherwise, to access PARTNER Tutor, press * 4.
When users dial [∗] [4] , they hear instructions for using Tutor, followed by a list of topics and subtopics. The user can then enter the topic and subtopic numbers of their choice. Refer to “Using the Tutor Feature” in Chapter 5 for a list of topic and subtopic numbers.
Instruction labels, which are designed for placement in the handset cradle on the base of the system phone, are shipped with the voice messaging system hardware.
Languages
The voice messaging system supports multiple languages. You can choose to have outside callers hear all voice prompts and customized messages in one of the supported languages (Monolingual Mode) or you can let outside callers choose between two available languages (Bilingual Mode).
Voice Messaging Services
The voice messaging system provides three types of service:
■
■
■
Automated Attendant Service. Answers outside calls and transfers
them to the destination selected by the caller.
Call Answer Service. Allows the caller to leave a message or to transfer
to another extension if the called party is busy or does not answer.
Voice Mail Service. Allows subscribers to listen to messages and
manage their own mailbox.
Figure 1-1 provides an overview of the features associated with each service.
Automated Attendant Service
The Automated Attendant Service can answer and route outside calls without assistance from a receptionist, After an outside call is answered, the Automated Attendant Service plays a customized message (called the menu prompt). The message typically welcomes callers—to let them know they have reached the correct number—then offers callers a menu of options for transferring to the desired party. It is recommended that the menu offer not more than five transfer options to avoid confusing callers.
You can customize the menu prompt for use during normal business hours (called the Day Menu Prompt) and for use after normal business hours (called the Night Menu Prompt), For example, you can setup Automated Attendant Service so that callers hear the following prompt during the day if the system is set for Monolingual Mode and the System Language is U.S. English:
Thank you for calling the ANY Travel Agency. If you know the extension you want, dial it now or press 0 to speak with the receptionist. For information on Corporate Travel, press 3. For information on Personal Travel, press 4. Press * 4 to replay this message.
For after-hours callers, you can set up Automated Attendant Service to play this prompt:
You have reached the ANY Travel Agency. Our hours are 8 to 5, Monday through Friday. Please press 9 to leave a message and we will return your call when the office opens .
For a system set for Bilingual Mode, the Day Menu Prompt should let callers know that they can switch from the Primary Language to the Secondary Language. In the following example, the Primary Language is Latin American Spanish and the Secondary Language is U.S. English:
Gracias pol llamar a Software Mexico. For English, press * 1. Si conoce el numero de extension, marquela ahora, de lo contrario espere a ser atendido por nuestra operadora.
For after-hours callers, you can set up Automated Attendant Service to play this prompt:
Gracias pol llamar a Software Mexico. For English, press * 1. Nuesro horario de oficina es de 9 a 2:30 y de 4 a 6. Si conoce el numero de la extension a la que desea llamar y dejar un mensaje marquela ahora. Si no la conoce, espere y deje un mensaje con la operadora.
NOTE:
When the system is installed initially, Automated Attendant Service has this factory-set Day Menu Prompt:
Hello, welcome to PARTNER MAIL VS.
Please enter the
In addition, Automated Attendant Service has this factory-set Night Menu Prompt:
Good Evening. Welcome to PARTNER MAIL VS. Please enter the extension number of the person you wish to reach, or press 9 to leave a message with the
receptionist.
Automated Attendant Service is useful for many businesses, such as car dealerships, insurance agencies, and stores. For example, a car dealership can use Automated Attendant Service to allow its customers to reach the customer service department directly. This frees sales people to handle customer transactions while the Automated Attendant Service transfers service calls to the appropriate department. In this case, the Automated Attendant Service can be programmed to prompt the caller to enter a single digit to reach any available customer service representative.
Automated Attendant Options
When planning Automated Attendant Service, you must choose settings for the following communications system features:
■
■
■
Group Call Distribution. Specifies the outside lines that are to be
answered by Automated Attendant Service.
VMS Hunt Schedule. Specifies when the communications system is to
route calls to the Automated Attendant Service.
VMS Hunt Delay. Specifies whether the Automated Attendant Service is
to provide immediate or delayed call handling. Each of these features is explained further below.
Group Call Distribution
This feature lets you specify the outside lines on which you want Automated Attendant Service coverage. You can specify some or all of your lines.
VMS Hunt Schedule
This feature determines when the communications system is to route calls to the Automated Attendant Service. VMS Hunt Schedule works in conjunction with the communication system’s Night Service feature so that the voice messaging system can play the appropriate menu prompt. In other words, the menu prompt the caller hears depends on the VMS Hunt Schedule setting you select and the status of the Night Service button at the receptionist’s extension.
You can choose one of the following VMS Hunt Schedule settings:
■
■
■
Always (factory setting). Routes outside calls to Automated Attendant
Service all the time. When Night Service is off, the Day Menu Prompt plays; when Night Service is on, the Night Menu Prompt plays.
Day OnIy. Routes outside calls to Automated Attendant Service only
when Night Service is off. The Day Menu Prompt plays.
Night Only. Routes outside calls to Automated Attendant Service only
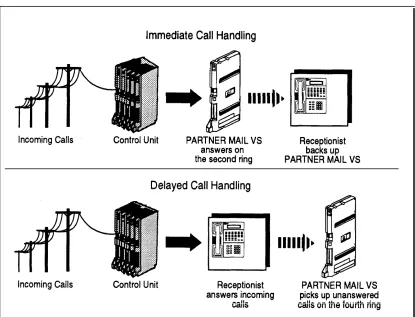
VMS Hunt Delay
This option specifies either immediate or delayed call handling (see Figure 1-2):
■ Immediate (factory setting). The Automated Attendant Service answers
outside calls on the second ring and plays the Day or Night Menu
Prompt. The receptionist can act as backup. Callers using rotary phones or callers requesting assistance can be transferred to the receptionist’s extension.
■ Delayed. The Automated Attendant Service answers outside calls on the
fourth ring. This delay gives the receptionist time to answer the call,
The VMS Hunt Delay setting you select is used for both day and night operation.
Music On Hold
If you use Automated Attendant Service, you also may want to use the communications system’s Music On Hold feature. When Music on Hold is Active and an audio source is connected to the system, callers waiting to be transferred hear music or recorded material. If Music on Hold is Not Active, callers hear tones, ringing, or silence (depending on how the communications system is set up) while they are being transferred.
For more information, see Music on Hold and Ring on Transfer in the
Programming and Use guide for the communications system.
Call Answer Service
This service offers callers the following options when they reach an extension that is unable to answer their call:
■
■
■
■
If the system is in Bilingual Mode, press [∗] [1] while listening to the personal greeting to switch between the Primary and Secondary Languages,
Leave a detailed, confidential message in the called party’s mailbox. Press [0] to transfer to the receptionist’s extension for assistance.
Press [∗] [8] to transfer to another system extension,
Callers can press [0] or [∗] [8] before, during, or after leaving a message.
NOTE:
Until subscribers record a personal greeting for their mailbox, outside callers hear this factory-set message in either the System Language (Monolingual Mode) or the Primary Language (Bilingual Mode):
Extension XX is not available. To leave a message, wait for the tone. After recording hang up or press 1
for more options.
Call Answer Service provides the following main features:
■ VMS Extension Coverage
■ Line Coverage
■ Voice Mailbox Transfer
Each of these features is explained further below.
VMS Extension Coverage
VMS Extension Coverage may be either automatic or manual
Automatic VMS Coverage
When the communications system’s Automatic VMS Cover feature is Assigned for an extension, intercom and transferred callers can leave messages or transfer to another extension when the called person does not answer by the fourth ring (or by the number of rings specified with the communications system’s VMS Cover Rings (#117)* feature). The system greets the caller with the subscriber’s personal greeting (or with the system greeting if a personal greeting is not recorded). If the system is in Bilingual Mode and the subscriber recorded a personal greeting in two languages, the caller can switch between the two languages by pressing [∗] [1] .
* VMS Cover Rings (#117) IS not available on all systems. Check the Programming and Use guide for the
Manual VMS Coverage
Regardless of the Automatic VMS Cover setting, the communications system allows subscribers to press a programmed button to turn voice mail coverage on and off at their extension. To make this possible, the VMS Cover feature must be programmed on a button with lights on the subscriber’s system phone,
Send All Calls
Subscribers who have VMS extension coverage—either automatic or
manual-can use the communications system’s Do Not Disturb feature when they want calls to have immediate VMS coverage, If Do Not Disturb is used in conjunction with VMS extension coverage, callers are sent to the subscriber’s mailbox immediately (calls do not ring the extension first) so the caller can leave a message, In addition, on some systems, subscribers can press the Do Not Disturb button while the call is ringing to send the call to their mailbox. This is useful when subscribers are already on a call or are too busy to answer calls or when they leave their desk for extended periods of time, such as at lunch time or at the end of the day. To use Do Not Disturb, this feature must be
programmed on a button with lights on the subscriber’s system phone.
Line Coverage
Line Coverage lets callers who call in on a covered line leave messages in the mailbox of a specific subscriber (known as the owner of the covered line). When a call comes in on a covered line, the system routes the caller directly to the line owner’s mailbox if the call is not answered, The caller has the option of leaving a message or transferring to another extension.
Line ownership typically is assigned to personal lines or to lines to be used for outside access to the voice messaging system when Automated Attendant Service is not used. (Lines in the system can be assigned either Line Coverage or Automated Attendant Service coverage—a single line cannot be assigned both types of coverage.)
Voice Mailbox Transfer
Voice Mail Service
This service allows subscribers to manage their own mailboxes. With it, a subscriber can:
■
■
■
■
Listen to messages, then save or delete them.
Record a personal greeting (in Bilingual Mode, the user may record his or her personal greeting in both the Primary and Secondary Languages)
Change the default password for his or her mailbox to ensure that messages are kept confidential,
Transfer to another extension or to the receptionist’s extension,
A subscriber’s extension number and mailbox number are the same. When a caller leaves a message, the voice messaging system places the message in the subscriber’s mailbox and turns on the message light (if available) at the subscriber’s phone.
Subscribers can retrieve messages at their convenience from any touch-tone phone either while on-site or from an off-site location. Subscribers can refer to Using PARTNER MAIL VS for instructions on recording a personal greeting, changing a password, and performing other Voice Mail Service procedures. Voice Mail Service also allows the System Manager to program the voice messaging system. See “Voice Messaging System Programming” in Chapter 3 for more information.
NOTE:
When subscribers call into the Voice Mail Service, they hear this factory-set prompt in either the System Language (Monolingual Mode) or the Primary and Secondary Language (Bilingual Mode):
Welcome to PARTNER MAIL VS. Please enter extension and #. Otherwise, to access PARTNER Tutor, press * 4.
Mailboxes
The voice messaging system provides a predetermined number of mailboxes which are assigned to extensions in order beginning with extension 10. For example, the system may have 10 default mailboxes for extensions 10 through
19. If a Mailbox Expansion Card is installed, the number of default mailboxes is doubled; in this example, installation of a Mailbox Expansion Card would increase the number of default mailboxes to 20, for extensions 10 through 29. The System Manager can change default mailbox assignments. First, delete mailboxes from any extensions that do not require voice mail coverage. Then, create mailboxes for extensions that need them. Note that the mailbox assigned to extension 10, the receptionist’s extension, cannot be changed. Mailboxes can be created for extensions 11 through 33 for the PARTNER Plus system and
11 through 57 for the PARTNER II or PARTNER 48 system.
NOTE:
Mailboxes should be deleted from extensions that connect auxiliary equipment (such as fax machines or doorphones) to keep the maximum number of mailboxes available for users.
Guest Mailboxes
The System Manager can create guest mailboxes for users who do not have their own phone, but still require mailboxes, If this is the case, either the
Important Safety Instructions
WARNING:
The following list provides basic safety precautions that should always be followed when using the system:
1.
2.
3.
4.
5.
6.
7.
8.
9.
Read and understand all instructions.
Follow all warnings and instructions marked on the product.
Unplug all telephone connections before cleaning. DO NOT use liquid cleaners or aerosol cleaners. Use a damp cloth for cleaning.
This product should be serviced by (or taken to) a qualified repair center when service or repair work is required.
DO NOT use this product near water, for example, in a wet basement location
DO NOT place this product on an unstable cart, stand, or table.
Never push objects of any kind into slots or openings as they may touch dangerous voltage points or short out parts that could result in a risk of fire or electric shock. Never spill liquid of any kind on the product.
Avoid using this product during an electrical storm. There may be a remote risk of electric shock from lightning.
DO NOT use the telephone to report a gas leak in the vicinity of the leak.
10. The product is provided with a three-wire grounding type plug. This is a safety feature. DO NOT defeat the safety purpose of the grounding type plug. DO NOT staple or otherwise attach the AC power supply cord to building surfaces.
CAUTION:
DO NOT block or cover the ventilation slots and openings. They prevent the product from overheating. DO NOT place the product in a separate enclosure unless proper ventilation is provided.
Installation
2
This chapter provides instructions for installing the voice messaging system’s hardware in the communications system’s control unit.
Before You Start
Refer to the enclosed product information sheet to verify that you have the appropriate voice messaging system and communications system hardware. Then:
■
■
Make sure the communications system control unit, processor module(s), and 206/400 modules have been installed.
Make sure this installation meets the environmental and electrical requirements listed in Appendix A of this guide.
Installing the Voice Messaging System
Module
To install the voice messaging system module in the communications system’s control unit:
1. Turn off power to the communications system’s control unit: either pull out the main circuit breaker on the upper right rear corner of the control unit or move the on/off switch to the “off” position.
CAUTION:
2. Install the voice messaging system module in the first available slot to the right of the last installed 206 or 400 module. Do not install the voice messaging system module in the first slot of the PARTNER Plus system control unit or the PARTNER II or PARTNER 48 system primary carrier.
NOTE:
The voice messaging system module should always be installed after the 206 and 400 modules to ensure consecutive extension numbering. If the control unit is upgraded with more 206 or 400 modules, the voice
messaging system module should be removed, the new modules should be installed, and the voice messaging system module should be replaced in the first available slot after the 206 and 400 modules, The VMS Hunt Group Extensions and Transfer Return Extensions should be
reprogrammed (see page 4-2 and 4-3).
Push slowly but firmly in the center of the module until the module locks into place, and is attached to the rear of the backplane. Do not force the module. If it does not insert easily, remove the module, clear any
obstruction, and reinsert it.
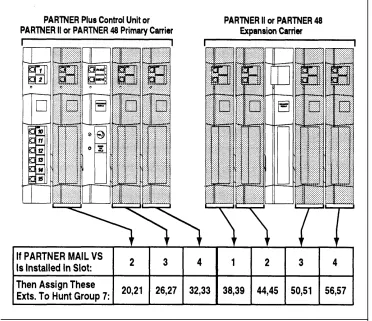
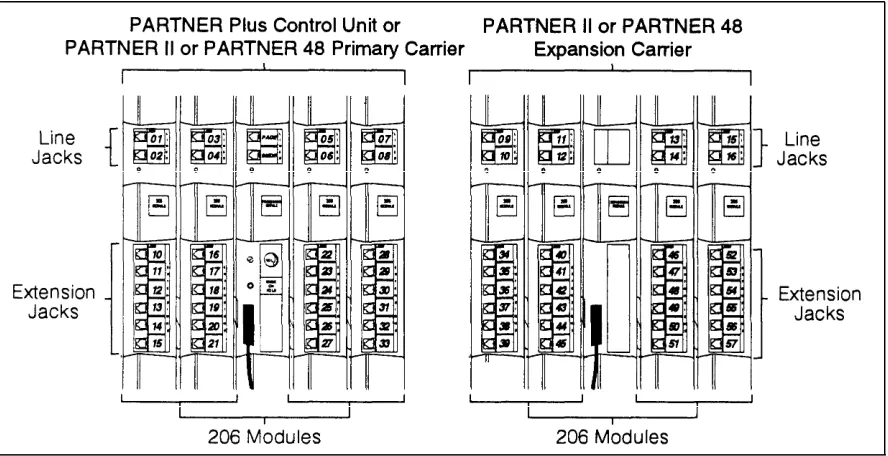
3 . Refer to Figure 2-1, then record the extensions associated with the PARTNER MAIL VS module on Form B1 of the System Planner for the
communications system.
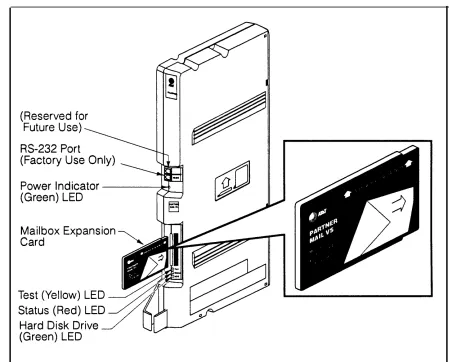
Figure 2-2. Installing the Mailbox Expansion Card
4. To install the Mailbox Expansion Card, insert the card in the vertical slot on the lower front of the voice messaging system module (see Figure 2-2). Make sure the arrows on the Mailbox Expansion Card label face up and in. Also make sure the card is pushed in all the way.
5. Turn on power to the control unit. The green Power LED should light—if it does, skip to Step 6. If the green Power LED does not light, power down the control unit, reseat the voice messaging system module, then power up the control unit again. If the green Power LED still does not light, call for support as indicated on the inside front cover of this guide.
6. Next, the voice messaging system module performs self-diagnostic tests. The LEDs work as follows:
LED State
Green Power ON Yellow Test ON
7. After approximately 10 seconds when the tests are completed, the yellow Test LED goes off, When this occurs, check the red Status LED:
■ If the red Status LED is not lit, the module passed the tests. Continue
with Step 8.
■ If the red Status LED is lit, power down the control unit, re-install the
Mailbox Expansion Card if it was installed in Step 4, then power up the control unit again. If the red Status LED comes on again, call for support as indicated on the inside front cover.
Understanding Programming
3
This chapter provides general programming information for the communications system and the voice messaging system. Both systems must be programmed so they can work together as an integrated unit.
Communications System Programming
When the communications system is installed, it uses factory settings that reflect the most common usage of the equipment. You can change these settings as required to customize them for the business.
You can program the communications system from extension 10. Some systems also allow programming from extension 11. Check the Programming
and Use guide for the communications system for more information. If your
system supports programming from both extensions, you may find it more convenient to program from extension 11. This allows the receptionist to continue handling calls at extension 10 while you program.
System Programming changes settings for the system as a whole, or for individual lines or extensions. (Refer to the Programming and Use guide for the communications system for more information about System Programming options.)
Planning Forms
Refer to the communications system’s System Planner when you are changing system settings, and be sure to record any changes you make, The following forms from the System Planner contain information about the voice messaging system:
■
■
■
■
Form A: System Configuration. Contains basic information about the
system including the line number and type of voice messaging service required for each line.
Form B1: System Extensions. Contains basic information about each
extension. This includes the type of phone or auxiliary equipment at the extension, and the name of the user or a description of how the extension is used.
Form B2: Customized Extension Settings. Contains feature settings,
such as Automatic VMS Cover and Automatic Extension Privacy, and group assignments for each extension.
Form C: Button Assignments. Specifies which features are
programmed on buttons for each extension. This includes VMS Cover, Voice Mailbox Transfer, and Voice Mail Messages buttons.
Using System Programming
System Programming requires a system display phone at extension 10 (or 11 if available), with a programming overlay placed over the phone’s dialpad. System Programming procedures are identified by # and a 3-digit code (for example, the procedure code for System Date is #101).
You can program the system in one of two ways:
■ Direct Method. You access a programming procedure directly by
dialing the code for that procedure. This method works best when you are using only a few procedures during the programming session, and you know the codes. For example, press [#] [1] [0] [1] to change the system date.
■ Cycle Method. You cycle through a sequence of procedures in
numerical order by pressing [ Next Procedure ] or [ Prev Procedure ] . You should use this method when programming the communications system for the first time, or when you are changing a series of related settings.
However, procedures #399, #609, and #728 are skipped when you cycle through procedures
NOTE:
The Programming Overlays
During System Programming, the normal functions of several buttons on the phone at extension 10 (or 11 if available) change. For example, left [ Intercom ] becomes [ System Program ] , which is the button used to enter programming mode. To identify these buttons while programming, place the appropriate
programming overlay provided with the system over the dialpad of the phone at extension 10 (or 11 if available).
Use the following special buttons while programming:
[ Next Procedure ] and [ Prev Procedure ] cycle forward and backward through the
programming procedures.
[ Next Item ] and [ Prev Item ] cycle forward and backward through a procedure’s
parameters, A parameter is typically an outside line, an extension, or a telephone list entry.
[ Next Data ] and [ Prev Data ] cycle forward and backward through the valid list
entries. These buttons work only for fixed data, such as a line or
extension number. They do not work for variable data such as date, time, password, telephone numbers, or doorphone assignments.
[ Remove ] returns the current setting to the factory setting.
[ Enter ] ends an entry of variable length, such as a telephone number in an
Allowed Phone Number List.
[ System Program ] starts the System Programming process.
[ Central Tel Program ] starts the Centralized Telephone Programming process
(that is, customizing individual telephones from extension 10, or 11 if available).
[ Feature ] , when followed by [0] [0] , enters or exits programming mode.
Programming Mode
To enter programming mode:
1. At extension 10 (or 11 if available), make sure the programming overlay is in place over the system phone’s dialpad,
2. Press [ Feature ] [0] [0] .
3. Press [ System Program ] [ System Program ] .
4. Enter the System Password, if required.
Voice Messaging System Programming
Before you program the voice messaging system, obtain completed copies of planning forms for the communications system and the voice messaging system. These forms provide the names, extensions, mailboxes and other information required to program the voice messaging system.
Planning Forms
You need the following forms for the voice messaging system:
■
■
■
■
■
■
■
■
Form 1: Language. Shows the Language Mode, Monolingual or
Bilingual. Also specifies the System Language for Monolingual Mode or the Primary and Secondary Language for Bilingual Mode.
Form 2: Mailbox Assignments. Shows factory-set mailbox assignments
with and without the Mailbox Expansion Card. Allows you to change mailbox assignments and to identify the language used for each mailbox.
Form 3: Menu Definition. Shows transfer options for Automated
Attendant Service. Allows you to specify the extension or group number for a selector code transfer and to provide a description of that extension or group.
Form 4: Day Menu Prompt—System Language or Primary Language.
Shows the script used to record the Day Menu Prompt in the System Language for Monolingual Mode or the Primary Language for Bilingual Mode.
Form 4A: Day Menu Prompt—Secondary Language. Used only if the
system is set for Bilingual Mode. Shows the script used to record the Day Menu Prompt in the Secondary Language.
Form 5: Night Menu Prompt: System Language or Primary Language.
Shows the script used to record the Night Menu Prompt in the System Language for Monolingual Mode or the Primary Language for Bilingual Mode.
Form 5A: Night Menu Prompt: Secondary Language. Used only if the
system is set for Bilingual Mode. Shows the script used to record the Night Menu Prompt in the Secondary Language.
Form 6: Line Ownership. Identifies the lines assigned VMS Line
Using System Programming
A special login number is required to program the voice messaging system. The following information applies to this login
■
■
■
■
The login number is 99.
99 is not an extension number.
The language associated with this login is either the System Language chosen for Monolingual Mode or the Primary Language chosen for Bilingual Mode; it cannot be changed.
This login’s factory-set Mailbox Password is 1234. If you are the System Manager, refer to “Changing Your Mailbox Password” in Chapter 5 to change the password before you begin to program the system.
NOTE:
Although this login has a Mailbox Password, it does not have an associated mailbox.
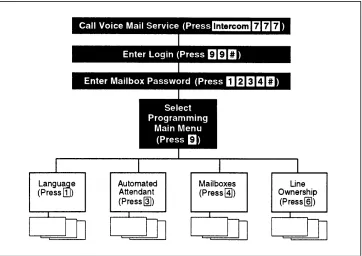
To begin programming the voice messaging system, you make a call to the Voice Mail Service, enter the login and password, and select option 9 (you are not prompted for this option). This takes you to the Programming Main Menu (shown in Figure 3-1).
The Programming Main Menu
The Programming Main Menu allows you to access the Language Mode and the language(s) associated with that mode, the Automated
Attendant Service Menu,
mailbox assignments, and line ownership assignments.
Accessing the Programming Main Menu
To access the Programming Main Menu:
1. Press [ Intercom ] [7] [7] [7] or the programmed VMMsgs button. The system plays:
Welcome to PARTNER MAIL VS. Please enter extension and #. Otherwise, to access PARTNER Tutor, press * 4.
2. Press [9] [9] [#] , The system plays:
Enter password and #.
3. Enter the Mailbox Password and press [#] . (The factory-set Mailbox Password is 1234.) The system plays:
System Manager. PARTNER MAIL VS Release 3.
The system plays the available programming options. It does not play option 9 (the Programming Main Menu), which only the System Manager can access.
4. Press [9] to access the Programming Main Menu. The system plays:
To program the System Language press 1, for Automated Attendant press 3, for mailboxes press 4, for line
ownership press 6. If finished press * #.
Programming Guidelines
Once you are familiar with the voice messaging system, use these shortcuts to save time while programming:
■ You do not have to wait for a prompt to play before entering digits for the
next step.
■ Press [∗] [#] to return to the previous menu.
■ Press [∗] [4] to repeat the current menu options.
■ Press [∗] [7] at any point during programming to restart at the
Programming Main Menu.
■ Use the handset rather than the speakerphone to record prompts and greetings to avoid background noise in your recordings.
■ To ensure that you hear voice prompts, turn off your microphone when programming the system using the speakerphone.
Initial Programming
4
Overview
This chapter tells you how to program the voice messaging system and communications system for initial installations. It begins with two procedures that allow you to access and program the voice messaging system-you must perform these procedures first for every installation. The next section deals with voice messaging system programming and the last section covers
communications system programming.
The order of the procedures in this chapter enables you to program the Menu Definition and record the Day and/or Night Menu Prompts before the voice messaging system begins to handle calls—this order is recommended for voice messaging systems that are being added to existing communications systems. If this is a new installation, however, you can program the communications system first, then the voice messaging system if you prefer,
In addition, you can either follow the step-by-step instructions or use the flowchart at the end of this chapter as a quick guide. If you use the step-by-step instructions, note that Step 1 of each procedure for the voice messaging system is logging in. However, if you are already logged in, you can skip Step 1.
Initial System Setup
For the following two procedures, you need to know the extension numbers associated with the PARTNER MAIL VS system module. Figure 2-1 (in Chapter 2) shows the possible extension numbers. For the extension numbers
appropriate to this installation, locate Form B1 of the System Planner for the communications system.
VMS Hunt Group Extensions
You must use this procedure to assign the extensions associated with the voice messaging system module to Hunt Group 7. This Hunt Group, which is called the VMS Hunt Group, is used exclusively for the voice messaging system. To assign the PARTNER MAIL VS extensions specified on Form B1 to Hunt Group 7:
1.
2.
3.
4.
5.
6. 7.
8.
9.
10.
At extension 10*, press [ Feature ] [0] [0] [ System Program ] [ System Program ] .
Enter the System Password if required.
Press [#] [5] [0] [5] .
At the Group: prompt, press [7] .
At the Extension: prompt, enter the first PARTNER MAIL VS extension number specified on Form B1.
Press [ Next Data ] until the display reads 1 Assigned.
Press [ Next Item ] or [ Prev Item ] until the next PARTNER MAIL VS extension number specified on Form B1 displays.
Press [ Next Data ] until the display reads 1 ASSigned.
If additional PARTNER MAIL VS extensions are specified on Form B1, repeat Steps 7 and 8 for each one.
Continue with “Transfer Return Extensions” on the next page.
* Some systems also allow programming from extension 11. Check the Programming and Use guide for the
Transfer Return Extensions
For extensions that do not have voice mail coverage, this procedure ensures that unanswered calls transferred by the voice messaging system transfer return to the receptionist’s extension where they will ring until they are answered.
To assign extension 10 as the transfer return extension for the PARTNER MAIL VS extensions specified on Form B 1:
1. Press [#] [3] [0] [6] * .
2. At the Extension: prompt, enter the first PARTNER MAIL VS extension number specified on Form B 1,
3. At the Data: prompt, press [1] [0] .
4. Press [ Next Item ] or [ Prev Item ] until the next PARTNER MAIL VS extension number specified on Form B1 displays.
5. At the Data: prompt, press [1] [0] .
6. If additional PARTNER MAIL VS extensions are specified on Form B1, repeat Steps 4 and 5 for each one.
7. Press [ Feature ] [0] [0] to exit programming.
8. Refer to the next section for information about programming the voice messaging system.
Voice Messaging System Programming
Language
Before you begin, locate Form 1 for the voice messaging system. Check to see if any of the Language settings are changed from the factory defaults:
■
■
If none of the Language settings are changed, skip to “Automated Attendant Service.”
If any of the Language settings are changed, follow the appropriate procedure for either Monolingual Mode or Bilingual Mode.
* In some countries, the procedure code for Transfer Return Extension is #309. Check the Programming and
Monolingual Mode
To change the System Language as specified on Form 1:
1.
2.
3.
4.
5.
6. 7.
8.
If necessary, access the Programming Main Menu. If you are already at the Programming Main Menu, skip to Step 2.
a. Press [ Intercom ] [7] [7] [7] or the programmed VMMsgs button,
b. Press [9] [9] [#] .
c. Enter the Mailbox Password and press [#] .
d. Press [9] .
Press [1] for Language.
Press [2] for System Language.
Press [6] to modify System Language.
Enter the number corresponding to the System Language specified on Form 1. Press [9] to confirm your selection.
Press [∗] [7] to return to the Programming Main Menu.
Continue with the next section, “Automated Attendant Service.”
Bilingual Mode
To change the Language Mode and the Primary and Secondary Languages as specified on Form 1:
1.
2.
3.
4.
5.
6.
7.
8.
9. 10.
11.
12.
If necessary, access the Programming Main Menu. If you are already at the Programming Main Menu, skip to Step 2.
a. Press [ Intercom ] [7] [7] [7] or the programmed VMMsgs button.
b. Press [9] [9] [#] .
c. Enter the Mailbox Password and press [#] .
d. Press [9] .
Press [1] for Language.
Press [1] for Language Mode.
Press [2] for Bilingual Mode.
Press [2] for System Language.
Press [1] for Primary Language or [2] for Secondary Language.
Press [6] to modify the language.
Enter the number corresponding to the language specified on Form 1.
Press [9] to confirm your selection.
To modify the other language, press [∗] [#] and repeat Steps 6 through 9. Otherwise, skip this step.
Press [∗] [7] to return to the Programming Main Menu.
Automated Attendant Service
Before you begin, locate Forms 3,4, and 5 for the voice messaging system. If the system is set for Bilingual Mode, also locate Forms 4A and 5A. If Automated Attendant Service is not to be used; skip to “Voice Mail Service.” Otherwise, to program Automated Attendant Service:
■ If the system is set for Monolingual Mode, use the procedures below.
■ If the system is set for Bilingual Mode, use the procedures beginning on
page 4-7.
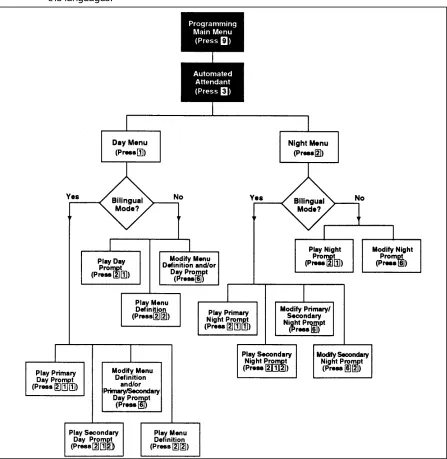
Monolingual Mode
Menu Definition and Day Menu Prompt
To define the Automated Attendant Service menu as specified on Form 3 and record the Day Menu Prompt specified on Form 4:
1.
2.
3. 4.
5.
6.
7.
8.
9.
10.
11.
12.
13.
If necessary, access the Programming Main Menu. If you are already at the Programming Main Menu, skip to Step 2.
a. Press [ Intercom ] [7] [7] [7] or the programmed VMMsgs button,
b. Press [9] [9] [9] .
c. Enter the Mailbox Password and press [#]
.
d. Press [9] .
Press [3] for Automated Attendant.
Press [1] for Day Menu.
Press [6] to modify the Menu Definition and/or Day Menu Prompt,
Enter a Selector Code for which information is specified in Column C of Form 3. If Column C is empty, skip to Step 10.
Press [9] to confirm that you are modifying this Selector Code action.
Press [1] for Selector Code Transfer.
Enter the extension, Hunt Group, or Calling Group number specified in Column C of Form 3 corresponding to the Selector Code entered in Step 5, followed by [#] .
Repeat Steps 5 through 8 for each Selector Code for which there is information in Column C.
Press [∗] [#] to finish modifying the Menu Definition.
If you do not want to record a Day Menu Prompt, press [#] to approve the Menu Definition and go to Step 16.
To record a Day Menu Prompt, lift the handset, press [1] , and record the Menu Prompt from Form 4.
14. Choose an option or skip this step:
■
■
■
Press [2] [1] to immediately re-record this Menu Prompt, Begin recording immediately after the beep; press [1] after recording, Repeat, if desired.
Press [2] [3] to play back this Menu Prompt.
Press [∗] [3] to delete this Menu Prompt and return to Step 12 to be prompted for re-recording.
15. Press [∗] [#] to approve the Menu Definition and the Day Menu Prompt.
16. Press [∗] [7] to return to the Programming Main Menu.
17. Continue with “Night Menu Prompt” or go to the next section, “Voice Mail Service.”
Night Menu Prompt
To record the Night Menu Prompt specified on Form 5:
1. If necessary, access the Programming Main Menu. If you are already at the Programming Main Menu, skip to Step 2.
a. Press [ Intercom ] [7] [7] [7] or the programmed VMMsgs button.
b. Press [9] [9] [#] .
c. Enter the Mailbox Password and press [#] . d. Press [9] .
2. Press [3] for Automated Attendant.
3. Press [2] for Night Menu.
4. Press [6] to modify the Night Menu Prompt.
5. Lift the handset, press [1] , and record the Menu Prompt from Form 5.
6. Press [1] after recording.
7. Choose an option or skip this step:
■
■
■
Press [2] [1] to immediately re-record this Menu Prompt. Begin recording immediately after the beep; press [1] after recording, Repeat, if desired.
Press [2] [3] to play back this Menu Prompt.
Press [*] [3] to delete this Menu Prompt and return to Step 5 to be prompted for re-recording.
8. Press [*] [#] to approve the Night Menu Prompt.
9. Press [*] [7] to return to the Programming Main Menu.
Bilingual Mode
Menu Definition and Day Menu Prompts
To define the Automated Attendant Service menu as specified on Form 3 and record the Day Menu Prompts for the Primary and Secondary Languages specified on Form 4 and 4A:
1.
2.
3. 4.
5.
6. 7.
8.
9.
10.
11.
12.
13.
If necessary, access the Programming Main Menu. If you are already at the Programming Main Menu, skip to Step 2.
a. Press [ Intercom ] [7] [7] [7] or the programmed VMMsgs button,
b. Press [9] [9] [#] .
c. Enter the Mailbox Password and press [#] .
d. Press [9] .
Press [3] for Automated Attendant. Press [1] for Day Menu.
Press [6] to modify the Menu Definition and/or Day Menu Prompts.
Enter a Selector Code for which information is specified in Column C of Form 3. If Column C is empty, skip to Step 10.
Press [9] to confirm that you are modifying this Selector Code action. Press [1] for Selector Code Transfer.
Enter the extension, Hunt Group, or Calling Group number specified in Column C of Form 3 corresponding to the Selector Code entered in Step 5, followed by [#] .
Repeat Steps 5 through 8 for each Selector Code for which there is information in Column C.
Press [∗] [#] to finish modifying the Menu Definition.
At this point, do one of the following:
■ If you do not want to record a Day Menu Prompt, press [#] to approve the Menu Definition and go to Step 22.
■ If you want to record the Day Menu Prompt in the Primary Language,
continue with Step 12.
■ If you want to record the Day Menu Prompt in the Secondary Language, skip to Step 17,
Lift the handset, press [1] , and record the Menu Prompt from Form 4.
14. Choose an option or skip this step:
■ Press [2] [1] to immediately re-record this Menu Prompt. Begin recording immediately after the beep; press [1] after recording. Repeat, if desired.
■ Press [2] [3] to play back this Menu Prompt.
■ Press [∗] [3] to delete this Menu Prompt and return to Step 12 to be
prompted for re-recording.
15. Press [∗] [#] to approve this Day Menu Prompt.
16. If you want to record the Day Menu Prompt in the Secondary Language, continue with Step 17; otherwise, skip to Step 21.
17. Press [2] and record the Menu Prompt from Form 4A.
18. Press [1] after recording.
19. Choose an option or skip this step:
■ Press [2] [1] to immediately re-record this Menu Prompt, Begin recording immediately after the beep; press [1] after recording. Repeat, if desired.
■ Press [2] [3] to play back this Menu Prompt.
■ Press [∗] [3] to delete this Menu Prompt and return to Step 17 to be
prompted for re-recording.
20. Press [∗] [#] to approve this Day Menu Prompt,
21. Press [#] to approve all changes, The Menu Definition and the Day Menu Prompts now take effect.
22. Press [∗] [7] to return to the Programming Main Menu.
23. Continue with “Night Menu Prompt” or go to the next section, “Voice Mail Service.”
Night Menu Prompt
To record the Night Menu Prompt in the Primary and Secondary Languages specified on Form 5 and Form 5A:
1. If necessary, access the Programming Main Menu. If you are already at the Programming Main Menu, skip to Step 2.
a. Press [ Intercom ] [7] [7] [7] or the programmed VMMsgs button.
b. Press [9] [9] [#] .
c. Enter the Mailbox Password and press [#] .
d. Press [9] .
2. Press [3] for Automated Attendant.
3. Press [2] for Night Menu.
5.
6.
7.
8.
9. 10.
11.
12. 13.
14.
15.
16.
17.
At this point, do one of the following:
■ If you want to record the Night Menu Prompt in the Primary Language,
continue with Step 6.
■ To record the Night Menu Prompt in the Secondary Language, skip to
Step 11.
Lift the handset, press [1] , and record the Menu Prompt from Form 5.
Press [1] after recording.
Choose an option or skip this step:
■ Press [2] [1] to immediately re-record this Menu Prompt. Begin
recording immediately after the beep; press [1] after recording, Repeat, if desired.
■ Press [2] [3] to play back this Menu Prompt.
■ Press [∗] [3] to delete this Menu Prompt and return to Step 6 to be
prompted for re-recording.
Press [∗] [#] to approve this Night Menu Prompt.
If you want to record the Night Menu Prompt in the Secondary Language, continue with Step 11; otherwise, skip to Step 15.
Press [2] and record the Menu Prompt from Form 5A.
Press [1] after recording,
Choose an option or skip this step:
■ Press [2] [1] to immediately re-record this Menu Prompt. Begin
recording immediately after the beep; press [1] after recording. Repeat, if desired.
■ Press [2] [3] to play back this Menu Prompt.
■ Press [∗] [3] to delete this Menu Prompt and return to Step 11 to be
prompted for re-recording.
Press [∗] [#] to approve this Night Menu Prompt.
Press [#] to approve all changes. The Night Menu Prompts now take effect.
Press [∗] [7] to return to the Programming Main Menu.
Voice Mail Service
Before you begin, locate Form 2 for the voice messaging system. Check to see if mailboxes are numbered differently from the factory defaults, if any mailbox is to be deleted, or if a Mailbox Language is changed for any mailbox.
■ If mailboxes are not numbered differently, no mailbox is deleted, and no
mailbox’s language is changed, skip to “Line Ownership.”
■ If any mailbox is to be deleted, use the procedure below.
■ If mailboxes are numbered differently, first use the procedure below to delete all mailboxes from extensions that do not require coverage; then use the procedure on the next page to create mailboxes for all extensions that require coverage.
■ If Mailbox Language is changed for any mailbox, see “Modifying a
Mailbox’s Language” later in this section.
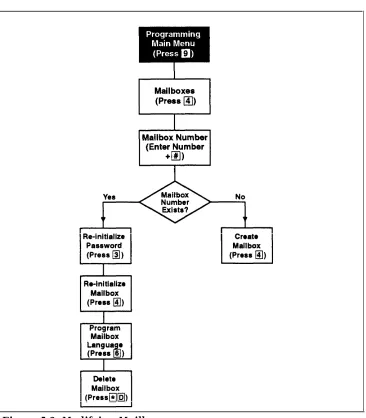
Deleting a Mailbox
NOTE:
The receptionist’s mailbox (at extension 10) cannot be deleted.
To delete mailboxes as specified on Form 2:
1.
2.
3.
4.
5.
6.
7.
8.
If necessary, access the Programming Main Menu. If you are already at the Programming Main Menu, skip to Step 2.
a. b.
c.
d.
Press [ Intercom ] [7] [7] [7] or the programmed VMMsgs button. Press [9] [9] [#] .
Enter the Mailbox Password and press [#] . Press [9] .
Press [4] for Mailboxes.
Enter the number of a mailbox to be deleted as indicated on Form 2, followed by [#] .
Press [∗] [3] to delete the mailbox
Press [9] to confirm mailbox deletion.
Repeat Steps 3 through 5 for each mailbox to be deleted.
Press [∗] [7] to return to the Programming Main Menu.
Creating a Mailbox
To create mailboxes as specified on Form 2:
1. If necessary, access the Programming Main Menu. If you are already at the Programming Main Menu, skip to Step 2.
a. Press [ Intercom ] [7] [7] [7] or the programmed VMMsgs button.
b. Press [9] [9] [#] .
c. Enter the Mailbox Password and press [3] .
d. Press [9] .
2. Press [4] for Mailboxes.
3. Enter the number of a mailbox to be created as indicated on Form 2, followed by [#] .
4. Press [4] to create this mailbox.
5. Repeat Steps 3 and 4 for each mailbox to be created.
6. Press [8] [7] to return to the Programming Main Menu.
7. Continue with “Modifying a Mailbox’s Language” or go to the next section, “Line Ownership.”
Modifying a Mailbox’s Language
To modify a mailbox’s language as specified on Form
2:
1.
2.
3.
4.
5.
6.
7.
8.
9. 10.
If necessary, access the Programming Main Menu. If you are already at the Programming Main Menu, skip to Step 2.
a. Press [ Intercom ] [7] [7] [7] or the programmed VMMsgs button.
b. Press [9] [9] [#] .
c. Enter the Mailbox Password and press [#] .
d. Press [9] .
Press [4] for Mailboxes.
Enter the number of a mailbox whose language is to change as indicated on Form 2, followed by [#] .
Press [6] for Mailbox Language.
Press [6] to modify Mailbox Language.
Enter the number corresponding to the Mailbox Language specified on Form 2.
Press [9] to confirm.
Repeat Steps 3 through 7 for each mailbox whose language is to be changed.
Press [∗] [7] to return to the Programming Main Menu.
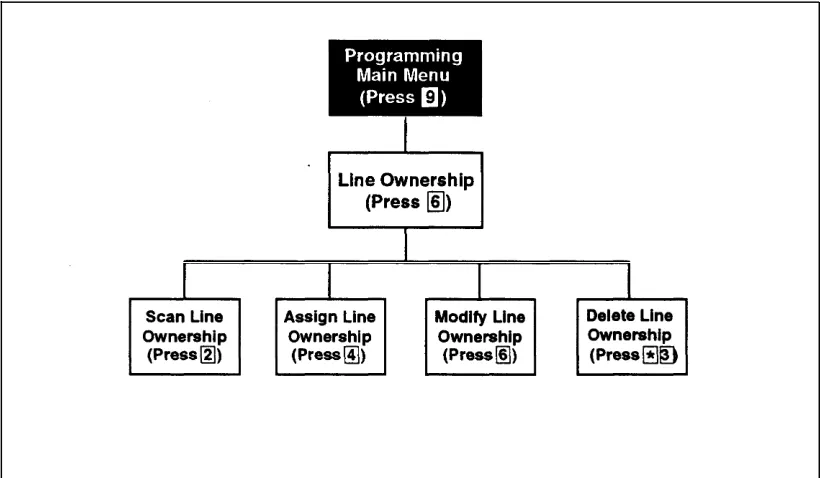
Line Ownership
Before you begin, locate Form 6 for the voice messaging system.
■ If Form 6 is filled out, use the procedure below to assign ownership.
■ If Form 6 is not filled out, skip to “Communications System Programming. ”
Assigning Line Ownership
To assign an owner to an outside line as specified on Form 6:
1.
2.
3.
4.
5.
6.
7.
8.
If necessary, access the Programming Main Menu. If you are already at the Programming Main Menu, skip to Step 2.
a. Press [ Intercom ] [7] [7] [7] or the programmed VMMsgs button.
b. Press [9] [9] [#] .
c. Enter the Mailbox Password and press [#] . d. Press [9] .
Press [6] for Line Ownership.
Press [4] to assign Line Ownership.
Enter a line number specified in Column A of Form 6, followed by [#] . Enter the line owner’s mailbox number specified in Column D of Form 6, followed by [#] .
Repeat Steps 4 and 5 for each owned line.
Hang up to exit voice messaging system programming,
Communications System Programming
Automated Attendant Service
Before you begin, locate Forms A, B 1, and C of the System Planner for the communications system.
Refer to Form A, Page 1 of 2, Line Coverage, to see if any lines are checked for VMS–AA, If so, use this section to program Automated Attendant Service; otherwise, skip to “Call Answer Service.”
Group Call Distribution
Use this procedure to specify the outside lines on which Automated Attendant Service is required.
To assign VMS–AA lines specified on Form A, Page 1 of 2, Line Coverage, to Hunt Group 7:
1.
2.
3.
4.
5.
6.
7.
8.
9.
At extension 10*, press [ Feature ] [0] [0] [ System Program ] [ System Program ] .
Enter the System Password if required.
Press [#] [2] [0] [6] †
.
At the Group: prompt, press [7] .
At the Line: prompt, enter the first VMS–AA line specified in the Line Coverage column of Form A, Page 1 of 2.
Press [ Next Data ] until the display reads 1 Assigned.
To program another line, press [ Next Item ] or [ Prev Item ] until the appropriate line number displays.
Press [ Next Data ] until the display reads 1 ASSigned.
Repeat Steps 7 and 8 for each VMS–AA line on Form A.
10. Continue with “VMS Hunt Delay” below.
VMS Hunt Delay
Check Form A, Page 2 of 2, VMS Hunt Delay. If Delayed is checked, follow the procedure below. Otherwise, skip to the next section, “Automatic Extension Privacy.”
To change the VMS Hunt Delay setting from Immediate to Delayed as specified on Form A, page 2 of 2:
1. Press [#] [5] [0] [6] .
2. Press [ Next Data ] until the appropriate value displays.
3. Continue with “VMS Hunt Schedule” on the next page.
* Some systems also allow programming from extension 11. Check the Programming and Use guide for the
communications system.
Automatic Extension Privacy
If VMS Hunt Delay is set to Immediate, use this procedure to prevents users from accidentally picking up calls sent to the voice messaging system.
To set Automatic Extension Privacy (#304) to Assigned for the PARTNER MAIL VS extensions specified on Form B1:
1. Press [#] [3] [0] [4] .
2. Enter the first PARTNER MAIL VS extension number specified on Form B1.
3. Press [ Next Data ] until the display reads 1 Assigned.
4. Press [ Next Item ] or [ Prev Item ] until the next PARTNER MAIL VS extension number specified on Form B1 displays.
5. Press [ Next Data ] until the display reads 1 Assigned.
6. If additional PARTNER MAIL VS extensions are specified on Form B1, repeat Steps 4 and 5 for each one.
7. Continue with “VMS Hunt Schedule” below.
VMS Hunt Schedule
Check Form A, Page 2 of 2, VMS Hunt Schedule. If Day Only or Night Only is selected, follow the procedure below. Otherwise, skip to the next section “Night Service.”
To change the VMS Hunt Schedule setting from Always to Day Only or Night Only as specified on Form A, Page 2 of 2:
1. Press [#] [5] [0] [7] .
2. Press [ Next Data ] until the appropriate value displays.
Night Service
Check Form C for extension 10. If a Night Service button is specified, follow the procedure below,
To program Night Service on a button with lights at extension 10 as specified on Form C:
2. At this point, do one of the following:
■ If you want to assign Night Service to the first available button on the
system phone, press [ Next Data ] until the display reads:
Night Service 1 Assigned-Ext 10
Go to Step 3.
■ If you want to assign Night Service to a specific button*, press [3] . The display reads:
Night Service 3 Select Button
Press the desired programmable button with lights to assign Night Service to that button.
3. Label the Night Service button at extension 10.
5. Continue with “Music on Hold” below.
Music on Hold
If desired, program Music on Hold. See the Programming and Use guide for the communications system for instructions.
Continue with the next section, “Call Answer Service.”
Call Answer Service
Before you begin, locate Forms A and B2 of the System Planner for the communications system.
■ Refer to Form A, Page 1 of 2, Line Coverage, If either check marks or extension numbers appear in the VMS-Mail column, use “Line Coverage” on the next page to program personal lines for Call Answer Service.
■ If nothing is specified in the VMS-Mail column of Form A, refer to Form B2
to see if Automatic VMS Cover is assigned to any extensions. If it is, refer to “Automatic VMS Cover” and “VMS Cover Rings” on page 4-17.
■ If neither VMS-Mail for personal lines or Automatic VMS Cover is specified, skip to “Telephone Button Programming.
”
* Select button (option 3) is not available on all systems. Check the Programming and Use guide for the
Line Coverage
Refer to Form A, Page 1 of 2, Line Coverage, VMS-Mail:
■ If check marks appear for any lines in this column, use the procedure in
“VMS Line Coverage” below.
■ If extension numbers are specified for any lines in this column, use the procedure in “Line Coverage Extension” below.
VMS Line Coverage
To assign VMSMail lines checked on Form A, Page 1 of 2, Line Coverage, to Hunt Group 7:
1. Press [#] [2] [0] [6] * .
2. At the Group: prompt, press [7] .
3. At the Line: prompt, enter the first line checked in the VMS-Mail column, 4. Press [ Next Data ] until the display reads 3 VMS Line Cover.
5. To program another line, press [ Next Item ] or [ Prev Item ] until the appropriate line number displays.
6. Press [ Next Data ] until the display reads 3 VMS Line Cover.
7. Repeat Steps 5 and 6 for each VMS-Mail line checked on Form A.
8. Continue with the next section, “Automatic VMS Cover.”
Line Coverage Extension
To assign line coverage for the extension numbers specified in the VMS-Mail column on Form A, Page 1 of 2, Line Coverage:
1. Press [#] [2] [0] [8] †
.
2. At the Line: prompt, enter the first line for which an extension is specified in the VMS-Mail column of Form A, Page 1 of 2, Line Coverage.
3. At the Data: prompt, enter the number of the extension specified in the VMS-Mail column,
4. To program another line, press [ Next Item ] or [ Prev Item ] until the appropriate line number displays.
5. At the Data: prompt, enter the number of the extension specified in the VMS-Mail column.
6. Repeat Steps 4 and 5 for each VMS-Mail line for which an extension number is written on Form A.
7. Continue with the next section, “Automatic VMS Cover.”
* In some countries, the procedure code for Group Call Distribution is #205, Check the Programming and Use
guide for the communications system.
Automatic VMS Cover
Check Fo