NexPath Telephony Server
User’s Guide
Copyright © 1997-2003 NexPath Corporation
Santa Clara, CA 95054
For Software Release 7.
All rights reserved. This product and related documentation are protected by copyright and distributed under licenses re-stricting its use, copying, distribution, and decompilation. No part of this product or related documentation may be repro-duced in any form by any means without prior written authorization of the NexPath Corporation.
NTS SERVER HARDWARE LIMITED WARRANTY
THIS IS TO CERTIFY that the NexPath NTS Server hardware ("NTS Server") is hereby warranted to be free of all defects in material and workmanship for one (1) year from the date of initial purchase from an authorized dealer, but not withstand-ing this, no longer than 18 months after the date of original manufacture. This Warranty does not apply to a defect caused by negligence, misuse, accidents, acts of God, or to any use not in accordance with the instructions and specifications pub-lished by NexPath Corporation ("NexPath"). Use of the NTS Server in emergency or time-critical or medical applications is not appropriate. This Warranty only applies to hardware; NTS Server software is covered by separate warranty described in Software License Agreement provided with the system.
During the period of this Warranty, NexPath will repair or replace at our service center located in Santa Clara, California, any part proving defective in material or workmanship. All expenses related to replacing or repairing a defective part under this Warranty will be assumed by NexPath except for (a) the cost of transporting the product to NexPath's service center, which shall be the responsibility of the buyer; and (b) if the NTS Server is not returned in original packaging, then a charge will be assessed for an approved shipping container.
The buyer must notify NexPath of any defect, malfunction or nonconformity promptly upon discovery. Within 30 days after receiving the NTS Server from the buyer, NexPath will repair or replace the defective part, at its own option, provided that NexPath has found the NTS Server to be defective. CUSTOMER'S SOLE AND EXCLUSIVE REMEDY HEREUNDER SHALL BE LIMITED TO THE REPAIR OR REPLACEMENT SPECIFIED HEREIN.
The foregoing warranties are contingent upon (1) the proper use of the hardware in accordance with the instructions and specifications published by NexPath, (2) the purchase of the NTS Server from a dealer or distributor authorized by Nex-Path to sell the NTS Server, and (3) return of a properly completed Warranty Registration Card within 30 days of purchase; and may not apply to any NTS Server that has been repaired or modified by persons other than NexPath. The NTS Server Limited Warranty is non-transferable.
BUYER AGREES THAT ITS EXCLUSIVE REMEDIES, AND NEXPATH'S ENTIRE LIABILITY WITH RESPECT TO THE NTS SERVER, SHALL BE AS SET FORTH HEREIN. BUYER FURTHER AGREES THAT NEXPATH SHALL NOT BE LIABLE TO BUYER OR ANY THIRD PARTY FOR ANY DAMAGES, INCLUDING ANY LOST PROFITS, LOST SAVINGS, OR OTHER INCIDENTAL OR CONSEQUENTIAL DAMAGES ARISING OUT OF BUYER'S USE OR INABILITY TO USE THE NTS SERVER OR THE BREACH OF ANY EXPRESS OR IMPLIED WARRANTY, EVEN IF THE BUYER HAS BEEN ADVISED OF THE POSSIBILITY OF THOSE DAMAGES. THE EXPRESS WARRANTIES SET FORTH IN THIS AGREEMENT ARE IN LIEU OF ALL OTHER WARRAN-TIES, EXPRESS OR IMPLIED, INCLUDING WITHOUT LIMITATION, ANY WARRANTIES OF MERCHANT-ABILITY OR FITNESS FOR A PARTICULAR PURPOSE.
NexPath Corporation
CHAPTER 1
Introduction
1
Where to go for assistance 4
Support Policies 4
Legal Notices 5
CHAPTER 2
Telephone Operations
7
General Concepts 8 Hook-flashes 8
Beeps and rings 9
Ring Cadence 11
Call distribution groups 11
Ring groups and Pickup groups 11
Extensions numbers in the NexPath Telephony Server 12
System speed dial numbers 13
Accept Calls/Do Not Disturb 14 Accept Calls 14
Do Not Disturb 14
Call Forwarding 17 Forward Calls 17
Cancel Forwarding 17
Call Waiting 20 Enable Call Waiting 20
Pick up a Waiting Call 20
Swap Between a Current Call and a Call on Hold 20
Cancel Call Waiting 20
Clear 22
Clearing a Command Sequence 22
Conference Calls 23 Set Up Conference 23
Add To Conference 23
Day Ringing/Night Ringing 24 Enable Day Ringing 24
Enable Night Ringing 24
Disconnecting 26 Disconnect Call 26
Do Not Disturb 27
Help 28 Help 28
Hold 29
Put A Call On Hold 29
Retrieve A Call From Hold 29
Swap Between a Current Call and a Call on Hold 29
Hook Flash the Central Office Line (Centrex and CLASSsm features) 31 Hook Flash the Central Office Line 31
Inside Lines 32
Line and Extension Numbers 34
Announce Line Number and Extensions 34
Listen In 35 Listen In 35
Night ringing 36
Operator 37
Outside Lines 38
Obtain an Outside Line 38
Paging (Public Address) 39
Park Orbits 40
Passwords 42 Enter Password 42
Change Password 42
Pick up 44
Pick Up Ring Group 44
Pick Up Any Ringing Phone 44
Pick Up Ringing Speaker 44
Record a Call 45 Record a Call 45
Transferring Calls 46 Direct (Blind) Transfer 46
Set Up Transfer 46
Complete Transfer 46
Summary of the keypad sequences 48
CHAPTER 3
Voice Mail
51
Determining if you have new messages in your voice mailbox 51
Accessing voice mail from your telephone 52
Forwarding a message to a another mailbox or a group 55
Replying to a message 56
Call the person who left a message 56
Getting a help message during voice mail 56
To record your standard or alternate greeting 57
To listen to your standard or alternate greeting 57
To set your Standard Greeting or Alternate Greeting 57
Accessing your voice mail from an outside line 58
Getting into your voice mail box if your mailbox is full 58
To enter a numeric pager number 59
Recording a short name 60
Removing a voice mail distribution group 61
Sending a message directly from voice mail 62
Features Available When Leaving a Message 64
Keys that callers can use during the greeting when they are in voice mail 64
Keys that callers can use during or after recording a message 64
CHAPTER 4
Windows Desktop Tools- NexDial™
67
Installing the NexDial dialer program 68
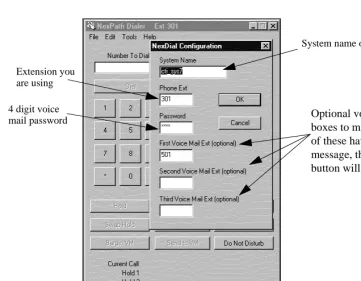
Configuring the dialer 68
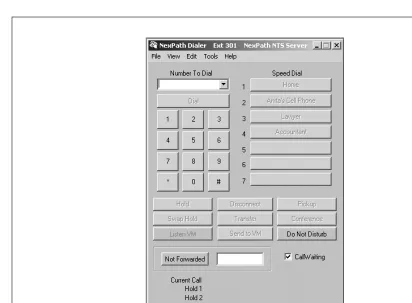
Features available with NexDial Dialer Window 73 Screen pops 73
The numeric keypad and the Dial/Transfer button 74
User speed dial buttons 75
The function buttons below the keypad 76
Status information 79
Setting Day/Night Mode 80
Changing your password 80
Selecting the audio player 80
Recording a Call 81
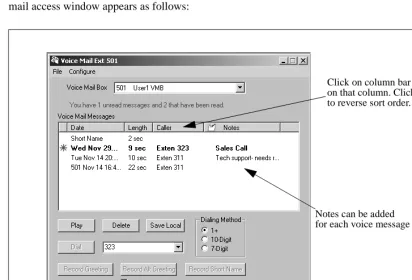
Voice Mail Access from NexDial 82 Playing back a message 83
Calling the call back number 83
Saving a copy of the voice mail file to the local computer 83
Forwarding a message to another voice mail box or a group 84
Recording your Standard Greeting 84
Recording your Alternate Greeting 85
Selecting the Standard or Alternate Greeting 85
To play back your greetings 85
Deleting a message or messages 85
Announce Time and Date and/or Caller ID 86
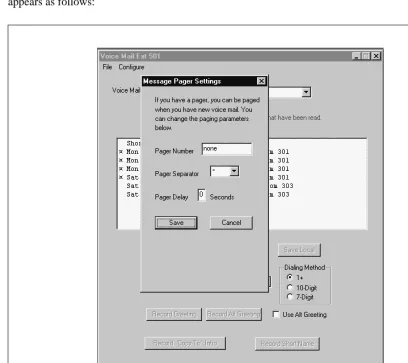
Numeric Pager Notification 87
Email Notification 89
Adding and Using Voice Mail Distribution Groups 90
Personal Phone Book 92
Integration with Goldmine 4.0 and ACT! 3 & ACT! 4: 95
CHAPTER 5
Windows Desktop Tools- NexPath Call Director
97
System Requirements for NexDirector 98
Installing the NexDirector program 98
Establishing a network connection to the NexPath Telephone Server 99
NTS Server Configuration Issues Related to NexDirector 101
Configuration and Setup 103
Tabs and Views 104
Configuration Management- Multiple Views 105
Customizing Buttons and Views 106
Resetting Button Assignments 108
Resizing the Window 108
Activity and Status 108
Controlling Calls 109 Call An Extension 109
Transfer A Call 109
Retrieve a call from a Park Orbit 110
Put a call on Hold 110
Seizing a particular outside line 110
Picking up a ringing call 110
Do Not Disturb 111
Disconnect a call 111
CHAPTER 6
TelOper™: the Web Browser Desktop Interface
113
To Control your Phone from your Web Browser 113
The Control page 116
Selecting a voice mail box to monitor 117
VM Barge-in 117
Send to VM 117
Hold 117
Using the Ring Group button 119
The Voice Mail page 120
Setting message, pager, and email parameters 122
Dialing Method for Call Back 123
Other Voice Mail Features 124
System Information 126
Using the Phone Book page 128
The View Log button 130
The status information at the bottom of the Control page 133
CHAPTER 7
Installing the NexPath TAPI 2.1 Service Provider
135
Installing the NexPath TAPI 2.1 Telephony Service Provider (TSP) program 135
Using the NexPath Telephony Service Provider (TSP) with other programs 139
Uninstalling the NexPath TAPI Telephony Service Provider (TSP) 140
CHAPTER 8
Frequently asked questions
141
APPENDIX A
Glossary 147
Welcome to the NexPath Telephony Server! The NexPath Telephony Server is a complete integrated tele-phone system, including switching (or PBX-type functions), voice mail, automated attendant, automated call distribution (or ACD), and network access and administration. This unique solution to small company tele-phone systems allows you to have most if not all of the features of a large company PBX at a fraction of the cost of these larger systems.
In fact, in many ways the NexPath Telephony Server goes beyond the functionality of most traditional tele-phone systems. The NexPath Telephony Server was the first web-enabled teletele-phone system when it was introduced in late 1996. It has unique features not commonly found on larger systems, such as allowing you to perform functions like picking up a ringing phone from any other phone, checking and retrieving your voice mail from any desktop computer in the building or on the Internet, ring groups within call distribution groups, and many other features that are unique to NexPath.
Note This manual, along with all other system manuals, is available on the NexPath Telephony Server in Adobe Acrobat format, if your PC is connected to the LAN. The URL for the list of manuals is http:// <system name>/manuals/1. Other URLs that are useful are available on the NexPath Telephony Server at the URL http://<system name>/ or http://<system name>/help/.
The NexPath Telephony Server combines the following subsystems into a single, tightly integrated, easy-to-install, easy-to-maintain package:
•
A complete switching system (PBX-like functions) • Up to 136-line (outside+inside lines) capability.• Functions such as call routing and switching can be performed using standard touch-tone codes from conventional telephones. No expensive, proprietary phones are necessary.
• High bandwidth (64 kilobits per second), all digital signal paths pass fax and modem signals trans-parently.
• Automatic fax detection
•
An auto-attendant system• Allows automated answering and routing of calls.
• Fully configurable, including custom messages and flexible numbering plans. • Multiple auto-attendants with a different auto-attendant on each line if desired.
•
A voice message recording and retrieval (i.e., voice mail) system• Over 50 hours of voice mail and custom messages can be stored per system. • Password protection provided for all voice mail access.
• Personal greetings can be recorded for each extension.
• 64 kilobits-per-second digitization, storage, and playback gives your messages unsurpassed clarity. • 30 port simultaneous voice mail access capability.
• Support of the VMWI (FSK) voice mail waiting light.
•
An Automatic Call Distribution (ACD) system• Allows calls to be directed to a group, such as sales, rather than just to an individual. • Multiple overlapping distribution groups with priority settings.
• Custom reassurance messages and hold music while the caller is waiting in the hold queue. Other features include:
•
Integrated TCP/IP LAN for network control and administration• System administration is performed using standard Web browser (Netscape or Internet Explorer) software running on any desktop computer.
• Control of any extension can be performed either from a telephone, from the Windows programs
any desktop computer.
• Complete backup via LAN command, and retrieval of the backup file via ftp.
• A completely open network API (NexPath Simple Computer Telephony Protocol, N-SCTP) for custom application development and 1st and 3rd party call control.
•
Voice prompts and error messages available for all telephone operations•
A public address output for announcements, speaker ringing, and background music.•
A music-on-hold input•
Multiple auto-attendants and ACD groups can be set up•
Call waiting and call forwarding•
A complete system activity log•
Ring groups, including ring groups in ACD groups•
Distinctive ringing•
Reminder rings•
Multiple hold stack•
Park orbits•
Call recording•
Barge-in to voice mail in progress•
Listen-in to voice mail in progress•
Caller-ID pass-through and decoding (inside and outside calls).•
Visual Call Waiting (waiting call Caller ID).•
Power-failure bypass relays on all CO lines•
Multiple extension number assignment capability per line•
Numeric page upon receipt of voice mail•
System speed dial numbers•
Email notification upon receipt of voice mail.Where to go for assistance
Every company has its own way of handling support for the NexPath System. Most have a person that is responsible for the setup and administration of the NexPath Telephony Server, for making configuration changes and answering questions about use of the telephone system. This person, the system administrator, can provide you with information on use of the features of the system, and help you troubleshoot problems if they arise.
All manuals on the system can be viewed from your web browser, if your system is LAN connected. The URL is: http://<system_IP_address>/, then click on the link Manuals. Fill in <system_IP_address> with the IP address provided to you by your system administrator. Note that in all URLs you must enter the trail-ing “/” unless your system administrator has assigned the system a name that you can use instead of the IP address.
In addition to this manual, the User’s Guide, there is also the System Administration Guide, and any Release Notes provided with your system when it was shipped. All of these are also available on-line at the URL listed above.
You can also have your system administrator call NexPath Support. The telephone number is on the Nex-Path web page: http://www.nexpath.com.
Support Policies
Legal Notices
WARNING: The NexPath Telephony Server can be programmed to allow users, if the feature is enabled by the system administrator and a valid password is entered, to listen in to or record conversations without the participants knowledge. Listening in to or recording a conversation without the consent of one or both par-ties may be a violation of local, state, and federal privacy laws. It is the responsibility of the user of the Nex-Path Telephony Server, when using features of the system, to assure that he or she is in compliance with all applicable laws.
The NexPath Telephony Server allows operations such as placing calls on hold, transferring a call, and set-ting up conference calls to be controlled from any telephone connected to the system. This chapter describes the operations available and how to control them. Note, though, that all of the operations described in this chapter can also be performed from a Windows 95/98/NT/2K/XP computer if the computer is connected to the NexPath Telephony Server through a TCP/IP network connection, and the program NexDial™ is installed. Some operations are also available from NexDirector™. Also, Windows and non-Windows machines connected to the network and running Netscape 4 or Mozilla 5 or later versions can run
TelOper™, a web-based desktop call control program. See CHAPTER 4:Windows Desktop Tools- Nex-Dial™ starting on page 67 and CHAPTER 5:Windows Desktop Tools- NexPath Call Director starting on page 97 for details.
General Concepts
Below is a list of topics which are common to the commands described throughout the rest of this chapter. Please take the time to read this information before proceeding to the actual commands available in the Nex-Path Telephony Server.
Hook-flashes
Hook-flashes are one of the more complicated operations needed in the NexPath Telephony Server. The rea-son we need them, though, is that if you press the keys on your telephone keypad while in the middle of a normal call, the NexPath Telephony Server simply passes these key presses on to the other party. This is handy when the other party’s phone system can do something with them, such as route your call to an exten-sion within their building, but it makes it difficult to signal the NexPath Telephony Server that you want to do something special like put a call on hold once you are in the middle of a call.
Some telephone systems solve this problem by requiring that you use special keys on their proprietary phones (sometimes misleadingly called digital phones). The problems with special phones are that they are expensive, they only work on one system, they become obsolete quickly, and they often do not have other-wise commonly available features such as speed-dial.
On the NexPath Telephony Server, you can signal the system that you want to do something special like put a call on hold while in the middle of a call by performing a hook-flash, then entering the command sequence for the operation desired. Hook-flashes are done by quickly depressing and releasing the hook switch1on your phone, or by pressing the flash key on your phone.
Note, though, that perfecting the art of performing hook-flashes using the hook-switch might take a little practice. You must depress the switch for long enough to make it obvious to the system that you want to sig-nal it but not so long that the system thinks you hung up. A valid hook-flash is accomplished by depressing the telephone hook switch for an interval of greater than 50 milliseconds and less than 1000 milliseconds (a millisecond is 1/1000ths of a second, so 1000 milliseconds is one second).
Some phones come with a button which performs the hook-flash function. Nortel telephones label it the Link key. Care must be used with some telephones that have this button, however, since they can issue a
1. The hook-switch is the switch that gets depressed by the handset when you hang up your phone.
hook-flash for a full 3/4 of a second, which is a fairly long time. Some telephone do not properly collect the keys you enter during this flash interval. If you begin entering other keys of a sequence before the pre-pro-grammed flash time has ended, many older phones will block the subsequent tones, and the NexPath Tele-phony Server will not “hear” these other keys and you will likely get an error message.
Test the telephones you are using, and, if the telephone does not queue the keys, make sure you have waited until the preprogrammed flash time is over before pressing other keys. Or, better yet, if you have one of these older phones, learn how to depress and release the hook-switch properly by hand instead of using the
key1.
Note Many telephones are now being produced that properly queue other keypad keys after the flash key, so that it can be depressed along with the other keys at any rate. In particular, the flash key on the Nortel 9316 (the flash key is called Link on the Nortel phone) and the Panasonic KX-TSC50 or KS-TSC55 telephones works properly with the NexPath Telephony Server.
In this manual, we will designate a hook-flash with the symbol .
Beeps and rings
You will hear one short beep in your conversation if you are on the phone and you leave another call on hold for too long2. You can use the Swap Hold sequence (i.e., performing a hook-flash followed by pressing the button on your telephone) to toggle between your existing call and the call on hold.
Note If you are not on the phone and you leave a call on hold too long, you will receive a short ring on your phone, but when you pick up the phone, no one will be there. You can retrieve this call from hold using the Retrieve Call From Hold sequence .
1. If you program a sequence into a phone with speed-dial, and is programmed as one of the keys in the pro-grammed sequence, the phone will automatically wait until the end of its own flash time before issuing the other keys in the sequence. Therefore, this 3/4 second blanking time is not a problem for flash sequences programmed into a speed-dialer.
2. This delay time is usually 45 seconds. However, the reminder ring delay time can be changed by your system administra-tor, and might be set differently for your system.
Flash
Flash
Flash
Flash * *
Two short beeps in your conversation indicates that you have a call waiting. You can put the current call on hold and pick up the new call using the Pick up Waiting Call sequence . You can then use the Swap Hold sequence to toggle between the two. Note that if you are done with your current call, you can still use to pick up the incoming call. The pre-existing call you put on hold with the
will disappear when the person you were talking to hangs up.
You will hear three short beeps if you are on the phone and someone uses the barge-in sequence to break into your conversation.
Table 1: Rings
Sound Meaning
Single normal ring (repeated every 5 seconds)
By default, an Internal or External call. Your system administrator can assign different ring cadences to outside calls if you wish.
Short ring every 60 seconds A Reminder ring, meaning a call is on hold or in a park orbit Double ring, short-long ring, or
other combinations
An Internal or External call, depending on how your extension is config-ured. Check with your system administrator for different ring cadences.
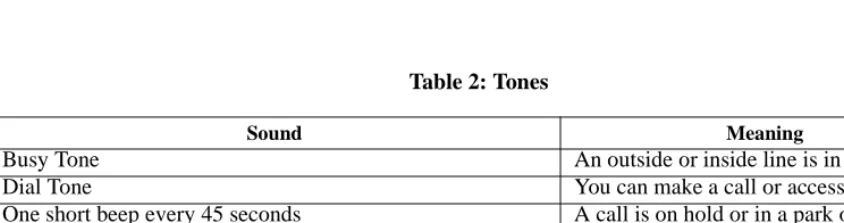
Table 2: Tones
Sound Meaning
Busy Tone An outside or inside line is in use.
Dial Tone You can make a call or access a feature.
One short beep every 45 seconds A call is on hold or in a park orbit.
Two short beeps A waiting call is trying your extension.
Three short beeps Someone is barging in to your call.
Several short tones followed by dial tone when picking up telephone.
You have unread voice mail messages.
Flash 3 Flash *
Ring Cadence
Each inside line extension in the NexPath Telephony Server can be programmed to ring with one of six dif-ferent ring cadences, or ringing patterns:
1. Long ring 2. Medium ring 3. Two short rings 4. Three short rings 5. Long and short ring 6. Short and long ring
Also, each inside line extension can be programmed to ring differently depending on whether the call is an inside call or an outside call, using these ring cadences. Check with your system administrator if you would like to have different ring cadences for inside or outside calls at your extension.
Call distribution groups
Your system administrator may configure your system’s auto-attendant to support call distribution groups (ACD or automated call distribution), that is, groups of extensions which represent entire departments, such as Sales or Marketing. When a caller calls in, they are given a message such as “Press 1 for Sales, 2 for tech-nical support...”
When the caller presses one of these selections, the call is routed to the call distribution group defined for the selection, and each extension within the call distribution that is accepting calls (see Accept Calls on page 14) will ring in sequence. The exact ring sequence for the group and what happens if no one picks up the call is determined by the system administrator when the call distribution group is configured.
Ring groups and Pickup groups
Your system administrator can assign a ring group number to any group of physical telephone lines. This function is normally used so that a ringing phone can be picked up from another phone using the Pick Up Group sequence , followed by the ring group number. It is also used to cause a group of phones to ring at the same time, so that any one of the phones can be answered to accept the call.
By factory default, ring group 0 is defined as all phones in the system except the PA speaker. This means that you can usually pick up any ringing phone in the building by entering .
Also by factory default, ring group 1 is defined as containing the telephone line which rings through your company’s overhead PA speaker. Unless your system administrator has changed the definition of ring group 1, you can pick up a call ringing over the overhead PA speaker by picking up any phone and pressing
.
Ring groups can also be assigned to extensions by the system administrator, so that when the extension num-ber is dialed, several telephones ring at the same time. Any one of the telephones can be answered to receive the call; the first telephone in the ringing group of extensions that goes off hook gets the call, the others get dial tone.
Extensions numbers in the NexPath Telephony Server
There are eight different types of extensions in NexPath system: 1. Inside line extensions (default is 300-399)
2. Outside line extensions (default is 200-299)
3. Voice mailbox extensions (default is 500 -599 and 130-131)
4. Auto-attendant extensions (pre-configured as 120 (Day Program) and 121 (Night Program)) 5. Park orbit extensions (default is 100 - 110)
6. Speed dial extensions (none predefined)
7. Public address extensions (special case of item 2 above, default is 111).
8. Extensions that ring several phones at once (special case of item 1 above, none predefined)
Any of these extensions types can be directly dialed from a telephone. The resulting function will be deter-mined by the system programming for that extension type, i.e., you will ring a phone, seize an outside line, enter voice mail, execute an auto-attendant program, etc.
The concept of extension numbers and their symmetric use throughout the system is a very powerful feature of the NexPath Telephony Server.
* 0 0
System speed dial numbers
Your system administrator can program the NexPath Telephony Server to recognized special three digit numbers, called speed dial extensions, that translate to 7 or more digit off-site numbers. These can be used for convenient direct dialing, or for convenience in transferring calls.
Accept Calls/Do Not Disturb
Accept Calls
Do Not Disturb
When the NexPath Telephony Server is first started, your extension will automatically be placed in the Accept Calls mode, which means that your phone will ring when someone calls you.
You can place your extension in the Do Not Disturb mode, though, during which calls made to your exten-sion will go directly to your voice mail or directly to the number you specify as a forwarding number with-out first ringing at your extension1. You may want to place your extension in the Do Not Disturb mode when you are in a meeting and do not want your phone to ring or when you are out to lunch and do not want some-one else to pick up your phsome-one.
If your extension is part of a call distribution group and you place your phone in the Do Not Disturb mode, then calls to the distribution group (Sales, for example) will not ring at your phone, but instead will go on to the next extension in the group. Calls placed by dialing your extension number directly, however, will be routed as described above.
To put your extension in the Do Not Disturb mode:
1. Pick up any phone or otherwise get an inside line dial tone. 2. Enter the Do Not Disturb sequence .
3. Enter your extension number.
4. If prompted, enter your password2, or a password with administrator privileges.
5. If your password was accepted, you will be notified that your extension has been placed in the Do Not Disturb mode.
6. Hang up.
1. If your extension has not been configured to support voice mail and you have not set up call-forwarding for your exten-sion, your phone will ring even if you place it in the Do Not Disturb mode.
2. You will not be asked for a password if you have already entered it once to enable some other command and you have not hung up since then.
* 8
* 9
To return your extension to the Accept Calls mode:
1. Pick up any phone or otherwise get an inside line dial tone. 2. Enter the Accept Calls sequence .
3. Enter the number of the extension you wish to change to Accepting Calls. 4. If prompted, enter your password1, or a password with administrator privileges.
5. If your password is accepted, you will be notified that your extension is now accepting calls. 6. Hang up.
Note There is no indication at your phone whether your extension is in the Accept Calls mode or the Do Not Disturb mode. If you want to be sure to receive calls, you can enter the Accept Calls sequence at any time, even if your extension is already in the Accept Calls mode.
1. You will not be asked for a password if you entered it to enable some other command and have not hung up since then.
Barge In
Barge In
Barge-in is the process of breaking into a conversation. To barge into your own voice mail extension, for example, while someone is leaving you voice mail:
1. Pick up any phone or otherwise get an inside line dial tone. 2. Enter the Barge-in sequence .
3. Enter the number of your voice mail extension.
4. If prompted, enter your password1, or a password with administrator privileges.
5. If your password is accepted, you will be connected to the person currently leaving you a message.
Note If your phone is still ringing, you can usually pick up the call from any other telephone in the building by picking up a phone and entering the Pick Up Ring Group 0 sequence .
If your system administrator has given your account Barge-in/Listen-in permissions, you can also use the sequence described above to barge into other people’s conversations while they are on the phone. Check with your system administrator to see if you have barge-in permission. You do not need Barge-in/Listen-in permission to barge-in to voice mail in progress in your own voice mail boxes.
Barge-in and Listen-in can be blocked on a line by the system administrator, by setting the line as a Secure Line.
Note When you barge into an existing conversation, the party at the extension number you barged into will hear three short beeps, indicating that someone is barging into his or her call.
WARNING: Barge-in permissions also allow Listen-in. Listening-in to a conversation without the consent of one or
both parties may be a violation of local, state, and federal privacy laws. It is the responsibility of the user of the NexPath Telephony Server, when using features of the system, to assure that they are in compliance with all applicable laws.
1. You will not be asked for a password if you entered it to enable some other command and have not hung up since then.
# 2
# 2
Call Forwarding
Forward Calls
Cancel Forwarding
You can forward your calls to ring at any extension on the NexPath Telephony Server, or to an offsite num-ber1. To set up call-forwarding:
1. Pick up any phone or otherwise get an inside line dial tone. 2. Enter the Forward Calls sequence .
3. Enter your extension number.
4. Enter the number (either an extension or an off-site number) to which you want your calls forwarded, fol-lowed by the key, or wait four seconds.
5. If prompted, enter your password2, or a password with administrator privileges.
6. If your password was accepted, you will be notified that call-forwarding has been enabled, followed by the announcement of the forwarded number (i.e., you can verify that the number you entered is correct). 7. Hang up.
Note You do not have to enter a 9 to seize an outside line, if you are forwarding your calls offsite. The system automatically seizes an outside line if the number is seven or more digits. However, you must enter a one (if required) for a long distance number. Outside calls that are forwarded offsite may have reduced quality and reduced audio levels. Consider using Centrex or CLASS type outside (CO) lines for best forwarding quality. You can also use speed dial extensions for offsite forwarding, and get more control over the call. See the Administrators Guide for details on speed dial extensions and CO line types.
When you enable call-forwarding for your extension, an incoming call will ring at your phone for 20 sec-onds before being forwarded3. The call will then ring at the forwarding extension for 20 more seconds. If, after this additional 20 seconds, no one has picked up the call and you have an exit extension (such as a
1. Your extension must have offsite forwarding enabled in the system configuration. Check with your system administrator. 2. You will not be asked for a password if you have already entered it once to enable some other command and you have not
hung up since then.
3. These are the factory-default forwarding and ringing delay times. Your system administrator can alter both of these times.
* 2
* 3
* 2
voice mailbox extension) associated with your extension, the call will go to the exit extension. That is, the call will eventually go to the exit extension of the original extension the caller dialed.
If the extension is forwarded to a speed dial extension, and the speed dial number does not answer, the call will go to the exit extension programmed in the speed dial extension configuration.
On the other hand, if you do not have an exit extension programmed, after the forwarding phone rings for its additional 20 seconds, the caller will be notified that there is no one to take the call and will be disconnected. Calls that are forwarded offsite (not using speed dial extensions) are monitored by the NexPath Telephony Server, and the system will attempt to determine if a caller has answered. If not, the call will go to the exit extension (such as voice mail), if the exit extension has been configured for the extension that was for-warded. However, the monitoring of the progress of calls to outside lines depends on the ability to detect call progress sounds on the telephone line. This is not a precise process and it may not be successful in all cases. There can also be a delay before the call is connected.
Note Offsite forwarding is only permitted from extensions that have offsite forwarding enabled in the system configuration. Check with your system administrator to see if offsite forwarding is enabled on your extension.
Offsite forwarding will use Centrex or CLASS features (hook-flash transfers) if the CO line involved has been designated as a Centrex or CLASS line.
Calls forwarded to a speed dial extension are handled differently. If an extension is forwarded to a speed dial number, then the call progress monitoring is handled as specified in the speed dial extension configura-tion. The system will not attempt to determine if the call connects unless so designated in the speed dial setup. The exit extension as specified in the speed dial extension setup is used if the call fails to complete. If callers are experiencing delays in calls that forward off-site, try using speed dial extensions where you have more control of the call progress monitoring. You may also want your system administrator to create a custom automated attendant, which is used as an exit extension in place of your voice mail box. This will allow you to play customized messages to a caller before fowarding off-site, to prepare the caller for delays, and to allow the caller the option of going directly to voice mail.
Note An extension can only be forwarded once.
Call forwarding for your extension will remain in effect until you cancel call forwarding. To cancel call for-warding:
1. Pick up any phone or otherwise get an inside line dial tone. 2. Enter the Cancel Forwarding sequence
3. Enter your extension number.
4. If prompted, enter your password1, or a password with administrator privileges.
5. If your password was accepted, you will be notified that call-forwarding has been cancelled. 6. Hang up.
1. You will not be asked for a password if you entered it to enable some other command and have not hung up since then.
Call Waiting
Enable Call Waiting
Pick up a Waiting Call
Swap Between a Current Call and a Call on Hold
Cancel Call Waiting
When call-waiting is enabled for your extension, you will hear two beeps in your conversation when you are on the phone and a new call comes in1. When you hear these two beeps, you can decide whether to put your current caller on hold and take the new call, or continue talking to your current caller and, depending on how you extension is set up, let the new caller go to either your voice mail, get forwarded, or be disconnected. You can eliminate call-waiting beeps from your conversations by disabling call-waiting for your extension. To enable call waiting at your extension:
1. Pick up any phone or otherwise get an inside line dial tone. 2. Enter the Enable Call Waiting sequence .
3. Enter your extension number.
4. If prompted, enter your password2or a password with administrator privileges. 5. If your password was accepted, you will be notified that call-waiting has been enabled. 6. Hang up.
If you enable call waiting for your extension and you are on the phone when another call comes in, you will hear two short beeps in the middle of your existing call. You can press to put the current call on hold and answer the new call, or you can ignore the new call and let it go to your voice mail.
Note that if you pick up the incoming call, you can use the Swap Hold sequence to toggle between the two calls.
1. Your caller will not hear these beeps, only you will.
2. You will not be asked for a password if you have already entered it once to enable some other command and you have not hung up since then.
* 4 Flash 3
Flash * * 5
* 4
Flash 3
To disable call waiting at your extension:
1. Pick up any phone or otherwise get an inside line dial tone. 2. Enter the Disable Call Waiting sequence .
3. Enter your extension number.
4. If prompted, enter your password1, or a password with administrator privileges. 5. If your password was accepted, you will be notified that call-waiting has been disabled. 6. Hang up.
The NexPath Telephony Server’s default configuration allows a phone to ring 20 seconds before being for-warded, or 20 seconds before being sent to voice mail or getting disconnected, though your system adminis-trator can alter these times. If you do not pick up a waiting call and you have set up call-forwarding for your extension, a waiting call will forwarded after 20 seconds. If you do not have call-forwarding enabled but do have a voice mailbox, then after 20 seconds the waiting call will go to your voice mailbox. If you have nei-ther call-forwarding enabled nor voice mail, then after the 20-second delay time has expired, the caller will be notified that there is no one to take the call and the call will be disconnected.
1. You will not be asked for a password if you have already entered it once to enable some other command and you have not hung up since then.
Clear
Clearing a Command Sequence
After getting an inside dial tone but before finishing a command sequence, you can get back to an inside dial tone by pressing the Clear sequence .
# #
Conference Calls
Set Up Conference
Add To Conference
The NexPath Telephony Server can allow up to four parties to be conferenced on a single conference call, with the four parties being any combination of inside or outside lines.
To initiate a conference call:
1. Call your first party. This could be either an inside or an outside number.
2. Enter the Set up Conference sequence . This will put your current call on hold and request a conference circuit from the system. If a conference circuit is available, you will get an inside dial tone. If no conference circuits are available, you will receive an error message and be re-connected to your first call. Wait and try again later.
3. After getting a conference circuit and an inside dial tone, dial the number of the next party you wish to conference in. This can include making calls to parties on either inside or outside lines. If you cannot get your second party, retrieve your first call from hold using and try again later.
4. Upon reaching your second party, enter the Add To Conference sequence . You, your first party, and your second party will all be talking to each other.
5. To add a fourth party to the conference, enter again. The first two callers will remain con-nected to each other, and you will receive an inside dial tone.
6. Dial the number of the next party you wish to conference in.
7. Upon reaching your third party, enter the Add To Conference sequence . You will be con-nected to all three callers.
8. You may hang up at any time and leave the conference active. The conference will end when no more inside lines are involved in the call.
Note You can obtain a conference circuit before calling your first party by skipping step 1 above.
Flash 7
Flash 8
Flash 7
* 1
Flash 8
Flash 7
Day Ringing/Night Ringing
Enable Day Ringing
Enable Night Ringing
The NexPath Telephony Server has two modes of operation that affect both the ringing of all extensions and the auto-attendant: Day Mode (day ringing) and Night Mode (night ringing). Each extension can pro-grammed to ring at different lines or groups of lines when the system is switched from Day Mode to Night Mode. For example, an extension may be programmed so that calls placed to it ring one particular phone when the system is in Day Mode, but ring all the phones in an entire ring group when the system is in Night mode so that anyone left in the building can pick it up.
The auto-attendant may also have a Day Mode program and a Night Mode program. A different message and set of choices may be presented to the caller depending on whether it is during regular business hours or after hours. All of these features depend on the configuration and setup that is done by the system adminis-trator when the system is installed or configured.
To enable day ringing (and disable night ringing):
1. Pick up any phone or otherwise get an inside line dial tone. 2. Enter the Enable Day Ringing sequence .
3. If prompted, enter your password1, or a password with administrator privileges. 4. If your password was accepted, you will be notified that day ringing has been enabled. 5. Hang up.
To enable night ringing (and disable day ringing):
1. Pick up any phone or otherwise get an inside line dial tone. 2. Enter the Disable Day Ringing sequence .
3. If prompted, enter your password1.
4. If your password was accepted, you will be notified that day ringing has been disabled.
1. You will not be asked for a password if you have already entered it once to enable some other command and you have not hung up since then.
# 0
# 1
# 0
5. Hang up.
Disconnecting
Disconnect Call
You can disconnect from a call without hanging up. Once you have entered a password, you may want to do this to avoid losing password protection or perhaps for other reasons. If your are using an inside extension that automatically seizes an outside line (sometimes called assumed dial nine), this sequence will disconnect from the outside line and return inside dial tone.
To disconnect from a call, or to disconnect from an outside line and obtain inside dial tone, without actually hanging up the phone:
1. Enter the Disconnect sequence . 2. You will receive an inside dial tone.
3. Enter a new command or the next number you want to dial.
Flash #
Do Not Disturb
Help
Help
To get a summary of all commands listed here from your phone: 1. Pick up any phone or otherwise get an inside line dial tone. 2. Dial the Help sequence .
* *
Hold
Put A Call On Hold
Retrieve A Call From Hold
Swap Between a Current Call and a Call on Hold
The NexPath Telephony Server can place up to three calls on hold at a time on any one extension. The calls are place on a stack, much like a stack of boxes or books. The last call placed on the stack using
is the first one retrieved when is entered. Calls place on hold at an extension can only be retrieved from that extension (private hold). If you want to place calls on hold to be retrieved from any extension, use park orbits (public hold). See Park Orbits on page 40 for a detailed description.
Calls placed on hold using the above sequences, or placed into park orbits, receive hold music, if enabled for the line and external hold music is supplied to the system.
To place a call on hold:
1. Enter the Put Call On Hold sequence . You will get an inside dial tone, and are free to call a new number, enter a command, or hang up.
Note If you inadvertently leave a call on hold and forget about it, you will get a short reminder ring every 45 seconds1.
To retrieve the call most recently put on hold:
1. Pick up the phone or otherwise get an inside line dial tone at the phone where the call was put on hold. 2. Enter the Retrieve Call From Hold sequence . You will be connected to the call most recently put on
hold.
1. This is the factory default value for the reminder ring delay time. Your system administrator can alter this time if desired.
Flash 1
* 1
Flash *
Flash 1 * 1
Flash 1
To swap your current call with the call most recently put on hold:
1. Enter the Swap Hold sequence . Your current call will go to the top of the hold stack, and you will be connected with the most recent caller put on hold.
To get at a call on the hold stack when more than one call is on the stack:
1. Get an inside line. If you are on a call, you can hang up on this call without putting down the handset by entering . You can also transfer the current call using the Blind Transfer sequence
or the Set Up Transfer and Complete Transfer sequences and respectively. 2. Take the most recent call which was placed on hold off of hold by entering the Retrieve Call From Hold
sequence .
3. Hang up or transfer this call.
4. Take the next call off of hold by entering the Retrieve Call From Hold sequence .
5. If necessary, hang up or transfer this call, and take the first call which was placed on hold off of hold by entering the Retrieve Call From Hold sequence .
6. When done, hang up.
Flash *
Flash # Flash 4
Flash 5 Flash 6
* 1
* 1
Hook Flash the Central Office Line (Centrex and CLASS
SMfeatures)
Hook Flash the Central Office Line
You can send a hook flash to the central office line, rather than have the hook flash interpreted by the Nex-Path Telephony Server. This is only useful if you have Centrex lines or CLASSSMfeatures, such as three
way calling, enabled on your outside lines.
Note The ability to hook flash a Central Office line can be enabled or disabled on a CO line by CO line basis in the NexPath Telephony Server. This feature must be enabled with the administration software in order for the sequence to work. Otherwise the sequence is ignored.
To send a hook flash to the central office line (see the note above):
1. While connected to an outside (central office) line, enter . You should receive the signal from the central office that the sequence is recognized, usually three short beeps and then central office dial tone.
For example, to setup a three way call using CLASSSMfeatures:
1. While connected to an outside (central office) line and talking to the first party, enter . You should receive the signal from the central office that the sequence is recognized: three short beeps and then central office dial tone.
2. Dial the second party.
3. When you are connected, enter again. You should now have a three way call.
Note You must subscribe to CLASSSMfeatures from your telephone company in order to use the three way calling described above.
Flash 9
Flash 9
Flash 9
Inside Lines
When you first pick up your phone, the dial tone you hear is an “inside line” dial tone. This is a dial tone provided directly by the NexPath Telephony Server and not by the phone company. When you have an inside line, the NexPath Telephony Server is ready to accept both phone numbers to be dialed and the key presses of the command sequences for the advanced operations described in this chapter and in the chapter Voice Mail starting on page 51.
Some notes: After getting an inside line dial tone, if you do not press any keys, you will get a dial tone time-out message after 90 seconds. Similarly, once you start dialing a phone number or command sequence, if you wait more than 15 seconds between digits, the system will give you a keypad dialing time-out message and then return you to an inside line dial tone. Also, if you make a call to another inside line and get a busy signal and then forget to either hang up or otherwise disconnect from the call, you will get a busy signal time-out message after 60 seconds1.
Often, the first thing you do after picking up your phone is dial to get an outside line. Once you do this, however, the NexPath Telephony Server stops trying to interpret all key presses except hook-flashes, as described in the beginning of this chapter2. Not all commands start with hook-flashes, however, so it is important to know how to get back to inside line dial tone. The easiest method is to hang up for a second or two and then pick your handset again. Another way is to wait until the phone company decides that your phone has been off-hook too long and disconnects you. This is similar to leaving a phone off-hook too long at home, but instead of hearing silence and then the loud “beep-beep-beep” that the phone company usually puts out, the NexPath Telephony Server detects this condition, hangs up the outside line, and returns you to an inside line dial tone. Yet another method is to disconnect from your current call is to use the Disconnect
sequence .
Sometimes, it is desirable to get an inside dial tone from outside your facility, especially when you want to check your voice mail from home or from another facility. To get an inside line dial tone from outside your building:
1. Dial your company and wait for your system to pick up.
1. These are factory default times, and can all be altered by your system administrator.
2. If your system is configured to perform area code lockouts, the NexPath Telephony Server will also check that the inside line being used has permission to obtain an outside line, and that the area code being dialed is allowed for that line.
9
2. During your company’s auto-attendant greeting, dial the number specifically set up by your system administrator to give you an inside dial tone.
If your system is not programmed for an inside dial tone selection during the auto-attendant answering sequence (it is not in the factory default), you can still get an inside dial tone by doing the following: 1. Dial your company and wait for your system to pick up.
2. During your company’s auto-attendant greeting, dial your own voice mail extension number.
3. When you hear your pre-recorded greeting, hit the key, then enter your password. You will be in voice mail at this point, and if your intention was to check your voice mail, then you are ready to press for Play, for Pause, etc., as outlined in the chapter Voice Mail starting on page 51.
If, on the other hand, you really need an inside line dial tone to perform some other function such as enabling call-forwarding for your extension or putting your system in Night Mode, then once you are in your voice mail, press (at this point, is the Exit Voice Mail sequence), and you will get an inside dial tone.
Once you get an inside line dial tone from an outside line, you can perform all of the functions you would from inside the building EXCEPT pressing to get an outside line dial tone. This is done to prevent users from dialing in from outside and then placing long-distance calls which get charged to the company.
#
1 2
* *
Line and Extension Numbers
Announce Line Number and Extensions
The Announce Line and Extension Number sequence is primarily of value when performing system administration of the NexPath Telephony Server. The system will announce the physical line number and all extension numbers associated with any telephone from which the sequence is entered.
can also used for performing system administration from a telephone. If you use and enter a password with system administrative permissions and then press after the password is accepted, you will get a list of all user numbers and their passwords (see the NexPath Telephony Server System Administra-tion Guide for details on user numbers).
# 8
# 8
# 8 # 3
Listen In
Listen In
Listen-in is the process of monitoring a conversation without notifying the participants. You can also listen in (screen) voice mail in progress.
To listen into your own voice mail extension, for example, while someone is leaving you voice mail: 1. Pick up any phone or otherwise get an inside line dial tone.
2. Enter the Listen-in sequence .
3. Enter the number of your voice mail extension.
4. If prompted, enter your password1, or a password with barge-in privileges.
5. If your password is accepted, you will be listening to the person currently leaving you a message. 6. If you want to Barge-in (take the call), enter . The voice mail recorded up to that point will be
saved, the recording will terminate, and you will be connected to the caller.
If your system administrator has given your account Barge-in/Listen-in permissions, you can also use the sequence described above to listen into other people’s conversations while they are on the phone, for quality control and monitoring purposes. Check with your system administrator to see if you have Barge-in/Listen-in permission.
Listen-in and Barge-in can be blocked on a line by the system administrator, by setting the line as a Secure Line.
You do not need Barge-in/Listen-in privileges to listen in to voice mail in progress on your own voice mail boxes.
WARNING: Listening-in to a conversation without the consent of one or both parties may
be a violation of local, state, and federal privacy laws. It is the responsibility of the user of
the NexPath Telephony Server, when using features of the system, to assure that they are in
compliance with all applicable laws.
1. You will not be asked for a password if you entered it to enable some other command and have not hung up since then.
# 5
# 5
Night ringing
Operator
Dial the operator
To reach the operator from inside your company:
1. Pick up any phone or otherwise get an inside line dial tone. 2. Dial .
3. The operator’s phone will ring.
Your system administrator will set up a normal extension number as the operator’s extension. Dialing from an inside line is a shortcut for dialing this extension, though you can get the same result by dialing the full extension number. Your system administrator can configure your system so that if the operator is busy or does not answer, your call will go to the auto-attendant.
Note Both inside and outside callers will get an entry error message if they try to dial (or, for that matter, any other number) while ringing an inside line. To get back to the operator, they will need to allow voice mail to pick up, then press .
0
0
0
0
Outside Lines
Obtain an Outside Line
You will get an inside dial tone when you lift your telephone handset unless your extension has been spe-cially set up otherwise. Once you have an inside line dial tone, to get an outside line:
1. Pick up any phone or otherwise get an inside line dial tone. 2. Dial .
Note You will get a busy signal if you dial and all of the outside lines connected to your system are busy.
Your NexPath Telephony Server can be programmed to block dialing specific area codes from specific phones or groups of phones. If you try to dial an area code that has been blocked on the phone you are using, you will be disconnected and hear an error message, then get an inside dial tone.
On the other hand, your system administrator can assign you your own set of area code lockouts and permis-sions. To override the area code lockouts on a particular phone with the area code permissions you have been assigned personally:
1. Pick up any phone or otherwise get an inside line dial tone. 2. Enter . The system will ask you for your password. 3. Enter your password.
4. If your password was accepted, you will get a voice prompt and another inside dial tone. 5. Enter .
6. After receiving an outside dial tone, dial the long distance number desired.
Check with your system administrator to determine the area code lockouts and permissions in place in your system.
Note Each inside line can be programmed by your system administrator to seize a different group of outside lines when is dialed. You can seize a particular outside line by dialing the outside line extension number.
9
9
9
# 3
9
Paging (Public Address)
If your system is connected to a PA system, your system administrator can configure one extension per card as the paging extension1. When you dial this extension, you will be connected to the PA system and can make announcements (For example, “Jim Williams, please dial 455.”).
To make an announcement:
1. Pick up any phone or otherwise get an inside line dial tone. 2. Dial the paging extension number.
3. Begin speaking. 4. Hang up when done.
Park Orbits
Calls on the NexPath Telephony Server may be put on hold such that any caller can pick them up. This type of public hold is called a park orbit. Park orbits are essentially a special type of extension, one which does not ring anywhere, and anyone can pick up.
Park orbits are useful in a company where a call must be put on hold, and a PA (Public Address) system is available to notify the called party to pick up the call. By putting the call in a park orbit, the called party can answer the call anywhere in the building.
Calls in park orbits receive hold music, if enabled for the line and external hold music is supplied to the sys-tem.
A call is placed in a parking orbit in the same way that it is transferred to a regular inside line extension. To put a call in a parking orbit:
1. While connected to the party, enter the Blind Transfer sequence . 2. Enter the desired park orbit extension number.
3. If your transfer was successful, you will hear a prompt telling you that the call was transferred and the caller will be put on hold. If the park orbit you dialed is busy, you will get a busy tone and be reconnected to your caller.
To announce that the call is on hold over the PA system: 1. Get an inside dial tone.
2. Dial the paging extension configured for your system (the factory default is extension 111). 3. Make your announcement.
4. Hang up.
To retrieve a call from park orbit:
1. Pick up any phone or otherwise get an inside line dial tone. 2. Dial the desired park orbit number.
Note Calls left in a park orbit too long will cause a reminder ring (a single, short ring) to be sent to the originating extension every 45 seconds1.
Your system administrator will reserve a specific set of consecutively-numbered extensions as park orbits2.
1. This is the factory default reminder ring delay time. Your system administrator can alter this time.
Passwords
Enter Password
Change Password
Passwords are required for a number of the operations described in this chapter, as well as for accessing voice mail. Each user is assigned a unique password. When you enter your password, you identify yourself to the system. This allows the system to block unauthorized users from forwarding your calls, retrieving your voice mail, for example.
Note The factory-default configuration is for all passwords to be four digits long.
Once you enter a password, the system will know who you are and you will remain “under password protec-tion” until you hang up. This means that any further operations you may want to perform which require a password can be done without re-entering a password.
If you attempt to perform an operation which requires a password and you have not already “gone under” password protection, the system will prompt you for a password. If this happens, enter your password at the prompt to complete the operation. You will then be “under password protection” from then until you hang up the phone.
In addition, you can also “go under password protection” by doing the following: 1. Pick up any phone or otherwise get an inside line dial tone.
2. Enter . The system will ask for a password. 3. Enter your password.
4. If your password was accepted, you will get a voice prompt and another inside dial tone.
5. Perform the operation desired. Note that, instead of hanging up, you can finish one operation and start another by using the Disconnect sequence .
To change your password:
1. Pick up any phone or otherwise get an inside line dial tone.
2. Enter the Change Password sequence . The system will ask for the old password.
# 3
# 4
# 3
Flash #
3. Enter your old password. The system will ask for the new password
4. If the old password was valid and the new password was accepted, you will get a voice prompt saying the password has been changed.
Note Some passwords are reserved for system use only. You will get an error message if you attempt to use the Change Password sequence to change your password to one of the reserved passwords.
Your system administrator is in charge of assigning all passwords and permissions. In addition to allowing you to access your voice mail and perform basic telephone operations, your system administrator can assign you permission to:
•
Change the system mode from Day Mode to Night Mode and back again.•
Override the area code lockouts in place on a particular phone with your own set of area code permissions and lockouts.•
Barge into or Listen into other people’s calls.•
Perform system administration functions.Ask your system administrator about the password and permissions you have been assigned.
Pick up
Pick Up Ring Group
Pick Up Any Ringing Phone
Pick Up Ringing Speaker
Your system administrator can group telephones together into ring groups (also called pickup groups). See the section entitled Ring groups and Pickup groups on page 11 for details.
To pick up a ringing phone within a ring group from a phone that is not ringing: 1. Pick up any phone or otherwise get an inside line dial tone.
2. Enter the Pick Up Ring Group sequence , followed by the single digit representing the ring group. You will be connected to the caller ringing the phone.
By factory default, ring group 0 is defined as the group of all extensions except the PA speaker. This means that to pick up any ringing phone in your building, you can:
1. Pick up any phone or otherwise get an inside line dial tone.
2. Enter . You will be connected to the caller ringing the phone.
Note Check with your system administrator to see how this ring group is defined for your system.
Also by factory default, ring group 1 is defined as containing the extension which rings over to the PA sys-tem. This means that, if you hear a ringing phone over your PA system (usually a system is configured so that this happens for incoming calls when the system is in Night Mode), to answer it, you:
1. Pick up any phone or otherwise get an inside line dial tone.
2. Enter . You will be connected to the caller ringing the phone.
Note Check with your system administrator to see how this ring group is defined for your system.
* 0
* 0 0
* 0 1
* 0
* 0 0