PeopleTools 8.54: Workflow
Technology
PeopleTools 8.54: Workflow Technology CDSKU pt854pbr0_r02
Copyright © 1988, 2014, Oracle and/or its affiliates. All rights reserved.
Trademark Notice
Oracle and Java are registered trademarks of Oracle and/or its affiliates. Other names may be trademarks of their respective owners.
Intel and Intel Xeon are trademarks or registered trademarks of Intel Corporation. All SPARC trademarks are used under license and are trademarks or registered trademarks of SPARC International, Inc.
AMD, Opteron, the AMD logo, and the AMD Opteron logo are trademarks or registered trademarks of Advanced Micro Devices. UNIX is a registered trademark of The Open Group.
License Restrictions Warranty/Consequential Damages Disclaimer
This software and related documentation are provided under a license agreement containing restrictions on use and disclosure and are protected by intellectual property laws. Except as expressly permitted in your license agreement or allowed by law, you may not use, copy, reproduce, translate, broadcast, modify, license, transmit, distribute, exhibit, perform, publish, or display any part, in any form, or by any means. Reverse engineering, disassembly, or decompilation of this software, unless required by law for interoperability, is prohibited.
Warranty Disclaimer
The information contained herein is subject to change without notice and is not warranted to be error-free. If you find any errors, please report them to us in writing.
Restricted Rights Notice
If this is software or related documentation that is delivered to the U.S. Government or anyone licensing it on behalf of the U.S. Government, the following notice is applicable:
U.S. GOVERNMENT END USERS: Oracle programs, including any operating system, integrated software, any programs installed on the hardware, and/or documentation, delivered to U.S. Government end users are "commercial computer software" pursuant to the applicable Federal Acquisition Regulation and agency-specific supplemental regulations. As such, use, duplication, disclosure, modification, and adaptation of the programs, including any operating system, integrated software, any programs installed on the hardware, and/or documentation, shall be subject to license terms and license restrictions applicable to the programs. No other rights are granted to the U.S. Government.
Hazardous Applications Notice
This software or hardware is developed for general use in a variety of information management
applications. It is not developed or intended for use in any inherently dangerous applications, including applications that may create a risk of personal injury. If you use this software or hardware in dangerous applications, then you shall be responsible to take all appropriate fail-safe, backup, redundancy, and other measures to ensure its safe use. Oracle Corporation and its affiliates disclaim any liability for any damages caused by use of this software or hardware in dangerous applications.
Third Party Content, Products, and Services Disclaimer
This software or hardware and documentation may provide access to or information on content, products, and services from third parties. Oracle Corporation and its affiliates are not responsible for and expressly disclaim all warranties of any kind with respect to third-party content, products, and services. Oracle Corporation and its affiliates will not be responsible for any loss, costs, or damages incurred due to your access to or use of third-party content, products, or services.
Alpha and Beta Draft Documentation Notice
If this document is in preproduction status:This documentation is in preproduction status and is intended for demonstration and preliminary use only. It may not be specific to the hardware on which you are using the software. Oracle Corporation and its affiliates are not responsible for and expressly disclaim all warranties of any kind with respect to this documentation and will not be responsible for any loss, costs, or damages incurred due to the use of this documentation.
Contents
Preface...xi
Understanding the PeopleSoft Online Help and PeopleBooks... xi
PeopleSoft Hosted Documentation... xi
Locally Installed Help...xi
Downloadable PeopleBook PDF Files...xi
Common Help Documentation...xi
Field and Control Definitions... xii
Typographical Conventions...xii
ISO Country and Currency Codes...xiii
Region and Industry Identifiers... xiii
Access to Oracle Support... xiii
Documentation Accessibility...xiv
Using and Managing the PeopleSoft Online Help...xiv
PeopleTools Related Links... xiv
Contact Us...xiv
Follow Us...xiv
Chapter 1: Getting Started with PeopleSoft Workflow Technology...15
PeopleSoft Workflow Technology Overview... 15
PeopleSoft Workflow Technology Implementation...15
Chapter 2: Understanding PeopleSoft Workflow...19
Understanding PeopleSoft Workflow... 19
Understanding Workflow Tools...19
Workflow Tools... 19
Work Items... 20
Workflow Triggers...20
Understanding Workflow Application Development... 20
Rules... 21
Roles... 21
Routings... 21
Steps for Developing Workflow Applications... 21
Understanding Extended Workflow Capabilities...22
Route Controls...23
Workflow Triggers from External Applications... 23
EIPs... 23
Batch Workflow Processing... 24
Approval Processes...24
Workflow Activity Guides... 24
Notification Features... 25
Worklist Feeds... 25
Chapter 3: Building Workflow Maps... 27
Understanding Workflow Maps...27
Workflow Maps... 27
PeopleSoft Navigator Maps... 27
Understanding Map Hierarchies... 28
Map Hierarchies... 28
Map Icons... 29
Contents
Activities... 29
Defining Maps...30
Understanding Map Definition...30
Common Elements Used in This Section...31
Creating a New Map...31
Defining Business Process Properties...32
Defining Activity Properties... 32
Adding Map Objects...33
Understanding Toolbar Buttons...33
Adding Icons to Maps...37
Connecting Icons Within a Map... 37
Adding Images to Maps...38
Controlling Text... 39
Adding Standalone Text to Maps... 39
Formatting Standalone Text... 39
Changing the Position of Icon Text...40
Adding Drawing Shapes to Maps...40
Adding Drawing Shapes to Maps...40
Changing the Appearance of the Drawing Line... 40
Changing the Color and Pattern of a Drawing Shape... 41
Using Other Map Display Features...41
Understanding Other Map Display Features...41
Controlling the Size of the Map Display...41
Viewing the Grid... 42
Resizing the Grid...42
Activating the Snap-to Grid...42
Navigating Between a Business Process and Its Component Maps... 42
Arranging Objects on Maps...42
Moving Objects on Maps...43
Deleting Objects from Maps...43
Changing the Display Bitmap of an Existing Icon...43
Aligning Multiple Objects Visually... 43
Moving Objects in Front Of or Behind Each Other...44
Setting Icon Properties...44
Understanding Descriptive Icons... 44
Setting Properties for Descriptive Icons... 44
Setting Properties for Step Icons... 45
Setting Attributes for Step Icons...46
Chapter 4: Defining Roles and Users... 49
Understanding Roles and Users...49
User List Roles...49
Query Roles... 50
Route Controls...50
Case Study: The Manager Query Role...50
Defining a Role Query... 51
Maintaining Roles and Role Users...52
Understanding Roles and Role User Maintenance... 52
Maintaining User Workflow Information... 52
Contents
Worklist Records... 53
Creating Worklist Record Definitions... 55
Replicating Worklists... 56
Understanding Worklist Replication... 56
Setting Up Worklist Replication... 57
Running the WL_REPLICATE Process...57
Checking the WORKLIST_MSG Status... 58
Chapter 6: Adding Events and Routings... 59
Understanding Events and Routings...59
Common Elements Used in Events and Routings...59
Events and Routings...59
Adding and Defining Events... 59
Adding an Event...60
Defining the Event... 60
Editing the Business Rules...60
Adding and Defining Worklist Routings...61
Prerequisites to Adding and Defining Worklist Routings...61
Creating Worklist Routings...61
Defining Worklist Attributes... 62
Specifying Field Mappings... 65
Adding and Defining Email Routings...68
Understanding Email Routings... 68
Creating an Email Routing...68
Mapping Fields...69
Chapter 7: Defining Event Triggers...75
Understanding Event Triggers... 75
Writing Workflow PeopleCode...75
Understanding Workflow PeopleCode... 75
Using the TriggerBusinessEvent Function...76
Creating Workflow PeopleCode Programs... 76
Cloning Business Processes and Activities...77
Writing PeopleCode for Approval Processes... 77
Understanding Approval Processes...78
Using Virtual Approver...78
Using the GetApprovers Library Function... 78
Using Additional PeopleCode Functions and Variables...78
Chapter 8: Using Additional Routing Options...81
Understanding Route Control Development... 81
Route Control Development...81
Route Control Query Roles...81
Defining Route Controls...82
Understanding Route Control Definition...82
Adding Route Control Types... 82
Building Route Control Profiles... 83
Using Route Control Roles...84
Understanding Route Control Query Roles... 84
Defining Routings in Application Designer... 85
Reviewing Role Users... 85
Understanding Role Users...85
Searching For and Reviewing Role Users...86
Contents
Understanding Workflow Batch Processes...87
Understanding Batch Workflow Applications...87
Workflow Batch Processing... 88
Database Monitoring with PeopleSoft Application Engine...88
Events Triggered with Component Interfaces...88
Understanding Database Agents Conversion... 88
Understanding the Notification Application Class...89
Creating Batch Workflow Applications...89
Understanding Batch Workflow Applications... 89
Creating Batch Workflow Applications... 90
Monitoring the Database with PeopleSoft Application Engine...91
Chapter 10: Defining Approval Processes...93
Understanding Approval Processes... 93
Understanding Virtual Approver...94
Virtual Approver...95
Virtual Approver Templates... 96
User List Roles for Organizational Levels... 96
Understanding Approval Rule Sets... 97
Creating Approval Rule Sets...97
Creating an Approval Rule Set...97
Specifying Approval Rule Properties...98
Specifying Additional Approval Rule Properties... 99
Making an Effective-Dated Change to an Approval Rule Set...100
Defining Approval Steps... 101
Understanding Approval Steps...101
Adding a Rule Step to a Rule Set... 101
Defining a Rule Step...102
Specifying Rule Step Rules... 105
Specifying Rule Step Events...107
Maintaining Approval Rules...108
Understanding Approval Rule Maintenance...108
Maintaining Approval Rule Steps...109
Triggering Virtual Approver Routings... 110
Understanding Virtual Approver Routings... 110
Adding Workflow Work Pages... 110
Adding Virtual Approver PeopleCode...111
Reviewing Approval History... 113
Reviewing Approval Instances...114
Using GetApprovers PeopleCode...114
GetApprovers...114
Chapter 11: Designing Workflow Activity Guides... 117
Understanding Workflow Activity Guides... 117
Understanding Workflow Activity Guide Creation... 117
Creating and Defining Activities...117
Creating an Activity... 117
Defining Step Attributes...119
Defining Workflow Activity Guide Options...120
Creating Workflow Activity Guide Pages...121
Contents
Understanding Workflow Activity Guide Page Access...123
Understanding Workflow Activity Guide Mode...123
Understanding Step Status... 123
Accessing Workflow Activity Guides Through Worklists...124
Accessing Workflow Activity Guides Through Custom Links... 124
Chapter 12: Designing PeopleSoft Navigator Maps...127
Understanding PeopleSoft Navigator... 127
Understanding Navigator Map Design... 127
Establishing Navigator Homepages...128
Understanding Navigator Homepages...128
Establishing a User's Homepage...128
Preparing a Business Process To Be a Navigator Homepage...128
Associating a Permission List with a Navigator Homepage...128
Upgrading Maps to Work with PeopleSoft Navigator... 129
Chapter 13: Using Notification Templates... 131
Understanding Notification Templates... 131
Defining Template Variables...132
Defining Template Variables...132
Defining Component Data Variables... 133
Defining Component URL Variables...137
Defining External URL Variables... 138
Defining Additional Recipients... 138
Understanding the Additional Recipients List...138
Defining the Additional Recipients List... 139
Defining Notification Templates...139
Defining Component Notification Templates... 140
Defining BlackBerry Email Responses...141
Calling Component Templates with PeopleCode...142
Defining Generic Templates... 143
Understanding Generic Templates... 143
Defining Generic Templates...144
Using PeopleCode with Generic Templates...145
Deleting Templates...146
Accessing Notification Templates... 146
Sending Email Notifications in a User's Preferred Language...147
Understanding Sending Email Notifications in a User's Preferred Language...147
Sending Email Notifications using SetLanguage( )...148
Storing Preconfigured Email Text in the Message Catalog...149
Chapter 14: Designing BlackBerry Email Responses... 151
Understanding RIM BlackBerry Email Responses... 151
Setting Properties for BlackBerry Email Responses...151
Understanding Application Server SMTP Settings for Sending Email Messages... 151
Configuring the Email Channel... 152
Creating an Application Engine Program for Responses...152
Understanding Application Engine Programs for Responses... 152
Activating the Send Notification Component...153
Running a BlackBerry Response Application Engine Process...154
Chapter 15: Administering PeopleSoft Workflow...157
Scheduling Workflow Processes...157
Setting Workflow Defaults... 157
Contents
Setting Workflow System Defaults...158
Defining Worklist Messages...160
Understanding Worklist Messages... 160
Defining a Default Message...161
Sending a Message...162
Receiving and Responding to Worklist Messages... 163
Monitoring Worklist Volumes...163
Understanding Worklist Volume Monitoring... 163
Configuring a Worklist Volume Monitor...164
Scheduling Worklist Volume Monitors to Run...166
Reviewing Notifications Sent by the Volume Monitor...166
Checking for Worklist Timeouts...167
Understanding Worklist Timeouts...167
Checking for Worklist Timeouts...167
Checking Timeout Worklist Data...168
Reviewing Work Items Online... 168
Understanding Online Work Item Review...168
Searching for Work Items Based on Workflow Properties...169
Searching for Work Items Within a Worklist... 170
Updating Work Items... 171
Running Workflow Reports... 171
Understanding Workflow Reports...172
Running Workflow Reports...172
Setting Notification Options... 173
Enabling the Notify Toolbar Button... 173
Setting Workflow Routing Options...174
Setting Delivery Options...175
Chapter 16: Configuring Worklist Search... 179
Understanding Worklist Search... 179
Creating New Worklist Search Definition...181
Generating the Query... 181
Defining Search Definition... 182
Defining Search Category... 189
Deploying and Scheduling Worklist Search Index... 192
Viewing Worklist Search Definition...197
Chapter 17: Understanding Worklist Entries Created by an External System... 199
Understanding Worklist Entries from External Systems...199
Creating Worklist Entries by an External System...199
Preface
Understanding the PeopleSoft Online Help and PeopleBooks
The PeopleSoft Online Help is a website that enables you to view all help content for PeopleSoft Applications and PeopleTools. The help provides standard navigation and full-text searching, as well as context-sensitive online help for PeopleSoft users.
PeopleSoft Hosted Documentation
You access the PeopleSoft Online Help on Oracle’s PeopleSoft Hosted Documentation website, which enables you to access the full help website and context-sensitive help directly from an Oracle hosted server. The hosted documentation is updated on a regular schedule, ensuring that you have access to the most current documentation. This reduces the need to view separate documentation posts for application maintenance on My Oracle Support, because that documentation is now incorporated into the hosted website content. The Hosted Documentation website is available in English only.
Locally Installed Help
If your organization has firewall restrictions that prevent you from using the Hosted Documentation website, you can install the PeopleSoft Online Help locally. If you install the help locally, you have more control over which documents users can access and you can include links to your organization’s custom documentation on help pages.
In addition, if you locally install the PeopleSoft Online Help, you can use any search engine for full-text searching. Your installation documentation includes instructions about how to set up Oracle Secure Enterprise Search for full-text searching.
See PeopleTools Installation for your database platform, “Installing PeopleSoft Online Help.” If you do not use Secure Enterprise Search, see the documentation for your chosen search engine.
Note: Before users can access the search engine on a locally installed help website, you must enable the Search portlet and link. Click the Help link on any page in the PeopleSoft Online Help for instructions.
Downloadable PeopleBook PDF Files
You can access downloadable PDF versions of the help content in the traditional PeopleBook format. The content in the PeopleBook PDFs is the same as the content in the PeopleSoft Online Help, but it has a different structure and it does not include the interactive navigation features that are available in the online help.
Common Help Documentation
Common help documentation contains information that applies to multiple applications. The two main types of common help are:
Preface
• Using PeopleSoft Applications
Most product families provide a set of application fundamentals help topics that discuss essential information about the setup and design of your system. This information applies to many or all
applications in the PeopleSoft product family. Whether you are implementing a single application, some combination of applications within the product family, or the entire product family, you should be familiar with the contents of the appropriate application fundamentals help. They provide the starting points for fundamental implementation tasks.
In addition, the PeopleTools: Applications User's Guide introduces you to the various elements of the PeopleSoft Pure Internet Architecture. It also explains how to use the navigational hierarchy, components, and pages to perform basic functions as you navigate through the system. While your application or implementation may differ, the topics in this user’s guide provide general information about using PeopleSoft Applications.
Field and Control Definitions
PeopleSoft documentation includes definitions for most fields and controls that appear on application pages. These definitions describe how to use a field or control, where populated values come from, the effects of selecting certain values, and so on. If a field or control is not defined, then it either requires no additional explanation or is documented in a common elements section earlier in the documentation. For example, the Date field rarely requires additional explanation and may not be defined in the
documentation for some pages.
Typographical Conventions
The following table describes the typographical conventions that are used in the online help. Typographical Convention Description
Key+Key Indicates a key combination action. For example, a plus sign ( +) between keys means that you must hold down the first key while you press the second key. For Alt+W, hold down the Alt key while you press the W key.
. . . (ellipses) Indicate that the preceding item or series can be repeated any number of times in PeopleCode syntax.
{ } (curly braces) Indicate a choice between two options in PeopleCode syntax. Options are separated by a pipe ( | ).
[ ] (square brackets) Indicate optional items in PeopleCode syntax.
& (ampersand) When placed before a parameter in PeopleCode syntax, an ampersand indicates that the parameter is an already instantiated object.
Ampersands also precede all PeopleCode variables.
⇒ This continuation character has been inserted at the end of a line of code that has been wrapped at the page margin. The code should be viewed or entered as a single, continuous line
Preface
ISO Country and Currency Codes
PeopleSoft Online Help topics use International Organization for Standardization (ISO) country and currency codes to identify country-specific information and monetary amounts.
ISO country codes may appear as country identifiers, and ISO currency codes may appear as currency identifiers in your PeopleSoft documentation. Reference to an ISO country code in your documentation does not imply that your application includes every ISO country code. The following example is a country-specific heading: "(FRA) Hiring an Employee."
The PeopleSoft Currency Code table (CURRENCY_CD_TBL) contains sample currency code data. The Currency Code table is based on ISO Standard 4217, "Codes for the representation of currencies," and also relies on ISO country codes in the Country table (COUNTRY_TBL). The navigation to the pages where you maintain currency code and country information depends on which PeopleSoft applications you are using. To access the pages for maintaining the Currency Code and Country tables, consult the online help for your applications for more information.
Region and Industry Identifiers
Information that applies only to a specific region or industry is preceded by a standard identifier in parentheses. This identifier typically appears at the beginning of a section heading, but it may also appear at the beginning of a note or other text.
Example of a region-specific heading: "(Latin America) Setting Up Depreciation"
Region Identifiers
Regions are identified by the region name. The following region identifiers may appear in the PeopleSoft Online Help: • Asia Pacific • Europe • Latin America • North America
Industry Identifiers
Industries are identified by the industry name or by an abbreviation for that industry. The following industry identifiers may appear in the PeopleSoft Online Help:
• USF (U.S. Federal)
• E&G (Education and Government)
Access to Oracle Support
Oracle customers have access to electronic support through My Oracle Support. For information, visit http://www.oracle.com/pls/topic/lookup?ctx=acc&id=info or visit http://www.oracle.com/pls/topic/ lookup?ctx=acc&id=trs if you are hearing impaired.
Preface
Documentation Accessibility
For information about Oracle's commitment to accessibility, visit the Oracle Accessibility Program website at http://www.oracle.com/pls/topic/lookup?ctx=acc&id=docacc.
Using and Managing the PeopleSoft Online Help
Click the Help link in the universal navigation header of any page in the PeopleSoft Online Help to see information on the following topics:
• What’s new in the PeopleSoft Online Help. • PeopleSoft Online Help acessibility.
• Accessing, navigating, and searching the PeopleSoft Online Help. • Managing a locally installed PeopleSoft Online Help website.
PeopleTools Related Links
Oracle's PeopleSoft PeopleTools 8.54 Documentation Home Page (Doc ID 1664613.1) PeopleSoft Information Portal
My Oracle Support
PeopleSoft Training from Oracle University PeopleSoft Video Feature Overviews on YouTube
Contact Us
Send us your suggestions Please include release numbers for the PeopleTools and applications that you are using.
Follow Us
Get the latest PeopleSoft updates on Facebook.
Chapter 1
Getting Started with PeopleSoft Workflow
Technology
PeopleSoft Workflow Technology Overview
Workflow capabilities enable you to efficiently automate the flow of information throughout your enterprise, crossing both application and functional boundaries. PeopleSoft Workflow Technology consists of a powerful set of tools that enables you to automate time-consuming business processes and deliver the right information to the right people at the right time. You can merge the activities of multiple users into flexible business processes to increase efficiency, cut costs, and keep up with rapidly changing customer and competitive challenges.
Many of the tasks that you perform throughout the day are part of larger tasks that involve several steps and several people. For example, when you order supplies, you are really initiating an approval process: someone else reviews the order and either approves or denies it. If the order is approved, a purchase order is sent to the vendor. If it is denied, notification is sent back to the person who submitted the original order. The term workflow refers to this larger process.
Using PeopleSoft Workflow Technology requires you to define, step by step, your business processes. The first step in implementing your workflow application is determining the business rules of your organization. This step involves taking fluid, subtle, and sometimes controversial practices and defining explicit rules of operation. Your business rules must be specific enough to give you a solid understanding of your project goals, but not so specific that they predefine a single solution—one that might be
impossible to implement or will not provide adequate flexibility.
PeopleSoft Workflow Technology Implementation
This section discusses the steps required to build a workflow.
Step One: Design a Workflow Application
Complete these main steps when designing a workflow application: 1. Analyze and document your business requirements.
2. Diagram the process flow.
3. Document the workflow object attributes for business processes, activities, steps, events, and email and worklist routings.
In the planning phase of your implementation, take advantage of all PeopleSoft sources of information, including the installation guides, PeopleTools documentation, and the product documentation specific to your applications.
Getting Started with PeopleSoft Workflow Technology Chapter 1
After clearly designing your workflow requirements, you can proceed to building the workflow.
Step Two: Build Supporting Definitions
If the applications required for your workflow do not already exist, build the definitions that you need for fields, records, pages, components, and menus.
See Understanding Workflow Maps.
Step Three: Create Workflow Maps
Create the workflow maps comprising the steps, activities, and business processes required for your workflow, as determined in step one.
Use PeopleSoft Application Designer to create graphical maps that represent your business process. At this stage, you create maps only for the processes that are involved in the underlying application; you add PeopleSoft Workflow-specific elements to the maps when you define events and routings.
See Understanding Workflow Maps and Understanding Navigator Map Design.
Step Four: Define Roles and Role Users
Define the roles and the role users, including any Query roles required for your workflow.
To ensure that work flows to the correct person, you must determine who that person is. You can find the right person using either Query roles or user list roles.
See Understanding Roles and Users.
Step Five: Define Worklist Records
Create a record definition that will be used to store all of the application-specific information for the worklist.
The worklist record determines which fields of information the system stores for each work item, including the data needed to access the target page (the search keys for the page) and any additional information that you want to display in the worklist itself. Because different worklist entries can have different target pages and display data, you need separate worklist records for the different types of entries that will appear in the worklist.
See Understanding Worklist Records.
Step Six: Define Workflow Objects
You define the workflow application in this step. You enter each of the objects into a business process definition in Application Designer, as determined in step one.
You will define the events and routings that make up workflow. Events and routings are both objects in the workflow maps. To define these workflow objects, you add the icons to the map, linked to the step representing the page where the triggering event occurs.
Chapter 1 Getting Started with PeopleSoft Workflow Technology
Step Seven: Define Event Triggers
Define the business rule in PeopleCode in the triggering application record definition. Workflow programs are defined in a record definition for one of the tables that the component accesses. They contain the business rules used to decide whether to trigger the business event. The PeopleCode detects when a business rule has been triggered and determines the appropriate action.
See Understanding Event Triggers.
Step Eight: Test
Test your workflow, or use the workflow monitoring tools in Workflow Administrator to validate worklist routing results.
Chapter 2
Understanding PeopleSoft Workflow
Understanding PeopleSoft Workflow
Many of the daily tasks that you perform are part of larger tasks that involve several steps and several people working together. For example, when you enter an invoice, you are initiating an approval and payment process: someone else reviews and approves it, and a third person submits payment to the vendor. The term workflow refers to this larger process.
To a certain extent, all of the business processes that you define using PeopleSoft Application Designer involve workflow. However, we usually reserve the term to refer to processes that involve multiple users and the routing of data between the users.
This documentation describes the features of PeopleSoft Workflow Technology as they relate to business process design and workflow. These features include PeopleSoft Application Designer tools for designing workflow applications, adding workflow to your business processes, and tools for administering
workflow within your organization. Other topics include notification features, Virtual Approver, and Research In Motion (RIM) BlackBerry handheld device response programs.
Understanding Workflow Tools
This section discusses: • Workflow tools • Work items • Workflow triggers
Workflow Tools
You create and use workflow applications using several tools:
• Worklists are prioritized lists of the work items that a person (or group of people) has to do. A worklist is a standard PeopleTools grid; therefore, the user can use grid personalization features to order and sort columns. When work is routed to a PeopleSoft user, it is put in the user’s worklist. To work on an item, the user selects it from the worklist and is presented with the appropriate page to begin work. Users accessing worklists through a browser see worklist entries prioritized in a predefined order (set on a properties page). For example, worklists for accounts receivable clerks can be sorted by days overdue, amount overdue, or credit class.
Note: The URL/ID field in the worklist grid is an HTML area which cannot be sorted and will not download into a Microsoft Excel spreadsheet.
Understanding PeopleSoft Workflow Chapter 2
• PeopleSoft Application Designer includes the tools that you use to design and build business processes, including the workflow rules and routings.
• PeopleCode functions detect when a business rule has been triggered as users enter data into a PeopleSoft application. These functions evaluate who should act on the new work instance (the role) and route it to the appropriate employee (the routing).
• PeopleSoft Workflow Administrator enables you to access, monitor, analyze, and control workflow in your organization.
Work Items
At the center of a workflow definition is a set of business events and the routings that are associated with those events. A business event is a condition that tells the system that an activity is complete. For example, a new record has been created, a record field has a particular value, or a due date has passed. A routing is an instruction that tells the system to forward information to the next step in the business process. It specifies what information to forward and where to forward it.
When a user saves a page, the system determines whether an event has occurred and triggers the associated routings. For example, suppose an employee enters a change of address from an online page. An agent determines that the database has been correctly updated and may then add an item to the benefits administrator’s worklist to notify the insurance provider of the correct address.
In addition to adding work items to worklists, routings can send email messages.
Workflow Triggers
Workflow routings are initiated by Workflow PeopleCode. The PeopleCode is assigned to pages and, when you save a page, it triggers a business event and its related routings.
Any process that can trigger PeopleCode can trigger a workflow event, including: • Users working in PeopleSoft pages.
• Third-party applications sending information to a PeopleSoft component through a component interface.
• Batch programs or queries sending information to a PeopleSoft component through a component interface. Batch workflow processing uses these tools in addition to the standard workflow tools: • Application Engine programs run queries behind the scenes and pass the results to a component
interface.
You can use PeopleSoft Process Scheduler to run these programs on a regular schedule. • A component interface accesses the component and its PeopleCode to trigger a business event,
thus initiating a workflow.
Chapter 2 Understanding PeopleSoft Workflow
• Rules. • Roles. • Routings.
• Steps for developing workflow applications.
Rules
Rules determine which activities are required to process your business data. For example, you might implement a rule that says department managers must approve all requests for external classes. You implement rules through workflow events, such as PeopleCode that evaluates a condition and triggers a notification (a routing) when appropriate.
Roles
Roles describe how people fit into the workflow. A role is a class of users who perform the same type of work, such as clerks or managers. Your business rules typically specify which roles do which activities. For example, a rule can say that department managers (a role) must approve external course requests. Roles direct the work to types of people rather than to individuals. Identifying roles instead of individual users makes a workflow more flexible and easier to maintain. Associating roles with users makes it easy to ensure workflow users the security access that they need to access the pages where they complete their work.
Roles remain stable, even as people change jobs. For example, if an employee in the Research and Development (R&D) department requests an external class, the system forwards the request to R&D Manager, not to Vic Rumpel, who is the current R&D manager. PeopleSoft application data serves as the basis for defining roles throughout your organization.
Routings
Routings specify where the information goes and what form it takes: email message or worklist entry. Routings make it possible to deploy applications throughout the enterprise. They work through the levels and departments of an enterprise to bring together all of the roles that are necessary to complete complex tasks.
Steps for Developing Workflow Applications
Workflow development progresses through eight steps: 1. Design the workflow application.
Before you start developing workflow applications, analyze the business processes that you want to automate. Identify the goal of each business process, what its component tasks are, and how the tasks should be divided into smaller activities and steps. Articulate the conditions that trigger a workflow event and what happens when those conditions occur. Understand who your workflow users are and how you’ll determine who receives a work item.
Understanding PeopleSoft Workflow Chapter 2
2. Build the underlying application. 3. Create workflow maps.
Use PeopleSoft Application Designer to create graphical maps that represent your business process. At this stage, you create maps only for the processes that are involved in the underlying application; you add PeopleSoft Workflow-specific elements to the maps when you define events and routings. 4. Define roles and users.
Define users’ roles when you give them their user IDs. Roles are important in PeopleSoft Workflow. To ensure that work flows to the correct person, you must determine who that person is. You can find the right person using either query roles or user list roles.
5. Create a worklist record.
The worklist record determines which fields of information the system stores for each work item, including the data needed to access the target page (the search keys for the page) and any additional information that you want to display in the worklist itself. Because different worklist entries can have different target pages and display data, you need separate worklist records for the different types of entries that will appear in the worklist.
6. Define workflow objects.
Events and routings are both objects on the workflow maps. To define these workflow objects, add the icons to the map, linked to the step representing the page where the triggering event occurs.
7. Define event triggers.
After you create workflow processes, link them into the PeopleSoft applications by adding
PeopleCode programs to the pages. The PeopleCode detects when a business rule has been triggered and determines the appropriate action.
8. Test.
No development is complete until the workflow is thoroughly tested. Be sure to test under a variety of conditions, both usual and unusual.
Understanding Extended Workflow Capabilities
In addition to basic workflow events and routings, PeopleSoft Workflow provides extended capabilities that add to the power of workflow applications.
This section discusses: • Route controls.
• Workflow triggers from external applications. • Enterprise Integration Points (EIPs).
Chapter 2 Understanding PeopleSoft Workflow
• Workflow activity guides. • Notification features.
Route Controls
Route controls identify the aspects of a situation on which you want to base routing decisions, and they enable you to associate values with role users. For example, suppose you want to route purchase requisitions to different buyers, depending on which vendor supplies the ordered items, which business unit is requesting the items, which department needs the items, or some combination of these factors. Route controls simplify the creation of role queries by enabling you to associate application data with the role user definition. Instead of joining together a group of records, you can look at the role user table. Another advantage of route controls is that the factors controlling routing are stored in a database table instead of in query definitions or PeopleCode. To change the routing rules, you change users’ route control profiles. You do not have to modify the business process, role queries, or PeopleCode.
Workflow Triggers from External Applications
A component interface enables third-party applications to enter data into PeopleSoft applications. It accepts data from a variety of sources, such as electronic forms software, interactive voice response (IVR) systems, or web applications, and from PeopleCode and Application Engine programs.
When a component interface sends data into the PeopleSoft system, the system performs the same edits and security checks as it always does, including running any PeopleCode that is associated with the page. Therefore, if the page has associated workflow PeopleCode, then a component interface can trigger a business event.
EIPs
The PeopleSoft application delivers a number of preconfigured EIPs to meet some of the common integration needs. These PeopleSoft Workflow-related EIPs may be particularly useful:
• The Worklist Entry EIP (component interface WORKLISTENTRY) enables third-party applications to access existing worklist entries, mark items as selected or worked, or reassign items to other users. • The Worklist Synchronization EIP consolidates worklist data from multiple PeopleSoft databases
using the application engine program WL_REPLICATE, which publishes worklist data using WORKLIST_MSG.
Users who would otherwise have to work from multiple worklists (for example, people who use PeopleSoft Workflow in both PeopleSoft HCM and PeopleSoft Financials) can use one worklist and still see all work items from both sources.
Third-party applications can also use this EIP to create new worklist entries, entries that can include a URL for the action that must be taken.
• The Worklist EIP (component interface WORKLIST) enables third-party applications to add new entries to PeopleSoft worklists.
This method is not the preferred way to add worklist entries. The preferred method is to use a component interface for a component that already calls TriggerBusinessEvent and to let
Understanding PeopleSoft Workflow Chapter 2
TriggerBusinessEvent create the worklist entry. Another alternative is to use the Worklist Synchronization EIP.
• Third-party applications can use a web service request message to create worklist entries for a task that is external to a PeopleSoft application. The web service provides a reply message when the worklist item is marked complete.
Batch Workflow Processing
Sometimes, the event that triggers a workflow routing is actually a nonevent. That is, a situation exists but not because someone entered data into the system. The most common examples of this type of event are aging processes. For example, an invoice becomes overdue, an employee reaches his five-year anniversary, or a worklist entry remains unworked for more than a week.
PeopleSoft Application Engine enables you to monitor your database for this type of event. You can create an Application Engine program that runs a SQL query against the PeopleSoft database and passes the results to a component interface.
Using Application Engine programs in conjunction with PeopleSoft Process Scheduler, you can monitor the database tables for conditions that should trigger workflow events.
Approval Processes
Approval processes are a common form of business process, and you can define approval rules on an Approval Rule Set map. The approval steps that you place on this map represent the approval levels required for the activity in question.
Two tools can read and implement the approval rules from the map:
• Virtual Approver automatically tracks the approval process. As users complete transactions that require approvals, Virtual Approver determines the appropriate approver and sends a workflow routing. As each approver completes the approval, Virtual Approver determines whether additional approvals are needed and, if necessary, sends additional workflow routings.
• GetApprovers PeopleCode determines the entire list of required approvals at once, so that you can develop custom approval tracking applications.
Workflow Activity Guides
Workflow activity guides support a specific type of workflow: a single user’s work across several pages. Because workflow activity guides are intended for a single user, they do not involve routings like those found in a regular workflow application. Rather, the workflow activity guide leads a user through a multistep task.
A workflow activity guide appears as a navigation bar across the top of a page. Within the bar, you can see each of the steps involved in the activity. Clicking a step takes you to the page where you can complete the step; the navigation bar remains visible as you move from page to page.
Workflow activity guides take a single map and integrate it into the pages that are used for the specific transaction. Although workflow activity guides can benefit all users, they are particularly appropriate for
Chapter 2 Understanding PeopleSoft Workflow
Of the two kinds of workflow maps (business processes and activities), only activities are used for workflow activity guides. The workflow activity guide maps are built with the same tools as all other maps.
Notification Features
Within an activity definition, an event can trigger a notification routing in email or a worklist. These features facilitate sending notifications in workflow:
• The Notify toolbar button can be added to any PeopleSoft component.
With the Notify toolbar button, the user can determine when an event has occurred that requires that someone be notified. The Notify toolbar button opens the Send Notification page, where the user can enter a personal message and send an email or worklist notification to users.
• Notification templates enable functional users to configure unique message text for each component. The notification template can include values from the component page (for example, order number and customer name) so that even the predefined text in the notification can be specific to the data on the page. These values are called template variables.
• The BlackBerry Email Response notification setup and polling program enables companies to leverage the functionality of the Research in Motion (RIM) wireless handheld device to send and receive email.
The email response from the device can trigger business logic in the PeopleSoft system to update or complete a transaction.
• The combination of generic templates and PeopleCode application classes can be used by application developers to extend the delivered notification features for an application.
Worklist Feeds
Worklist feeds provide the ability to publish a user's worklist as a feed in real time. By using worklist feeds, the worklist items can be available from systems other than the system that originated the entries without copying the data. Worklist feeds use the Feed Publishing Framework for delivering feeds. PeopleTools delivers the WORKLIST feed data type used to publish worklist feeds.
Worklist feeds are real-time feeds. The feed is generated in the security context of the signed on user and reflects the user's current worklist items. It does not show worked or old items.
Chapter 3
Building Workflow Maps
Understanding Workflow Maps
This section discusses: • Workflow maps.
• PeopleSoft Navigator maps.
Workflow Maps
Workflow maps, also known as PeopleSoft Navigator maps, are visual representations of your organization's business processes. Maps are necessary to all workflow processes, and they can also be used as navigational aids for users.
Workflow maps are of two types, each representing a different hierarchical level. The top-level map, known as a business process, represents broad areas of functionality. Business processes contain one or more activities, or subprocesses. Activities contain individual steps that represent the specific transactions that complete the activity.
When you create workflow maps, you first create basic maps (business processes and activities) as described in these topics. As you continue with subsequent steps, you add workflow-specific elements —events and routings—to the activities. You need events and routings only in activities that are used as workflow tools, not in those that are used as navigation tools.
PeopleSoft Navigator Maps
PeopleSoft Navigator is an alternative to the standard portal navigation. With PeopleSoft Navigator, users can see workflow maps and use them to access pages (but not external programs) that are represented within these maps.
PeopleSoft Navigator presents maps according to their hierarchical relationships. Users can browse the available maps and navigate to individual pages by clicking the step that represents the page. As users
Building Workflow Maps Chapter 3
move from map to page and back to map, the Navigator tree remains visible on the left-hand side of the screen.
Image: PeopleSoft Navigator
This example illustrates the fields and controls in PeopleSoft Navigator.
You control which maps are visible in PeopleSoft Navigator by defining a Navigator homepage: a top-level business process that greets the user when PeopleSoft Navigator is first accessed. Users can access only the maps that are hierarchically related to this homepage.
Understanding Map Hierarchies
This section discusses: • Map hierarchies. • Map icons.
• Business processes. • Activities.
Map Hierarchies
PeopleSoft Workflow uses three hierarchical levels. The first two levels, business processes and activities, are both maps: graphical representations of the relationships between the component objects (other maps
Chapter 3 Building Workflow Maps
The third level, steps, are not maps. Steps are elements within activities. They represent the level at which the user interacts directly with application pages.
Business processes and activities are both freestanding definitions that you can open in PeopleSoft Application Designer and include in projects. Because business processes include icons for other maps (activities or other business processes), create these lower level maps before you add them to a business process. You can develop in a top-down approach by creating the lower level maps from the Business Process Designer directly.
Steps are not freestanding definitions in PeopleSoft Application Designer; they exist only within a particular activity. You create steps as you define an activity.
Note: PeopleSoft Workflow and PeopleSoft Navigator applications require all three levels: all activities must belong to business processes. Workflow activity guides, on the other hand, do not involve business processes. Workflow activity guides are built from standalone activities and their component steps. A setting in the Activity Properties dialog box identifies the activity as being used in a workflow activity guide.
Map Icons
The following table presents the basic map elements.
The Business Process icon represents a complete business task, consisting of one or more activities. Business processes can include other business processes. Normally, you use this functionality only when designing maps for use in PeopleSoft Navigator.
The Activity icon represents a subprocess of the business task, consisting of one or more steps.
The Step icon represents a discrete step in the business
process, corresponding to a single transaction performed on an application page or through an external program.
Business Processes
A business process is a graphical representation of the relationships between related activities. Arrows show the relationships between the activities, indicating the proper chronological sequence.
Activities
Activities that are intended only for end users (in PeopleSoft Navigator or in workflow activity guides) typically include only steps that correspond either to application pages or to external programs.
When you incorporate workflow, activities also include events and routings. Events represent specific transactions that can occur in the page that is connected to the event. Routings represent notifications that are triggered by that event.
For example, several possible events appear on a page where managers approve orders. The manager can approve or deny the order, or send the order back to the employee for changes. Each event requires
Building Workflow Maps Chapter 3
routings to inform the next person in the chain (a buyer, an additional approver, or the employee who submitted the original order) about what action must happen next.
Image: Activity with workflow routings
This example illustrates an activity with workflow routings.
Defining Maps
This section provides an overview of map definition, lists common elements, and discusses how to: • Create a new map.
• Define business process properties. • Define activity properties.
Understanding Map Definition
You create maps using PeopleSoft Application Designer. After creating the map, you can add items and establish the attributes of and relationships between the items.
Because maps are freestanding definitions in PeopleSoft Application Designer, use the standard techniques for opening, saving, deleting, renaming, adding to projects, printing, and so on.
Chapter 3 Building Workflow Maps
Common Elements Used in This Section
Icon Desc (icon description) Enter a description, which will appear in the dialog boxes that list this type of map. If you leave this field blank, the map name appears by default.
This field is language-sensitive; the map name is not. If you intend to translate this object, supply a value for this field.
Owner ID To track definition owners, enter an appropriate value.
Creating a New Map
To create a new map:
1. In PeopleSoft Application Designer, select File, New.
2. In the New scrolling list, select the map type: Activity or Business Process. 3. Click OK.
4. Add the icons required to represent the activity or business process.
If you are creating a business process, the icons represent other maps, activities, and possibly other business processes. When you add these types of icons to the map, you can specify an existing activity or business process that the icon represents, or you are prompted to create a new one.
Even if you do not save the business process on which you are working, the new activities or business processes that you created are saved to the database. Arrange the icons in a logical and visually informative way.
If appropriate, add modeling symbols, drawings, arrows, text, or other graphic elements to the map. These elements are useful primarily in maps that are visible in PeopleSoft Navigator. They do not affect workflow processing, nor are they visible in workflow activity guides.
5. Connect the activities, decision points, and subprocesses in the appropriate order: a. Click the Link button.
b. Click the two objects sequentially.
An arrow appears, pointing from the first object to the second.
The links between steps only clarify the flow of work. They do not directly determine the order of the steps, which you specify when you set the properties for individual icons in the maps. However, if you enabled automatic sequencing in the activity properties, then the default step order is based on the links.
6. Define the properties of the map.
7. Define the properties of the icons on the map. 8. Save the map.
Building Workflow Maps Chapter 3
Defining Business Process Properties
To define the properties of a business process:
1. Open the business process in PeopleSoft Application Designer. 2. Open the Business Process Properties dialog box and then:
a. Right-click in the map (but not on an item in the map). b. Select Definition Properties.
The General tab in the Business Process Properties dialog box appears.
3. Set the properties on the General tab. 4. Set the properties on the Use tab.
A Navigator homepage is the high-level business process that a user sees immediately after accessing PeopleSoft Navigator. A user's homepage settings are established on the User Profile and Permission List pages. To make this business process available as a homepage, select the Can be used as a Navigator home page check box.
5. Click OK to accept the settings. 6. Save the business process.
Defining Activity Properties
To define the properties of an activity:
1. Open the activity in PeopleSoft Application Designer. 2. Open the Activity Properties dialog box and then:
a. Right-click in the map (but not on an item in the map). b. Select Definition Properties.
The General tab in the Activity Properties dialog box appears.
3. Set the properties on the General tab. 4. Set the properties on the Use tab.
The Use tab includes options for automatically sequencing steps and for enabling end-user-facing workflow activity guides.
After you add steps to an activity, arrange them into a logical sequence using connecting arrows, and assign each step a number. If you select Automatically sequence steps, the step numbers are automatically assigned when you save the activity. The step numbers are based on the order in which you connect the arrows. This is an efficient way to order the steps.
Chapter 3 Building Workflow Maps
Note: Normally, an activity that you use in a workflow application isn’t reused as a workflow activity guide. Instead, you create activities specifically for workflow activity guides.
5. Click OK to accept the settings.
Adding Map Objects
This section provides an overview of toolbar buttons and discusses how to: • Add icons to maps.
• Connect icons within a map. • Add images to maps.
Understanding Toolbar Buttons
Use toolbar buttons to add icons and connecting lines to maps. Different toolbars (and, therefore, different map objects) are available for business processes and activities.
Business Process Toolbar
This toolbar provides the basic components of a business process, including activities and the lines that link them. This toolbar is visible only when a business process is the active window.
Click the Link button to connect related activities or steps. This button also appears in the Activity toolbar.
You must use the link tool to connect objects on the map; do not use arrows or other drawn shapes.
Click the Business Process button to add another business process.
Click the Activity button to add an activity.
Click the Decision button to add a decision point in a process. A Decision icon in a map is descriptive only; it has no workflow functionality. This button also appears in the Activity toolbar.
Activity Toolbar
This toolbar provides the basic components of an activity, including steps, workflow events, and workflow routings. This toolbar is visible only when the active window displays an activity.
Click the Link button to connect related activities or steps. This button also appears in the Business Process toolbar.
Building Workflow Maps Chapter 3
Click the Step button to add a page.
Click the Event button to add a business event.
Click the Worklist button to add a worklist.
Click the Email button to add email for workflow routing.
Click the Batch button to create a descriptive icon for a background process.
Click the Manual Process button to create a descriptive icon for a manual process.
Click the Decision button to create a descriptive icon for a decision point in a process. This button also appears in the Business Process toolbar.
Click the Local Transaction button to create a descriptive icon representing a service operation definition for a transaction that occurs in one database.
Click the Transaction other DB (transaction other database) button to create a descriptive icon representing a service operation definition for a transaction that sends a message to another database in the same enterprise.
Click the Remote Transaction button to create a descriptive icon representing a service operation definition for a transaction that sends a message to another database in another enterprise by crossing the firewall. Service operation definitions are used in PeopleSoft Integration Broker.
Modeling Toolbar
This toolbar provides additional buttons for creating icons to graphically enhance maps. Some of the icons are informational only; those that are functional have exact equivalents in either the Business Process or the Activity toolbar. This toolbar is visible when either a business process or an activity is the active window in the workspace.
Click the Document button to create a descriptive icon for a document. (Informational only.)
Click the End Process button to create a descriptive icon for the end of process. (Informational only.)
Click the Business Process button to add an icon for a business process. This is the same function as the Business Process
Chapter 3 Building Workflow Maps
only when a business process is the active window in the workspace.
Click the Activity button to add an icon for an activity. This is the same function as the Activity button in the Business Process toolbar. When you add this icon to a map, you are prompted to identify an existing activity that the icon represents. This functionality is available only when a business process is the active window in the workspace.
Click the Event button to add an icon for an event. This is the same function as the Event button in the Activity toolbar. This functionality is available only when an activity is the active window in the workspace.
Click the Page button to add an icon for a page. This is the same function as Step button in the Activity toolbar. This functionality is available only when an activity is the active window in the workspace.
Drawing Toolbar
This toolbar is visible when either a business process or an activity is the active window in the workspace. Normally, you add an object to a map by clicking the object in the toolbar and clicking the location on the map. Some of the drawing tools, however, involve extra clicks on the map. For example, to draw a line, first click the Line button as you click any other button. To draw the line on the map, click once at the beginning of the line and again at the end of the line.
Click the Line button to draw a static line. Drag the cursor from one end of the line to the other. You can move the endpoints later.
Click the Arrow Line button to draw a line that terminates with an arrow.
Click the Rectangle button to draw a rectangle. Drag the cursor from one corner of the rectangle to the opposite corner. You can move the corners later.
Click the Polycurvebutton to draw a curve. Drag from anchor point to anchor point, and double-click at the end of the curve. You can move the anchor points later.
Click the Ellipse button to draw an ellipse. Drag from one corner of the surrounding rectangle to the opposite corner. You can move the corners later.
Click the Text button to draw a static text field. Place text by clicking at the appropriate location. You can move or resize the text box later.
Building Workflow Maps Chapter 3
Click the Image button to add a bitmap. Place the bitmap by clicking at the appropriate location.
Click the Toggle Grid button to display or hide an optional grid to help you place map objects.
Alignment Toolbar
This toolbar contains options for aligning objects on several different axes.
Click the Align Top button to arrange all selected objects so that they are aligned at the top of the base position object.
Click the Align Middle button to arrange all selected objects so that they are aligned at the middle of the base position object. Click the Align Bottom button to arrange all selected objects so that they are aligned at the bottom of the base position object. Click the Align Left button to arrange all selected objects so that they are aligned at the left-hand side of the base position object. Click the Align Center button to arrange all selected objects so that they are aligned at the center of the base position object. Click the Align Right button to arrange all selected objects so that they are aligned at the right-hand side of the base position object.
Layering Toolbar
This toolbar contains options to move objects in front of or behind each other.
Click the Front button to move the selected object in front of any overlapping objects.
Click the Back button to move the selected object behind any overlapping objects.
Click the Forward button to move the selected object in front of the overlapping objects that are immediately in front of it. Click the Backward button to move the selected object behind any overlapping objects that are immediately in front of it.
Chapter 3 Building Workflow Maps
Events and Routings Icons
These icons are actual workflow objects, representing transactions that trigger workflow (events) and the medium through which the trigger sends work to the recipient (routings). You normally add these objects to activities after completing the basic maps.
Image: Events and routings icons
This example illustrates the events and routings icons.
Adding Icons to Maps
To add an icon to a map:
1. Click the toolbar button representing the icon that you want to add. 2. Click the map where you want to place the icon.
In most cases, the icon is added to the map when you click. If you are adding an icon for an activity, business process, or transaction, however, the Select Definition dialog box appears.
3. In the Select Definition dialog box, select the specific activity, business process, or service operation definition that the icon represents.
4. Click the Select button to finish placing the icon on the map.
Connecting Icons Within a Map
To connect icons within a map:
1. Click the Link button on the toolbar.
You must use the link tool to connect icons; do not use arrows or other drawing objects. 2. Click the icon where the link starts.
The icon must be a linkable definition. As you pass the cursor over different parts of the map, its appearance changes to indicate whether you are over a linkable definition:
• A plus sign indicates that you are not over a linkable definition.
• A plus sign within a circle indicates that you are over a linkable definition.
3. Click the icon where the link ends.
This click completes the link, and an arrow from one object to the other appears. Even if you relocate objects on the map, the link stays connected to both objects.
Building Workflow Maps Chapter 3
To cancel without completing the link, right-click. 4. (Optional) Modify the shape of the link.
To create angles at the same time that you create the link, make one or more intermediate clicks where you want the line to bend. You can add multiple angles. However, you must always end the line with a linkable definition.
Change the angle by clicking the connector line, selecting the angle anchor, and moving it.
To create an angle in an existing link, select the link, press and hold the Ctrl key, and click where you want to create an angle anchor. You can then move the anchor as described previously.
Adding Images to Maps
To add an image to a map:
1. Click the Image button in the toolbar.
2. Click on the map where you want to place the image. 3. Right-click the bitmap and select Change Bitmap.
The Select Image dialog box appears. 4. Select the image file.
5. Click OK.
The selected image replaces the default bitmap.
Note: The Select Image dialog box lists all of the images that are stored in the PeopleSoft database. If the Show Only Workflow Images check box is selected, the list includes only images that have the Used in Workflow property set in the image definition properties. If the Show Only Workflow Images check box is cleared, the list includes all images that can be rendered in the Microsoft Windows environment. Because Graphics Interchange Format (GIF) files cannot be rendered in Windows, they do not appear.
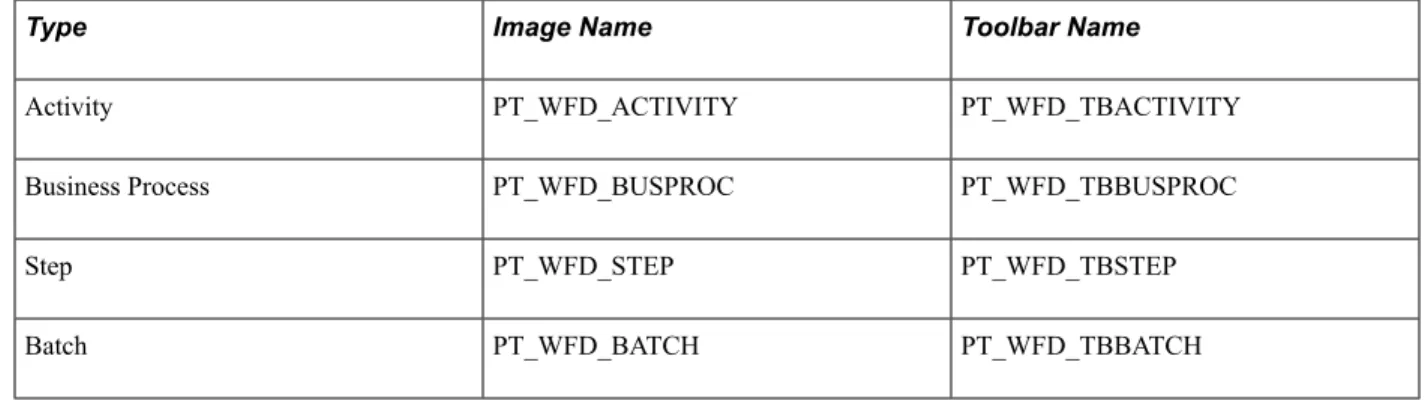
Table of Default Workflow Images
To replace the PeopleSoft default images for new or existing maps, you can add new images to the Image Catalog using the same names, as shown in this table:
Type Image Name Toolbar Name
Activity PT_WFD_ACTIVITY PT_WFD_TBACTIVITY
Business Process PT_WFD_BUSPROC PT_WFD_TBBUSPROC
Step PT_WFD_STEP PT_WFD_TBSTEP
Chapter 3 Building Workflow Maps
Type Image Name Toolbar Name
Manual Process PT_WFD_MANUALPROC PT_WFD_TBMANUALPROC Transaction Same DB PT_WFD_SAMEDB PT_WFD_TBSAMEDB Transaction Other DB PT_WFD_OTHERDB PT_WFD_TBOTHERDB Transaction Outside Firewall PT_WFD_OUTSIDEFW PT_WFD_TBOUTSIDEFW
Event PT_WFD_EVENT PT_WFD_TBEVENT
Worklist PT_WFD_WORKLIST PT_WFD_TBWORKLIST
Email PT_WFD_EMAIL PT_WFD_TBEMAIL
Decision PT_WFD_DECISION PT_WFD_TBDECISION
Bitmap PT_WFD_BITMAP PT_WFD_TBBITMAP
Controlling Text
This section discusses how to: • Add standalone text to maps. • Format standalone text.
• Change the position of icon text.
Adding Standalone Text to Maps
To add standalone text to maps:
1. Click the Text button in the Drawing toolbar.
2. Click the map in the location where you want to place the text. A text box with the word text appears on the map.
3. Double-click the default text to select it. 4. Enter your own text.
Formatting Standalone Text
To format standalone text: