Extreme Networks Security
Installation Guide
Copyright © 2011–2015 All rights reserved. Legal Notice
Extreme Networks, Inc. reserves the right to make changes in specifications and other
information contained in this document and its website without prior notice. The reader should in all cases consult representatives of Extreme Networks to determine whether any such changes have been made.
The hardware, firmware, software or any specifications described or referred to in this document are subject to change without notice.
Trademarks
Extreme Networks and the Extreme Networks logo are trademarks or registered trademarks of Extreme Networks, Inc. in the United States and/or other countries.
All other names (including any product names) mentioned in this document are the property of their respective owners and may be trademarks or registered trademarks of their respective companies/owners.
For additional information on Extreme Networks trademarks, please see: www.extremenetworks.com/company/legal/trademarks/
Support
For product support, including documentation, visit: www.extremenetworks.com/ documentation/
For information, contact: Extreme Networks, Inc. 145 Rio Robles
San Jose, California 95134 USA
Table of Contents
Introduction to Extreme Security installations ... 4
Text Conventions...4
Providing Feedback to Us... 5
Getting Help...5
Related Publications...6
Chapter 1: Extreme Security deployment overview... 8
Activation keys and license keys... 8
Integrated Management Module...9
Extreme Security components...10
Prerequisite hardware accessories and desktop software for Extreme Security installations...12
Supported web browsers ...12
USB flash drive installations... 13
Chapter 2: Installing a Extreme Security Console or managed host...19
Chapter 3: Extreme Security software installations on your own appliance... 21
Prerequisites for installing Extreme Security on your own appliance...21
Installing RHEL on your own appliance... 24
Chapter 4: Virtual appliance installations for Extreme SIEM and Log Manager...26
Overview of supported virtual appliances ... 26
Creating your virtual machine...29
Installing the Extreme SIEM software on a virtual machine...31
Adding your virtual appliance to your deployment...31
Chapter 5: Installations from the recovery partition...33
Reinstalling from the recovery partition...33
Chapter 6: Overview of Extreme Security deployment in a cloud environment...35
Configuring server endpoints for cloud installations...35
Configuring client networks for cloud installations...37
Configuring a member for cloud installations...38
Chapter 7: Data Node Overview...39
Chapter 8: Network settings management...43
Changing the network settings in an all-in-one system...43
Changing the network settings of a Extreme Security Console in a multi-system deployment ...44
Updating network settings after a NIC replacement... 45
Chapter 9: Troubleshooting problems... 47
Troubleshooting resources... 48
Extreme Security log files...49
Ports used by Extreme Security ...49
Introduction to Extreme Security
installations
Extreme Networks Security Analytics appliances are pre-installed with software and the Red Hat Enterprise Linux™ operating system. You can also install Extreme Security software on your own
hardware.
To install or recover a high-availability (HA) system, see the Extreme Networks SIEM High Availability Guide.
Intended audience
Network administrators who are responsible for installing and configuring Extreme Security systems must be familiar with network security concepts and the Linux™ operating system.
Statement of good security practices
IT system security involves protecting systems and information through prevention, detection and response to improper access from within and outside your enterprise. Improper access can result in information being altered, destroyed, misappropriated or misused or can result in damage to or misuse of your systems, including for use in attacks on others. No IT system or product should be considered completely secure and no single product, service or security measure can be completely effective in preventing improper use or access. Extreme Networks® systems, products and services are designed to
be part of a lawful comprehensive security approach, which will necessarily involve additional operational procedures, and may require other systems, products or services to be most effective. EXTREME NETWORKS DOES NOT WARRANT THAT ANY SYSTEMS, PRODUCTS OR SERVICES ARE IMMUNE FROM, OR WILL MAKE YOUR ENTERPRISE IMMUNE FROM, THE MALICIOUS OR ILLEGAL CONDUCT OF ANY PARTY.
Note
Use of this Program may implicate various laws or regulations, including those related to privacy, data protection, employment, and electronic communications and storage. Extreme Networks Security Analytics may be used only for lawful purposes and in a lawful manner. Customer agrees to use this Program pursuant to, and assumes all responsibility for complying with, applicable laws, regulations and policies. Licensee represents that it will obtain or has obtained any consents, permissions, or licenses required to enable its lawful use of Extreme Networks Security Analytics.
Text Conventions
Table 1: Notice Icons
Icon Notice Type Alerts you to...
Tip Helpful tips for using the product. Note Important features or instructions.
Caution Risk of personal injury, system damage, or loss of data. Warning Risk of severe personal injury.
New This command or section is new for this release.
Table 2: Text Conventions
Convention Description
Screen displays This typeface indicates command syntax, or represents information as it appears onthe screen.
The words enter and
type When you see the word “enter” in this guide, you must type something, and then pressthe Return or Enter key. Do not press the Return or Enter key when an instruction simply says “type.”
[Key] names Key names are written with brackets, such as [Return] or [Esc]. If you must press two or more keys simultaneously, the key names are linked with a plus sign (+). Example: Press [Ctrl]+[Alt]+[Del]
Words in italicized type Italics emphasize a point or denote new terms at the place where they are defined in the text. Italics are also used when referring to publication titles.
Providing Feedback to Us
We are always striving to improve our documentation and help you work better, so we want to hear from you! We welcome all feedback but especially want to know about:
•
Content errors or confusing or conflicting information.•
Ideas for improvements to our documentation so you can find the information you need faster.•
Broken links or usability issues.If you would like to provide feedback to the Extreme Networks Information Development team about this document, please contact us using our short online feedback form. You can also email us directly at [email protected].
Getting Help
If you require assistance, contact Extreme Networks Global Technical Assistance Center using one of the following methods:
Web www.extremenetworks.com/support
Phone 1-800-872-8440 (toll-free in U.S. and Canada) or 1-603-952-5000 For the Extreme Networks support phone number in your country:
www.extremenetworks.com/support/contact
Email [email protected]
To expedite your message, enter the product name or model number in the subject line.
Before contacting Extreme Networks for technical support, have the following information ready:
•
Your Extreme Networks service contract number•
A description of the failure•
A description of any action(s) already taken to resolve the problem (for example, changing mode switches or rebooting the unit)•
The serial and revision numbers of all involved Extreme Networks products in the network•
A description of your network environment (such as layout, cable type, other relevant environmental information)•
Network load and frame size at the time of trouble (if known)•
The device history (for example, if you have returned the device before, or if this is a recurring problem)•
Any previous Return Material Authorization (RMA) numbersRelated Publications
The Extreme Security product documentation listed below can be downloaded from http:// documentation.extremenetworks.com.
Extreme Security Analytics Threat Protection
•
Extreme Networks Security API Reference Guide•
Extreme Networks Security Application Configuration Guide•
Extreme Networks Security Ariel Query Language Guide•
Extreme Networks Security DSM Configuration Guide•
Extreme Security DSM Configuration Guide Addendum•
Extreme Networks Security Hardware Guide•
Extreme Networks Security Installation Guide•
Extreme Networks Security Juniper NSM Plug-in User Guide•
Extreme Networks Security Log Manager Administration Guide•
Extreme Networks Security Log Sources User Guide•
Extreme Networks Security Managing Log Sources Guide•
Extreme Networks Security Offboard Storage Guide•
Extreme Security Release Notes•
Extreme Networks Security Risk Manager Adapter Configuration Guide•
Extreme Networks Security Risk Manager Getting Started Guide•
Extreme Networks Security Risk Manager Installation Guide•
Extreme Networks Security Risk Manager User Guide•
Extreme Networks Security Troubleshooting System Notifications Guide•
Extreme Networks Security Upgrade Guide•
Extreme Networks Security Vulnerability Manager Release Notes•
Extreme Networks Security Vulnerability Manager User Guide•
Extreme Networks Security WinCollect User Guide•
Extreme Networks SIEM Administration Guide•
Extreme Networks SIEM Getting Started Guide•
Extreme Networks SIEM High Availability Guide•
Extreme Networks SIEM Troubleshooting Guide•
Extreme Networks SIEM Tuning Guide•
Extreme Networks SIEM Users Guide•
Migrating Extreme Security Log Manager to Extreme SIEMExtreme Security Threat Protection
•
Extreme Security Intrusion Prevention System Hardware Replacement Guide•
Extreme Security Threat Protection Release Notes1
Extreme Security deployment
overview
Activation keys and license keys Integrated Management Module Extreme Security components
Prerequisite hardware accessories and desktop software for Extreme Security installations
Supported web browsers USB flash drive installations
You can install Extreme Networks Security Analytics on a single server for small enterprises, or across multiple servers for large enterprise environments.
For maximum performance and scalability, you must install a high-availability (HA) managed host appliance for each system that requires HA protection. For more information about installing or recovering an HA system, see the Extreme Networks SIEM High Availability Guide.
Activation keys and license keys
When you install Extreme Networks Security Analytics appliances, you must type an activation key. After you install, you must apply your license keys. To avoid typing the wrong key in the installation process, it is important to understand the difference between the keys.
Activation
key The activation key is a 24-digit, 4-part, alphanumeric string that you receive from Extreme. Allinstallations of Extreme Security products use the same software. However, the activation key specifies which software modules to apply for each appliance type. For example, use the Extreme Networks Security QFlow Collector activation key to install only the QFlow Collector modules. You can obtain the activation key from the following locations:
•
If you purchased an appliance that is pre-installed with Extreme Security software, the activation key is included in a document on the enclosed CD.•
If you purchased Extreme Security software or virtual appliance download, a list of activation keys is included in the Getting Started document. The Getting Started is attached to the confirmation email.License
key Your system includes a temporary license key that provides you with access to Extreme Securitysoftware for five weeks. After you install the software and before the default license key expires, you must add your purchased licenses.
Table 3: Restrictions for the default license key for Extreme SIEM installations
Usage Limit
Active log source limit 750
Events per second threshold 5000
Flows per interval 200000
User limit 10
Network object limit 300
Table 4: Restrictions for the default license key for Log Manager installations
Usage Limit
Active log source limit 750
Events per second threshold 5000
User limit 10
Network object limit 300
When you purchase a Extreme Security product, you will receive a License Certificate with instructions for obtaining your permanent license key. These license keys extend the capabilities of your appliance type and define your system operating parameters. You must apply your license keys before your default license expires.
Related Links
Installing a Extreme Security Console or managed host on page 19 Installing RHEL on your own appliance on page 24
You can install the Red Hat Enterprise Linux™ operating system on your own appliance for
use with Extreme Networks Security Analytics.
Installing the Extreme SIEM software on a virtual machine on page 31
After you create your virtual machine, you must install the Extreme Networks Security Analytics software on the virtual machine.
Integrated Management Module
Use Integrated Management Module, which is on the back panel of each appliance type, to manage the serial and Ethernet connectors.
You can configure Integrated Management Module to share an Ethernet port with the Extreme Networks Security Analytics product management interface. However, to reduce the risk of losing the connection when the appliance is restarted, configure Integrated Management Module in dedicated mode.
To configure Integrated Management Module, you must access the system BIOS settings by pressing F1 when the splash screen is displayed. For more information about configuring Integrated Management
Module, see the Integrated Management Module User's Guide on the CD that is shipped with your appliance.
Related Links
Prerequisite hardware accessories and desktop software for Extreme Security installations on page 12 Before you install Extreme Networks Security Analytics products, ensure that you have access to the required hardware accessories and desktop software.
Extreme Security components
Extreme Networks Security Analytics consolidates event data from log sources that are used by devices and applications in your network.
Important
Software versions for all Extreme Networks Security Analytics appliances in a deployment must be same version and fix level. Deployments that use different versions of software are not supported.
Event Processor
Console
Event Collector QFlow
Data Node Data Node
Flow Processor
Data Node Customer router
Event/log sources Event/log sources
Figure 1: Extreme Security deployment example
Extreme Security deployments can include the following components:
QFlow
Collector Passively collects traffic flows from your network through span ports or network taps. The ExtremeNetworks Security QFlow Collector also supports the collection of external flow-based data sources, such as NetFlow.
You can install a QFlow Collector on your own hardware or use one of the QFlow Collector appliances.
Restriction
The component is available only for Extreme SIEM deployments. Extreme
Security Console
Provides the Extreme Security product user interface. The interface delivers real-time event and flow views, reports, offenses, asset information, and administrative functions.
In distributed Extreme Security deployments, use the Extreme Security Console to manage hosts that include other components.
Magistrate A service running on the Extreme Security Console, the Magistrate provides the core processing components. You can add one Magistrate component for each deployment. The Magistrate provides views, reports, alerts, and analysis of network traffic and security events.
The Magistrate component processes events against the custom rules. If an event matches a rule, the Magistrate component generates the response that is configured in the custom rule.
For example, the custom rule might indicate that when an event matches the rule, an offense is created. If there is no match to a custom rule, the Magistrate component uses default rules to process the event. An offense is an alert that is processed by using multiple inputs, individual events, and events that are combined with analyzed behavior and vulnerabilities. The Magistrate component prioritizes the offenses and assigns a magnitude value that is based on several factors, including number of events, severity, relevance, and credibility.
Extreme Security Event Collector
Gathers events from local and remote log sources. Normalizes raw log source events. During this process, the Magistrate component examines the event from the log source and maps the event to a Extreme Security Identifier (QID). Then, the Event Collector bundles identical events to conserve system usage and sends the information to the Event Processor.
Extreme Security Event Processor
Processes events that are collected from one or more Event Collector components. The Event Processor correlates the information from Extreme Security products and distributes the information to the appropriate area, depending on the type of event.
The Event Processor also includes information that is gathered by Extreme Security products to indicate behavioral changes or policy violations for the event. When complete, the Event Processor sends the events to the Magistrate component.
Data Node
Data Nodes enable new and existing Extreme Security deployments to add storage and processing capacity on demand as required.
For more information about each component, see the Administration Guide. Related Links
Troubleshooting problems on page 47 Data Node Overview on page 39
Understand how to use Data Nodes in your Extreme Networks Security Analytics deployment.
Prerequisite hardware accessories and desktop software for
Extreme Security installations
Before you install Extreme Networks Security Analytics products, ensure that you have access to the required hardware accessories and desktop software.
Hardware accessories
Ensure that you have access to the following hardware components:
•
Monitor and keyboard, or a serial console•
Uninterrupted Power Supply (UPS) for all systems that store data, such as Extreme Security Console, Event Processor components, or QFlow Collector components•
Null modem cable if you want to connect the system to a serial console ImportantExtreme Security products support hardware-based Redundant Array of Independent Disks (RAID) implementations, but do not support software-based RAID installations.
Desktop software requirements
Ensure that following applications are installed on all desktop systems that you use to access the Extreme Security product user interface:
•
Java™ Runtime Environment (JRE) version 1.7 or 64-bit Runtime Environment for Java™ V7.0•
Adobe™ Flash version 10.xRelated Links
Installing a Extreme Security Console or managed host on page 19 Installing RHEL on your own appliance on page 24
You can install the Red Hat Enterprise Linux™ operating system on your own appliance for
use with Extreme Networks Security Analytics.
Installing the Extreme SIEM software on a virtual machine on page 31
After you create your virtual machine, you must install the Extreme Networks Security Analytics software on the virtual machine.
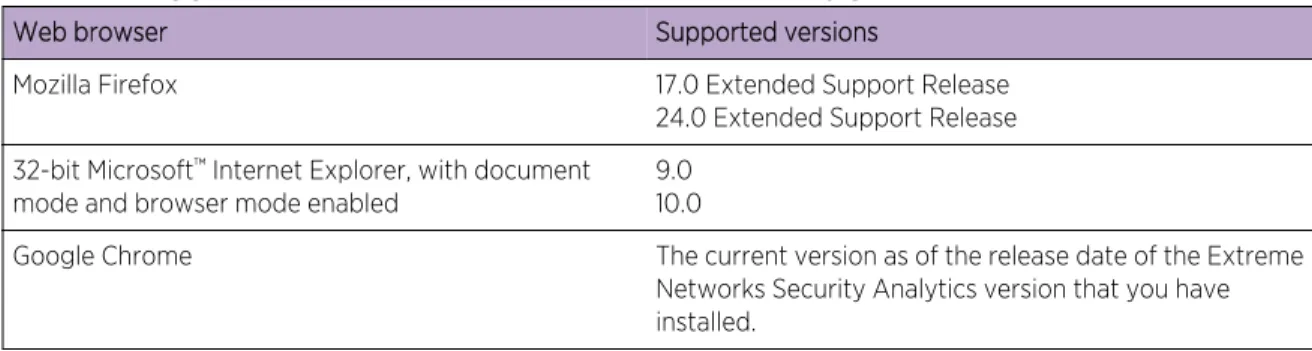
Supported web browsers
For the features in Extreme Networks Security Analytics products to work properly, you must use a supported web browser.
When you access the Extreme Security system, you are prompted for a user name and a password. The user name and password must be configured in advance by the administrator.
The following table lists the supported versions of web browsers.
Table 5: Supported web browsers for Extreme Security products
Web browser Supported versions
Mozilla Firefox 17.0 Extended Support Release 24.0 Extended Support Release 32-bit Microsoft™ Internet Explorer, with document
mode and browser mode enabled
9.0 10.0
Google Chrome The current version as of the release date of the Extreme Networks Security Analytics version that you have installed.
Enabling document mode and browser mode in Internet Explorer
If you use Microsoft™ Internet Explorer to access Extreme Networks Security Analytics products, you
must enable browser mode and document mode.
1 In your Internet Explorer web browser, press F12 to open the Developer Tools window. 2 Click Browser Mode and select the version of your web browser.
3 Click Document Mode.
•
For Internet Explorer V9.0, select Internet Explorer 9 standards.•
For Internet Explorer V10.0, select Internet Explorer 10 standards. Related LinksPrerequisite hardware accessories and desktop software for Extreme Security installations on page 12 Before you install Extreme Networks Security Analytics products, ensure that you have access to the required hardware accessories and desktop software.
USB flash drive installations
You can install Extreme Networks Security Analytics software with a USB flash drive.
USB flash drive installations are full product installations. You cannot use a USB flash drive to upgrade or apply product patches. For information about applying fix packs, see the fix pack Release Notes.
Supported versions
The following appliances or operating systems can be used to create a bootable USB flash drive:
•
A Extreme Security v7.2.1 appliance or later•
A Linux™ system that is installed with Red Hat Enterprise Linux™ 6.5•
Microsoft™ Windows™ Vista•
Microsoft™ Windows™ 7•
Microsoft™ Windows™ 2008•
Microsoft™ Windows™ 2008R2Installation overview
Follow this procedure to install Extreme Security software from a USB flash drive: 1 Create the bootable USB flash drive.
2 Install the software for your Extreme Security appliance. 3 Install any product maintenance releases or fix packs.
See the Release Notes for installation instructions for fix packs and maintenance releases.
Creating a bootable USB flash drive with a Extreme Security appliance
You can use an Extreme Networks Security Analytics V7.2.1 or later appliance to create a bootable USB flash drive that can be used to install Extreme Security software.
Before you can create a bootable USB flash drive from a Extreme Security appliance, you must have access to the following items:
•
A 2 GB USB flash drive•
A Extreme Security V7.2.1 or later ISO image file•
A physical Extreme Security applianceIf your Extreme Security appliance does not have Internet connectivity, you can download the Extreme Security ISO image file to a desktop computer or another Extreme Security appliance with Internet access. You can then copy the ISO file to the Extreme Security appliance where you install the software. When you create a bootable USB flash drive, the contents of the flash drive are deleted.
1 Download the Extreme Security ISO image file.
a Access the Customer Support (www.extremenetworks.com/support/) website.
b Locate the Extreme Networks Security Analytics ISO file that matches the version of the Extreme Security appliance.
c Copy the ISO image file to a /tmp directory on your Extreme Security appliance.
2 Using SSH, log in to your Extreme Security system as the root user.
3 Insert the USB flash drive in the USB port on your Extreme Security system. It might take up to 30 seconds for the system to recognize the USB flash drive. 4 Type the following command to mount the ISO image:
mount -o loop /tmp/<name of the ISO image>.iso /media/cdrom
5 Type the following commend to copy the USB creation script from the mounted ISO to the /tmp
directory.
cp /media/cdrom/post/create-usb-key.py /tmp/
6 Type the following command to start the USB creation script:
/tmp/create-usb-key.py
7 Press Enter.
8 Press 1 and type the path to the ISO file.
For example,
/tmp/<name of the iso image>.iso
9 Press 2 and select the drive that contains your USB flash drive.
10 Press 3 to create your USB key.
The process of writing the ISO image to your USB flash drive takes several minutes to complete. When the ISO is loaded onto the USB flash drive, a confirmation message is displayed.
11 Press q to quit the USB key script.
12 Remove the USB flash drive from your Extreme Security system. 13 To free up space, remove the ISO image file from the /tmp file system.
If your connection to the appliance is a serial connection, see Configuring a USB flash drive for serial-only appliances on page 17.
If your connection to the appliance is keyboard and mouse (VGA), see Installing Extreme Security with a USB flash drive on page 18.
Creating a bootable USB flash drive with Microsoft Windows
You can use a Microsoft Windows® desktop or notebook system to create a bootable USB flash drive
that can be used to install Extreme Security software.
Before you can create a bootable USB flash drive with a Windows system, you must have access to the following items:
•
A 2 GB USB flash drive•
A desktop or notebook system with one the following operating systems:• Windows 7
• Windows Vista
• Windows 2008
• Windows 2008R2
You must download the following files from the Customer Support (www.extremenetworks.com/ support/) website.
•
Extreme Security V7.2.1 or later, Red Hat 64-bit ISO image file•
Create-USB-Install-Key (CUIK) tool.You must download the following files from the Internet.
•
PeaZip Portable 4.8.1•
SYSLINUX 4.06Tip
Search the web for Peazip Portal v4.8.1 and Syslinux to find the download files.
When you create a bootable USB flash drive, the contents of the flash drive are deleted. 1 Extract the Create-USB-Install-Key (CUIK) tool to the c:\cuik directory.
2 Copy the .zip files for PeaZip Portable 4.8.1 and SYSLINUX 4.06 to the cuik\deps folder.
For example, c:\cuik\deps\peazip_portable-4.8.1.WINDOWS.zip and c:\cuik
\deps\syslinux-4.06.zip.
You do not need to extract the .zip files. The files need only to be available in the cuik/deps
directory.
3 Insert the USB flash drive into the USB port on your computer.
4 Verify that the USB flash drive is listed by drive letter and that it is accessible in Microsoft™
Windows™.
5 Right-click on c:\cuik\cuik.exe, select Run as administrator, and press Enter.
6 Press 1, select the Extreme Security ISO file, and click Open.
7 Press 2 and select the number that corresponds to the drive letter assigned to your USB flash drive.
8 Press 3 to create the USB flash drive.
9 Press Enter to confirm that you are aware that the contents of the USB flash drive will be deleted. 10 Type create to create a bootable USB flash drive from the ISO image.
This process takes several minutes.
11 Press Enter, and then type q to exit the Create_USB_Install_Key tool.
12 Safely eject the USB flash drive from your computer.
If your connection to the appliance is a serial connection, see Configuring a USB flash drive for serial-only appliances on page 17.
If your connection to the appliance is keyboard and mouse (VGA), see Installing Extreme Security with a USB flash drive on page 18.
Creating a bootable USB flash drive with Red Hat Linux
™You can use a Linux™ desktop or notebook system with Red Hat v6.3 to create a bootable USB flash
drive that can be used to install Extreme Networks Security Analytics software.
Before you can create a bootable USB flash drive with a Linux™ system, you must have access to the
following items:
•
A 2 GB USB flash drive•
A Extreme Security V7.2.1 or later ISO image file•
A Linux™ system that has the following software installed:• Red Hat 6.5 • Python 6.2 or later
When you create a bootable USB flash drive, the contents of the flash drive are deleted. 1 Download the Extreme Security ISO image file.
a Access the Customer Support (www.extremenetworks.com/support/) website. b Locate the Extreme Networks Security Analytics ISO file.
c Copy the ISO image file to a /tmp directory on your Extreme Security appliance.
2 Update your Linux- based system to include these packages.
•
syslinux•
mtools•
dosfstools•
partedFor information about the specific package manager for your Linux™ system, see the vendor
documentation.
3 Log in to your Extreme Security system as the root user. 4 Insert the USB flash drive in the front USB port on your system.
It might take up to 30 seconds for the system to recognize the USB flash drive. 5 Type the following command to mount the ISO image:
mount -o loop /tmp/<name of the ISO image>.iso /media/cdrom
6 Type the following command to copy the USB creation script from the mounted ISO to the /tmp
directory.
cp /media/cdrom/post/create-usb-key.py /tmp/
7 Type the following command to start the USB creation script:
/tmp/create-usb-key.py
8 Press Enter.
9 Press 1 and type the path to the ISO file.
For example,
/tmp/Rhe664QRadar7_2_4_<build>.iso
10 Press 2 and select the drive that contains your USB flash drive.
11 Press 3 to create your USB key.
The process of writing the ISO image to your USB flash drive takes several minutes to complete. When the ISO is loaded onto the USB flash drive, a confirmation message is displayed.
12 Press q to quit the USB key script.
13 Remove the USB flash drive from your system.
If your connection to the appliance is a serial connection, see Configuring a USB flash drive for serial-only appliances on page 17.
If your connection to the appliance is keyboard and mouse (VGA), see Installing Extreme Security with a USB flash drive on page 18.
Configuring a USB flash drive for serial-only appliances
You must complete an extra configuration step before you can use the bootable USB flash drive to install Extreme Security software on serial-only appliances.
This procedure is not required if you have a keyboard and mouse that is connected to your appliance. 1 Insert the bootable USB flash drive into the USB port of your appliance.
2 On your USB flash drive, locate the syslinux.cfg file.
3 Edit the syslinux configuration file to change the default installation from default linux to default serial.
4 Save the changes to the syslinux configuration file.
You are now ready to install Extreme Security with the USB flash drive.
Installing Extreme Security with a USB flash drive
Follow this procedure to install Extreme Security from a bootable USB flash drive.
You must create the bootable USB flash drive before you can use it to install Extreme Security software.
This procedure provides general guidance on how to use a bootable USB flash drive to install Extreme Security software.
The complete installation process is documented in the product Installation Guide. 1 Install all necessary hardware.
2 Choose one of the following options:
•
Connect a notebook to the serial port at the back of the appliance.•
Connect a keyboard and monitor to their respective ports.3 Insert the bootable USB flash drive into the USB port of your appliance. 4 Restart the appliance.
Most appliances can boot from a USB flash drive by default. If you are installing Extreme Security software on your own hardware, you might have to set the device boot order to prioritize USB. After the appliance starts, the USB flash drive prepares the appliance for installation. This process can take up to an hour to complete.
5 When the Red Hat Enterprise Linux menu is displayed, select one of the following options:
•
If you connected a keyboard and monitor, select Install or upgrade using VGA console.•
If you connected a notebook with a serial connection, select Install or upgrade using Serial console.6 Type SETUP to begin the installation.
7 When the login prompt is displayed, type root to log in to the system as the root user.
The user name is case-sensitive.
8 Press Enter and follow the prompts to install Extreme Security.
The complete installation process is documented in the product Installation Guide.
2
Installing a Extreme Security
Console or managed host
Install Extreme Networks Security Analytics Console or a managed host on the Extreme Security appliance or on your own appliance.
Software versions for all Extreme Networks Security Analytics appliances in a deployment must be same version and fix level. Deployments that use different versions of software is not supported. Ensure that the following requirements are met:
•
The required hardware is installed.•
A keyboard and monitor are connected using the VGA connection.•
The activation key is available.1 Type setup to proceed and log in as root.
2 Accept the End User License Agreement (EULA). Tip
Press the Spacebar key to advance through the document.
3 When you are prompted for the activation key, enter the 24-digit, 4-part, alphanumeric string that you received from Extreme.
The letter I and the number 1 (one) are treated the same. The letter O and the number 0 (zero) are also treated the same.
4 For the type of setup, select normal, Enterprise model, and set up the time. 5 Select the IP address type:
•
Select Yes to auto-configure Extreme Security for IPv6.•
Select No to configure an IP address manually Extreme Security for IPv4 or IPv6. 6 Select the bonded interface set up if required.7 Select the managed interface.
8 In the wizard, enter a fully qualified domain name in the Hostname field. 9 In the IP address field, enter a static IP address, or use the assigned IP address.
Important
If you are configuring this host as a primary host for a high availability (HA) cluster, and you selected Yes for auto-configure, you must record the automatically-generated IP address. The generated IP address is entered during HA configuration.
For more information, see the Extreme Networks SIEM High Availability Guide. 10 If you do not have an email server, enter localhost in the Email server name field.
12 In the Root password field, create a password that meets the following criteria:
•
Contains at least 5 characters•
Contains no spaces•
Can include the following special characters: @, #, ^, and *.13 Follow the instructions in the installation wizard to complete the installation. The installation process might take several minutes.
14 Apply your license key. a Log in to Extreme Security:
https://IP_Address_QRadar
The default user name is admin. The password is the password of the root user account. b Click the login.
c Click the Admin tab.
d In the navigation pane, click System Configuration. e Click the System and License Management icon.
f From the Display list box, select Licenses, and upload you license key. g Select the unallocated license and click Allocate System to License.
h From the list of licenses, select and license, and click Allocate License to System.
15 If you want to add managed hosts, use the deployment editor. For more information about the deployment Editor, see the Extreme Networks SIEM Administration Guide.
3
Extreme Security software
installations on your own appliance
Prerequisites for installing Extreme Security on your own applianceInstalling RHEL on your own appliance
To ensure a successful installation of Extreme Networks Security Analytics on your own appliance, you must install the Red Hat Enterprise Linux™ operating system.
Ensure that your appliance meets the system requirements for Extreme Security deployments.
If you are installing Extreme Security software on your own hardware, you can now purchase the RHEL license as part of the Extreme Security software purchase, and use the RHEL that ships with the Extreme Security software ISO image.
Install RHEL separately if your Extreme Security purchase does not include the RHEL operating system. If your Extreme Security system does include RHEL, you do not need to configure partitions and perform other RHEL preparation. Proceed to Installing a Extreme Security Console or managed host on page 19.
Important
Do not install RPM packages that are not approved by Extreme. Unapproved RPM
installations can cause dependency errors when you upgrade Extreme Security software and can also cause performance issues in your deployment. Do not use YUM to update your operating system or install unapproved software on Extreme Security systems.
Prerequisites for installing Extreme Security on your own
appliance
Before you install the Red Hat Enterprise Linux™ (RHEL) operating system on your own appliance,
ensure that your system meets the system requirements. The following table describes the system requirements:
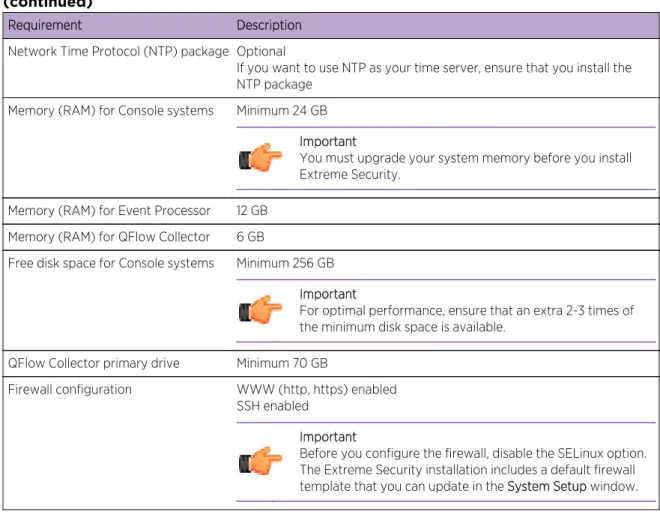
Table 6: System requirements for RHEL installations on your own appliance
Requirement Description
Supported software version Version 6.5
Bit version 64-bit
Table 6: System requirements for RHEL installations on your own appliance (continued)
Requirement Description
Network Time Protocol (NTP) package Optional
If you want to use NTP as your time server, ensure that you install the NTP package
Memory (RAM) for Console systems Minimum 24 GB Important
You must upgrade your system memory before you install Extreme Security.
Memory (RAM) for Event Processor 12 GB Memory (RAM) for QFlow Collector 6 GB
Free disk space for Console systems Minimum 256 GB Important
For optimal performance, ensure that an extra 2-3 times of the minimum disk space is available.
QFlow Collector primary drive Minimum 70 GB
Firewall configuration WWW (http, https) enabled SSH enabled
Important
Before you configure the firewall, disable the SELinux option. The Extreme Security installation includes a default firewall template that you can update in the System Setup window.
Preparing Extreme Security software installations for HA and XFS file systems
As part of configuring high availability (HA), the Extreme Security installer requires a minimal amount of free space in the storage file system, /store/, for replication processes. Space
must be allocated in advance because XFS file systems cannot be reduced in size after they are formatted.
To prepare the XFS partition for use with HA systems, you must do the following tasks: 1 Use the mkdir command to create the following directories:
•
/media/cdrom•
/media/redhat2 Mount the Extreme Security software ISO image by typing the following command:
mount -o loop <path_to_QRadar_iso> /media/cdrom
3 Mount the RedHat Enterprise Linux™ V6.5 software by typing the following command:
/media/cdrom/post/prepare_ha.sh
5 To begin the installation, type the following command:
/media/cdrom/setup
Note
This procedure is not required on your HA secondary host.
Linux
™operating system partition properties for Extreme Security installations
on your own appliance
If you use your own appliance, you can delete and re-create partitions on your Red Hat Enterprise Linux™ operating system rather than modify the default partitions.
Use the values in following table as a guide when you re-create the partitioning on your Red Hat Enterprise Linux™ operating system.
Restriction
Resizing logical volumes by using a logical volume manager (LVM) is not supported.
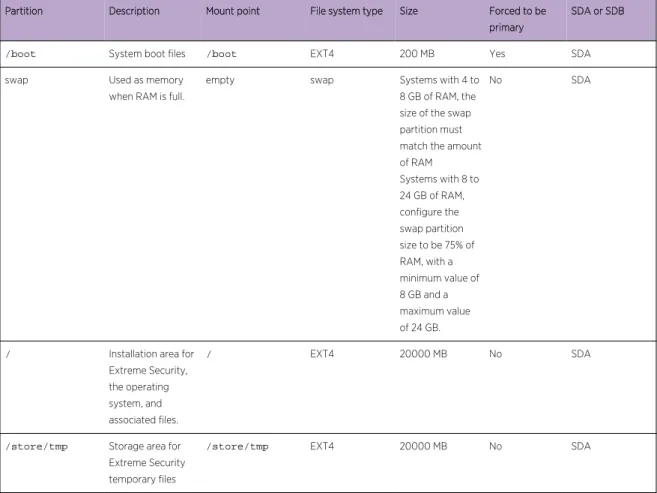
Table 7: Partition guide for RHEL
Partition Description Mount point File system type Size Forced to be primary
SDA or SDB
/boot System boot files /boot EXT4 200 MB Yes SDA
swap Used as memory when RAM is full.
empty swap Systems with 4 to 8 GB of RAM, the size of the swap partition must match the amount of RAM Systems with 8 to 24 GB of RAM, configure the swap partition size to be 75% of RAM, with a minimum value of 8 GB and a maximum value of 24 GB.
No SDA
/ Installation area for
Extreme Security, the operating system, and associated files.
/ EXT4 20000 MB No SDA
/store/tmp Storage area for
Extreme Security temporary files
/store/tmp EXT4 20000 MB No SDA
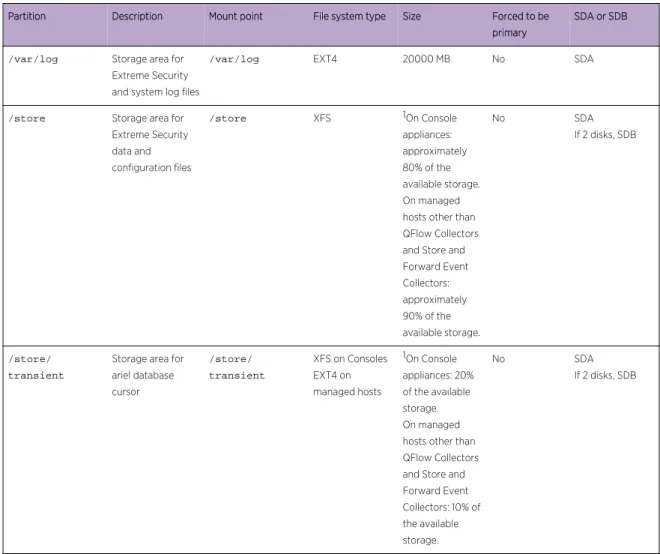
Table 7: Partition guide for RHEL (continued)
Partition Description Mount point File system type Size Forced to be primary
SDA or SDB
/var/log Storage area for
Extreme Security and system log files
/var/log EXT4 20000 MB No SDA
/store Storage area for
Extreme Security data and configuration files
/store XFS 1On Console
appliances: approximately 80% of the available storage. On managed hosts other than QFlow Collectors and Store and Forward Event Collectors: approximately 90% of the available storage.
No SDA
If 2 disks, SDB
/store/ transient
Storage area for ariel database cursor
/store/ transient
XFS on Consoles EXT4 on managed hosts
1On Console appliances: 20% of the available storage. On managed hosts other than QFlow Collectors and Store and Forward Event Collectors: 10% of the available storage.
No SDA
If 2 disks, SDB
1The /store and /store/transient together take 100% of the disk space that remains after you create the first 5 partitions.
Restrictions
Future software upgrades might fail if you reformat any of the following partitions or their sub-partitions:
•
/store•
/store/tmp•
/store/ariel•
/store/transientInstalling RHEL on your own appliance
You can install the Red Hat Enterprise Linux™ operating system on your own appliance for use with
Extreme Networks Security Analytics.
Install RHEL separately if your Extreme Security installation does not include the RHEL operating
1 Copy the Red Hat Enterprise Linux™ 6.5 operating system DVD ISO to one of the following portable
storage devices:
•
Digital Versatile Disk (DVD)•
Bootable USB flash drive2 Insert the portable storage device into your appliance and restart your appliance. 3 From the starting menu, select one of the following options:
•
Select the USB or DVD drive as the boot option.•
To install on a system that supports Extensible Firmware Interface (EFI), you must start the system in legacy mode.4 When prompted, log in to the system as the root user.
5 To prevent an issue with Ethernet interface address naming, on the Welcome page, press the Tab key and at the end of the Vmlinuz initrd=initrd.image line add biosdevname=0.
6 Follow the instructions in the installation wizard to complete the installation: a Select the Basic Storage Devices option.
b When you configure the host name, the Hostname property can include letters, numbers, and hyphens.
c When you configure the network, in the Network Connections window, select System eth0 and then click Edit and select Connect automatically.
d On the IPv4 Settings tab, from the Method list, select Manual. e In the DNS servers field, type a comma-separated list. f Select Create Custom Layout option.
g Configure EXT4 for the file system type for the /, /boot, store/tmp, and /var/log
partitions.
For more information about file system types based on appliance types, see Linux operating system partition properties for Extreme Security installations on your own appliance on page 23. h Reformat the swap partition with a file system type of swap.
i Select Basic Server.
7 When the installation is complete, click Reboot.
After installation, if your onboard network interfaces are named anything other than eth0, eth1, eth2, and eth3, you must rename the network interfaces.
Related Links
Linux operating system partition properties for Extreme Security installations on your own appliance on page 23
If you use your own appliance, you can delete and re-create partitions on your Red Hat Enterprise Linux™ operating system rather than modify the default partitions.
4
Virtual appliance installations for
Extreme SIEM and Log Manager
Overview of supported virtual appliances Creating your virtual machine
Installing the Extreme SIEM software on a virtual machine Adding your virtual appliance to your deployment
You can install Extreme SIEM and Extreme Networks Security Log Manager on a virtual appliance. Ensure that you use a supported virtual appliance that meets the minimum system requirements.
Restriction
Resizing logical volumes by using a logical volume manager (LVM) is not supported. To install a virtual appliance, complete the following tasks in sequence:
•
Create a virtual machine.•
Install Extreme Security software on the virtual machine.•
Add your virtual appliance to the deployment.Overview of supported virtual appliances
A virtual appliance is a Extreme Networks Security Analytics system that consists of Extreme Security software that is installed on a VMWare ESX virtual machine.
A virtual appliance provides the same visibility and function in your virtual network infrastructure that Extreme Security appliances provide in your physical environment.
After you install your virtual appliances, use the deployment editor to add your virtual appliances to your deployment. For more information on how to connect appliances, see the Administration Guide. The following virtual appliances are available:
Extreme SIEM All-in-One Virtual 3199
This virtual appliance is a Extreme SIEM system that can profile network behavior and identify network security threats. The Extreme SIEM All-in-One Virtual 3199 virtual appliance includes an on-board Event Collector and internal storage for events.
The Extreme SIEM All-in-One Virtual 3199 virtual appliance supports the following items:
•
5,000 Events Per Second (EPS), depending on your license•
750 event feeds (more devices can be added to your licensing)•
External flow data sources for NetFlow, sFlow, J-Flow, Packeteer, and Flowlog files•
QFlow Collector and Layer 7 network activity monitoringTo expand the capacity of the Extreme SIEM All-in-One Virtual 3199 beyond the license-based upgrade options, you can add one or more of the Extreme SIEM Event Processor Virtual 1699 or Extreme SIEM Flow Processor Virtual 1799 virtual appliances:
Extreme SIEM Flow Processor Virtual 1799
This virtual appliance is deployed with any Extreme SIEM 3105 or Extreme SIEM 3124 series appliance. The virtual appliance is used to increase storage and includes an on-board Event Processor, and internal storage.
Extreme SIEM Flow Processor Virtual 1799 appliance supports the following items:
•
600,000 flows per interval, depending on traffic types•
2 TB or larger dedicated flow storage•
1,000 network objects•
QFlow Collector and Layer 7 network activity monitoringYou can add Extreme SIEM Flow Processor Virtual 1799 appliances to any Extreme SIEM 3105 or Extreme SIEM 3124 series appliance to increase the storage and performance of your deployment.
Extreme SIEM Event Processor Virtual 1699
This virtual appliance is a dedicated Event Processor that allows you to scale your Extreme SIEM deployment to manage higher EPS rates. The Extreme SIEM Event Processor Virtual 1699 includes an on-board Event Collector, Event Processor, and internal storage for events.
The Extreme SIEM Event Processor Virtual 1699 appliance supports the following items:
•
Up to 10,000 events per second•
2 TB or larger dedicated event storageThe Extreme SIEM Event Processor Virtual 1699 virtual appliance is a distributed Event Processor appliance and requires a connection to any Extreme SIEM 3105 or Extreme SIEM 3124 series appliance.
Data Node Virtual 1400
This virtual appliance provides retention and storage for events and flows. The virtual appliance expands the available data storage of Event Processors and Flow Processors, and also improves search performance.
Size your Data Node Virtual 1400 appliance appropriately, based on the EPS rate and data retention rules of the deployment.
Data retention policies are applied to a Data Node Virtual 1400 appliance in the same way that they are applied to stand-alone Event Processors and Flow Processors. The data retention policies are evaluated
on a node-by-node basis. Criteria, such as free space, is based on the individual Data Node Virtual 1400 appliance and not the cluster as a whole.
Data Nodes can be added to the following appliances:
•
Event Processor (16XX)•
Flow Processor (17XX)•
Event/Flow Processor (18XX)•
All-In-One (2100 and 31XX)To enable all features included in the Data Node Virtual 1400 appliance, install using the 1400 activation key.
VFlow Collector 1299
This virtual appliance provides the same visibility and function in your virtual network infrastructure that a QFlow Collector offers in your physical environment. The QFlow Collector virtual appliance analyzes network behavior and provides Layer 7 visibility within your virtual infrastructure. Network visibility is derived from a direct connection to the virtual switch.
The VFlow Collector 1299 virtual appliance supports a maximum of the following items:
•
10,000 flows per minute•
Three virtual switches, with one more switch that is designated as the management interface. The VFlow Collector 1299 virtual appliance does not support NetFlow.System requirements for virtual appliances
To ensure that Extreme Networks Security Analytics works correctly, ensure that virtual appliance that you use meets the minimum software and hardware requirements.
Before you install your virtual appliance, ensure that the following minimum requirements are met:
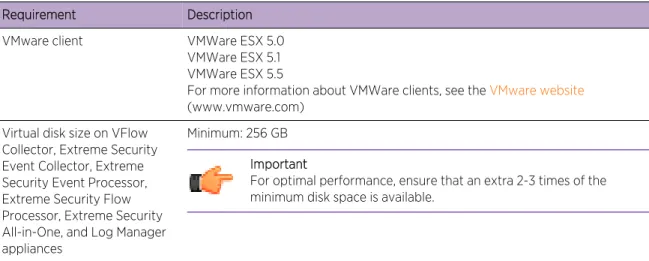
Table 8: Requirements for virtual appliances
Requirement Description VMware client VMWare ESX 5.0
VMWare ESX 5.1 VMWare ESX 5.5
For more information about VMWare clients, see the VMware website
(www.vmware.com) Virtual disk size on VFlow
Collector, Extreme Security Event Collector, Extreme Security Event Processor, Extreme Security Flow Processor, Extreme Security All-in-One, and Log Manager appliances
Minimum: 256 GB Important
For optimal performance, ensure that an extra 2-3 times of the minimum disk space is available.
Table 8: Requirements for virtual appliances (continued)
Requirement Description Virtual disk size for QFlow
Collector appliances
Minimum: 70 GB Virtual disk size for Risk
Manager appliances
Suggested virtual disk size for implementation with up to 10000 configuration sources: 1 TB.
Virtual disk size for Extreme Security Vulnerability Manager processor appliances
50000 IPs - 500 GB 150000 IPs - 750 GB 300000 IPs - 1 TB Virtual disk size for Extreme
Security Vulnerability Manager scanner appliances
20000 IPs - 150 GB
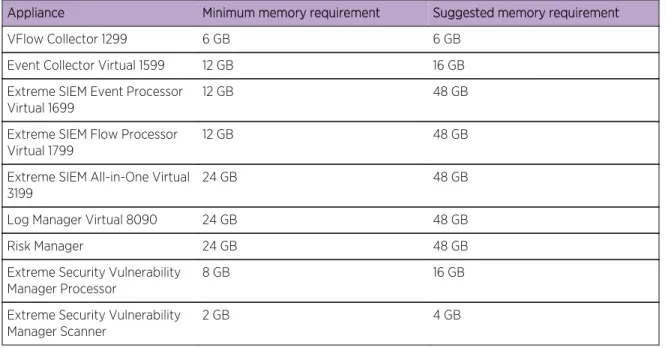
The following table describes the minimum memory requirements for virtual appliances.
Table 9: Minimum and optional memory requirements for Extreme Security virtual appliances
Appliance Minimum memory requirement Suggested memory requirement
VFlow Collector 1299 6 GB 6 GB
Event Collector Virtual 1599 12 GB 16 GB Extreme SIEM Event Processor
Virtual 1699 12 GB 48 GB
Extreme SIEM Flow Processor
Virtual 1799 12 GB 48 GB
Extreme SIEM All-in-One Virtual 3199
24 GB 48 GB
Log Manager Virtual 8090 24 GB 48 GB
Risk Manager 24 GB 48 GB
Extreme Security Vulnerability
Manager Processor 8 GB 16 GB
Extreme Security Vulnerability Manager Scanner
2 GB 4 GB
Related Links
Creating your virtual machine on page 29
To install a virtual appliance, you must first use VMWare ESX to create a virtual machine.
Creating your virtual machine
To install a virtual appliance, you must first use VMWare ESX to create a virtual machine. 1 From the VMware vSphere Client, click File > New > Virtual Machine.
2 Add the Name and Location, and select the Datastore for the new virtual machine.
3 Use the following steps to guide you through the choices:
a In the Configuration pane of the Create New Virtual Machine window, select Custom. b In the Virtual Machine Version pane, select Virtual Machine Version: 7.
c For the Operating System (OS), select Linux, and select Red Hat Enterprise Linux 6 (64-bit). d On the CPUs page, configure the number of virtual processors that you want for the virtual
machine:
The following table provides examples of CPU page settings you can use based on the performance of Extreme Networks Security Analytics appliances.
Table 10: Sample CPU page settings
Number of processors Performance based on Extreme Security appliances 4 Log manager 3190: 2500 events per second or less.
Log manager Event Processor 1690, or SIEM Event Processor 1690: 2500 events per second or less.
All-in-One 3190: 25000 flows per minute or less, 500 events per second or less. Flow Processor 1790: 150,000 flows per minute.
Dedicated Console 3190
8 Log manager 3190: 5000 events per second or less.
Log manager Event Processor 1690, or SIEM Event Processor 1690: 5000 events per second or less.
All-in-One 3190: 50000 flows per minute or less, 1000 events per second or less. Flow Processor 1790: 300,000 flows per minute.
12 All-in-One 3190: 100,000 flows per minute or less, 1000 events per second or less.
16 Log manager Event Processor 1690, or SIEM Event Processor 1690: 20,000 events per second or less.
All-in-One 3190: 200,000 flows per minute or less, 5000 events per second or less.
e In the Memory Size field, type or select 24 or greater.
f Use the following table to configure you network connections.
Table 11: Descriptions for network configuration parameters
Parameter Description
How many NICs do you want to connect You must add at least one Network Interface Controller (NIC)
Adapter VMXNET3
g In the SCSI controller pane, select VMware Paravirtual.
h In the Disk pane, select Create a new virtual disk and use the following table to configure the virtual disk parameters.
Table 12: Settings for the virtual disk size and provisioning policy parameters
Property Option
Capacity 256 or higher (GB)
Disk Provisioning Thin provision
4 On the Ready to Complete page, review the settings and click Finish.
Installing the Extreme SIEM software on a virtual machine
After you create your virtual machine, you must install the Extreme Networks Security Analytics software on the virtual machine.
Ensure that the activation key is readily available.
1 In the left navigation pane of your VMware vSphere Client, select your virtual machine. 2 In the right pane, click the Summary tab.
3 In the Commands pane, click Edit Settings.
4 In the left pane of the Virtual Machine Properties window, click CD/DVD Drive 1. 5 In the Device Type pane, select DataStore ISO File.
6 In the Device Status pane, select the Connect at power on check box. 7 In the Device Type pane, click Browse.
8 In the Browse Datastores window, locate and select the Extreme Security product ISO file, click Open and then click OK.
9 After the Extreme Security product ISO image is installed, right-click your virtual machine and click Power > Power On.
10 Log in to the virtual machine by typing root for the user name.
The user name is case-sensitive.
11 Ensure that the End User License Agreement (EULA) is displayed. Tip
Press the Spacebar key to advance through the document. 12 For the type of setup, select normal.
13 For Extreme Security Console installations, select the Enterprise tuning template. 14 Follow the instructions in the installation wizard to complete the installation.
After you configure the installation parameters, a series of messages are displayed. The installation process might take several minutes.
Related Links
Creating your virtual machine on page 29
To install a virtual appliance, you must first use VMWare ESX to create a virtual machine.
Adding your virtual appliance to your deployment
After the Extreme Networks Security Analytics software is installed, add your virtual appliance to your deployment.
1 Log in to the Extreme Security Console.
2 On the Admin tab, click the Deployment Editor icon.
3 In the Event Components pane on the Event View page, select the virtual appliance component that you want to add.
4 On the first page of the Adding a New Component task assistant, type a unique name for the virtual appliance.
The name that you assign to the virtual appliance can be up to 20 characters in length and can include underscores or hyphens.
5 Complete the steps in the task assistant.
6 From the Deployment Editor menu, click File > Save to staging. 7 On the Admin tab menu, click Deploy Changes.
8 Apply your license key. a Log in to Extreme Security:
https://IP_Address_QRadar
The default user name is admin. The password is the password of the root user account. b Click the login.
c Click the Admin tab.
d In the navigation pane, click System Configuration. e Click the System and License Management icon.
f From the Display list box, select Licenses, and upload you license key. g Select the unallocated license and click Allocate System to License.
h From the list of licenses, select and license, and click Allocate License to System. Related Links
Creating your virtual machine on page 29
To install a virtual appliance, you must first use VMWare ESX to create a virtual machine.
5
Installations from the recovery
partition
Reinstalling from the recovery partition
When you install Extreme Networks Security Analytics products, the installer (ISO image) is copied to the recovery partition. From this partition, you can reinstall Extreme Security products. Your system is restored back to the default configuration. Your current configuration and data files are overwritten When you restart your Extreme Security appliance, an option to reinstall the software is displayed. If you do not respond to the prompt within 5 seconds, the system continues to start as normal. Your configuration and data files are maintained. If you choose the reinstall option, a warning message is displayed and you must confirm that you want to reinstall.
The warning message states that you can retain the data on the appliance. This data includes events and flows. Selecting the retain option backs up the data before the reinstallation, and restores the data after installation completes. If the retain option is not available, the partition where the data resides may not be available, and it is not possible to back up and restore the data. The absence of the retain option can indicate a hard disk failure. Contact Customer Support if the retain option is not available.
Important
The retain option is not available on High-Availability systems. See the Extreme Networks SIEM High Availability Guide for information on recovering High-Availability appliances. Any software upgrades of Extreme Security version 7.2.0 replaces the existing ISO file with the newer version.
These guidelines apply to new Extreme Security version 7.2.0 installations or upgrades from new Extreme Security version 7.0 installations on Extreme Security version 7.0 appliances.
Reinstalling from the recovery partition
You can reinstall Extreme Networks Security Analytics products from the recovery partition. Locate your activation key. The activation key is a 24-digit, four-part, alphanumeric string that you receive from Extreme. You can find the activation key in one of the following locations:
•
Printed on a sticker and physically placed on your appliance.•
Included with the packing slip; all appliances are listed along with their associated keys. If you do not have your activation key, go to the Extreme Networks support page(www.extremenetworks.com/support) to obtain your activation key. You must provide the serial number of the Extreme Security appliance. Software activation keys do not require serial numbers.
If your deployment includes offboard storage solutions, you must disconnect your offboard storage before you reinstall Extreme Security. After you reinstall, you can remount your external storage solutions. For more information on configuring offboard storage, see the Extreme Networks Security Offboard Storage Guide.
1 Restart your Extreme Security appliance and select Factory re-install. 2 Type flatten or retain.
The installer partitions and reformats the hard disk, installs the OS, and then re-installs the Extreme Security product. You must wait for the flatten or retain process to complete. This process can
take up to several minutes. When the process is complete, a confirmation is displayed. 3 Type SETUP.
4 Log in as the root user.
5 Ensure that the End User License Agreement (EULA) is displayed. Tip
Press the Spacebar key to advance through the document.
6 For Extreme Security Console installations, select the Enterprise tuning template. 7 Follow the instructions in the installation wizard to complete the installation. 8 Apply your license key.
a Log in to Extreme Security:
https://IP_Address_QRadar
The default user name is admin. The password is the password of the root user account. b Click the login.
c Click the Admin tab.
d In the navigation pane, click System Configuration. e Click the System and License Management icon.
f From the Display list box, select Licenses, and upload you license key. g Select the unallocated license and click Allocate System to License.
h From the list of licenses, select and license, and click Allocate License to System.
6
Overview of Extreme Security
deployment in a cloud environment
Configuring server endpoints for cloud installations Configuring client networks for cloud installations Configuring a member for cloud installations
You can install instances of Extreme Networks Security Analytics software on a cloud server that is hosted by either Amazon Web Service or SoftLayer. To establish secure communications between on-premises and cloud instances of Extreme Security, you must configure a VPN connection. You can configure an OpenVPN connection, or use another mechanism, such as a cloud provider VPN infrastructure.
Important
Ensure that the following requirements are met to avoid compromised security data:
•
Set a strong root password.•
Allow only specific connections to ports 443 (https), 22 (ssh), 10000 (webmin), and 1194 (UDP, TCP for OpenVPN).Configure Extreme Security for the cloud in the following order: 1 Install Extreme Security on cloud instances:
•
AWS: for more information, see www.ibm.com/support/docview.wss?uid=swg27044417.•
SoftLayer: for more information, see www.ibm.com/support/docview.wss?uid=swg27044327. 2 For cloud and on-premises hosts, define the role:•
The server endpoint of a VPN tunnel.•
The client endpoint of a VPN tunnel.•
The member host that routes traffic that is destined for the VPN tunnel through the local VPN endpoint.•
None, if a host that has no need to communicate with hosts on the other side of the VPN tunnel. 3 Confirm that the Extreme Security firewall settings protect your network security.Configuring server endpoints for cloud installations
Use OpenVPN to configure a server endpoint on the cloud server when the Extreme Networks Security Analytics console is on-premises, with more processing and storage nodes are installed in the cloud. A server endpoint requires the following items:
•
A main OpenVPN configuration file.•
A configuration file for each client that records routing instructions for each client that can connect.•
Additional iptables rules that allow forwarding across the tunnel.•
IP forwarding enabled in the kernel.•
A custom certificate authority (CA) to issue the certificates that are used to authenticate servers and clients.•
A server certificate that is issued by the local CA.For more information about the OpenVPN tool options, enter -h.
1 To specify the server endpoint, type the following command to define the server endpoint in the cloud.
/opt/qradar/bin/vpntool server server_host_IP_address
network_address_behind_VPN
Example
/opt/qradar/bin/vpntool server 1.2.3.4 5.6.7.8/24
If your network requires TCP rather than UDP mode on your clients and servers, type the following command with your required IP addresses:
/opt/qradar/bin/vpntool server server_host_IP_address network_address_behind_VPN --tcp
After you define the server endpoint, VPNtool Server completes the following tasks:
•
If the local certificate authority is not established, the CA is initialized and the CA key and certificate created.•
The local CA creates a key and certificate for use by this server endpoint.•
Configuration properties are written to the VPN configuration file. 2 To build and deploy the configuration, type the following command:/opt/qradar/bin/vpntool deploy
After you build and deploy the configuration, VPNtool Server completes the following tasks::
•
The OpenVPN server configuration is generated and copied into the /etc/openvpn directory.•
The CA certificate, and the server key and certificate, are copied into the standard location in /etc/openvpn/pki.•
IPtables rules are constructed and reloaded.•
IP forwarding is enabled and made persistent by updating the /etc/sysctl.conf file.3 To start the server, type the following command:
/opt/qradar/bin/enable --now
Entering /opt/qradar/bin/enable --now creates the persistent enabled state, and
automatically starts OpenVPN on system restart.
Configuring client networks for cloud installations
In on premises environments, use OpenVPN to configure a client network that communicates with endpoints that are in the cloud.
A client requires the following items:
•
A main OpenVPN configuration file.•
Extra iptables rules to allow forwarding across the tunnel.•
IP forwarding is enabled in the kernel.•
A client certificate that is issued by the local CA.1 On the server, inform the server of the new client, type the following command:
/opt/qradar/bin/vpntool addclient Console name, role,
or IP 1.2.3.4/24
Informing the server of the client includes the following tasks:
•
The CA certificate is copied to a known location.•
The client key and certificate from the PKCS#12 file are extracted and copied to known locations.•
Client configuration properties are written to the VPN configuration file. 2 Deploy and restart the server by using the following command:/opt/qradar/bin/vpntool deploy service openvpn restart
3 Copy the generated client credentials file and the CA file to the Extreme Security host that is used for this client endpoint.
Example
scp root@ server_IP_address :/opt/qradar/conf
/vpn/pki/ca.crt /root/ca.crtscp root@ server_IP_address :/opt/qradar/conf/vpn/pki/Console.p12 /root/Console.p12
4 On the client, configure the host as a VPN client:
/opt/qradar/bin/vpntool client server_IP_address
ca.crt client.pk12
If your network requires that you not configure UDP mode on your clients and servers, you can use TCP.
/opt/qradar/bin/vpntool client server_IP_address /root/ca.crt /root/Console.p12 --tcp