Attunity RepliWeb
SSL Guide
Software Version 5.2
June 25, 2012
RepliWeb, Inc., 6441 Lyons Road, Coconut Creek, FL 33073 Tel: (954) 946-2274, Fax: (954) 337-6424
Attunity RepliWeb SSL Guide
ii
© 2012 Attunity Ltd. All rights reserved.
The information in this manual has been compiled with care, but Attunity Ltd. makes no warranties as to its accuracy or completeness. The software described herein may be changed or enhanced from time to time. This information does not constitute a commitment or representation by Attunity and is subject to change without notice. The software described in this document is furnished under license and may be used and/or copied only in accordance with the terms of this license and the End User License Agreement.
No part of this manual may be reproduced or transmitted, in any form, by any means (electronic, photocopying, recording or otherwise) without the express written consent of Attunity Ltd.
Windows, Windows XP and Windows Vista are trademarks of Microsoft Corporation in the US and/or other countries. UNIX is a registered trademark of Bell Laboratories licensed to X/OPEN. Any other product or company names referred to in this document may be the trademarks of their respective owners.
Please direct correspondence or inquiries to: RepliWeb, Inc.
6441 Lyons Road
Coconut Creek, Florida 33073 USA
Telephone: (954) 946-2274
Fax: (954) 337-6424
Sales & General Information: [email protected]
Documentation: [email protected]
Technical Support: http://support.repliweb.com
Attunity RepliWeb SSL Guide iii
Table of Contents
1. Overview ... 1 2. SSL Introduction ... 3 Confidentiality ... 3 Integrity ... 3 Authentication ... 3 3. SSL Terminology ... 4Public Key Cryptography ... 4
Digital Certificates ... 4 Certificate Authority ... 5 SSL Handshake ... 5 4. SSL in R-1 ... 6 GUI ... 6 CLI ... 8 Using R-1 Defaults ... 9 5. Common SSL Configurations ... 10
Center Authenticating the Console ... 10
Console Authentication ... 10
Mutual Center-Edge Authentication ... 14
Center (Client) Settings ... 15
Edge (Server) Settings ... 16
Center Authenticating the Consoles and Edges ... 18
Console-Center Communication ... 19
Center-Edge Communication ... 22
6. Multiple Trusted Certificate Authorities ... 25
Using a Multiple Approved CA File ... 25
Attunity RepliWeb SSL Guide
1
1. Overview
R-1 security mechanisms allow using Internet and Internet-based VPNs and WANs as efficient distribution channels without the concerns of data loss, pilferage or malicious impersonation. R-1 uses SSL end-to-end, making integration with other systems seamless.
R-1 offers the following SSL features:
Three levels of certificate authentication: Certificate level, Common Name, None
A choice of strong encryption ciphers
Private key-phrase protection
Note: SSL is enabled for jobs using WAN or LFA transport engines. When using SSL, all traffic in the job, including snapshot generation and file transfer, is encrypted.
SSL communication is supported both for Console Center communication and Center
Edge communication.
In a typical SSL session, the Server presents its digital certificate to the Client and the Client, in turn, presents the Server with its own digital certificate. To successfully negotiate an SSL connection, the Client and the Server must authenticate each other. This type of authentication is referred to as mutual authentication.
Both the Client and the Server are required to have digital certificates from trusted certificate authorities. When using mutual authentication, both the Server and the Client need private keys and digital certificates that represent their identity.
This type of authentication restricts access to trusted clients only.
Figure 1 – SSL Topology
Using R-1 for Console Center with SSL communication, the Console is the Client and the
Center is the Server. For CenterEdge SSL communication (during a replication process), the
Attunity RepliWeb SSL Guide Overview
2
Note: Using SSL connection for both Console Center and CenterEdge, the Center needs to be configured twice: once as an SSL Server and once as an SSL Client.
Attunity RepliWeb SSL Guide
3
2. SSL Introduction
R-1 5.2 SSL protocol protects your data from tampering and provides the following security features:
Confidentiality
Integrity
Authentication
Confidentiality
Confidentiality is the ability to keep communications secret from parties other than the intended recipient. It is achieved by encrypting data with strong algorithms. The SSL protocol provides a secure mechanism that enables two communicating parties to negotiate the strongest algorithm they both support and to agree on the key with which to encrypt the data.
Integrity
Integrity is a guarantee that the transferred data has not been modified in transit. The same handshake mechanism, which allows the two parties to agree on algorithms and keys, also allows the two ends of an SSL connection to establish shared data integrity secrets, which are used to ensure that when modified data is received, it will be detected.
Authentication
Authentication is the ability to ascertain with whom you are speaking. By using digital
certificates and public key security, R-1 client and server applications can each be authenticated to the other. This allows the two parties to be certain they are communicating with someone they trust.
The SSL protocol provides secure connections by allowing two applications connecting over a network connection to authenticate the other's identity and by encrypting the data exchanged between the applications. When using the SSL protocol, the target always authenticates itself to the initiator. Encryption makes data transmitted over the network intelligible only to the intended recipient. An SSL connection begins with a handshake during which the applications exchange digital certificates, agree on the encryption algorithms to use, and generate
encryption keys used for the remainder of the session.
Attunity RepliWeb SSL Guide
4
3. SSL Terminology
The following terms and concepts are used in this document.Public Key Cryptography
Public-key cryptography - also known as asymmetric cryptography - uses a pair of keys that work together to fulfill one or both of the following functions:
Encrypt and decrypt information
Sign and verify digital signatures
One key is freely distributed (the public key) while the other key (the private key) is kept secret. The sender uses the public key to encrypt messages to the recipient. The recipient uses his or her private key to decrypt messages from the sender. Similarly, the sender may use his or her private key to “sign” a digital signature. The recipient uses his or her public key to verify the authenticity of the sender’s signature. The private key will only work with its corresponding public key.
Digital Certificates
Digital certificates are electronic documents used to uniquely identify entities over networks such as the Internet. A digital certificate securely binds the client/server identity, as verified by a trusted third party known as a certificate authority (CA), to a particular public key. The
combination of the public key and the private key provides a unique identity to the owner of the digital certificate.
Digital certificates provide confirmation that a specific public key does in fact belong to the sender. A recipient of a digital certificate can use the public key contained in the digital
certificate to verify that a digital signature was created with the corresponding private key. If the verification is successful, the recipient can be certain that the corresponding private key belongs to the subject named in the digital certificate, and that the digital signature was created by that particular subject.
A digital certificate typically includes a variety of information, such as:
The name of the subject (holder, owner) and other identification information required
to uniquely identifying the subject, such as the hostname of the node using the digital certificate (in the Common Name field), or an individual's email address.
The subject's public key.
The name of the certificate authority that issued the digital certificate.
Attunity RepliWeb SSL Guide SSL Terminology
5
The validity period (or lifetime) of the digital certificate (defined by a start date and an end date).
Certificate Authority
Digital certificates are issued by a Certificate Authority (CA). Any trusted third-party organization or company that is willing to vouch for the identities of those to whom it issues digital
certificates and public keys can be a certificate authority. When a certificate authority creates a digital certificate, the certificate authority signs it with its private key, to ensure the detection of tampering. The certificate authority then returns the signed digital certificate to the requesting subject.
The subject can verify the digital signature of the issuing certificate authority by using the public key of the certificate authority. The certificate authority makes its public key available by providing a digital certificate issued from a higher-level certificate authority attesting to the validity of the public key of the lower-level certificate authority.
Thus, digital signatures establish the identities of communicating entities, but a digital signature can be trusted only to the extent that the public key for verifying the digital signature can be trusted.
SSL Handshake
The SSL handshake establishes the encrypted connection. This is accomplished in part by mutual authentication whereby the client authenticates itself to the server and the server authenticates itself to the client. Authentication involves digital certificates, which employ public-key
encryption techniques.
During the SSL handshake, the server and client exchange a symmetric session key. The session key itself is encrypted using public-key techniques, so only the intended recipient can decrypt it.
Attunity RepliWeb SSL Guide
6
4. SSL in R-1
R-1 uses OpenSSL to enable Encryption and Authentication for:
Console Center communication effective for R-1 Console Center, RTM
Console RTM Organizer and RTM Console RTM Host.
CenterEdge communication effective for WAN and LFA transfer replication and distribution jobs.
SSL sessions can be configured using RTM GUI and Manage / Center or Manage / Console SSL
Settings on the Console GUI user interfaces.
Note: For maximal data-security, although the key-phrase is encrypted at all times, it is
recommended to set SSL configuration using a local Console on each of the Centers and Edges, and not over the network.
GUI
Note: Only users with Administrative Group Privileges on the Center may configure SSL settings. To connect to a UNIX Center, use root or root-like users (UID and GID 0); to connect to a Windows Center, use a member of the Administrator group on the Center.
To access the SSL window:
Attunity RepliWeb SSL Guide SSL in R-1
7
Note: Use the default certificate and key provided with R-1 to configure and test SSL
communication. However, for production environment, it is recommended to use certificates provided by a Certificate Authority (CA).
To configure R-1’s SSL security settings: 1. Select the required sub-tab:
o Console (Client) – Configure the Client in a Console Center communication.
o Center, RTM Organizer/Host (Server) – Configure the Server in a Console
Center communication.
o Center (Client) – Configure the Client in a Center Edge replication process communication.
o Edge (Server) – Configure the Server in a Center Edge replication process communication.
2. In the Local Certificate section, determine how the machine being configured introduces itself in the Authentication stage.
o Select the Use Files checkbox to specify the Certificate and Key file names to be
used. If unselected, the default certificate, private key and private key phrase will be used.
i. In the Certificate field, specify the full path to the CA Certificate file. ii. In the Private Key field, specify the full path to the private key file.
iii. In the Private Key Phrase field, specify the password to read the private key
file. The key phrase is kept encrypted and hidden.
Note:Private Key Phrase is kept encrypted for each Windows Login user separately.
3. In the Other Side Authentication section, specify how the machine being configured verifies the other side in the Authentication stage.
a. From the Authenticate using drop-down list,select the authentication type that will take place:
Certificate – Authenticate the other end using a certificate
Certificate + Name – Authenticate the other end by using a certificate and the Common name written in certificate.
o Server/Client Common Name –When using authentication by name – this name will be expected in the other end’s certificate.
None –Do not authenticate the other end. The SSL session will use encryption but not authentication.
This option is only available in Console Center communication.
Note: Authenticating the other side using Certificate or Certificate + Name, the other side has to have the Local certificate/Use Files checkbox selected.
Attunity RepliWeb SSL Guide SSL in R-1
8
b. Select the Use Approved CA checkbox to change the certificate being used.If unselected, the default certificate, private key and private key phrase will be used. If selected, the following will be used:
i. In the CA File field, specify the full path to a file containing trusted certificate authorities information.
ii. In the CA Dir field, specify the full path to a directory containing trusted certificate authorities files.
4. From the Encryption section, select the encryption type to use during the SSL session. Options are:
o DES – DES (Data Encryption Standard) applies a 56-bit key to each 64-bit block of
data.
o 3DES – Triple DES.
o RC2 – RC2 (Rivet’s Cipher 2) is a variable key-size block cipher.
o RC4 – RC4 is a variable key-size block cipher with a key size range of 40 to 128 bits. It is faster than DES and is exportable with a key size of 40 bits.
o Use Server Defaults – The encryption type is selected by the server automatically. Note: Encryption can be set on Client side only.
CLI
Using the CLI, use the appropriate qualifier to specify SSL usage:
Console Center communication:
-center_ssl|-nocenter_ssl
Specify to R-1 that all communication to the Center will be over SSL.
CenterEdge communication effective for WAN transfer replication and distribution jobs.
-ssl|-nossl qualifier in the submit command.
Specify to R-1 that all communication with the Edges will be over SSL.
Attunity RepliWeb SSL Guide SSL in R-1
9
Using R-1 Defaults
Sample key files and certificates are located in the following default directories:
Windows: ~\RepliWeb\RDS\Config\SSL
UNIX: ~/repliweb/rds/config/SSL/
The files are:
Client certificate rds_client_cert.pem
Client private key file rds_client_key.pem
Server certificate rds_server_cert.pem
Server private key file rds_server_key.pem
Trusted CA (RepliWeb) certificate trusted_ca_cert.pem
Key Phrases for default private keys are:
Client private key phrase rdsclient
Server private key phrase rdsserver
Common Names:
Client Common Name RDSClient
Server Common Name RDSServer
Default Certificates directory is located in:
Windows: ~\RepliWeb\RDS\Config\SSL\Cert
UNIX: ~/repliweb/rds/config/SSL/cert
These directories may be used when using the Multiple Approved CA Path option. They contain the files (Windows) and Links (UNIX) required for this option.
Attunity RepliWeb SSL Guide
10
5. Common SSL
Configurations
This chapter explains in detail what properties need to be set for common SSL configurations.
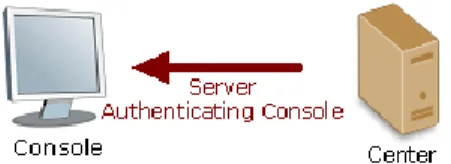
Center Authenticating the Console
In this configuration, the Center authenticates all Consoles connecting to it.
Figure 2 – Center Authenticating Console & Edges The configuration steps are as follows:
1. Set the Console and Center SSL for Console Authentication.
2. Test the Console connection using SSL by opening the Console GUI, and connecting to the Center.
Console Authentication
Set the Console and Center SSL for Console Authentication, and then verify settings by connecting to the Center using the Console GUI.
Console (Client) Settings
To configure SSL for the Client:
1. On the Console machine, create a directory which will include the following files:
o Certificate file identifying the Console (Client).
o Private Key file that matches the Certificate file.
2. Using the Console GUI, select: Manage / Console SSL Settings. This option can be performed while the Console is not connected to any Center (offline).
Attunity RepliWeb SSL Guide Common SSL Configurations
11
If connected to a Center, using the Console GUI, select Manage / Center / SSL tab: To configure the machine the Console is currently running on:
Connect to localhost.
To configure a remote Console:
Connect to the remote Center on that machine
3. To set the Console (Client) to be authenticated using Certificate and Private Key Phrase:
a. In the Local Certificate area, select the Use Alternate Files checkbox. b. Browse to the client Certificate and Private Key files copied earlier. c. Enter the Private Key Phrase.
Using the default R-1 files, the key phrase is: rdsclient
4. In the Other Side Authentication area, perform the following steps. The Console will not authenticate the Center. Therefore, fields are left blank.
a. From the Authenticate using drop-down list, select None. b. Leave the Use Approved CA checkbox unselected.
5. From the Encryption area’s SSL Session Cypher drop-down list, select any option. 6. Click Save.
Attunity RepliWeb SSL Guide Common SSL Configurations
12
Center RTM Organizer/Host
(Server) Settings
Note: For maximal data-security, although the key-phrase is encrypted at all times, it is recommended to set SSL configuration using a local Console on the Center, and not over the network.
To configure SSL for the Center RTM Organizer/Host (Server):
1. On the Center machine, create a directory which will include the trusted Certificate Authority file.
2. Using the Console GUI, connect to the Center and select the menu option Manage / Center / SSL Tab.
3. Select the Center RTM Organizer/Host (Server) sub-tab.
a. In the Local Certificate area, leave the Use Alternate Files checkbox unselected. The Center will not be authenticated. Therefore, Center Authentication fields are left blank.
b. In the Other Side Authentication area, perform the following steps. The Console (Client) will be authenticated using these settings.
i. From the Authenticate using drop-down list, select Certificate + Name and
enter the Client Common Name.
Using the default R-1 files, the Client Common Name is: RDSClient
ii. Select the Use Approved CA checkbox and browse to the Trusted CA file.
Attunity RepliWeb SSL Guide Common SSL Configurations
13
Testing Console
Center Communication
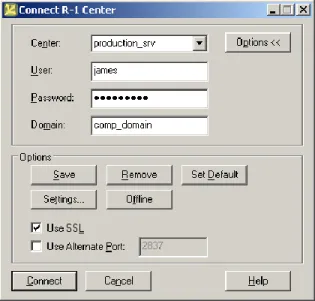
Test the SSL settings defined so far. Using the Console GUI, connect to the Center using SSL.
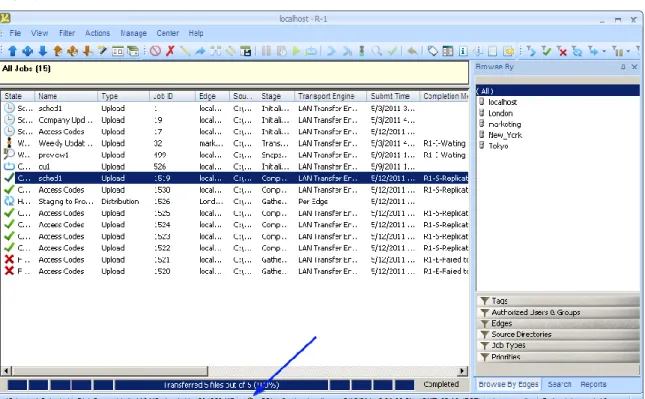
Figure 3 – Connecting using SSL
When the connection is approved and the main Console window is opened, the SSL lock is displayed at the Center Status bar at the bottom of the screen.
Attunity RepliWeb SSL Guide Common SSL Configurations
14
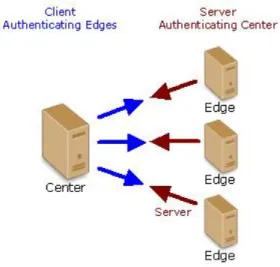
Mutual Center-Edge Authentication
In this configuration, the Center and Edge authenticate each other during Replication and Distribution jobs.
Figure 5 – Mutual Authentication
The configuration steps are as follows:
1. Set the Center SSL for Edge Authentication. 2. Set the Edge SSL for Center Authentication.
Attunity RepliWeb SSL Guide Common SSL Configurations
15
Center (Client) Settings
Note: For maximal data-security, although the key-phrase is encrypted at all times, it is recommended to set SSL configuration using a local Console on the Centers, and not over the network.
To configure SSL for the Center (Client):
1. On the Center machine, create a directory which will include the following files:
o Trusted Certificate Authority file.
o Certificate file identifying the Center (Client).
o Private Key file that matches the Certificate file.
2. Using the Console GUI, connect to the Center and select the menu option Manage / Center / SSL Tab.
3. Select the Center (Client) sub-tab and configure the Local Certificate and Other Side Authentication.
a. In the Local Certificate area, the Center (Client) will be authenticated using these settings.
i. Select the Use Alternate Files checkbox.
ii. Browse to the client Certificate and Private Key files copied earlier.
iii. Enter the Private Key Phrase.
Using the default R-1 files, the key phrase is: rdsclient
b. In the Other Side Authentication area, perform the following steps. The Edge (Server) will be authenticated using these settings.
i. From the Authenticate using drop-down list, select Certificate + Name.
ii. Enter the Client Common Name.
Using the default R-1 files, the Client Common Name is: RDSServer
iii. Select the Use Approved CA checkbox and browse to the Trusted CA file.
4. From the Encryption area’s SSL Session Cipher drop-down list, select any option. 5. Click Save.
Attunity RepliWeb SSL Guide Common SSL Configurations
16
Edge (Server) Settings
Note: Using an Edge only machine, only the RTM Console can be used to Manage SSL settings for that Edge. If the Edge machine also has the Center component installed, then SSL settings for that Edge can be performed through the R-1 Console GUI connected to the Center.
Note: For maximal data-security, although the key-phrase is encrypted at all times, it is
recommended to set SSL configuration using a local Console GUI on the Edge, and not over the network, using the RTM Console.
To configure SSL for the Edge (Server):
1. On the Edge machine, create a directory which will include the following files:
o Trusted Certificate Authority file.
o Certificate file identifying the Center (Client).
o Private Key file that matches the Certificate file.
2. Using the RTM Console, select the Edge and click the Manage menu option. 3. Select the Edge (Server) sub-tab and configure the Local Certificate and Other Side
Authentication.
a. In the Local Certificate area, perform the following steps. The Edge (Server) will be authenticated using these settings.
i. Select the Use Alternate Files checkbox.
ii. Browse to the server Certificate and Private Key files copied earlier.
iii. Enter the Private Key Phrase.
Using the default R-1 files, the key phrase is: rdsserver
b. In the Other Side Authentication area, perform the following steps. The Center (Client) will be authenticated using these settings.
i. From the Authenticate using drop-down list, select Certificate + Name.
ii. Enter the Client Common Name.
Using the default R-1 files, the Client Common Name is: RDSClient
iii. Select the Use Approved CA checkbox and browse to the Trusted CA file.
Attunity RepliWeb SSL Guide Common SSL Configurations
17
Testing Center
Edge Communication
Test the SSL settings defined so far.
To test communication between the Center and Edge: 1. Using the Console GUI, connect to the Center.
2. Define a Replication or Distribution job from the Center to one or more Edges.
3. In the Performance Tab, or TransferTab if you are defining a Distribution job, select to use WAN or LFA transport engines and select the Use SSL option. Make sure the job actually transfers data.
Note: SSL is not available when using the LAN transport engine.
The General Report should indicate that SSL was used during the transfer stage:
…
12:27:18 Starting files transfer to target Using WAN Transfer Engine
Using SSL authentication and encryption …
Attunity RepliWeb SSL Guide Common SSL Configurations
18
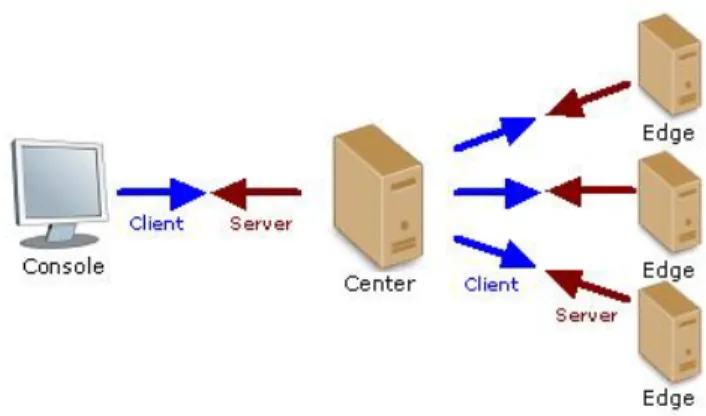
Center Authenticating the Consoles and Edges
In this configuration the Center authenticates all Consoles and all Edges connecting to it, and the Console and Edges authenticate the Center.
The Center plays a duplicate role here, once as a Server (in a Console – Center communication), and once as a Client (in a Center – Edge communication).
Figure 6 – Center Authenticating Console & Edges; Console & Edges Authenticating the Center The configuration steps are as follows:
1. Set the Console and Center SSL for Console-Center Authentication.
2. Test the Console connection using SSL by opening the Console GUI, and connecting to the Center.
3. Set the Center and Edge SSL for Center-Edge Authentication.
4. Test the Edge communication using SSL by running an R-1 job using the WAN transfer engine.
Attunity RepliWeb SSL Guide Common SSL Configurations
19
Console-Center Communication
Set Console and Center SSL properties, and then verify settings by connecting to the Center using the Console GUI.
Console (Client) Settings
To configure SSL for the Console (Client):
1. On the Console machine, create a directory which would include the following files:
o Trusted Certificate Authority file.
o Certificate file identifying the Console (Client).
o Private Key file that matches the Certificate file.
2. Using the Console GUI, select the menu option Manage / Console SSL Settings. This option can be performed while the Console is not connected to any Center (offline).
If connected to a Center, using the Console GUI, select the menu option Manage /
Center / SSL tab:
To configure the machine the Console is currently running on:
Connect to localhost.
To configure a remote Console:
Connect to the remote Center on that machine
3. In the Local Certificate area, perform the following steps. The Console (Client) will be authenticated using these settings.
a. Select the Use Alternate Files checkbox and browse to the client Certificate and Private Key files copied earlier.
b. Enter the Private Key Phrase.
Using the default R-1 files, the key phrase is: rdsclient
4. In the Other Side Authentication area, perform the following steps. The Console will not authenticate the Center, hence fields are left blank.
a. From the Authenticate using drop-down list, select Certificate + Name. b. Enter the Server Common Name.
Using the default R-1 files, the Client Common Name is: RDSServer
c. Select the Use Approved CA checkbox and browse to the Trusted CA file. 5. From the Encryption area’s SSL Session Cipher drop-down list, select any option. 6. Click Save.
Attunity RepliWeb SSL Guide Common SSL Configurations
20
Center Settings (Server)
Note: For maximal data-security, although the key-phrase is encrypted at all times, it is recommended to set SSL configuration using a local Console on the Center, and not over the network.
To configure SSL for the Center (Server):
1. On the Center machine, create a directory which would include the following files:
o Trusted CertificateAuthority file.
o Certificate file identifying the Center (Server).
o PrivateKey file that matches the Certificate file.
2. Using the Console GUI, connect to the Center, and select the option: Manage / Center / SSL Tab.
3. Select the Center (Server) sub-tab and configure the Local Certificate and Other Side Authentication.
a. In the Local Certificate area, leave the Use Alternate Files checkbox unselected. The Center will not be authenticated, hence Center Authentication fields are left blank.
b. In the Other Side Authentication area, perform the following steps. The Console (Client) will be authenticated using these settings.
i. From the Authenticate using drop-down list, select Certificate + Name.
ii. Enter the Client Common Name.
Using the default R-1 files, the Client Common Name is: RDSClient
iii. Select the Use Approved CA checkbox and browse to the Trusted CA file.
Attunity RepliWeb SSL Guide Common SSL Configurations
21
Testing Console
Center Communication
Test the SSL settings defined so far. Using the Console GUI, connect to the Center using SSL.
Figure 7 – Connecting using SSL
When the connection is approved and the main Console window is opened, the SSL lock is displayed at the Center Status bar at the bottom of the screen.
Attunity RepliWeb SSL Guide Common SSL Configurations
22
Center-Edge Communication
Set Center and Edge SSL properties, and then verify settings by running a replication job from the Center to the Edge using WAN Transfer Engine with SSL.
Center Settings (Client)
Note: For maximal data-security, although the key-phrase is encrypted at all times, it is recommended to set SSL configuration using a local Console on the Centers, and not over the network.
To configure SSL for the Center (Client):
1. On the Center machine, create a directory which would include the following files:
o Trusted Certificate Authority file.
o Certificate file identifying the Center (Client).
o Private Key file that matches the Certificate file.
2. Using the Console GUI, connect to the Center, and select the menu option Manage / Center / SSL Tab.
3. Select the Center (Client) sub-tab and configure the Local Certificate and Other Side Authentication.
a. In the Local Certificate area, perform the following steps. The Center (Client) will be authenticated using these settings.
i. Select Use Alternate Files
ii. Browse to the client Certificate and Private Key files copied earlier.
iii. Enter Private Key Phrase.
Using the default R-1 files, the key phrase is: rdsclient
b. In the Other Side Authentication area, perform the following steps. The Edge (Server) will be authenticated using these settings.
i. From the Authenticate using drop-down list, select Certificate + Name.
ii. Enter the Client Common Name.
Using the default R-1 files, the Client Common Name is: rdsclient
iii. Select the Use Approved CA checkbox and browse to the Trusted CA file.
4. From the Encryption area’s SSL Session Cipher drop-down list, select any option. 5. Click Save.
Attunity RepliWeb SSL Guide Common SSL Configurations
23
Edge (Server) Settings
Note: Using an Edge only machine, only the RTM Console can be used to Manage SSL settings for that Edge. If the Edge machine also has the Center component installed, then SSL settings for that Edge can be performed through the R-1 Console GUI connected to the Center.
Note: For maximal data-security, although the key-phrase is encrypted at all times, it is
recommended to set SSL configuration using a local Console GUI on the Edge, and not over the network, using the RTM Console.
To configure SSL for the Edge (Server):
1. On the Edge machine, create a directory which would include the following files:
o Trusted Certificate Authority file.
o Certificate file identifying the Edge (Server).
o Private Key file that matches the Certificate file.
2. Using the RTM Console, select the Edge and Click on the Manage menu option. 3. Select Edge (Server) sub-tab
a. In the Local Certificate section, perform the following steps. The Edge (Server) will be authenticated using these settings.
i. Select Use Alternate Files.
ii. Browse to the server Certificate and Private Key files copied earlier.
iii. Enter Private Key Phrase.
Using the default R-1 files, the key phrase is: rdsclient
b. In the Other Side Authentication area, perform the following steps. The Center (Client) will be authenticated using these settings.
i. From the Authenticate using drop-down list, select Certificate + Name.
ii. Enter the Client Common Name.
Using the default R-1 files, the Client Common Name is: rdsclient
iii. Select the Use Approved CA checkbox and browse to the Trusted CA file.
Attunity RepliWeb SSL Guide Common SSL Configurations
24
Testing Center
Edge Communication
Test the SSL settings defined so far.
To test communication between the Center and Edge: 1. Using the Console GUI, connect to the Center.
2. Define a Replication or Distribution job from the Center to one or more Edges.
3. In the Performance Tab, or TransferTab in a Distribution job, select to use WAN or LFA transport engines and select the Use SSL option. Make sure the job actually transfers data.
Note: SSL is not available when using the LAN transport engine.
The General Report should indicate that SSL was used during the transfer stage:
…
12:27:18 Starting files transfer to target Using WAN Transfer Engine
Using SSL authentication and encryption …
Attunity RepliWeb SSL Guide
25
6. Multiple Trusted
Certificate Authorities
Installing a trusted CA (Certificate Authority) certificate on a system means that the system now completely trusts that CA in terms of authentication.If there are multiple authorities to trust, all certificates should be stored in one place: either put all files in the same path with one authority certificate in each file, or put all certificate files in one directory.
OpenSSL will search the multiple certificates to verify that the currently used authority exists, and therefore can be trusted.
A typical certificate looks like:
---BEGIN
CERTIFICATE---MIICgTCCAeoCAQAwDQYJKoZIhvcNAQEEBQAwgYgxCzAJBgNVBAYTAklMMQ8wDQYD …
gDxENH1kxR5O7xb1+D5JBjZypgVe ---END
CERTIFICATE---Using a Multiple Approved CA File
You can store multiple approved CA certificates in a single file. To store multiple CA certificates in a single file:1. Using a text editor, append all certificates into one file. Make sure that each certificate is copied in full, including the lines:
---BEGIN CERTIFICATE---
---END CERTIFICATE---
2. Using the R-1 Console, in the Manage / SSL tab of the configured component: a. Select Use Approved CA.
i. Select the File option.
ii. Browse to the file containing all certificates. b. Click Save.
Attunity RepliWeb SSL Guide Multiple Trusted Certificate Authorities
26
Using a Multiple Approved CA Path
Multiple Certificates can be stored in a single directory. In this case, OpenSSL is looking for certificates by Hash Values, and not by file names.
Note: To use this option, a UNIX machine must be used with OpenSSL installed. The certificates can be stored on a Windows machine at the end of the process, but the hashing utility can be activated on UNIX only.
To store multiple approved CA certificates in a single folder:
1. Copy all Approved CA Files to a UNIX machine to a single folder …/cert_dir.
2. Run a utility called c_rehash to create hash keys to all approved CA certificate files in
cert_dir by performing:
> cd …/cert_dir > ls –l
-rwxr-xr-x 1 root root 928 Jul 26 09:21 trusted_ca_cert.pem
--wxrw--wt 1 root root 1314 Jul 29 06:31 trusted_ca_cert_sl.pem
> c_rehash
3. Verify that a link was created for each of the CA files. Link names are in a hexadecimal format.
> ls –l
lrwxrwxrwx 1 root root 22 Jul 29 08:53 50d59a91.0 -> trusted_ca_cert_sl.pem lrwxrwxrwx 1 root root 19 Jul 29 08:53 58c1d707.0 -> trusted_ca_cert.pem -rwxr-xr-x 1 root root 928 Jul 26 09:21 trusted_ca_cert.pem
--wxrw--wt 1 root root 1314 Jul 29 06:31 trusted_ca_cert_sl.pem
4. This folder is now ready to be used. If the CA files are required on a Windows machine, perform the following steps:
a. Create a directory with the CA files stored in it.
b. Copy each CA file (in the same directory) and name the copy with the appropriate
hash value from the UNIX machine.
c. In this example we will now have 4 files in the directory
50d59a91.0 identical to trusted_ca_cert_sl.pem 58c1d707.0 identical to trusted_ca_cert.pem
Attunity RepliWeb SSL Guide Multiple Trusted Certificate Authorities
27
6. Select Use Approved CA. a. Select the Path option.
b. Browse to the folder containing all certificates. 7. Click Save.
R-1 is installed with a default Certificates directory which is located in:
Windows: ~\RepliWeb\RDS\Config\SSL\Cert
UNIX: ~/repliweb/rds/config/SSL/cert
These directories may be used for using the Multiple Approved CA Path option. They
contain the files (Windows) and Links (UNIX) required for this option.