Ateneo de Manila University
Ateneo de Manila University
Arch
ī
um Ateneo
Arch um Ateneo
Department of Information Systems &
Computer Science Faculty Publications
Department of Information Systems &
Computer Science
2014
A Mobile Authoring Tool for AR Content Generation Using Images
A Mobile Authoring Tool for AR Content Generation Using Images
as Annotations
as Annotations
Ma. Mercedes T. Rodrigo
Ateneo de Manila University, [email protected]
Follow this and additional works at: https://archium.ateneo.edu/discs-faculty-pubs
Part of the Computer Sciences Commons
Recommended Citation
Recommended Citation
Santos, M. E. (2014). A Mobile Authoring Tool for AR Content Generation Using Images as Annotations.
Philippine Information Technology Journal.
This Article is brought to you for free and open access by the Department of Information Systems & Computer Science at Archīum Ateneo. It has been accepted for inclusion in Department of Information Systems & Computer Science Faculty Publications by an authorized administrator of Archīum Ateneo. For more information, please contact [email protected].
A Mobile Authoring Tool for AR Content Generation Using
Images as Annotations
Jayzon F. Ty
Department of Information Systems and Computer Science, Ateneo de
Manila University
Katipunan Avenue, Loyola Heights Quezon City, 1108 Philippines
[email protected]
Ma. Mercedes T. Rodrigo
Department of Information Systemsand Computer Science, Ateneo de Manila University
Katipunan Avenue, Loyola Heights Quezon City, 1108 Philippines
[email protected]
Marc Ericson C. Santos
Graduate School of Information Science, Nara Institute of Science andTechnology 8916-5 Takayama, Ikoma
Nara, 630-0192 Japan
[email protected]
ABSTRACT
Augmented Reality (AR) is a technology that allows the superimposition of virtual objects onto the real world environment. Various fields, such as education, medicine, and architecture, have started adapting AR technology. However, developing AR applications, along with their contents, requires a specific skillset, which limits the number of AR-based applications that can be developed. Various authoring tools are available for desktop systems to ease the development of AR applications and content, yet only few attempts have been made to develop these kinds of tools for mobile systems. This paper describes a mobile application that allows users to author content for AR viewing using 2D images. Furthermore, the tool allows users to produce and to edit AR content on the spot. After the application was developed, a usability test was conducted with eight teachers in order to assess the difficulty of using the application. The user testing showed that the application developed was generally easy to use, and that further addition of features can improve the application.
Categories and Subject Descriptors
H.1.2 [Models and Principles]: User/Machine Systems; H.5.1 [Information Interfaces and Presentation (e.g. HCI)]: Multimedia Information Systems---Artificial, augmented, and virtual realities
General Terms
Human factors
Keywords
augmented reality, authoring tool, mobile application
1.
INTRODUCTION
1.1
Context of the Study
Augmented Reality (AR) is a technology that allows the
superimposition of virtual objects onto the real world environment through the use of special devices. Using a mobile phone or tablet, an AR application allows users to see the virtual objects on top of the real world environment, thus creating the illusion that the virtual object is part of the real world environment [1] [2] [14]. ARAR must be differentiated from Virtual Reality (VR). Virtual Reality, in contrast to AR, completely immerses the user inside a virtual environment, effectively replacing the real world environment with a virtual one. In general, ARAR uses virtual objects to enhance the perception of the user, while Virtual Reality uses virtual objects to replace reality. This study will focus on the use of AR technology.
As AR developed over the past few years, it has begun to make its way into various fields of knowledge. In the medical field, Seilhorst et al. [13] created an AR Delivery Simulator for Medical Training in order to provide an almost realistic birth simulator for the purpose of training medical students in the birth-giving procedures. This allowed medical students to gain experience even without performing the actual procedure itself. In the field of education, Billinghurst et al. [3] developed the “Magic Book”, an AR driven story book wherein users can see the story book come to life in the form of animated virtual objects sitting on top of the book.
One of the drawbacks to AR lies in the difficulty associated with creating the application and the content. Creating an AR application is a long and non-intuitive task [6]. It requires knowledge of programming languages as well as a combination of graphics programming and computer vision to determine where, when, and how to render a virtual object. In order to solve this, programming libraries such as HITLab’s ARToolkit are provided to developers in order to ease the development of AR applications. These libraries contain the necessary implementations needed to make AR work, and thus developers only need to reuse these libraries to develop their applications. This shifts the difficulty from developing the application to actually creating the content itself. AR content, on the other hand, is usually registered in 3D, which requires tools that allows the creation of content in 3D space, usually separate from the actual application itself. Furthermore, compatibility is still a big concern, considering that the content is created outside the application, and that importing of the content to the application is necessary. Furthermore, most mobile devices don’t recognize file formats for 3D objects, and thus, accessibility is another concern in terms of the content.
In order to address these issues, this study aims to provide an AR authoring tool that allows users to produce AR content easily and
quickly without worrying about compatibility between the content and the application. To achieve this, standard 2D images registered in 3D space will be used as content instead of 3D virtual objects. This is based on the rationale that 2D images are widely accessible and at the same time easy to create, given that various devices have the capability to recognize different image formats, and to allow users to use images that they have produced as content. Furthermore, the application must be developed for a mobile device, which will allow users to create and to edit the content on the spot. In effect, everything is happening on the mobile device itself.
The authoring tool is the result of an internship program offered by the Interactive Multimedia Design (IMD) laboratory of the Nara Institute of Science and Technology and is built around another study by the third author of this paper. The study pointed out the lack of authoring tools for AR content which can be easily used by educators to assist in their discussions. For this purpose, this study will focus specifically on developing the authoring tool with the educational field in mind, though the scope of usage of the application is not strictly tied to the field of education per se.
1.2
Research Objectives
As a summary of the points previously discussed, this project aims to provide a mobile authoring tool for the creation of AR content through the use of 2D images as content, i.e. an application that allows users to easily and quickly create their own AR content by using widely available existing materials in the form of images in order to annotate the real world environment. By providing an application that is simple for users to use, the study further aims to improve the chances of being able to use AR technology in the classroom setting.
The study aims to answer the following question: Will the authoring tool provide a simple interface for users to produce their own AR content, and further encourage them to use AR in the field of education? The following sub-questions will aid in answering the main question of the project:
1. What functions should the authoring tool support to enable users to create their own AR content?
2. How easy will the authoring tool be for potential users to use?
1.3
Scope and Limitations
This study focuses primarily on the development of an authoring tool that allows users to author AR content using 2D images. As for the target device, the application is developed with the Apple iPad as the primary target device, and thus the features that the application can support is also subject to the limitations of the device, as well as the libraries used in the development of the application.
The authoring tool will contain the following features in order to allow the users to create simple AR content:
1. The ability to use any 2D image from the device as AR content
2. The ability to perform basic affine transformations onto the image, such as translation, rotation, and scaling using the device’s touch screen capabilities
3. The ability to switch to another marker in order to edit the image associated with that marker
4. The ability to save and load previous works done by users ( images and markers used, association between
marker and image, and the individual images’ position, rotation, and scaling factor )
Although the application may have a wide variety of use cases, the application was developed primarily for educational purposes, and thus the target users included teachers, who will potentially author AR content in order to assist their lessons, and also students, who can potentially use AR to further enhance their learning experience.
1.4
Significance of the Study
AR in education has proven to be effective based on the different AR applications that have been produced over the past few years. According to Kerawalla et al. [8], “AR has the potential to engage and motivate learners to explore material from a variety of differing perspectives, and has been shown to be particularly useful for teaching subject matter that students could not possibly experience first-hand in the real world.” Dunleavy et al. [4] studied about how teachers and students describe their experience with using AR in education. The study reports that AR was found by both teachers and students to be highly engaging, and that its use also promoted collaborations among students. Shelton et al. created an AR application for teaching earth-sun relationships in terms of axial tilt and solstices, and concluded that the application provided a great way of presenting complex visualizations as compared to that of a desktop interface [8] [12].
However, even though AR proves to be highly effective in the field of education, producing AR applications for education is a lengthy process. This limits the amount of AR based applications that can be developed in a certain period of time, and at the same time the amount of content that can be provided to its potential users. Thus by creating a simple AR authoring tool that dedicated educators can use, using and encouraging the use of AR in the classroom setting will become more feasible. Also, by implementing a successful authoring system, it can serve as a foundation for future improvements onto the system, and can encourage more researchers and developers to delve into developing more powerful applications that can eventually overcome the obstacles of bring AR to the classroom setting.
2.
RELATED LITERATURE
2.1
Desktop-based AR Authoring Tools
The ARToolkit library is a software library built using the C and C++ programming language that provides developers with the necessary tools to incorporate AR onto their applications. The ARToolkit library contains the necessary functions in order to calculate the viewpoint of the user in real-time in order to correctly display the virtual objects onto the real world. The ARToolkit library can be integrated onto various devices, such as head-mounted displays, desktop computers, and even mobile devices, such as smartphones and tablets. Currently, the ARToolkit library is widely used for various AR applications, and has proven to be successful in allowing programmers to generate their own AR content.
One limitation to the ARToolkit library is that it only provides developers with the fundamental functions in order to add AR capabilities onto their applications. Creating the actual content that will be viewed through AR requires a separate 3D modeling software. The developer will then need to tweak the library in order to make it compatible with the 3D models that the application will be using.
A similar study, the ARLab [11], is a library of its own that allows programmers to create AR content. The library abstracts the
underlying techniques used in AR such as computer vision, and instead provides programmers methods to easily access the data collected and processed by the library. Furthermore, the ARLab also allows the programmers to easily extend these abstractions with their own modifications in order to suit their needs. Just like the ARToolkit library, the content has to be made and exported from a different application that handles generating 3D content to be used for overlaying onto the real world.
The ARToolkit and ARLab libraries are system-level AR authoring libraries, which are primarily for users who have specialized knowledge in programming. However, there is also the need to allow non-programmers to produce their own AR content. Thus, high-level AR authoring interfaces were created in order to address this problem.
DART (Designer’s AR Toolkit) [10] is an application that was built on top of Macromedia Director, which is considered the standard for multimedia content creation, and aims to provide designers an AR authoring tool that enables them to work on the content directly, rather than relying on collaborating with developers to produce the content. The application was built using the Lingo programming language, the underlying scripting language of Macromedia Director, which makes it easier to integrate the functionalities onto Macromedia Director itself, and to allow designers to add additional functionalities onto the system.
The DART toolkit has been used for teaching AR classes, and has also been distributed to a small number of designers for professional use. The initial feedback for the application was positive, but the sample size was still too small to give a suitable gauge for the usability of the system.
Furthermore, the application is focused on providing an authoring interface for professional designers working on big projects. This system also assumes prior knowledge of Macromedia Director, which may not be familiar to many users.
To lower the prior knowledge requirement, Haringer et al. [7] developed PowerSpace, an application that transforms Microsoft PowerPoint slides into content that is viewable through AR. The application first exports the Microsoft PowerPoint slides into XML format. PowerSpace uses this XML file in order to arrange the 2D elements in 3D space using a built-in editor. Finally, a built-in viewer is used in order to view the final output for evaluation and use.
One limitation of this system is that it is also subject to the limitations of Microsoft PowerPoint in terms of the content the user can produce. Furthermore, this system has only been tested in the field of automotive industry, and thus was developed based on that context. Extending this system to fit other applications requires substantial internal modifications.
2.2
Mobile-based AR Authoring Tools
AR authoring tools for desktop systems, though powerful, do not address an important feature in terms of authoring AR content, which is the ability to author content in any location and time, and to be able to edit the content instantly. Mobile AR authoring tools can serve as a solution to this problem. However, there is still little research done on mobile AR authoring tools. One of the few initiatives done was by Guven et al. [5]. Their system runs on a tablet PC, and is meant to be an authoring tool for mobile AR systems (MARS). The application supports three modes for authoring AR content: freeze-frame, free-n-move, and freeze-n-link. In freeze-frame, the application allows the user to capture a screenshot of the real world environment, to perform the
annotations using that screenshot, and later mapping the result back onto the real world. The free-n-move mode allows the user to easily move a group of virtual objects around the world while maintaining organizational integrity. Finally, freeze-n-link mode allows two separate capture screenshots taken using freeze-frame to be linked with one another.
Langlotz et al. [9] developed another mobile AR authoring tool which also allows users to produce AR content in place, without the need for prior preparations. The application allows users to specify a custom target that the user desires to map the virtual objects onto. The application does this by letting the user draw a rectangle around the area to be used as target. Then, after the target has been selected, the user can author his/her own AR content by first drawing the 2D shape onto the screen through the touch screen interface. The application then handles the mapping of the 2D shape generated by the user into 3D space, and also transforming the 2D shape into 3D shape. The application also allows the user to perform affine transformations onto the content, such as translation, rotation, and scaling. The application also allows the user to apply textures onto the 3D shape generated by the application.
3.
SYSTEM DESIGN/DEVELOPMENT
3.1
Development Tools
This section describes the tools that were used in order to develop the authoring tool for AR Content, such as the development environment that the application was built on, and the libraries and programming languages that were used in order to implement the different functionalities of the application.
3.1.1
Xcode
The integrated development environment (IDE) that was used for creating the application is Xcode, which was the standard IDE for developing applications for both iOS, the operating system of Apple’s mobile devices, and MacOSX, the operating system of Apple’s desktop systems. The version used was Xcode 4.6.2, which was the latest version at the time of writing, and the target version of the iOS was version 6.1, which was also the latest version of the iOS at the time of writing.
3.1.2
Cocoa Touch Framework
The Cocoa Touch Framework is the set of programming libraries required to create applications for iOS devices. The framework also provides an easy way for programmers to create user interfaces using different Graphical User Interface (GUI) elements such as buttons and text fields, and also provides support for touch screen support using the multi-touch gesture libraries. The library also provides access to the built-in hardware of iOS devices, such as the camera, networking, and graphics processor using the built-in functions of the library. The framework is built usbuilt-ing the Objective-C programming language, which makes it easy to incorporate C or C++ code onto the application.
3.1.3
ARToolkit Library
The authoring tool uses an AR marker in order to determine where to render the image, and thus, the ARToolkit library was incorporated into the application in order to facilitate the tracking of the AR marker. The ARToolkit library abstracts the computer vision techniques needed to determine where and how to render the image based on the position of the viewer, and his/her perspective. An open-source version of the ARToolkit is available on their homepage. However, the source code of the ARToolkit library that the application used was directly taken from the
Interactive Media Design Lab from the Nara Institute of Science and Technology. Thus, future changes in the library might not be available in the open-source version.
3.1.4
OpenGLES Library
OpenGLES is a subset of the OpenGL library, which is one of the most commonly used library for graphics programming. The OpenGLES library is specifically optimized for graphics programming in mobile systems. The version that the application will be using is OpenGLES 1.0. The OpenGLES library was used in order to render the 2D image onto 3D space, which in this case is the real world environment. The library was also used in order to facilitate the affine transformations that can be performed onto the 2D image, such as translation, scaling, and rotation, using the built-in functions that the OpenGLES library offers.
3.2
Building the User Interface
The user interface of the whole application was created using the interface builder tool that is included with Xcode. The application was made using the single-view application template provided. The user interface is split into two parts: edit mode and view mode. Edit mode serves as the authoring part of the application, wherein the user can load an image from the device, perform modifications onto it, and choose which markers to use. View mode, on the other hand, allows the user to view the image through AR, and apply image effects onto the image. This section provides an explanation of the different functionalities of the application that can be accessed through the user interface.
3.2.1
Accessing Images from the Device
2D images are the main resources that the user must use in order to start authoring content. Thus, a means to access the images from the device is required. The UIImagePicker class, which is iOS’ built-in class for accessing the images from the devices, was then used for this purpose. One thing to note, however, is that according to the Apple iOS documentation, using the UIImagePicker class on the iPad requires the class to be displayed using a UIPopover class, which handles the display of popovers. Furthermore, the UIImagePicker class requires a delegate class, which implements the protocol (or interface) defined by the UIImagePicker class in order to specify what happens when the user confirms the selection of the desired image. The following code snippet shows the implementation of the delegate function that is called when the user successfully chooses an image that he/she intends to use:
function didSelectImage
image <- get selected image resize image to a square
imageData <- extract pixel data from image store imageData to marker
end function
Based on the code snippet above, one important thing to note is that when the image has been successfully selected by the user, the image needs to be resized to a square. This is done in order for the application to render the image properly. This restriction reflects the limitation of the OpenGLES 1.0 library, wherein the image to be rendered must be a square. When the image has different lengths for each of its sides, the library will refuse to render the image. In this case, the image is being resized to 512 x 512 pixels. Another thing to note in the code is the “UIImagetoPixelData” function call. This function will be further explained in secion 3.3.1.
3.2.2
Gestures
After the image has been loaded from the device, the user is now able to edit it by performing basic affine transformations to it. One option given to the user to perform this is through performing gestures in the device’s touch-enabled screen. The Cocoa Touch framework provides the GestureRecognizer class which handles the gestures made by the user onto the screen. For this application, the PanGesture, PinchGesture, and RotateGesture class was be used. Each of these classes are protocols, and the application needs to define what happens when each of these gestures are detected.
Whenever the device detects that the user has performed a panning gesture, a certain function is called, which contains the process that the application performs in order to move the image around. The code snippet below shows the implementation of the PanGestureRecognizer function:
function panGesture
if not in edit_mode or marker is not detected exit
trans <- get translation vector normalize trans vector
z <- get distance of camera from marker translate image using the trans vector end function
Based on the code above, translation is done by first getting the direction of the gesture performed by the user on the screen. The direction is then normalized, and is given a speed factor based on the distance of the iPad from the marker, which is given by the getZ() function. The direction vector is then added to the current position of the image, which makes the image move to the direction that the user makes in his panning gesture.
The RotateGesture and PinchGesture work similarly, such that the class provides the scale factor and the rotation factor based on the gesture made by the user. For the pinch gesture, the value becomes smaller when the two fingers of the user come together, and become larger when the two fingers of the user come apart. For the rotate gesture, the value goes to the positive direction when the user rotates his/her fingers clockwise, and the value goes to the negative direction when the user rotates his/her fingers counter-clockwise. These values will be passed as a variable to the OpenGL system, and the scaling and rotation of the image is applied using the glRotate() and glScale() functions of the OpenGL library, which handles the rotation and scaling respectively.
3.3
System-level Implementations
This section describes the relevant functions that run behind the user interface, as well as the variables and parameters that needed to be considered in order to have the application working properly, and to have similar results for replication purposes.
3.3.1
UIImage to RGBA8 Pixel Data
As mentioned in Section 3.3.1, it is required to specify what happens when the user confirms the selection of the image. After the image is loaded from the device, it must be pre-processed in order to pass the image data onto the ARToolkit library. The image must first be converted into raw byte data to allow the ARToolkit library to render the actual image onto the screen. Aside from rendering, this raw byte data will also be used for storing the image, essentially allowing the application to load an image even if the image is not physically present in the device itself. The following code snippet shows the implementation of the conversion from a UIImage to its RGBA pixel data:
function UIImageToPixelData imageSize <- get image size determine color format of image
initialize imageData array containing pixel data of image
remove white background in the image by adjusting the alpha values of the pixels end function
In order to convert the UIImage data to an array of RGBA8 format pixel data, the CGBitmapContext class was used, which allows the application to retrieve the raw byte data of the image contained in the UIImage object. The first step is to create a CGContext by using the function CGBitmapContextCreate(). One thing to note about the function is the last parameter, which indicates the information regarding the bitmap data. The application will supply the value corresponding to pre-multiplying the alpha bit at the end of each byte to the last parameter of the function in order to tell the function to create an array of RGBA format pixel data. This value is specifically important in order to preserve the alpha data of the image. After creating the context, the image must be rotated along the x-axis in order to display the image correctly in OpenGL. After setting up the context, the array of pixel data can be retrieved from the CGContext object using the function CGBitmapContextGetData(). This array of pixel data is particularly important when using the OpenGL library to render the image onto the screen, due to the limitation of the library itself. Finally, in order to remove the white background of the image, a naïve solution was used in order to do so, which is to set the alpha byte of the pixels that are close to the color white to zero, which effectively makes it transparent. A variable containing the threshold can be adjusted, which determines which pixels are close to the color white.
3.3.2
Image Rendering
After converting the image into raw byte data, the ARToolkit library is now able to process the image for rendering. The first step in rendering the image is to get the current frame of the video input device. The iOS library provides a class that allows access to the data from the video input device. The image data provided by this class is represented as an array of unsigned 8-bit integers, represented in BGRA format. Due to this, the ARToolkit library is also configured to accept BGRA format images in order to correctly process the image.
The next step in rendering the image is to know where to render the image. To handle this requirement, a built-in function in the ARToolkit library is used, which returns a value indicating whether the marker is detected in the current frame of the video input or not. When the marker is detected, ARToolkit automatically calculates the user’s viewpoint, and updates the transformation matrix. This transformation matrix gives the coordinates of the position where the image should be rendered, the scaling factor of the image based on how far the user is from the marker and how big the marker is, and the rotation factor of the image, based on the perspective of the user.
After determining the necessary information, the next step is to render the image itself in the screen. The following code snippet shows how the image rendering was implemented:
function drawTexture( imagePixelData ) enable OpenGL textures
initialize an array of vertices for a square attach imagePixelData as texture for the square
render the square with the image as texture end function
The OpenGL library is not capable of drawing the image directly onto the screen. However, the library is capable of drawing basic shapes onto the screen, and applying image textures onto these shapes. This technique is called Texture Mapping, and the application will be using this technique in order to display the image onto the screen. Texture mapping works by first drawing the shape where the texture will be applied. Since the application will be using images, the shape to be drawn in OpenGL will be a 2D square mapped into a 3D coordinate frame. In preparation for drawing the 2D square, the coordinates of the square must be provided as an array of vertices. Order matters in the array such that the first element in the array will be drawn first. Since the 2D square will be drawn using a triangle strip, the coordinates must be arranged in such a way that the coordinates produce 2 triangles. For the application, the square will be drawn by first drawing the lower-left, lower-right, and upper-left vertices in order to produce the first triangle, and finally drawing another triangle using the lower-right, upper-left, and upper-right vertex in order to finish the triangle strip.
After drawing the 2D square, the next step is to apply the image as texture for the 2D square. The OpenGL function glTexImage2D() handles the storing of the texture data onto the OpenGL system. First, the image must be transformed into an array of pixel data, which is done when the user loads the image from the device. Since the array of pixel data is represented in RGBA format, the texture must also be stored in RGBA format. After storing the texture data, the next step is to provide the order as to how the texture must be drawn by providing the texture coordinates. The texture will start drawing from the lower-left corner, lower-right corner, upper-left corner, and finally the upper-right corner. The texture data must also be bound onto the square shaped declared earlier, using the OpenGL function glBindTexture().
The final step in rendering the image is to draw the 2D square with the texture data inside. This is done by using the OpenGL function glDrawArrays(), with GL_TRIANGLE_STRIP as a parameter in order to tell the OpenGL system to draw the shape using triangle strips.
3.3.3
Saving and Loading Profiles
After the user successfully authors the content, the application must be able to save the work for future use. The iOS library provides the option of using property lists for storing persistent data onto the device. Property lists works in the same manner as a hash map, which requires supplying a key that maps to the actual data to be stored onto the device. One limitation to using property lists is the requirement that the data be stored in one of the built-in iOS objects that conforms to the NSCoding protocol. Considering this limitation, data regarding the image are saved in the following format: Pixel data of the overlaid image is saved using NSData created from an array of unsigned 8-bit integers; the index of the marker used, and the dimensions of the overlaid image, e.g. width and height, scale factor, rotation factor, and position, are saved using NSNumber with integer values for the width and height of the image and the index of the marker used, and float values for the scale and rotation factor, and also the position. All these data are then stored in an NSDictionary object, which works exactly like a hash table. Each marker is represented by a separate NSDictionary, thus making it a total of 6 NSDictionary objects for each profile. In light of this, a profile is defined as an array of NSDictionaries, which represents each individual marker. In order to identify unique profiles, a profile name will be supplied by the user.
3.4
User Interface
When the application initially starts, the user is taken directly into the “edit mode” screen, which is the screen where most of the authoring happens. Figure 1 shows a screenshot of the user interface of the application.
One of the core features of the application is the ability to get an image from the iPad and use it as AR content. Thus, a button at the lower right corner of the screen named “Change Image…” is provided in order to allow the user to browse through the images from the iPad device, and to choose the desired image to be used as AR content.
Another core feature of the application is the ability to perform basic affine transformations to the 2D images being rendered. Thus, interfaces were provided for the user to be able to perform these tasks. Positioning of the 2D image is done by performing a pan gesture (or dragging motion) on the screen. When the user performs a pan gesture to a specific direction, the image will follow this direction as well. At the time of writing, there is a slight issue with regards to this functionality. When the screen and marker coordinate planes are the same, translation works as intended: dragging along the axis moves the image along the x-axis, and dragging along the axis moves the image along the y-axis. However, when the coordinate planes are different, translation is made relative to the coordinate plane of the marker. When the user drags along the x-axis of the screen, the image moves along the x-axis of the coordinate marker, which may not necessarily be horizontal in the perspective of the user. The same effect happens when dragging along the y-axis.
Scaling and rotation of the 2D image can be done in two ways: either through gestures or through the use of the stepper buttons that are present in the screen that correspond to scaling and rotation. Steppers are user interface controls that allows incrementing or decrementing values using a set of buttons that contains a button for both functionalities. Originally, these steppers were not present in the application. However, this addition was done in line with the results of the usability test, wherein users had a hard time using the gestures in order to perform scaling and rotation. Further discussion of feedback from the participants will be done in the next section.
Currently, the application only recognizes a fixed number of markers. The user is able to work on one marker at a time, which is enabled by the “Change Marker” button. When the user wants
to change the image associated to a specific marker, the user must first select the marker through the “Change Marker” button. When the user wants to perform modifications on an image associated with another marker, the user first needs to select the corresponding marker, then perform the modifications from there. As for the marker recognition, the application can detect multiple markers in the screen at once. For the detected markers, the images associated with each of them are rendered in the screen. Saving a profile is done through the “Save” button located at the bottom left part of the screen. When the user touches the “Save” button, the application asks for a profile name in order to distinguish it from other profiles. After giving a profile name, the application saves the profile onto the system, which can be loaded for future use. Saving with a profile name that is already in use will overwrite the data associated with the previous profile, replacing it with the data in the new one. Loading a profile can be done through the “Load” button, which is located beside the “Save” button. Finally, deleting a profile can be done through the “Delete” button, which is beside the “Load” button. This allows the user to delete a certain profile in the application.
Lastly, View Mode, which can be toggled using the toggle button in the upper left corner of the screen, simply removes the buttons presented in Edit Mode to give a wider, unobstructed view of the content and the real world environment. Authoring functions are also disabled in order to avoid accidental modifications done to the system. During View Mode, a “Load Profile” button at the upper right corner of the screen is provided to allow users to still load a specific profile from the application for viewing purposes. As for the performance of the application, when the application initially starts, it runs at a framerate of 30 frames per second, which is the normal framerate for applications in the iPad. For the first few images that the user renders in the screen, approximately around 2 images rendered in the screen simultaneously, there is no noticeable change in the framerate of the application. However, as the number of images rendered in the screen increases, there is a noticeable drop in the framerate of the iPad, from 30 fps to around 20~25 fps. A breakdown of the different processes that are happening per frame may provide an explanation for the drop in performance as the number of images go up:
1. Capturing the current frame, and processing the frame to detect the markers
2. Searching through which markers are detected by the iPad
3. Updating the transformation matrix of each detected marker
4. Rendering the images that correspond to the markers detected
5. Drawing the processed frame onto the screen of the iPad Based on the list, there are three processes which can be computation-heavy=. Processing the frame to detect the markers involves a large number of operations in order to extract relevant data from the frame. Another computation-heavy process is the rendering of the image onto the frame. For each marker detected, the application needs to render the image onto the frame, and considering the worst-case scenario wherein all markers are detected in the screen, the application needs to render the image onto the frame 6 times, which is processor-intensive in nature. Finally, drawing the processed frame onto the screen of the iPad also takes a lot of resources to perform. Having six images in the screen at a time may still be tolerable, but in the event that the
number of markers increases, the performance may decrease, adversely affecting the usability of the application.
4.
USER TESTING AND FEEDBACK
After the development of the application, a usability test was then held with the participation of eight (8) teachers from the Ateneo Grade School.. The testers were provided an iPad with the application installed and were asked to perform two tasks which involved using the application’s features. For the first task, the participants were asked to associate different images to different markers such that the name of the image starts with the letter that is shown in the marker. For the second task, the testers were asked to choose an image of a body part from the iPad, and to align the image of the body part onto its approximate location in the volunteer’s body, using scaling or rotation as necessary. A think-aloud protocol required the testers to express their thought process verbally while performing the tasks, enabling the researchers to determine specific problems or difficulties that the user encountered. At the end of each task, the testers were asked to rate the difficulty in using the functionalities provided by the application. A 5-scale Likert scale was used in order to assess the testers’ response regarding their experience in using the application, with 1 being the negative extreme, while 5 being the positive extreme.
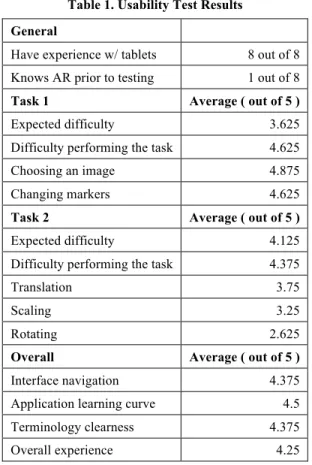
Table 1 shows the results of the usability test. A score of 1 represents the negative extreme, while 5 is the positive extreme.
Table 1. Usability Test Results General
Have experience w/ tablets 8 out of 8 Knows AR prior to testing 1 out of 8
Task 1 Average ( out of 5 )
Expected difficulty 3.625 Difficulty performing the task 4.625
Choosing an image 4.875
Changing markers 4.625
Task 2 Average ( out of 5 )
Expected difficulty 4.125 Difficulty performing the task 4.375
Translation 3.75
Scaling 3.25
Rotating 2.625
Overall Average ( out of 5 )
Interface navigation 4.375 Application learning curve 4.5 Terminology clearness 4.375
Overall experience 4.25
Table 1 describes the result of the questionnaire answered by the testers which shows the difficulty rating of the application based on the scores given by the testers. All 8 participants have experience with using tablets, yet only 1 out of 8 of the testers had knowledge of AR prior to the usability test.
For both tasks 1 and 2, “expected difficulty” refers to how easy or how difficult the tester expect the task to be, while “difficulty performing the task” refers to the actual difficulty in doing the task given to the tester. For task 1, “choosing an image” refers to the functionality of the application which allows the tester to select images from the iPad’s image library, while “changing markers” refers to the functionality of the application which allows the tester to switch control between different markers. For task 2, “translation”, “scaling”, and “rotation” refer to the functionality of the application that allows the tester to perform modification onto the image such as its position, its size, and its orientation. For both tasks 1 and 2, the higher the number, the easier the task is.
For the overall experience, “interface navigation” refers to the interaction between the user and the user interface of the application, “application learning curve” refers to the amount of time required in order to learn the basic functionalities of the application, “terminology clearness” refers to the accuracy of the terminologies used in the user interface, and “overall experience” refers to the overall difficulty of using the application. For interface navigation, the higher the number is, the easier it is for the tester to navigate the user interface. For terminology clearness, the higher the number, the more accurate the terminologies are. Finally, for the learning curve and the overall experience, the higher the number, the easier the application is to use.
Based on the results, the most problematic aspect was performing the basic modifications to the image (translation, scaling and rotation). The most common feedback from the testers involved the difficulty that they encountered when trying to perform the touch gestures in order to perform scaling and rotation. A common suggestion was to add buttons to perform the scaling and rotation. Another feedback was given with regards to the constant need to use the “Change Marker” button in order to toggle between the images. A recommendation was to provide the ability to select the image by tapping on it, and from there perform modifications onto it.
Aside from the ratings and the suggestions given by the testers, some possible use cases were also mentioned by the participants. One of them was to use the application in order to associate an illustration of a certain location for each marker, effectively creating a map when multiple markers are displayed in the screen. Another idea was more of a suggestion for future iteration of the application, wherein the application produces positive or negative feedback based on the image associated to the marker by the user. The example was similar to the nature of the testing, wherein the testers were asked to associate images that start with the letter that is printed in the marker. Instead of just accepting any image, the application must now enable users to incorporate logic onto the application, such that when the image associated to the marker is wrong, the application will produce negative feedback.
5.
SUMMARY AND RECOMMENDATION
This study aimed to develop an AR authoring tool for mobile systems that allowed users to easily create their own AR content without the need for prior programming background, and the need for external tools in order to use the application. The study formulated two questions in order to assist the development of the authoring tool:
1. What functions should the authoring tool support to enable users to create their own AR content?
2. How easy will the authoring tool be for potential users to use?
For the first research question, based on the functionalities implemented onto the application, the feedback gained from the testers, and the fact that the application makes use of 2D images as its main source of content, it can be concluded that the primary functionalities that the authoring tool needed was first, the ability to choose the image that the user intends to use as AR content, and second, the ability to perform basic affine transformations onto the image, such as translation, scaling, and rotation. Without these core functionalities, the application would not be able to do its intention of providing users with the tool to create AR content through the use of 2D images. Aside from these functionalities, offering the users the ability to program simple interactions with the AR content is also important to consider, since it opens up a wide variety of options to the content that the user can create. An example of this may include allowing users to dictate what happens when the contents interact with each other.
For the second research question, based on the results gathered from the user testing, and the feedback from the testers, it can be concluded that the authoring tool that was developed for this study was able to provide a simple interface for creating AR content. With an average score of 4.25 out of 5 in the aspect of overall experience, with 1 being very difficult and 5 being very easy, the application proved to be a straightforward application to use. The authoring tool was also able to achieve its goal of being able to create and edit AR content on the spot, without the need for additional tools in order to do so.
Despite the overall success of the application in providing a simple interface for creating AR content, there are still improvements to the application that can be done in order to further enhance the experience of the user in using the application. One improvement that can be done to the application is fixing the way the application handles the translation gesture. Currently, the application is only able to optimally perform translation onto the image when the orientation of the iPad is perfectly aligned to the orientation of the image. When the iPad is slightly tilted, the translation aspect does not work as expected. One possible approach to this is tweaking the code for the translation component such that the orientation of the iPad is taken into account when performing the translation to the image. Another possible point of improvement is the implementation of some of the points mentioned in the related literature section, such as freezing the frame to allow the user to edit the content without the need to hold it in place. Finally, the application can be tweaked such that the “Change Marker” button is no longer necessary. Tapping on the image itself should be sufficient to select and to edit the image as necessary.
As for possible additions to the application, one recommendation will be the ability for the users to be able to define their own markers. Currently, the markers are hard-wired onto the application, effectively restricting the amount of content that the users can produce. By allowing users to define their own markers, the amount of content is now restricted to the limitations of the memory of the iPad device itself. At the time of writing, the next iteration of the application is already underway, with the application being able to detect and save new markers onto the system. However, further development is necessary in order to be able to effectively use the application. Another possibility is to tweak the application such that when a marker is detected, a set of images is rendered instead of a single image. Another recommendation would be the ability to render not only static images but also play video files when the marker is detected. By incorporating video capabilities onto the application, the variety of content effectively widens. Finally, the application may be
further developed such that the need for using AR markers is eventually removed, which allows users to create AR content at almost any location, even without printing AR markers.
Aside from the development of the application, the usability test also needs to be improved, due to the fact that the number of tasks introduced for the usability test in this study is strictly limited, in which the results might not reflect the real usability of the application. Improvements may include adding more tasks for the usability test, or by employing other kinds of testing in order to measure the usability of the application.
6.
ACKNOWLEDGMENTS
Our thanks to the Dr. Hirokazu Kato for the necessary library in order to implement AR functionalities onto the application, for providing concrete examples, which made the library easier to learn, and for providing the internship opportunity which made this study possible.
7.
REFERENCES
[1] Azuma, R. T. A Survey of AR. Presence: Teleoperators and Virtual Environments, 6 (4). 355-385.
[2] Azuma, R.T., Baillot, Y., Behringer, R., Feiner, S., Julier, S., and Mcintyre, B. Recent Advances in AR. IEEE Computer Graphics and Applications, 21 (6). 34-47.
[3] Billinghurst, M., Kato, H., and Poupyrev, I. The MagicBook—Moving Seamlessly between Reality and Virtuality, Computer Graphics and Applications, IEEE, 21 (3). 6-8.
[4] Dunleavy, M., Dede, C., and Mitchell, R. Affordances and Limitations of Immersive Participatory AR Simulations for Teaching and Learning. Journal of Science Education and Technology, 1 (18). 7-22.
[5] Guven, S., Feiner, S., and Oda, O. Mobile AR Interaction Techniques for Authoring Situated Media On-Site. IEEE/ACM International Symposium on Mixed and AR, (Santa Barbard, CA, 2006), IEEE, 235-236.
[6] Hampshire, A., Seichter, H., Grasset, R., and Billinghurst, M. AR Authoring: Generic Context from Programmer to Designer. Proceedings of the 18th Australia Conference on Computer-Human Interaction: Design: Activities, Artefacts, and Environments, (Sydney, Australia, 2006), ACM, 409-412.
[7] Haringer, M. and Regenbrecht, H. A Pragmatic Approach to AR Authoring. Proceedings of the International Symposium on Mixed and AR, (Washington DC, USA, 2002), IEEE Computer Society, 237-245.
[8] Kerawalla, L., Luckin, R., Seljieflot, S., and Woolard, A. Making it Real: Exploring the Potential of AR for Teaching Primary School Science. Virtual Reality, 10 (3-4). 163-174. [9] Langlotz, T., Mooslechner, S., Zollmann, S., Degendorfer,
C., Reitmayr, G., and Schmalstieg, D. Sketching Up the World: In-Situ Authoring for Mobile AR. Personal and Ubiquitous Computing, 16 (6). 623-630.
[10]Macintyre, B., Gandy, M., Dow, S., and Bolter, J.D. DART: A Toolkit for Rapid Design Exploration of AR Experiences. Proceedings of the 17th Annual ACM Symposium on User Interface Software and Technology, (Santa Fe, New Mexico, USA, 2006), 197-206.
[11]Roth, A. The Arlab and Cave Libraries: On Authoring AR and Virtual Reality Experiences Using a Graphical Programming Language. IEEE International Symposium on Mixed and AR – Arts, Media and Humanities (ISMAR-AMH) (Basel, Switzerland, 2011), 101-102.
[12]Shelton, B., and Hedley, N. Using AR for Teaching Earth-Sun Relationships to Undergraduate Geography Students. AR Toolkit, The First IEEE International Workshop (2002), 8.
[13]Sielhorst, T., Obst, T., Burgkart, R., Riener, R., and Navab, N. An AR Delivery Simulator for Medical Training. International Workshop on Augmented Environments for Medical Imaging – MICCAI Satellite Workshop, 141 (2004). [14]Van Krevelen, D., and Poelman, R. A Survey of AR
Technologies, Applications, and Limitations. International Journal of Virtual Reality, 9 (2). 1-20