LEARNING TO PROGRAM WITH
VISUAL BASIC AND
.NET GADGETEER
A guide to accompany the Fez Cerberus Tinker Kit
Sue Sentance
Steven Johnston
Steve Hodges
Jan Kučera
James Scott
Scarlet Schwiderski-Grosche
LEGAL NOTICE: The source code available in this book is subject to the Apache License, version
2.0. To view a copy of this license, visit http://www.apache.org/licenses/LICENSE-2.0.html.
All other content is licensed under the Creative Commons Attribution-ShareAlike 3.0 Unported
License. To view a copy of this license, visit http://creativecommons.org/licenses/by-sa/3.0/
or send a letter to Creative Commons, 444 Castro Street, Suite 900, Mountain View,
California, 94041, USA.
2 Learning to Program with Visual Basic and .NET Gadgeteer
FOREWORD
Computer programming can be fun! This book on Visual Basic and .NET Gadgeteer shows how. Aimed at high school students and first-time programmers, the authors use a combination of hardware and software to make programming come alive - audibly, visually, and tangibly. Using small hardware components - a standalone processor, simple sensors and actuators - students build their own little computers in hardware and then program them to do fun things, such as play music (Chapter 3), blink lights (Chapter 6), or draw pictures (Chapter 10). By the end of the book, students have learned all the basics of programming: variables, basic data types, arrays, conditionals, iteration, procedures, and functions. More importantly, they learn a fundamental “computational thinking” concept - modularity. From the very first exercise, students become engaged through the tactile experience of assembling hardware components together to build real devices which they program through standard interfaces, protocols, and built-in libraries. Without a lot of fuss, the authors teach these concepts using the widely-adopted Visual Studio software development tool, exposing students to a modern programming environment that supports the engineering cycle of design, build, test, and debug. At the same time, students naturally assimilate a better understanding of how electronic devices work and how they are made, valuable skills in our increasingly digital lives.
Jeannette M. Wing
Corporate Vice President, Microsoft Research 15 October 2013
Learning to Program with Visual Basic and .NET Gadgeteer 3
ACKNOWLEDGEMENTS
The authors would like to acknowledge several others who have been invaluable in creating the material contained within this book.
First and foremost we would like to thank our colleagues Clare Morgan and Nicolas Villar: Clare has been instrumental in facilitating school outreach and supporting the team; Nicolas is the original inventor of the platform without whom we would have no .NET Gadgeteer. We have worked with a number of Gadgeteer hardware manufacturers during this project, but we would particularly like to call out GHI Electronics who were excited to explore how Gadgeteer could be used in the classroom from the outset of our work and who tailored a kit of Gadgeteer parts to support the learning points and exercises we wanted to cover. We are extremely grateful to the young people who have spent dedicated time working through the book, testing the exercises, and giving us their invaluable feedback, including: Ellen Curran, Thomas Denney, David and Jonathan Goh, Armin Grosche, Maeve McLaughlin, Alistair Sentance, and Alfie Sharp. Finally, we owe a great deal to the hundreds of students and educators who have embraced Gadgeteer in their classrooms over the past two years. In a world where it is all too easy to become a consumer of digital technologies, we hope that this book will inspire a new generation of digital creators!
AUTHORS
Sue Sentance works for Computing At School (CAS), the professional association in the UK for Computer Science school teachers. Her work revolves around bringing more Computer Science teaching into schools, and she has been developing teaching materials for schools using .NET Gadgeteer since its launch in 2011. She has worked in schools as a teacher of Computing and as a lecturer in Initial Teacher Education, and has a PhD from the
University of Edinburgh.
Steven Johnston is a program manager on the .NET Gadgeteer project at Microsoft Research and has a PhD from the University of Southampton where he is also a Senior Research Fellow in the Faculty of Engineering and the Environment. Much if his work involves exploiting new, and up and coming technologies and applying them to the field of engineering.
Steve Hodges leads the Sensors and Devices research group at Microsoft Research and is also a visiting Professor at Newcastle University. His work centres around new tools and technologies for prototyping and fabrication, new ways of interacting with computer systems, and wearable devices. He has a PhD from the University of Cambridge and is a Fellow of the Institution of Engineering and Technology.
James Scott is a researcher in the Sensors and Devices group at Microsoft Research. His research interests span a wide range of topics in ubiquitous and pervasive computing, including novel devices and sensors, rapid
prototyping, mobile computing and interaction, and security and privacy. He has a PhD from the University of Cambridge. He is one of the creators of the .NET Gadgeteer platform.
Scarlet Schwiderski-Grosche is a senior research program manager in the Microsoft Research Connections team. She is responsible for academic research partnerships relating to .NET Gadgeteer and other Microsoft Research projects, and drives liaison with a number of joint research centres. Scarlet has a PhD in Computer Science from University of Cambridge and worked in academia for almost 10 years before joining Microsoft in 2009.
4 Learning to Program with Visual Basic and .NET Gadgeteer
TABLE OF CONTENTS
Chapter 1.
Introduction ... 7
Objectives of this book ... 8
Modules used in this book ... 8
How to use this book ... 10
Chapter 2.
Getting started with .NET Gadgeteer ... 11
Assembling the hardware ... 11
Starting a project in .NET Gadgeteer ... 11
The Gadgeteer Designer in Visual Studio ... 13
Chapter 3.
Playing tunes ... 17
Overview ... 17
Programming in Visual Studio ... 17
Tutorial: Playing a tune ... 18
Exercises ... 22
Summary ... 22
Chapter 4.
Clicker ... 23
Overview ... 23
New concepts: What is a variable? ... 23
Tutorial: Building a clicker ... 24
Exercises ... 28
Summary ... 28
Chapter 5.
Stop watch ... 29
Overview ... 29
New concepts: If … Then … Else… statement ... 29
Tutorial: Building a stop watch ... 29
Exercises ... 33
Summary ... 34
Chapter 6.
Traffic lights ... 35
Overview ... 35
New Concepts: More on If statements and the Select…Case statement ... 35
Tutorial: Traffic lights ... 36
Exercises ... 40
Summary ... 40
Chapter 7.
Counting in binary ... 41
Learning to Program with Visual Basic and .NET Gadgeteer 5
New concepts: Binary numbers ... 41
New concepts: The For loop in Visual Basic ... 42
Tutorial: Counting in binary ... 43
Exercises ... 48
Summary ... 48
Chapter 8.
Burglar alarm ... 49
Overview ... 49
Tutorial 1: Creating a burglar alarm ... 49
Exercises ... 51
New concepts: Saving to the SD card ... 51
Tutorial 2: Keeping a record of an intrusion ... 52
Exercises (Continued) ... 55
Summary ... 55
Chapter 9.
Morse code ... 57
Overview ... 57
New concepts: Reading from a file in Visual Basic ... 57
New concepts: Creating a function in Visual Basic ... 57
Tutorial: Morse code ... 58
Tutorial: Reading a word from a file and translating to Morse code ... 60
Exercises ... 64
Summary ... 64
Chapter 10.
Drawing ... 65
Overview ... 65
Tutorial 1: House draw ... 65
New concepts: Arrays in Visual Basic ... 67
New concepts: Passing parameters into procedures and functions – By Val and By Ref ... 69
Tutorial 2: Graph draw ... 69
Exercises ... 72
Summary ... 73
Chapter 11.
Reaction game ... 75
Overview ... 75
New concepts: Working with random values ... 75
New concepts: Logical operators ... 76
Tutorial: Building the reaction timer game ... 76
Exercises ... 83
Summary ... 83
6 Learning to Program with Visual Basic and .NET Gadgeteer
Overview ... 85
Tutorial 1: Make a noise! ... 85
Tutorial 2: Use the joystick to control the pitch and duration ... 88
Exercises ... 89
Summary ... 90
Appendix A . Where to buy .NET Gadgeteer ... 91
Appendix B . Installing the “FEZ Cerberus Tinker Kit” ... 92
Appendix C . Getting to know Visual Studio ... 94
The Solution Explorer Window ... 94
The Toolbox window ... 94
The Designer window ... 95
The Output window ... 95
IntelliSense in Visual Studio ... 96
Appendix D . Updating the firmware ... 98
Checking the firmware version ... 98
Updating the FEZ Cerberus Firmware using the FEZ Config Tool (recommended) ... 100
Updating the FEZ Cerberus TinyBooter manually ... 103
Updating the FEZ Cerberus TinyCLR manually ... 105
Appendix E . How to debug Visual Basic in Visual Studio ... 107
Printing debug messages ... 107
Setting a breakpoint ... 107
The conditional breakpoint ... 109
Walking through your code ... 110
Debugging tips ... 112
Appendix F . Coping with Out-of-Memory exceptions ... 114
Appendix G . Troubleshooting: Visual Studio will not deploy ... 115
Appendix H . List of current socket types ... 120
Appendix I . Operators in Visual Basic ... 123
Appendix J . Typical Lux values ... 124
Learning to Program with Visual Basic and .NET Gadgeteer 7
CHAPTER 1.
INTRODUCTION
Microsoft .NET Gadgeteer is a really easy-to-use platform for creating new electronic devices using a wide variety of hardware modules and a powerful programming environment. Students with little or no electronics background can design and build devices that sense and react to their environments using components such as switches, displays, buzzers, motor controllers and more. Using cables these various modules are plugged into a mainboard which is programmed to make everything work together.
Figure 1: FEZ Cerberus Tinker Kit, showing mainboard and modules.
.NET Gadgeteer originated at Microsoft Research in Cambridge, U.K. It was initially designed as a tool for researchers to invent new kinds of devices more quickly and easily. It very quickly proved to be of interest to hobbyists and for secondary and higher education. In particular, several pilots in schools in the UK and the US with students ranging from 11 to 18 years of age demonstrated that .NET Gadgeteer is a motivating environment for teaching computer programming both within the curriculum and as an extra-curricular club. Gadgeteer is programmed in a modern event-based and object-oriented style using Visual C# or Visual Basic. In addition to teaching programming, Gadgeteer offers exciting possibilities for teaching electronics and computer-aided design.
Microsoft Research launched .NET Gadgeteer as an open platform in 2011. As a result .NET Gadgeteer components are now available from several hardware vendors, whilst the software required to program the devices is available for free from Microsoft. The Fez Cerberus Tinker Kit from GHI Electronics consists of a mainboard and various modules which have been selected to allow someone new to Gadgeteer to build a wide variety of exciting devices. Other Gadgeteer kits are available and there are also a wide variety of individual modules which are available separately.
With .NET Gadgeteer we hope that we can give students a better understanding of how the devices and technology all around us work, as well as the skills to create their own. We hope to inspire a future generation of producers of electronic devices, not just consumers!
8 Learning to Program with Visual Basic and .NET Gadgeteer
O
BJECTIVES OF THIS BOOKThis book is intended for school students and others learning to program in Visual Basic. It assumes no prior knowledge of programming, electronics, Visual Basic or the Visual Studio environment. Programming concepts are introduced and explained throughout the book. Each chapter is structured in a similar way: firstly a new concept to be learned is introduced, secondly there is a step-by-step tutorial on how to develop a simple example in Gadgeteer which uses that concept, and finally a set of exercises is given which enable the reader to practise the main points. This last step is the most important: when learning to program, practising new programing skills is crucial! Answers to all the exercises are available at http://gadgeteering.net.
This book is based on the Fez Cerberus Tinker Kit made by GHI Electronics, which is a good value-for-money .NET Gadgeteer kit produced specifically for education. Although images of this kit are used throughout this book, different mainboards and modules from other manufacturers or kits can be substituted with little or no changes to the associated code.
M
ODULES USED IN THIS BOOKThis book uses the following modules, which are all included in the FEZ Cerberus Tinker Kit apart from the ‘Extender’ module in Chapter 12. Note that in many cases other kits and modules can be substituted.
Module name Image Used in chapters
Fez Cerberus mainboard
This is at the heart of every project. It has a processor, memory and a series of sockets. You can connect modules into these sockets.
All
USBClientSP power module
The mainboard and modules require power. This module not only provides power to your device it also lets you program and debug over USB.
All
Display N18 module
This LCD module lets you display images and text in colour. It is backlit and is visible in the dark. The display is 128 pixels wide and 160 pixels high.
Chapter 4 Chapter 5 Chapter 10 Chapter 11
Learning to Program with Visual Basic and .NET Gadgeteer 9 Joystick
The joystick moves up-down and left-right. You can then read values corresponding to how far the joystick has been moved in each direction. You can also press the joystick and it acts like a normal button.
Chapter 11 Chapter 12
LED Strip
There are 7 LED lights in a row: 2 red, 3 amber and 2 green. You can turn each LED on/off individually.
Chapter 6 Chapter 7 Chapter 8
Light sensor
This module returns a value that corresponds to the amount of light to which the sensor is exposed.
Chapter 8
Button
The module detects when the button is pressed and released and also has an LED which can be turned on/off.
Chapter 4 Chapter 5 Chapter 6 Chapter 7
SD card module
This modules accepts a full sized SD card and lets you read from and write to files. You will need an SD card to use it; not all SD cards work so use the one provided with the Tinker Kit.
Chapter 8 Chapter 9
Tunes
This module lets you play individual notes and construct basic melodies.
Chapter 3 Chapter 9
Extender
This is an advanced module that lets you connect existing electronic components or custom devices to your project. You can use any extender or breakout module instead.
10 Learning to Program with Visual Basic and .NET Gadgeteer
H
OW TO USE THIS BOOKThis book consists of a series of projects built using a Fez Cerberus Tinker Kit. There are 9 projects using the kit, with an additional project in chapter 12 which needs a Gadgeteer Extender module and a buzzer which you can purchase separately.
Chapters 1 and 2 introduce you to how to use .NET Gadgeteer and Visual Studio so you will need to read these first and make sure that you have installed Gadgeteer successfully and are familiar with the Visual Studio interface.
Chapters 3 to 12 each contain a project and are divided up as follows: Key Terms – these are the new concepts to be covered in this chapter;
Modules you will need – which Gadgeteer modules you will need for this project; Overview – what you will build in this chapter;
New Concepts – an explanation of the new programming concepts. Programming concepts are introduced in this order: variables, data types, if statements, loops, functions, arrays and file-handling; Tutorial – a step-by-step tutorial on how to develop the core project. Follow the instructions carefully,
referring to the appendices if you have problems getting anything to work;
Exercises – the most important part of each chapter! This is where you try to build some projects on your own, building on what you have learned in that chapter. Solutions to the exercises can be found at http://www.gadgteteering.net/learn;
Summary – this gives some key points that we think you will have learned in the chapter.
The appendices cover a range of topics from where to buy Gadgeteer to what to do if your project will not work as expected. We recommend you read through the appendices to see the range of topics covered, and then refer to them when you have any difficulties or need additional information. Note that the technical details are correct at the time of writing but can change as new software releases or updates become available. In this case, updated information will be available at http://www.gadgeteering.net.
Learning to Program with Visual Basic and .NET Gadgeteer 11
CHAPTER 2.
GETTING STARTED WITH .NET GADGETEER
A
SSEMBLING THE HARDWA REEach project needs a mainboard. This contains the microprocessor which will be programmed to make it behave in the desired way. But a microprocessor only really becomes useful when it is connected to other components to let it display output, react to inputs, process files and so on. To do this with Gadgeteer, different modules are connected to the mainboard using small grey cables.
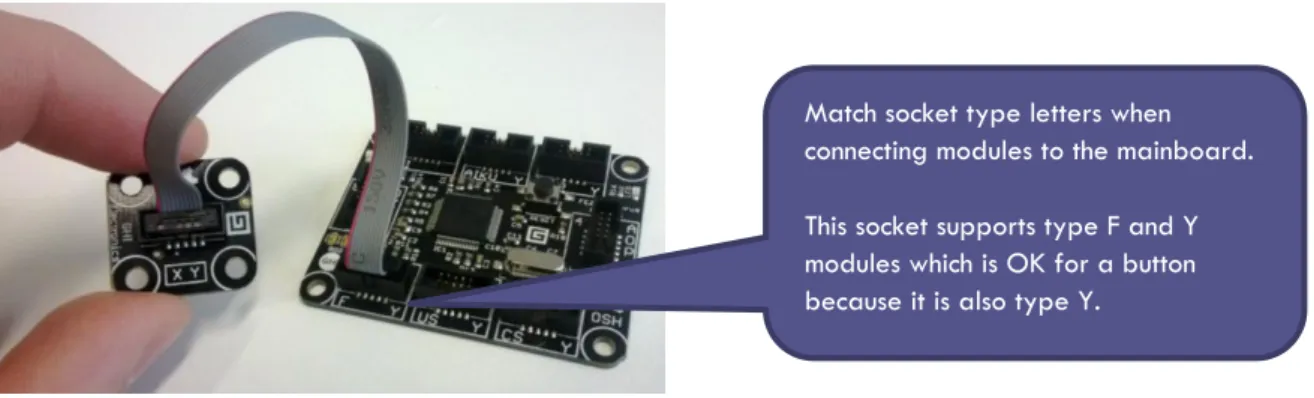
You will begin each project in this book by plugging together the modules needed for that particular project. There is a list of modules at the start of each chapter. It is important to plug the modules into the right sockets on the mainboard – each module has a letter on it which indicates which socket type it can be attached for. When you have found the socket letter on the module, look for the same letter next to a mainboard socket – there will probably be more than one option – and attach the other end of the cable there.
Figure 2: Assembling the hardware The most important rules for plugging together Gadgeteer are:
When connecting modules, always make sure that the mainboard is not connected to the PC or powered on using a different power supply.
Red modules supply power to the mainboard. Only one red module should ever be connected to the mainboard at any time.
Match the socket type letters between the modules and the mainboard as described above. If a module is connected to the wrong socket type it won’t work but it shouldn’t damage anything either.
S
TARTING A PROJECT IN.NET
G
ADGETEERYou need a desktop or laptop computer in order to program a Gadgeteer mainboard. Before starting to work with Gadgeteer, ensure that you have downloaded and installed all the software on to your machine. You need three different pieces of software:
The Microsoft Visual Studio programming application for developing code;
The Microsoft .NET Micro Framework system which allows your code to run on a Gadgeteer mainboard; A software development kit (SDK) from the manufacturer of the particular Gadgeteer components you
are using.
All modern software is updated frequently by the companies who develop it, in order to fix any problems and add new features. The same is true of the Gadgeteer software components listed above and it’s important that you use the right versions! There are currently two popular versions of Microsoft Visual Studio and you can use either one as long as you install the associated version of the .NET Micro Framework. The installers are pretty
Match socket type letters when connecting modules to the mainboard. This socket supports type F and Y modules which is OK for a button because it is also type Y.
12 Learning to Program with Visual Basic and .NET Gadgeteer
easy to use. You must install the software in the order given below. Some of the installations involve downloading a zipped file. In this case you must extract all the contents before running the Setup program. For detailed installation instructions go to http://www.gadgeteering.net/content/installation-instructions and check Appendix B.
If you want to use Visual Studio 2012 edition, this is exactly what you need to get your Fez Cerberus Tinker Kit up-and-running:
Visual Studio Express 2012 for Desktop; Microsoft .NET Micro Framework 4.3 SDK; GHI NETMF and Gadgeteer Package 2013 R2. Alternatively you can use the following:
Visual Basic 2010 Express;
Microsoft .NET Micro Framework 4.2 SDK; GHI NETMF and Gadgeteer Package 2013 R2.
The Express Editions of both Visual Basic 2010 and Visual Studio 2012 are free, but if you already have another version of Visual Studio 2010 or 2012 which supports Visual Basic it is fine to use this instead. The rest of the software is also free.
To start using .NET Gadgeteer, first launch Visual Studio 2012 or Visual Basic 2010. On launching the software, you will see a screen enabling you to choose a .NET Gadgeteer Application (see Figure 3). If you do not see this, select NEW and then Project… from the FILE menu. You will need to make sure you select Visual Basic and then Gadgeteer on the left-hand side before you are offered the chance to select a new .NET Gadgeteer application as shown in Figure 3. The screenshots in this book all use Visual Studio 2012; if you are using Visual Basic 2010 things will look slightly different but all the principles are the same.
Figure 3: Starting to use .NET Gadgeteer
You are then prompted to choose the mainboard you want. There are many different mainboards available from different manufacturers but the Fez Cerberus mainboard comes with the Fez Cerberus Tinker Kit and this is what
Click here to indicate you want to create a new Gadgeteer application. Give your project
a meaningful name here.
Click ‘OK’ to proceed.
Learning to Program with Visual Basic and .NET Gadgeteer 13 we will be using in this book. So choose the Fez Cerberus mainboard as shown in Figure 4 and then click on ‘Create’.
This will create a new project in Visual Studio and you are ready to start!
Figure 4: Choosing the Cerberus mainboard
T
HEG
ADGETEERD
ESIGNER INV
ISUALS
TUDIOBefore you start to write any code to run on your Gadgeteer mainboard, you need to specify which modules you are going to use in your new project and which sockets you are going to connect them to. This is done in Visual Studio using a feature called the Gadgeteer Designer. This Designer is a special picture-based view of your project – the idea is to drag photos of each of the modules you are using into the Designer window and then click on the module sockets to draw lines on the screen which connect up to sockets on the mainboard you are using. When you created a new Visual Studio ‘.NET Gadgeteer Application’ in the previous section you probably ended up with something like the screenshot in Figure 5. This is the Designer view, and to start with it only includes the mainboard you selected when creating your new project. If you ever want to return to the Designer view, look for the tab labelled ‘Program.gadgeteer’ and click on this.
The next stage is to add the modules you want to use for your project. This is done by selecting them from the Toolbox. The Toolbox is a window which runs down the left hand side of the screen in Visual Studio and lists all the modules that were included in the SDK you installed previously. If the Toolbox is not showing, click as shown in Figure 5 to reveal it. Bring the modules you need into the Designer window by dragging or double-clicking the relevant module names in the Toolbox. Then connect them to the mainboard.
14 Learning to Program with Visual Basic and .NET Gadgeteer Figure 5: Using the Toolbox
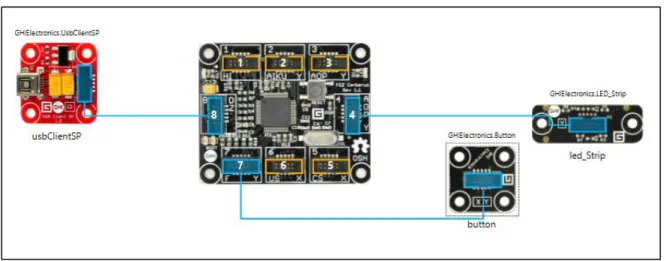
Figure 6: Adding modules in the Designer
Figure 7: Modules in the Designer Double-click on each of the modules needed for your project or drag them to the right. Click on the connector on a module and drag to the mainboard to connect it. Select Toolbox to see a list of modules.
Learning to Program with Visual Basic and .NET Gadgeteer 15 Figure 8: Connecting modules in the Designer
You will probably notice that when you ‘wire up’ a module in the Designer it is only possible to connect to a compatible socket on the mainboard – one with the same socket type letter.
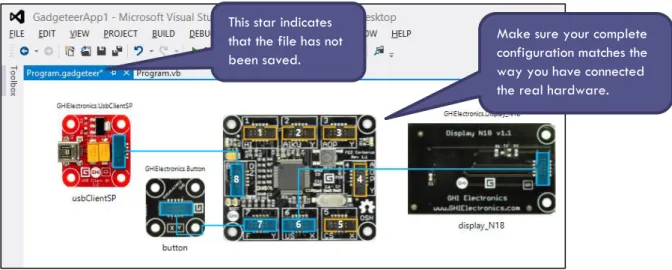
When you have finished connecting the modules to the mainboard and your configuration matches your
hardware, select Save All under the FILE menu to save the whole project. Connect the hardware to your computer using the USB cable. You are then ready to start programming your project. If you ever go back and make changes in the Designer be sure to save the file, there is an indicator on each tab showing if it has been saved as shown in Figure 8.
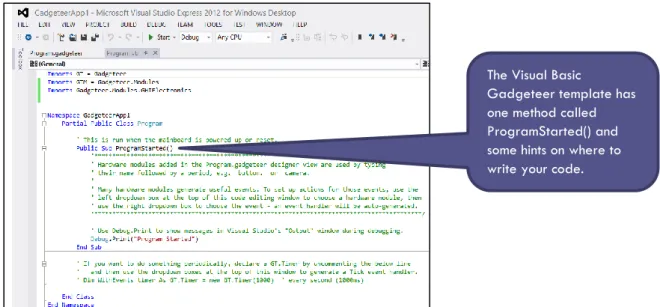
To start writing code for your project, click on the Program.vb tab at the top of the project (see Figure 9). This takes you away from the Designer and replaces it with a code window as shown in Figure 10. As you will see, Visual Studio automatically creates the framework for your code using a template which was installed with the Gadgeteer software. The template contains several lines of comments – text that can be included in a program in order to help programmers understand how a piece of code works but which the computer will ignore. These comments can be deleted of course, but they are often useful to help you get started with programming.
Figure 9: Locating the Program.vb tab
Make sure your complete configuration matches the way you have connected the real hardware.
Click on Program.vb to see the program. .code.
This star indicates that the file has not been saved.
16 Learning to Program with Visual Basic and .NET Gadgeteer
Figure 10: The ProgramStarted() method
The next step is to write the code for your project. The remaining chapters in the book explain how to write the code for several different projects. While you are doing this you will be learning how to write computer
programs. The skills you learn when programming in one language are very transferable to other languages you learn in the future. Also you will be learning a lot about how electronic devices and computer applications are made.
The Visual Basic
Gadgeteer template has one method called ProgramStarted() and some hints on where to write your code.
Learning to Program with Visual Basic and .NET Gadgeteer 17
CHAPTER 3.
PLAYING TUNES
K
EY TERMSM
ODULES YOU WILL NEEDProgram Sub Procedure Comment
Cerberus mainboard USBClientSP power module Tunes module
O
VERVIEWIn this first project you will learn to use the tunes module to play a tune using .NET Gadgeteer. Before starting, the next section will give you a short introduction to what a program in Visual Basic looks like.
P
ROGRAMMING INV
ISUALS
TUDIOVisual Studio can look very complicated when you start using it but you will quickly learn which parts are important. When you are programming you need to focus on the main window.
Figure 11: The main code window in Visual Studio
A program begins with Import statements and these specify what modules will be used in the Gadgeteer program. The next section of Program.vb declares the program itself. The program begins where the code says Partial Public Class Program and ends with End Class at the bottom of the page. This will always be written for you by the Gadgeteer Visual Basic template so you will not need to worry too much about it. Inside a Program Class are procedures. A procedure in Visual Basic is known as a Sub.
This Sub (or procedure) is run when the program
starts.
Import statements tell the program which modules to use.
Debug.Print(“Program Started”) outputs the text “Program Started” to the Output window.
18 Learning to Program with Visual Basic and .NET Gadgeteer
Each Sub (procedure) begins with Public Sub and ends with End Sub. In a Gadgeteer program the beginning and end of procedures will nearly always be written for you, either in the template or added automatically when you need them. In this case the Sub is called ProgramStarted() and not surprisingly, runs when your Visual Basic program starts.
Later on you will create other Subs (procedures). But in this project we will put all the code we write inside the ProgramStarted() Sub so that it is run as soon as the program starts.
Inside ProgramStarted() there is some code already written but most lines start with an apostrophe and are in green. These lines are comments which are ignored by the computer when the program runs. They are there for the humans! These help you to understand what is going on and you should add comments to your own programs as you write them so that you can remember how they work too.
The only line that is not in green inside ProgramStarted() is Debug.Print(“Program started”). This is an instruction to the computer to write the words “Program started” to the Output window (see Appendix C). This will be useful it provides a signal to you that the program is running correctly. See Figure 11 for details of what this looks like on-screen.
In this project we will add some code to the ProgramStarted() Sub and this will tell the computer to play a tune using the tunes module.
T
UTORIAL:
P
LAYING A TUNEStep 1: Assemble these modules
Referring back to Chapter 1, the first step when building a Gadgeteer project is to connect up the hardware modules you will need. For this project, you will need a mainboard, a tunes module and a power module as shown in Figure 12.
Cerberus Mainboard USB Client SP power module Tunes module
Figure 12: Modules needed for Tunes project
Connect these modules together using the cables to the correct sockets on the mainboard. The letter on the module tells you which sockets are allowed (see page 11 for more information).
Step 2: Use the Gadgeteer Designer to link the modules together
The next step is to open Visual Basic and to start a new .NET Gadgeteer application (as shown on page 11). Following the instructions there, drag a tunes module, mainboard and power module on to the Gadgeteer Designer screen and connect them up in exactly the same way as you have connected your hardware. The diagram in Figure 13 shows an example.
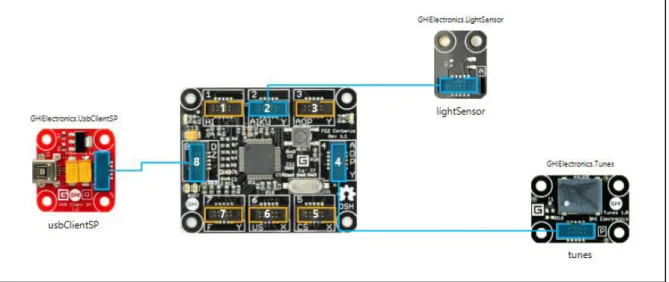
Learning to Program with Visual Basic and .NET Gadgeteer 19 Figure 13: Modules in the Designer for the Tunes project
When you have finished connecting the modules to the mainboard and your configuration matches your hardware, select Save All under the FILE menu to save the whole project. Ensure the hardware is connected to your computer using the USB cable. You are then ready to start programming your project. If you ever go back and make changes to the Designer be sure to save the file.
Step 3: Write your program
Now click the Program.vb tab at the top of your program and your Gadgeteer Designer window should disappear and the code window should appear.
Figure 14: Code window for Tunes project
Visual Studio has various features that assist with editing your code, many are intuitive but it is worth looking at the IntelliSense appendix on page 96 for a quick introduction to these features that can save time and make coding these examples easier.
Underneath the line Debug.Print(“Program Started”) add the line highlighted in yellow below: Click the Program.vb
20 Learning to Program with Visual Basic and .NET Gadgeteer
Public Sub ProgramStarted()
' Use Debug.Print to show messages in
' Visual Studio's "Output" window during debugging. Debug.Print("Program Started")
tunes.Play(261)
tunes.Play(number) plays a sound at a certain pitch or frequency. The frequency is specified by the number in brackets and is measured in a unit called Hertz, abbreviated to Hz. A frequency of 261 Hertz is the frequency of middle C, if you play the piano! Now add the lines highlighted in yellow in the code below.
Public Sub ProgramStarted()
' Use Debug.Print to show messages in
' Visual Studio's "Output" window during debugging. Debug.Print("Program Started")
tunes.Play(261) Thread.Sleep(1000) tunes.Stop()
Thread.Sleep(1000) causes the program to pause for 1000 milliseconds, which is one second. After this tunes.Stop() will stop the note playing.
This program should print Program Started in the Output window (if you cannot find this, see Appendix C) and then play a middle C for one second. So now it is time to get this first program running.
Now is a good time to save your program. To do this, click on the Save All icon . It is very important to save ‘all’ as there are lots of different files in a Gadgeteer application and they all need to be saved together. If you are working in Visual Studio 2010, you may need to name your project for the first time – call it “Playing Tunes”. If you are using Visual Studio 2012 Express you will already have named your project as this is done when you create a new project.
Now press the green play button at the top of the screen to run the program. Allow around half a minute for the program to load onto the Gadgeteer mainboard and then it should play automatically.
Does your program work? If it does not, check the following:
- Is the USB cable plugged in and attached to the red power module (USB Client SP)?
- Are the connections to the sockets on the mainboard the same as those that you have used in the Designer?
- Did you install the Gadgeteer software that comes with the FEZ Cerberus Tinker Kit? - Did you type in the code exactly as written above?
If you have checked all these and you still have errors, go to page 98 (the troubleshooting section of the appendices) to look up some strategies that will help you check that your code is written correctly and get it working.
When you press the green play button your program is deployed to the hardware that you have plugged in via USB. The play button starts a process called debugging and is covered in more detail on page 107. Since your program has been deployed to the hardware, every time you reset the Gadgeteer device from now on (or power it up) your program will execute. In the case of the Tunes example, it will beep every time you connect it over USB. Remember that you are programming the hardware to create a standalone gadget.
You cannot edit your code or alter the modules of the Designer if your program is running. You will first need to press the stop button or Stop Debugging on the Debug menu at the top (Shift + F5).
Learning to Program with Visual Basic and .NET Gadgeteer 21 When your program successfully plays one note, it is possible to create a longer tune. You could do this with a sequence of tunes.play(<number>) commands. Alternatively you can save a series of individual notes into a melody. Firstly, here is how to create a longer tune with more tunes.play() commands.
The scale of C Major uses frequencies shown in Table 1.
Table 1 : Scale of C Major and corresponding frequencies
Note Frequency (in Hz) Note Frequency (in Hz) Middle C 261 G 392 D 293 A 440 E 329 B 493 F 349 C 523
To play the scale of C Major using Gadgeteer, add these frequencies to your program. Simply add some more lines with tunes.play(<frequency>) using the numbers in the table. Using Thread.Sleep() between notes makes the computer wait for a certain number of milliseconds before playing the next note. If you are not sure how to do this, refer to the code below to help you.
Partial Public Class Program
' This is run when the mainboard is powered up or reset. Public Sub ProgramStarted()
Debug.Print("Program Started") tunes.Play(261) ' Middle C Thread.Sleep(1000) tunes.Play(293) ' D Thread.Sleep(1000) tunes.Play(329) ' E Thread.Sleep(1000) tunes.Play(349) ' F Thread.Sleep(1000) tunes.Play(392) ' G Thread.Sleep(1000) tunes.Play(440) ' A Thread.Sleep(1000) tunes.Play(493) ' B Thread.Sleep(1000) tunes.Play(523) ' C Thread.Sleep(1000) tunes.Stop() End Sub End Class
Another way of playing a tune is to add some notes to a “melody” and then play the melody.
To do this you will need to declare a variable melody. A variable is a container that holds a value. Each variable has a particular data type associated with it – this refers to the type of information (or data) that the variable will be used to store. For example whole numbers are stored using a data type called an Integer. In this case we are creating a variable called melody which is an instance of a data type called Melody (capital M). Variables will be described in detail in the next chapter.
22 Learning to Program with Visual Basic and .NET Gadgeteer
' declare a new melody
Dim melody As Tunes.Melody = New Tunes.Melody()
Once you have declared the melody, you can add notes to the melody – for each note you add you need to specify the frequency (pitch) and the duration (length). The frequency is in Hertz as before and the duration is in milliseconds (thousandths of seconds).
So for example, to play middle C for 2 seconds use the line of code: melody.add(261,2000)
Dim melody As Tunes.Melody = New Tunes.Melody() ' declare a new melody
melody.Add(261, 600) ' Middle C melody.Add(293, 600) ' D melody.Add(329, 600) ' E melody.Add(349, 600) ' F melody.Add(392, 600) ' G melody.Add(440, 600) ' A melody.Add(493, 600) ' B melody.Add(523, 600) ' C
' Now play the melody tunes.Play(melody)
Edit your program by changing the lines of code starting with tunes.play() and instead use melody.add(<frequency>, <time>) as shown in the code.
Run your program and check that it works as you would expect. Then try the following exercises.
E
XERCISES1. Edit your Visual Basic program to see if you can play the scale of middle C going down as well as up. 2. Edit your program so that it adds the notes for the tune “Happy Birthday” to a new melody and then plays
that melody. You will need to research some more notes and frequencies.
3. (Advanced). Edit your program so that it uses a loop to repeat two notes five times, using the code given
below. This uses a For … Next loop which you will learn properly in Chapter 7. For counter As Integer = 1 To 5
tunes.Play(261) ' Middle C tunes.Play(293) ' D
Next
4. Once this works see if you can use For … Next loops to play the popular tune “Frère Jacques”.
S
UMMARYIn this chapter, you have learned how to:
write and run your first Visual Basic program using .NET Gadgeteer; use the tunes module and the Play() method to create a tune; create a new melody and add notes and time intervals to it.
Learning to Program with Visual Basic and .NET Gadgeteer 23
CHAPTER 4.
CLICKER
K
EY TERMSM
ODULES YOU WILL NEEDVariable Integer Event Event-handler Comment Cerberus mainboard USBClientSP power module 2 Button modules
Display N18 module
O
VERVIEWThis program introduces output to a display screen. It is a simple clicker that somebody might use at an event to count how many people have gone into a room. Imagine a very popular event taking place where it is important it does not get too crowded. We need to click when somebody goes in and display how many people have gone into the room. We also need to be able to reset the counter.
N
EW CONCEPTS:
W
HAT IS A VARIABLE?
A key concept in programming is understanding what a variable is. A variable is like a box which holds a value. This value can change when the program is running.
Figure 15: Assigning values to variables myName = “Bob”
myName = “Carla”
In these examples, “Bob” is a value, myName is a variable. The variable myName is assigned the value “Bob”. Then it is assigned the value “Carla” which overwrites the previous value.
Each variable has a specific ‘data type’. This refers to the type of information that the variable is able to store. The myName variable above had text data in it and so that’s its data type. We can also have variables that have numbers in them. One type of number is called integer. This is a whole number with no fraction or decimal place.
myNumber = 46 myAge = 15
Before using a variable in Visual Basic, it needs to be declared and this is done with the Dim statement. Dim actually stands for Dimension, but you could think of it as standing for “Declare in Memory” which is what it is used for. When a variable is declared, a space in memory is set aside for it.
24 Learning to Program with Visual Basic and .NET Gadgeteer
The Dim statement needs to specify the name of the new variable and its data type. An example of declaring a variable in Visual Basic and then assigning a value to it is given below:
Dim number As Integer number = 356
You can also declare the variable and assign the value all in one go: Dim number As Integer = 356
There are many data types that can be used with variables but you will use just a few to start with. The commonly used ones are shown in Table 2.
Table 2: Different data types and their uses
Data type What it is used for? Example
Integer Whole number 1, 5, 35, -5 Double Decimal (or fractional) number 1.56, 4.78
String Piece of text “Happy Birthday” Boolean True or False only True, False
T
UTORIAL:
B
UILDING A CLICKERStart by putting together the hardware you need as you have done previously (see page 11). Use the socket letters to see how the modules attach to the mainboard.
Step 1: Assemble these modules
Cerberus mainboard USB Client SP power module Button Display N18 module
Figure 16: Modules needed for Clicker project
Step 2: Use the Gadgeteer Designer to link the modules together
Open Visual Studio, save your program as “Clicker” and then use the Designer to drag on the modules you are using and link them together. The diagram in Figure 17 shows an example, but you can wire things differently if you want. Just make sure you connect the modules together in the Designer using the same sockets as you have used when assembling your real hardware.
Learning to Program with Visual Basic and .NET Gadgeteer 25 When you initially drag the modules on to the Designer screen the display module will be called “display_N18”. This can be seen as text which appears under the photo of the module. You should rename the display by clicking on the text “display_N18” underneath the picture and then changing it to read “display”. This will make your code easier to read and is done for all exercises in this book.
When you have finished connecting the modules to the mainboard and your configuration matches your hardware, select Save All under the FILE menu to save the whole project. Ensure the hardware is connected to your computer using the USB cable. You are then ready to start programming your project. If you ever go back and make changes to the Designer be sure to save the file.
Figure 17: Modules in the Designer for the Clicker project
Step 3: Write your program
A very fundamental concept when programming in Visual Basic is the event. An event is when something happens and the computer reacts to it by running a piece of code. This code is something you program yourself and it is called an event-handler.
Our first program in this chapter is going to do the following: Display “0” on the screen when the program starts. Repeatedly
o Do nothing until the user presses the button – that will be the “event”.
o Add one to a variable called ‘count’ in the button event-handler.
o Display the new value of the count variable on the screen whenever it changes.
This list of steps tells you that we will need to have a variable to hold the most up-to-date value of the number of people in the room. A variable is a container with a name that holds a value. This value can change while the program is running. Our variable is going to be called “count”.
In this example we will also need a second variable. This is needed to hold the value of the font (or typeface) that we use to display the number on the screen. There are only two fonts built into Gadgeteer by default but later in the book we will add more.
So the code can be written in three stages. Firstly, when the program starts, we need to display a “0” on the screen. We start by declaring the font variable which we will use later. This code goes at the top of the program just after the line Partial Public Class Program. The green lines beginning with an apostrophe are comments which won’t be executed by the computer. However they are important when you look back at the code because they help you understand what you wrote and why. They are also very important when someone else tries to understand your code.
Change the name of the display N18 to “display”. This will make your program easier to read.
26 Learning to Program with Visual Basic and .NET Gadgeteer Namespace Clicker
Partial Public Class Program
' font is the variable used to hold the font name.
' Gadgeteer comes with two fonts: ninaB and small
Dim font As Font
' This is run when the mainboard is powered up or reset.
After the class definition, there is a procedure called ProgramStarted(). As described previously, the
ProgramStarted() procedure contains the code that runs once the program starts. By default there are a lot of comments in this section to help you get started with your first program.
Having declared the font as Font, we need to give it a value. We’re going to use the NinaB font. Enter the yellow highlighted line below to do this.
Namespace Clicker
Partial Public Class Program
' font is the variable used to hold the font name. ' Gadgeteer comes with two fonts: NinaB and small Dim font As Font
' This is run when the mainboard is powered up or reset. Public Sub ProgramStarted()
'*************************************************************************************** ' Hardware modules added in the Program.gadgeteer designer view are used by typing ' their name followed by a period, e.g. button. or camera.
'
' Many hardware modules generate useful events. To set up actions for those events, use ' left dropdown box at the top of this code editing window to choose a hardware module, ' use the right dropdown box to choose the event - an event handler will be
'***************************************************************************************/ ' Use Debug.Print to show messages in Visual Studio's "Output" window during debugging. font = Resources.GetFont(Resources.FontResources.NinaB)
Debug.Print("Program Started")
display.SimpleGraphics.DisplayText(count.ToString(), font, GT.Color.Red, 50, 50) End Sub
Secondly, you will need to set up the variable count and initialise it to 0. The variable will be declared at the top of the program directly under the line where the font variable was declared.
Namespace Clicker
Partial Public Class Program
' font is the variable used to hold the font name.
' Gadgeteer comes with two fonts: ninaB and small
Dim font As Font
' count is a variable used to hold the value which will be displayed on the screen.
Dim count As Integer
Using the data type Integer means a whole number will be stored in the variable.
You can set the count to be 0 at the same time as declaring it. This is doing two things at once but it will save remembering to set the count to 0 later on. Alter your code like this:
Namespace Clicker
Partial Public Class Program
' font is the variable used to hold the font name. ' Gadgeteer comes with two fonts: ninaB and small Dim font As Font
' count is a variable used to hold the value which will be displayed on the screen. Dim count As Integer = 0
Learning to Program with Visual Basic and .NET Gadgeteer 27 The next step is to write the code to add one to the count and display the updated value on the screen. To do this we have to find the event handler which corresponds to the action of “pressing the button”. In Visual Basic you just need to select the appropriate action from a list of all possible events and the outline of the associated event-handling procedure will be displayed.
A procedure is a section of code that has a particular purpose. We will need to write the code that we want to be executed when the button is pressed.
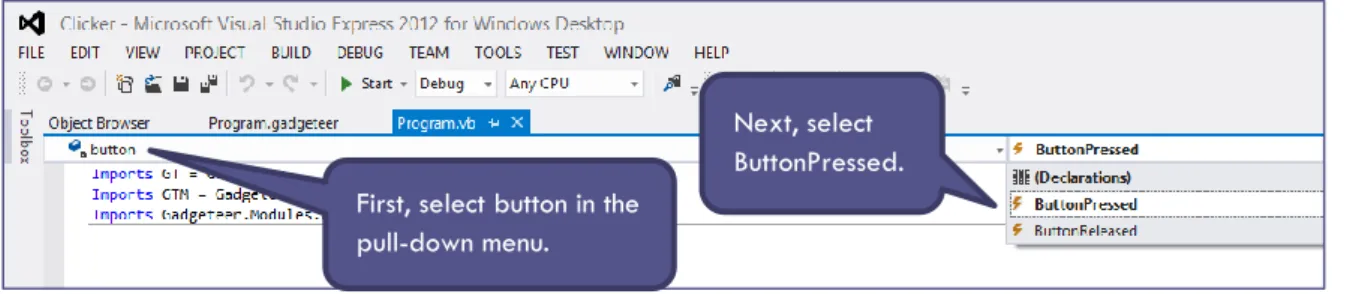
To find the event handler which corresponds to pressing the button, go to the top of the screen under the toolbar in Visual Studio and select button in the grey pull-down box marked “General”. This selects all the events associated with the Button module. Then select ButtonPressed in the grey area to the right which is labelled “Declarations”.
Figure 18: Finding an event handler An empty procedure will appear at the bottom of your code listing:
Private Sub button_ButtonPressed(sender As Button, buttonState As Button.ButtonState) Handles button.ButtonPressed
End Sub
This is the empty shell of your event handler. The next stage is to write the code to add one to the variable count, then to clear the screen (otherwise the next number you write will sit on top of the previous one), and then display the new value of count. This can be done by entering the following code. Once again add the highlighted lines then add a comment that makes sense to you on the line before each line of code
Private Sub button_ButtonPressed(sender As Button, buttonState As Button.ButtonState) Handles button.ButtonPressed
count = count + 1
display.SimpleGraphics.Clear()
display.SimpleGraphics.DisplayText(count.ToString(), font, GT.Color.Red, 50, 50) End Sub
Enter the code above, save your program and test that the basic clicker works! To run your program click on the button.
Figure 19: Use the green 'play' icon in Visual Studio to start your program running First, select button in the
pull-down menu.
Next, select ButtonPressed.
The green ‘play’ icon will start your program running.
28 Learning to Program with Visual Basic and .NET Gadgeteer
Wait for the program to load. You should see an Output window and after a few seconds some lines of text will start to scroll by. If you cannot find the Output window, see Appendix C. After a few more seconds the words “Program Started” should be displayed. This is printed because the Visual Basic template includes a
Debug.Print("Program Started") statement. It tells you that the program is running correctly.
Figure 20: The Output window
Once your program runs successfully, work through the exercises below to extend the clicker.
E
XERCISES1. Add a second button which resets the clicker to 0. This button will have a different name (for example button1) and so you will need a separate event handler. You could change the event handler so that the second button decrements the count whenever anyone leaves the room.
2. Set a limit to your clicker so that it stops when it reaches 20 people entering the room and gives a message to say the room is full.
S
UMMARYIn this chapter, you have learned to:
write code that responds to an event; use variables in Visual Basic;
change the value of a variable, for example, by adding a number; display the contents of a variable on the display.
Learning to Program with Visual Basic and .NET Gadgeteer 29
CHAPTER 5.
STOP WATCH
K
EY TERMSM
ODULES YOU WILL NEEDBoolean statement
If … Then … Else statement Timer events
Cerberus mainboard USBClientSP power module 2 Button modules
Display N18 module
O
VERVIEWThis program builds on the previous chapter and enables you to build a stop watch. This will have two buttons – one to stop and start, and one to reset. To do this you will be working with timers – once you have understood how to use these you will be able to do many more projects that work in the same way.
N
EW CONCEPTS:
I
F…
T
HEN…
E
LSE…
STATEMENTThe structure of a simple If statement in Visual Basic is shown below. If <condition> Then
<statements> Else
<statements> End If
It is important to remember when writing an If statement that the <condition> must be something that has a “yes” or “no” answer. In other words, when you work out what the condition is, it can only be True or False. A statement which can only be True or False is called a Boolean statement.
These would be acceptable conditions to put into an If statement: number = 5
name = “Carlos” age >= 17
timer.IsRunning = True (this can also be written as just timer.IsRunning)
In this chapter you will use an If statement to test whether the timer is running. If it is running you will stop it, but if it is not running you will start it. This will enable you to create a Stop/Start button on your stop watch.
T
UTORIAL:
B
UILDING A STOP WATCHThe modules and the Designer view are exactly the same as the Clicker, assuming that you completed the exercises and added a second button, so the code below should look familiar.
30 Learning to Program with Visual Basic and .NET Gadgeteer
Step 1: Assemble these modules
These are the modules that you will need for this project. Use the letters on the module to connect them together using the cables.
Cerberus mainboard USBClientSP power module 2 Button modules Display N18 module
Figure 21: Modules needed for Stop watch project
Step 2: Use the Gadgeteer Designer to link the modules together
Open Visual Basic and use the Gadgeteer Designer to recreate the hardware you have just put together. Drag the modules on to the Designer screen as you have done previously and then link them together. The diagram in Figure 22 gives an example, but you should connect the modules in the Designer to exactly the same sockets as you used when putting the hardware together.
When you initially drag the modules on to the Designer screen the display module will be called “display_N18”. This can be seen as text which appears under the photo of the module. You should rename the display by clicking on the text “display_N18” underneath the picture and then changing it to read “display”. This will make your code easier to read and is renamed for all exercises in this book.
Figure 22: Modules in the Designer for the Stop watch project
Step 3: Write your program
The stop watch program is going to do the following:
1. Display 0 on the screen when the program starts, but also print some text with instructions. 2. Add one to the counter every second.
Change the name of the display N18 to “display”. This will make your program easier to read.
Learning to Program with Visual Basic and .NET Gadgeteer 31 3. Display the new value of the counter on the screen every second.
4. Respond to the other (reset) button being pressed by setting the counter back to 0. You should start by declaring the variables needed, see Table 3.
Table 3: The stop watch variables and their use
Variable Data Type Description
seconds Integer Used as the second counter font Font Small font for instructions font2 Font NinaB font for the time display
Note that only two fonts, called Small and NinaB, are included with Gadgeteer by default. However, it is possible to import other fonts into .NET Gadgeteer using a utility called Tiny Font Tool.
The code you need to type in is highlighted below: Partial Public Class Program
Dim seconds As Integer = 0
Dim font As Font = Resources.GetFont(Resources.FontResources.small) Dim font2 As Font = Resources.GetFont(Resources.FontResources.NinaB) ' This is run when the mainboard is powered up or reset.
Public Sub ProgramStarted()
Having declared and assigned the variables the next step is to set up the display on the screen.
This can be done in the ProgramStarted() sub (Visual Basic’s name for a procedure)). Depending on the size of the screen the coordinates may be different to the example below. Here we are using a GHI Electronics Display N18 which has 128x160 pixels. Add the lines of code that are highlighted in yellow to the ProgramStarted() sub.
Public Sub ProgramStarted()
Debug.Print("Program Started")
display.SimpleGraphics.DisplayRectangle(GT.Color.Cyan, 1, GT.Color.Black, 40, 40, 40, 40) display.SimpleGraphics.DisplayText("Stop Watch", font2, GT.Color.Cyan, 20, 20)
display.SimpleGraphics.DisplayText("00", font2, GT.Color.White, 50, 50)
display.SimpleGraphics.DisplayText("LEFT button to Stop/Start", font, GT.Color.Cyan, 0, 90) display.SimpleGraphics.DisplayText("RIGHT button to Reset", font, GT.Color.Cyan, 0, 105) End Sub
Test this to see that this works and that the screen looks as you would expect, see Figure 23. Heading
32 Learning to Program with Visual Basic and .NET Gadgeteer
Figure 23: The stop watch in operation
The next stage is to add code to create a timer. A timer is a special type of variable which creates (or raises) an event periodically. It is useful if you want to run some specific code every so often – for example every second or every minute. The code which needs to be run periodically is put inside the timer event handler.
It is possible to have many different timers in a single program, and to start and stop them (or enable and disable them) as your program runs if you want to. Here we only need a single timer. Start by adding the following line of code which creates a new Timer variable called timer:
Dim WithEvents timer As GT.Timer = New GT.Timer(1000) ' every second
This line of code should already be in your project because it is included in the template in green as a comment. So all you need to do is to remove the apostrophe that is in front of the timer definition. Changing a comment into working code is something programmers often do and is called ‘uncommenting your code’. Similarly, sometimes you want to temporarily stop certain lines of code from working and to do this you can turn them into comments by putting an apostrophe at the front. This is called ‘commenting out’ lines of code.
Select the timer from the pull down menu as shown in Figure 24 and then select the Tick event from the top of the program window. This will generate a timer_Tick procedure ready to program with your code.
Figure 24: Selecting the timer_Tick() event handler Select “timer”. Then select “Tick”. Time display (inside rectangle) Instructions
Learning to Program with Visual Basic and .NET Gadgeteer 33 Then add the timer code as follows:
Private Sub timer_Tick(timer As Gadgeteer.Timer) Handles timer.Tick seconds = seconds + 1
display.SimpleGraphics.DisplayRectangle(GT.Color.Cyan, 1, GT.Color.Black, 40, 40, 40, 40) display.SimpleGraphics.DisplayText(seconds.ToString(), font2, GT.Color.White, 50, 50) End Sub
Then program the button to start and stop the timer. Use the pull-down menus to create the button_ButtonPressed() procedure from the top of the program window as before.
Private Sub button_ButtonPressed(sender As Button, state As Button.ButtonState)
Handles button.ButtonPressed
End Sub
The first step is to start the timer when the button is pressed. To do this just add the timer.Start() line of code inside the button_ButtonPressed() procedure:
Private Sub button_ButtonPressed(sender As Button, state As Button.ButtonState)
Handles button.ButtonPressed
timer.Start() End Sub
Save the program and test that it works so far. At the moment the button just starts the timer but we want to use it as a toggle to turn the timer on and off. To do this we need to use a property of the timer. Properties are values that are associated with certain variables. One of the properties that timers have is called IsRunning. IsRunning is True if the timer has been started and False otherwise.
We can test the current value of the IsRunning property using an If Statement. The Visual Basic code we need to use in the button_ButtonPressed() procedure is shown highlighted below:
Private Sub button_ButtonPressed(sender As Button, state As Button.ButtonState)
Handles button.ButtonPressed If timer.IsRunning Then timer.Stop() Else timer.Start() End If End Sub
Enter this code to check if the timer is already running, then test that your button will stop and start the timer! Then try the exercises below which will make your stop watch more sophisticated, with a reset button and minutes and seconds.
E
XERCISES1. Add the second button which will reset the timer to 0.
2. Improve your stop watch so that it counts to 60 seconds and then resets to 0 and continues counting. 3. Edit your stop watch so that it displays minutes and seconds. When the seconds reset to 0 (as in 2
above) the minutes should increment by 1.
Add one to the seconds counter.
34 Learning to Program with Visual Basic and .NET Gadgeteer
S
UMMARYIn this chapter, you have learned to: use a timer to control events; use a simple If statement.
Learning to Program with Visual Basic and .NET Gadgeteer 35
CHAPTER 6.
TRAFFIC LIGHTS
K
EY TERMSM
ODULES YOU WILL NEEDSelect … Case If … Then … Else
Cerberus mainboard USBClientSP power module Button module
LED Strip
O
VERVIEWIn this project you will use the LED Strip module. This has seven lights in a row: two red, three amber and two green. You will program them to light up in a particular sequence and create a set of traffic lights.
N
EWC
ONCEPTS:
M
ORE ONI
F STATEMENTS AND THES
ELECT…C
ASE STATEMENTAs a reminder, the structure of the If statement in Visual Basic is as follows: If <condition> Then
<statements> Else
<statements> End If
A more complex version of the If statement in Visual Basic chains together several test conditions. The ElseIf keyword is used for this as shown here:
If <condition1> Then <statements> ElseIf <condition2> <statements> Else <statements> End If
If you have lots of different conditions you can use the Select ... Case statement instead of lots of ElseIf statements. You can use Select ... Case when you have an integer or char (single character) variable and you want to control what your program will do depending on the value of these variables. For example, with an Integer variable called count, a Select statement could be used to control what would happen if count was 1 or count was 2 etc. The syntax of this statement in Visual Basic is shown below:
Select Case count Case 1 led_Strip(5) = True led_Strip(6) = True Case 2 led_Strip(2) = True led_Strip(3) = True led_Strip(4) = True Case 3 led_Strip(0) = True led_Strip(1) = True count = 1 End Select
36 Learning to Program with Visual Basic and .NET Gadgeteer
T
UTORIAL:
T
RAFFIC LIGHTSStep 1: Assemble these modules
Cerberus Mainboard USBClientSP power module LED Strip
Figure 25: Modules needed for Traffic lights project
Step 2: Use the Gadgeteer Designer to link the modules together
Figure 26: Modules in the Designer for the Traffic lights project
Step 3: Write your program
The basic traffic lights program is going to do the following: Display a red light when the program starts.
Use a timer to display an amber light and then a green light. You will then be able to extend this simple sequence to make it more realistic!
The LED Strip module has 7 individual lights which are numbered from zero to six. The colour of each light is as follows:
Learning to Program with Visual Basic and .NET Gadgeteer 37 Colour Red Red Amber Amber Amber Green Green
Index 6 5 4 3 2 1 0
Figure 27: The LED Strip module
An array is a special type of variable that can be used to store a sequence of values, similar to a list. Each member of the sequence is also known as an array element and is identified by its position in the list, known as the index. The first element is at position 0 as the array index always starts at 0, not 1.
The LED Strip has an array which corresponds to the seven LED lights on the module. The hardware module also has a number from 0 to 6 printed under each LED so you can easily identify the correct LED (see Figure 27). Setting one of the array elements to either True (on) or False (off) will turn the appropriated LED either on or off. For example if you wanted to turn the green (first) LED in the strip on, look to see which number is printed underneath. In this case it is 0, so you must set the value of the array at position 0 to True (on) as shown below:
led_Strip(0) = True
The first step in our program is to display red which means setting light 5 and light 6 to True so try the code shown below inside the ProgramStarted() procedure.
Partial Public Class Program
Public Sub ProgramStarted()
Debug.Print("Program Started") led_Strip(5) = True
led_Strip(6) = True
End Sub
Enter the code above and test that the red lights come on!
The next step is to have a sequence of lights and for this you will need to set up a timer. In the Gadgeteer template, underneath the ProgramStarted() procedure, there are some comments containing instructions on how to set up a timer, and an example which you can copy and use is given.
' If you want to do something periodically, declare a GT.Timer by uncommenting the below line ' and then use the dropdown boxes at the top of this window to generate a Tick event handler. ' Dim WithEvents timer As GT.Timer = new GT.Timer(1000) ' every second (1000ms)
End Class
This line of code sets up a Gadgeteer timer which will cause an event-handler to execute every 1000
milliseconds, which is once every second. Change the interval to 3000 so that the timer event is called every three seconds – this will help us run the traffic lights program at an appropriate speed.
Dim WithEvents timer As GT.Timer = New GT.Timer(3000) ' every three seconds
The next step is to write the code that needs to be executed every three seconds, which is every time the timer tick event is raised.
Add the highlighted code and write your own comments above.
Remove the comment from this line of code.