Administrator’s Guide 4.30
Rep
l
ica
t
or
f
o
r Micr
o
s
oft Dy
namic
s
N
A
V
®
readable form; in whole or in part; without the prior written consent of Data Backbone Software A/S, except in the manner described in the documenta-tion.
Usage of information in this document is the users’ own responsibility; Data Backbone Software A/S can not be held responsible for any damage that may arise from using this document or the software described herein, even if Data Backbone Software A/S has been notified of such.
Navision®, Navision® Financials, Navision® Attain, MBS-Navision®, Micro-soft Dynamics NAV®, Windows Vista, Windows 7, Windows 2000 and MS-SQL Server are registered trademarks of Microsoft Corporation.
All other registered trademarks are the property of their respective holders.
Preface
This guide describes how to install, set up and use Replicator for Microsoft Dynamics NAV.
It is intended for system administrators who want to set up and maintain Replicator.
It is assumed that you are familiar with the following:
· Your LAN/WAN environment.
· NetBIOS and/or TCP/IP.
· Navision 3.56 (old textbased version), Navision Financials, Navision Attain, MBS-Navision or MS Dynamics NAV.
This guide is made up of eight chapters and four appendixes. The first chapter contains basic information about the functions of Replicator. Chapter two guides you through the installation process of Replicator. Chapter three and four deals with setting up the software as well as more detailed information about the special facilities in Specifications. Chapter five deals with the Replicator Server. Chapter six shows how to run Repli-cator from the command line prompt. Chapter seven describes how to run tasks as services and the last chapter guides you through an advanced example of setting up transfers of customers. Appendixes contain informa-tion on troubleshooting, descripinforma-tion of Source Counter and Acinforma-tion code in MS Dynamics NAV 3.70 or later, new features and document history.
Each chapter or appendix starts with a brief description of the contents in it. This will help you decide if this is where the information you need is located.
Below is a list of other publications you might wish to read:
· Microsoft Dynamics NAV Administrator’s Guide
· Introduction to MS Dynamics NAV
Table of Contents
Chapter 1 Getting Started 1 General description 2
Chapter 2 Installing Replicator for Microsoft Dynamics NAV 7 System Requirements 8
Quick Installation and setup list 9 Contents of the Replicator installation CD 10 Installing Replicator 16
Installing the Replicator Setup Application 17 Ensuring access to the MS Dynamics NAV databases 19 Replicat.ini (Replicator INI Editor) 23
Chapter 3 Setting up Replicator for Microsoft Dynamics NAV 31
Setting up Replicator (in general) 32 The Replicator Setup facility 34 The Databases facility 38
Setting up transfers of data using Specifications 45 Other setup options within Specifications 54 Read Design into the Replicator Setup database 62
Chapter 4 Special facilities in Specifications 63 The Groups facility 64
The Flag Field 65 The Source Counter 67 The Actions facility 76 Sub Specifications 83 Tags 86
The ToDo table transfer facility 88 The Export and Import facilities 91 Change Register 93
Transfer of objects in MS Dynamics NAV 96
The Replicator Backup server and BackupCompare facilities 99 The Scheduler 102
The CompanyImport and CompanyExport facilities 107
Chapter 5 The Replicator Server 119 The Replicator Server facility 120
How to install and set up the Replicator Server 122 How to run the Replicator Server 125
Chapter 6 Running Replicator 129 Running Replicator 130
Running Replicator from a command line prompt 131 What happens when running Replicator? 133 Points to watch out for while replicating 134
Chapter 7 Running Replicator as a Service (Windows Service) 135
Replicator Service Manager 136 How to Install a Service 137 How to run Services 143
Chapter 8 Advanced Example 147 Before we begin 148
PART 1: Setting up transfers of changed data 149 PART 2: Setting up rules 155
PART 3: Setting up transfers of deletions 157
Appendix A Troubleshooting and Error Messages 161 Tracing errors 162
Troubleshooting 164 error messages 168
Appendix B Source Counter and Action code in MS Dynamics NAV 3.70 or later. 171
Contents
Appendix C New Features from version to version 179 Initial version 1.00 of Replicator (released November 1996) 180 Version 1.50 of Replicator (released March 1997) 181 Version 1.51 of Replicator (released May 1997) 183 Version 1.52 of Replicator (released June 1997) 184 Version 1.60 of Replicator (released September 1997) 185 Version 2.00 of Replicator (released October 1998) 186 Version 3.00 of Replicator (released March 2000) 189 Version 4.00 of Replicator (released June 2001) 193 Version 4.10 of Replicator (released February 2002) 196 Version 4.20 of Replicator (released April 2004) 198 Version 4.22 of Replicator (released March 2007) 200 Version 4.30 of Replicator (released July 2009) 204
Appendix D Document History 209
Replicator for Navision Administrator’ s Guide 1.00 210 Replicator for Navision Administrator’ s Guide 1.50 211 Replicator for Navision Administrator’ s Guide 1.60 212 Replicator for Navision Financials Administrator’ s Guide 2.0 214 Replicator for Navision Financials Administrator’ s Guide 3.00 216 Replicator for Navision Financials Administrator’ s Guide 4.00 219 Replicator for Navision Attain/Financials Administrator’ s Guide 4.10 222
Replicator for MBS-Navision Administrator’ s Guide 4.20 223 Replicator for Microsoft Dynamics NAV Administrator’ s Guide 4.22 225 Replicator for Microsoft Dynamics NAV Administrator’ s Guide 4.30 226
Chapter 1
Getting Started
This chapter briefly describes what Replicator for Microsoft Dynamics NAV is and gives an
1.1 General description
In this Administrators Guide MS Dynamics NAV covers Navision Financials, Navision Attain, MBS-Navision and MS Dynamics NAV except if version number is mentioned.
If version number is mentioned it only regards that version.
Replicator for Microsoft Dynamics NAV is a program that enables you to transfer data to/from the following:
· Navision Financials databases (ver. 2.0, 2.50 or 2.60d) Navision Attain (ver. 3.0, 3.10 or 3.60)
MBS-Navision 3.70 and 4.0
(both local databases as well as databases running on MBS-Navision and MS-SQL Servers).
MS Dynamics NAV 4.01, 4.02, 4.03, 5.0, 5.01 and 2009
(both local databases as well as databases running on MS Dynamics NAV and MS-SQL Servers).
· Navision databases ver. 3.56 (old textbased version)
(both local Navision databases as well as databases running on Navision servers).
Replicator for Microsoft Dynamics NAV uses C/Front for MS Dynamics NAV to access both the source database and the destination database at the same time (With Navision 3.56, C-Toolkit is used). This enables a secure and controlled comparison and update of data directly between the databases.
The Replicator Setup Application in which you set up Replicator is installed in an MS Dynamics NAV database. When running Replicator it reads setup tables in the MS Dynamics NAV database to find out which data should be
1.1 General description
Replicator features
Replicator offers different features which you can make use of, for example:
· Specifications:
You specify what should be replicated, and from where to where in Specifications.
· Replication of entire table:
Replication of the entire table automatically replicates all fields in a specified table, to the same table in the destination database. Each time the replication is run, it determines which fields are in the table and replicates these fields (I.e. you don't have to change the replication setup, if you add fields to the table!).
· Replication of specified fields only:
The replication of specified fields, lets you specify exactly which fields in a table should be replicated. You can even replicate data between different tables, for example, from a posting table to the general ledger.
· Replication of the ToDo table:
The ToDo table replication, implements a simple way to send messages between two or more databases. This can be used for a number of different purposes. For example, you could summarize postings in the source database, and replicate the sum-postings to another database and post them there.
· Execution of Actions:
The Action table facility is a kind of a dictation machine to Replicator where you can dictate exactly what should be done in the destination database e.g. update customer no. 70000 etc.
· Replication of MS Dynamics NAV objects:
You can replicate MS Dynamics NAV objects between MS Dynamics NAV databases.
· Source Counter:
Another feature that is very useful is the Source Counter feature. This feature makes it easy to replicate only changed data from a source to a destination database, and even allow Star Replication if needed. Star Replication means that a source sends modifications to a central destination, and this central database then forwards those changes to other databases, replicating them with the central database.
· Activity Register:
Under Activity Register, Replicator writes a log telling what it has done, such as statistics on each replication or error messages if any. This log is written to the central database where the setup also resides.
· Change Register:
Logging changes that occur to data when replicating is also possible. These changes will be shown in the Change Register.
· Scheduler:
Here you can create Scheduler jobs which can run Specifications or Groups of Specifications at a certain time. You can also create a Scheduler job calling MS Dynamics NAV codeunits to be run at a certain time.
· Replicator Backup facility:
This replication mode can be used in order to keep a backup server (an extra MS Dynamics NAV server) up-to-date with all changes made on the primary MS Dynamics NAV server.
· The BackupCompare facility:
By using this replication mode you can make a comparison of the backup server and the primary MS Dynamics NAV server. Replicator will write the differences (if any) into the Activity Register and the Change Register (if
1.1 General description
· Replicator Server:
The Replicator Server facility reduces the total replication time significantly when using mobile phones or internet. When an MS Dynamics NAV table is accessed, the Replicator Server ensures that only the description of the fields and table is send to the client. Normally, the C/AL-Code included in the table is send as well.
In addition, records are gathered in a package (e.g. 500 records in one package), compressed and then send.
· Replicator Service Manager
The Replicator Service Manager enables you to have either the Replicator Server or Scheduler running as a Windows Service.
The features mentioned are explained in detail in chapter three, four, five, six and seven. In chapter eight you will also find an advanced example of setting up transfers of customers using Source Counter and Actions.
The feature “The Replicator Command Center” is described in a separate manual “Command Center Guide 4.30”
· Command Center
The Command Center is a graphical application you can use in order to run Replicator Specifications, start Replicator in Scheduler mode or/and start Replicator as a Server.
Chapter 2
Installing Replicator for Microsoft
Dynamics NAV
This chapter explains how to install Replicator for Microsoft Dynamics NAV.
Contents are:
· System Requirements.
· Quick installation and setup list.
· Contents of the Replicator installation CD.
· Installing the Replicator program.
· Installing the Replicator Setup Application.
2.1 System Requirements
You need the following hardware and software to install and use Replicator for Microsoft Dynamics NAV.
· Computer with at least 512 MB RAM.
· Windows-2000 Service pack 1 or later, Windows-XP Professional, Windows Vista, Windows 7, Windows 2000 Server or later.
· MS Dynamics NAV.
Your MS Dynamics NAV License, fin.flf, must have access to C/Front and to the Replicator objects, or
· Navision Financials 1.30, 2.0, 2.01, 2.50, 2.60d, or
· Navision Attain 3.0, 3.10, 3.60 (MS-SQL Server option is also supported) or,
· MBS-Navision 3.70 or 4.0 (MS-SQL Server option is also supported).
· MS Dynamics NAV 4.01, 4.02, 4.03, 5.0, 5.01 or 2009 (MS-SQL Server option is also supported).
· Replicator installation CD with license file replicat.dat.
· A TCP/IP or NetBios connection from the computer where Replicator is installed to each of the databases you want to replicate with. The connection can be a dial-up connection as long as it is automatically established when the MS Dynamics NAV server is requested.
· Navision 3.56 (with a navi_inf.dat with C-Toolkit access and access to table 4826 and 4831) – only if you need to transfer data to/from Navision
2.2 Quick Installation and setup list
2.2 Quick Installation and setup list
In this section we will outline the steps to follow to install and set up Repli-cator for use with MS Dynamics NAV. Please check out the respective sections for a complete discussion.
1 Install the Replicator program. (Section 2.4)
2 Install the Replicator Setup Application. (Section 2.5)
3 Ensuring access to the MS Dynamics NAV databases. (Section 2.6)
4 Edit replicat.ini(Replicator INI Editor). (Section 2.7)
5 Set up databases in the Replicator Setup Application. (Section 3.3)
6 Set up Specifications in the Replicator Setup Application. (Section 3.4)
7 Run Replicator. (Section 6.1)
2.3 Contents of the Replicator installation CD
Below you will find a description of the files placed on the Replicator for Microsoft Dynamics NAV installation CD.
File Name File Description File Destination
\Program\
readme.txt A text file containing a description of the contents of the installation CD as well as the latest information about Replicator for Microsoft Dynamics NAV.
When you have installed Replicator, you can read the file by choosing:
Start > Programs > Replicator for MS Dynamics NAV > Readme
The directory where you choose to install Replicator.
The default destination directory is: “C:\Program Files\Data Backbone Software\REPNT
license.txt A text file containing the Replicator for Microsoft Dynamics NAV license agreement.
When you have installed Replicator, you can read the file by choosing:
Start > Programs > Replicator for MS Dynamics NAV > License
The directory where you choose to install Replicator.
The default destination directory is: “C:\Program Files\Data Backbone Software\REPNT
replicat.dat The Replicator for Microsoft Dynamics NAV license file. This file contains license specific information like user name, license number etc.
Do not edit this file.
The directory where you choose to install Replicator.
The default destination directory is: “C:\Program Files\Data Backbone Software\REPNT In addition the file is copied to your computer’ s “system32” directory. For
2.3 Contents of the Replicator installation CD
rep.fob The MS Dynamics NAV object file containing the Replicator objects. This is the file required in order to install the Replicator for Microsoft Dynamics NAV Setup Application.
PLEASE NOTE: If you only want to install the Replicator for Microsoft Dynamics NAV Setup Application, you can choose to import the file directly from the installation CD. For further information, please refer to section 2.5.
The directory where you choose to install Replicator.
The default destination directory is: “C:\Program Files\Data Backbone Software\REPNT
Replicator-Functions_ 370.fob
This MS Dynamics NAV object file contains a replacement of Codeunit 64825 "Replicator Functions" with additional functionality for use in MBS-Navision 3.70 or later.
The directory where you choose to install Replicator.
The default destination directory is: “C:\Program Files\Data Backbone Software\REPNT
repnt.exe The Replicator executable file. The directory where you choose to install Replicator.
The default destination directory is: “C:\Program Files\Data Backbone Software\REPNT
repcom.exe The Replicator Command Center executable file.
For further information, please refer to the Replicator for Microsoft Dynamics NAV Command Center Guide 4.30. When you have installed Replicator, you can enter the Replicator Command Center by choosing:
Start > Programs > Replicator for MS Dynamics NAV > Command Center
The directory where you choose to install Replicator.
The default destination directory is: “C:\Program Files\Data Backbone Software\REPNT
replicat.ini The Replicator initialization file. In this file you specify where Replicator should locate the Replicator Setup Information. When you have installed Replicator, you can edit the parameters within
replicat.ini by choosing: Start > Programs > Replicator for MS Dynamics NAV > Replicator INI Editor
The directory where you choose to install Replicator.
The default destination directory is: “C:\Program Files\Data Backbone Software\REPNT
repini.exe The “Replicator INI Editor” executable file.
See description of replicat.ini.
The directory where you choose to install Replicator.
The default destination directory is: “C:\Program Files\Data Backbone Software\REPNT
replicat.uk The Replicator language file. This file contains all messages used by the Replicator program.
Do not change this file.
The directory where you choose to install Replicator.
The default destination directory is: “C:\Program Files\Data Backbone Software\REPNT In addition the file is copied to your computer’ s “system32” directory. For example:
“C:\Winnt\System32”
repnt.cpl The Replicator Service Manager file. When you have installed Replicator, you can enter the Service Manager from the Control Panel window.
For further information, please refer to chapter 7.
Your computer’ s “system32”directory For example: “C:\WINNT\ SYSTEM32\”
2.3 Contents of the Replicator installation CD
repag430.pdf The Replicator for Microsoft Dynamics NAV Administrator’ s Guide 4.30 in PDF format. If you have Adobe Acrobat Reader installed on your computer, you can when Replicator has been installed, enter the guide by choosing:
Start > Programs > Replicator for MS Dynamics NAV > Help > Administrators Guide
The directory where you choose to install Replicator.
The default destination directory is: “C:\Program Files\Data Backbone Software\REPNT
repcc430.pdf The Replicator for Microsoft Dynamics NAV Command Center Guide 4.30 in PDF format.
If you have Adobe Acrobat Reader installed on your computer, you can when Replicator has been installed, enter the guide by choosing: Start > Programs > Replicator for MS Dynamics NAV > Help > Command Center Guide
The directory where you choose to install Replicator.
The default destination directory is: “C:\Program Files\Data Backbone Software\REPNT
repnt.isu The uninstall file regarding Replicator for Microsoft Dynamics NAV.
How to uninstall Replicator is described in section 2.4.
The directory where you choose to install Replicator.
The default destination directory is: “C:\Program Files\Data Backbone Software\REPNT
db.ico The Data Backbone Software A/S icon file.
The directory where you choose to install Replicator.
The default destination directory is: “C:\Program Files\Data Backbone Software\REPNT
sched.cmd A command file you can use in order to start the Scheduler regarding jobs of the type “Replicator” from the command line prompt.
The directory where you choose to install Replicator.
The default destination directory is: “C:\Program Files\Data Backbone Software\REPNT
rep.obj If you want to be able to set up Replicator in a Navision 3.56 database, you can use this Navision 3.56 object file. The file (rep.obj) is imported into the Navision 3.56 database where you want to setup and maintain Replicator.
The directory where you choose to install Replicator.
The default destination directory is: “C:\Program Files\Data Backbone Software\REPNT
traceon.cmd A command file you can use in order to enable the “CTRACE” environment variable.
When enabled, information about what Replicator has been doing while running is written in the file “Trace.txt”.
For more information, please refer to Appendix A.
The directory where you choose to install Replicator.
The default destination directory is: “C:\Program Files\Data Backbone Software\REPNT
traceoff.cmd A command file that will disable the “CTRACE” environment variable.
The directory where you choose to install Replicator.
The default destination directory is: “C:\Program Files\Data Backbone Software\REPNT
2.3 Contents of the Replicator installation CD
\Extras\
nc_netb.dll The Netbios driver for Replicator. This file is only required, if an MS Dynamics NAV database uses NetBIOS as Network Protocol.
This file will not be copied during the installation.
If required, you have to copy the file manually to the main directory of your MS Dynamics NAV Client.
nc_netb.ndl The Netbios driver for Replicator. This file is only required if a Navision 3.56 uses NetBIOS as Network Protocol.
This file will not be copied during the installation.
If required, you have to copy the file manually to the main directory of your Navision 3.56 Client.
repguide.pdf The Replicator for Navision 3.56 Administrator’ s Guide in PDF format. You can use Adobe Acrobat Reader to read and/or print the guide.
This file will not be copied during the installation.
\Adobe\
AR60.exe By running this file from the installation CD, you will install Adobe® Acrobat® Reader on your computer.
We have included Replicator manuals on the installation CD in PDF format. To read and/or print these guides you need Adobe Acrobat Reader.
This file will not be copied during the installation.
2.4 Installing Replicator
On the computer from where you want to run Replicator you install the Repli-cator files.
To install Replicator you insert the installation CD and if “Autorun” is acti-vated, the installation Program starts automatically. If not, you locate and run the installation file setup.exe.
The directory where you choose to install Replicator, will be referred to as the Replicator main directory. The Replicator execution file (repnt.exe)
resides in this directory.
Installation step by step:
1 Insert the Replicator installation CD into the CD-ROM drive.
2 If “Autorun” is not activated, locate the installation file setup.exe on the CD and run it.
3 Follow the installation instructions on the screen.
Uninstalling Replicator
To uninstall Replicator for Microsoft Dynamics NAV, you enter the Control Panel window and choose “Add/Remove Programs”.
2.5 Installing the Replicator Setup Application
2.5 Installing the Replicator Setup Application
The Replicator Setup Application is where you set up the databases you want to replicate data between as well as the Specifications that determine which data is transferred between the databases.
You install the Setup Application by importing an object file into the MS Dynamics NAV database where you want to set up and maintain Replicator. This object file is included on the Replicator installation CD (rep.fob) and contains all the needed Replicator tables, forms, reports and codeunits.
Your main MS Dynamics NAV Server database would normally be the MS Dynamics NAV database where you choose to keep the Replicator Setup Information.
When you have imported the Replicator object file you have to insert the Replicator Submenu button, as it is usually done.
Installation step by step:
2 Select File and Import.
3 Locate the file rep.fob on the Replicator installation CD or in the directory where you have installed Replicator and choose yes to import.
4 You have to insert the Replicator submenu button yourself.
Place the Replicator menu (form 64842) in the main MS Dynamics NAV menu (form 330).
Now you can select the Replicator main menu and you are ready to set up Replicator.
2.6 Ensuring access to the MS Dynamics NAV databases
2.6 Ensuring access to the MS Dynamics NAV databases
Whenever access to a database is required, certain MS Dynamics NAV files are used to provide this access. These files are used whether it is access for data transfer purposes or access to the database containing the Replicator Setup Application. The files required reside within the main directory of your MS Dynamics NAV Client except for the following which you have to copy manually into the main directory of your MS Dynamics NAV Client.
. . . .
Notice that...
If you manually copy the required files directly from a CD you must ensure that the files are not write protected.
Always ensure that you use the correct version of the file cfront.dll. To
ensure this, check that the file corresponds with the version of MS Dynamics
NAV in use. Also ensure that the TimeStamp of the files cfront.dll and
. . . . dbm.dll are identical.
Later on, you will have to specify the path to where you installed the needed MS Dynamics NAV files (Installation Path).
MS Dynamics NAV databases (local or running on an MS Dynamics NAV server) If you want to replicate data from/to an MS Dynamics NAV database (whether it is a local database or running on an MS Dynamics NAV server):
1 Copy the following files into the main directory of your MS Dynamics NAV Client:
cfront.dll
fin.flf Must have C/Front access.
nc_netb.dll Netbios driver for Replicator (only if you use Netbios).
MS Dynamics NAV databases (running on an MS-SQL Server)
If you want to replicate data from/to an MS Dynamics NAV database running on an MS-SQL Server:
1 Copy the following files into the main directory of your MS Dynamics NAV Client:
Navision 3.56 databases (old textbased ver.) (local or running on a Navision 3.56 server) If you want to replicate data from/to a Navision 3.56 database (whether it is a local database or running on a Navision 3.56 server):
1 Copy the following files into the main directory of your Navision 3.56 Client:
cfrontsql.dll
fin.flf Must have C/Front access.
dbl.ndl Navision database access library for 3.56.
navi_inf.dat Must have C-Toolkit access.
nc_netb.ndl Netbios driver for Replicator (only if you use Netbios).
2.6 Ensuring access to the MS Dynamics NAV databases
A list of all the files used to access the MS Dynamics NAV databases
MS Dynamics NAV databases (local or running on an MS Dynamics NAV server)
The following files are used to access an MS Dynamics NAV database (whether it is a local database or running on an MS Dynamics NAV server):
MS Dynamics NAV databases (running on an MS-SQL Server)
cfront.dll
dbm.dll
fin.etx
fin.flf Must have C/Front access.
fin.smt
fin.stx
nc_netb.dll Netbios driver for Replicator (only if you use NetBios).
nc_tcp.dll
slave.exe
cfrontsql.dll
fin.etx
fin.flf Must have C/Front access.
fin.smt
fin.stx
Navision 3.56 databases (local or running on a Navision 3.56)
dbl.ndl Navision database access library for 3.56.
navi.etx
navi.smt
navi.stx
navi_dcn.exe
navi_inf.dat Must have C-Toolkit access.
navi_ni.ndl
navi_sr.ndl
nc_netb.ndl Netbios driver for Replicator (only if you use NetBios).
2.7 Replicat.ini (Replicator INI Editor)
2.7 Replicat.ini (Replicator INI Editor)
On the computer from where you want to run Replicator you have to specify where the Replicator Setup Information is located.
This is done by specifying parameters within replicat.ini.
You can edit replicat.ini by entering the Replicator INI Editor situated under “Programs” in the Start menu.
The tab “Configuration”
1 Choose Start > Programs > Replicator for MS Dynamics NAV > Replicator INI Editor and the tab “Configuration”:
2 Specify in which database you set up and maintain Replicator. The fields of the Replicator INI Editor are described as follows:
Parameter Parameter Description
Type Here you specify, if the database is a Navision 3.56 or an MS Dynamics NAV database.
Server No. If the database is hosted by a Navision 3.56 server, the server number is specified here.
Server Name If the database is running on an MS Dynamics NAV server or on an MS-SQL Server, you specify the name of the server here.
2.7 Replicat.ini (Replicator INI Editor)
Database Name If the database is hosted by an MS-SQL Server, you specify the name of the database here.
If the database is a local database you leave the parameters “Server No.” or “Server Name” and “NetType” blank and specify the exact location of the database (path and name).
Company Specify the name of the Company that should keep the Configuration data (the Specifications etc.).
PLEASE NOTE: Company name is case sensitive!
UserID If the database is protected by UserID and Passwords, you specify a UserID here. Since Replicator only needs access to read and write to tables it is a good idea to create a specific UserID for Replicator and give it access to all tables, both read and write, but remove all access to forms and codeunits, this will render the UserID useless for all others, but Replicator.
Password Apply the Password for the UserID here, if any.
Database Driver By default this parameter is set to NDBCN (i.e. the database is placed on an MS Dynamics NAV server).
If the setup database is placed on an MS-SQL Server you specify NDBCS instead.
Use NT Authentication
If you use the same UserID and Password to access the database as for logging on to your Windows NT platform, you can set this parameter to “Yes”. If you do this then leave the parameters UserID and Password empty.
PLEASE NOTE: “Use NT Authentication” is only valid from version 2.50 of Navision Financials.
Local Db. Cache If the database is a local database you can specify a size for cache settings.
For further information about Cache, you can refer to the on-line MS Dynamics NAV help under the Contents subject “Dictionary”.
Local Db. Commit Cache
If the database is a local database you can specify a size for commit cache settings.
For further information about Commit Cache, you can refer to the on-line MS Dynamics NAV help under the Contents subject “Dictionary”.
Installation Path Specify the path to the main directory of your MS Dynamics NAV or Navision 3.56 installation.
With the button “Verify” you can check that access to the database is possible using the specified parameters. If this verification is successful, it means that the Replicator INI Editor will be able to use this Configuration.
Another way to tell Replicator how to get to the setup database is by using a number of command line parameters (see section 6.2).
The tab “Server”
The tab “Server” will be described in section 5.2.
The tab “Miscellaneous”
Within the tab “Miscellaneous” you can specify parameters dealing with issues such as logging of Replicator messages in a text file.
2.7 Replicat.ini (Replicator INI Editor)
Info
Parameter Parameter Description
Configuration file version
This parameter is used to check that Replicator executable and this configuration file are of same version.
Miscellaneous parameters
Settings for Text Log File
Parameter Parameter Description
Text messages file name
This parameter must be the name of the text messages file. The text messages file contains all text messages and error messages used by Replicator. This parameter should not be changed from the default value replicat.uk.
Log and Action Key Delimiter
When specifying the key in Actions and when logging changes in the databases Replicator as standard use a '+' to specify separation of the values in the primary key. If you for any given reason find this inconvenient you can change this here with specifying the character you wish to use as a delimiter.
Scheduler wait time (seconds)
Here you can specify how often Automatic Navision Scheduler jobs should be repeated. This you can also specify in the field Repeat Interval (sec.) in the tab, Navision Scheduler in Replicator Setup (see section 3.2).
Parameter Parameter Description
Text Log file name By default this parameter is set to “Replicat.log”. That means, Replicator will, when run, generate a separate log file (replicat.log) where you can see what happened during execution. The file will be placed within the main directory of Replicator.
If Replicator is unable to write information to the Activity Register, you can always use the Replicat.log file to see what happened.
2.7 Replicat.ini (Replicator INI Editor)
Text Log max size This parameter is the maximum size in bytes the Replicator Log file is allowed to grow to.
If the Log file grows beyond this size, all Log file messages will be written to the screen and additional error messages stating that the Log file should be deleted are also written to the screen. The default value for this parameter is 10000000 (10 MB).
PLEASE NOTE: This setting also applies to Trace files (if enabled). For further information about the Trace file facility, please see section A.1.
Chapter 3
Setting up Replicator for Microsoft
Dynamics NAV
In this chapter we will discuss how to set up Replicator for use with MS Dynamics NAV.
This chapter contain subjects such as:
· Setting up Replicator (in general).
· The Replicator Setup facility.
· The databases facility.
· Setting up transfers of data using Specifications.
· Other options when setting up Specifications.
· Transferring the design of MS Dynamics NAV databases into the setup database.
3.1 Setting up Replicator (in general)
After having Replicator and the Replicator Setup Application installed you are ready to set up Replicator.
To transfer data between the databases Replicator needs to know how it can access the databases. This is done by creating a database record for each database that you want to transfer data to/from.
In addition, you have to create Specifications. Specifications are in essence the heart of Replicator. Here you specify exactly what Replicator should do, and how to do it. You make one Specification for each table you want to transfer data to/from.
Replicator also offers groupings of Specifications. Using Groups you can tie a given number of Specifications together and then have Replicator work only on the Group you specify in the Command Center or on the command line prompt. The Group facility will be covered in chapter four.
If the design of the tables you transfer data between are different from the setup database you have to transfer the design into the setup database (where you create the needed Specifications).
To actually transfer the data, you need to run Replicator (see chapter 6).
Below you see an outline of what to do:
· Specify a number series in the field Specification Nos. (i.e., in Replicator Setup, the tab “Numbering”).
3.1 Setting up Replicator (in general)
The Setup menu
The Setup menu contains different setup facilities:
· Replicator Setup:
Here you can specify different settings for Replicator such as specifying the Specification Nos. (defining what kind of numbering your
Specifications should go by). You can also specify settings for the Navision Scheduler and the Replicator Scheduler.
· Databases:
Here you set up the database records needed.
· Groups:
Here you can create the groups needed (see section 4.1).
In the following sections we will cover the Replicator Setup and databases facilities.
3.2 The Replicator Setup facility
In this facility you get the option of selecting between the tabs General, Numbering, Navision Scheduler and Replicator Scheduler.
Numbering
Before creating any Specifications, you have to define what kind of numbering they should go by.
1 Select the tab “Numbering” and press F6. Now you have the possibility of creating a new number series code.
2 When you have created the code, you have to select it within the field Specification Nos.
Example
If Specifications should be numbered
automatically, you fill in a value within “Starting.” and mark “Default Nos.”. If Specifications should be numbered manually, you mark only “Manual Nos.”.
3.2 The Replicator Setup facility
General
When you have set up the databases, you can specify the two fields in the tab “General”. The fields are used to indicate where the central database is located and where the local database is located.
Example
At HQ (Headquarters) the window General has been specified as in the picture above. Now you can quickly survey where you are compared to the central database.
. . . .
Notice that...
The fields “Local Database Code” and “Central Database Code” are not used by Replicator.
We included the fields here, because they are normally needed when you implement Replicator in a customer project. When the fields are specified correctly, you can easily determine (from your C/AL code) in which database you currently are running the code. For example, if “Local Database
Code”<>“Central Database Code” we are in a local/department/salesman database. If “Local Database Code”=“Central Database Code” we are in the central database.
Field Name Field Description
Local Database Code Here you have the possibility to fill in the database code of what location your local database is.
Navision Scheduler
Within the Navision Scheduler window you can specify the settings for the Automatic Scheduler (Scheduler jobs of the type MS Dynamics NAV).
The fields of the Navision Scheduler window are as follows:
Fieldname Field Description
Date Shut Down Here you can specify what date the Automatic Scheduler should be shut down.
Time Shut Down Here you can specify what time the Automatic Scheduler should be shut down.
Repeat Interval (sec.) Here you specify the interval for how often the Navision Scheduler should check for Navision Scheduler entries (default is “5” seconds).
Running If this field is marked it is an indication of that the Navision Scheduler is running.
Register Scheduler actions
By marking this field you can register Navision Scheduler actions in the Activity Register.
3.2 The Replicator Setup facility
For more information about Scheduler jobs of the type Navision, see section 4.12.
Replicator Scheduler
Within the Replicator Scheduler window you can specify settings for the Scheduler concerning Replicator jobs.
The fields of the Replicator Scheduler window are as follows:
Calcdate Month char By default this field is set to “M” meaning “Month”. Depending on which version of MS Dynamics NAV you use you can use another term for month by typing the character defining the language you want to use. It should correspond to the parameters needed for the AL-function CalcDate.
Fieldname Field Description
Field Name Field Description
Shut Down Date (Sched) Here you can specify what date the Scheduler concerning Replicator jobs should be shut down.
Shut Down Time (Sched) Here you can specify what time the Scheduler concerning Replicator jobs should be shut down.
3.3 The Databases facility
Before you can transfer data between databases, you need to specify how Replicator can access these databases.
From version 3.00 of Replicator it is possible to transfer t0/from an MS Dynamics NAV database hosted by an MS-SQL Server. An example of how to set up a database of this type will be shown later in this section.
The following steps describes how to set up databases within the Replicator Setup Application.
1 Select Setup from the Replicator main menu.
2 Choose Databases.
3 You enter the Database List window. Here all the database records that you have created will be listed.
You can create the database records from here, however, you need to enter the Database Card in order to specify other things such as Company name.
3.3 The Databases facility
The fields of the Database Card are described as follows:
The tab, General
Fieldname What to fill in with...
Code In the field Code, you give the database a name (unique ID).
Description Fill in a descriptive text for the database. This field is for information only and is not used by Replicator.
Type Here you specify, if the database is a Navision 3.56 or an MS Dynamics NAV database.
Server No. If the database is hosted by a Navision 3.56 server, the servernumber is specified here.
Server Name If the database is on an MS Dynamics NAV server or on an MS-SQL Server, you specify the name of the server here.
NetType If the database is hosted by a server, you specify the network protocol type here. Can be either TCP/IP (apply “tcp”) or NetBIOS (apply “netb”). If nothing is entered, the default is NetBIOS.
If the database is hosted by an MS-SQL Server, this parameter is specified differently. Please refer to the MS Dynamics NAV for MS-SQL Server on-line help.
Database Name If the database is hosted by an MS-SQL Server, you specify the name of the database here.
If the database is a local database you leave the fields “ServerName” or “Server No.” and “NetType” blank and specify the exact location of the database instead (path and name).
Company Specify the name of the Company that should keep the Configuration data (the Specification etc.).
PLEASE NOTE: Company name is case sensitive!
UserID If the database is protected by UserID and Passwords, you specify a UserID here. Since Replicator only needs access to read and write to tables it is a good idea to create a specific UserID for Replicator and give it access to all tables, both read and write, but remove all access to forms and codeunits, this will render the UserID useless for all others, but Replicator.
Password Apply the Password for the UserID here, if any.
Read Design When setting up Specifications, you can make use of a built-in facility that lets you choose between the different tables, fields etc. (the design) of the database you want to replicate to/from.
As default Replicator will automatically use the design of the database in which the Replicator Setup Application has been installed. If you want to replicate to/from a database that uses a different design, you can mark this field and then run Replicator with the command line parameter "repnt g=design". Hereby Replicator will transfer the design of the remote database into the Replicator Setup Application.
When marking “Read Design” the field “Assume Design” will automatically be filled in too.
3.3 The Databases facility
Assume Design If the database is a remote database where it is hard to get updates of design, but you know that the design matches another database, you can tell the Replicator Setup Application to assume the design of that database here. This of course means that the field “Read Design” should not be marked.
If “Assume Design” (and “Read Design”) is blank Replicator automatically uses the design of the database in which the Replicator Setup Application has been installed.
Database Driver By default this field is set to NDBCN. Only if the database is hosted by an MS-SQL Server you set the field to NDBCS.
Use NT Authentication If you use the same UserID and Password to access the database as for logging on to your Windows NT platform, you can set this parameter to “Yes”. If you do this then leave the parameters UserID and Password.
PLEASE NOTE: “Use NT Authentication” is only valid from version 2.50 of Navision Financials.
Local Db. Cache If the database is a local database you can specify a size for cache settings.
Local Db. Commit Cache If the database is a local database you can specify a size for commit cache settings.
Use Codeunits Permissions You can transfer data to write protected MS Dynamics NAV tables. The additional rights are setup in a codeunit (as permission for the codeunit) and the number of the codeunit must then be specified in here.
PLEASE NOTE: “Use Codeunits Permissions” is only valid from version 2.60d of Navision Financials.
Directory Replicator uses certain MS Dynamics NAV files to access the databases (see section 2.6). For each database being used, a directory containing these files is required. By filling in the field “Installation Path” the directories needed will be created automatically under the Replicator main directory. They will be called the same as what you specified in the field “Code”. If you want to name them differently you can specify it here.
The tab, Remote Server
The tab, Remote Server, is used with the Replicator Server facility and will be covered in chapter 5.
Example
To give you an idea of how to specify the fields, when setting up databases, we have made the following example.
Example, MS Dynamics NAV Database on an MS Dynamics NAV Server:
The database, which is running on the MS Dynamics NAV Server “HQ”, is accessed via the TCP/IP network protocol. The company is CRONUS International Ltd. and UserID and Password are not required. The main directory of the MS Dynamics NAV installation is: “c:\program files\MS Dynamics NAV”.
Based on the information given we create a database record the following way: Installation Path Specify the path to the main directory of your MS
Dynamics NAV or Navision 3.56 installation. For further information see section 2.6.
Single user database Use this field to mark all Database Specifications that points to Navision Databases that are only used by one user (Laptop databases etc.).
3.3 The Databases facility
Example, Navision 3.56 database on a Navision 3.56 Server:
The number of the Navision 3.56 server is “1”. The Network Protocol is “Tcp” and the company is “Demo Account”. UserID and Password are not required. The main directory of the Navision 3.56 installation is “c:\program files\navision356”.
Based on the information given we create a database record the following way:
Example, MS Dynamics NAV database on an MS-SQL Server:
The host name of the server is SQLSERV. The Network Protocol is “TCP/IP Sockets” and the company is CRONUS International Ltd. The name of the database is NavFindb, the UserID is “rep” and the Password is “rep”. The main directory of the MS Dynamics NAV installation is: “c:\program files\MS Dynamics NAV”.
. . . .
Notice that...
If the design of the database you want to transfer data to/from differs from the design of the setup database, you have to transfer the design of the
. . . .
3.4 Setting up transfers of data using Specifications
3.4 Setting up transfers of data using Specifications
To transfer data from one database to another, we need to specify what should be transferred and from where to where. In Replicator we operate with the following terms:
· Source database:
The database or server where data is transferred from.
· Destination database:
The database or server where data is transferred to.
The data from the source database will overwrite the data in the destination database.
For each transfer, you have to choose the source database and the destina-tion database – i.e. where the data is read from and where it is written to.
If the design of the tables you transfer data between is different from the main database design, you have to transfer design into the setup database before setting up Specifications (see section 3.6).
Before setting up Specifications you must remember to specify what kind of numbering these Specifications should go by (see section 3.2, Numbering).
. . . .
Notice that...
Setting up Specifications the wrong way can result in fatal data loss, so it is crucial to check Specifications more than once before running a transfer for
. . . .
Simple setup of transfer
The simplest type of transferring data, is a transfer of data from all fields in a table, to the same table in the destination database. This type of transfer is called All fields in the field Field List Type (see next page for field descrip-tions of the Specification List).
1 Select Specifications from the Replicator main menu.
2 This takes you to the window of the Specification List. Press F3 to create a new Specification.
Example
As you can see, we have made an example showing the setup of four Specifications to transfer customer data between a headquarters (HQ) and departments(DEP1 & DEP2). This is a simple setup transferring entire tables and all records using Update-Add functionality.
3.4 Setting up transfers of data using Specifications
Description A free text you can use to specify what this Specification is doing. The text is used in the Activity Register and is written on screen by Replicator.
Replicator Group Code When you have created a group that you want a Specification to belong to this is where you choose the specific group. You can use F6 for lookup or press the lookup button . For more information about groups see section 4.1.
Seq. No. If you need to have the Specifications run in a specific order, you can specify the order here.
Enabled If enabled is not marked, Replicator will ignore this Specification.
Source Database The database where data is transferred from. Dest. Database The database where data is transferred to.
Source Table No. The table that data is read from.
Dest. Table No. The table that data is written to.
Transfer Type Here you tell Replicator if the Specification is a Normal transfer, a transfer of the ToDo table, a transfer By Actions, a transfer of Objects, a Backup transfer, a BackupCompare, a CompanyExport or a CompanyImport transfer.
For more information about the different types of transfers, please see chapter 4.
WhatToDo This field has several possible settings – all combinations of Update, Add and Delete.
Update:
All records found in the destination database will be updated (overwritten) with the corresponding values from the source database.
Add:
All records that are not found in the destination database, will be added to the destination database.
Update-Add:
All records found in the destination database will be updated (overwritten) with the corresponding values from the source database. In addition, all records that are not found in the destination database, will be added to the destination database.
Delete:
All records found in the destination database, that are not found in the source database, will be deleted from the destination database.
Update-Delete:
All records found in the destination database will be updated (overwritten) with the corresponding values from the source database. In addition, all records found in the destination database, that are not found in the source database, will be deleted from the destination database.
Add-Delete:
All records that are not found in the destination database, will be added to the destination database. In addition, all records found in the destination database, that are not found in the source database, will be deleted from the destination database.
Update-Add-Delete:
All records that are not found in the destination database, will be added to the destination database. All records found in the destination database will be updated (overwritten)
3.4 Setting up transfers of data using Specifications
By filling in the fields in the Specification List window you have concluded the setup of a simple transfer.
Field List Type You can choose to replicate all fields or specific fields. If you want to transfer specific fields you enter the Field List in the "Specification" pull-down menu. You enter a window where you can specify a list of fields that should be either included or excluded. Included, means that only the fields that are specified in the Field List will be replicated. Excluded, means that all fields except those specified in the Field List will be replicated (see also section 3.5, Field List).
Source Counter Field To use the Source Counter Field you need to create this field in the table you wish to replicate. This field must be of type BigInteger (see section 4.3). When the field is created you specify it here.
Sub Specifications If this field is marked it indicates that the main Specification contain Sub Specifications.
Complex setup of a transfer
If you need to set up a more complex transfer you must enter the Specifica-tion Card. The Card is entered by pressing shift+F5 or by selecting Card in the Specification pull-down menu.
In the Specification Card you can fill in more detailed information. You can choose between the tabs: General, Advanced, Source Counter, Actions and Logging.
Source Counter, Actions and Logging (Change Register) will be covered in chapter 4.
The Specification pull-down menu
3.4 Setting up transfers of data using Specifications
General.
As you can see, most of the fields on the Specification List are repeated in the General window. So if you have set up simple transfers of Specifications you will be able to see what you specified in the Specification List here, as well.
An additional field not present in the Specification List window is the field, Sequential Read.
Field Name Field Description
Sequential Read Here you can specify where Replicator should read the records from.
Source only:
If you choose Source only, Replicator will read the records in the source database and then, look up these records’ presence in the destination database.
Dest only:
If you choose Dest. only, records are read in the destination database and looked up in the source database.
Source+Dest:
If you choose Source+Dest, Replicator reads from both source and destination and then makes a comparison.
Advanced.
Here you can specify Key Fields of source and destination and specify the Flag Field.
Following is a description of the fields in the Advanced window:
Field Name Field Description
Source Design If you have specified the field “Assume Design” within the database chosen as source, then what you specified there will automatically be inserted here. This also means that if “Assume Design” is blank, this field will be too.
Dest. Design If you have specified the field “Assume Design” within the database chosen as destination, then what you specified there will automatically be inserted here. This also means that if “Assume Design” is blank, this field will be too.
Source Key Fields This field shows the names of the fields in the key used. The primary key is used by default.
Dest Key Fields This field shows the names of the fields in the key used. If using Source Counter, a key with the Source Counter field is used by default.
Source Flag Field Here you can specify the number of the Flag Field. The Flag Field must be of type Boolean.
Source Flag Field Name The name of the Flag Field is shown here.
Commit per If you enter a number here the Replicator will Commit the destination (and Source Counter entries to the Log etc.) each time it has transferred this many records. The Replicator will continue until all records are transferred. This facility should be used together with Source Counter or Actions to ensure that all records will be dealt with. The facility is useful when using slow and unstable modem lines
3.4 Setting up transfers of data using Specifications
Source Filter If Source Filters have been set on the Specification this field will be marked.
Dest. Filter If Destination Filters have been set on the Specification this field will be marked.
Sub Specifications If this field is marked it is an indication of that the main Specification contains Sub Specifications.
Field List If this field is marked it indicates that fields have been added to the Field List,
Table-Linking If this field is marked it indicates that a table-link has been specified.
3.5 Other setup options within Specifications
This section covers setting up more complicated transfers of data. Such as transferring only some of the fields in a table or data between different tables.
If you click on Specification (Specificat... pull-down menu) in the Specifica-tion Card you will get several opSpecifica-tions.
List
If you select List, you enter the Specification List window.
FieldList
If you select Field List, you enter a window where you can specify the corre-spondence between the source table and the destination table – i.e. which field in the source table is transferred to which field in the destination table.
Below, the fields of the Field List are described:
Field Name Field Description
Field No. Source Pressing F6 you can select the fields from the source table.
Field Name Source The name of the source field will automatically be shown here.
Field No. Dest. Here you select the corresponding fields in the destination table.
3.5 Other setup options within Specifications
Example
Above we have specified the Field List to include the two fields “Name” and “Address” of the customer Table. Completing this table tells Replicator that only these two fields will be transferred from the source to the destination database.
When specifying fields within the Field List, the Field List Type in the Specifi-cation Card will automatically change to Include, indicating that you have specified the fields to transfer – in contrast to transferring All Fields.
Filters
This feature is used for setting filters on either the source table or the desti-nation table, so that only part of the table are read from or written to. When you select Filters in the pull-down menu, you first get a submenu where you can select either Source or Destination.
This submenu is used to set a filter on either the source table or on the desti-nation table. Selecting either of the two you get a window where you can specify Filter Fields.
Below, the fields of the window Filter are described.
Field Name Field Description
Field No. Press F6 and you can select a Field No.
Field Name The name of the field chosen will automatically be shown here.
Filter Set a filter using the SETFILTER function. The filters set in this manner corresponds to setting a filter in C/AL using the SETFILTER function.
When specifying a filter value for a Boolean field, Replicator supports that “1” or “0” is specified, which makes it easier to specify these filters in a Multi-language environment.
3.5 Other setup options within Specifications
. . . .
Notice that...
If you are using Filters on the destination database you have to keep in mind that depending on how your Specification is set up you could get an error from Replicator. The error you are most likely to get is that a given record already exists, and Replicator will stop replicating. This is because Replicator is trying to add a record which is changed in the source database but the delimitation in the destination database is shielding the existing record in the destination database so Replicator is tricked into believing that it should
. . . .
add the record and not update it.
Table-Linking
If the tables you transfer between differ so that the Primary key in the source table does not match the Primary key in the destination table you can use Table-Linking to link the source table to the destination table. You simply specify which field(s) in the source table makes up a unique key to be used to find records in the destination table (and to specify the corresponding fields in the destination table).
If you do not specify anything in this window, Replicator will use the fields making up the primary key in the source table. For example Replicator will use the customer number (field 1) when transferring the customer table (table 18).
Below, the fields of the window Table-Link Fields are described:
Field Name Field Description
Field No.Source Here you choose the number of the field in the source database that will be used as a key for linking it with the desired destination database. Press F6 and you can select a Field No. Source.
Field Name Source The name of the source field will automatically be shown here.
Sub-Specifications
Selecting Specifications, you enter a window where you can create Sub-Specifications. Sub-Specifications can be used to link two related tables to one another or to group several Specifications together in a transfer where committing should not occur before all the Specifications have been trans-ferred successfully.
Following is a description of the fields in the Sub-Specification List window.
Field No. Dest. Here you select the field number in the destination database to be used for linking. Press F6 and you can select a Field No. Dest.
Field Name Dest. The name of the destination field will automatically be shown here.
Field Name Field Description
Field Name Field Description
No. Give the Sub-Specification a unique ID (the name or number given cannot be the same as given to the main Specification).
Source Table No. Here you select the source table.
Dest. Table No. Here you select the destination table.
Description Here you can describe the Sub-Specification.
Enabled Leave the “Enabled” field marked. You may use this field to temporarily disable a Specification, if you do not want the transfer to be executed, but would like to keep the Specification for later use.
3.5 Other setup options within Specifications
Activity Register
If you select Activity Register from the pull-down menu you enter the Activity Register window.
When entering the Activity Register this way, you will see only the entries belonging to the current Specification. If you want to survey all the Specifica-tions which have been registered in the Activity Register, you will have to enter Activity Register from the main menu of Replicator.
When you run the Replicator program it will write some log information about the transfers to a register table in the setup database. The information in the Activity Register can be used to survey if any errors did occur when running Replicator. Every time Replicator gets an error it will be logged in the Activity Register, and marked as such. In the Activity Register you can see exactly what Replicator has been doing.
An example of the information that will be logged on to the Activity Register.
Following is a description of the fields of the Activity Register.
Every time you run Replicator, information will be added to the Activity
Field Name Field Description
Specification No. This is the number of the Specification that generated this register entry. Any number given in this column, is for your information.
Scheduler No. When the Replicator is running as Scheduler, the “Scheduler No.” for the running scheduler card is shown here.
This way you can see what is running and when it is running.
Replicator Group Code If a group code is specified in the Specification it will be shown here.
Source Database Here you can see what source database the register entry is replicated from.
Dest. Database Here you can see what destination database the register entry is replicated to.
Date Here you can see the date the register entry was generated. Time Here you can see the time the register entry was generated.
Error If this register entry is part of an error message, this field is marked.
Text The register text is seen here.
Source Counter If the entry is a Source Counter entry, the Source Counter number will be shown on this column. In order to keep Source Counter functional, you must NOT DELETE THESE ENTRIES (see Source Counter, section 4.3).
3.5 Other setup options within Specifications
Doing this all entries up to a week ago will be cleared (the last Source Counter entry for a transfer will never be cleared).
The clear function is also available within the Activity Register (the button, Clear).
For more information on the special features in Specifications, see chapter 4.
. . . .
Notice that...
You can also view information about what happened during replication in the
Replicator Log file (replicat.log). For further information, please see
. . . .
section 2.7.
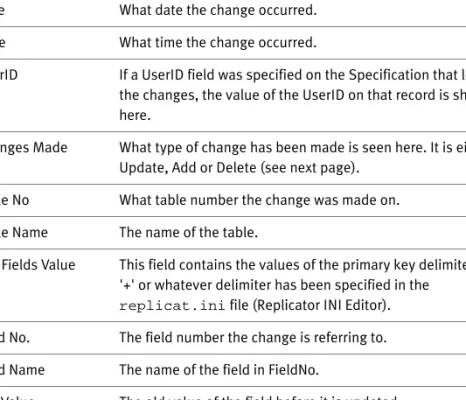
Change Register
If you select Change Register from the pull-down menu you enter the Change Register window.
3.6 Read Design into the Replicator Setup database
When setting up Specifications, you can make use of a built-in facility that lets you choose between the different tables, fields etc. (the design) of the database you want to replicate to/from.
As default Replicator will automatically use the design of the setup data-base. If you want to replicate to/from a database that uses a different design, you need to transfer the design of this database into the database where you set up and maintain Replicator.
To transfer the design of a database, you first need to set up databases as described in section 3.3. Then you can proceed with the following steps:
1 For each database you want to transfer design from, make sure that the Read Design field is marked in the Database Card.
2 Run Replicator with the command line parameter G=Design(repnt g=design).
Hereby Replicator will read Design from all the databases specified (with the field Read Design marked).
For further information please refer to section 6.2
If you are having trouble in transferring the design when running Replicator with G=Design look up appendix A.2.
Chapter 4
Special facilities in Specifications
In this chapter we will describe the following special facilities available in Specifications.
· The Groups facility.
· The Flag Field.
· The Source Counter.
· The Actions facility.
· Sub Specifications.
· Tags.
· The ToDo table transfer facility.
· The Export and Import facilities.
· Change Register.
· Transfer of objects in MS Dynamics NAV.
· The Replicator Backup Server and BackupCompare facilities.
· The Scheduler.
· The CompanyImport and CompanyExport facilities.
4.1 The Groups facility
Using this facility you can group your Specifications.
First you create the group, then you enter the Specification that should belong to the group created and within the field “Replicator Group Code” the group is chosen.
There are two ways of creating groups:
· Select “Setup” in the Replicator main menu and then “Groups”. Now you can create the groups you need.
· Select “Specification” in the Replicator main menu. If you enter “Replicator Group Code” you can create groups and here choose the wanted group.
·
The fields of the Replicator Groups window are described as follows:
Field Name F